Jenlis Muck Razer User manual

Item 580136
Product Manual
Product Contents................ 2
Assembly Instructions . . . . . . . . . . .3-4
Operating Instructions ...........5-6
Replacement Parts .............. 7
Product Warranty................ 8
Table of Contents:
Muck Razer

www.weedrazers.com
Important Information:
2
Please read these instructions thoroughly before use. Failure to follow instructions
may result in equipment damage or failure, losses, injury or death.
WARNING:
To reduce the risk of injury:
•The Muck Razer is designed for cutting submerged, partially emergent,
or emergent aquatic vegetation from underwater. Any other use is strictly
prohibited. Before using the Muck Razer, please read this manual carefully to
understand the proper use of the unit.
•The Muck Razer teeth have sharp edges.
SAFETY FIRST:
Keep out of reach of children.
Do not use with children in immediate area.
IMPORTANT: Jenlis, Inc®is not responsible for equipment damage or failure,
losses, injury or death resulting from failure to follow safety
precautions, misuse or abuse of equipment.
PRODUCT CONTENTS:
C
GH L M
O
P
N
A
I
B
D
E
F
K
J
PART QTY
A Oset Handles 2
B Main Handle 1
C Handle Extensions 3
DAlternating Rake Teeth
Rows with 13 Teeth 6
EAlternating Rake Teeth
Rows with 12 Teeth 5
F ¼” Hex Head Screws 22
G Carriage Bolts 2
H Lock Nuts 2
PART QTY
I Washers 2
J Thrust Bearings 2
K Spring Clips (in handles) 3
L Handle Nuts 3
M Handle Bolts 3
N Razer Drum 1
O Drum End Caps 2
P Handle End Cap 1

www.weedrazers.com 3
Notes:
Assembly Instructions
Tools Required:
• 10mm Wrench
• 11mm Wrench
• Adjustable Wrench
• 1/4” Nut Driver
Step 1
Insert a Carriage Bolt (G) into the inside of each
Drum End Cap (O) and thread on each Thrust
Bearing (J). Tighten each Thrust Bearing securely
using an adjustable end wrench.
Step 2
Next insert a Drum End Cap (O) into each end of
the Razer Drum (N), then install one Offset Handle
(A) onto each Carriage Bolt with the handles
forming a Y shape with the cylinder in the middle.
Next, slide the Main Handle (B) between the Offset
Handles so that the three holes align. Insert all
three Handle Bolts (M) and secure in place with
Handle Nuts (L) using a 11mm wrench. Tighten
the nuts only enough to prevent the handle from
wobbling; overtightening the nuts will bend the
handle and void the warranty.
Step 3
Install the Washers (I) and Lock Nuts (H) and
tighten each just enough so that the Carriage Bolt
protrudes slightly from the end of the Lock Nut.
Do not overtighten the nut, as the drum needs to
roll freely without resistance.

www.weedrazers.com
4
Step 4
Align one Alternating Razer Teeth Row with 13
Teeth (D) on the Razer Drum (N) so that the two
outer holes on the teeth row align with two of the
outer holes on the drum. Insert a ¼” Hex Head
Screw (F) into each of the outer holes making sure
that the End Caps (O) are tight up against the
Razer Drum (N) when securing each fastener.
Each screw should be snug but not tightened
beyond the point where it makes contact with the
metal surface of each teeth row.
Step 5
Repeat the process for the next Alternating Teeth
Row with 12 Teeth (E) so that the hook of the teeth
points in the same direction as the first row, again
making sure that the End Caps (O) are tight up
against the Razer Drum (N) when installing the ¼”
Hex Head Screws. Continue in the same manner
alternating between the rows with 13 and 12 teeth
until all teeth rows have been installed and secured
in place. NOTE: The final row of teeth WILL NOT
be offset from first row.
Step 6
Slide one of the Handle Extensions (C) with the
spring clip into the Main Handle (B) by depressing
the buttons on the spring clip and sliding it in until
the holes align and the buttons lock into the holes
of the Main Handle.
Step 7
Repeat this process for the two remaining Handle
Extensions (C).
Step 8
Lastly, insert the Handle End Cap (P) on the last
Handle Extension to close off the tube.
Assembly Instructions (con’t)
www.weedrazers.com 5
You will rarely find weeds or muck on the bottom of public beach waters;
lake, river, pond or ocean bottoms in these areas are constantly stirred
up by people. The Muck Razer is designed to accomplish the same
thing. The Muck Razer agitates the sediment on the bottom of your
pond or lake and will, in some cases, pull up existing weeds, dislodge
the root systems, and aerate mucky, muddy and silty sediment. The
Muck Razer is best suited for areas where the weeds have been cut
and removed with the Weed Razer, Weed Raker and Razer Rake.
Muck generally accumulates from excess nutrients and limited wave
action or water flow. Muck is made up of incompletely degraded
organic matter. As layers of this organic matter builds up year after
year, the lower layers become devoid of oxygen. The Muck Razer stirs
up and agitates the lower layers and reintroduces oxygen allowing
bacteria that already exists in this organic material to complete the
process of digestion and helps return the bottom to a hard surface.
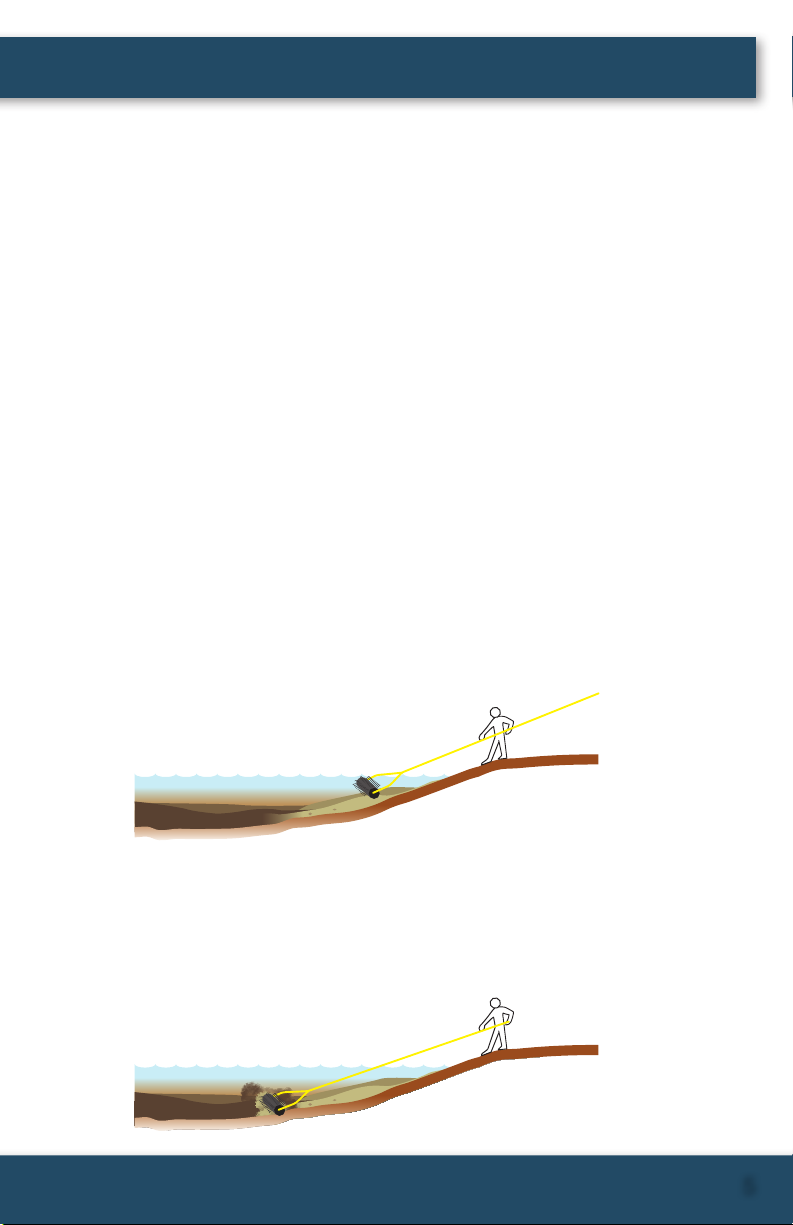
Step 1
Stand in a stable location and roll the Muck Razer head into the water.
The head will fill with water, adding weight to keep it firmly on the pond
or lake bottom.
Step 2
Roll the drum back and forth over the area that you wish to improve.
This can be accomplished by walking with the handle in and out of
the water or by pushing and pulling the drum back and forth with the
handle.
Operating Instructions

www.weedrazers.com
6
Step 3
The closer you grab the handle to the drum, the more downward pressure you can
apply. If you’re working in an area with deep muck buildup, it will be easier to start
with a smaller area and work the drum back and forth without applying downward
pressure. The process may need to be repeated numerous times over an extended
period of weeks to gradually reduce the muck layers.
Step 3a
The water may become cloudy creating poor visibility. Therefore, if you can’t see
your desired working area, you may need to stop and resume later when the
cloudiness has dissipated.
Step 3b
The Muck Razer should be used regularly until the areas that you wish to address
have shown improvement.
Operating Instructions (con’t)

www.weedrazers.com 7
Replacement Parts
Replacement parts can be found online at www.weedrazers.com

V1
8View other great products on-line at www.weedrazers.com
ONE YEAR MANUFACTURER’S WARRANTY:
1-Year Manufacturer’s Warranty – Jenlis, Inc. warrants this product to be free from
defects in workmanship and materials, under normal, non-commercial use and conditions,
for a period of (1) one year from the original invoice date. Warranty Limitations – Damage
resulting from use in commercial environment, misuse, abuse, negligence, and/or accidents.
The manufacturer agrees, at its option during the warranty period, to repair any defect in
material or workmanship, or to furnish a repaired or refurbished product without charge. All
warranty claims must be sent to Jenlis, at the customer’s expense. Return shipping will be
pre-paid. All returns must be pre-approved. Please visit www.weedrazer.com/warranty for
an RMA number prior to returning product. Returns without RMA’s will be refused.
This manual suits for next models
1
Table of contents


