Jiayuan 6879 User manual

W'
ßwffr:,?.tdT
:!!F-
WssMMffitrctuBd
RC Heticopter
4 channel remote
control series
ITEM NO:6879
Remote control built-in LCD
The aircraft finetuning status display
Status display of power and transceiver
Throttle, steering, side flying status display
I
I
I
Length of fuselage: 230mm Total weight: around 439 Diameter of the main rotalor:195mm
Overall heioht: 85mm Main engine: @B
Tail enqine: 06X1 Battery: 3.7V200mAh
Charging time: around 40 minutes The helicopter can have about 5-7 minutes of flight time
Name ..ITV Name QTY Name QTY
Helicopter USB to DC 2.5 cable x 1Instruction manual
Infrared control Main rotator Tail rotator I
Li-Polymerbattery | 2 | Chargingstand I j
Please read the instruction manual comprehensively before using.
(Please read it carefully,especially the NOTICE.)

6Ä
/r'ry,0=
'eo ^/u @
@
\?4 @r'
S/No Part name OTY S/No Part name QTY
01 Main rotor housing t6 Lithium-polymer battery
02 Blade 217 Receiver board
03 Flybar rod t8 Main engine
o4 Washout base 19 Engine gear
05 Washout base control arm z20 Canopy
06 Swash plate 21 Round tail pipe
o7 Main shaft 22 Vertical tail wing
OB Ball linkA ZJ Flybar
09 Ball link Bz24 Parts of the supporting pole 2
10 Ball link 25 Supporting pole
11 Servo 26 Tail engine stand
12 Mainframe 21 Tail engine 1
13 Bearing(q5x98x2.5) 28 Tail rotator 1
14 Gear wheel 229 Bearing(q3x96x2.5) 1
15 Landing skid 130 Bearing(q6xgl 0x2.5) 1

Power LED
Left and right steering
handle conversion
Speed control stick
Speed trim
Direction trim
Power switch
Status display of LCD display
Diversion trim tips --'/ Lffi ,T^l.lt{[l *
H is the high-speed, L is the low speed
Forward / backward acceleration display
Forbidden:Do not disassemble
flight operations -----------\
Transmitter status display
stick modes indicator -.-l*l'ii
=E ;=,T.-- Fon,rraro ano rne proponron
lR\F r,rZL_,"J$:,';:ff '"'HH:l
t?:Bllfir"äil%ilffi;no''nn',(i@H|:l lilF'iE.- "tiÄä'"0 and right side nv
Speed trim tip. --$---{,[:J
tlJ,f J+ rrim indicator
Direction control stick
Forwards and
backwards trim
Crab trim
Crab trim tips
1
Throttle percentage
Transmitter
LCD nel
Note: The default left and riqht turninq handle conversion is on MODEI under
which is the left hand to cohtrol left a-nd rioht turnino and the rioht hand to
control side flvinq. Push the conversion bütton to süritn to MOÜE2 under
which is the righf hand to control left and right turning and the left hand to
control side flvfno.
The rudder cohvdrsion button is to adiust the movement ranqe of the olane
durinq flioht. When vou are oroficientln controllino the olanelvou can use the
ruddör cönversion button fcir more fun. lt is undeiminiinum iridder condition
when the controller is started up. The plane moves forwards and backwards
or side flies left and riqht in a normal movement ranoe. Push the rudder
conversion button onde durinq flioht to increase the-movement ranoe bv
about 40%. Please concentra1e oin controlling the fliqht as under th-rs ccindition,
the plane moves and flies much more raoidlvl Push lhe rudder conversion
buttbn again to come back to minimum rüdder condition. Repeat for better fligh

Battery cover
I
t-:--__l
ltrt I
t-l
t\
Open the ..
cover ol oatreTy 6 PCS of M batteries
ll I Li-po Charqer orovides two indeoendent charqinq receotacles to
ll I enäble cha-rqe of lipo batteries iridividuallv or öonturrentlv. The
ll I charoer canle oowered via two oower source: either coÄnectino to
= ll I the tlSB port ori a computer,or cönnecting to a third party USB pYower
ll I supply fröm a cell phone.
fi WnnrutruC, For safety concerns,battery charging must be done under
/ : \supervision at all times. Avoid shortening the metal conlacts in charger
receptacles. as it may lead to nternal damage of charger.
LED
indicates Red light off -:O! Red light iO!
Charging is complete ls charging
Charoino
Specifiöations
Electrical
tnput Charging currenl Charoino
Up vollaqä
DC 5V 1A 200m4 X 2 set 4. 210. 03v
lf there are frequency interference preventing completton of radio binding, please re - binging
the radio of transmitter and receiver
With the helicopter placed on ievelsurface,push the lipo
battery pack in the direction shown in diagram until fixed
into position. At this time avoid moving the heljcopter so
the radio and gyro system can initjalize and the red LED
on the receiver borad wjll be start flashing.
lE;ni _;l Please click_edqe gendy removing
L:::L:__J rne banery Husn n ro.
With throttle control stick at lowest
position, turn on radio transmitter to
start the binding process
CAUTION: l\4otor should not be run without loading
man or tail rotor blades to avoid motor burnout.
a Note: The freouencv of the orocess of movino bodv
,/r\ will lead to thd neutial ooint of the ovroscood
/ i \ qrorF-lying helicopter tbil offset seiröus, rebeat
- SteD2 -
The red LED on receiver board will blink durino
radio initialization. and becomes steadv after {
seconds, indicatinq successful radio bihdinq. lf it
continues to blink.-radio bindino has failed änd
needs to be restaited.After the-radio bindino is
done. you don't need to re-bing it anymorel

After the above steps aircraft after the success of the code, the throttle
control lever to the lowest point,Follow these steps to check. 7\ cnuttoN: Check the control
l-:J fll1ssti6n5 with throttle off prior to flioht
I Stepl-1 |
Horizontallv level Push riqht on aileron control.aileron servo will
Push thä left side of swashpiate up. E
Push left on aileron control. aileron servo will
Push the left side of swasholate down.e
Horizontally level
I Stepl-3 |
Push uo on elevator control. elevator servo will
Push the night side of swashplate down.
. Prrch down on elevator control, elevator servo
Horrzontarrv rever i,viriöün'tüiüiöhi ;iää öiä,üäöniiaie üp. -
to be used for a lonq duration.olease remove
the batterv for storaöe.
4Warning: lf lhe AA batteries are left in
L-\ the transmitter,potential leakage could
occur which may damage the transmitter,
and create fire hazards.
Turn off the transmitter. Of transmitter is not
to be used for a long duration, please remove
the battery for storage.

Before vou are familiar with the helicoDter, oleasure don t it flv. read the instruction carefullv.Get familiar with
all kinds of direction control and keep ieoeätino until vou can'olav it as vou oerform vour wishes.
'l .Place the helicopter in a clear opei' fi€ild and-the tail of helicbDt-er Doirit to Vour sell
2.Practice ro operäte the throttle Sticktas below illustrationland iepeat practi'cinq
"Throttle hiqh/low'. Aileron lefvrioht'. Rudder leturioht . and Elevätor uo/döwm .
3.The simulatr-pn flight practlce is ve-ry important. pleasö keep praclicing untll the flngers
move naruraily wnen you near operaflon oroers oerng cail out.
MODE
ft"j-,m:!
il;; l r
/äx
retr+
\EEg'
lTetu-rehi-l E
l@iko everl A
1ffiil
' l:]-:'11!J /
[e-;dl F
-@
' '+ +-
i-
, trf,sl \
,:€1 {
Lefimov€meil Richtn.v6menr
lllustration luP
F
)-E
: ^E;
+ Down
/ .\ Lefrrotation
=@16+ -: *.;
\ tnisnt,otution
Ä
'ffii^
ds
<6:fF,[
Check if the screws are tlrmly tightened.
Check if the transmitter and receivers are
practice hovering for flying safety. This is a basic flight action.(Hovering
means keeping the helicopter in mid air in a fixed position)Please stand
When the helicopter begins to lift-off the ground, slowly
reduce the throttle to bring the helicopter back down.
keep practicing this action until you control the throttle smoothly.
^ lfthe nose of the helicoDter moves, olease lower the throttle stick and land the helicopter then move
/l\ oosition diaoonallv behiÄd the helimöter 2m and continue Dracticino. lf the helicooter fries too far awav
4 lrom vou. oleaseland the helicooter'and move vour msitiön behind 2m and continue oracticino.
l.Slowlv raise the throttle stick.
2.Move the nose of the helicopter to right or left, and then
slowly move the rudder stick in the opposite direction to fly
E
Ä.V.4
/(!.9r\r/,WSi
\ EEII /
(srEP3)
After you are familiar with Step 4,
stnd at side of the helicooter and
continuepracticing Ster4 Ther
repeat the Step 1 to 4 by standing
in front of the helicopter @(sTEP5)
<F
r'->
2. Adjustment of
trim Just before i
helicopter liftoff,
iirä-nösätöä;lörwaft Fotuad Aaekwad
/backward...when leans <€A
forward, -adjust the trim to f@j
oown. vvnen reans \ #Yl
backward. adjust the tnm up. \_ql.
3.Adjustment of
before the heli@oter . -liftoff, the body 6an t Le
letvright... Whenleans
right, adjust the trim to left
side. When leans left,
adiust the trim to
s|de. Left
l;$!jü:lT3il..g,H*.. LenRisprC
hqlicopter lift-off, the nose lean @
lerunqht...Whenleans - \ EE
rightr?djust the trim /-5isnt \-Er
lifil'ifnflffil".1-@p 1

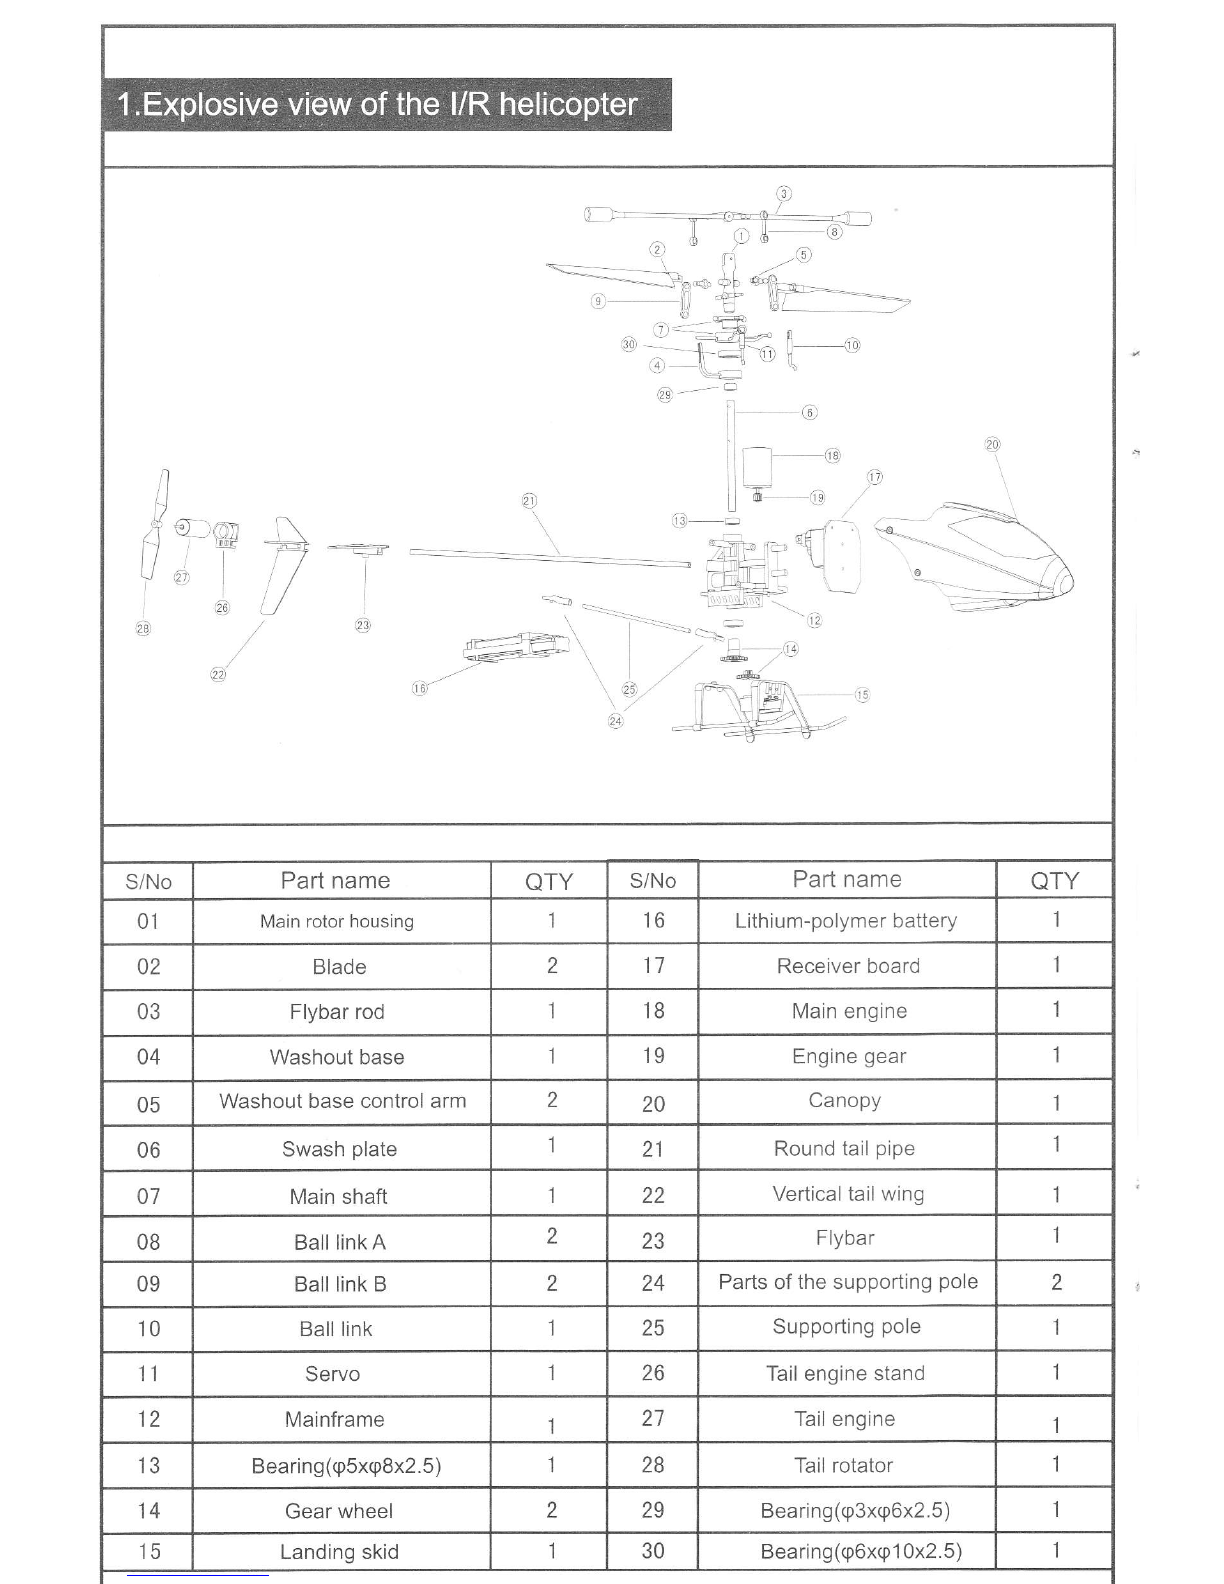
Situation Cause Way to deal
1
Receiver status LED blinks
continuously for more than
4 seconds after helicopter
battery inserted.
No responseto controi input
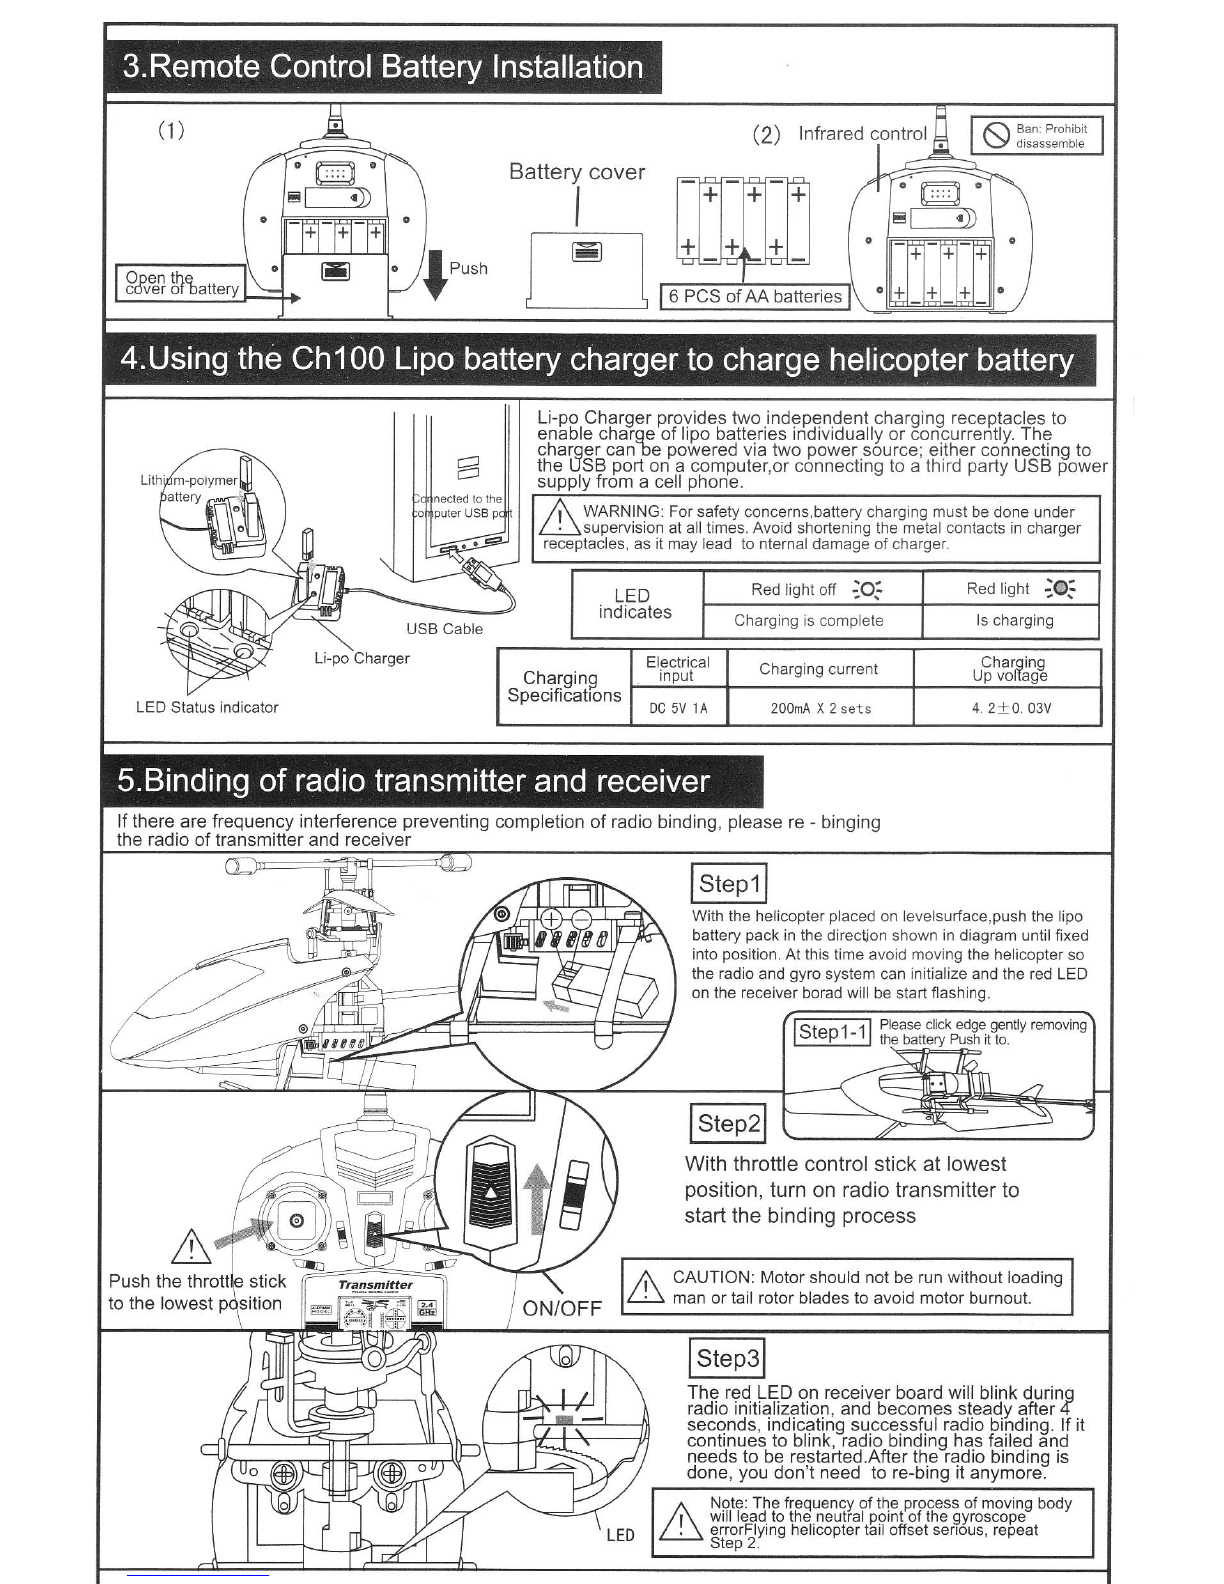
Unable to bind to transmitter. Repeat the power up initializing
process. (Refer to P11:Binding
of radio transmitter and receiver)
2No response after
battery is connected
tn holinnnfar
l.Power lo transmitter and receiver.
2.Check transmitter and receiver voltage
3.Poor contact on battery terminals.
1.Turn on transmitter and ensure helicopter
battery is inserted properlv.
2.use fullv charoed batlerids.
3.Re-seafthe bätterv and ensure oood
contact between bätterv contacts:
3Motor does not
respond to throttle
stick,receiver LED
flashes. Helicopter battery depleted. Fully charge the battery, or replace
with a fully charged battery.
4Main rotor continue
to spin after landing Throttle trim accidentally
increased during flight Confirm throttle trim is in center or
slightly below.
5Motor fails to run,
but servo moves.
l.Throttle trim is too high, triggering safety
Drotection function. 2.Throttle was not all
the way down during power up. 3.Loose
motor connection or damaqed motor
l.Lower throttle trim and restart throttle.
2.Lower throttle stick all the way down and
restart throttle.
3.Re-seat the motor plug or replace the motor.
6Main rotor spins bul
unable to takeoff. l.Deformed main blades.
2. Helicopter battery depleted
l.Replace main blades
2.Charge or replace with a fully charged
battery
lStrong vibration
of helicopter
l.Deformed main blades
2.Bent main shaft
3.Deformed tail rotor
4.Over tightening of main blade grips.
l.Replace main blades
2.Replace main shaft
3.Replace tarl rotor
4.Re-tighten main blade grips with suitable
force.
8Tail siill off trim after
tab adjust ment, or
inconsistent speed
during lefvright pirouette.
l.Damaged tail rotors 2.Damaged tail
drive motor 3.Helicooter was not
stationary during power up. 4.Vibration
in duced gyro interference,causing tail
rrnahlc ta lnaL
l.Replace tail rotors 2.Replace tail drive
motor 3.Re-oower the helicooter while
remaining stationary. 4.Refer to symptom 7
IHelicopter still wonders
forward after trim
adjustmentduring hover.
l.Elevator servo not level during
power up.
2.Elevatoer pushrod too long or
too short.
l.Center elevator trim after Dower uo.and
re-install elevator servo horn at lev'e'i
position. 2.lf helicopter drifts forward,
adjust linkage longbr. lf ut drifts backward,
adlust linkaöe shoiter.
10 Helicopter still wonders
lefUright after trim
adjustment during hover
l.Aileron seryo not level during
power up.
2.Aileron pushrod too long or too
snon.
l.Center aileron trim after power up, and
re-install aileron servo hom at level position.
2.lf helicopter drifts left, adjust linkage longer
lf it drifts right,adjust linkage shorter.
11 Hover when the body
cannot be designated
1.the agency interference
smoothness.
2.control arm lock tight interference
1.confirm the body each agency and the
connecting rod head movement is smooth.
2.relax collar screw to control arm movement
is smooth.
12 Helicooter fliqht
Itmtno tne Doov
is aböormal jittei.
1, the main rotor and main rotor holder
interference. 2, the helicopter battery
voltage is low, the main rotor rotation
is too slow.
1, the confirmation of the main rotor head
of each agency activities smoothly does
not dry 2, replace a new battery charging
ts comptele.
Finished the above adjustments, still can not improve the situation, should immediately
stop flying and contact your dealer.

zA
Case Landing skid Blade Mainframe
7c
Main shaft Verticaltailwing Flybar Tail rotator
I
-
-D
10 I11
Parts of the supporting pole SwaSh plate Round tail pipe
12 13
eur 14
Motor pinion gear
Receiver board Main engine Flybar rod
15 16 17
Tail engine Lithium-polymer battery Charging stand USB cable
19 20 21 s22 e" $$
Motor pinion gear Gear wheel Bearing(q6xg10x2.5) Bearing(93x96x2.5 Washout base
control arm
24il €F
@
25 26
SS
27
Ball link B Ball link
(( e:ä; Tail engine stand
,K
I
Ball link A
Table of contents
Popular Toy manuals by other brands

Gro Company
Gro Company grohush operating instructions

TP
TP TP609 Instructions for assembly, maintenance and safe use

Fisher-Price
Fisher-Price GROW TO PRO BASKETBALL 72408 instructions

Carl Goldberg Products
Carl Goldberg Products Sr. Falcon instructions

Kyosho
Kyosho EP concept instruction manual

Faller
Faller 2 OLD TOWN HOUSES manual

Eduard
Eduard B-17E/F radio compartment manual

Elenco Electronics
Elenco Electronics Snap Circuits Green Energy SCG225 manual

Eduard
Eduard 72 668 manual

Eduard
Eduard 35 883 manual

Seagull Models
Seagull Models HARRIER 3D Assembly manual

Carl Goldberg Products
Carl Goldberg Products ULTIMATE BIPLANE instruction manual