1.
Pulse el botón de encendido para encender la cámara.Pulse el botón de encendido para apagar la cámara.
La cámara se apagará automáticamente después de un período de inactividad para ahorrar energía.
ENCENDIDO Y APAGADO DE LA CÁMARA
1.
2.
3.
4.
Pulse el botón Mode para configurar la cámara en modo de captura,el icono aparece en la pantalla LCD.
Utilice la pantalla LCD para ver el sujeto.
Use el botón zoom para acercar y alejar el sujeto.
Presione el disparador para tomar la foto. Después de que la imagen haya sido tomada, el LCD mostrará la imagen por un breve
segundo.La capacidad de memoria en la parte superior derecha de la pantalla disminuirá a medida que se toma cada imagen.
TOMAR UNA FOTO
1.
2.
a.
b.
Si se utiliza lector de tarjetas de memoria, por favor leer las instrucciones antes de su uso.
Si se utiliza USB suministrado, conecte la pequeña conexión USB al ranura USB de la cámara (debajo de la tapa de la batería) y la
conexión USB al puerto USB de la computadora. De la cámara luz LED indicador de ocupado encenderá cunado este descargando.
Si un cuadro aparece en Windows solicitando una acción,haga clic en "ver los archivos en el Explorador de Windows" o de lo contrario
ir a Mi PC y haga clic en el icono de "Disco extraíble".
Arrastre y suelte los archivos de la cámara a una ubicación en su computadora para descargar. Retire USB de la computadora.
Puede descargar los archivos a su computadora a través de: 1) insertar la tarjeta de memoria en un lector de tarjetas o 2) conectando
la cámara a una computadora usando el cable USB suministrado. Si extrae la tarjeta de memoria, apague la cámara primero.
BAJANDO ARCHIVOS A SU COMPUTADORA.
• 2.0” Pantalla TFT
• Imagen fija Resolución: 12 MP (4000 x 3000) / 10 MP (3648x2736) /
8 MP (3264x2448) / 5MP (2592x1944) / 3MP 2048x1536) /
2MP (1600x1200) / 1.3MP (1280x1024) / VGA (640x480)
• Soporte de memoria microSD / TF
de hasta 32 GB
• Modo de flash - Auto / fuerza / Off
• Zoom digital 4x
• Windows XP/7/8/10/11
• 2x AAA Baterías
• Almacenamiento / Operación:
5ºC (41ºF) a 40ºC (104ºF)
INFORMACIÓN DE LA CÁMARA
12,0 MP CÁMARA DIGITAL RESISTENTE - 67778
Llame: 800-327-6868 Online: jjkeller.com
Limitación de Responsabilidad:
Este producto será sustituido si está defectuoso en el montaje o embalaje. Excepto portal sustitución, este producto se
vende sin garantía o responsabilidad a pesar de quedefecto,daño o pérdida es causada por la negligencia u otro fallo.
2 pilas AAA
y microSD de 8GB
pre instalado
1.
2.
3.
4.
Presione el botón Menú para abrir el menú. Presione el botón Derecha hasta que vea el menú de Configuración .
Los botones Arriba y Abajo se pueden usar para seleccionar un elemento.Presione Abajo hasta que se resalte Fecha. Pulse Aceptar para
confirmar.
Puede seleccionar su sello de fecha para que se muestre en la parte inferior derecha de su imagen: 1) Activado: agregue la fecha y la
hora a las imágenes (selección predeterminada) o 2) Desactivado: no agregue la fecha y la hora a las imágenes.
Confirme presionando la tecla OK.
CONFIGURACIÓN DE FOTOS - CONFIGURACIÓN DEL SELLO DE FECHA (PREDETERMINADO:ENCENDIDO)
1.
2.
3.
4.
5.
Presione el botón Menú para abrir el menú. Presione el botón Derecha hasta que vea el menú de Configuración .
Los botones Arriba y Abajo se pueden usar para seleccionar un elemento.Presione hacia abajo hasta que se resalte Fecha.Pulse Aceptar
para confirmar.
Pulse el botón Abajo hasta que se resalte Fijar fecha. Pulse Aceptar para confirmar.
Cambie el Día (DD) / Mes (MM) / Año (YY) y Hora (hr, min, seg) presionando Arriba y Abajo para cambiar la fecha específica y
presionando Izquierda y Derecha para pasar de una selección a la siguiente.
Confirme presionando la tecla OK.
CONFIGURACIÓN DE LA CÁMARA - CONFIGURACIÓN DE FECHA Y HORA
1.
2.
3.
Presione el botón de Modo hasta que el icono aparezca en la pantalla LCD .
Use los botones Izquierda o Derecha para navegar a través de los archivos.
Para dejar de ver imágenes o videos, presione el botón Modo hasta que aparezca el ícono en la pantalla LCD .
VER IMÁGENES EN LA CÁMARA
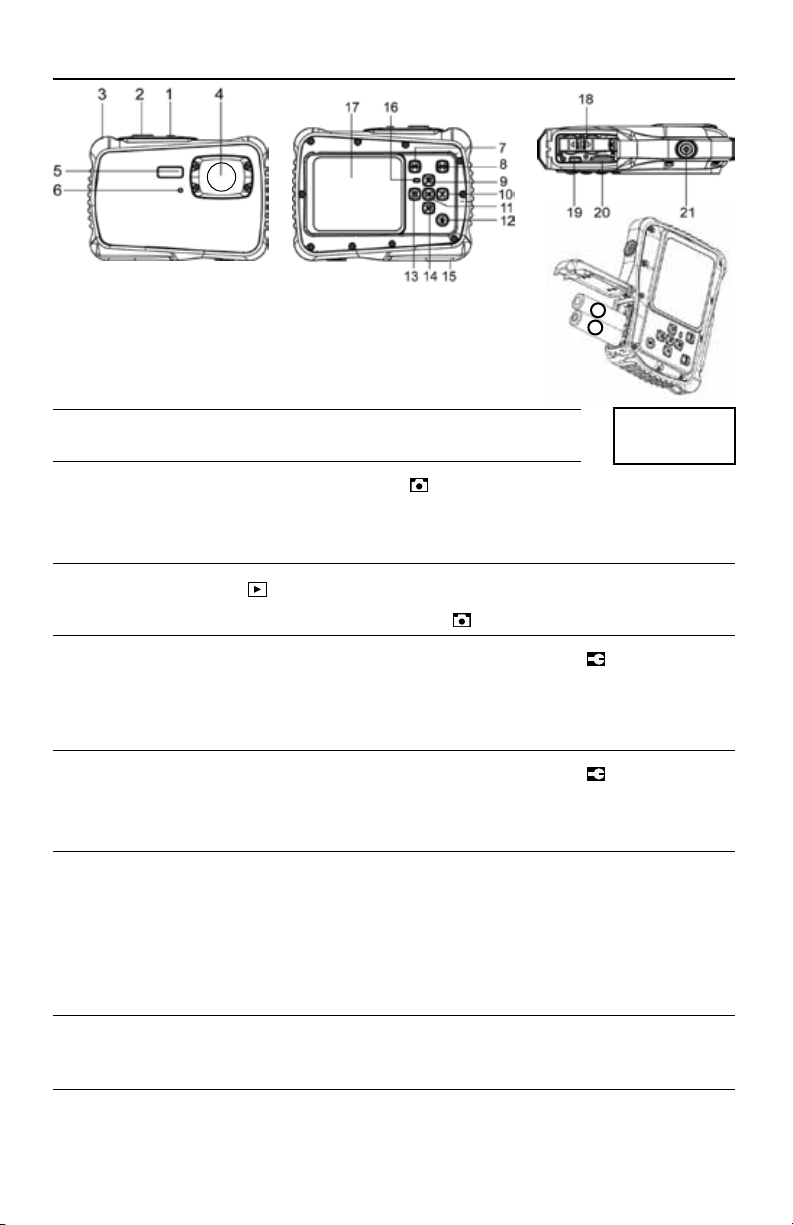
DETRÁS
BASE
1. Botón de encendido
2. Botón del obturador
3. Orificio de la correa
4. Lente
5. Flash
6. LED del temporizador auto
7. Botón de Menú
8. Botón de Modo
9. ARRIBA/Acercar
10. DERECHA / Flash
11. Botón Aceptar
12. Botón Eliminar
13. IZQUIERDA /
Temporizador auto
14. ABAJO / Alejar
15. Tapa de la batería
16. LED indicador de ocupado
17. Pantalla LCD
18. Puerta interior de la batería/
Compartimiento de la batería
19. Ranura USB
20. Ranura para tarjeta Micro SD
21. Zócalo para trípode
+
-
FRENTE