JMA TPX CLONER User manual

1
Portuguese Francaise Español
Italiano Deutsch English
TPX CLONER
Manual de instrucciones
TPX CLONER
Instruction manual
TPX CLONER
Anweisungshandbuch
TPX CLONER
Manuale d’istruzione
TPX CLONER
Notice d'utilisation
TPX CLONER
Manual de instruções


3
Indice / Index / Inhaltsverzeichnis / Indice / Index / Indice
1 Descarga del firmware para
habilitar el puerto USB
2 Descarga del firmware para
habilitar el TPX CLONER y
mejoras
3 Manual de instalación del
TPX CLONER
4 Conexión y funcionamiento del
TPX CLONER
1 Downloading the firmware to
enable the USB port
2 Downloading the firmware to
enable the TPX CLONER and
upgrades
3 TPX CLONER installation
guidelines
4 Connecting and operating
the TPX CLONER
1 Downloaden der firmware zum
aktivieren des USB-ports
2 Download der firmware zum
aktivieren des TPX CLONER und
für verbesserungen
3 Installationshandbuch für den
TPX CLONER
4 Anschluss und funktionsweise des
TPX CLONER
1 Download del firmware per
abilitare la porta USB
2 Download del firmware per
abilitare il TPX CLONER e
migliorament
3 Manuale di installazione del
TPX CLONER
4 Connessione e funzionamento del
TPX CLONER
1 Telechargement du firmware pour
habiliter le port USB
2 Telechargement du firmware pour
habiliter le TPX CLONER et
evolutions
3 Notice d’installation du
TPX CLONER
4 Connexion et fonctionnement du
TPX CLONER
1 Transferência do firmware para
activar a porta USB
2 Transferência do firmware para
activar o TPX CLONER e
actualizações
3 Manual de instalação do
TPX CLONER
4 Ligação e funcionamento do
TPX CLONER
4
10
16
22
28
34
5-6
11-12
17-18
23-24
29-30
35-36
12-13
14-15
18-19
20-21
8-9
6-7 24-25
26-27
30-31
32-33
36-37
38-39

Español
4
Descarga del firmware
para habilitar el puerto USB
1
Lo primero que debemos hacer para poder
utilizar el TPX Cloner es actualizar el
firmware de la TRS-5000. Para ello procede-
mos como se indica a continuación:
• Se enciende la TRS-5000.
• A continuación, se conecta la TRS-5000
con el cable RS232 al PC.
• Lanzamos el software de PC TRS-5000 y
dentro del menú OPCIONES, en el apar-
tado Parámetros, se elige dentro de la
pestaña Puerto de comunicaciones, el
puerto serie COM1. presionando el botón
Comenzar Comunicación para finalmente
salir de este menú apretando el botón
OK.
Una vez establecida la comunicación con la
TRS-5000, (se comprueba observando el led
de COM en la esquina inferior izquierda del
programa; “verde” si comunica correcta-
mente), procedemos a descargar el fichero
TRS52x_USBdriver.hex, desde la ubicación
donde se encuentre, CD, PenDrive, Disco
Duro, Web JMA, etc.
TRS-5000 LEYENDO
Actualizar TRS
USB DRIVERS
loaded
READY FOR
download
Siempre y cuando la versión de
firmware presente en la TRS5000
sea anterior a la Rev.2.00., habría
que seguir todos los pasos presen-
tes en este manual. Si no, saltar
directamente al punto 3 y 4 del pre-
sente manual.
Para proceder con la descarga, dentro del
mismo menú OPCIONES en el apartado
Actualizar programa y siguiendo las explica-
ciones que se nos indican, (Reiniciar la TRS-
5000, manteniendo presionados los botones
READ y COPY) en el Display de la TRS apa-
recerá:
Y presionando el botón Enviar, que se habrá
habilitado automáticamente, nos descarga-
mos el firmware.
Una vez finalizada la descarga, en la TRS-
5000 aparecen sucesivamente los siguientes
mensajes hasta que no se descargue la segun-
da y definitiva parte del firmware:

Español
5
Descarga del firmware
para habilitar el TPX CLONER y mejoras
2
Llegados a este punto, procedemos con la
siguiente secuencia:
• Cerramos el software de PC TRS-5000.
• Desconectamos el cable RS232.
• Se enciende la TRS-5000 y se conecta al PC
utilizando el cable USB A-B.
En cuanto llevemos a cabo esta opción, el
Sistema Operativo Windows reconoce que se
ha añadido un nuevo dispositivo USB y proce-
deríamos a instalar los drivers específicos para
su correcto funcionamiento.
1) Seleccionar la opción “NO POR EL
MOMENTO” del asistente para nuevo had-
ware encontrado y pulsar siguiente.
2) Seguidamente, escoger la opción
“INSTALAR AUTOMATICAMENTE EL
SOFTWARE (RECOMENDADO)” del mismo
menú y nuevamente seleccionar siguiente.
3) Esperamos a que el asistente finalice la
instalación automática de los drivers.
4) Para finalmente pulsar Finalizar y dar por
terminado el proceso de instalación.
Si la revisión del Software de PC es
igual o mayor que la 2.1.0, el driver
USB se instalará automaticamente.
Para poder conseguir esta versión,
bién la descargamos de la web de
JMA o nos ponemos en contacto con
el servicio tecnico JMA para que nos
la suministre.

Español
6
Para todas las versiones anteriores
a la Rev.1.06.hex, ésta incluida, la
conexión USB no estará habilitada,
no pudiéndose hacer uso del TPX2
Cloner.
Se deben usar los siguientes cables para
conectar el TPX CLONER a la TRS5000.
Esta es la lista de elementos que se deben
usar como mínimo para trabajar con el TPX
CLONER.
1. Dispositivo TPX CLONER.
2. Adaptador de corriente AC/DC. Incluido
en la caja de TRS5000.
3. Cable DC/DC para conectar el TRS5000 y
el TPX CLONER.
4. Cable de Conexión M/M DB9 para conec-
tar TRS5000 y TPXCLONER. Véase Nota1.
Nota 1:
Este cable es diferente del incluido en la caja
de TRS5000. Este tiene 2 conectores macho
en ambos lados, y permite conectar el TPX
CLONER y la TRS5000.
Manual de instalación
del TPX CLONER
3
1. TPX CLONER
3. Cable de
conexión dc del TPX
CLONER al TRS5000
4. Cable de
conexión de
puerto serie
DB9 M/M
2. Adaptador de
corriente AC/DC

Español
7
El procedimiento para conectar el cable:
• Conecte el TPX CLONER enchufando el
adaptador de corriente (2) en la red
(110/220 Vac) y también en cualquiera de
los 2 enchufes hembra de la parte poste-
rior del duplicador (véase imagen 2).
• Conecte el cable de conexión de puerto
serie (4) del TPX CLONER a la TRS5000.
• Y finalmente, enchufe el cable DC del
conector libre del TPX CLONER a la
TRS5000.
Imagen 2. Parte posterior del TPX CLONER con los
conectores DC y la conexión de puerto serie.
Imagen 3. Segundo de los tres pasos para conec-
tar el TPX CLONER y la TRS5000.
Una vez se hayan completado los pasos ante-
riores, procedemos a encender la TRS5000.
Si el tercer mensaje que nos muestra el
Display es TPX CLONER ENCONTRADO, sig-
nificaría que ya estaríamos preparados para
clonar las las llaves Texas Crypto.

Español
8
Tras haber concluido el proceso de insta-
lación de los drivers USB para la TRS-5000,
procederíamos con la parte final del proceso
de instalación, siguiendo los pasos que se
detallan a continuación:
• Una vez de haber cumplimentado los
pasos presentes en el punto 3, lanzar
nuevamente la aplicación TRS-5000 del
software de PC.
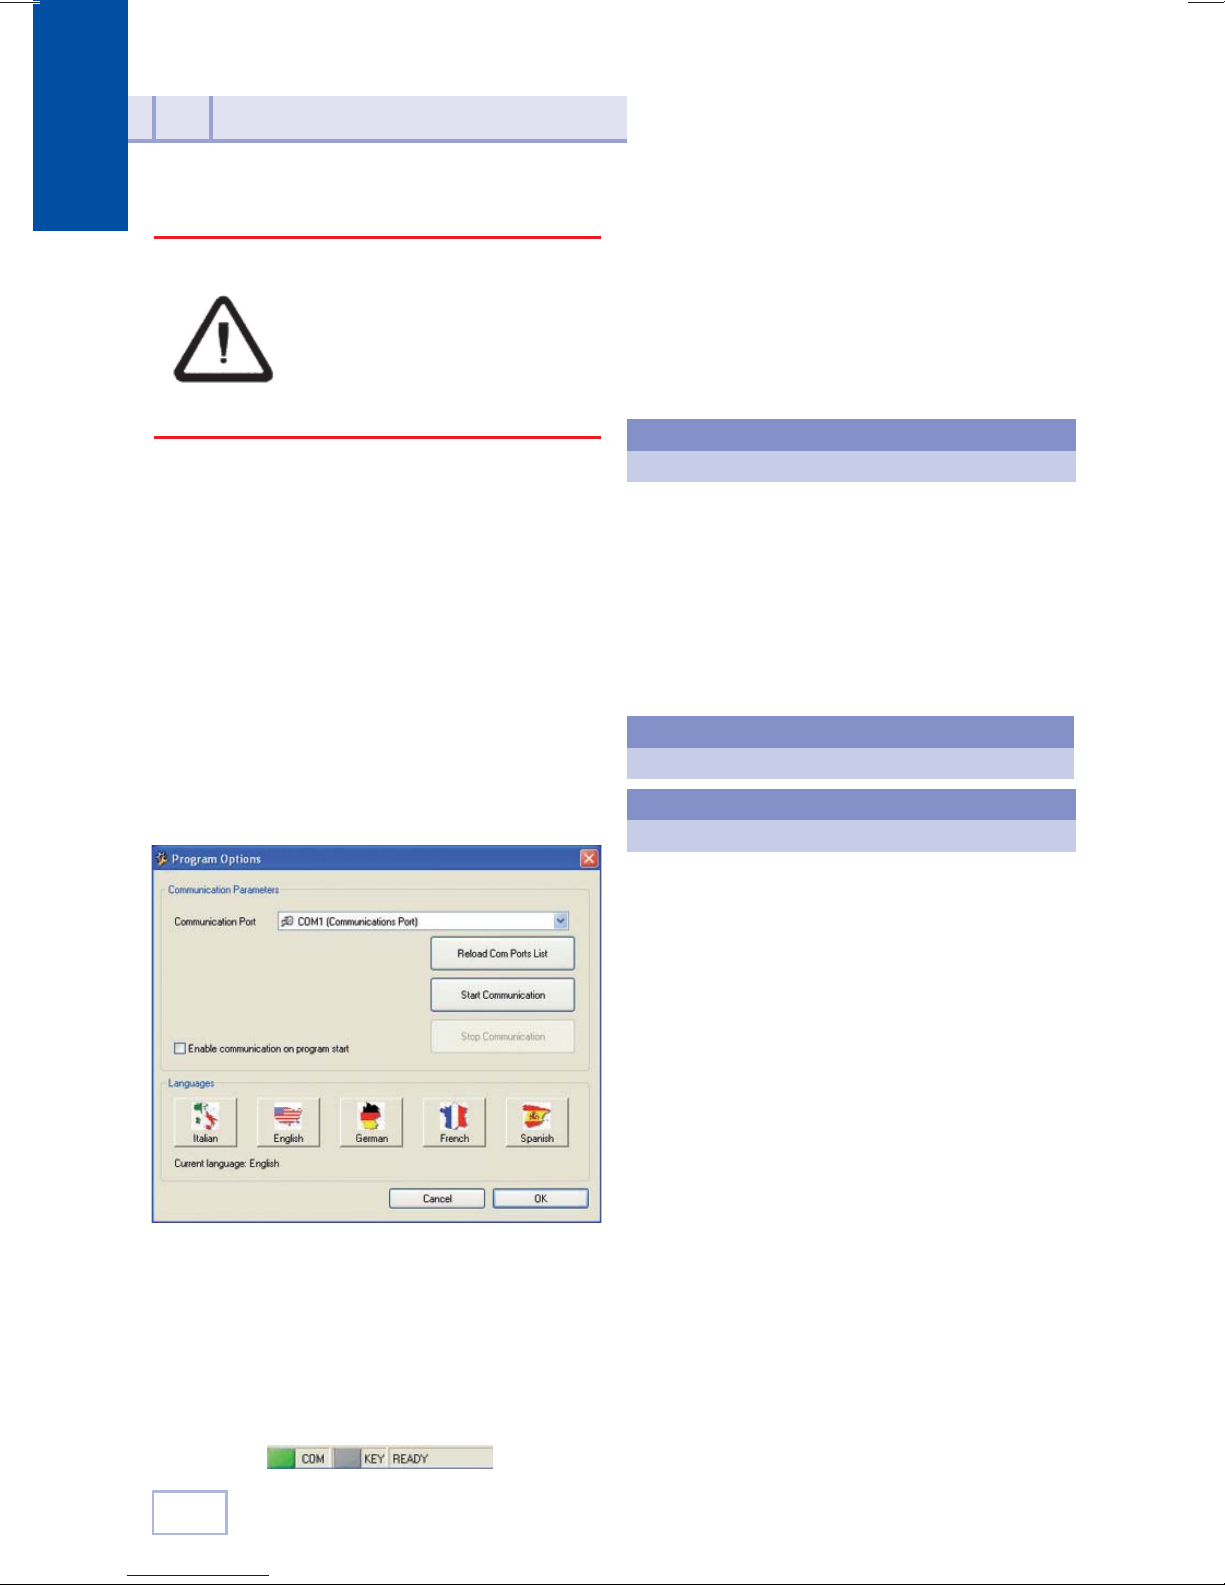
• Nuevamente dentro de OPCIONES,
en el apartado Parámetros, presiona-
mos el botón Reload Comm Por List,
que nos carga en el menú despegable
Communication Port, el nuevo puerto
USB que tenemos para la TRS-5000.
• En función de los programas que uno
tenga instalados y los puertos por defec-
to que utilicen, habrá una asignación
diferente de puerto, en el ejemplo es el
COM5, pudiéndose dar diferentes puer-
tos. (Todos ellos con un símbolo de USB a
su izquierda):
• A continuación, se presiona el botón Start
Communication y establecemos la comu-
nicación vía USB con la TRS-5000.
• Como ya hemos realizado con anteriori-
dad, dentro del menú OPCIONES, en el
apartado Actulizar programa, procede-
ríamos a descargarnos la ultima versión
Conexión
y funcionamiento del TPX CLONER
4
de firmware (trs5xxx.bin), con la cual ya
podremos hacer uso del TPX Cloner.
Para verificar si se dispone de la última
revisión de firmware remitirse a la WEB
de JMA en los diferentes paises.
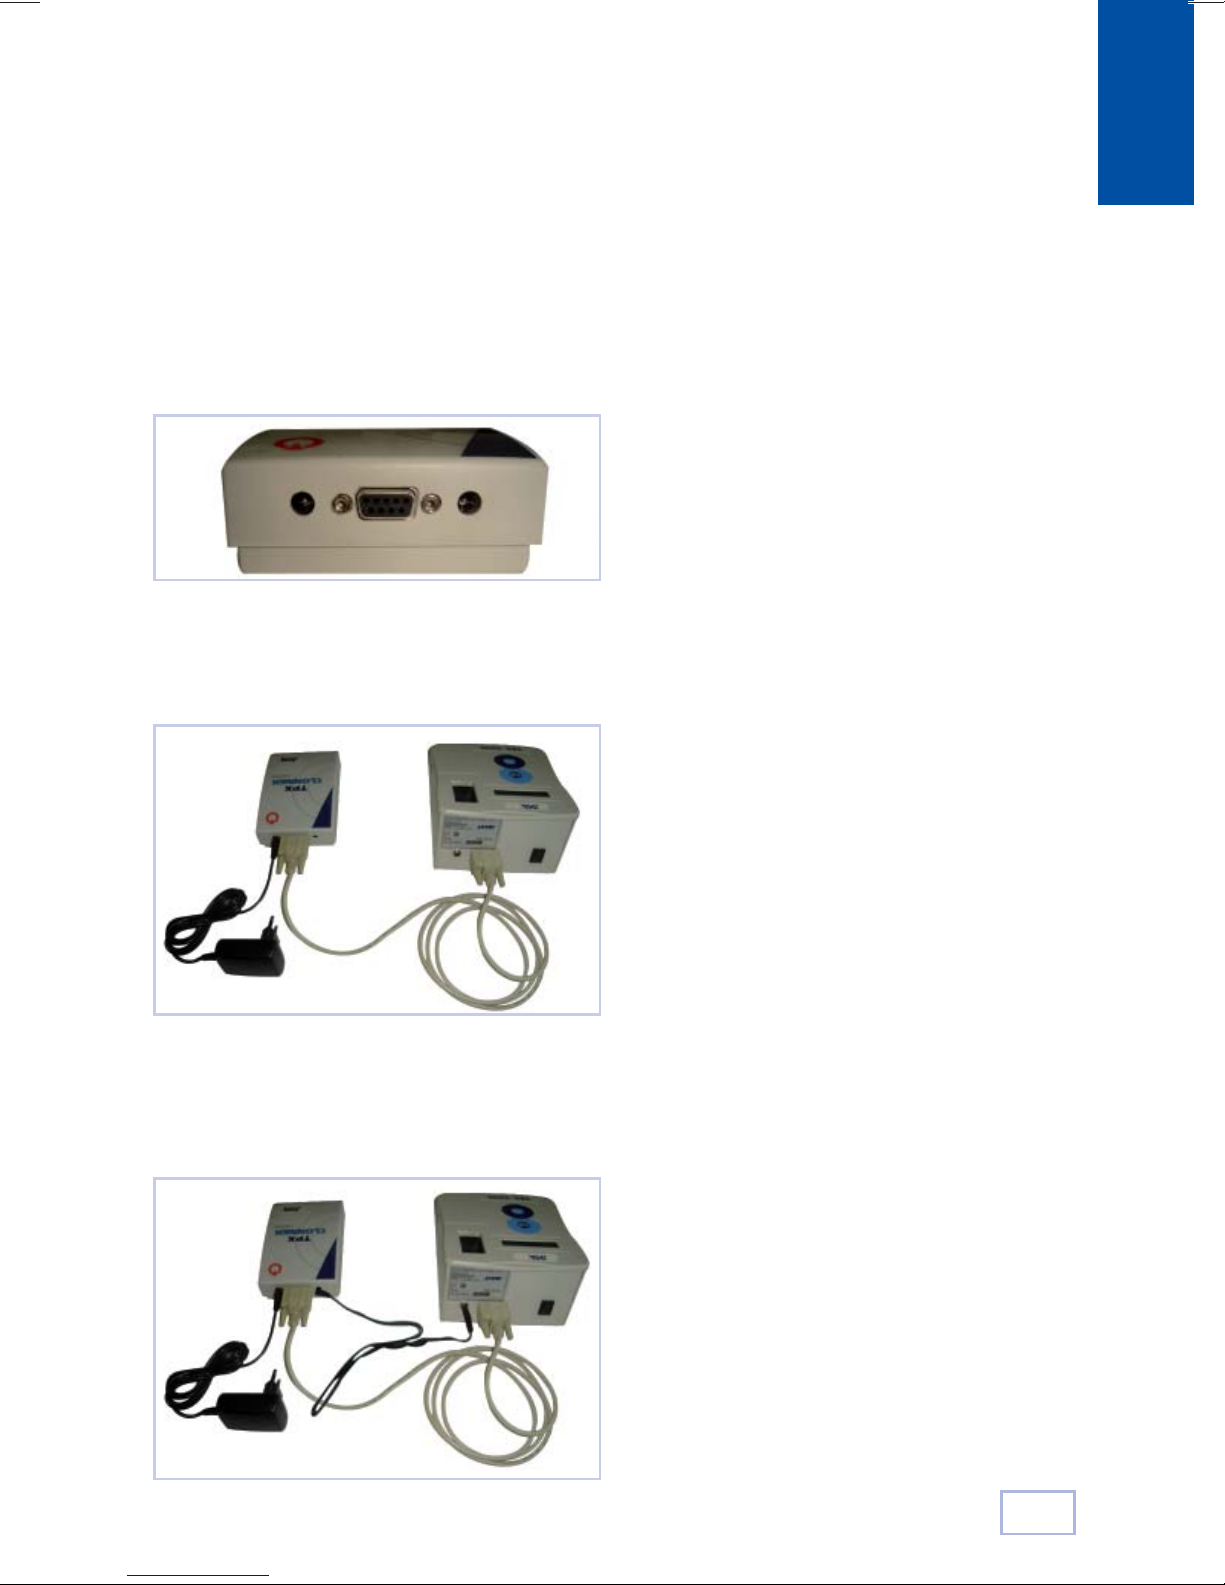
• Una vez realizadas todas estas conexiones
procedemos a encender la TRS-5000.
Los mensajes que debieran de aparecer en la
TRS-5000 tras su encendido son :
Tras lo cual, la TRS-5000 estaría totalmente
operativa.
A modo de ejemplo, se detallan los mensajes
que deben de aparecer al proceder a clonar
en este caso una llave FORD con transponder
TP06:
Se introduce la llave original y se presiona la
tecla READ:
Para que la comunicación entre la
TRS-5000 y el TPX Cloner sea operati-
va, el LED de estado del TPX Cloner ha
de pasar del rojo inicial al verde.
Si no fuera así, papagar la TRS-5000,
proceder a reiniciar el TPX Cloner des-
conectando la alimentación y volvién-
dolo a reconectar, y finalmente volver
a encender la TRS-5000.
JMA TRS-5000
Versión 2.02
JMA TRS-5000
Hw rel. 1.1
JMA TRS-5000
TPX CLONER found
INSERTAR LLAVE
Pulsar READ

Español
9
Espere Por Favor
…………………
Tp06/19 TEXCRYPT
Mire Manual TP
META NUEVA LLAVE
Pulsar COPY
A continuación introducimos la llave a clonar
con el transponder TPX2 virgen, y seguida-
mente presionamos el botón COPY.
En ese momento, el Led de estado del TPX
Cloner cambia del Verde al Rojo (tanto en
cuanto dure el proceso de búsqueda de la
clave), para una vez finalizado volver a su
estado normal; en verde.
Y en este momento ya podríamos proceder a
realizar la siguiente copia.
Espere Por Favor
------------ + ---------
COPIA EFECTUADA
Retirar Llave
INSERTAR LLAVE
Pulsar Read
Mientras el TPX2 Cloner se encuentra
procesando la información de la llave
original, el LED de estado del Cloner
se tornará a rojo.
El proceso puede variar entre 1 y un
máximo de 150 s.

10
English
Downloading the firmware
to enable the USB port
1
First of all, you need to update the TRS-5000
firmware, if you want to use the TPX Cloner.
In order to do that, proceed as follows:
• Switch on the TRS-5000.
• Connect the TRS-5000 to the PC with the
RS232 cable.
• Start up the PC TRS-5000 software and in
the OPTIONS menu, in Settings, select the
serial port COM1 in the Communication
Port scroll down bar. Press the Start
Communication button and the OK
option to quit this menu.
Once serial communication have been
established with the TRS-5000, (this can be
verified by looking at the COM led in the
bottom left-hand corner of the program; it
is “green” if it is communicating properly),
proceed to download the TRS52x_USBdriver.
hex file, from the place where you copied it,
CD, Hard Disk, JMA Web page, etc…
To begin downloading, in the same OPTIONS
menu, select Upload Program following
the explanations that are given, (Re-Initiate
the TRS-5000, keeping the READ and COPY
If the firmware version installed in
the TRS5000 is older than Rev.2.00.,
follow all the steps shown in this
manual. If it is a newer version, go
straight to points 3 and 4 of this
manual.
buttons pressed at the same time). The
following will appear on the display:
And pressing the button Upload, which will
have been automatically enabled, we begin
with firmware downloading procedure.
Once the process have been finished, the
following messages will continuously appear
in the display of the TRS-5000 until the
second and definitive part of the firmware
have been downloaded:
TRS-5000 READY
For PC Download
USB DRIVERS
loaded
READY FOR
download

11
English
Downloading the firmware
to enable the TPX CLONER and upgrades
2
Once you have reached this point, follow the
sequence of instructions below:
• Shut down PC TRS-5000 software.
• Unplug the RS232 cable.
• Connect the TRS-5000 to the PC using the
USB A-B cable.
As soon as this has been done, the Windows
Operating System will recognize that new
hardware have been plugged in, and you
will need to follow the procedure below to
install the right drivers for using USB with
our device.
1) Reject the Windows Update software
search.
2) Select the option Install from a list or
specific location and Press Next:
3) Wait until the new menu has completed
the automatic installation of the drivers.
4) And finally, press the Finish button to end
the installation procedure.
If the PC software version is version
2.1.0 or later, the USB driver will be
installed automatically.
To obtain this version, either down-
load it from the JMA website or con-
tact the JMA technical service, who
will supply it.

12
English
TPX CLONER
installation guidelines
3
The following wires must be used to connect
the TPX CLONER to the TRS5000,
This is the list of components that must at
least be used to work with the TPX CLONER.
1. TPX CLONER device.
2. AC/DC Power supply. Comes in the
TRS5000 box.
3. DC / DC cable to connect the TRS5000 and
the TPX CLONER.
4. DB9 male/male serial communication
cable. See Note 1.
Note 1:
This cable is different from the one included
in the TRS5000 box. This one has 2 male
connectors on both sides, and allows you to
connect the TPX CLONER and the TRS5000.
1. TPX
CLONER
3. DC connection
cable from TPX 4. DB9 M/M
serial
comm cable
2. AC/
DC power
supply
For all the previous versions prior
to and including Rev. 1.06.hex,
the USB connection will not be
enabled.
So it is not possible use the TPX
Cloner.50

13
English
The procedure to connect the cables is:
• Switch on the TPX CLONER by plugging
the power supply (2) into the mains supply
(110/220 Vac) and also into either of the 2
sockets on the back of the cloner.(see pic-
ture 2).
• Connect the serial cable (4) from the TPX
CLONER to the TRS5000.
• And finally, just plug the DC cable cord
from the free connector of the TPX
CLONER into the TRS5000.
Picture 2 . Back side of the TPX CLONER with the
DC connectors and Serial Comm.
Picture 3. Second of the three steps to connect
the TPX CLONER to the TRS5000.
Now you are ready to switch on the TRS5000,
and the third message that will appear on
the display will be TPX CLONER FOUND.
This means that you are ready to work with
Texas Crypto keys.

14
English
• Once all the connections have been com-
pleted, you are ready to switch on the
TRS-5000.
The followings messages will be displayed
after the TRS-5000 has been switched on:
After which, the TRS-5000 will be fully ope-
rative.
As an example, these are the messages that
should appear if you are going to clone an
OEM key, in this case a FORD key with a TP20
transponder.
Insert the OEM key and press the READ
button:
In order to ensure that communica-
tion between the TRS-5000 and the
TPX Cloner will be fully operative, the
TPX Cloner’s status LED must change
from the initial red to green.
If this does hot happen, reinitiate the
TPX cloner, unplugging the power su-
pply and plugging it back in again.
JMA TRS-5000
Version 2.02
JMA TRS-5000
Hw rel. 1.1
JMA TRS-5000
TPX CLONER found
READY TO READ
Press READ
PLEASE WAIT
…………………
Tp20 TEX CR FORDT
Copy on TPX2
READY TO COPY
Press COPY
Connecting
and operating the TPX CLONER
4
Once the USB drivers install procedure has
been completed, you should complete the
last part of the installation. Follow the steps
detailed below:
• Start up the TRS-5000 PC software appli-
cation program again.
• As explained earlier, in the OPTIONS
menu, in Settings press the Reload Comm
Por List button. This will load the new
USB port to handle the TRS-5000 in the
Communication Port scroll down bar on
the menu.
• Depending on the programs that you
have installed and the default ports that
they use, there will be a different TRS
port assigned. In the example, the TRS
port is COM3, with different ports pos-
sible. (The ones that interest us are the
ones that have an USB symbol on the
left):
• Immediately after, press the Start
Communication button and communica-
tion with the TRS-5000 will be established
through the USB connector.
• As explained earlier, in the OPTIONS
menu, in Upload program, you have to
start downloading the final version of
the firmware (trs5200.bin), which will
enable you to use the TPX Cloner.

15
English
Next, insert the key to be cloned with the
TPX2, and press the COPY button.
At that moment, the TPX Cloner’s status LED
will change from the normal green to red
(meanwhile the secret key searching proce-
dure takes place). Once it has finished it turns
back to its normal green again.
Having reached to this point, the TPX Cloner
is ready to clone the next key.
PLEASE WAIT
------------ + ---------
COPY OK
Extract Key
READY TO READ
Press READ
During the secret key searching pro-
cedure, the status LED changes to red,
changing automatically to green once
the process has been completed.
The searching time lasts between 1
and a maximum of 130 seconds.

16
Deutsch
Downloaden der firmware
zum aktivieren des USB-ports
1
Unter der Voraussetzung, dass
es sich bei der Firmware-Version
der TRS5000 um eine Version vor
Rev.2.00 handelt, sind alle in die-
sem Handbuch enthaltenen Schritte
zu verfolgen. Andernfalls direkt zu
Punkt 3 und 4 dieses Handbuchs
gehen.“
Um den TPX Cloner benutzen zu können,
muss zunächst die Firmware der TRS-5000
heruntergeladen werden. Dazu gehen Sie
bitte folgendermaßen vor:
• Die TRS-5000 einschalten.
• Dann die TRS-5000 mit dem RS232-Kabel
an den PC schließen.
• Die PC-Software der TRS-5000 starten.
In dem Menü OPTIONEN wählt man in
der Sektion Parameter in dem Dialogfeld
des Reiters Kommunikationsport
den Serienport COM1 und klickt die
Schaltfläche Kommunikation starten an.
Anschließend verlässt man dieses Menü
durch Anklicken von OK.
Sobald die Kommunikation mit der TRS-5000
hergestellt ist (dies kann anhand der Led des
COM in der unteren linken Ecke überprüft
werden: Wenn es grün anzeigt, ist die
Kommunikation korrekt), geht man auf den
Platz, an dem sich die Datei TRS52x_USBdriver.
hex befindet (CD, PenDrive, Festplatte, Web
JMA, etc.) und lädt sie herunter.
Zum Herunterladen ruft man im Menü
OPTIONEN die Sektion Programm
aktualisieren auf. Folgt man den dort
angegebenen Erklärungen (TRS-5000 neu
starten, die Tasten READ und COPY gedrückt
halten), erscheint auf dem TRS-Bildschirm
folgende Anzeige:
Durch Anklicken der Schaltfläche Senden,
die automatisch aktiviert wurde, wird die
Firmware heruntergeladen.
Nach dem Download erscheinen auf der TRS-
5000 nacheinander folgende Meldungen, bis
der zweite und endgültige Teil der Firmware
heruntergeladen wird:
TRS-5000 LIEST
TRS aktualisieren
USB DRIVERS
loaded
READY FOR
download

17
Deutsch
Downloaden der firmware
zum aktivieren des TPX CLONER und für verbesserungen
2
Nun wird folgendermaßen fortgefahren:
• Die PC-Software des TRS-5000 schließen.
• Den Anschluss des RS232-Kabels
unterbrechen.
• Die TRS-5000 einschalten und mit dem
USB-Kabel A-B an den PC schließen.
Dabei erkennt das Windows-Betriebssystem,
dass ein neues USB-Gerät angeschlossen ist
und man installiert dann die spezifischen
Driver für den korrekten Betrieb des USB.
1) Die Option Bestimmte Quelle installieren
anwählen und Weiter anklicken:
2) Anschließend die Option Nicht suchen.
Ich wähle den Treiber, der installiert wird.
anwählen und Weiter anklicken:
3) Nun wartet man, bis der Assistent die
automatische Installation der Driver
beendet hat.
4) Abschließend betätigt man Beenden,
womit die Installation abgeschlossen ist
Wenn die Version der Software auf
ihrem PC gleich oder höher als die
Version 2.1.0 ist, installiert sich der
USB-Treiber automatisch.
Um diese Version zu erhalten, laden
Sie sie entweder direkt von den Web-
seiten von JMA herunter oder setzen
Sie sich mit dem technischen Kun-
dendienst in Verbindung, damit er Sie
ihnen zusendet.

18
Deutsch
Installationshandbuch für
den TPX CLONER
3
Für den Anschluss des TPX CLONER an die
TRS5000 verwenden Sie bitte folgende
Kabel.
Zum Arbeiten mit dem TPX CLONER benöti-
gen Sie mindestens folgende Elemente.
1. TPX CLONER-Gerät.
2. AC/DC-Stromadapter. Im Lieferumfang
der TRS5000 enthalten.
3. DC/DC für den Anschluss des TRS5000 an
den TPX CLONER.
4. Anschlusskabel DB9 Serienport Stecker/
Stecker. Siehe Anmerkung 1.
Anmerkung 1:
Dieses Kabel unterscheidet sich von dem,
das mit der TRS-5000 geliefert wird. Es hat
an jedem Ende einen Stecker und dient
der Verbindung zwischen TRS-5000 und TPX
CLONER.
1. TPX
CLONER
3. Dc-anschlusskabel
des TPX CLONER an
die TRS5000
4. Anschlusskabel
serienport DB9
M/M
2. Stromadapter
AC/DC
Bei allen Versionen vor und eins-
chließlich der Version Rev.1.06.hex
ist der USB-Anschluss nicht aktiv, so
dass TPX2 Cloner nicht benutzt wer-
den kann.

19
Deutsch
Ausführen des Kabelanschlusses:
• Schließen Sie den TPX CLONER an, indem
Sie den Stromadapter (2) ans Netz (110/220
Vac) und an eine der zwei Buchsen auf der
Rückseite des Geräts (siehe Abbildung 2)
schließen.
• Verbinden Sie den TPX CLONER und die
TRS5000 mit dem Serienport-Kabel (4).
• Stecken Sie dann das DC-Kabel in die freie
Buchse an dem TPX CLONER und in die
TRS5000.
Abbildung 2. Rückseite des TPX CLONER mit den
zwei DC-Buchsen und dem Serienport-Anschluss.
Abbildung 3. Zweiter der drei für den Anschluss
des TPX CLONER an die TRS5000 notwendigen
Schritte.
Jetzt kann die TRS-5000 eingeschaltet werden.
Die dritte auf dem Bildschirm erscheinende
Meldung ist: TPX CLONER GEFUNDEN.
Jetzt können Sie mit Texas-Crypt-Schlüsseln
arbeiten.

20
Deutsch
• Wenn alle genannten Anschlüsse herges-
tellt sind, schalten Sie bitte die TRS-5000
ein.
Nach dem Einschalten müssen folgende
Meldungen auf der TRS-5000 erscheinen:
Nun ist die TRS-5000 vollständig betriebsbe-
reit.
Als Beispiel zeigen wir Ihnen die Meldungen,
die beim Klonen des hier als Beispiel dienen-
den FORD-Schlüssels mit Transponder TP06
erscheinen müssen:
Den Originalschlüssel einlegen und die Taste
READ betätigen
Wenn die Kommunikation zwischen
der TRS-5000 und dem TPX Cloner
betriebsbereit ist, muss die Anzeige-
LED des TPX Cloner von rot auf grün
wechseln.
Sollte dem nicht so sein, starten Sie
bitte den TPX Cloner neu, indem
Sie die Versorgung unterbrechen und
dann wieder herstellen.
JMA TRS-5000
Version 2.02
JMA TRS-5000
Hw rel. 1.1
JMA TRS-5000
TPX CLONER found
SCHLÜSSEL EINLEGEN
READ betätigen
Anschluss
und funktionsweise des TPX CLONER
4
Nach der Installation der USB-Driver für die
TRS-5000, nimmt man wie nachfolgend bes-
chrieben, die abschließenden Schritte der
Installation vor:
• Erneut die Anwendung TRS-5000 der
PC-Software starten.
• In OPTIONEN, in der Sektion Parameter
die Schaltfläche Reload Comm Ports List
anklicken. Aus diese Weise wird in das
Aufklappmenü Communication Port gela-
den, der neue USB-Port, der für die TRS-
5000 zur Verfügung steht.
• Ja nach den jeweils installierten
Programmen und den standardmäßig
verwendeten Ports, kommt es zu unters-
chiedlichen Portzuweisungen, in unserem
Beispiel ist es COM5, es können jedoch
auch andere sein. (Dabei findet sich stets
das USB-Symbol auf der linken Seite):
• Danach klickt man die Schaltfläche
Start Communication an und stellt die
Kommunikation mit der TRS-5000 über
USB her.
• Wie bereits zuvor wird in dem Menü
OPTIONEN in der Sektion Programm
aktualisieren die endgültige Fassung der
Firmware (trs52_b.bin) heruntergeladen,
mit deren Hilfe man dann den TPX Cloner
benutzen kann.
Table of contents
Languages: