jobmate YT4348 User manual

PDF
NZ002
A5(148.5x210mm)
2015-12-24
说明书/8458-4348013-011
张妹珍
70g双胶纸
名称/料号
5张A4纸
页 数
503
封面彩色印刷


CONTENTS
Safety Instructions ---------------------------------------------------------------------------------------------------3
Specific Safety Rules For Pole Chain Saws-------------------------------------------------------------------4
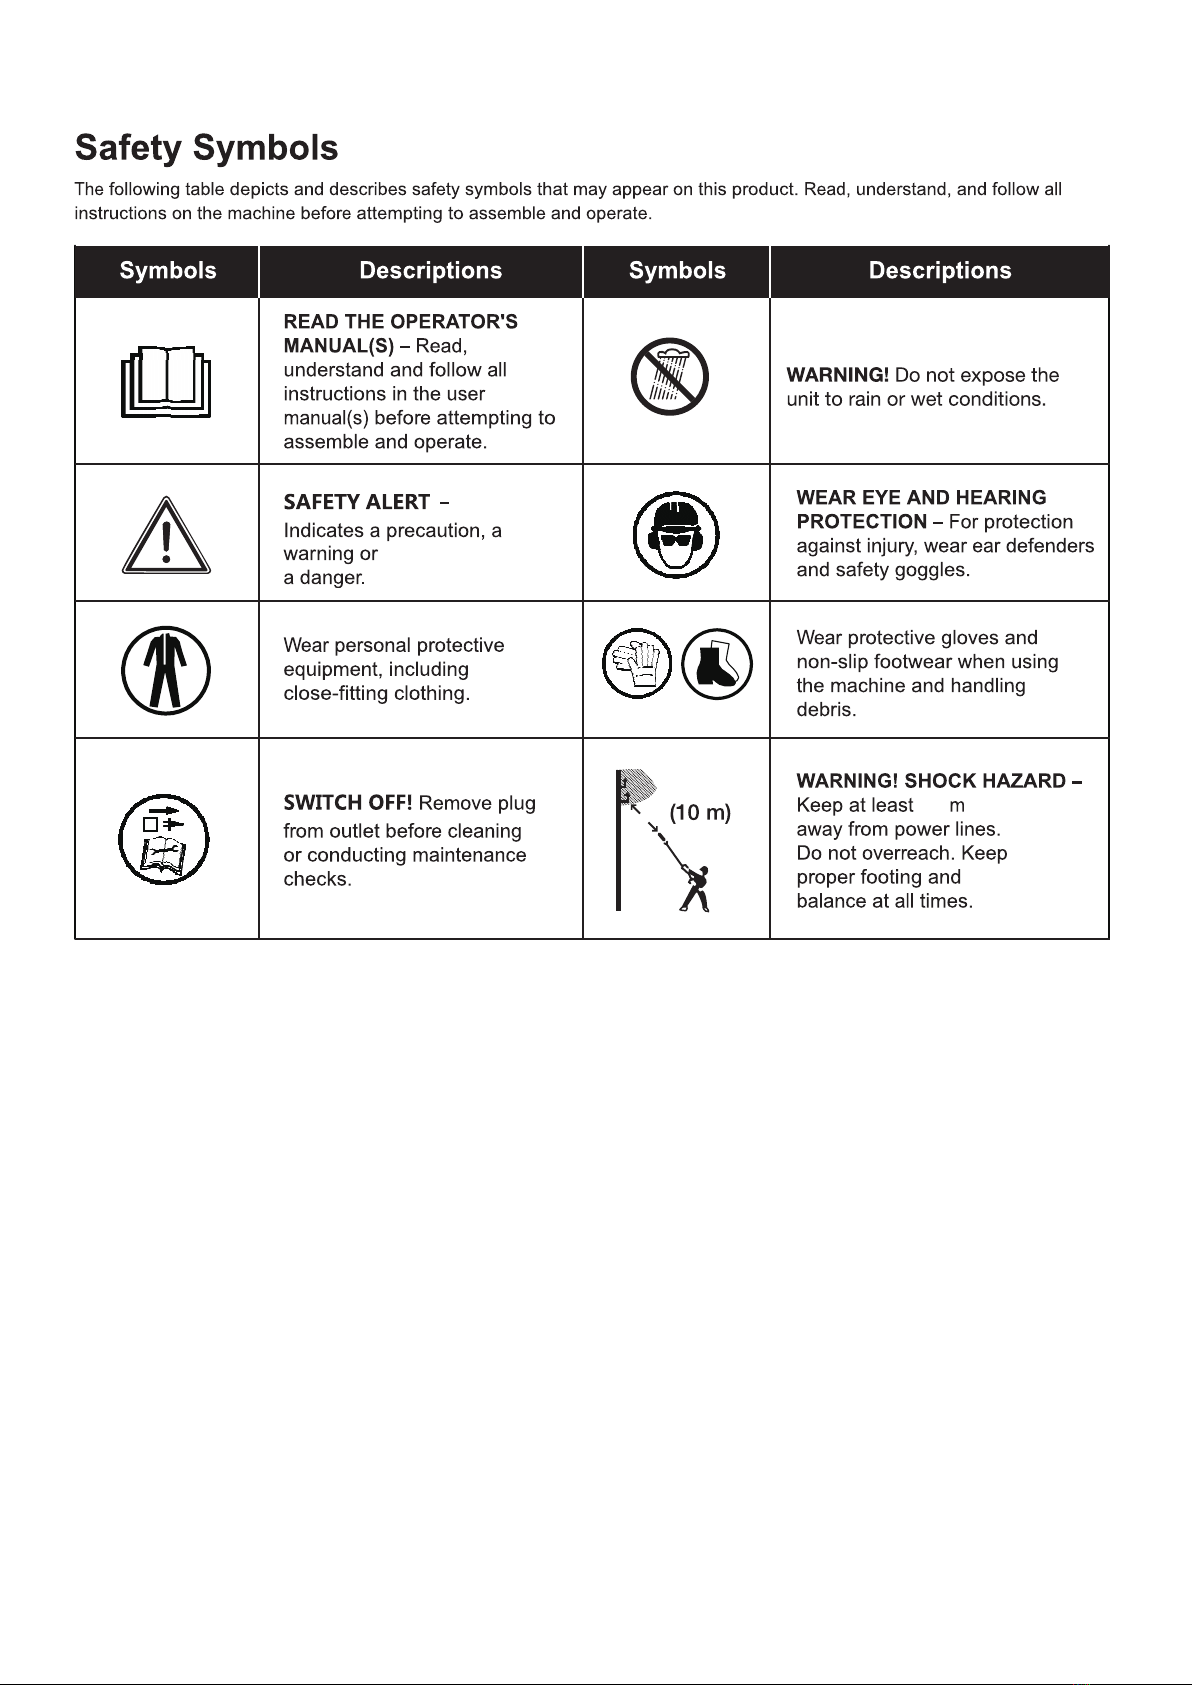
Safety Symbols--------------------------------------------------------------------------------------------------------5
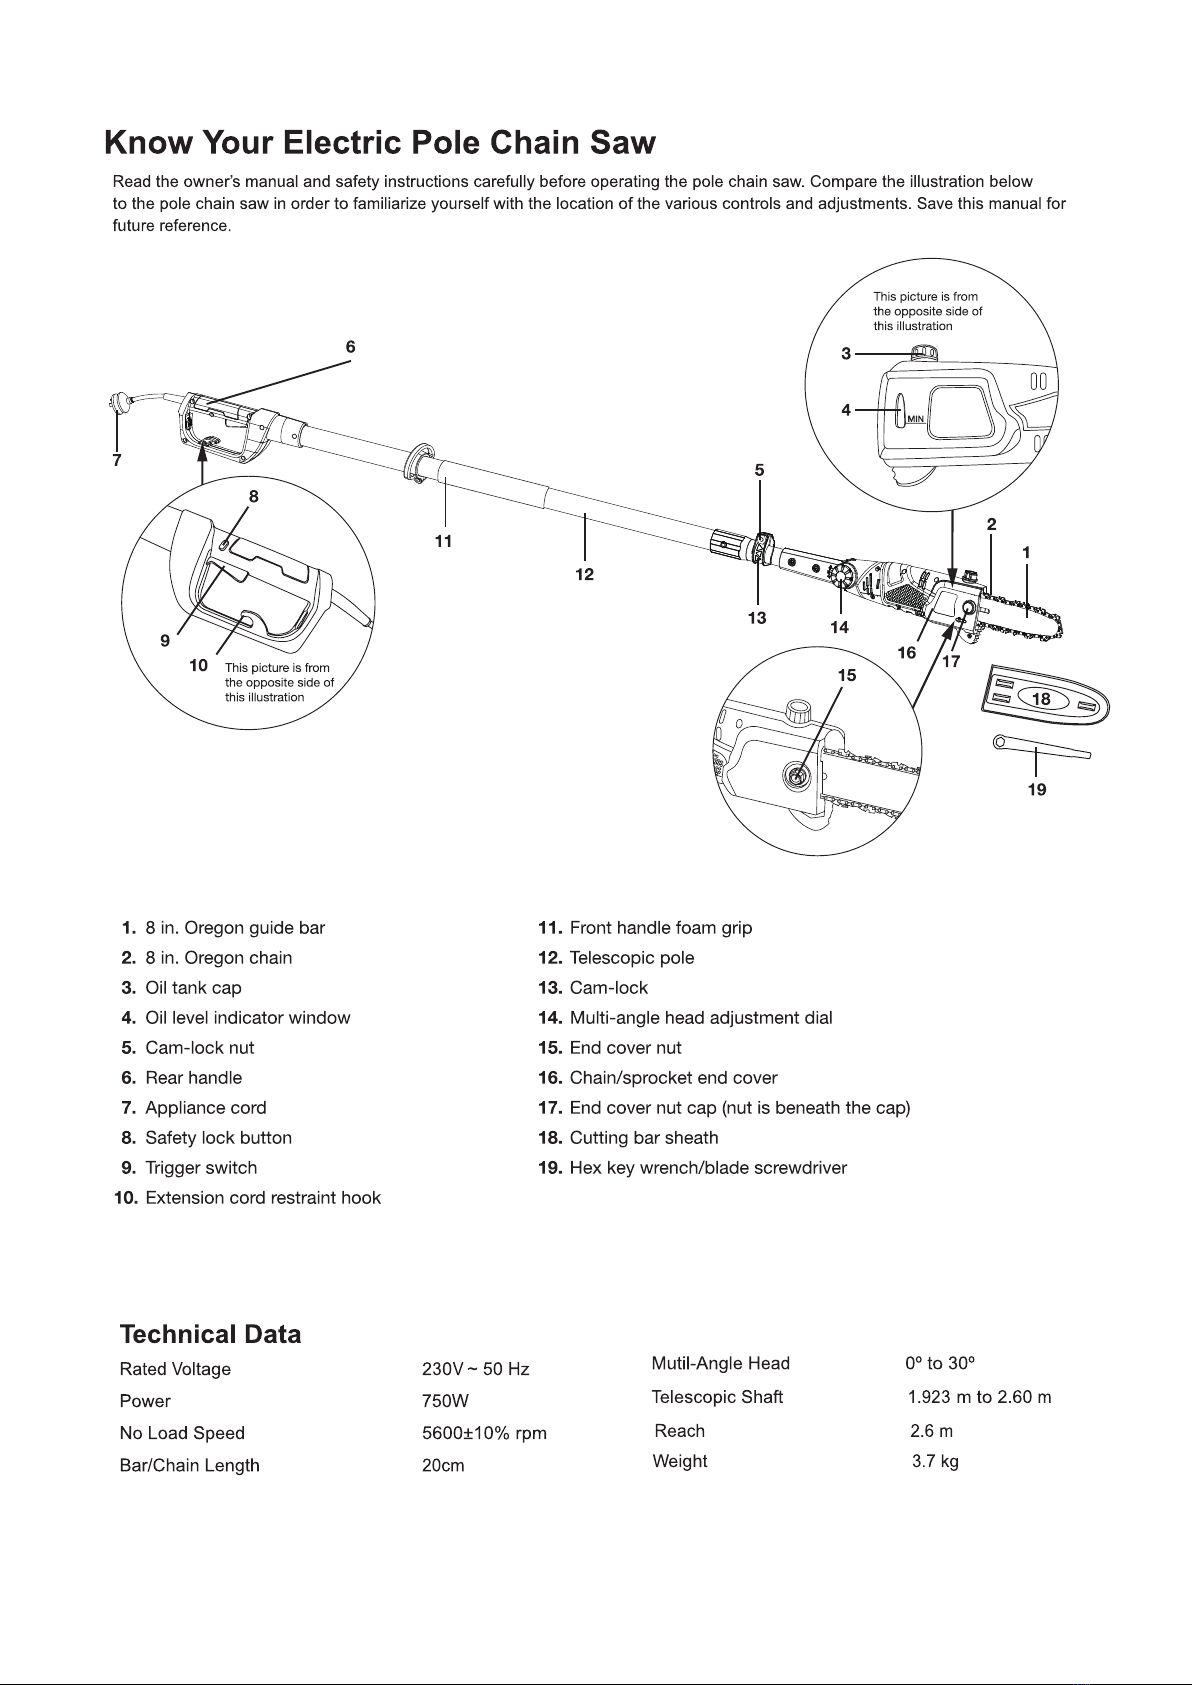
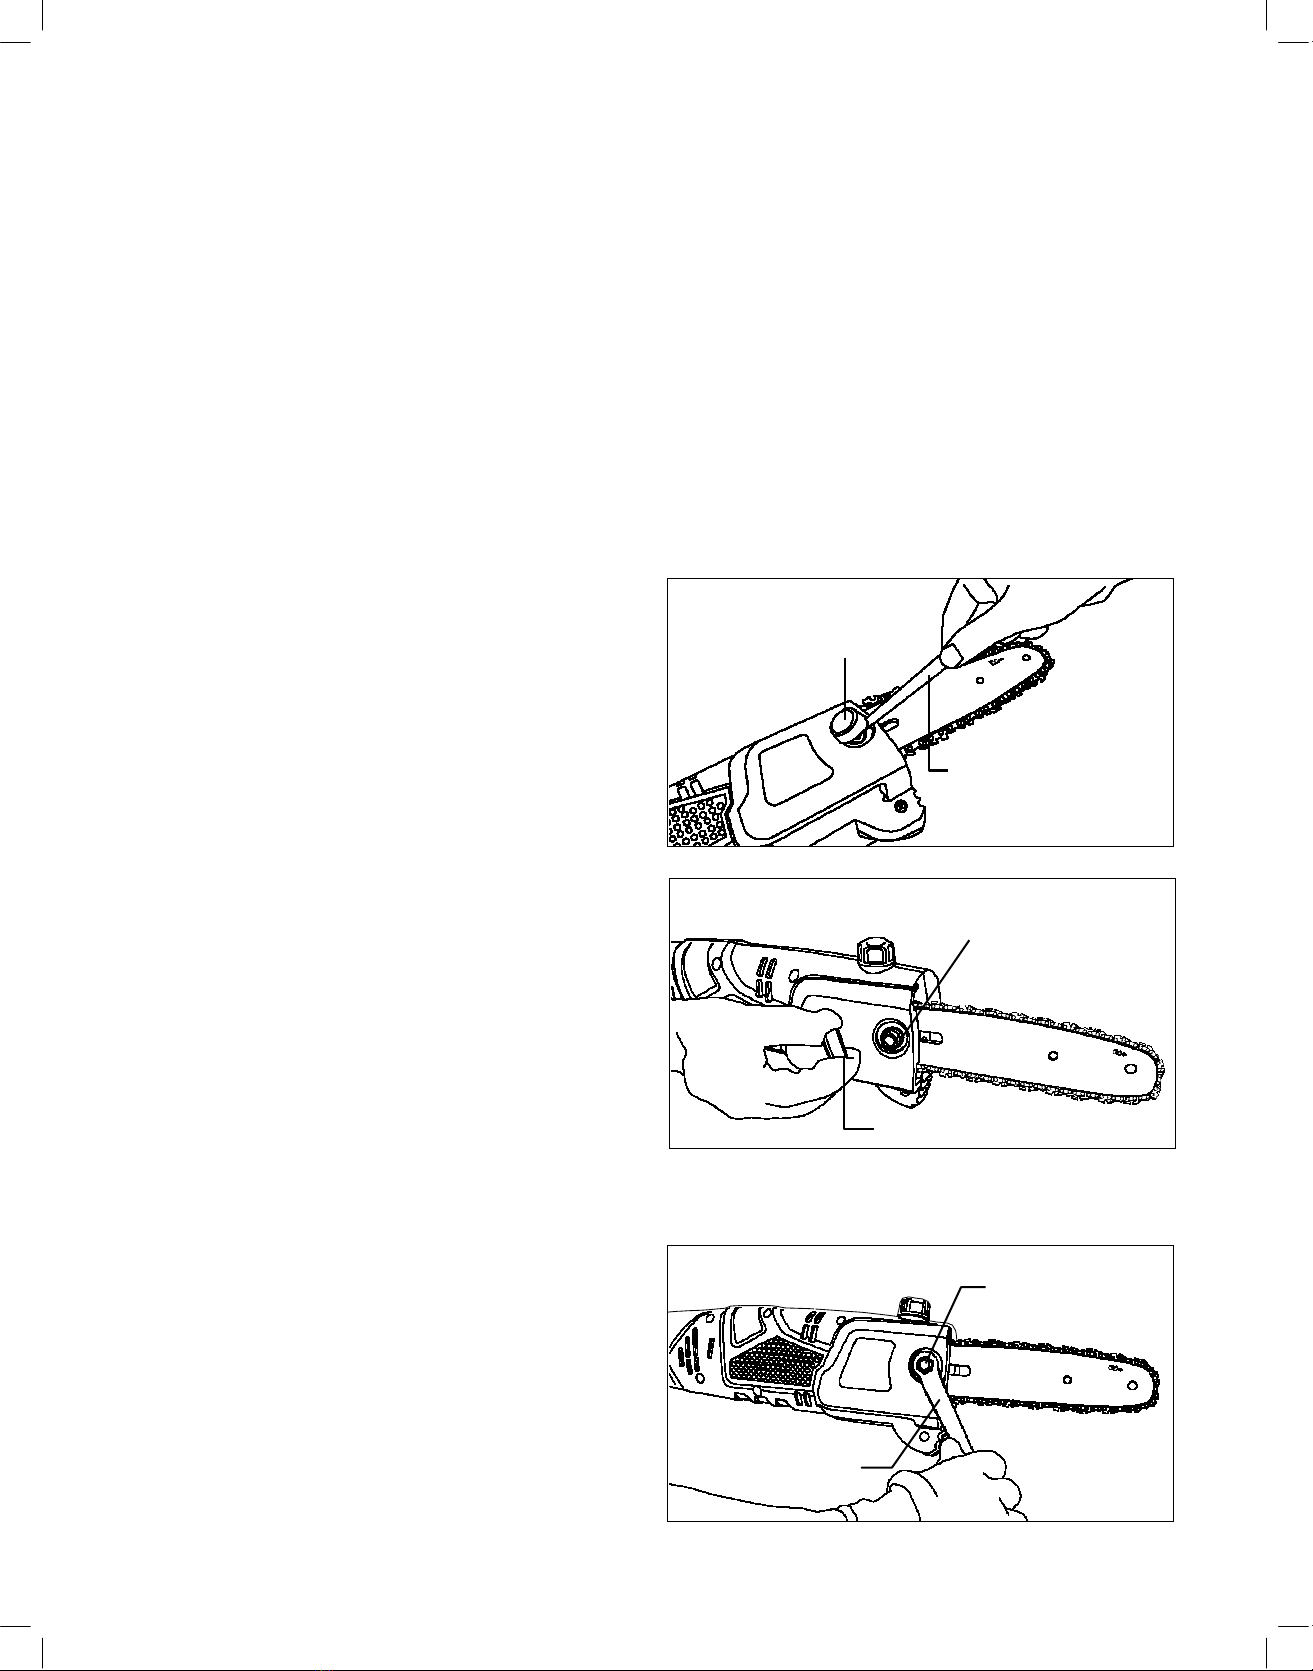
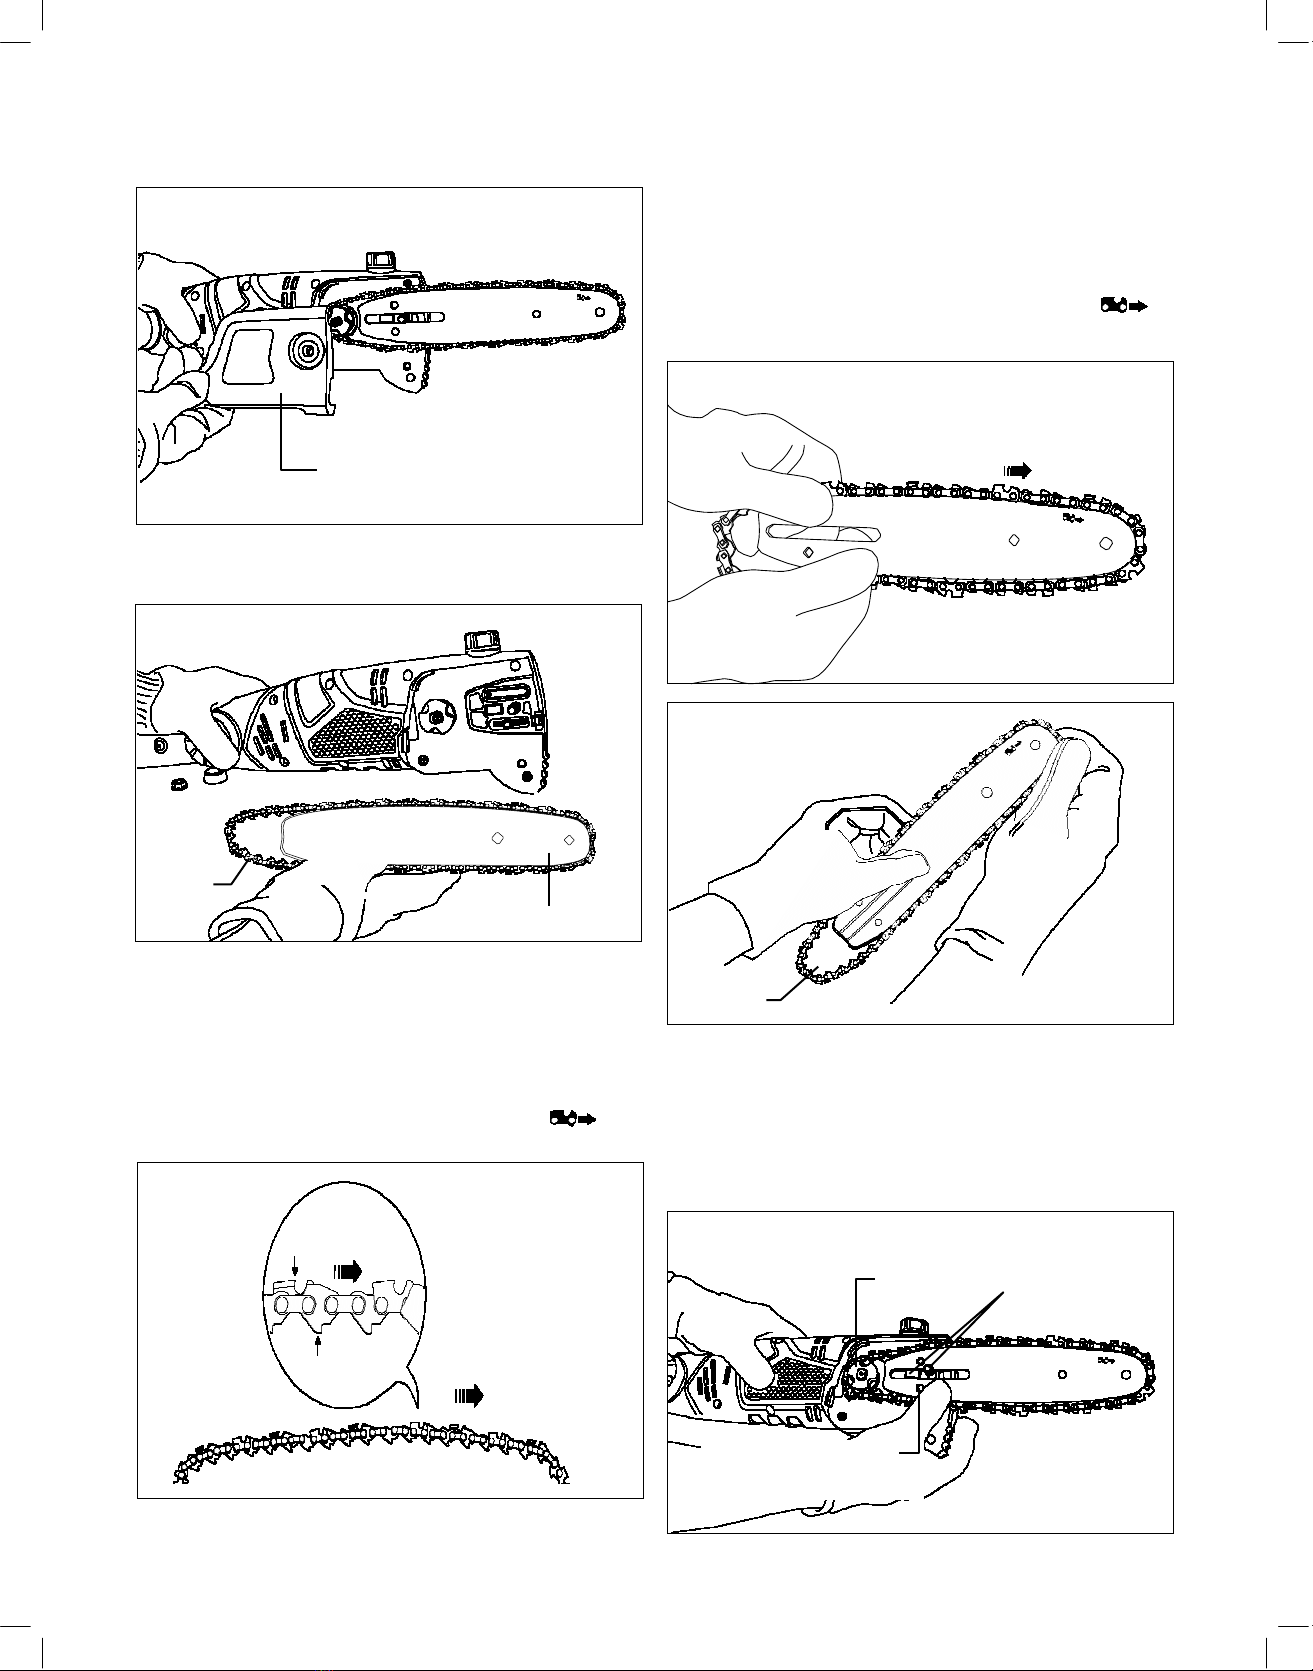
Know your Electric Pole Chain Saw------------------------------------------------------------------------------6
Daily Checklist, Cleaning and Storage--------------------------------------------------------------------------16
Accessories------------------------------------------------------------------------------------------------------------17
Warranty Policy-------------------------------------------------------------------------------------------------------18
2

IMPOR
T
ANT!
Safety
Instructions
All
Operators
Must
Read
These
Instructions
Befor
e
Use
Always
follow
these
safety guidelines.
Failur
e
to
do
so
may
result in
serious
bodily
injury
or
death.
DANG R!
This
indicates
a
hazar
dous
situation,
which,
if
not
followed,
will
result in
serious
injury
or
death.
W
ARNING!
This
indicates
a
hazar
dous
situation,
which,
if
not
avoided,
could
result in
serious
injury
or
death.
CAUTION!
This
indicates
a
hazar
dous
situation,
which,
if
not
avoided,
could
result in
minor
or
moderate
injury.
General Safety
W
ARNING!
When
using
electric
yar
d
tools,
basic
safety
pr
ecautions
should
always
be
followed
to
r
educe
the
risk
of
fir
e,
electric
shock,
and
personal injury,
including
the
following:
1.
Keep
guar
ds
in
place
–
r
otective
guar
ds
should
be
checked
periodically
to
ensur
e
they
ar
e
pr
operly
fitted
and
in
corr
ect
working
or
der
.
2. Remove
adjusting
keys
and
wr
enches
–
Check
that
adjusting
wr
enches
ar
e
r
emoved
fr
om
the
saw
befor
e
tur
ning
it
on.
3.
Keep
work
ar
ea
clean and
well-lit
–
Clear
work
ar
ea
of
branches
and
limbs
after
each
cutting
session.
Cluttered
areas
invite
accidents.
4.
Do
not
use
in
danger
ous
envir
onments
–
Do
not
use
power
tools
in
damp
or
wet
locations.
5.
Do
not
use
the
pole
chain
saw
in
the
rain.
6.
Keep
bystanders
and
childr
en
away
–
All
bystanders,
including
childr
en
and
pets,
should
be
kept
a
safe
distance
away
fr
om
the
work
area.
7.
Do
not for
ce
the
tool
–
It
will
do
the
job
effectively
and
safely
if
it
is used
at
the
rate
for
which
it
was
designed.
8. Use
the
right
tool
–
Do
not
for
ce
the
tool
or
any
attachment
on
the
tool
to
do
a
job
for
which
they
wer
e
not
designed.
9. W
ear
proper
appar
el
–
Do
not
wear
loose
articles
of
clothing
or
jewelry
since
such
items
may
get
caught
in
moving
parts.
Use
of
heavy-duty
rubber
gloves,
substantial
non-skid
footwar
e,
and
close-fitting
clothing
is
r
ecommended
when
working
outdoors
with
power
tools.
10. W
ear
pr
otective
hair
covering
s
to
contain
long
hair
.
11.
Always
wear
safety
glasses
and
ear
defenders
to
pr
ovide
eye
and
ear
pr
otection
–
Everyday
eyeglasses
only
have
impact
r
esistant
lenses
and
do
not
pr
ovide
the
same
pr
otection
as
safety
glasses.
12. W
ear
face
or
dust
masks
–
If
the
cutting
operation
is
dusty
,
the
use
of
a
face
or
dust
mask specially
designed
to
filter
out
miscoscopic
particles
is r
ecommended.
13.
Do
not
overr
each
–
Keep
pr
oper
footing
and
balance
at
all
times.
14.
Maintain
tools
with
car
e
–
Keep
tools
sharp
and
clean
for
best
and
safest
performance.
Follow
instructions
for
lubricating
and
changing
accessories.
15. Disconnect tool
–
Disconnect
the
pole
chain saw
fr
om
the
power
supply
when
not
in
use,
befor
e
servicing,
when
transporting,
or
when
changing
the
chain
or
other
accessories.
16.
Reduce
the
risk
of
unintentional
starting
–
Make sur
e
the
switch
is in
the
OFF
position
befor
e
plugging
the
tool
into
a
power
sour
ce.
17. Use r
ecommended
accessories
–
Consult
the
owner’
s
manual
for
r
ecommended
accessories.
The
use
of
impr
oper
accessories may
cause
risk
of
injury.
18.
Check
for
damaged
parts
–
Befor
e
each
use,
r
epair
or
replace
any
guar
d
or
part
that
is
damaged.
In
addition,
check
for
alignment
of
moving
parts,
binding
of
moving
parts,
br
eakage
of
parts,
and
any
other
conditions
that
may
affect
the
tool's
operation.
19. Never
leave
tool unattended
while
it
is
running
–
T
urn
the
power
OFF
by
removing
the
power
cor
d
dir
ectly
fr
om
its
socket.
Do
not
leave
the
saw
until
the
cutting
bar
comes
to
a
complete
stop.
20.
A
void
unintentional
starting
–
Do
not
carry
the
pole
chain saw
with
your finger
on
the
switch.
21.
Do
not grasp
the
exposed cutting blade or cutting
edges when
picking
up
or
holding
the
saw
–
Be sur
e
to
encase
the
cutting
bar
in
its
pr
otective
sheath
when
not
in
use.
22.
Stay
alert
–
W
atch
what
you
ar
e
doing.
Use
common
sense.
Do
not
operate
the
pole
chain saw when
you
ar
e
tir
ed.
23. Stor
e
idle
tool
indoors
–
When
not
in
use,
appliances
should
be
stor
ed
indoors
in
a
dry
and
high
or
locked-up
place
out
of
the
r
each
of
childr
en.
SA
V
TH S
INSTRUCTIONS
3

4

10
5

6

Unpacking
Carton
Contents
•
Electric
pole
chain saw
• 8 in.
(20.3
cm)
Or
egon chain
• 8 in.
(20.3
cm)
Or
egon
guide
bar
•
Dual-tipped
hex
key
wr
ench/blade
scr
ewdriver
•
Cutting
bar
sheath
•
Manual
1.
Car
efully remove
the
pole
chain saw
and
check
to
see
that
all
of
the
above
items
ar
e
supplied.
2.
Inspect
the
pr
oduct
car
efully
to
make sur
e
no
br
eakage
or
damage
occurr
ed
during
shipping.
NOT :
Do
not
discar
d
the
shipping
carton
and
packaging
material
until
you
ar
e
r
eady
to
use
your new
electric
pole
chain saw.
The
packaging
is made
of
r
ecyclable
materials.
r
operly
dispose
of
these
materials in
accor
dance
with
local
regulations.
IMPOR
T
ANT!
The
equipment
and
packaging
material
ar
e
not
toys.
Do
not
let
childr
en
play
with
plastic
bags,
foils,
or
small
parts.
These
items
can
be
swallowed
and
pose
a
suffocation
risk!
Assembly
Installing/Replacing
the
Guide
Bar and
Chain
T
ools
and
supplies
requir
ed:
•
Dual-tipped
hex
key
wr
ench/blade
scr
ewdriver
(supplied)
•
Heavy-duty
work
gloves
NOT :
When
r
eplacing
the
guide
bar
and
chain,
use
only
identical
r
eplacement
parts.
Make sur
e
the
pole
chain saw is
disconnected
fr
om
the
power
supply
befor
e
pr
oceeding
with
installation.
1. Using
the
supplied
flat-tip
blade
scr
ewdriver, remove
the end
cover
nut
cap
fr
om
the
chain/spr
ocket
end
cover
to
expose
the
end
cover
nut
(Figs.
1
&
2).
TIP:
When
r
eplacing
the
chain, slide
on
the
cutting
bar
sheath
temporarily
for
added
pr
otection.
Fig.
1
nd
cover
nut
cap
Blade
scr
ewdriver
Fig.
2
W
ARNING!
Always
wear
heavy-duty
gloves when
handling
the
bar
and
chain.
Mount
the
bar
and
chain
very
car
efully
so
as
not
to
impair
the
safety
and
efficiency
of
the
machine.
W
ARNING!
Unpacking
and
assembly
should
be
completed
on
a
flat
and
stable
surface,
with
adequate
space
for
moving
the
machine
and
its
packaging.
DANG R!
Never
start
the
motor
befor
e
installing
the guide
bar
, chain,
and
chain
cover
.
Without
all
these
parts
in
place,
the
clutch
can
fly
off
or
explode,
exposing
the
user
to
potentially
serious
injuries.
W
ARNING!
T
o
avoid
serious
personal injury, r
ead
and
understand
all
safety
instructions
pr
ovided.
W
ARNING!
Befor
e
performing
any
maintenance, make sur
e
the
tool
is
unplugged
fr
om
the
power
supply
.
Failur
e
to
heed
this
war
ning
could
result in
serious
personal injury.
nd
cover
nut
nd
cover
nut
cap
2. Using
the
supplied
hex
key
wr
ench,
unscrew
the
end
cover
nut
and
remove
the
chain/spr
ocket
end
cover
(Figs.
3
&
4).
Fig.
3
nd
cover
nut
Hex
key
wr
ench
7

Fig.
4
6.
Starting
at
the
tip,
mount
the
chain drive links
into
the
bar
gr
oove,
leaving
a
loop
at
the
back
of
the
bar
.
The
chain
will
loosely
fit
until
it
is
placed
on
the
spr
ocket.
(Figs.
7
&
8)
NOT :
Make
certain
of
the
dir
ection
of
the
chain .
If
the
chain is
mounted
backwards,
the
saw
will
vibrate
abnormally
and
will
not
cut.
Fig.
7
Chain/spr
ocket
end cover
3.
Remove
the
cutting
bar
and
chain
fr
om
the
mounting
surface
(Fig.
5).
Fig.
5
Fig.
8
Chain
Cutting
bar
4.
Remove
the
old
chain
fr
om
the
bar
.
5.
Lay
out
the
new saw chain in
a
loop
and
straighten
any
kinks.
THE
SHARP
SIDE
OF
THE
TEETH
MUST
F
ACE
A
W
A
Y
FROM
YOU
IN
THE
DIRECTION
OF
THE
CHAIN
ROT
A
TION
INDICA
T D
ON
TH GUID
BAR
. If
the
teeth
face
backwards,
tur
n
the
loop
over
(Fig.
6).
Fig.
6
Loop
8.
Hold
the
chain in
position
on
the
bar
and
place
the
loop
ar
ound
the
spr
ocket.
Fit
the
bar
flush against
the
mounting
surface
so
that
the
bar
studs
ar
e
in
the
long
slot
of
the
bar
and
the
adjusting
pin
is in
the
chain
tension
pin
hole
(Fig.
9
).
Sharp
cutting
edge
Chain
drive
link
Chain
rotation
Fig.
9
Spr
ocket
Bar
studs
Chain
tension
pin
hole
(with
adjusting
pin)
8

9.
Adjust
the
chain
tension
as
needed
by
adjusting
the
chain tensioner
scr
ew
with
the
supplied
flat
-
tip
blade
scr
ewdriver. Make sur
e
to
align
the
chain tensioner
scr
ew
with
the
pin
hole
(Fig.
10).
Fig.
12
Fig.
10
Chain
tensioner
Chain
tensioner
scr
ew
Blade
scr
ewdriver 12. Tighten
the
end
cover
nut
using
the
hex
key
wr
ench
(Fig.
11
)
, then replace
the
end
cover
nut
cap
to
secur
e
the
chain/spr
ocket
end
cover
(Fig.
13).
10.
Replace
the
chain/spr
ocket
end
cover
by
inserting
the
r
ear
tab
first
into
the
r
ear
tab
slot
and
position
the
cover
onto
the
saw
head.
Tighten
the
end
cover
nut
,
but
leave
the
bar
fr
ee
to
move
for
tension
adjustment
(Fig.
11).
Fig.
13
nd
cover
nut
cap
Fig.
11
Rear
tab
Chain/spr
ocket
end cover
Chain/spr
ocket
end cover
nd
cover
nut
NOT :
If
the
chain is
too
tight,
it
will
not
r
otate.
Loosen
the
end
cover
nut
slightly
and
tur
n
the
chain tensioner
1/4
tur
n
counterclockwise.
Lift
the
tip
of
the
guide
bar
up
and
r
etighten
the
end
cover
nut.
Ensur
e
that
the
chain
can
be
r
otated
by
hand
without
binding.
11.
Remove
all
slack
fr
om
the
chain
by
tur
ning
the
chain
tensioner
scr
ew
clockwise
until
the
chain
seats
snugly
against
the
bar
with
the
drive links in
the
bar
gr
oove
(Fig.
12
).
NOT :
The
chain is
corr
ectly
tensioned
when
ther
e
is
no
sag
on
the
underside
of
the
guide
bar;
the
chain is snug,
but
can
be
r
otated
by
hand
without
binding.
For
mor
e
information
on
chain
tensioning,
see
the
maintenance
section
beginning
on
pg.
12.
NOT :
A
new chain
tends
to
str
etch;
check
the
chain
tension
fr
equently,
and
adjust
tension
as
requir
ed.
Operation
Starting and
Stopping
CAUTION!
•
Befor
e
starting
the
saw, remove
the
oil
tank
cap
and
add
bar
&
chain
oil
to
the
top
of
the
oil
level
window
(Fig.
14
).
One
minute
of
use
will
consume
appr
oximately
0.15
fl
oz
(5
ml)
of
oil.
Refill
when
the
oil
level
dr
ops
to
1/4
of
a
tank.
NOT :
Y
our
electric
p
ole
chain s
aw
is
equipped
with
an
automatic
oil
pump
for
bar
and
chain
oiling.
Y
ou
must
add
bar
and
chain
oil
or
your
pole
chain saw
will
not
function.
9

Fig.
14
Oil
level
window
MI
N
Oil
tank
cap
Minimum
level
mark
W
ARNING!
Failur
e
to
lubricate
the
chain
will
cause
damage
to
the
bar
and
chain.
Use
only
a
good
quality
bar
and
chain
oil
designed
specifically
for
use
with
chain saws.
One
minute
of
use
will
consume
appr
oximately
0.15
fl
oz.
(5
ml)
of
oil.
NOT :
It
is normal
for
oil
to
seep
fr
om
the
saw when
not
in
use.
T
o
pr
event
seepage,
empty
the
oil
tank
after
each
use.
When
storing
the
unit
for
a
long
period
of
time
(3
months
or
longer),
be
sur
e
the
chain is
lightly
lubricated;
this
will
pr
event
rust
on
the
chain
and
bar
spr
ocket.
W
ARNING!
Be
awar
e
of
the
cor
d
while
operating
the
saw. Keep
the
cor
d
away
fr
om
the
chain. Be
car
eful
not
to
trip
over
the
extension
cor
d.
•
Starting,
stopping,
and
r
estarting
an
electric
motor
repeatedly
within
a
few
seconds
can
generate
a
gr
eat
deal
of
heat
and
damage
the
motor
.
T
o
pr
otect
the
life
of
your
e
lectric
p
ole
chain s
aw
,
always
wait
at
least five
seconds
after
stopping
befor
e
r
estarting
the
saw.
W
ARNING!
Be
certain
that
the
chain is
not
in
contact with
any
object
when
you
start
the
motor
.
W
ARNING!
Keep hands
away
fr
om
chain. Keep hands
on
handles.
Do
not
overr
each.
Fig.
15
KICKBACK
DANG R
ZON
A
good,
firm
grip
on
the
tool
using
both
hands
will
help
you
maintain
contr
ol.
When
using
the
pole
chain saw,
place
one
hand
on
the
fr
ont
handle
foam
grip
and
the
other
hand
on
the
r
ear
handle
with
your
thumbs
and
fingers encir
cling
the
pole
and
handle.
A
firm
grip
combined
with
pr
oper
positioning
of
the
handle
against your
body
will
help
you
maintain
contr
ol
of
the
saw. Do
not
let
go
of
the
pole
chain saw while
it
is in
operation.
W
ARNING!
Do
not
operate
the
pole
chain saw in
a
tr
ee,
on
a
ladder
,
or
on
a
scaffold.
Using
the
tool
under
such
cir
cumstances
is
extr
emely
danger
ous.
CAUTION!
The
chain
will
continue
to
run
for
several
seconds
after
tur
ning
off
the
tool.
Do
not
use
the
pole
chain saw under
wet
conditions.
Use
extr
eme
caution
when
cutting
small
brush,
saplings,
or
limbs
under
tension
because
slender
and
tense material may
catch
the
saw
and
be
whipped
towar
d
you,
pull
you
off
balance,
or
spring
back.
Do
not
use
the
pole
chain saw
to
cut
vines
and/or
small
underbrush.
W
ARNING!
Do
not
let
familiarity
with
this
type
of
tool pr
event
you
fr
om
taking
all
necessary
pr
ecautions.
Remember
that
a
car
eless
fraction
of
a
second
is
sufficient
to
inflict
serious
injury.
W
ARNING!
Do
not
cut
tr
ees
near
electrical
wir
es.
W
ARNING!
Kickback
may
occur
when
the
moving
chain
contacts
an
object
at
the
upper
portion
of
the
tip
of
the
guide
bar
or
when
the
wood
closes
in
and
pinches
the
chain saw in
the
cut
(Fig.
15).
Contact
at
the
upper
portion
of
the
tip
of
the
guide
bar
can
cause
the
chain
to
dig
into
the
object
and
stop
the
chain
for
an
instant.
The
result is
a
lightning-fast
r
everse
r
eaction,
which
kicks
the
guide
bar
up
and
back
towar
d
the
operator
. If
the
chain saw is
pinched
along
the
top
of
the
guide
bar
,
the
guide
bar
can
be
driven
rapidly
back
towar
d
the
operator
.
Either
of
these
r
eactions
can
cause
loss
of
saw
contr
ol,
which
can
thr
ow
the
operator
off
balance
and
result in
serious
injury. Do
not
r
ely
exclusively
upon
the
safety
devices
built
into
the
saw.
As
a
user
,
you
should
take
several
pr
ecautions
to
keep your
cutting
jobs
fr
ee
fr
om
accident
or
injury.
1. rior
to
each
cutting
session, run
thr
ough
the
daily
checklist
(see
pg.
15).
2.
Connect
the
electric
pole
chain saw
to
a
working
120
V
outlet
using
a
heavy-duty
outdoor
extension
power
cor
d.
3. Make
a
loop
in
the
power
cor
d
and
push
it
up
thr
ough
the
hole
in
the
handle
and
ar
ound
the
cor
d
r
estraint
hook
(Fig.
16),
then
connect
the
extension
cor
d
to
the
appliance
cor
d.
10

4.
T
o
tur
n
the
tool
ON,
push
and
hold
the
safety
lock
button
(located
on
the
r
ear
handle)
with
your
thumb
and
then
squeeze
the
trigger
with
your fingers. Once
the
tool
is
running,
you
can
r
elease
the
safety
lock
button
(Fig.
16).
Fig.
16
Safety lock button
Cor
d
restraint
4.
Lock
the
pole
in
position
by
closing
the
cam-lock
(Fig.
19),
and
ensur
e
that
the
pole
is secur
e.
If
the
pole
telescopes
when
the
cam-lock
is
closed,
the
nut
may
need
tightening
.
Fig.
19
Cam-lock
Trigger
switch
5.
T
o
tur
n
the
tool
OF
F
, r
elease
the
trigger
switch
(Fig.
16)
.
NOT :
Do
not
pr
ess
the
trigger
switch
until
you
ar
e
r
eady
to
make
a
cut.
Adjusting
the
T
elescoping
Pole
1.
Disconnect
the
saw
fr
om
the
power
supply
.
2.
Unclip
the
cam-lock
to
r
elease
the
pole
(Fig.
17).
Fig.
17
Cam-lock
3. Extend
the
pole
to
the
desir
ed
length
(Fig.
18)
.
NOT :
ush
poles
towar
d
each
other
to
shorten
the
pole
or
pull
them
away
fr
om
each
other
to
lengthen
the
pole.
Only
extend
the
pole
to
the
minimum
length
requir
ed
to
r
each
the
limb
to
be
cut.
Fig.
18
Telescopic pole
W
ARNING!
Failur
e
to
lock
the
telescopic
pole
cam-lock
as
directed
could
result in personal injury.
Tightening
the
Bolt
The
retaining
bolt
may
need
tightening
to
secur
e
the
telescopic
pole
in
place.
1.
Unclip
the
cam-lock.
Using
the
hex
key
wr
ench,
tighten
the
cam-lock
nut,
then
close
the
cam-lock.
Ensur
e
that
the
pole
is secur
e.
The
wr
ench may
be
requir
ed
to
loosen
the
cam-lock
nut
if
you
need
to
adjust
the
pole
to
a
different
height
(Fig.
20).
Fig.
20
Hex
key
wr
ench
Cam-lock
nut
Adjusting
the
Multi-Angle
Head
The
pole
chain saw
head
can
be
r
otated
for
different
cutting
angles
fr
om
0º
to
30º.
1.
Disconnect
the
pole
chain saw
fr
om
the
power
supply
.
2.
T
urn
the
multi-angle
head
adjustment
dial
counterclockwise
to
loosen
the
head
(Fig.
21).
11

Fig.
21
•
The
most
typical
cutting
application
is
to
position
the
unit
at
an
angle
of
60°
or
less
depending
on
the
specific
situation
(Fig.
24
).
As
the
angle
of
the
pole
chain saw
shaft
to
the
ground
incr
eases,
the
difficulty
of
making
the
first
cut
(fr
om
the
underside
of
limb)
incr
eases.
Fig.
24
Multi-angle
head adjustment
dial
3.
Adjust
the
head
to
the
desir
ed
position
(Fig.
22).
60º
MAXIMUM
Fig.
22
4.
T
urn
the
dial
clockwise
to
tighten
and
secur
e
the
head
in
place
(Fig.
23).
Fig.
23
NOT :
Failur
e
to
pr
operly
secur
e
the
head
adjustment
dial
may result in personal injury
and/or
pr
operty
damage.
Cutting
Tips
Proper Cutting
Stance
•
Balance
your
weight
with
both
feet
on
solid
ground.
•
Y
our
body
should
always
be
to
the
left
of
the
chain
line.
Basic
Cutting Procedur
e
This
unit
is
designed
for
trimming
small branches
and
limbs
up
to
7.5 in.
(19.1
cm)
in diameter
depending
on
the
wood
type.
ractice
cutting
a
few
small
limbs
using
the
following
technique
to
get
the
“feel”
of
using
the
saw
befor
e
you
begin
a
major
sawing
operation.
•
T
ake
the
pr
oper
stance
in
fr
ont
of
the
tr
ee
with
the
saw
OFF
(Fig.
24
).
•
Squeeze
the
trigger
and
let
the
chain accelerate
to
full
speed
befor
e
entering
the
cut.
• Keep
the
saw running
the
entir
e
time
you
ar
e
cutting;
maintain
a
steady
speed.
•
Allow
the
chain
to
cut
for
you;
exert only
light
downwar
d
pr
essur
e.
If
you
for
ce
the
cut,
damage
to
the
bar
, chain,
or
unit
can
result.
• PUSH and
PULL
–
This
r
eaction
for
ce
is
always
opposite
to
the
dir
ection
the
chain is
moving
when
it
is in
contact
with
the
wood.
Thus,
the
operator
must
be
r
eady
to
contr
ol
the
PULL
when
cutting
on
the
bottom
edge
of
the
bar
,
and
PUSH when
cutting
along
the
top
edge.
• Do
not
put
pr
essur
e
on
the
saw
at
the
end
of
the
cut.
Pruning
runing is
the
pr
ocess
of
trimming
limbs
fr
om
a
live
tr
ee.
•
Remove
long
branches in
several
stages.
•
Cut
lower
branches
first
to
allow
the
top
branches
mor
e
r
oom
to
fall.
•
When
pruning
tr
ees,
it
is
important
not
to
make
the
finishing
cut
next
to
the
main
limb
or
trunk
until
you
have
cut
off
the
farthest
lying
limb.
This
will
r
educe
the
weight
and
pr
event
stripping
the
bark
fr
om
the
main
member
.
• Under
cut
the
branch
1/3
thr
ough
for
your
first
cut.
Y
our
second
cut
should
over
cut
to
drop
the
branch
off
(Fig.
25
).
Be
pr
epar
ed
to
balance
the
weight
of
the
p
ole
chain s
aw
when
the
limb
falls.
12

First
Cut
Load
Second
Cut
Either
of
these
r
eactions
can
cause
loss
of
saw
contr
ol,
which
can
result in
serious
injury. Do
not
r
ely
exclusively
upon
the
safety
devices
built
into
the
saw.
As
a
pole
chain saw
user
,
you
should
take
several
steps
to
keep your
cutting
jobs
fr
ee
fr
om
accident
or
injury.
T
ake
the
following
pr
ecautions
to
minimize
kickback:
•
Befor
e
you
start
the
unit,
make sur
e
the
p
ole
chain s
aw
is
1/3
Diameter
Finishing
Cut
Fig.
25
•
Now
make your
finishing
cut
fr
om
the
topside
of
the
branch
smoothly
and
neatly
against
the
main
member
so
the
bark
will
gr
ow
back
to
seal
the
wound.
•
Release
the
trigger
ON/OFF
switch
as
soon
as
the
cut
is
completed.
Failur
e
to
follow
pr
oper
cutting
pr
ocedur
es
will
result in
the
bar
and
chain
binding
and
becoming
pinched
or
trapped
in
the
limb.
Limbing
Limbing
is
the
pr
ocess
of
removing branches
fr
om
a
fallen
tr
ee.
•
Y
ou
should
cut
limbs
one
at
a
time.
Remove
the
cut
limbs
fr
om
the
work
ar
ea
often
to
help keep
the
work
ar
ea
clean
and
safe.
•
Cut
branches under
tension
fr
om
the
bottom
up
to
avoid
binding
the
p
ole
chain s
a
w.
• Keep
the
tr
ee
between
you
and
the
p
ole
chain s
aw
while
limbing.
Cut
fr
om
the
side
of
the
tr
ee
opposite
the
branch you
ar
e
cutting.
If
the
Saw
Becomes
Pinched
or T
rapped
1.
W
ait
for
the
blade
to
stop,
wait
five
minutes
for
the
saw
to
cool,
unplug
the
power
cor
d
,
and
wear
gloves
to
pr
otect
your hands
fr
om
the
chain
teeth.
2. If
you
can
r
each
the
limb
fr
om
the
ground,
lift
the
limb
while
holding
the
saw.
This
should
r
elease
the
“pinch”
and
fr
ee
the
saw.
3. If
the
saw is
still
trapped,
call
a
pr
ofessional
for
assistance.
Minimize
Kickback
Kickback
may
occur
when
the
moving
chain
contacts
an
object
at
the
upper
portion
of
the
tip
of
the
guide
bar
or
when
the
wood
closes
in
and
pinches
the
pole
chain saw in
the
cut.
Contact
at
the
upper
portion
of
the
tip
of
the
guide
bar
can
cause
the
chain
to
dig
into
the
object
and
stop
the
chain
for
an
instant.
The
result is
a
lightning-fast
r
everse
r
eaction,
which
kicks
the
guide
bar
up
and
back
towar
d
the
operator
. If
the
pole
chain saw is
pinched
along
the
top
of
the
guide
bar
,
the
guide
bar
can
be
driven
rapidly
back
towar
d
the
operator
.
not
contacting
any
object.
•
Always
grip
the
pole
and
handle
firmly
with
both
hands
when
the
unit
is running.
lace
one
hand
on
the
pole
and
your
other
hand
on
the
molded
handle
with
your
thumbs
and
fingers encir
cling
the
pole
and
handle.
A
firm
grip
combined
with
pr
oper
positioning
of
the
handle
against
your
body
will
help
you
maintain
contr
ol
of
the
saw
if
kickback
occurs.
• Make sur
e
that
the
ar
ea
in
which
you
ar
e
cutting
is
fr
ee
fr
om
obstructions.
• Do
not
let
the
kickback
danger
zone
ar
ea
of
the
guide
bar
contact
a
log,
branch,
fence,
or
any
other
obstruction
that could
be
hit
while
you
ar
e
operating
the
pole
chain
s
aw
(Fig.
15
).
•
Always
cut
with
the
unit
running
at
full
speed.
Fully
squeeze
the
ON/OFF
trigger
and
maintain
a
steady
cutting
speed.
•
W
ear
non-slip
gloves
for
maximum
grip
and
pr
otection.
• Extend
the
p
ole
only
to
the
length
requir
ed
to
r
each
the
limb
cut.
Do
not
extend
the
r
ear
h
andle
above
waist
height.
W
ARNING!
For
your safety
and
that
of
others:
• Corr
ect
maintenance is
essential
to
maintain
the
original
efficiency
and
safety
of
the
machine
over
time.
• Keep
all
nuts,
bolts
,
and
scr
ews
tight
to
be
sur
e
the
equipment
is in
safe
working
condition.
•
Never
use
the
machine
with
wor
n
or
damaged
parts.
Damaged
parts
ar
e
to
be
r
eplaced
and
never
r
epair
ed.
•
Only
use
original r
eplacement
parts.
arts
that
ar
e
not
of
the
same
quality
can
seriously
damage
the
equipment
,
compr
omise safety,
and
invalidate
the
warranty.
13

W
ARNING!
A
lways
unplug
the
power
cor
d
befor
e
performing
any
adjustments,
maintenance,
or
r
epairs
to
your
pole
chain saw.
•
Use
pr
otective
gloves when handling
the
bar
and
chain.
• Keep
the
bar
encased in
its
sheath,
except
when
working
dir
ectly
on
the
bar
or
the
chain.
•
Never
dispose
of
oils
or
other
polluting
materials in
unauthorized
places.
Motor
Cooling
T
o
avoid
overheating
and
damage
to
the
motor
,
always
keep
the
cooling
air
vents
clean
and
fr
ee
of
sawdust
and
debris.
Chain
T
ension
Check
the
chain
tension
befor
e
using
the
saw when
the
chain is
cold.
The
corr
ect
tension
of
a
cold
chain is when
ther
e
is
no
slack
on
the
underside
of
the
guide
bar;
the
chain is snug,
but
you
can
r
otate
it
by
hand
without
binding.
During normal saw
operation,
the
temperatur
e
of
the
chain
will
incr
ease.
The
drive links
of
a
corr
ectly
tensioned
warm
chain
will
hang
appr
oximately
0.050 in.
(1.25
mm)
out
of
the
bar
gr
oove
(Fig.
26).
Be
awar
e
that
a
chain
tensioned
while
warm,
may
be
too
tight
upon
cooling.
Check
the
“cold
tension”
befor
e
next
use.
The
chain
must
be
r
e-tensioned
whenever
the
flats
on
the
drive links
hang
out
of
the
bar
gr
oove
(Fig.
26).
Fig.
26
Pr
operly
Adjusted
W
arm
Chain
Flats
ar
e
not
visible
her
e
Appr
oximately
.050
in.
(1.25
mm)
Chain
Needs
T
ensioning
Flats
ar
e
visible
her
e
NOT :
A
new chain
tends
to
str
etch.
Check
the
chain
tension
fr
equently
and
r
e-tension
as
needed.
Nuts and Scr
ews
eriodically
check
that
all
the
nuts
and
scr
ews
ar
e
tightened
secur
ely
.
Check
that
the
cam-lock
that
contr
ols
the
telecoping
pole
is
intact
and
in
pr
oper
working
or
der
.
Chain
Sharpening
W
ARNING!
T
o
ensur
e
that
the
chain saw
works
safely
and
efficiently
,
it
is
essential
that
the
cutting
components
ar
e
well-sharpened.
It
is
highly
r
ecommended
to
r
eplace
the
chain
once
it
loses
its
ability
to
cut
cleanly
and
safely
.
It
is
possible,
however,
to
sharpen
the
existing
chain
if
the
sharpening is
car
efully
performed.
Any
work
on
the
chain
and
bar
requir
es
specific
experience
and
special
tools.
Sharpening
is
necessary
when:
•
the
sawdust
looks
like
dust;
•
c
utting
becomes
mor
e
difficult
;
•
t
he
cut
is
not
straight
;
• v
ibrations
incr
ease.
An
authorized
service
center
will
sharpen
the
chain using
the
right
tools
to
ensur
e
minimum
removal
of
material
and
even
sharpness
on
all
the
cutting
edges.
If
you
sharpen
the
chain yourself,
use
special
r
ound-section
files
with
the
right
diameter
depending
on
the
type
of
chain
(see
“Chain
Maintenance
T
able”
pg.
15).
Y
ou
need
a
certain
amount
of
skill
and
experience
to
avoid
damaging
the
cutting
edges.
Sharpen
the
chain
as
follows
(Fig.
27):
• Secur
e
the
bar
firmly
,
with
the
chain
mounted,
in
a
suitable
vice.
• Tighten
the
chain
if
it
is loose.
•
Mount
the
file in
the
guide
and
then insert
it
in
the
tooth
at
a
constant
angle
fr
om
the
cutting
edge.
•
Sharpen
in
a
forwar
d
motion
a
few
times
and
repeat
this
on
all
the
cutting
edges
facing
the
same
way
(right
or
left).
•
T
o
move
the
chain
forwar
d,
use
a
scr
ewdriver.
•
T
urn
the
bar
over
in
the
vice
and
repeat
on
all
the
other
cutting
edges.
•
Check
that
the
depth
limiter
tooth
does
not
stick
out
f
a
rther than
the
inspection
tool
and
file
any
pr
ojecting parts
with
a
flat
file, r
ounding
off
the
edges
(Fig.
27
).
• After sharpening, remove
all
traces
of
filing
and
dust
and
lubricate
the
chain in
an
oil
bath.
Replace
the
chain
whenever:
–
the
length
of
the
cutting
edges
decr
eases
to
5
mm
or
less;
–
ther
e
is
too
much
play
between
the
links
and
the
rivets.
14

Pr
oblems
Corrective
Action
The
saw
motor
fails
to
start
•
Check
that
you
installed
the
extension
cor
d
pr
operly
into
the
pole
saw
power
cor
d
r
eceptacle
and
that
you
plugged
the
extension
cor
d
into
a
live
120
V
outlet.
• Make sur
e
that
you
fully
depr
ess
and
hold
the
safety
lock
button
befor
e
squeezing
the
ON/OFF
trigger
switch.
The
saw
runs,
but
the
chain
speed
is
low
•
The
chain is
too
tight;
r
e-tension.
Bar
and
chain
running
hot
and
smoking
•
The
chain
tension
is
too
tight;
r
e-tension.
•
The
chain
oil
tank
is
empty;
refill.
•
The
lubrication
holes
ar
e
plugged;
clean
them
out.
The
saw
motor
runs,
but
the
chain
is
not
tur
ning
•
The
chain
tension
is
too
tight;
r
e-tension.
•
The
guide
bar
or
chain is
damaged;
inspect
and
replace
the
damaged
part.
Fig.
27
Fig.
28
<
0.5
mm
Cutting
edge
Inspection tool
Depth
limiter
tooth Tr
oubleshooting
Tr
oubleshooting
Tips
Most
difficulties
ar
e
easy
to
fix.
Consult
the
tr
oubleshooting
table
for
common
pr
oblems
and
their
solutions.
Guide
Bar
Maintenance
Depth
limiter
tooth
.
W
ARNING!
Always
unplug
the
power
cor
d
befor
e
performing
any
adjustments,
maintenance,
or
r
epairs
to
your
pole
chain saw.
When
the
guide
bar
shows
signs
of
wear
,
tur
n
it
over
on
the
saw
to
distribute
the
wear
for
maximum
bar
life.
Feathering
or
burring
of
the
bar
rails
is
a
normal
pr
ocess
of
bar
wear
.
Y
ou
should
smooth
such
faults
with
a
file
as
soon
as
they
occur
.
Replace
a
bar
with
any
of
the
following
faults:
•
wear
inside
the
bar
rails
permitting
the
chain
to
lay
over
sideways
•
bent
guide
bar
•
cracked
or
br
oken
rails
•
spr
ead
rails
T
urn
the
saw
over
,
check
the
underside
of
the
guide
bar
,
and
make sur
e
that
the
lubrication
holes
and
chain
gr
oove
ar
e
fr
ee
fr
om
impurities.
Chain
Spr
ocket
Regularly
check
the
condition
of
the
spr
ocket
and
replace
it
when
wear
exceeds 0.5
mm
(Fig.
28).
Do
not
mount
a
new chain
with
a
wor
n
spr
ocket
or
vice-versa.
Tr
oubleshooting
Table
15

Chain
Maintenance
Table
Chain
Pitch
Limiter
Tooth
Level
(a)
File
Diameter
(d)
a
d
inches
mm
inches
mm
inches
mm
3/8
Mini
9.32 0.018 0.45
5/32
4.0
0.325
8.25
0.026
0.65
3/16
4.8
3/8
9.35 0.026 0.65
13/64
5.2
0.404 10.26 0.031 0.80
7/32
5.6
Daily
Checklist,
Cleaning
and
Storage
Daily
Checklist
T
o
help maintain your
electric
pole
chain saw
for
optimum
performance,
we
r
ecommend
you
complete
this
checklist
prior
CAUTION!
•
Remove
the
power
cor
d
and
wait
at
least five
minutes
for
the
saw
to
cool
befor
e
servicing
or
storing
your
unit.
•
I
f
you
drop
the
saw,
car
efully
inspect
it
for
damage. If
the
guide
bar
is
bent,
the
housing
is
cracked,
the
handle
is
br
oken,
or
if
you
see
any
other
condition
that
may
affect
the
saw’
s
operation,
DO
NOT
US
the
tool.
to
each
work
session.
W
ARNING!
Do
not
plug
in
the
power
cor
d
until
you
have
completed
all
of
the
daily
checks.
•
Inspect
for
any
visible damage
to
the
chain,
guide
bar
,
or
motor
housing.
•
Inspect
the
oil
port
and
guide
bar
rails
and
clean
them
to
remove
any
debris.
•
Check
the
chain
tension.
•
Check
the
chain
teeth
for
sharpness.
•
Check
the
bar
and
chain
oil
level;
fill
with
only new chain
oil
specifically
formulated
for
chain saws.
NOIS S:
If
you
notice
anything
unusual,
such
as
a
vibration
or
odd
sound,
shut
the
saw
OFF
immediately
.
Remove
the
power
cor
d
and
check
the
saw
for
any
damage.
Cleaning
Use
only
mild
soap
and
a
damp
cloth
to
clean
the
pole
chain
saw.
Never
let
any
liquid
get
inside
the
motor
housing
and
N V R
immerse
any
part
of
the
saw
housing
in
liquid.
Storage
•
Ensur
e
that
the
guide
bar
cover
is in
place
when
storing.
• Do
not
stor
e
the
pole
chain saw
near
chemicals,
such
as
fertilizers
or
other
harsh
solvents. Do
not
expose
the
plastic
parts
of
the
unit
to
brake
fluids,
gasoline,
petr
oleum-based
products,
penetrating
oils,
or
the
like.
These
products
ar
e
often
highly
corr
osive
and
may
cause
permanent damage,
weaken,
or
destr
oy
the
plastic
parts
of
your
pole
chain saw.
•
When
not
in
use,
your
electric
p
ole
chain s
aw
should
be
stor
ed
indoors
in
a
dry
and
high
or
locked-up
place,
out
of
the
r
each
of
childr
en.
16

17

WARRANTY POLICY
Congratulations on your purchase of Jobmate Electric Pole Saw. In order to get maximum benefit
from your new purchase, please be aware of the warranty provisions outlined in this document.
2 YEAR [REPLACEMENT/REPAIR] WARRANTY
our Jobmate Electric Pole Saw is guaranteed for a period of 24 months from the original date of
purchase. As the product is intended exclusively for home DI (Do It ourself) use, thus use of
this product for professional, industrial or high frequency use will VOID this warranty. If your
product is defective, it will be repaired or replaced in accordance with the terms of this warranty.
The warranty is provided by Mitre 10 (New Zealand) Limited (“known as Mitre 10”)
Rights & Remedies
We are dedicated to delivering a quality product to all our customers. All of our products are
warranted for two years from date of purchase against defects in material and workmanship.
If we determine that the product has a manufacturing fault, we will repair or replace it free of
charge to you. The decision to repair or replace is solely at the discretion of Mitre 10 (New
Zealand) Limited.
What do e require?
It is our requirement that all warranty claims are accompanied by a proof of purchase (sales
receipt) to allow verification of the date of purchase. Where proof of purchase is not provided,
Mitre 10 (New Zealand) Limited reserves the right to charge a service fee and/or charge for parts
replaced/repaired. A return freight charge may apply.
The warranty is ‘return to base’ and not a free in-home service. This means the customer is
responsible for any inwards freight charge to return the product to the Mitre 10 or Mitre 10 MEGA
store where the product was purchased from, for the warranty to be applicable.
Please retain your Proof of Purchase.
Only the original owner is covered by the manufacturer’s warranty and must have purchased the
product from a Mitre 10 or Mitre 10 MEGA store in New Zealand.
What is not covered under arranty?
• Professional, Industrial or high frequency use if the purpose of the tool is stated as DI
(Do It ourself) in the instruction manual.
18

• If the tool has been operated on a supply voltage other than that specified on the tool.
• If the tool has been operated with incorrect oil, fuel or fuel mix.
• If the tool shows signs of damage or defects caused by or resulting from abuse,
accidents or alterations.
• Failure to perform maintenance as set out within the instruction manual.
• Failure to correctly fit, adjust or sharpen the chain, blade or cutting attachment.
• If the tool is disassembled or tampered with in any way
• General wear and tear
• Servicing by an unauthorized service agent
• Any consumable parts
Exclusions
• Any consequential loss or damage to any person or property directly or indirectly as a
result of using product.
• The warranty is only valid in the country of purchase. If you file a warranty claim outside
of the country of purchase you will be charged fees by the local provider.
This product is covered by a 2 year warranty against manufacturing defects. For any said defect,
Mitre10’s warranty provisions will apply. For full warranty disclosure, please refer to enclosed
instructional manual.
This product is covered by a 2 year warranty
against manufacturing defects. For any said
defect, Mitre 10’s warranty provisions wi app y.
For fu warranty disc osure, p ease refer to
enc osed instructiona manua .
19
This manual suits for next models
1
Table of contents
Other jobmate Pole Saw manuals