JOBO Smartcam Nano User manual

1
Contents
CE regulatory notice..........................................................3
1Introduction...................................................................4
1.1
System requirements..............................................4
1.1.1 Connection to a Computer..............................4
1.1.2 Linking a mobile device..................................5
1.2
Features..................................................................5
1.3
Package contents....................................................6
1.4
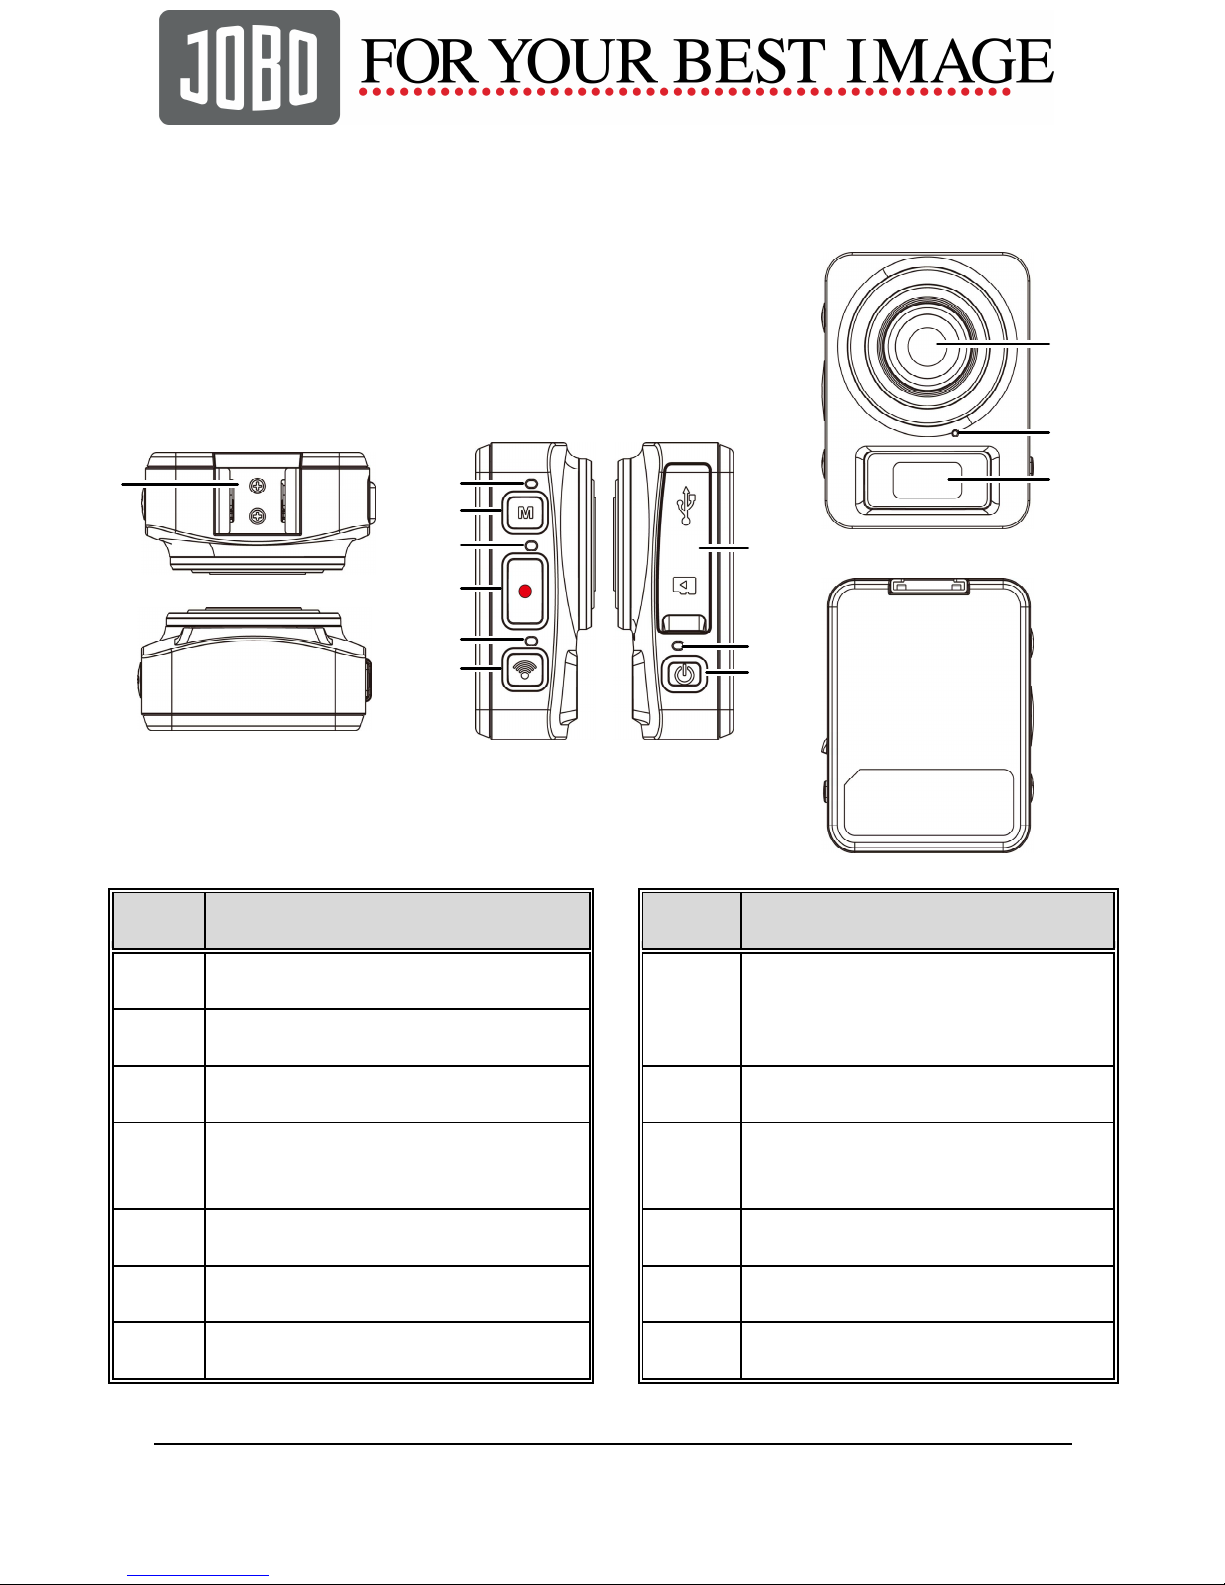
Product overview.....................................................7
1.5
Button operation......................................................8
2Getting started ..............................................................9
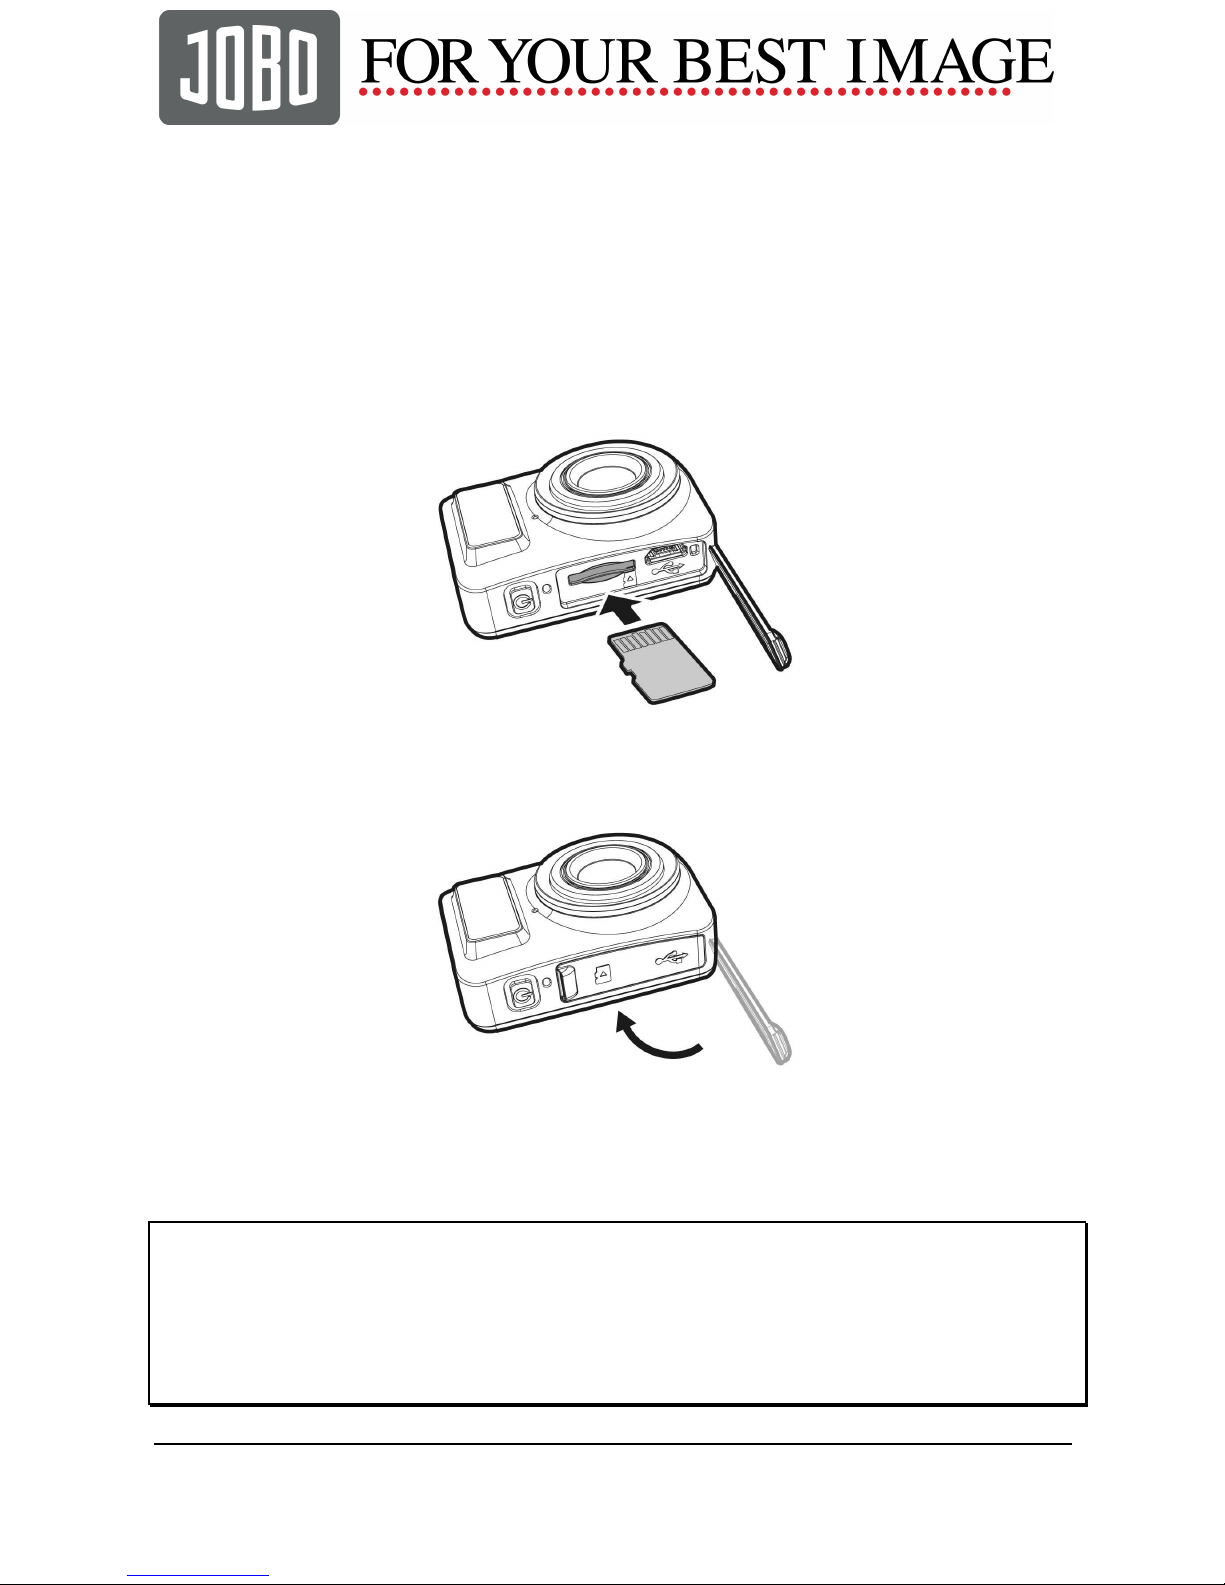
2.1
Inserting the memory card ......................................9
2.2
Charging the device..............................................10
2.2.1 Charging from a computer............................10
2.3
Definition of indicator lights...................................11
2.4
Information in LCM screen....................................13
2.5
Installing a mount..................................................15
2.5.1 Installing the clip mount & strap....................15
2.5.2 Installing the magnet mount .........................16
2.5.3 Installing the tripod mount ............................16
3Initial set up.................................................................17
3.1
Camera APP installation .......................................17
3.2
Wi-Fi connecting ...................................................18
4Using the Smart Cam APP .........................................19
4.1
Recording videos ..................................................19
4.1.1 The Recording screen..................................20

2
4.2
Shooting photos....................................................22
4.2.1 The Shooting screen ....................................23
4.3
Time lapse videos .................................................25
4.3.1 The Time lapse screen .................................27
4.4
Playback pictures and videos ...............................29
4.4.1 Viewing pictures............................................30
4.4.2 Playing videos ..............................................31
5Settings menu.............................................................33
5.1
Using the settings..................................................33
5.1.1 Menu items...................................................34
6onnecting to other devices........................................36
6.1
Connecting to the computer..................................36
7Installing the software................................................37
8Specifications .............................................................38

3
About this guide
This guide is also available in on the CD and on our website:
http://www.jobo.com/support
The manufacturer reserves the right to change the technical specifications
without prior notice.
CE regulatory notice
Our CE declaration may be requested from us by postal mail:
JOBO International GmbH, Kölner Str. 58a, 51645 Gummersbach, Germany.
Storage and maintenance:
Store the product in an environment of temperature range:
-20° ~ 60° C (-4° ~ 140° F) and humidity range: 0 ~ 90% RH]
only.
Never use any chemicals on the product for cleaning,
anti-rust, anti-fog, etc., or the waterproof capability may
deteriorate.
Make sure the waterproof cover of the USB / Memory card
slot is sealed tightly before rinsing the stain with low-pressure
running water, followed by wiping dry with a lint-free cloth or
leave it to air-dry.
To ensure the waterproof capability of the product, it is
suggested that you should replace the waterproof cover of
the USB / Memory card slot of the device on a yearly basis.
Take heed to prevent any impact of the product, otherwise
the casing or lens may become damaged, or the waterproof
capability may be eroded.

4
1 Introduction
Thank you for purchasing this camera. This device is specifically
designed for real time video and audio recording during leisure
activities.
1.1 System requirements
1.1.1 Connection to a Computer
For connection to a PC, be sure your PC meets the following
specifications:
For Windows:
•Windows XP SP2 / Vista / Win 7 / Win 8
•Processor with at least Pentium IV 3.2GHz / AMD Athlon FX
2.6GHz or higher
•2GB RAM at least
•NVIDIA GeForce 7600GT / ATI X1600 series or later
•USB port
•16-bit color display compatible monitor
(1280x1024, 32-bit color display recommended)
•250 MB of available hard disk space
•CD-ROM drive
For Macintosh:
•Mac OS 10.4 or higher
•Power Mac G3 or higher
•Minimum 256MB RAM
•110MB of available hard disk space
•USB port
•CD-ROM drive

5
1.1.2 Linking a mobile device
Linking a mobile device, be sure your mobile device meets the
following specifications:
For iOS operating system:
•Version: 6 / 7
•Product Name: iPhone4S / iPhone5 / iPhone5S / iPad / iPad2 /
New iPad (Retina display) / iPad Air
For Android operating system:
•Version: 4
•Brand Name: HTC / SONY / SAMSUNG / LG
•Screen Resolution: MDPI / HDPI
1.2 Features
•SONY 8MP CMOS sensor
•Full HD camcorder (1920x1080 @30fps)
•Wi-Fi Built-in
•4K MJPEG Time-Lapse video
•Complies with Class V of IEC waterproof classification (IPX5)
•The exclusive waterproof casing (optional) for the product
complies with IEC Class VIII (IPX8) specification
•Real-time live video preview via mobile device
(iOS / Android App)
•Self-timer function supported
•Support App / PC Edit Software

6
1.3 Package contents
The package contains the following items. In case there are any
missing or damaged items, contact your dealer immediately.
Standard:
Camera Strap
Micro USB cable CD-ROM Quick start
guide
Magnet mount Tripod mount Clip mount
Options:
Head mount Suction mount

7
1.4 Product overview
No.
Item
No.
Item
1 Bracket socket
8 Waterproof cover of the
USB / Memory card slot
2 Mode indicator light
3 Mode button
9 Power indicator light
4 Time lapse / Capture /
Recording indicator light
10 Power button
5 Record Button
11 Lens
6 Wi-Fi indicator light
12 Microphone
7 Wi-Fi button
13 LCM screen
Top and bottom views
Side (
l
eft and
r
ight)
v
iews
Front
v
iew
Rear view
1
11
12
8
13
10
3
5
7
2
4
6
9

8
1.5 Button operation
You can operate the camera alone without connecting to a mobile
device via Wi-Fi/App. See the table below for a description of each
button’s function.
Item
Function
Mode button Changing Modes (Timelapse / Capture / Recording
Mode)
Record button
•
••
•In Timelapse mode, press the Record button to
start recording a video. Press it again to stop
recording (When the device enters Power Saving
Mode and is in shutdown status, press the Power
button to stop recording).
•
••
•In Camera mode, press the Record button to
capture a photo.
•
••
•In Video mode, press the Record button to start
recording a video. Press it again to stop recording.
Wi-Fi button Press to turn the Wi-Fi on or off.
Power button •
••
•Press to turn the camera on or off.
•
••
•To reset, press and hold the Power button for at
least 5 seconds.
Note:
If you want the recorder to go back to the Default Setting, make sure the camera’s Wi-Fi is
turned off. Press and on-hold the Mode button, then press the Wi-Fi button, when the beep
tone is promoted, which indicates the completion of factory settings.

9
2 Getting started
2.1 Inserting the memory card
1. Open the waterproof cover of the USB / Memory card slot.
2. Insert the memory card with the gold contacts facing the front
of the device. Push the memory card until it clicks into place.
3. Make sure the waterproof cover of the USB / Memory card slot
is sealed tightly, to achieve normal activity waterproofing.
4. To remove the memory card, push to eject the memory card
out of the slot.
Note:
1. Do not remove or insert the memory card when the device is turned on. This may damage
the device and memory card.
2. Please use a Class 10 or higher rating Micro SD card, max up to 32GB.
3. Please format the micro SD card before initial use.

10
2.2 Charging the device
2.2.1 Charging from a computer
1. Open the waterproof cover of the USB / Memory card slot.
2. Connect the micro USB cable into the port on the device.
3. Connect the other end of the micro USB cable to an available
USB port on your computer.
4. On completion of charging, make sure the waterproof cover of
the USB / Memory card slot is sealed tightly, to achieve normal
activity waterproofing.

11
2.3 Definition of indicator lights
1
3
4
2
No.
Item Status LED
indicator Sound effect
1
Mode
indicator light
Changing
modes Flash red One beep
Self-timer Flash red None
Time lapse
mode Flash red None
2
Time lapse /
Capture /
Recording
indicator light
Time lapse
Flash red One beep
(Time interval)
Capture Flash red One beep
Recording
Flash red One beep
3
Wi-Fi
indicator light
Wi-Fi on Red One beep
Wi-Fi off No
indication One beep

12
4
Power
indicator light
Power on Red None
Power off No
indication None
Power will
soon be out
Flash Red None
Charging Red None
Fully charged
No
indication None

13
2.4 Information in LCM screen
1
2
3
No.
Item Icon Description
1
Battery status
Full battery power
2/3 battery power
1/3 battery power
Out of battery power
Charging
2
Wi-Fi status
Wi-Fi on
Wi-Fi off
3
Status
Timelapse mode
Photo mode
Video mode
Memory card error (damaged, locked
or no card inside)

14
Memory card full
Connect with mobile
Enter USB mode when connected
with a computer
Power will soon run out

15
2.5 Installing a mount
2.5.1 Installing the clip mount & strap
1. Push the fixture latch gently
into the support receptacle
on the device, until the latch
clicks into position.
2. Tie the hanger string into
the hole on the top of the
fixing.
3. Make sure the hanger string is firmly fixed to the device. The
base of the fixture allows a 360° adjustment.

16
The other mounts are installed in similar fashion:
2.5.2 Installing the magnet mount
2.5.3 Installing the tripod mount

17
3 Initial set up
Install a micro SD card (class 10 or higher rating, max up to 32GB)
into the camera device.
3.1 Camera APP installation
The camera allows you to connect to the mobile devices via the APP.
When using for the first time, install the [Life Cam] App for your
mobile device.
1. Download Life Cam APP from Google Play or an App Store.
2. Install the APP.
APP Layout and Features may be changed
subject to different software versions. Please
refer to Google Play or APP Store for update.

18
3.2 Wi-Fi connecting
1. Press the Power button to switch on the equipment.
2. Press the Wi-Fi button to activate the wireless network.
3. Using the Wi-Fi function of the mobile device, search for the
equipment ID from the list. Each device has a unique ID no.:
i3XXXXXX (if the last 2 digits are the same as the last 2 digits
of your password, your device corresponds.)
4. Select and input Wi-Fi password (repeating the 4
numeral/letter on your LCM display twice will give you the Wi-Fi
password. E.g., if LCM display shows “1234”, you Wi-Fi
password will be 12341234.
For iOS / Android Users:
Using the mobile device [Settings] →[Wi-Fi] →[Select device
ID no.:i3XXXXXX] →[Enter the password] →[Connecting]
5. Execute the Life Cam App , device LCM display will show
, indicating the connection is established.
Note:
1. Make sure the Wi-Fi function of the equipment is activated and the mobile device is
receiving Wi-Fi signal before executing the Life Cam App, or the App will be exited.
2. The mobile device shall be within a maximum of a 10m distance from the equipment without
any buildings in between.
3. When the Wi-Fi function of the equipment is activated for 3 minutes without connecting with
your mobile device, or the connection is disconnected, the equipment will automatically stop
the Wi-Fi function and you will need to re-activate the Wi-Fi function.
4. We suggest that you should set the correct date and time for your mobile device before
using the equipment, so that the recorded video will be consistent with the date and time
settings of the mobile device.
5. After connecting the mobile device with the equipment, all the mode switch, Record and
Wi-Fi operation buttons of the equipment will be inoperable; all the operations shall be
carried out via the Life Cam App.
6. The language of the Life Cam App will be consistent with that of your mobile device, it shall
be the default language if it is not the built-in one.

19
4 Using the Smart Cam APP
4.1 Recording videos
You can use this feature to record your life story, travel diary, or
sports clips.
1. Touch the button to switch over to Video mode.
2. Touch the button to set video duration. (3 min. / 5 min. / 10
min. / 30 min.)
3. Touch the button to enable or disable Voice Record.
4. Press button to start recording a video.
5. Press button again to stop recording.
Note:
Prior to recording video, you may set Rotate View to alter the viewing angle of the recorded
video. See Using the Rotate View (
5.1.1).

20
4.1.1 The Recording screen
1
2
3
4
5
6
9
11
8
7
10
No.
Icon Item Description
1
Wi-Fi status Indicates the Wi-Fi status.
2
Battery status
Indicates the remaining battery
power.
3
Video duration
The device will follow the set recording
video length to store them as individual
files.
Touch to select the required video
duration.
Avai
lable options: 3 min. / 5 min. / 10
min. / 30 min.
4
Voice record Touch to select the required
voice
record setting.
Available options: On / Off
Table of contents
Other JOBO Camcorder manuals