Joni MaxiMix QuickChill User manual

Operating Manual
Kettle model:
-MaxiMix QuickChill / OptiMix QuickChill (AutoTemp 56)
-MultiMix / OptiMix / MaxiMix (AutoTemp 36 / 56)
-Multi / Opti / Maxi (AutoTemp 32)
-EasyMix (AutoTemp 36)
-Easy / EasyMobil / EasyStand (AutoTemp 32)
Valid through Software version 1.9
“Original instructions”
Document 10000028013-DOC-000-00-EN
Manufacturer: Jøni A/S

we know what‘s cooking
Document 10000028013-DOC-000-00-EN
1/69
Table of contents
Foreword . . . . . . . . . . . . . . . . . . . . . . . . . . . . . . . . . . . . . . . . . . . . . . . . . . . . . . . . . . . . . . . . . . . .2
General . . . . . . . . . . . . . . . . . . . . . . . . . . . . . . . . . . . . . . . . . . . . . . . . . . . . . . . . . . . . . . . . . . . . . .3
Symbol explanation . . . . . . . . . . . . . . . . . . . . . . . . . . . . . . . . . . . . . . . . . . . . . . . . . . . . . . . .3
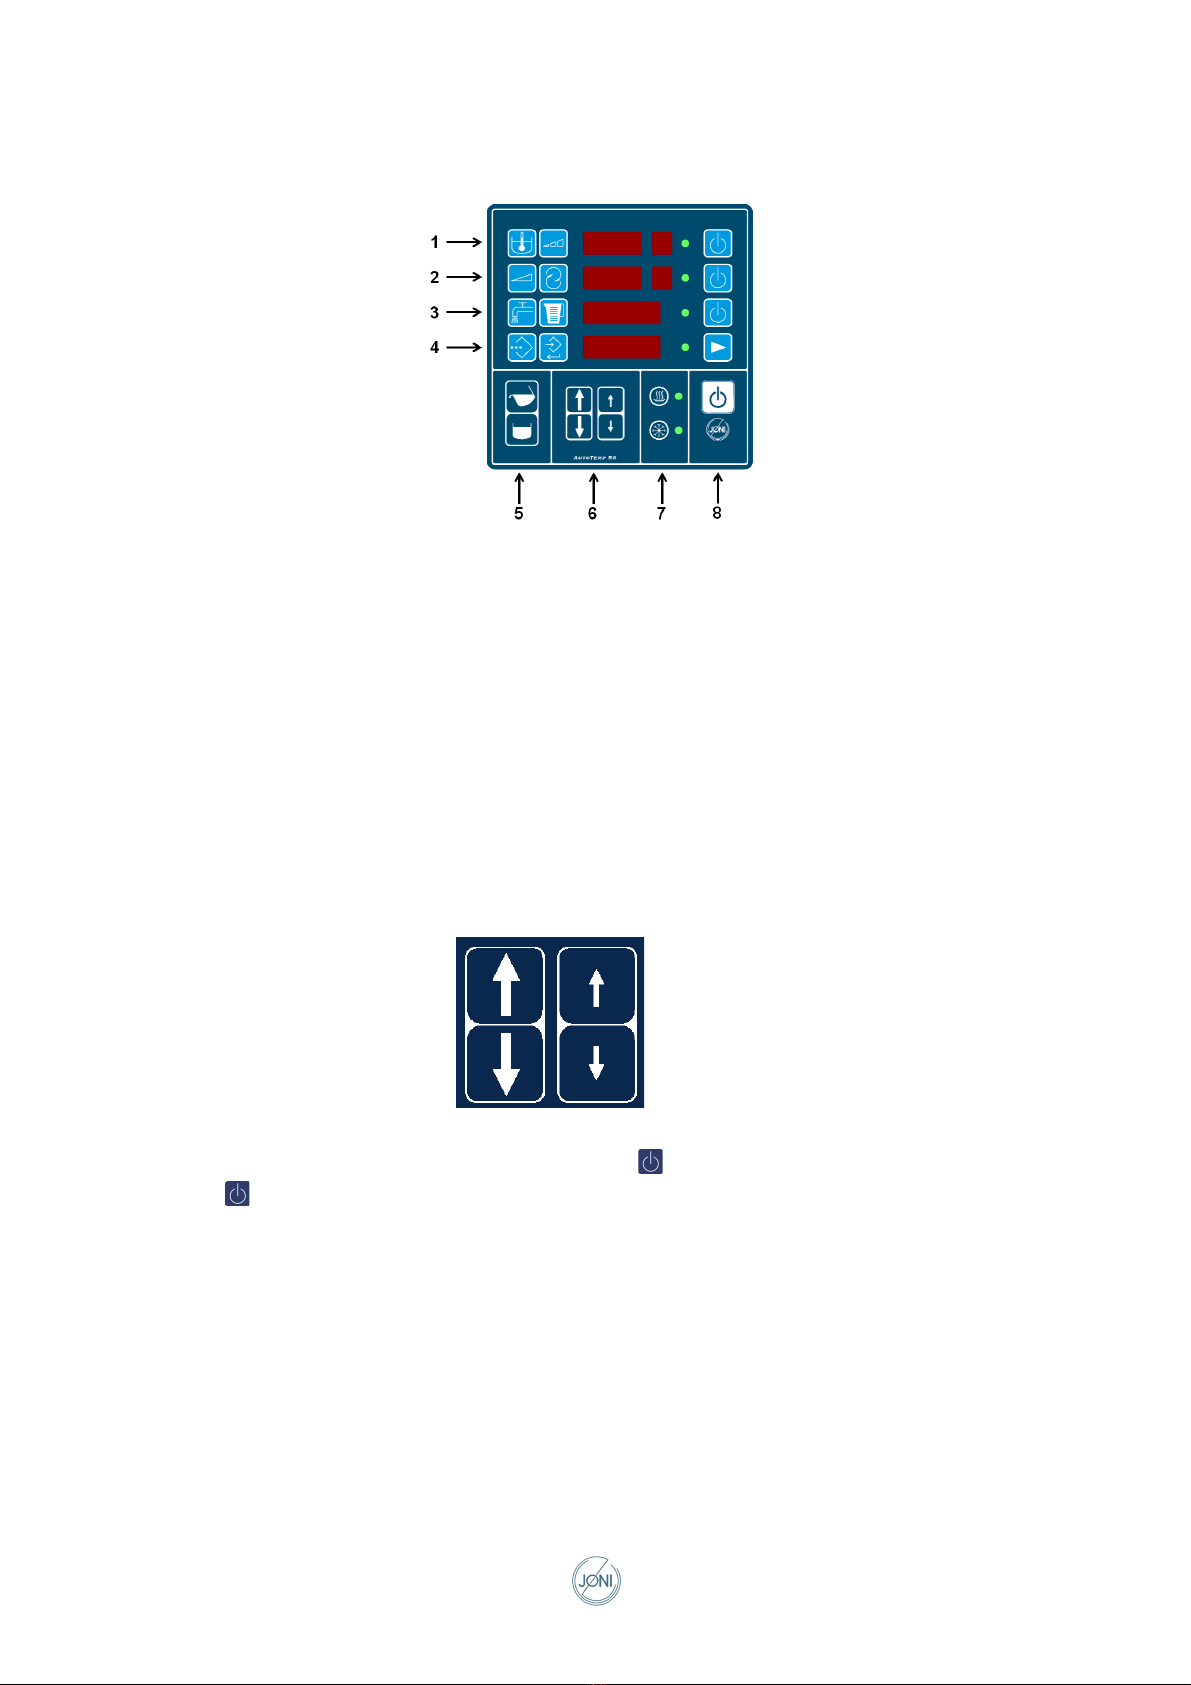
Controller . . . . . . . . . . . . . . . . . . . . . . . . . . . . . . . . . . . . . . . . . . . . . . . . . . . . . . . . . . . . . . . . . . . .5
Operation . . . . . . . . . . . . . . . . . . . . . . . . . . . . . . . . . . . . . . . . . . . . . . . . . . . . . . . . . . . . . . . . . . . .8
Switching the kettle on and off. . . . . . . . . . . . . . . . . . . . . . . . . . . . . . . . . . . . . . . . . . . . . . .10
Tilting function . . . . . . . . . . . . . . . . . . . . . . . . . . . . . . . . . . . . . . . . . . . . . . . . . . . . . . . . . . .12
Adjusting the heat . . . . . . . . . . . . . . . . . . . . . . . . . . . . . . . . . . . . . . . . . . . . . . . . . . . . . . . .13
Chilling. . . . . . . . . . . . . . . . . . . . . . . . . . . . . . . . . . . . . . . . . . . . . . . . . . . . . . . . . . .17
Filling the kettle with water . . . . . . . . . . . . . . . . . . . . . . . . . . . . . . . . . . . . . . . . . . . . . . . . .22
Timer . . . . . . . . . . . . . . . . . . . . . . . . . . . . . . . . . . . . . . . . . . . . . . . . . . . . . . . . . . . . . . . . . .25
Stirrer. . . . . . . . . . . . . . . . . . . . . . . . . . . . . . . . . . . . . . . . . . . . . . . . . . . . . . . . . . . . . . . . . .26
Inspection hatch . . . . . . . . . . . . . . . . . . . . . . . . . . . . . . . . . . . . . . . . . . . . . . . . . . .29
SlowMix . . . . . . . . . . . . . . . . . . . . . . . . . . . . . . . . . . . . . . . . . . . . . . . . . . . . . . . . . .30
Cleaning tool . . . . . . . . . . . . . . . . . . . . . . . . . . . . . . . . . . . . . . . . . . . . . . . . . . . . . .30
Programs . . . . . . . . . . . . . . . . . . . . . . . . . . . . . . . . . . . . . . . . . . . . . . . . . . . . . . . . . . . . . ..31
Programs for AutoTemp 56 . . . . . . . . . . . . . . . . . . . . . . . . . . . . . . . . . . . . . . . . . . .34
Additional equipment . . . . . . . . . . . . . . . . . . . . . . . . . . . . . . . . . . . . . . . . . . . . . . . . . . . . . .44
Sieve plate. . . . . . . . . . . . . . . . . . . . . . . . . . . . . . . . . . . . . . . . . . . . . . . . . . . . . . . .44
Pouring plate . . . . . . . . . . . . . . . . . . . . . . . . . . . . . . . . . . . . . . . . . . . . . . . . . . . . . .44
Cooking basket . . . . . . . . . . . . . . . . . . . . . . . . . . . . . . . . . . . . . . . . . . . . . . . . . . . .45
Measuring rod . . . . . . . . . . . . . . . . . . . . . . . . . . . . . . . . . . . . . . . . . . . . . . . . . . . . .45
Output for temperature logging . . . . . . . . . . . . . . . . . . . . . . . . . . . . . . . . . . . . . . . .46
Spray gun . . . . . . . . . . . . . . . . . . . . . . . . . . . . . . . . . . . . . . . . . . . . . . . . . . . . . . . .46
Tool trolley . . . . . . . . . . . . . . . . . . . . . . . . . . . . . . . . . . . . . . . . . . . . . . . . . . . . . . . .47
Foot pedal . . . . . . . . . . . . . . . . . . . . . . . . . . . . . . . . . . . . . . . . . . . . . . . . . . . . . . . .47
Drain valve type Echtermann . . . . . . . . . . . . . . . . . . . . . . . . . . . . . . . . . . . . . . . . .49
Drain valve type Butterfly valve . . . . . . . . . . . . . . . . . . . . . . . . . . . . . . . . . . . . . . . .51
User menu and factory settings menu . . . . . . . . . . . . . . . . . . . . . . . . . . . . . . . . . . . . . . . . . . .54
Adjusting the clock. . . . . . . . . . . . . . . . . . . . . . . . . . . . . . . . . . . . . . . . . . . . . . . . . . . . . . . .57
Error codes . . . . . . . . . . . . . . . . . . . . . . . . . . . . . . . . . . . . . . . . . . . . . . . . . . . . . . . . . . . ..57
Cleaning . . . . . . . . . . . . . . . . . . . . . . . . . . . . . . . . . . . . . . . . . . . . . . . . . . . . . . . . . . . . . . . .....61
Cleaning Drain valve type Echtermann . . . . . . . . . . . . . . . . . . . . . . . . . . . . . . . . . . . . . . . .63
Maintenance . . . . . . . . . . . . . . . . . . . . . . . . . . . . . . . . . . . . . . . . . . . . . . . . . . . . . . . . . . . . . . . . .64
Monthly maintenance . . . . . . . . . . . . . . . . . . . . . . . . . . . . . . . . . . . . . . . . . . . . . . . . . . . . .64
Annual maintenance . . . . . . . . . . . . . . . . . . . . . . . . . . . . . . . . . . . . . . . . . . . . . . . . . . . . . .66
Testing the safety pressure switch and the safety valve . . . . . . . . . . . . . . . . . . . . . . . . . . .67

2/69
Document 10000028013-DOC-000-00-EN
we know what‘s cooking
Foreword
This manual contains operating instructions for the appliance.
The ‘Installation Instructions’ and ‘Service Instructions’ folders contain additional information about the
appliance.
Please contact your dealer if you have any further questions concerning the appliance.
This manual has been optimized for colour printing
Before use
Please read this user manual carefully before using the appliance for the first time. This will ensure that
you know how to use the appliance correctly and are aware of the necessary safety precautions to pro-
tect both the user and the appliance itself.

we know what‘s cooking
3/69
Document 10000028013-DOC-000-00-EN
General
Purpose
The kettle must be stored and used indoors.
The appliance is intended for professional use in connection with heating, cooking, stirring and other sim-
ilar food preparation processes.
The appliance must not be used for other purposes, including heating of acids or other chemical sub-
stances.
Certain functions described in this operating manual are based on a particular controller or additional
equipment for the appliance.
Not all sections are relevant to your appliance.
It is the responsibility of the user to ensure that all users receive the necessary instructions when using
the appliance, so that they can operate the appliance safely and without risk of personal injury or damage
to the appliance.
The appliance can be used by children aged 8 and by persons with physical disabilities, reduced senses,
mental retardation or lack of experience and knowledge, if they use the device under supervision or have
been instructed for safe use of the appliance and understand the hazards associated with it.
Children are not allowed to play with the appliance.
The environment
The appliance has been designed and manufactured in an environmentally friendly way.
Virtually all the materials used can be recycled, and the manufacturing process was carried out with a
focus on minimising the release of environmentally harmful substances into the environment as well as
the recycling of raw materials to the maximum extent.
Fire extinguishing
Symbol explanation
CAUTION!
Warnings concerning possible damage to the appliance, injury to people, etc., are written in this
format and marked with the above symbol.
Burning appliances should be extinguished with carbon dioxide (Co2)
Burning oil, food or similar can be extinguished with a fire blanket.

4/69
Document 10000028013-DOC-000-00-EN
we know what‘s cooking
NOTICE!
Special conditions to be observed when using the appliance, to ensure safe and trouble-free op-
eration, is written in this format and marked with the symbol above
The following symbols, depending on the model, can be found on the device:
Fig. 0-1 Earth bonding
Earth bonding.
Is placed near the connection for earth bonding.
Fig. 0-2 Dangerous Electrical Voltage
Dangerous Electrical Voltage.
Is located on covers of components with dangerous electrical voltage.

we know what‘s cooking
5/69
Document 10000028013-DOC-000-00-EN
Controller
The controller’s functions are shown on the display gathered in function groups to make operation simple
and clear.
Below the display, there are a number of function buttons. The number of function buttons depends on
the appliance configuration.
Function keys
1 Control on
2 Control off
3 Switch between hot and cold water filling (Accessory)
4 Emergency stop (Only for kettles with mixer)
5 SlowMix (Accessory)
AutoTemp 16
Fig. 0-3 Controller AutoTemp 16
1 Heating functions
2 Stirrer functions
3 Water filling functions
4 Keys for tilt operation
5 Arrow keys
6 “Standby” key

6/69
Document 10000028013-DOC-000-00-EN
we know what‘s cooking
AutoTemp 32
Fig. 0-4 Controller AutoTemp 32
1 Heating functions
2 Water filling functions
3 Timer functions
4 Keys for tilt operation
5 Arrow keys
6 “Standby” key
AutoTemp 36
Fig. 0-5 Controller AutoTemp 36
1 Heating and chilling functions
2 Stirrer functions
3 Water filling functions
4 Timer functions
5 Keys for tilt operation
6 Arrow keys
7 Keys and LED’s for heating and chilling modes
8 “Standby” key

we know what‘s cooking
7/69
Document 10000028013-DOC-000-00-EN
AutoTemp 56
Fig. 0-6 Controller AutoTemp 56
1 Heating and chilling functions
2 Stirrer functions
3 Water filling functions
4 Program functions
5 Keys for tilt operation
6 Arrow keys
7 Keys and LED’s for heating and chilling modes
8 “Standby” key
General control methodology
In general, a function key is pressed so that the associated display flashes, indicating that the value can
be altered using the arrow keys. The large arrows change the value in large steps and the small arrows
change the value in small steps. If the key is held down, the value will increase/decrease at an increasing
rate. This enables the required setting to be achieved by simply pressing a few keys.
Fig. 0-7
For all relevant function groups there is an ON/OFF key and an LED.
Pressing alternately activates and deactivates the function.
The LED will illuminate when the function is activated.
Parameter settings
The operation of the kettle depends on a number of parameters, e.g. the volume of the kettle, which must
be set correctly in order for the kettle to work. These parameters are set in the sections ‘User menu’ and
‘Factory settings menu’.
Error codes
The system continually monitors many factors in order to protect the machine and the user. If the ma-
chine detects a fault, an error code will be shown, as described in the section Error codes

8/69
Document 10000028013-DOC-000-00-EN
we know what‘s cooking
Operation
CAUTION!
When using the kettle, both the intended purpose of the kettle and the safety instructions must
be followed
CAUTION!
The kettle must not be left unattended when in use.
CAUTION!
The kettle must be operated from the front.
CAUTION!
Should a hazardous situation occur at the appliance, turn off the safety switch immediately.
CAUTION!
If error code E99 is shown, the pressure in the kettle is too high and the heating power supply to
the kettle must be turned off immediately. Disconnect the power supply at the main switch imme-
diately and make sure that the kettle is repaired before taken into use again.
CAUTION!
If a dangerous situation should arise involving the kettle, press the emergency stop button im-
mediately. This will stop all functions. The power is applied again by manually turning the emer-
gency stop button.
(This only applies to kettles with a stirrer)
CAUTION!
Always ensure kettle is sufficiently clean before use.
CAUTION!
Never touch the top or inside of the kettle without first checking whether it is hot, as a kettle that
is in use can become so hot that anyone touching it risks a burn injury.
CAUTION!
A kettle which has been in use will cool down very slowly and anyone touching it risks a burn
injury long after it has been switched off. The control panel does not give any warning of this.
CAUTION!
Be careful when the contents of the kettle are boiling. Splashes from the kettle and over boiling
liquids may burn or scald anyone nearby.
CAUTION!
Do not use abrasive tool of metal for stirring.

we know what‘s cooking
9/69
Document 10000028013-DOC-000-00-EN
CAUTION!
Valves on the kettle bowl must not be opened, when the kettle is pressurized.
CAUTION!
For safety reasons, the kettle must not be filled to within 5 cm from the rim. Otherwise, there is
an increased risk of over boiling and emptying the kettle will be difficult.
CAUTION!
During use, no steam may be discharged from the safety valve. If this happens, disconnect the
power supply at the main switch immediately and make sure that the kettle is repaired before tak-
en into use again.
CAUTION!
During normal use, hot air/steam will be discharged from the venting valve. In the event of a fault,
steam may be discharged from the safety valve.
Note that any steam that is discharged could cause burn injuries.
CAUTION!
Connections between the steam jacket and the outside must not be blocked. This applies, for ex-
ample, to the safety valve, venting valve, vacuum valve and level valves.
CAUTION!
It is forbidden to stay behind the kettle, when it is in use.
CAUTION!
The kettle must not be moved when its contents are so hot that there is a risk of scalding.
CAUTION!
If a dangerous situation should arise involving the kettle, press the emergency stop button im-
mediately. This will stop all functions. The power is applied again by manually turning the emer-
gency stop button.
(This only applies to kettles with a stirrer)
CAUTION!
Stainless steel surfaces are protected by a thin layer of chromoxide, which is vulnerable to dam-
age by use of steel implements and exposure to chlorine, as found in normal kitchen salt for ex-
ample.
Never add salt to cold water in a kettle. Wait until the water is hot, when the salt will dissolve. This
will prevent salt crystals settling at the bottom of the kettle where they can damage the chromox-
ide layer, exposing the steel to corrosion.
CAUTION!
If the kettle is on castors, the castor brakes must be engaged when the kettle is in use.

10/69
Document 10000028013-DOC-000-00-EN
we know what‘s cooking
Fig. 0-8 Castor brakes disengaged
Fig. 0-9 Castor brakes engaged
Switching the kettle on and off
Turn power supply on by turning the handle clockwise to position ‘I’.
Fig. 0-10 On
Turn power supply off by turning the handle anticlockwise to position ‘0’.
Fig. 0-11 Off
The kettle’s controller is switched on by pressing and switched off by pressing .
When the control is turned on, it can be put into "Standby”-mode by pressing , thereby minimizing the
power consumption and the control will remember its initialization status.

we know what‘s cooking
11/69
Document 10000028013-DOC-000-00-EN
On kettles with compressed air, the compressed air supply must be opened in order for the kettle to func-
tion.
If a requirement for an access code has been activated in the user menu in order to switch the kettle on,
the heating display will show ‘PAS’, and a four digit access code must be entered in order to activate the
kettle.
The code will be shown in the water display and is set using the arrow keys. The large arrows alter the
code by 100 and the small arrows alter the code by 1.
When the access code has been selected, press water-
If the code is correct, the kettle will be activated. If it is incorrect, error code U01 will be shown for three
seconds, after which another attempt can be made.

12/69
Document 10000028013-DOC-000-00-EN
we know what‘s cooking
Tilting function
CAUTION!
Due to the risk of crushing injuries, it is forbidden to stay behind or below the kettle, when the
tilting function is operated.
CAUTION!
Due to the risk of crushing injuries, no hands or fingers may be placed between any fixed or mov-
ing components, when the tilting function is operated.
CAUTION!
The kettle must be emptied carefully, taking into account the risk of scalding and other factors
such as the size and capacity of the floor grates, etc.
CAUTION!
When emptying the kettle, keep clear of the front of the kettle, as the pouring lip and any splash-
ing liquids could cause scalding. Ensure there is sufficient space to evacuate the danger zone.
CAUTION!
There must always be open space around the moving components of the kettle, when it is being
tilted.
CAUTION!
The lid must be open before the kettle is tilted.
The kettle will tilt when is pressed and returne when is pressed. The kettle wil only tilt when the
keys are pressed. The kettle wil stop in both outher positions or the keys are released.
The kettle will stop automatically when it is fully tilted.
When the key is released, the kettle will remain in its current position, unless the ‘automatic return tilt’
function is activated in the user menu. After a pre selected number of seconds, the kettle will then return
for a pre selected number of seconds. This does not however apply when the kettle is only slightly tilted
or when it is fully tilted.
NOTICE!
This function is very useful when emptying the contents of the kettle into smaller containers.

we know what‘s cooking
13/69
Document 10000028013-DOC-000-00-EN
Adjusting the heat
NOTICE!
When the kettle is heating, pressure is built up inside the jacket. This pressure can be observed
at the pressure gauge at the rear of the kettle.
Automatic water level control in steam generator
Water level in the steam generator is monitored by the kettle control system. Water will be added auto-
matically if necessary to maintain the correct level.
Manual draining of condensate
Steam-heated kettles only
Under normal operating conditions, condensate is bled off automatically.
Under certain conditions or as a result of incorrect installation, condensate can build up in the bottom of
the kettle.
This causes a loud noise when steam is passed through the condensat.
In such instances, the condensate can be drained through a valve at the bottom of the kettle jacket.
Fig. 0-12 Valve for condensate out
CAUTION!
Beware of hot steam/water when valve is opened!
Step Action
1 Switch off the heating and position the kettle vertically.
2 Wait until pressure in the steam chamber reaches 0 bar.

14/69
Document 10000028013-DOC-000-00-EN
we know what‘s cooking
The kettle is now ready to heat.
3 Open valve to bleed condensate.
4 Close valve when condensate flow stops.

we know what‘s cooking
15/69
Document 10000028013-DOC-000-00-EN
AutoTemp 16, 32 and 36
The heat is adjusted using the part of the panel shown in the following illustration.
Fig. 0-13 Adjusting the heat, AutoTemp 16, 32 og 36
1 Key for jacket temperature
2 Display for jacket temperature
3 LED for heating and chilling on
4 Key for heating chilling on/off
Generally, the display will show the actual jacket temperature. The temperature set point for the steam
jacket is set by pressing sso that the display flashes. Set the temperature set point using the arrow
keys.
The function will be exited automatically after three seconds without a key press or if another function is
selected.
AutoTemp 56
NOTICE!
To get a more exact temperature measuring on AutoTemp 56, it’s important to activate the stirrer
with scrapers. Stirring ensures a more even temperature distribution.
The heat is adjusted using the part of the panel shown in the following illustration.
Fig. 0-14 Adjusting the heat, AutoTemp 56
1 Key for food temperature
2 Key for heating power
3 Display for food temperature
4 Display for heating power
5 LED for heating and chilling on
6 Key for heating and chilling on/off
By default, the display will show the actual food temperature. The set point for food temperature is set
by pressing so that the display flashes. Set the temperature set point using the arrow keys.
The function will be exited automatically after three seconds without a key press or if another function is
selected.
The required heating power is set by pressing so that the display flashes. Set the required power us-
ing the arrow keys.
The function will be exited automatically after three seconds without a key press or if another function is
selected.

16/69
Document 10000028013-DOC-000-00-EN
we know what‘s cooking
NOTICE!
The heating power function is used to determine the temperature of the steam jacket based on
the food temperature, and therefore how powerful the heating should be.
As the food is heated, the temperature of the jacket will automatically increase.
Lower power gives gentler heating but a longer heating time.
Higher power gives less gentle heating but a shorter heating time.
When power step 9 is selected, the temperature of the jacket will be set to maximum and the heat-
ing time will be the shortest possible.
General
The heating power supply is switched on/off by pressing . The LED will illuminate when the heating
is switched on.
To ensure that the food is heated uniformly and quickly, it should be stirred whenever possible. This also
gives an even distribution of heat, and therefore better temperature measurement to control the heating
process.
The kettle must be in the vertical position in order to heat its contents. If this is not the case, error code
U10 will be shown and the LED will flash until the kettle has returned to the vertical position or the heating
has been switched off. If the kettle is vertical again within two minutes, the heating will be switched on
automatically. If it takes longer than this, the heating must be switched on manually.

we know what‘s cooking
17/69
Document 10000028013-DOC-000-00-EN
Chilling
AutoTemp 36 and 56
CAUTION!
Watch out for discharging water/steam from the bottom of the kettle when the chilling function
is activated.
The chilling function is used to chill the contents of the kettle.
In technical terms, there are two solutions:
• Tap water is let in through the steam jacket from where it flows to the floor grate.
• Chilled water is pumped from an ice bank / chilled water tank through the steam jacket and back to
the ice bank.
In both cases, the steam jacket is filled with water until the temperature of the jacket is decreases to
80ºC, before the chilling process is started. This ensures that there is no pressure in the kettle when the
chilling process is started.
Chilling mode
The kettle’s function depends on whether it is in heating mode or chilling mode. The control panel indi-
cates which mode is active.
Fig. 0-15 Key and LED for chilling
1 LED for heating mode
2 LED for chilling mode
The kettle is switched to chilling mode by pressing and holding the key down for three seconds until
the LED for heating mode extinguishes and the LED for chilling mode illuminates. If the user attempts to
switch to chilling mode and chilling mode has not been activated in the factory settings menu, error code
U40 will be shown.
NOTICE!
When chilling, depending on the contents of the kettle and stirring there may be a difference be-
tween the temperature shown in the display and the actual temperature of the food.
It is therefore important to check the temperature of the food with another temperature measure-
ment directly in the food.
Setting the set point for food temperature
With the AutoTemp 36 controller, the user cannot set the set point for food temperature, only start and
stop the chilling process.
With the AutoTemp 56 controller, both the set point for food temperature and the required chilling inten-
sity can be set.
The set point for food temperature is set by pressing so that the display flashes. Set the temperature
set point using the arrow keys.The function will be exited automatically after three seconds without a key
press or if another function is selected.

18/69
Document 10000028013-DOC-000-00-EN
we know what‘s cooking
NOTICE!
To ensure that the food is at the temperature set point, it may be necessary to set the set point
for food temperature lower, e.g. to 1 ºC.
Starting and stopping chilling
Chilling is started/stopped by pressing .The LED will illuminate when chilling is switched on.
The kettle must be in the vertical position in order to chill. If this is not the case, error code U11 will be
shown and the LED will flash until the kettle has returned to the vertical position or chilling has been
switched off. If the kettle is returned to vertical position within two minutes, chilling will be switched on
automatically again. If it takes longer than this, chilling must be switched on manually again.
NOTICE!
The kettle’s chilling function works best when the contents of the kettle are stirred during chill-
ing. This ensures uniformly distribution of cooling throughout the food.
Setting water consumption for chilling AutoTemp 56
This function is used to set the intensity of the chilling. The lower the value that is selected, the smaller
the quantity of water that passes through the steam jacket and the longer the chilling process will last.
When power step 9 is selected, the flow rate will be set to maximum and the chilling time will be the short-
est possible.
The required chilling power is set by pressing so that the display flashes. Set the required power using
the arrow keys.The function will be exited automatically after three seconds without a key press or if an-
other function is selected.
Setting water consumption for chilling AutoTemp 36
The required chilling power is set in the user menu point 5.1.
NOTICE!
By this feature, when using open cooling, water consumption can be significantly reduced.
Heating mode
The kettle is switched to heating mode by pressing and holding the key down for three seconds until
the LED for chilling mode extinguish.
The kettle now performs an initialisation which takes several minutes, as the steam jacket must be emp-
tied of water. During this period, the LED next to flashes and the kettle can neither heat nor chill.
When the initialisation is complete and the kettle is ready to heat, the LED next to will illuminate.
AutoTemp 16 and 32
The chilling function is used to chill the contents of the kettle. Chilling takes place by letting water through
the steam jacket down to the floor grate.
NOTICE!
The kettle’s chilling function works best when the contents of the kettle are stirred during chill-
ing. This ensures uniformly distribution of cooling throughout the food.

we know what‘s cooking
19/69
Document 10000028013-DOC-000-00-EN
NOTICE!
When chilling, depending on the contents of the kettle and stirring there may be a difference be-
tween the temperature shown in the display and the actual temperature of the food.
It is therefore important to check the temperature of the food with another temperature measure-
ment directly in the food.
Start chilling
CAUTION!
Watch out for discharging steam/hot water when the valve for chilling water out is opened!
The water runs through the steam jacket, thereby chilling the content of the kettle, and out through the
valve “chilled water out”.
Step Action
1 Switch off the heating and position the kettle vertically.
2 Set the selector switch to chill and wait until the pressure
in the steam jacket is app. 0 bars
3 Open the valve for chilled water out.
4 Close the kettle’s venting valve. This is located on the
back of the kettle and is open during normal use.
This manual suits for next models
14
Table of contents