Juergen Perthold Video CatCam II User manual

Video CatCam User Manual - Page 1 of 10
Video CatCam®II User Manual
Revision: 18. March 2010
Check for updates on: www.mr-lee.com
Mr. Lee CatCam and CatCam are registered trademarks of Juergen Perthold.
Index
Index..............................................................................................................1
Change History..............................................................................................2
1. Overview....................................................................................................3
2. Charge Camera.........................................................................................4
3. Activate Camera........................................................................................6
4. Setting of Recording Interval......................................................................7
5. Change Time Stamp..................................................................................8
6. Collar Attachment......................................................................................9
7. Video Storage and Download..................................................................10
8. Support and Help.....................................................................................10

Video CatCam User Manual - Page 2 of 10
Change History
We try to keep this manual up-to-date. Therefore changes and additions are made. You
may want to check from time to time for updates so that you have the most recent issue
available.
Revision Date Changes
March 18, 2010 Initial revision

Video CatCam User Manual - Page 3 of 10
1. Overview
The Video CatCam®records video clips in an adjustable time interval. When nothing is
recorded the camera switches off automatically and safes battery energy. The device is
designed to be worn on the collar of an animal (cat) but may find use for general
surveillance tasks as well.
The Video CatCam®has small dimensions of 64x41x18mm (2.5 x 1.6 x 0.7 inch) and
weight of approx. 30 grams (1.1 oz).
Both memory and battery are integrated into the device. The camera records high
resolution video images (about 700x400 pixels) with a frame rate of 28-30fps. Per
recorded hour approx. 4 GB of data is generated.
The device is protected against dust, dirt and water. It is shock and scratch resistant. No
noise is emitted at any time.

Video CatCam User Manual - Page 4 of 10
2. Charge Camera
To connect the camera to the USB interface the enclosure must be opened and the
camera core pulled out as shown in the picture
After the camera core is removed the USB interface as well as the micro SD memory
card is accessible. The camera support memory cards up to 16GB.

Video CatCam User Manual - Page 5 of 10
The camera is supplied by an integrated rechargeable Lithium-Polymer battery.
Charging of the camera takes 3-4 hours.
After charging or data transfer put the camera core back into the enclosure as shown in
the following picture.
Then close the lid. For additional protection you may want to use some tape to keep the
lid closed.

Video CatCam User Manual - Page 6 of 10
3. Activate Camera
After the battery is charged the camera can be activated. Press shortly on the button in
the enclosure. The status light (marked by a circle) comes on.
As long as the device is active the status light blinks shortly every few seconds.
Press again on the button to switch the camera off. This may take some time depending
on the record state. The status light will remain on until the camera is shut down, you do
not need to press more than one time on the button.
If you have programmed recording interval time the setting will not get lost by switching
the camera off.

Video CatCam User Manual - Page 7 of 10
4. Setting of Recording Interval
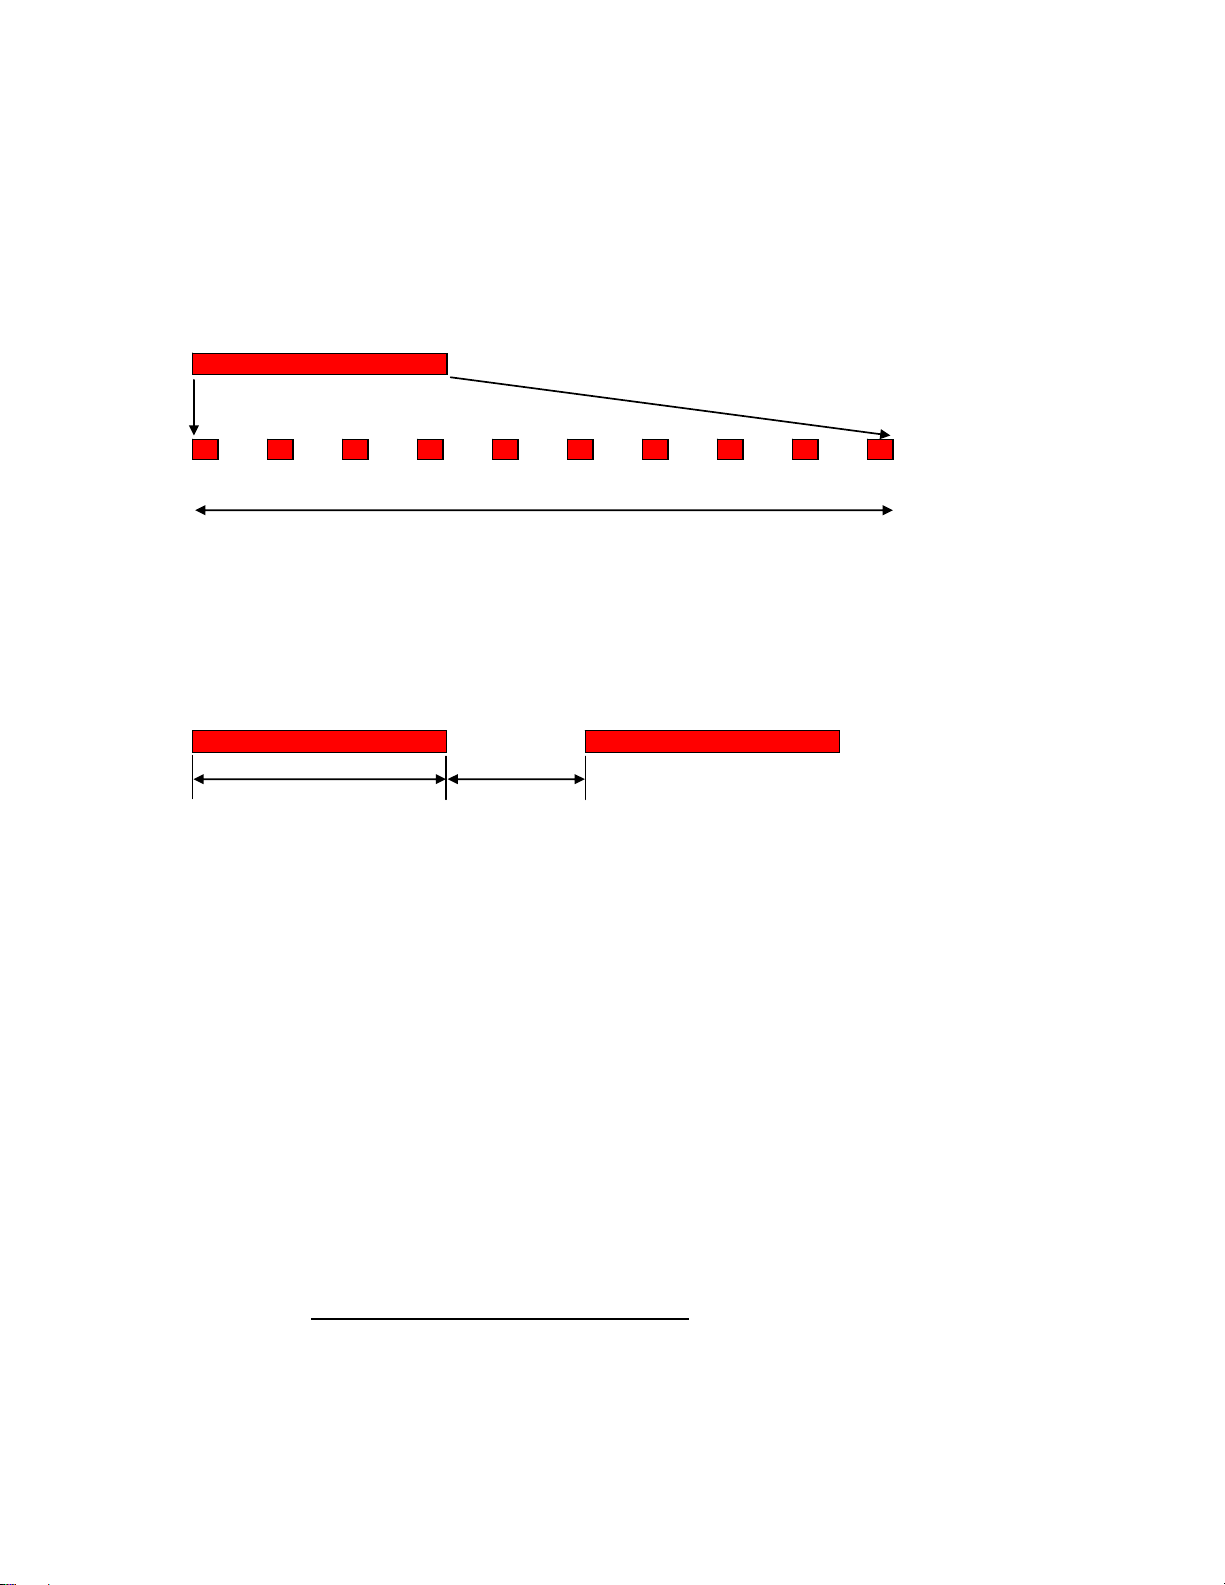
The available recording time which means memory capacity and battery energy can be
spread over a longer time. The following graphic shows this. If added together both bars
have the same length. Chopping the recording time into smaller pieces extends the
coverage to a longer time.
continuously
Interval
Total recording time
One cycle consists out of a recording phase and a pause phase in which the camera is
switched off as shown in the following graphic. For both phases the time can be set on
the camera.
Record time Pause time …..
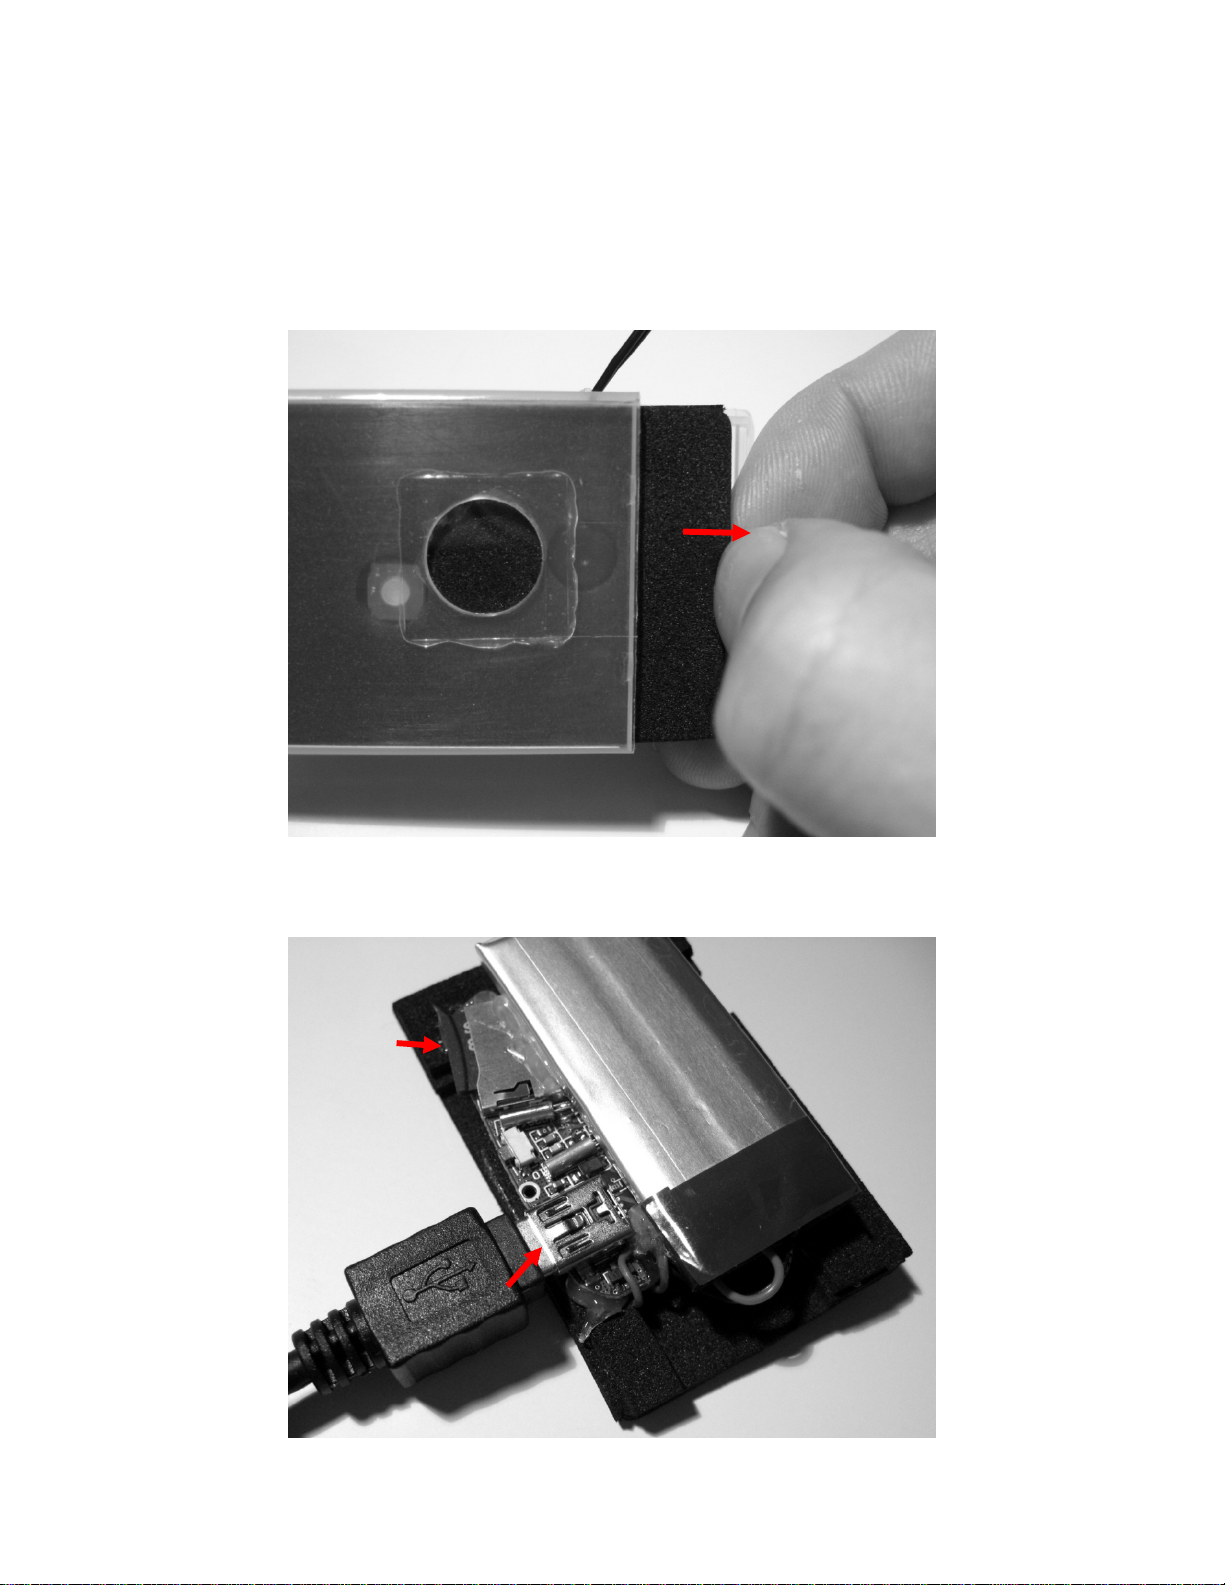
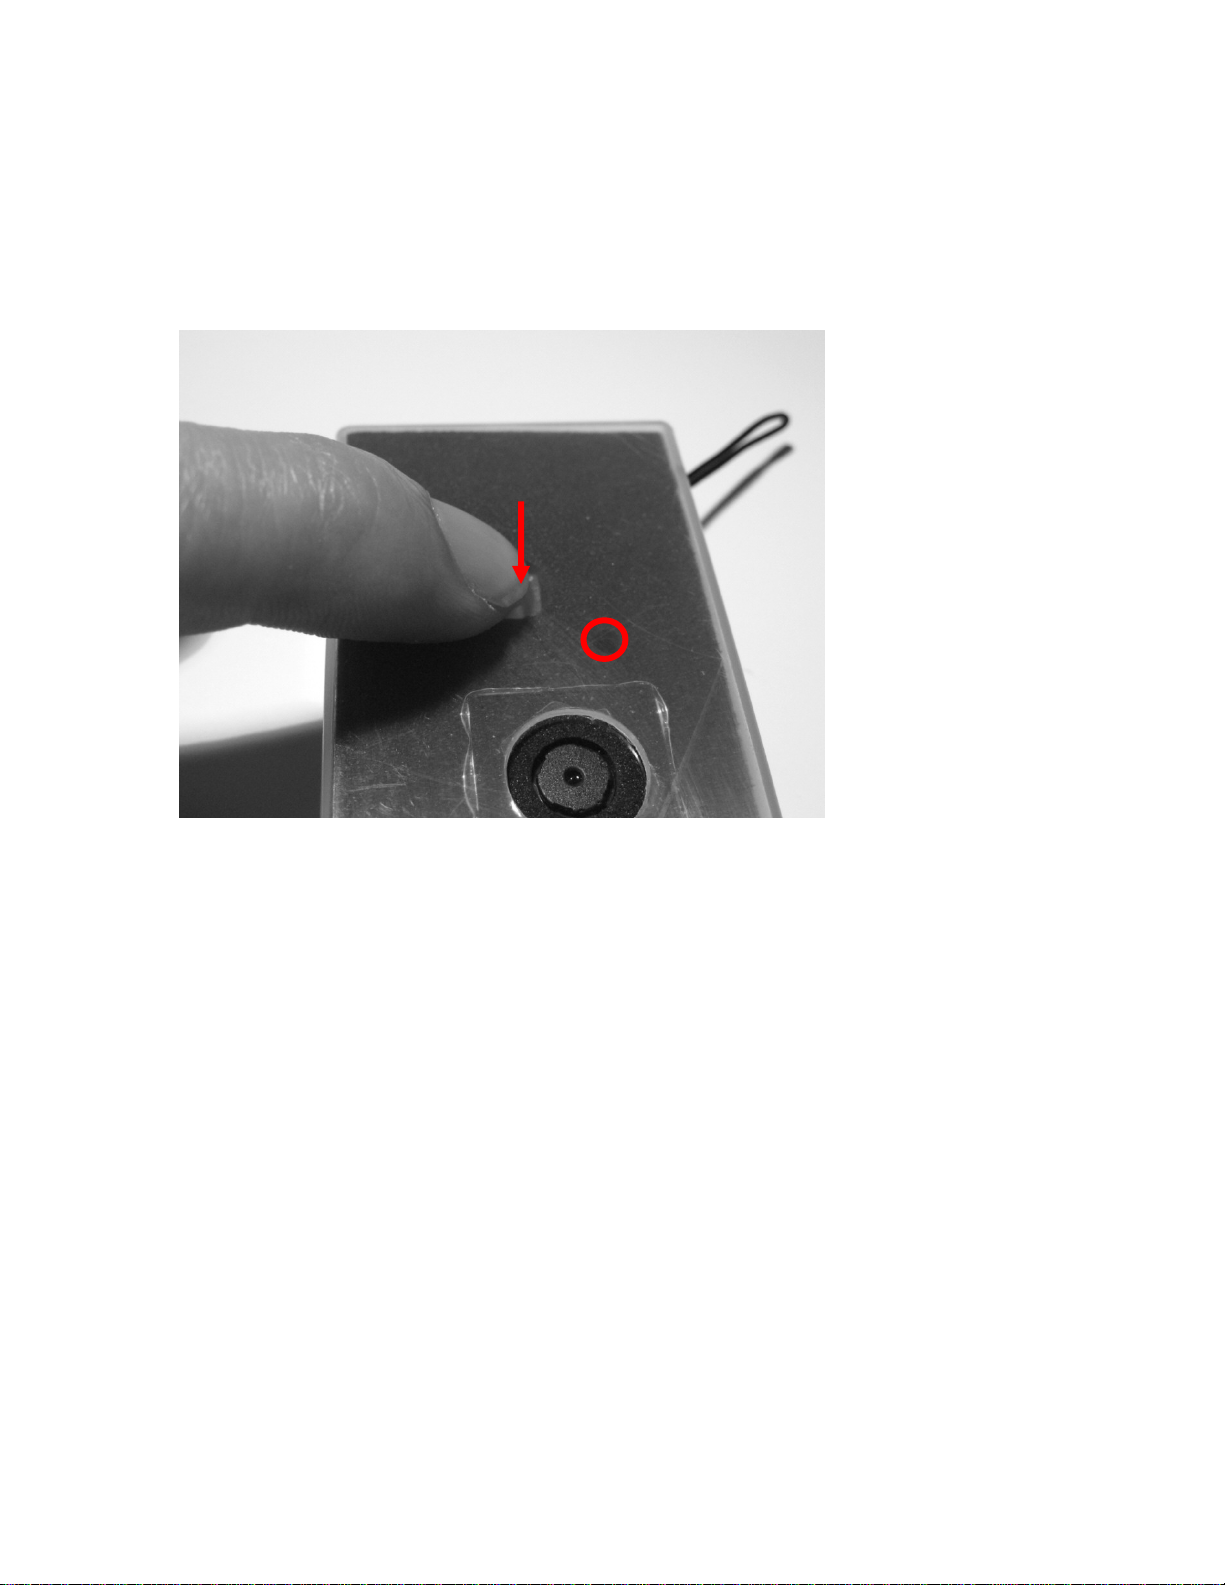
Setting these times is done using the On/Off button. While a quick push on the button is
switching the camera on a longer push enables the time setup.
The procedure is as follows:
•In the default state the camera is off
•Press the button and hold it for some seconds.
•The status light comes on and blinks. Each blinking increases the recording time
by 1 minute.
•When the desired recording time is reached release the button.
•Press the button again to set the pause time, each blinking increases the pause
time by 1 minute.
•When the button is released the settings will be stored and the camera switches
into the recording mode.
If you want a continuous recording without interrupts use the same procedure as before.
Release the button right after the first blinking of the status light. It doesn’t matter if you
do this at setting of recording time or pause time. In both cases the result is that the
interval mode is switched off. A fast blinking of the status light is acknowledging this.

Video CatCam User Manual - Page 8 of 10
5. Change Time Stamp
The video picture is overlaid with the recording time. This time can be adjusted.
Procedure:
1. Open notepad or any other text only editor
2. write:
[date] 2009/12/29 16:58:00_ this is setting the date to Dec. 29,
2009 and the time to 4pm 58 minutes. Make sure that the last character after the
time is a space !
3. save as text file with the name tag.txt (lower case).
4. copy this file in the cameras root directory.
5. disconnect camera
6. switch camera ON, the camera will read the file, set the date and erase the file.

Video CatCam User Manual - Page 9 of 10
6. Collar Attachment
The collar is fed through both loops and then attached around the neck of the animal.
Safety note: Please consider that a collar on a neck of a cat is a potential safety risk.
Because a cat wanders and crawls more or less in any place and can catch or trap itself
with the collar on an object such as fence rods or tree branches. This may lead to death

Video CatCam User Manual - Page 10 of 10
of your pet. In the USA are collars common which provide a safety release if a certain
amount of force is applied. Everything mounted to the collar will be lost in such a case.
Please decide what is more important: The life of your pet or the device on the collar.
7. Video Storage and Download
The video recordings are stored in AVI format. We recommend using the free VLC
player which has several codec’s already integrated. VLC is also working with different
operation systems.
To download the recordings open the camera as described before and connect the cable
to the USB interface. The computer should recognize the camera as an additional drive.
If this not the case check if the camera is switched off before connecting it to the
computer.
Now you can copy and erase files like on a regular hard disk.
Note: Prior to disconnecting the camera from the computer make sure you stopped it
with the device manager. Otherwise the file system of the camera may be screwed up.
8. Support and Help
You can get in contact with the technical support by sending a mail to
If your CatCam got damaged or you want to update to newer software contact also the
technical support.
Table of contents