manuals.online logo
Brands
  1. Home
  2. •
  3. Brands
  4. •
  5. JVC
  6. •
  7. Camcorder
  8. •
  9. JVC GY-HM200 User manual

JVC GY-HM200 User manual

B5A-1631-00
1
This is a notification on the addition of new features, feature
modifications and onscreen display changes. Please read this together
with the “INSTRUCTIONS”.
K, M: Feature available on the model or series name only.
“High-Speed” added to menu item [System]
“High-Speed” is added to [System] →[Record Set] →[Record Format]
→[System].
A moving subject can be effectively portrayed by shooting smooth slow
motion images.
Memo :
●The [Rec Mode] is fixed at “Normal”.
●The following functions cannot be used when “High-Speed” is selected.
Network, Time Stamp Recording, Flicker Correction, Shading, Face
Detection and WDR
●The settings for slot B are fixed at the same as slot A.
●For the “TC Generator” setting, only “Rec Run” and “Regen” can be
selected.
●It is not possible to set a shutter speed that is slower than the frame
rate.
(Example: When 120/60p is selected, 1/120 to 1/10000 can be set.)
●The angle of view shifts to telephoto.
(35 mm conversion: [Normal] 29.6 mm to 355 mm →[High-Speed]
49.3 mm to 592 mm)
●The sensitivity of high speed shooting is lower than normal shooting. In
order to capture more beautiful images, it is recommended to perform
shooting in a lighted environment.
●The remaining space on the media (recordable time to a SD card) runs
out faster than usual.
(Example: For 120/60p, as the recording speed is twice as fast as
usual, the remaining space on the media is reduced by approximately
double the speed.)
Bit Rate added to System “4K”
“70M” is added to [System] →[Record Set] →[Record Format] →[Bit
Rate].
Memo :
●When 4K is set, the network function cannot be used. (K)
Usable Cards
Format Setting and Usable SD Card Combinations
Estimated Recordable Time of SD Cards
●
When [System]
→
[Record Set]
→
[Record Format]
→
[Format] is set
to “QuickTime”.
(Unit: minute)
Histogram feature added
The histogram shows the brightness distribution, and is employed
mainly for checking the exposure of the image.
1. Set the histogram feature to ON.
●Set [Main Menu] →[LCD / VF] →[Display Settings] →
[Histogram] to “On”.
●You can also press the user button that is assigned with
“Histogram.
2. Set the upper and lower limits of the histogram display.
After setting, the brightness level is displayed in red color.
GY-HM200/GY-HM170 INSTRUCTIONS
Notification of Changes
System
Format Resolution Frame
Rate Bit Rate
High-
Speed Quick
Time 1920x1080
120/60p
100/50p
120/30p
60/30p
100/25p
50/25p
120/24p
60/24p
50M (XHQ)
35M (UHQ)
System
Format Resolution Frame
Rate
Bit Rate
(new values are in
bold)
4K Quick
Time 3840×2160 30p
25p
24p
150M
70M
System
Format Bit Rate Usable SD Card
High-Speed Quick
Time 50 M (XHQ),
35 M (UHQ) UHS-I U3 or higher
4K 150M
70M Class 10 or higher
HD
50 M (YUV422),
50 M (XHQ)
35 M (UHQ) Class 6 or higher
AVCHD −Class 4 or higher
SD −−
Web −−
System
4K HD SD Web
Resolution 2160p 1080i/1080p 480i/
576i 960p 480p
Bit Rate 150M 70M XHQ UHQ −HQ LP
4 GB 3 6 9 12 47 130 285
8GB 6 13 18 25 95 270 580
16GB 12 26 36 50 190 540 1160
32GB 25 52 72 100 380 1080 2320
64GB
(SDXC) 50 105 145 200 760 2160 4720
128GB
(SDXC) 100 210 290 400 1520 4320 9440
Item
Settings Options
Top
Sets the maximum brightness
limit for changing the histogram
display color
5% to 110% (in 5% increments)
Default value: 80%
Bottom
Sets the minimum brightness
limit for changing the histogram
display color
0% to 105% (in 5% increments)
Default value: 20%
Example 1) Top 110%, Bottom 0% Example 2) Top 90%, Bottom 10%
* The area in red is not displayed.
How to read the histogram
●
The vertical axis denotes the number of pixels.
●
The horizontal axis denotes the pixel brightness.
P 13000KP 13000K
F1.6F1.6
0dB0dB
AE+6AE+6
ND 1/16ND 1/16
12:34:5612:34:56
Jan 24,2015Jan 24,2015
00:00:00.0000:00:00.00
5.5.6 f t
100min100min
50min50min
282min282min
1/1001/100
1/1001/100
F1.6F1.6
0dB0dB
AE+6AE+6
ND 1/16ND 1/16
12:34:5612:34:56
Jan 24,2015Jan 24,2015
00:00:00.0000:00:00.00
5.5.66fftt
100min100min
50min50min
282min282min
P 13000K
Top
Bottom
Icon display added when zebra function is “On”
During zebra pattern display, (zebra icon) is displayed on the
display screen in Camera mode.
“98%” added to [Top] and [Bottom] of menu item
[Zebra]
“98%” is added to the setting values for specifying the upper and lower
limits of the luminance level in [LCD/VF] →[Shooting Assist] →
[Zebra]/[Top] and [Bottom].
This convenient setting is to keep the video level with 100% during the
video production for playback, screening and broadcasting on
nonlinear devices and PC.
[Top] [Setting Values: 5% to ●80% to 95%, 98%, 100%, Over]
[Bottom] [Setting Values: 0% to ●70% to 95%, 98%, 100%]
[Adjust] added to menu item [Color Matrix]
[Adjust] is added to [Camera Process] →[Color Matrix].
●
The color matrix of the camera recorder can be adjusted to a color of
the user’s preference.
●
When shooting is performed using multiple cameras, the colors of the
different cameras can be adjusted, and a color of the user’s
preference can be set on this camera recorder.
●
The saturation, hue and brightness of the primary and complementary
colors (6 colors in total) can be set individually.
●
Adjust the color on the vector scope and waveform monitor using the
DSC color chart.
* The adjusted values of “Standard”, “Cinema Vivid”, and “Cinema
Subdued” in [Color Matrix] can be stored individually.
1. Select [Camera Process] →[Color Matrix]/[Adjust].
2. Adjust the
“Hue”
. [Setting range: -5 to +5] (roughly ± 5%)
●Select the color using the cross-shaped button (JK) and confirm
using the cross-shaped button (I). (The cursor moves to
“
Hue
”
.)
●Pressing the cross-shaped button (J) rotates the hue in the
clockwise direction on the vector scope.
●Pressing the cross-shaped button (K) rotates the hue in the anti-
clockwise direction on the vector scope.
3. Adjust the
“S
aturation
”
. [Setting range: -10 to +10] (roughly ± 10%)
●Press the cross-shaped button (I) to move the cursor to
“
Saturation
”
.
●Each of the colors changes in the direction indicated by the arrow
on the vector scope.
●Pressing the cross-shaped button (J) moves the color outward
from the center of the circle on the vector scope.
●Pressing the cross-shaped button (K) moves the color toward to
the center of the circle on the vector scope.
4. Adjust the brightness. [Setting range: -10 to +10] (roughly ± 10%)
●Pressing the cross-shaped button (J) brightens; and pressing the
cross-shaped button (K) darkens.
●Press the cross-shaped button (I) to return the cursor to
“
Hue
”
.
Setting items changed or added to menu item [Rec
Trigger]
Setting items in
[A/V Set]
→
[Video Set]
→
[HDMI/SDI Out]
→[Rec
Trigger] are changed. (K)
Setting items are added to
[A/V Set]
→
[Video Set]
→
[HDMI Out]
→
[Rec Trigger]. (M)
●
HDMI (
K
):
Superimposes the trigger signals in tandem with the [HDMI] terminal
as well as the [REC] button on the camera body and outputs the
recording/stop control signals to the compatible device.
●
On (
M
):
Superimposes the trigger signals in tandem with the [HDMI] terminal
as well as the [REC] button on the camera body and outputs the
recording/stop control signals to the compatible device.
●
SDI (
K
):
Superimposes the trigger signals in tandem with the [SDI OUT]
terminal as well as the [REC] button on the camera body and outputs
the recording/stop control signals to the compatible device.
●
HDMI+SDI (
K
):
Superimposes the trigger signals in tandem with the [HDMI/SDI Out]
terminal as well as the [REC] button on the camera body and outputs
the recording/stop control signals to the compatible device.
[Setting Values: ROff, HDMI, SDI, HDMI+SDI] (K)
[Setting Values: ROff,On] (M)
Memo :
●When [A/V Set] →[Video Set] →[HDMI/SDI Out] (K) or [HDMI Out]
(M) is set to “Off”, [Rec Trigger] is fixed at “Off” and selection is
disabled.
●When [System] →[Record Set] →[Rec Mode] is set to “Interval Rec”
or “Frame Rec”, [Rec Trigger] is fixed at “Off” and selection is disabled.
●Set to “Off” when connecting to a device that does not support record
trigger.
Setting Values added to menu item [LCD Backlight]
The brightness is improved by changing the setting value of [LCD/VF]
→[LCD Backlight].
A brightness setting that is 2 times the existing brightness setting has
been added.
This improves the visibility and allows for more delicate focusing.
Increasing the value increases the brightness.
[Setting Values: -1, ●0, +1]
Bit Rate added to live streaming (K)
Setting values are added to [System]
→
[Network]/[Settings]
→
[Live
Streaming Set]
→
[Frame & Bit Rate].
R
Cy
B
G
Y
IMg
R
Cy
B
G
Y
IMg
R
Cy
B
G
Y
IMg
R
Cy
B
G
Y
IMg
R
Cy
B
G
Y
IMg
R
Cy
B
G
Y
IMg
Magenta
Green
Blue
Yellow
Cyan
Red
R
Cy
B
G
Y
IMg
R
Cy
B
G
Y
IMg
R
Cy
B
G
Y
IMg
R
Cy
B
G
Y
IMg
R
Cy
B
G
Y
IMg
R
Cy
B
G
YI
IMg
Magenta
Green
Blue
Yellow
Cyan
Red
No. of Frames
for Frame &
Bit Rate
Resolution New values are in bold
60i, 60p,
30p 1920×1080 60i (12 Mbps), ●60i (8 Mbps),
60i (5 Mbps), 60i (3 Mbps),
1280×720 30p (8 Mbps), ●30p (5 Mbps),
30p (3 Mbps), ●30p (1.5 Mbps)
720×480
60i (8 Mbps), 60i (5 Mbps),
●
60i (3 Mbps),
60i (1.5 Mbps), 60i (0.8 Mbps), 60i (0.3 Mbps)
640×360 30p (3Mbps), ●30p (1.5 Mbps),
30p (0.8Mbps), ●30p (0.3Mbps)
50i, 50p,
25p 1920×1080 50i (12 Mbps), ●50i (8 Mbps),
50i (5 Mbps), 50i (3 Mbps)
1280×720 25p (8 Mbps), ●25p (5 Mbps),
25p (3 Mbps), 25p (1.5 Mbps)
720×576
50i (8 Mbps), 50i (5 Mbps),
●
50i (3 Mbps),
50i (1.5 Mbps), 50i (0.8 Mbps), 50i (0.3 Mbps)
640×360 25p (3Mbps), ●25p (1.5 Mbps),
25p (0.8Mbps), 25p (0.3Mbps)
GY-HM200Sheet2_EN.fm 1 ページ 2016年5月23日 月曜日 午後5時24分
© 2016 JVC KENWOOD Corporation B5A-1631-00
2
SMPTE 2022-1 FEC supported (K)
MPEG2-TS/RTP is added to streaming type and SMPTE2022-1 FEC is
supported.
Also, MPEG2-TS/TCP is removed.
“MPEG2-TS/RTP” added to menu item [Type]
“MPEG2-TS/RTP” is added to [System] →[Network]/[Settings] →[Live
Streaming Set] →[Server]/[Streaming Server] →[Server1] to [Server4]
→[Type].
[Setting Values: ●MPEG2-TS/UDP, MPEG2-TS/RTP, RTSP/RTP,
ZIXI, RTMP]
Caution :
●With the addition of this setting value, “MPEG2-TS/TCP” is removed
from the setting values of [Type].
[SMPTE 2022-1 FEC] added to menu item
When “MPEG2-TS/RTP” is selected in [System] →[Network]/[Settings]
→[Live Streaming Set] →[Server]/[Streaming Server] →[Server1] to
[Server4] →[Type], [SMPTE 2022-1 FEC] can be configured. Set to
“On” to use FEC (Forward Error Correction). This is a transmission
system that recovers the missing packets in the decoding process
without having to retransmit the missing packets.
[Setting Values: On, ●Off]
* The decoder must be compatible with SMPTE 2022-1.
[FEC Matrix] added to menu item
For setting the amount of FEC (Forward Error Correction) overhead for
configuring SMPTE 2022-1.
Memo :
●This item is selectable only when [SMPTE2022-1 FEC] is set to “On”.
●When [Type] is set to “MPEG2-TS/RTP”, only even numbers from 2 to
65530 can be specified as the port number for the transmission
destination port.
●When [Type] is set to “MPEG2-TS/RTP” and [SMPTE2022-1 FEC] is
set to “On”, N+2 and N+4 port numbers are also used in addition to the
port number (N) specified for the transmission destination port.
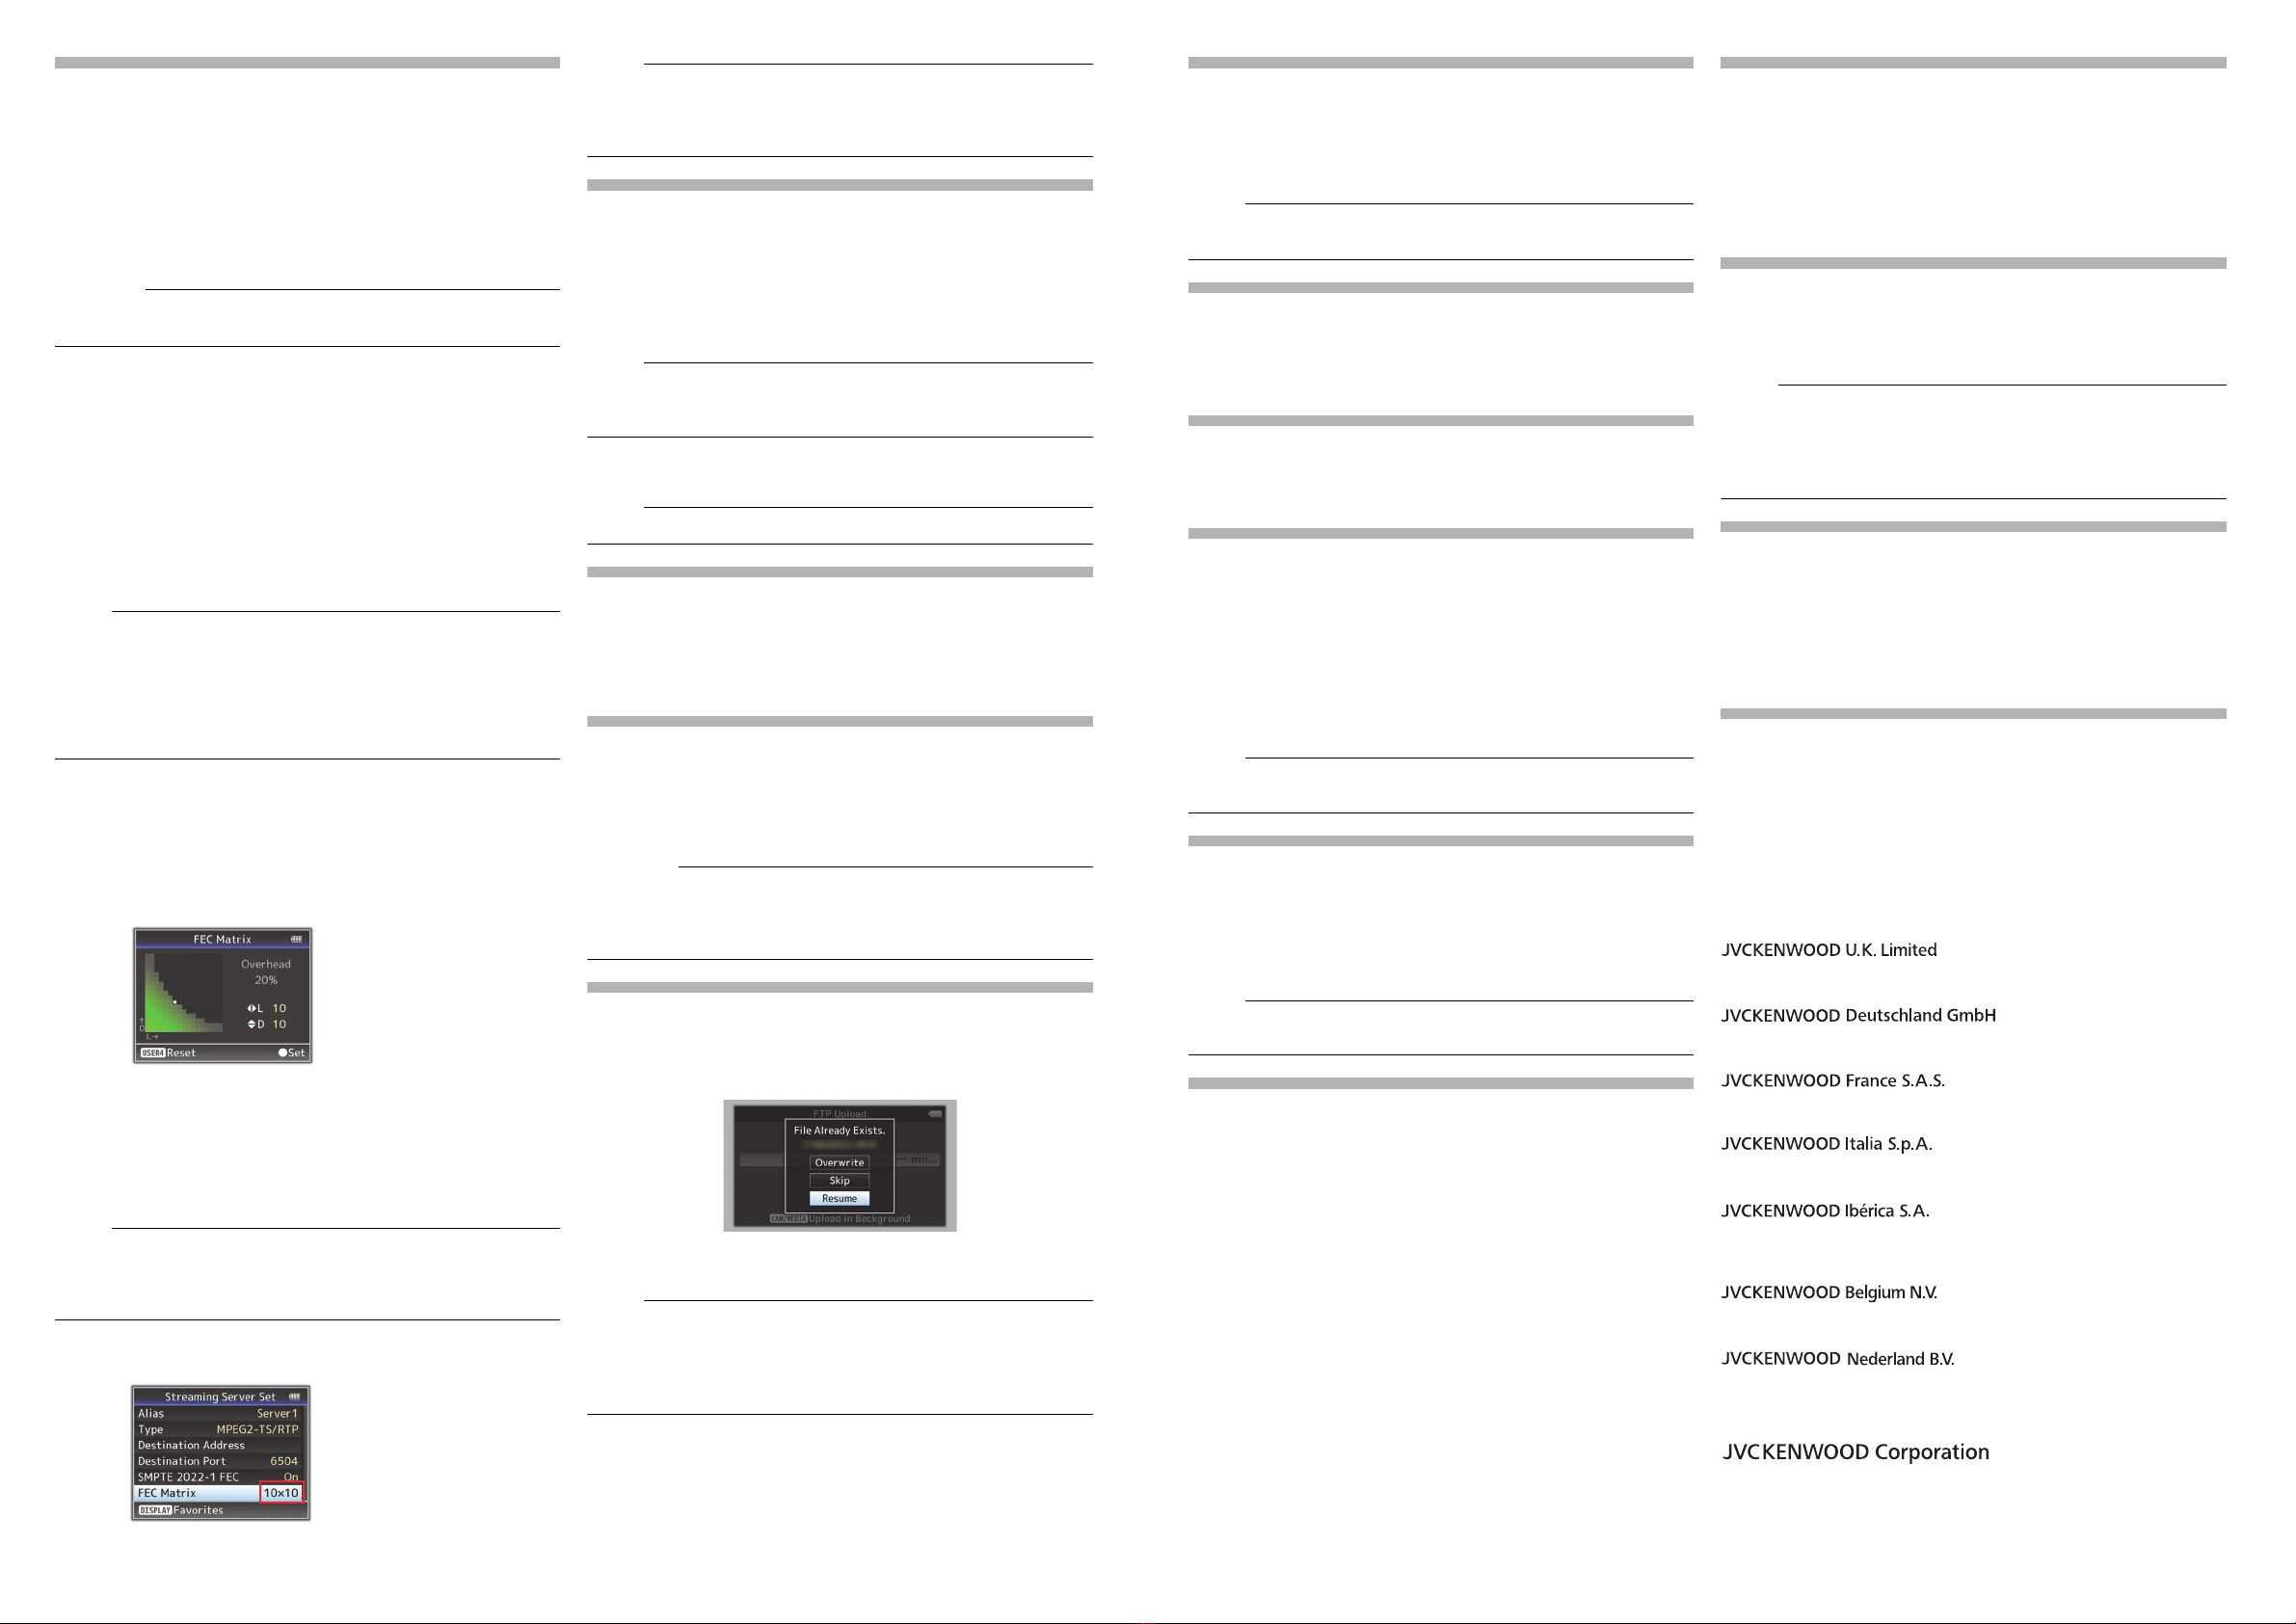
Setting the FEC Matrix
Set the amount of “FEC” (Forward Error Correction) overhead for
configuring [SMPTE 2022-1].
1Select [System] →[Network]/[Settings] →[Live Streaming Set] →
[Server]/[Streaming Server] →[Server1] to [Server4] →[Type] →
[FEC Matrix], then press the Set button ( ●).
The FEC adjustment screen appears.
2Adjust the L and D values.
Use the H/ Ibuttons to adjust the L value, and the J/Kbuttons to
adjust the D value.
The amount of FEC overhead changes when the L and D values are
changed.
To restore the L and D values to their default values, press the
[C.REVIEW/4] button.
Memo :
●Setting range
•4 ≦L ≦20 (Default value: L = 10)
•4 ≦D ≦20 (Default value: D = 10)
•L × D ≦100 (Default value: L×D = 10×10)
3Press the Set button ( ●).
The screen returns to the streaming server setting screen.
Memo :
●Increasing the amount of FEC overhead increases the packet loss
resilience but more network bandwidth is used.
●Even with the same amount of overhead, increasing the L value will
increase the packet loss (continuous packet loss) resilience.
[Adaptive Bit Rate] and [PCR Jitter] added to menu item
(K)
The following items are added to [System]
→
[Network]/[Settings]
→
[Live Streaming Set]
→
[Streaming Server]
→
[Server1] to [Server4].
●
Adaptive Bit Rate
If “On” is selected, the bit rate setting value of live streaming is set to
maximum limit, and the bit rate is changed automatically according to
changes in the network bandwidth. [Setting Values: On,
●
Off]
Memo :
●Adaptive bit rate setting is possible only when [Type] is set to “ZIXI” and
[Latency] is set to either “Medium” or “Low”.
* The bit rate is displayed on the status screen only when “On” is set.
●
PCR Jitter
Setting to “Low” reduces the PCR jitter of live streaming. [Setting
Values:
●
Normal, Low]
Memo :
●This item is selectable only when [Type] is set to “MPEG2-TS/UDP”.
“High” is added to menu item [Latency] (K)
High latency (high reliability) mode is added to ZIXI.
“High” is added to [System] →[Network]/[Settings] →[Live Streaming
Set] →[Server]/[Streaming Server] →[Server1] to [Server4] →
[Latency].
[Setting Values: High, Medium, ●Low, Minimum (ZIXI Off)]
[APN] added to menu item (K)
[APN] is added to [System] →[Network]/[Settings] →[Connection
Setup].
* APN: Access Point Name
* This item is grayed out and cannot be selected if APN cannot be set
for the adapter attached.
Caution :
●The APN setting is written into the cellular adapter, not this camera
recorder.  Setting a wrong APN may result in communication failure or
expensive bills from the telecommunications company. Set the APN
correctly.
FTP resume feature added (K)
When FTP transfer starts and there is a file of the same name on the
server with a file size smaller than the file to be transferred, the file on
the server will be regarded as an interrupted file during a FTP transfer.
A confirmation screen to resume transfer (append writing) appears.
If “Resume” is selected, FTP transfer is carried out such that it appends
from the position where it was interrupted. When FTP transfer ends
normally, “Successfully Completed.” appears on the screen.
Memo :
●FTP server equipped with resume function is required.
●If [System] →[Network]/[Settings] →[Clip Server] →[Clip-FTP1/2/3/4]
→[Protocol] is set to “SFTP”, the “Resume” function is disabled.
●If “HTTP” is selected in the [Select FTP Proxy] screen of the network
connection setting, the resume function is disabled.
Setting value “ZIXI” added to menu item [Protocol] (K)
“ZIXI” is added to [System] →[Network]/[Settings] →[Clip Server] →
[Clip-FTP1/2/3/4] →[Protocol].
If “ZIXI” is selected, [Username] in [System] →[Network]/[Settings] →
[Clip Server] →[Clip-FTP1/2/3/4] changes to [Stream ID]. [Setting
Values: ●FTP, SFTP, FTPS, FTPES, ZIXI]
Memo :
●To use the “ZIXI” setting, a dedicated server is needed separately.
●If “ZIXI” is set, the “Resume” function is enabled.
Items added to thumbnail screen
The following items are added to the metadata display on the detailed
screen of the thumbnail screen.
●
Clip Size
●
Gamma
Clip Continuous added to recording mode for AVCHD
“Clip Continuous” is added to the setting value for “AVCHD” format in
[System] →[Record Set] →[Rec Mode].
Clip Continuous Rec can also be operated in “AVCHD” mode.
Setting value “Side Cut” added to menu item [SD
Aspect]
“Side Cut” is added to the setting value for [A/V Set] →[Video Set] →
[SD Aspect].
●
Letter:
Displays as a wide image with the top and bottom blackened.
●
Squeeze:
Displays image that is squeezed horizontally.
●
Side Cut:
Displays wide screen with the left and right sides cut off.
[Setting Values: ●Squeeze, Letter, Side Cut]
Memo :
●When “SD” is selected in [System] →[Record Set] →[Record Format]
→[System], “Squeeze” and “Letter” can be selected.
2.5x display mode added to Expanded Focus function
in 4K mode
An approximately 2.5x display mode is added to the Expanded Focus
function when “4K” is selected in [System] →[Record Set] →[Record
Format] →[System]. You can use the Set button ( ●) to switch
between the conventional dot by dot equivalent (approximately 5x)
display and the 2.5x display.
Memo :
●Upon power on, the display of the initial Expanded Focus is dot by dot
equivalent (approximately 5x).
[Camera Data] added to menu item
[Camera Data] is added to [LCD/VF] →[Display Settings].
●
Always:
The Iris F-number, Gain, Shutter and White Balance values are
always displayed. The [A] icon appears on the left side of the gain
value in the mode.
●
Manual Only:
The Iris F-number, Gain, Shutter and White Balance values are
displayed only in Manual mode.
[Setting Values: Always, ●Manual Only]
Setting for adjusting Iris/Shutter/AE Level using iris
dial added
Setting value “Iris/Shutter/AE Level” are added to [Camera Function] →
[Iris Dial].
If “Iris/Shutter/AE Level” is selected, the iris dial that is normally used to
adjust the iris will be used to adjust the shutter speed and the AE level
when the shutter button and AE button are pressed respectively. After
which, the iris dial resumes its iris operation.
[Setting Values: ●Iris, Shutter, AE Level, Iris/Shutter/AE Level]
[HDMI TC] added to menu item
[HDMI TC] is added to [A/V Set]
→
[Video Set].
For setting whether to superimpose the time code to the HDMI output
terminal.
[Setting Values: ROff, On]
Memo :
●When [A/V Set]
→
[Video Set]
→
[HDMI/SDI Out] is set to “SDI” or
“Off”, [HDMI TC] is fixed at “Off” and selection is disabled. (K)
●When [A/V Set]
→
[Video Set]
→
[HDMI Out] is set to “Off”, [HDMI TC]
is fixed at “Off” and selection is disabled. (M)
●
Set to “Off” when connecting to a device that does not support HDMI TC.
Setting value changed in [Resolution] under [HDMI/SDI
Out] (K) and [HDMI Out] (M)
The video output is changed to native frame rate and setting values are
added. For selecting the resolution of video output from the [HDMI]
terminal or [SDI OUT] terminal according to the monitor to be
connected.
[Setting Values: 576i, 576p, 480i, 480p, 720p, 1080i, 1080p, 1080/30p,
1080/25p, 1080/24p, 2160/24p, 2160/25p, 2160/30p]
Other notes
The “MPEG LA MPEG-2 Patent” described in the “INSTRUCTIONS” of
this book is not applicable to this product.
Importer (EU only)
12 Priestley Way, London NW2 7BA, UNITED KINGDOM
Importeur (Nur EU)
Konrad-Adenauer-Allee 1-11, 61118Bad Vilbel, DEUTSCHLAND
Importateur (EU uniquement)
7 Allee desBarbanniers, CS20034 92632 GennevilliersCédex, FRANCE
Importatore (Solo EU)
ViaG. Sirtori 7/9, 20129 Milano, ITALIA
Importador (Solamente EU)
Ctra. Rubi, 88 Edificio Can Castanyer, 08174 Sant Cugat del Valles,
Barcelona, ESPAÑA
Importeur (Alleen EU)
Leuvensesteenweg 248J, 1800 Vilvoorde, BELGIQUE
Importeur (Alleen EU)
Amsterdamseweg 37, 1422 AC Uithoorn, NEDERLAND
Manufacturer
3-12, Moriya-cho, Kanagawa-ku, Yokohama-shi, Kanagawa, 221-0022,
JAPAN
GY-HM200Sheet2_EN.fm 2 ページ 2016年5月23日 月曜日 午後5時24分

Other manuals for GY-HM200

2

This manual suits for next models

1

Other JVC Camcorder manuals

JVC GR-AX470EE User manual

JVC

JVC GR-AX470EE User manual

JVC GZMG21US - Everio Camcorder - 680 KP User manual

JVC

JVC GZMG21US - Everio Camcorder - 680 KP User manual

JVC GR-AXM205 User manual

JVC

JVC GR-AXM205 User manual

JVC D-9 User manual

JVC

JVC D-9 User manual

JVC Everio GZ-MC100US User manual

JVC

JVC Everio GZ-MC100US User manual

JVC GZMG330AUS - Everio Camcorder - 680 KP User manual

JVC

JVC GZMG330AUS - Everio Camcorder - 680 KP User manual

JVC GZ-E100BUA User manual

JVC

JVC GZ-E100BUA User manual

JVC GR-DVL300 User manual

JVC

JVC GR-DVL300 User manual

JVC GR-FX15EK User manual

JVC

JVC GR-FX15EK User manual

JVC GR DV 3 User manual

JVC

JVC GR DV 3 User manual

JVC GZ-R15 Operating and maintenance manual

JVC

JVC GZ-R15 Operating and maintenance manual

JVC GZ HD5 - Everio Camcorder - 1080i Owner's manual

JVC

JVC GZ HD5 - Everio Camcorder - 1080i Owner's manual

JVC GR-DF420EK User manual

JVC

JVC GR-DF420EK User manual

JVC GZ-HD5 AA Manual

JVC

JVC GZ-HD5 AA Manual

JVC GR-AXM1U User manual

JVC

JVC GR-AXM1U User manual

JVC GR-AXM20 Instruction Manual

JVC

JVC GR-AXM20 Instruction Manual

JVC Everio GZ-R10 Operating and maintenance manual

JVC

JVC Everio GZ-R10 Operating and maintenance manual

JVC 1204YDR-NF-VM User manual

JVC

JVC 1204YDR-NF-VM User manual

JVC GR-SXM248 User manual

JVC

JVC GR-SXM248 User manual

JVC Everio 1109MNH-SW-VMUC User manual

JVC

JVC Everio 1109MNH-SW-VMUC User manual

JVC GR-X5U User manual

JVC

JVC GR-X5U User manual

JVC GZ HD10 - Everio Camcorder - 1080p Manual

JVC

JVC GZ HD10 - Everio Camcorder - 1080p Manual

JVC GR-AXM250UC User manual

JVC

JVC GR-AXM250UC User manual

JVC GR-DA30AA User manual

JVC

JVC GR-DA30AA User manual

Popular Camcorder manuals by other brands

Canon MVX35i Brochure & specs

Canon

Canon MVX35i Brochure & specs

ALSONE 3051STRM manual

ALSONE

ALSONE 3051STRM manual

Sony Handycam DCR-SR210E Handbook

Sony

Sony Handycam DCR-SR210E Handbook

Sony Handycam DCR-PC6E Service manual

Sony

Sony Handycam DCR-PC6E Service manual

Sony Handycam DCR-SR35E Handbook

Sony

Sony Handycam DCR-SR35E Handbook

Panasonic Digital Palmcoder Multicam PV-DC152-K operating instructions

Panasonic

Panasonic Digital Palmcoder Multicam PV-DC152-K operating instructions

Sony Handycam HDRSR11 operating guide

Sony

Sony Handycam HDRSR11 operating guide

Response QC 3674 operation instruction

Response

Response QC 3674 operation instruction

Sony Handycam HDR-PJ260 Service manual

Sony

Sony Handycam HDR-PJ260 Service manual

Panasonic VDR-D220E Service manual

Panasonic

Panasonic VDR-D220E Service manual

Sony HDR-AS50 Startup guide

Sony

Sony HDR-AS50 Startup guide

RCA EZ207 - Small Wonder Camcorder Guía de inicio Rápido

RCA

RCA EZ207 - Small Wonder Camcorder Guía de inicio Rápido

Panasonic Palmcorder Quasar VM-L152 operating instructions

Panasonic

Panasonic Palmcorder Quasar VM-L152 operating instructions

Canon SCOOPIC 16- M Operation manual

Canon

Canon SCOOPIC 16- M Operation manual

Lumens VC-B20UA installation guide

Lumens

Lumens VC-B20UA installation guide

Sony HDR-CX190 operating guide

Sony

Sony HDR-CX190 operating guide

Samsung VP-DC563i Owner's instruction manual

Samsung

Samsung VP-DC563i Owner's instruction manual

Panasonic HC-X1500 Basic operating instructions

Panasonic

Panasonic HC-X1500 Basic operating instructions

manuals.online logo
manuals.online logoBrands
  • About & Mission
  • Contact us
  • Privacy Policy
  • Terms and Conditions

Copyright 2025 Manuals.Online. All Rights Reserved.