manuals.online logo
Brands
  1. Home
  2. •
  3. Brands
  4. •
  5. JVC
  6. •
  7. Camcorder
  8. •
  9. JVC GY-HM200HW Parts list manual

JVC GY-HM200HW Parts list manual

r.002-002
1
GY-HM200HW Additional Functions
Please read this together with the “INSTRUCTIONS”.
Product and company names included in this instruction manual are trademarks and/or registered
trademarks of their respective companies. Marks such as ™and ® have been omitted in this manual.
Overlay
This camera recorder enables single-camera producing real-time text and image overlays on recorded
or streamed HD video. Overlays are available when the recording resolution is 1920×1080 only.
Selecting the Overlay Type
Press [MENU] button of the camera recorder to display the menu screen, and then select “HoW
(Default)”in [Main Menu] →[Overlay Settings] →[Type]. Then press [MENU] button to close the menu
screen.
HoW (Default) :
None:None displayed.
Overlay Control
1. Following the “Connecting to the Network” directions in the “INSTRUCTIONS” stored in the
CD-ROM or the Mobile User Guide
(http://manual3.jvckenwood.com/pro/mobile/global/), connect a network device such as a
smartphone or a tablet with the camera recorder via network. Then, launch a web browser on the
network device.
2. Input the following URL in the address field of the web browser.
http://“IP address of the camera recorder“
Example: http://192.168.0.1
You can find the “IP address of the camera recorder” by the following procedure.
(1) Press [STATUS] button of the camera to display the status screen.
(2) Use the cross-shaped button ( ) to display the [Network] status.
3. Input a username (jvc) and a password (default: 0000) on the login screen. And then, press the
[Overlay Control] button on the web page to move to the overlay control page.
Memo
:
This Camera cannot use the [Planning Metadata Function] in the INSTRUCTIONS.
<A>
<B>
<C>
<D>
<B>
⑦
⑤
⑥
①
①
①
②
④
③
Image
Logo
Title 1
Title 2
Memo
:
Section <A> Title 1
Section <B> Title 2
Section <C> Background Image
Section <D> Logo Image
①[Display] button
Activation of display on screen.
②Title 2 pre-input area
Highlighted sentence will be displayed in
Title 2.(Ref④)
③[Edit] button
Select to engage input mode.
④Selecting Title 2 sentence
Select the sentence to display in section
<B> by [▼] or [▲
] buttons, then update by
[Set] button.
⑤[Overlay] button
Turns the entire overlay on or off.
⑥Title 2 pre-input area (input mode)
After pushing [Edit] button ③
, input
sentences will be accessible for Title 2.
Enter the content for the desired line.
⑦[Cancel] and [Save] button
Press [Save] to retain the pre-input data to
the camera. Press [Cancel] to exit the input
mode
●
Press the [DISPLAY] button of the camera
to switch the display mode if the overlay is
difficult to see due to the camera operation
graphics.
r.002-002
2
Available characters for “Title 1”and “Title 2”are as follows:
!"#$%&'()*+,-./0123456789:;<=>?@ABCDEFGHIJKLMNOPQRSTUVWXYZ[\]^_`abcdef
ghijklmnopqrstuvwxyz{|}~
¡¢£¤¥¦§¨©ª«¬®¯°±²³´µ¶·¸¹º»¼½¾¿ÀÁÂÃÄÅÆÇÈÉÊËÌÍÎÏÐÑÒÓÔÕÖרÙÚÛÜÝÞßàáâ
ãäåæçèéêëìíîïðñòóôõö÷øùúûüýþÿĞğİıŒœŞşŠšŸŽžƒˆ˜–—‘’‚“”„†‡•…‰‹›€™
Adding additional logo images
You can add up to eight logo images in addition to those that come standard in the camera.
1. Copy the SDP file into a root folder of a SDHC/SDXC card. The SDP file name length must be 8
characters or less. Also the filename extension must be “.sdp”.
Example: “overlay1.sdp”
2. Insert the SDHC/SDXC card into slot A or B, then select [Main Menu] →[Overlay Settings] →
[Import User Layout]. The existing SDP data in the camera will be overwritten after importing.
3. The SDP files in the root folder of slot A and B are displayed (max. 8 files each). Select the SDP file
you would like to import and execute “Import”. Import takes about 20 –30 seconds.
In the case of import failure, the following message may be displayed:
Error Message
Status
Action
Failed To Read File From
Media!
・Card is defective.
・SDP file data is invalid.
・Use other card.
No User Layout Exists.
・SDP file data is invalid.
Use another SDP file.
Failed To Write File To The
Camera!
There may be a problem with
the camera.
Please contact a local dealer
in your area.
Import Error!
An internal error has
occurred.
Please contact a local dealer
in your area.
4. In order to apply the imported SDP file to the overlay, set [Main Menu] →[Overlay Settings] →
[Type] to “HoW (Custom)”. If a valid SDP file has not imported into the camera, the value will be
“None”and the characters grayed out. In this case, please import a valid SDP file [Import User
Layout].
Displaying the Image in Full-Screen (Full-Screen Graphic Function)
This function allows images of announcements, advertisements and the like to be overlaid on the
entire screen.
Importing the Image to Display to the Camera Recorder
1. Get ready the image to be displayed. Format supported include JPEG (.jpg extension) and PNG
(.png extension).
2. Copy the image file to the root folder of the SDHC/SDXC card. The maximum number of files that
can be copied is 50. The display order can be sorted according to the file name. Use an SDHC/SDXC
card with recording specifications that fit the current recording settings of the camera recorder.
3. Select [Main Menu] →[Overlay Settings] →[Full Screen Graphic] on the camera recorder unit.
4. Insert the SDHC/SDXC card that contains the copied image file into the SD card slot A or B of the
camera recorder, followed by selecting [Graphic Import A] or [Graphic Import B] accordingly and
execute import.
When import is executed, the previously imported image will be deleted.
Memo
:

You can input up to 36 bytes of characters for the Title1 and up to 2047 bytes (up to 32
bytes of each line) of characters for the Title2.
The numbers of available characters are depending on kind of its character.
Rules for the file name
:
●
Add a 2-digit number from 01 to 50 to the beginning of the file name. The files will be
displayed in ascending order according to the number.
Example:
When files with the names of 01flower.png, 02car.jpg and 13red.png are imported, they will
be displayed in the following sequence:
01flower.png →02car.jpg →13red.png
●
Only alphanumeric characters and underscore (_) can be used for the 3rd and subsequent
characters of the file name.
●Make sure that the file name does not exceed 31 characters.
r.002-002
3
5. To delete an imported image file, select [Delete Graphic]. The imported image file cannot be
deleted in [Main Menu] →[System] →[Reset All].
Displaying Images
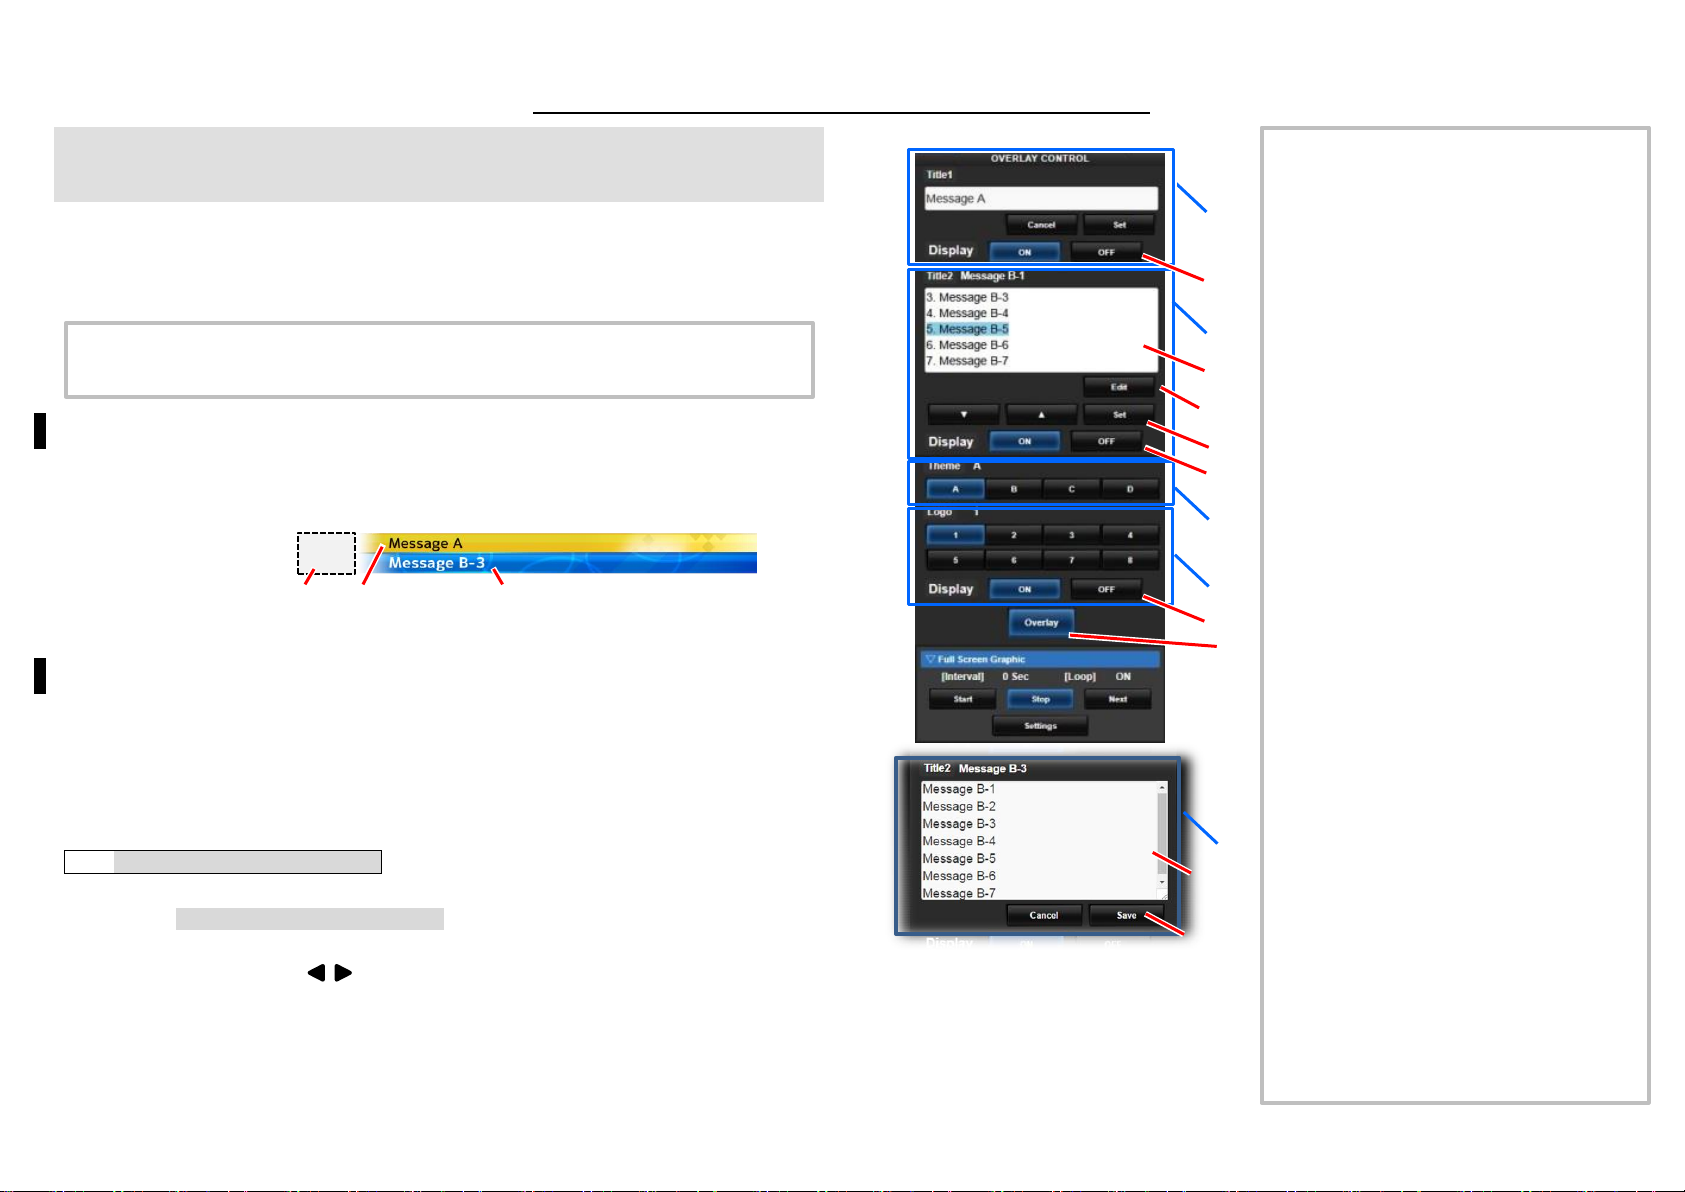
Start from the Input Scoreboard Data web screen. (→“Overlay Control”)
Memo
:
The total number of imported image files and the amount of space used can be viewed in [Main
Menu] →[Overlay Settings] →[Full Screen Graphic] →[Status]. The amount of space that
is displayed may be larger than the actual size of the files. The overlay is always present on the
live streaming images.
The largest size that can be imported is approximately 23 MB, which also includes the amount of
space as shown in [Status] and the size of the imported SDP files.
Images that can be displayed are as follows.
Recording Resolution
1920x1080
1280x720
Image Size
960x540
640x360
File Size
1MB and below
JPEG
- Gradation: 8 bits
- Pixel format: YCbCr or grayscale
- Baseline JPEG
PNG
- Bits/Channel: 1, 2, 4, 8
- Pixel format: Grayscale, indexed, truecolor (RGB), grayscale with alpha, truecolor with alpha
(RGBA)
- Non-interlaced PNG
When an image that cannot be displayed is imported to the camera recorder, a camera error
message indicating that “Unsupported Graphic Format” appears when the camera recorder
attempts to display the image. Check in advance to ensure that the image can be displayed as
expected.
When the frame rate of the recording format is 60i or 50i, the image will not be displayed in the
12 lines at the bottommost part of the screen.
Memo
:
To continue displaying a single image, set [Interval Time] to “0”.

The image may be displayed longer than several tens of seconds when recording and live
streaming is being executed simultaneously or when there are many information displayed
on the LCD/VF screen. In this case, reduce the resolution and bit rate of the recording and
live streaming or press the [DISPLAY] button of the camera recorder several times to
minimize the information displayed on the LCD/ VF screen.

To make use of the full-screen graphic function without displaying the score, select a setting
other than “None”in [Main Menu] →[Overlay Settings] →
[Type] , followed by
disabling the [Overlay] button on the Overlay Control web screen.

During the displaying of images, if the format of the next image intended for display is not
supported, “Unsupported Graphic Format” message appears on the camera and the image
will not be displayed. Import an image with a displayable format. (→“
Importing the Image
to Display to the Camera Recorder”) →“Memo”
Stop:
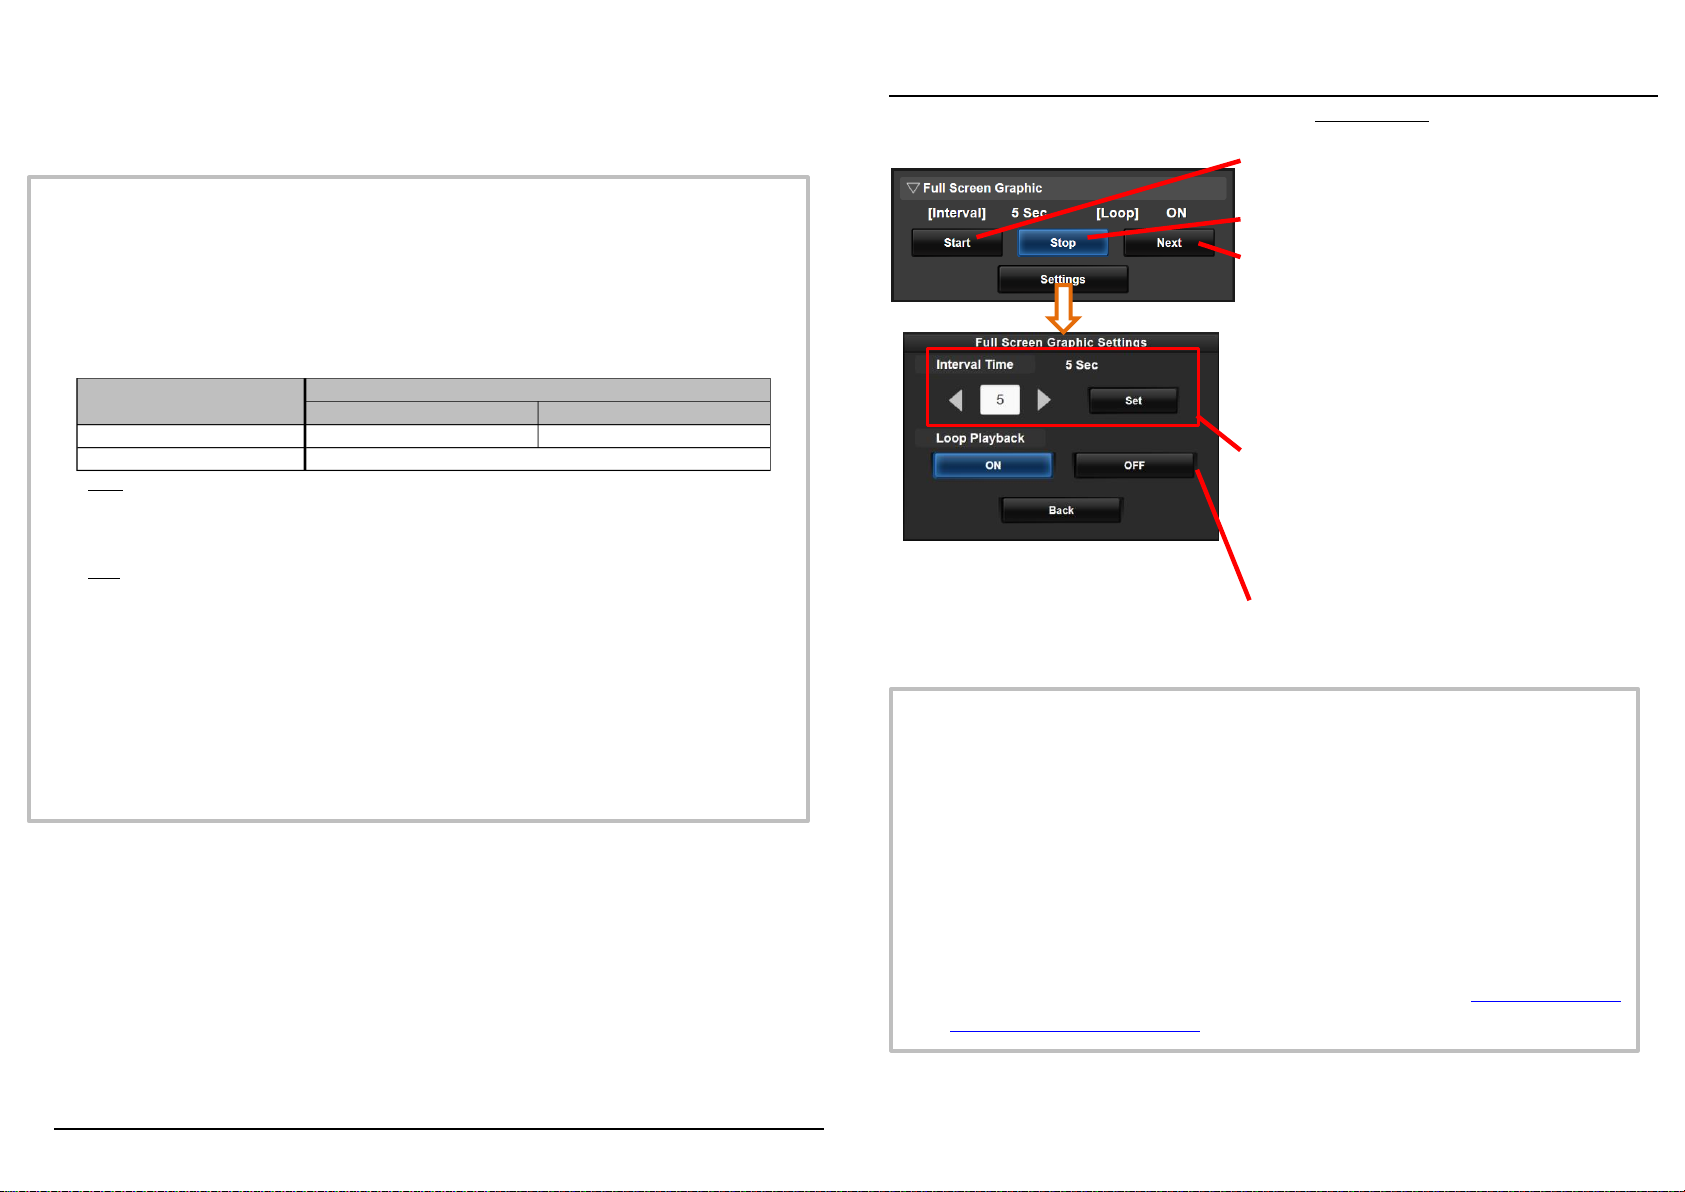
Stops displaying the image.
Next:
When image is displayed: Displays the next image
When image is not displayed: Starts displaying
the image following
the last image
displayed previously.
Depending on the state of the camera, it may
take some time before the image is acutually
displayed after pressing “Next”. (→Memo)
Start:
Starts displaying the image.
Interval Time:
For setting the display time for a single image.
Depending on the state of the camera, it may
take some time before the image is actually
displayed after pressing“Start. Also, an image
may be displayed for a longer period of time than
the preset interval time. (→Memo)
Loop Playback:
Set to [ON] to display the first image after
displaying the last image.
r.002-002
4
Selecting Overlay Output
When the overlay is selected, you can chose whether the contents is overlaid onto HD recording clips
or output video signals such as HDMI and SDI, or both.
[Main Menu]→[Overlay Settings]→[Output]
HD Recording
For setting whether to overlay the contents on HD recording clip.
HDMI/SDI
For setting whether to overlay the contents on video output such as HDMI, SDI and AV Output terminal.
Importing title data via FTP
You can import title 1 and title 2 pre-input data as an XML file via FTP. This is useful when you want to
import title data which is prepared in advance.
XML file format
Edit the <Description> and <Creator> tag element using the XML editor. (Indicated by the frames below)
<Description>: Title 2 pre-input data (up to 2047 bytes. Each line: up to 32 bytes)
<Creator>: Title 1 (up to 36 bytes)
Importing XML file
According to “Importing Metadata” in the “INSTRUCTIONS”, import the XML file into the camera.
Memo
:

When the recording format is “HD+Web”, the overlay is always present on the “Web”
recording clip.
The overlay is always present on the live streaming images.
When [HDMI/SDI] is “Off”, [AV Set]→[Video Set]→[Display On TV] is set to “---“.
[Output] cannot be changed while the camera is recording or live streaming.

When using the SD side cut output function while recording the contents in HD mode, the
left and right edges of the contents may be cropped.

When the recording format is “HD”, the overlay display settings are also reflected when
switched to the Time Stamp output.
<?xml version="1.0" encoding="UTF-8"?>
<NRT-MetaInterface lastUpdate="2012-07-26T18:06:21+09:00"
xmlns="urn:schemas-proHD:nonRealTimeMetaInterface:ver.1.00"
xmlns:xsi="http://www.w3.org/2001/XMLSchema-instance">
<MetaData>
<Title1></Title1>
<!—Not Used -->
<Title2></Title2>
<!—blank -->
<Description>Message B-1
Message B-2
Message B-3</Description>
<!-- ,max2047bytes -->
<Creator>Message A</Creator>
<!-- ,max36bytes -->
</MetaData>
</NRT-MetaInterface>

Other JVC Camcorder manuals

JVC GR-DVX507 User manual

JVC

JVC GR-DVX507 User manual

JVC GZ MG155 - Everio Camcorder - 1.07 MP User manual

JVC

JVC GZ MG155 - Everio Camcorder - 1.07 MP User manual

JVC TK-C9200EX User manual

JVC

JVC TK-C9200EX User manual

JVC GZ-HD5US User manual

JVC

JVC GZ-HD5US User manual

JVC GY-HM700 User manual

JVC

JVC GY-HM700 User manual

JVC gz-hm430bek Operating and maintenance manual

JVC

JVC gz-hm430bek Operating and maintenance manual

JVC EVERIO GZ-R50 Manual

JVC

JVC EVERIO GZ-R50 Manual

JVC GR-SX850 User manual

JVC

JVC GR-SX850 User manual

JVC Everio GZ-HM30AA Operating and maintenance manual

JVC

JVC Everio GZ-HM30AA Operating and maintenance manual

JVC GR-DVL9000 User manual

JVC

JVC GR-DVL9000 User manual

JVC GR-D47 User manual

JVC

JVC GR-D47 User manual

JVC DZ-VCA1SE User manual

JVC

JVC DZ-VCA1SE User manual

JVC GR-AXM300 User manual

JVC

JVC GR-AXM300 User manual

JVC GY-HM620E User manual

JVC

JVC GY-HM620E User manual

JVC GY-X2BU - S-vhs 3-ccd Camcorder Less Lens User manual

JVC

JVC GY-X2BU - S-vhs 3-ccd Camcorder Less Lens User manual

JVC GR-DV700 User manual

JVC

JVC GR-DV700 User manual

JVC GR-DV3000A User manual

JVC

JVC GR-DV3000A User manual

JVC GR-AX1010U User manual

JVC

JVC GR-AX1010U User manual

JVC Everio GZ-R10 Operating and maintenance manual

JVC

JVC Everio GZ-R10 Operating and maintenance manual

JVC GY-HM650U User manual

JVC

JVC GY-HM650U User manual

JVC GR-C1 User manual

JVC

JVC GR-C1 User manual

JVC GR-FXM41 User manual

JVC

JVC GR-FXM41 User manual

JVC GZ-MG77E/EK User manual

JVC

JVC GZ-MG77E/EK User manual

JVC GR-SXM98AC User manual

JVC

JVC GR-SXM98AC User manual

Popular Camcorder manuals by other brands

PANAVISION Millennium DXL quick guide

PANAVISION

PANAVISION Millennium DXL quick guide

Yashica Super-800 electro Instruction booklet

Yashica

Yashica Super-800 electro Instruction booklet

Samsung VP-D323 Owner's instruction book

Samsung

Samsung VP-D323 Owner's instruction book

Canon Vixia HF S21 Workshop manual

Canon

Canon Vixia HF S21 Workshop manual

ARRI Arricam Lite quick guide

ARRI

ARRI Arricam Lite quick guide

Sony Handycam CCD-F301 operating instructions

Sony

Sony Handycam CCD-F301 operating instructions

Panasonic NV-GS250 operating instructions

Panasonic

Panasonic NV-GS250 operating instructions

Coleman CVW9HD instruction manual

Coleman

Coleman CVW9HD instruction manual

Canon XL 2 instruction manual

Canon

Canon XL 2 instruction manual

Panasonic AG-AC30PJ Service manual

Panasonic

Panasonic AG-AC30PJ Service manual

Panasonic AG-AC90AP operating instructions

Panasonic

Panasonic AG-AC90AP operating instructions

Toshiba Camileo BW10 specification

Toshiba

Toshiba Camileo BW10 specification

Hitachi DZHV584E instruction manual

Hitachi

Hitachi DZHV584E instruction manual

DXG DC DXG-202V user manual

DXG

DXG DC DXG-202V user manual

Panasonic AJD900 - DVC PRO 50 CAMCORDER operating instructions

Panasonic

Panasonic AJD900 - DVC PRO 50 CAMCORDER operating instructions

Optronis CP70-1HS-M/C-1900 user manual

Optronis

Optronis CP70-1HS-M/C-1900 user manual

Panasonic AJ-PX230E operating instructions

Panasonic

Panasonic AJ-PX230E operating instructions

Panasonic Palmcorder PV-A207 user guide

Panasonic

Panasonic Palmcorder PV-A207 user guide

manuals.online logo
manuals.online logoBrands
  • About & Mission
  • Contact us
  • Privacy Policy
  • Terms and Conditions

Copyright 2025 Manuals.Online. All Rights Reserved.