JVC VideoMovie GR-A30 User manual


Thank
you
for
purchasing
the
JVC
GR·A30U VideoMovie. Before use, read this instruction
booklet
carefully for
obtaining
the
best results from
your
new unit.
Diagrams are
on
the
reverse side
of
th
is
page. Fold it
out
and keep it
opened
so
that
you
can refer
to
the
diagrams
when
you
are reading
this
booklet
.
INFORMATION
This equi
pment
generates and uses rad
io
fre-
quency
energy
and
if
not installed and used
properly,
that
i
s,
in
strict
accordance
wi
th
the
manufacturer's
instructions, may cause inte
r-
ference
to
rad io
and
televisi
on
recepti
on
. It
has been
type
tested
and
found
to
comp
ly
with
the
limits
for
a Class 8 computin!1 device
in
accordance wi
th
the
specifications
in
Sub-
part
J
of
Part
15
of
FCC Rules, which are
designed
to
provide reasonable
protect
i
on
against such interference
in
a residential i
n-
stallation. However,
there
is
no !1Uarantee
that
interference will
not
occur
in
a particular
installation.
If
this
equipment
does cause in-
terference
to
radio
or
television reception,
which can be
dete
rmined by turning
the
equipment
off
and
on,
the
user
is
encoura!1ed
to
try
to
correct
the
interference by
one
or
more
of
the
following measures:
Reorient
the
receivi
ng
antenna;
Relocate
this
equipment
with
respect
to
the
receiver;
Move
this
equi
pment
away from
the
receiver;
Plug this equipm
ent
into a di
fferent
outlet
so
that
this equi
pment
and
receiver are
on
different
branch circ
ui
t
s.
If
necessary, t he user should consult
th
e dealer
or
an experienced radio/television
techn
ici
an
for
add
it ional suggestio
ns
.
The
user may
fi
nd
the
following
booklet
prepared by
the
Federal
Communications Commission helpful:
"How
to
Identify and Resolve Rad i
o-
TV
Interference Problems".
This
booklet
is
ava
il
able from
the
US Govern-
ment
Pr
inting Office, Wash ington, D.C
.,
20
4
02
, Stock No.
004-000
-
00345-4.
CONTENTS
Safety
precautions
. . . . . . . . . . . . . . . . . . 1
Precauti
ons
. . . . . . . . . . . . . . . . . . . . . . . 2
Video cassettes . . . . . . . . . . . . . . . . . . . . . 3
Features . . . . . . . . . . . . . . . . . . . . . . . . . 4
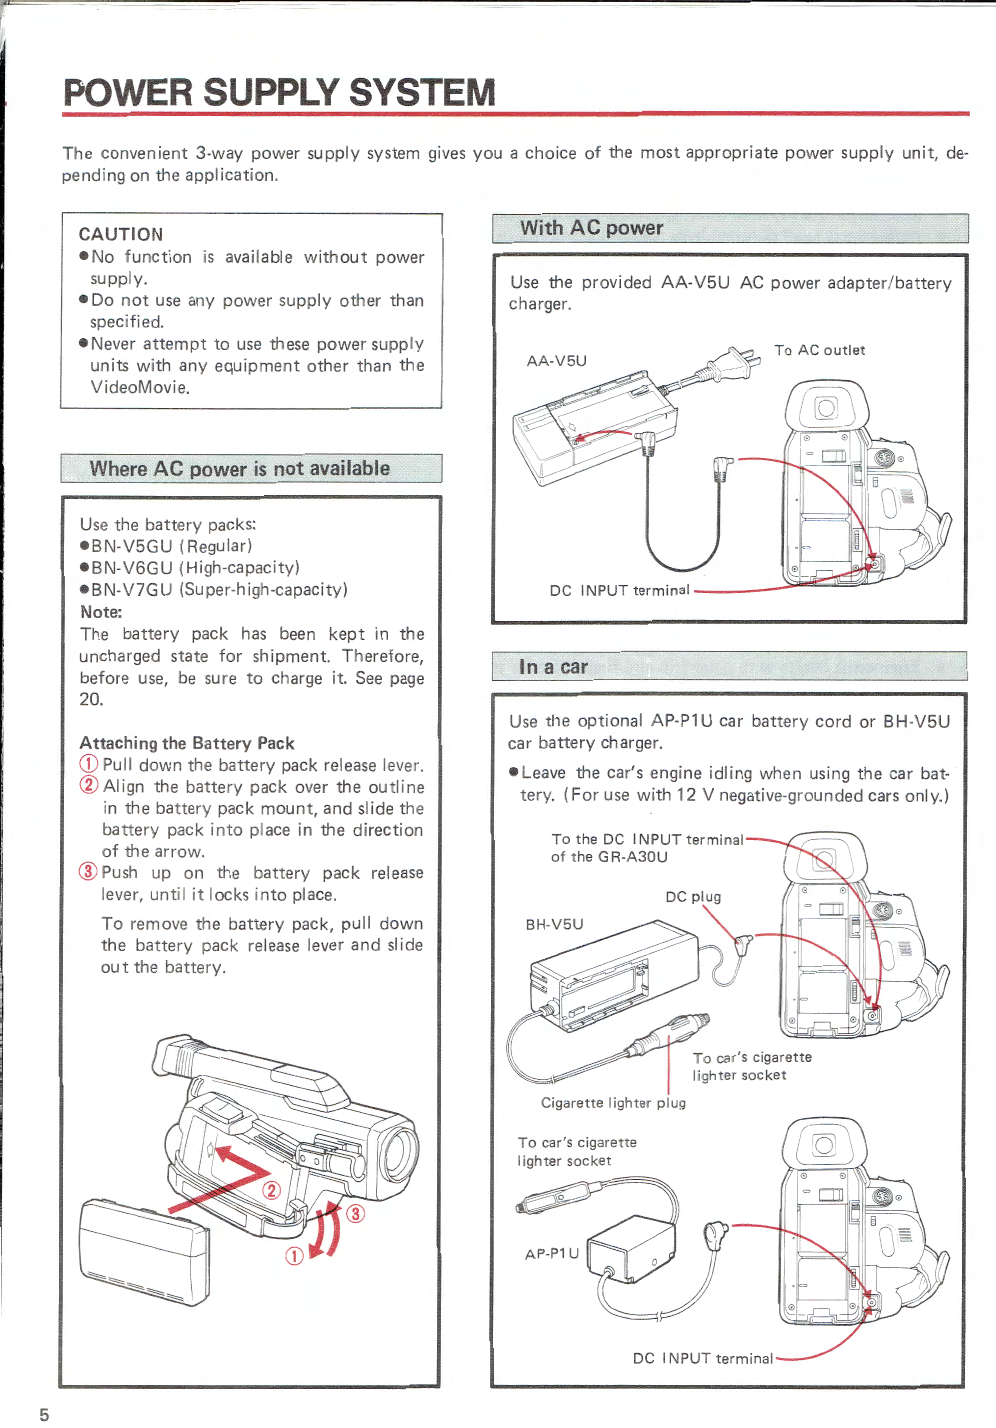
Power supply system . . . . . . . . . . . . . . . . . 5
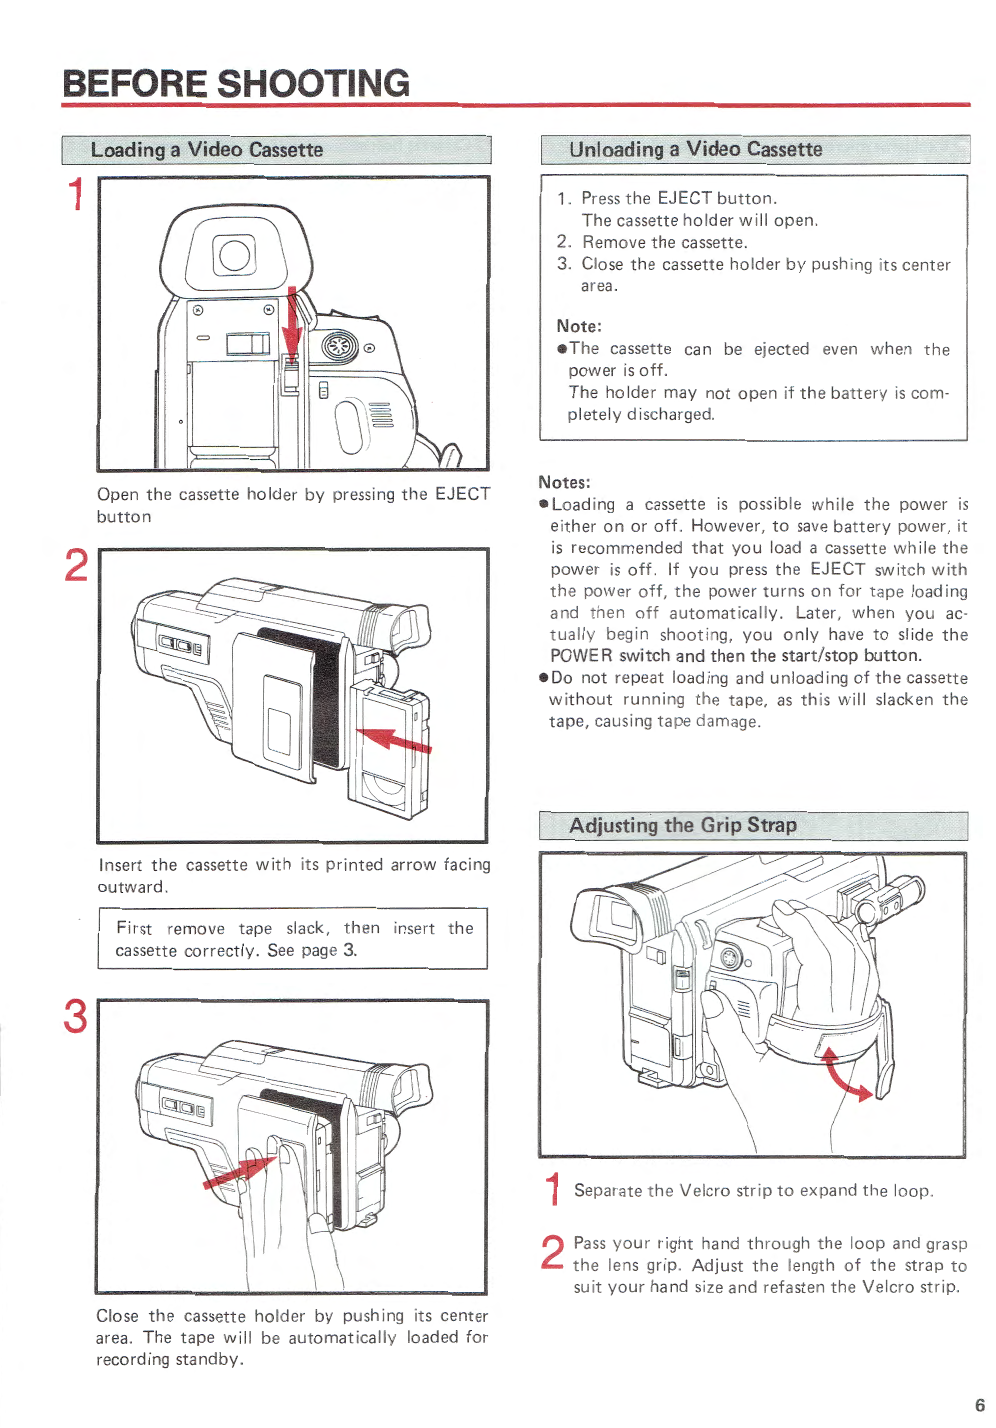
Before shooting . . . . . . . . . . . . . . . . . . . . 6
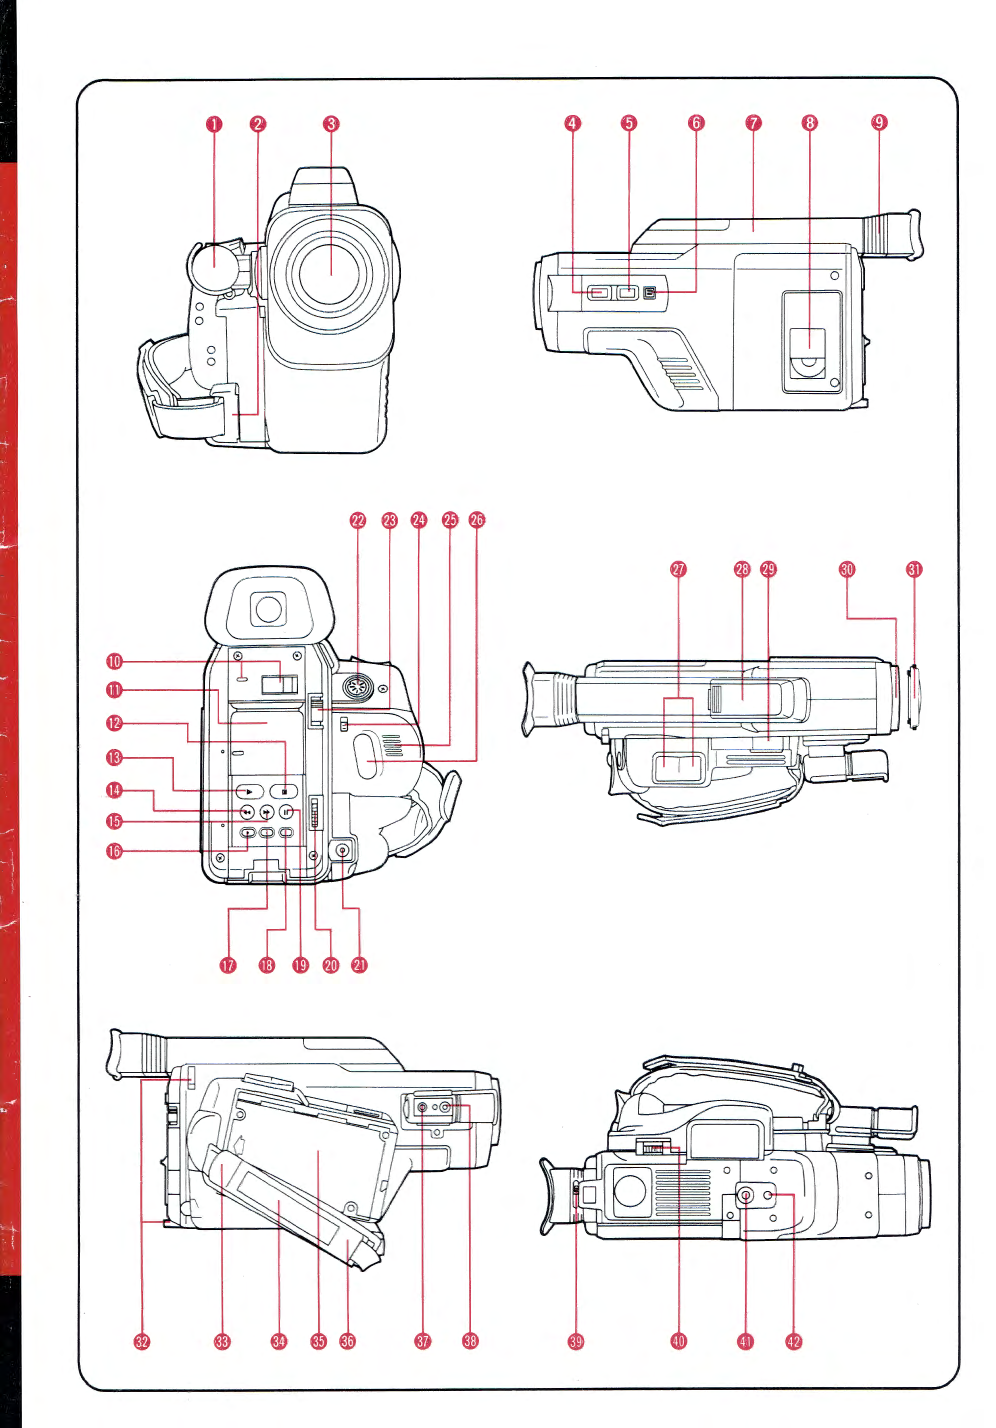
Controls
and
connectors
. . . . . . . . . . . . . . 7
Recording
operation
. . . . . . . . . . . . . . . . . 9
Precautions
for
auto
-focus . . . . . . . . . . .
10
Macro
shot
. . . . . . . . . . . . . . . . . . . . .
10
One-hour recording . . . . . . . . . . . . . . . .
10
Trigger alarm system . . . . . . . . . . . . . . .
10
Rehearsal . . . . . . . . . . . . . . . . . . . . . .
10
Viewfinder monitoring . . . . . . . . . . . . .
11
Remaining
tape
time
indicat
or
. . . . . . . .
11
Battery warning . . . . . . . . . . . . . . . . . .
11
Lithium
battery
warning . . . . . . . . . . . .
11
Power save
and
tape
protection
circuit . . . . .
12
Assemble recording
technique
-1 . . . . . . . . .
12
Assemble recording technique-2 . . . . . . . . .
12
Special techniques
Zooming . . . . . . . . . . . . . . . . . . . . . . .
13
High-speed
shutter
. . . . . . . . . . . . . . . .
13
Focus l
ock
. . . . . . . . . . . . . . . . . . . . .
13
Recording
the
date/time
. . . . . . . . . . . . . .
14
Playback . . . . . . . . . . . . . . . . . . . . . . . . .
15
Connect
i
on
to
a television for playback . . . . 17
Tape dubbing
or
editi
ng
Dubbing onto a s
tandard
recorder . . . . . .
18
Using the GR-A30U
as
a vi
deo
camera . . . . .
19
Charging
the
battery
pack . . . . . . . . . . . . .
20
Using the cassette
adapter
(provided) . . . . . . 21
Sys
te
ms
fl
exibility . . . . . . . . . . . . . . . . . .
22
Attach
i
ng
the
shoulder strap . . . . . . . . . . . .
23
External
microphone
. . . . . . . . . . . . . . . . .
23
Tripod
mounting
. . . . . . . . . . . . . . . . . . .
23
Supplemental i
nformation
. . . . . . . . . . . . .
24
In
case
of
difficulty . . . . . . . . . . . . . . . . . .
25
Specifications . . . . . . . . . . . . . . . . . . . . .
26


PRECAUTIONS
For safety, strictly observe
the
following instructions.
•Do
not
disassemble or modify
the
unit.
•Prevent
inflammables, water and metallic objects
from entering the unit.
•Do
not
use the
unit
when there
is
lightning
in
the
vicinity. Disconnect
the
power cable of
connected
equipment.
Avoid using
the
unit
under
the
following conditions:
•Places
subject
to
excessive
humidity
or dust.
•Near
appliances generating strong magnetic or elec-
tric fields (speakers, broadcasting antennas, etc.).
•Places
subject
to
soot
or steam such
as
near a cook-
ing
stove.
•Places
subject
to
excessive shock or vibration.
•Near
a television
set
(rolling pictures or howling
might result).
•Extremely
hot
places.
Do
not
expose
the
unit
to
high
temperatures
over
40°C (104°F) for long periods.
If
the
unit
should be subjected
to
direct sunlight, or
left
in a closed car in summer, or placed near a heater,
the
CCD
and the auto-focus sensor may deteriorate
and
the
cabinet
may become deformed. Furthermore,
this also may cause the transistors and
other
elec-
tronic
and
mechanical parts
to
malfunction. Remem-
ber
the
following:
•Do
not
leave
the
unit
in
places of over
5D°C
(122°F).
•Do
not
use the
unit
in
places of over 4D°C (1D4°F).
•Do
not
use the
unit
in
places
of
below
D°C
(32°F).
•Protect
the
unit
from excessively dry
or
excessively
humid
conditions
(below
35
%
or
above
80
%
humidity).
•For
long storage, select a place between
-1
D°C
(14°F)
and
3D°C (86°F).
Take special care
for
protection
of
the
unit.
•Do
not
allow the
unit
to
become wet.
•Do
not
leave
the
unit
in
closed cars on
hot
summer
days.
•Take
special care
not
to
drop
the
unit
or
strike
it
against hard objects.
Protect
from shocks during
transportation.
Make it a rule
to
observe
the
following instructions.
•Do
not
remove the
battery
pack or disconnect
other
power
supply units during recording or playback
before pressing
the
POWER switch
to
OFF
.
If
not
observed, this will cause tape damage.
•When
the
unit
is
not
in
use, remove
the
battery
pack.
Keep
the
lens and viewfinder eyepiece always clean.
•When
the lens
is
dirty or dusty, blow it off first and
then
gently wipe with a
soft
brush
or
lens cleaning
paper.
•The
lens
is
likely
to
become moldy if left dirty.
Be
careful
not
to
damage
the
CCD.
•Do
not
keep
the
lens directed
at
extremely
bright
objects such as the
sun
or
other
light sources for
long periods. Although
the
CCD
is
less susceptible
to
such burn than a
tube
would be,
caution
should
be exercised when using this unit. Most importantly,
the lens should be
capped
except
while actually
shooting.
•Do
not
direct the eyepiece of the viewfinder
atthe
sun.
Auto-focus requires a
bit
of
consideration.
•When
a filter
or
a special-effectlens
is
to
be
attached
to
the
end of the lens, be sure
to
turn
power off.
Handle
the
unit
carefully.
•Protect
the microphone from excessive shocks.
•Do
not
carry
the
unit
by holding it only by the
viewfinder.
2

I
I
3
Moisture condensation prevents
use
of
the unit.
•You
have observed
that
pouring a cold liquid
into a glass will cause drops
of
water
to
form on
the
glass's
outer
surface. This same
phenomenon
occurs on
the
head
drum
of a video recorder
when
the
recorder
is
moved from a cool place
to
a warm place,
after
heating in a cold
room,
under
extremely
humid
conditions
or
in
a place
directly subjected
to
the
cool air from an air
conditioner.
•Moisture
on
the
head
drum
can cause severe
damage
to
the
video tape, and can lead
to
inter-
nal damage
to
the
recorder itself.
•If
moisture
condensation
occurs
on
the
head
drum
a
condensation
warning appears
in
the
viewfinder and
the
unit
enters
the
Stop
mode,
unable
to
function.
In
such a case,
wait
for a
few hours until
the
indicator disappears.
Maintenance
•When
the
cabinet
is
dusty, clean by gently wiping
with a
soft
cloth.
•Avoid
the
use
of
strong cleaning agents such as ben-
zine or alcohol
as
they
may damage
the
cabinet.
•Cleaning
should be
done
only
after
the
battery
pack
has been removed or
other
power
units have been
disconnected.
Serious malfunctioning
If
malfunctioning occurs,
stop
using the
unit
im-
mediately
and
consult
your
local JVC Service
Center.
VIDEO CASSETTES
•Recording
onto
prerecorded tapes
automatically
erases
the
previously recorded video
and
audio
signals.
•An
inverted cassette
cannot
be
inserted.
•Do
not
load
and
unload
the
cassette repeatedly
without
allowing the tape
to
run
at
all. This will
slacken
the
tape
and
thereby
damage it.
•Make
certain before loading the cassette
that
the
tape
is
not
slackened.
If
there
is
any
slack,
turn
the
gear on
the
cassette in
the
di
recti
on
of
the
arrow
to
take up slack.
•The
cassette
is
equipped
with a safety
tab
to
prevent
accidental erasure. When
the
tab
is
removed,
re-
cording
is
impossible.
If
you
wish
to
record
on
a
cassette whose
tab
has been removed, use adhesive
tape
to
reseal the slot.
•To
avoid excessive
exposure
to
dust
and finger-
prints, do
not
open
the
front
tape cover.
Safety
tab
Storage
of
cassettes
Gear
Turn
to
take
up
slack
•Avoid
exposing
the
cassettes
to
direct
sunlight.
Keep them away from heaters.
•Avoid
storing
the
cassettes
in
humid
or
dusty
places.
•Do
not
drop
the
cassettes.
do
not
expose them
to
violent vibrations
or
shocks.
•Do
not
expose
the
cassettes
to
strong magnetic
fields (near a
motor,
transformer
or
magnet).
•Place
the cassettes in cassette cases
and
position
them
vertically.

FEATURES
• Allows direct playback with
no
add
itional
components
necessary.
• Ultra-compact and ultra-lightweight: a mere
2.5
lbs. (1.1
kg)
.
• New Auto-foc
us
system offering precise focusing from macro range
to
infinity.
• Flyi
ng
erase head for glitch-free, smooth scene
trans
itions.
• Newly developed high-resolution
1/2"
field-storage
type
CCD
(Charge Coupled Device) pickup delivering
400-line horizontal resolution pictures
in
camera section.
• Full-auto operation
of
focus, exposure,
and
whi
te
balance.
• Powerful, 6:1 power zoom.
• HO (High Quality) System for superlative picture quality.
• Maximum
of
60
minutes recording time
on
a single
tape
in
EP mode.
• High-sensitivity/low-
lag
design: allows shooting
in
light as low as 8 lux.
• High-speed, 1/1000-second electronic
shutter
for
sharp, clear playback
of
fast-action shots.
• Automatic Color Tracki
ng
whi
te
balance.
• Ultra-compact electronic viewfinder (monochrome CRT, 0.6-inch screen) with
diopter
control, also
for
instant on-the-spot playback.
• Selectable
automatic
date recording functi
on
.
• Recordable date/time/age display.
• Remaining
tape
time indicator.
• Trigger alarm system for preventing recording errors.
• Shuttle Search in bo
th
directions.
• Unique grip
battery
doubles as palm grip,
sav
ing weight and space.
• Ergonomic design with palm grip
and
finger rest for trigger control.
• Three-way power supply flexibility: battery pack, AC power adapter,
and
car
battery
.
The
G R-
A30
U is desi
gned
to
be
us
ed
with
NTSC-type
color
television
signals. It
canno
t
be
used
for
playback
with a
television
of
a
different
standard.
H
owe
v
er
, live re
cord
ing
and
viewf
i
nder
playback
are
possible
an
yw
h
ere
. U
se
the
BN-V5GU/BN-V6GU/BN-
V7
GU b
attery
pac
ks and,
to
re
-
c
harge
them,
th
e
provided
multiv
ol
tage
AC
power
adapter
/
battery
cha
rger. (An a
ppropria
te
conversion
adapter
may
be
necessary
to
accommodate
dif
ferent
designs
of
AC
ou
tl
et
s
in
different
c
ount
r
ie
s
.}
4

5
POWER
SUPPLY
SYSTEM
The
convenient
3-way
power
supply
system
gives
you
a
choice
of
the
most
appropriate
power
supply
unit, de-
pending
on
the
application
.
CAUTION
•No
function
is
available
without
power
supply.
•Do
not
use any
power
supply
other
than
specified.
•Never
attempt
to
use these
power
supply
units with
any
equipment
other
than
the
VideoMovie.
Where
AC
power
is
not
available
Use
the
battery
packs:
•BN-V5GU
(Regular)
•BN-V6GU
(High-capacity)
•BN-V7GU
(Super-high-capacity)
Note:
The
battery
pack
has been
kept
in
the
uncharged
state
for
shipment.
Therefore,
before use, be
sure
to
charge it. See page
20.
Attaching the Battery
Pack
CD
Pull
down
the
battery
pack release lever.
®Align
the
battery
pack
over
the
out
line
in
the
battery
pack
mount,
and
slide
the
battery
pack
into
place in
the
direction
of
the
arrow.
@Push up
on
the
battery
pack
release
lever, until
it
locks
into
place.
To
remove
the
battery
pack, pull
down
the
battery
pack release lever
and
slide
out
the
battery.
With
AC
power
Use
the
provided
AA-V5U AC
power
adapte
r/
battery
charger.
AA
-
V5U
To
AC
outlet
In
a car
Use
the
optional AP-P1 U
car
batte
ry
cord
or
BH-V5U
car
battery
charger.
•Leave
the
car's
engine idling
when
using
the
car
bat-
tery.
(For
use
with
12
V negative-grounded
cars
only.)
To
the
DC
INPUT
terminal
of
the GR-
A30U
Cigarette Ii
ghter
plug
To
car's cigarette
I
ighter
socket
AP-P1U
DC
INPUT
terminal

BEFORE SHOOTING
I Loading a Video Cassette
1
2
3
0
rn
Open
the
cassette
holder
by
pressing
the
EJECT
button
Insert
the
cassette
with
its
printed
arrow
facing
outward.
First remove
tape
slack,
then
insert
the
cassette
correctly.
See page 3.
Close
the
cassette
holder
by
pushing its
center
area.
The
tape
will be
automatically
loaded
for
recording
standby.
Unloading a Video Cassette
1. Press
the
EJECT
button.
The
cassette
holder
will
open.
2. Remove
the
cassette
.
3. Close
the
cassette
holder
by
pushing its
center
area.
Note:
•The
cassette
can
be ejected even
when
the
power
is
off.
The
holder
may
not
open
if
the
battery
is
com-
pletely
discharged
.
Notes:
•Loading
a
cassette
is
possible
while
the
power
is
either
on
or
off
. However,
to
save
battery
power, it
is
recommended
that
you
load a
cassette
while
the
power
is
off.
If
you
press
the
EJECT
switch
with
the
power
off,
the
power
turns
on
for
tape
loading
and
then
off
automatically.
Later,
when
you
ac-
tually
begin
shooting,
you
only
have
to
slide
the
POWER
switch
and
then
the
start/stop
button.
•Do
not
repeat
loading
and
unloading
of
the
cassette
without
running
the
tape,
as
this
will slacken
the
tape,
causing
tape
damage
.
Adjusting the Grip Strap
1
Separate
the
Velcro
strip
to
expand
the
loop
.
2 Pass
your
right
hand
through
the
loop
and
grasp
the
l
ens
grip.
Adjust
the
length
of
the
strap
to
suit
your
hand
size
and
refasten
the
Velcro
strip
.
6

,.
7
CONTROLS AND CONNECTORS Refer
to
the
diagrams
on
the
front
foldout
page.
0 Exclusive
microphone
Omnidirectional
condenser
microphone
for simul-
taneous
sound recording.
f}
Battery
pack
release lever
Pull
down
to
release
the
battery
pack.
8 6: 1
zoom
lens
F/1.4,
f =
8.5
-
51
mm. Filter
diameter:
46
mm.
()
FOCUS LOCK
button
Pressing
this
button
cancels
the
Auto
-focus
mode
and fixes
the
focus.
0
SHUTTER
select
button
Pressing
this
button
switches
the
shutter
between
its 1
/1000-second
(
"S
1000"
)
speed
and
1/60-
second
speed.
0DISPLAY
ON/OFF
button
Press
this
button
when
you
do
not
wish
to
record
the
date/time/age
. This will remove
date/time/age
indications from
the
viewfinder. Press again
to
re-
cord
date/time/age
.
Date/time
/age will reappear
in
the
viewfinde
r.
0 Electronic viewfinder
For monitoring scene being
shot
or
the
playback
picture
after
recording. Several indicators are
in-
cluded,
as
well as the
date/time/age
or
high-speed
shutter
if selected.
Battery
warning
indicator
Lithium
battery
warning
Remaining
tape
time
Recording
mode
indicator*
Shutter
mode
indicator
30MIN
81000
BATT .
Condensation
warning
Focus
lock
mode
indicator,
low-
contrast
warning
.........
EP REC
r -,
DEW
CLOC K
_J
DATE
TIME
BIRTHDAY
DEC
.25.88
PM
10
:
34
6
11
M
Auto-focus
detection
zone
indica
tor
Age
indicator
Time
indicator
Date
indicator
*
"CASSETTE"
appears
if
no cassette
is
loaded,
or
if
cassette
with
its
safety
tab
removed
is
loaded.
(j)
Cassette
holder
Insert a VHS-C video cassette for recording
or
playback.
0 Eyepiece
To clean,
turn
the
eyepiece
counterclockwise
and
pull
to
remove.
CI!>
POWER switch
Slide
to
turn
the
power
on
.
The
indicator
will light.
Slide again
to
switch
off
power.
4D
Control panel cover
Slide
this
cover
the
"CAMERA"
position
while
shooting.
48
STOP
butto
n
Press
to
engage
the
Stop
mode
.
~
PLAY
button
Press
to
start
playback.
G>
REW
button
Pressing
this
button
in
the
Stop
mode
rewinds
the
tape;
pressing it
in
the
Play
mode
allows fast play-
back
in
reverse (three
times
normal speed
in
SP
mode,
seven
times
normal speed
in
EP
mode
.)
G>
FF
button
Pressing
th
is
button
in
the
Stop
mode
fast-forwards
the
tape;
pressing it
in
the
Play
mode
allows fast
playback
(three
times
normal speed
in
SP
mode,
seven
times
normal speed
in
EP
mode)
.
0 DISPLAY MODE
button
Press
th
is
button
to
select
the
date/time/age
dis-
play and recording
mode
. It cycles
through
the
modes
in
the
follow
ing
order
:
Date/time/age
display -
Date/time
display
t t
Auto
Date
display Date/age display
t t
Age display -
Date
display
The
auto-date-r
ecord
function
automatically
dis-
plays
and
records
the
date
for
5 seconds
upon
turning
on
the
power
and beginning recording.
Be-
fore recording begins, this
mode
is
indicated in
the
viewfinder by
auto
date
record reserve
indication
"AUTO
DATE".
4D
DISPLAY
SELECT
button
Use
to
select
the
portion
of
the
clock
or
date
set-
tings
to
be changed. Cycles
through
the
month,
day, year,
hour,
minute
and
age settings.
To
end
adjustment,
press
once
after
select
in
g
the
birth
date
portion
.
4Ji>
DISPLAY
SET
button
Use
to
set
the
built-in clock and
date
function
.
41)
PAUSE
button
Press
to
view a still
picture
during
playback
or
pause
playback.
This
button
can also activate
the
rehearsal
function
. See page 10.

@)
SP/EP recording mode
select
switch
Set
to
SP
to
record
at
standard
tape
speed. Set
to
EP
to
record
at
a slower
tape
speed, allowing an
extended
recording
time
of
up
to
one
hour
with
a
single cassette.
f)
DC
input terminal
For
connection
of
the
provided AA-V5U AC
power
adapter/battery
charger,
optional
BH-V5U
car
battery
charger
or
AP-P1 U car
battery
cord
for
DC
power
supply.
fl)
AV
OUT
connector
Both
audio
and
video signals
may
be delivered
from
this
connector.
To
dub
from
this
unit,
con-
nect
the
A/V
input
connectors
of
a second re-
corder
to
this
connector,
using
the
optional
A/V
output
cable VC-V826U.
To
play back
from
this
unit
to
a
TV
set,
make
a
connection
between
this
connector
and
the
TV's
A/V
input
terminals using
the
A/V
output
cable.
For
playback
with
a TV set
not
equipped
with
A/V
terminals,
connect
the
RF-V3U RF
unit
(pro-
vided)
to
this
connector
and
to
the
TV.
~
EJECT
switch
To
open
the
cassette
holder.
~
ALARM
ON/OFF
switch
Switch
to
ON
to
engage
the
trigger alarm
system.
switch
to
OFF
when
you
do
not
wish
to
use
this
system. When
the
ALARM
ON/OFF
switch
is
set
to
ON,
an
electronic
alarm beeps
when
the
Re-
cording
start/stop
button
is
pressed
to
begin r
e-
cording.
The
electronic
alarm beeps
twice
when
the
Recording
start/stop
button
is
pressed for re-
cord pause. This alarm helps
prevent
recording
errors.
G}
Finger
rest
Place
your
thumb
on
this
grooved area
next
to
the
start/stop
switch
between
switch
operations.
f)
Recording start/stop button (Trigger button)
Press
this
button
in
the
Recording
Standby
mode
to
start
recording. Pressing it again re-engages
the
Recording
Standby
mode
.
0 Power zoom buttons
For
automatic
zooming; press
"T"
for
telephoto
and
"W"
for
wide-angle.
~
Accessory Shoe cover
Remove
this
cover
to
attach
an
optional
carrying
handle
or
optional
microphone
.
fJ>
CLOCK
BATTERY
compartment
Holds
the
lithium
battery
that
powers
the
date/
time/age
display.
~
Lens
hood
Attach
the
lens
cap
to
the
lens
hood
when
not
in
use.
G)
Lens
cap
~
Slots
for shoulder strap
@!)
Shoe cover hook
Keep
the
shoe
cover here while using
the
accessory
shoe.
C>
Grip strap
Secures
the
operator's
hand
to
the
hand
grip. Ad-
justs
to
fit
hand
size.
@Battery pack mount
~
Lens
cap
hook
This keeps
the
lens
cap
from
swinging
during
shooting.
@>
Earphone jack
(PHONE)
@D)
External microphone jack
(MIC)
~
Dioptric adjustment control
Adjusts
the
viewfinder lens
to
suit
the
operator's
eyesight.
~
TRACKING
control
Minimizes noise bars,
if
observed,
during
playback.
G)
Tripod mounting socket
$Stud hole
8

9
RECORDING OPERATION
1
2
CD
Set
the
tape
speed
to
SP
or
EP.
®
Set
the
control
panel cover
to
"CAME
RA''.
@Slide
the
POWER switch
to
ON.
Determine
the
compos1t1on
by
referring
to
the
viewfinder image.
For
zooming, see page 13.
For
date/time/age
recording, see page
14
.
For high-speed electronic
shutter,
see page 13.
3 =
[]]
I 0 =
""
Press
the
start/stop
button.
•This
causes REC
or
EP
REC
to
appear
on
the
viewfinder screen, showing
that
recording
is
actually
taking
place.
REC
4
5
=
[]]
To
stop
recording
temporarily
, press
the
start
/
stop
button
once
again.
•This
causes -
or
EP -
to
appear
on
the
view-
finder screen, showing
that
recording
is
paused.
-II
EP
-II
When
you'
re finished shooting, slide
the
POWER
switch
to
turn
the
power
off.
•To
start
recording again, slide
the
POWER swi
tch
on
.
The
recording lock
functio
n ensures a
smooth
transit
i
on.
•If
the
Recording
Standby
mode
continues
for
longer
than
about
5 minutes,
the
unit
switches
itself
off
automatically
for
tape
protection
.
To
restart
recording,
turn
the
power
on.
•Repeating
steps 3
and
5
produces
assemble
re-
cordings.
•If
recording
is
restarted
from
the
Stop
mode, a
few
frames
of
the
previously recorded
picture
is
replaced
with
a
new
recording.
To
avoid this,
follow
the
technique
described in "Assemble
Recording
Technique-2"
on
page 12.
One-hour recording
•To
record longer
on
a single cassette, use
the
EP
(Extended
Play)
mode
.
•For
worry-free shooting, it
is
recommended
that
you
prepare
battery
packs for 3
or
4 times
the
length
of
time
required
for
the
intended
recording.

Precautions
for
auto-focus
~-----
Focus
detection
zone
Note:
•The
rectangular
focus
area,
al-
ways
shown
by
the
indicators
in
the
center
of
the
viewfinder,
detects
focus.
•Do
not
Delete
the
focus
detection
zone
on
the
vi
ewfinder
screen.
Correct
focus may
not
be
obtained
in
the
following
situations. In such cases focus look
should
be
engaged
to
obtain
proper
focus. (See page
13).
Note:
Two
subjects
at
different
distances
overlap in
the
same scene.
The
subject has
no
contrast
(dif-
ferences in brightness
and
darkness),
such as a flat, one-color wall,
or
a
clear, blue sky, for instance.
A
dark
object
is
barely visible in
the
viewfinder.
•If
the
lens
is
smeared
with
stains
or
blurred
with
condensation,
accurate
focusing
is
not
possible.
Keep it clean.
If
it
becomes
dirty,
wipe
with
a piece
of
soft
cloth.
When
condensation
occurs,
dry
it
by
wiping
with
a
sof
t
cloth
or
wait
for
conditions
in
which
they
become
dry.
Macro
shot
The
new
auto
-focus sy5tem
can
offer
continuous
shooting ability
from
close-up
to
infinity. With
wide
angle,
the
subject
can
be right
up
to
the
front
of
the
lens.
•Perform
macro
shooting
in
the
Zoom-out
mode.
When
operating
in
the
Zoom
mode,
zoom
auto
-
matically shifts
to
wide angle
with
the
Focus Lock
mode
indicator
blinking, and
then
focus
adjustment
is
made.
This
process requires a
few
seconds.
•For
best results, increase illumination when
shoot-
ing in
the
Macro
mode.
Trigger
alarm
system
When
the
ALARM
ON/OFF
switch
is
set
to
on,
an
electronic alarm beeps
when
the
Recording
start/stop
button
is
pressed
to
begin recording.
The
electronic
alarm
beeps
twice
when
the
Recording
start/stop
button
is
pressed
for
record pause.
Th
is
alarm helps
prevent
recording errors.
Rehearsal
If
you
wish
to
rehearse
shooting
angles,
compose
scenes,
etc
.,
without
actually
recordin
g
on
the
tape,
slide
the
control
panel
cover
upward, slide
the
power
switch
on
and
press
the
PAUSE
button.
The
aimed-at
scene will
appear
on
the
viewfinder screen.
To
dis-
engage
the
Rehearsal
mode,
press
the
STOP
button.
•Rehearsal
is
possib
le
whether
a
cassette
is
loaded
or
not.
•With
a
cassette
loaded, rehearsal
is
not
possible dur-
ing rewind
or
fast forward.
•The
power
save circuit
does
not
functio
n during re-
hearsal.
(For
power
save
function
, see page 12.)
10

11
2 3
To
end
recording,
slide
the
control
panel
cover
upward
.
Rewind
the
tape
to
a
po
i
nt
from
which
you
want
to
check
the
recording.
Press
the
PLAY
button,
and
you
can
view
the
playback
picture
on
the
viewfinder
screen.
Notes:
• Pressing
the
PAUSE
button
during
playback
stops
the
picture
on
the
viewfinder
screen.
For
TV
playback
,
see page 17.
•
Shuttle
search
is
also possible in
both
directions
.
Remaining tape time indicator
50MIN
The
remaining
tape
time
is
displayed
in
the
viewfinder
as
shown.
EP
mode;
50MIN
1MIN
t
40MIN
30MIN
2MIN
20MIN
t
SP
mode; *
3M
IN
15MIN
t *
4MIN
-
4M
IN -
10MIN
The
remaining
tape
ti
me
indicat
or
will
blink
as a
warning
a
few
mi
nutes
before
the
tape
is
finished.
When
the
remaining
time
become
s
less
than
1
minute,
this
bar
will
appear
in
the
viewfinder
.
•The
Stop
mode
engages
automatical-
ly
when
the
tape
has
reached
its
end
during
recording.
•The
indicated
remaining
time
is
approximate.
Warning
Battery warning
Blinking
•When
battery
power
is
almost
ex-
........
/
--
BATT
/ I .,
Viewfinder
austed,
a
battery
warn
ing
indication
appears
in
the
viewf
in
der. Replace
the
battery
pack
wi
th
a
fully
charged
one
. (See next page.)
•After
this
i
ndication
appears
,
the
powe
r
turn
s off
automatically.
In
th
is state,
however,
pressing
the
EJEC
T b
ut
ton
turns
the
power
on
and
eject
s
the
cassette
.
Lithium battery warning
' I /
-.-._
CLOCK
/ I '
I /
_
.,..
.....
_
/I'
•The
lithium
battery
warning
indica-
tor
will
blink
in
the
viewfinder
if
the
battery
is
not
set
or
when
it
needs
to
be
replaced
. (See page 14.)
•The
low-contrast
warning
will
blink
when
subject
contrast
is
too
low
for
accurate
focusing. (See page
13
.)

POWER SAVE AND TAPE PROTECTION CIRCUIT
•To
save
battery
power,
the
GR-A30U (when battery-
operated) switches itself
off
automatically
in
the
following situations:
(1) When
left
for
longer than 5
minutes
in
the
Stop
mode.
(2) When
left
for
longer
than
5
minutes
in
the
Re-
cording
Standby
(Record-Pause) mode.
•To
protect
the
tape,
the
GR-A30U (regardless
of
whether
battery-operated
or
AC-powered) releases
tape
tension slightly and switches itself
off
auto-
matically if left
for
longer
than
5
minutes
in the
Recording
Standby
(Record-Pause)
mode
.
•For
the same reason,
the
GR-A30U
enters
the
Stop
mode
and
switches itself
off
automatically
if
left
for
longer
than
5
minutes
in the Still (Play-Pause) mode.
ASSEMBLE RECORDING
Battery operation
.___s_T_o_P_
__.I
_..
,
___
Po_w_E_R_o_F_F
__
5
minutes
Battery/AC operation
REC PAUSE I
-..
_j
___
P_o_w_E_R_o_F_F
_
__.
5
minutes
PLAY PAUSE
-..
1STOP
....
POWER
OFF
I
(STILL)
5
minutes
TECHNIQUE
-1
(To
replace the battery pack during recording)
1
If
the
battery
warning appears in the viewfinder
while recording,
stop
recording by pressing the
POWER switch
to
OFF,
not
the
STOP
button
.
2 Replace
the
battery
pack with a charged one.
ASSEMBLE RECORDING
3
4
Press
the
POWER switch
to
ON.
•The
unit
will be in
the
Recording
Standby
mode.
Press
the
recording
start/stop
button
to
start
recording.
TECHNIQUE - 2
(To
record onto a partially recorded tape)
1
2
Play back the tape
to
a
point
where
you
wish a
new recording
to
start.
•Use
the
FF
or REW
button
for
faster location.
•To
locate
the
point,
press
the
FF or
REW
but
-
ton
during
playback
.
Press the PAUSE
button
at
the
located
point
.
•The
unit
will
enter
the Still
mode.
3 Slide the
control
panel cover
downward.
4 Press
the
recording
start
/
stop
button
to
start
recording.
12

13
SPECIAL TECHNIQUES
Zooming
When
the
focal length
of
the
lens
is
varied by
turning
the
zoom
ring,
the
image
appears
to
come
nearer
to
or
retreat
from
the
viewer.
Power zooming
Press
"T"
for
zooming
in
and
"W"
for zooming
out.
Zoom
out
•Focusing
may
become
unstable
during
the
zooming-in
operation.
In
this
case
,
first
zoom
in
in
the
Recording
Standby
mode
then,
after
pressing
the
FOCUS
LOCK
button
to
hold
the
focus
fixed,
zoom
in
or
out
in
the
Record
mode
.
•When
shooting
low-contrast
subjects
in
the
Zoom-in
mode
,
the
Videomovie
automatically
zooms
out
with
the
Focus
lock
mode
indicator
blinking
and
focus
being
performed.
Focus
lock
The
GR-A30U's
focus lock
function
is
especially useful
in
the
following situations:
•When
things are passing
between
your
subject
and
the
VideoMovie,
make
sure
to
engage
the
focus lock
function,
to
lock
your
subject
in focus
before
recording.
•If
you
want
you
r main
subject
to
appear
in
a
corner
of
the
screen,
you
should
first
center
it
at
the
desired
distance,
then
use
the
autofocus
mode
for
focusing, engage
the
focus lock
function,
and
turn
the
VideoMovie
till
the
subject
is
where
you
want
it.
•When
the
low-contrast
warning blinks, it means
that
accurate
focus
cannot
be achieved. Point
the
VideoMovie
at
another
subject,
the
same di
stance
from
the
camera
as
the
one
you
want
to
record. Focus
with
the
autofocus
function
and
engage
the
focus lock
mode
. Now
turn
back
to
your
desired
subject
and record it.
rr=
====.:
~=--
-
Focus
lock
mode
-
-ii==
~
~=~
indicator
n
~
~
~
The
center
of
the
viewfinder
is focus-
ed in
the
Auto
focus
mode.
Press
the
FOCUS
LOCK
button,
the
indicator
wil
l
blink
in
the
viewfinder.
Then
aim
the
GR-A30U
so
that
the
subject
is
centered in
the
viewfinder
.
Return
to
the
original
composition.
The
subject
will
remain in
focus
even
though
it
is
no
longer
in
the
center
of
the
viewfinder
.
HIGH-SPEED ELECTRONIC SHUTTER
The
GR-A30U
is
equ
i
ppe
d with a selectable high-speed
shutter
that
allows
better
recording
of
quick
movements
for sharp, clear stills
or
slow-motion playback. Select it
when
taping
fast-action
shots
that
you
will
want
to
play
back later
in
still
or
slow-moti
on
mode
on
the
VCR with still
or
slow.
1
2
0
Press
the
SHUTTER
button
to
switch
to
the
1/ 1000-second
electronic
shutter.
This can be
done
while recording
or
in
any
other
mode.
It
cont
inues until switched
to
standard
speed.
When finished recording
the
fast-action scene,
switch back
to
the
standard
shutter
speed
by
pressing
the
SHUTTER
button.
F When selected,
the
High-Speed
Shutter
mode
is
indicated
on
the
viewfinder
screen.
Notes:
•The
High-Speed
Shutter
mode
requires slightly
more
subject ilh.Jmination
than
the
Standard
Shutter
mode.
Therefore,
the
low-light warning may blink
in
the
viewfinder.
If
so, switch
to
the
Standard
Shutter
mode.
•Picture
color
may
be adversely affected
in
the
high
speed
shutter
mode
when
the
subject
is
lit
by
al-
ternating
discharge-type light sources such as fluo-
rescent
or
mercury-vapor lights.

RECORDING
THE DATE/TIME/AGE
Battery insertion
This
battery
powers
the
date/time/age
function.
Warning
on
lithium
battery
•Dispose
of
used
battery
promptly.
•
Keep
away
from
children.
•
Do
not
disassemble
and
do
not
dispose
of
in fire.
1. Lift
the
cover
of
the
CLOCK
BATTERY
compartment,
on
top
of
the
VideoMovie.
2. Insert
the
provided lithium
battery
with
the
plus(+)
side up.
3. Close
the
cover
on
the
unit
it clicks.
Note:
•Switch
off
the
unit's
power
before inserting
the
battery.
Battery replacement
The
battery
lasts for
about
one
year. When
the
lithium
battery
warning (
c~K)
appears in
the
viewfinder,
this
battery
needs
to
be replaced.
Note:
Switch
off
the
unit's
power
before
removing
old
battery.
Replace
the
CR2025
lithium
battery
as follows:
1.
Remove old
battery
by
pressing
knob
.
2.
Insert
new
CR2025,
plus
side(+)
up.
3.
SI
ide
the
cover
back until it clicks.
Date/time/age setting
Replace
battery
with
Matsushita
type
CR
2025
only.
Use
of
another
battery
may
present
risk
of
fire
and
explosion.
Before adjusting
the
date, time
and
age
for
the
first
time
or
after
replacing the batteries, indicating
the
clock
needs
to
be set.
CD
Switch
the
unit's
power
on, JAN.
1.00
will
appear
in
the
viewfinder. Press PAUSE
button
to
enter
rehearsal
mode.
®Press
the
SELECT
button
-
the
month
blinks.
@Press
the
SET
button
to
choose
the
corr
ect
number.
©Press
the
SELECT
button
to
select
the
next
item
to
change,
with
the
i
tem
selected changing
in
the
following sequence:
~Month
-Day -Year -
Hour
-
Minute--,
L Finish -Year -Day -
Month~
Adjustment
Date/time/age recording
@Repeat
steps
® and @
to
set all item
s.
After
the
birth
date
setting has been performed, press
the
SELECT
button,
and items will cease blinking.
Then
the
date, time
and
age will be displayed.
•The
clock
begins timekeeping when
the
minute
portion
stops
blinking
and
lights
constantly.
When
the
date
and
time
portions
are
bl
inking,
the
clock
stops
keeping time.
Be
sure
to
confirm
the
time
when
resetting
the
age.
1.
The
date,
time,
or
date
and
age
can
be
displayed
and
recorded according
to
the
selected
mode
. Press
the
DIS·
PLAY MODE
button
to
cycle
throught
the
modes in
the
following
order:
Date/time/age
display -
Date/time
display
-
Date/age
display -
Date
display -Age
display
-
Auto
date
display
2. When
"Auto
Date"
appears in
the
viewfinder in
the
Recording
Standby
mode
after
the
unit
is
powered,
the
date
will be displayed
automatically
and
be
recorded
for
five seconds.
3. Press
the
DISPLAY
ON/OFF
button
when you
do
not
wish
to
record
the
date/time/age.
This
will remove
the
items
from
the
viewfinder. Press again
to
record date/time/age. Date/
time
/age will reappear in
the
viewfinder.
Date/time/age recording indications
Date/time/age
Date/time
display Date/age display
Date
display Age display
Auto
date
display
display
AU
TO
DATE
II
DEC
31
8811
88
11
9 9 y 1 1M
II
AM
1 2 3 0 D
EC
31
8811
DEC
31
88
JI
9 9 Y 1 1M
AM
1 2 : 3 0
99
Y 1 1M
DEC
31
Auto
date record
reserved
14

15
PLAYBACK
The
GR-A30U
permits
playback
of
recorded
VHS-C video cassettes.
For
connections
refer
to
pages
17
and
18.
Preparations 3
1
•With
a television
equipped
with
audio/video
input
connectors,
set
the
television's
TVI
VIDEO
switch
to
VIDEO
.
•With
a regular television receiver, set
the
anten-
na select switch
of
the
RF-V3U RF
unit
to
VIDEO
and
the
TV
receiver's
channel
selector
to
your
video
channel
(3
or
4).
•Connect
a
power
supply
unit
.
(Battery
or
AC
operation:
see page 5.)
Set
the
control
panel
cover
to
DECK.
2
SI
ide
the
POWER
switch
to
on
and
then
press
the
EJECT switch.
4
Insert a
pre-recorded
cassette.
First remove
tape
slack,
then
insert
the
cassette
correctly
. See page 3.
Press
the
PLAY
button
. Playback will
start.
Tracking adjustment
If
noise bars
appear
on
the
screen,
adjust
the
TRACKING
control.
Turn
it slowly
in
either
direction
to
minimize
noise bars.
After
playing
a
particular
tape,
return
the
TRACK
I
NG
control
to
the
center
position.

Shuttle Search
Fast-speed playback
in
the
forward direction
Press
the
FF
button
in
the
Play
mode.
Playback
will
be
speeded
up
to
3
times
normal
speed
in
SP
mode,
7
times
normal
speed
in
EP
mode,
as long as
the
but-
ton
is
being pressed.
Still playback
Press
the
PAUSE
button
during
playback
.
The
picture
will
stop
on
the
screen.
•After
about
5
minutes
of
still
playback,
the
unit
enters
the
Stop
mode
automatically
for
tape
pro-
tection
and
switches
i
tse
lf
off.
Fast-speed reverse playback
Press
the
REW
button
in
the
play
mode.
The
tape
will
be
played
back
in
the
reverse
direction
at
3
times
normal
speed
in
SP
mode,
7
times
normal
speed in EP
mode,
as long
as
the
button
is
being pressed.
Notes:
•Noise
may
appea
r
on
the
screen
during
Shuttle
Search
and
still
playback.
This
is
not
due
to
any
defect
of
the
unit.
•Pictures
may
become
monochrome
during
Shuttle
Search
in
the
SP
mode
.
This
is
not
due
to
any
defect
of
the
unit.
16

17
CONNECTION
TO
A TELEVISION FOR PLAYBACK
The
GR-A30U includes
playback
circuits
and
allows
playback
of
pre-recorded cassettes
simply
by
connecting
to
a
television set.
Connection
to
a television
not
equipped with audio/video input connectors
For
this
situation,
use
the
RF-V3U RF
unit
(provided).
1
Matching
transformer
(provided)
Antenna
cable
(provided)
TV
receiver
ANTENNA
IN
lvi
oeo
l
OD
RF
OUT
~
::r
I
--,,
Side view
To
AV
OUT
connector
CH3
CH4
: I Diil 11
• •
Set
the
output
channel
select
switch
of
the
RF-V3U
to
CH 3
or
CH4.
•The
RF
unit
permits
playback
of
video
and
audio
recordings
through
a
TV
receiver.
The
signals
from
the
RF
unit
are viewed
through
a
vacant
channel
not
used
for
broadcasting in
your
area.
•The
RF
unit
has been
set
to
CH3
prior
to
shipment.
Reset
the
channe
l
to
CH4 (using a
screwdriver) in areas
where
channel 3
is
em
-
ployed
for
broadcasting.
•This
is
your
video
channel.
To
view video
cassettes, always
set
the
TV
channel
selector
to
either
channel
3
or
4.
PRECAUTIONS FOR RF-V3U
•For
exclusive use with
the
VideoMovie.
•Do
not
disassemble
or
remodel
the
RF-V3U.
•Do
not
expose
it
to
strong
shocks.
•Unplug
the
connected
equipment
during light-
ning storms.
(Never
touch
the
antenna
calbe.)
To
VHF
antenna terminal
RF-V3U
'------.--
....
(provided)
2 Remove
the
antenna
cable
from
the
TV
receiver.
3
4
Connect
the
antenna
cab
le
to
the
ANTENNA
IN
terminal
of
the
RF
unit.
Connect
the
RF
OUT
terminal
of
the
RF uni1
to
the
75-ohm coaxial
antenna
terminal of the
TV
receiver
us
ing
the
provided
antenna
cable.
To
AV
OUT
connector
Connect
the
VIDEO/
AUDIO
INPUT
cable
of
th1
RF
unit
to
the
AV
OUT
connector
of
the
GR
A30U.

OPERATION
How
to
affix
the
matching
transformer
to
your
VHF
antenna
cable Viewing video cassettes being
played
back with
the
GR·
A30U
•If
your
VHF
antenna
cable
is
a
300-ohm
flat
feeder,
connect
the
two
lugs
to
the
screws
in
an
ordinary
manner
.
•If
your
VHF
antenna
cable
is
a 75-ohm coaxial cable, proceed as follows:
To
view video cassettes
or
to
monitor
the recording,
set
the
VIDEO/TV switch
of
the
RF
channel selector
to
the chan-
nel corresponding
to
the
RF
output
channel (3
or
4).
Viewing television programs
Set
the VIDEO/TV switch
to
TV,
and
the
TV
receiver will
function
as
usual.
CD
Press
both
side tabs inward
and
slide
the
cover off.
®
Strip
the
coaxial cable with a pair of wire strippers, a
knife, or the like
as
shown.
@Remove
the
collar
and
put
it
on
the
pole inside
the
cover.
©Loosen
the
screws for
the
clamp
and
insert
the
stripped
cable so
that
the
braided
portion
is
positioned under
the
clamp.
@Insert
the
stripped
end
(core
conductor)
of
the
cable
from
above
into
between
the
knife
contacts.
@Tighten
the
screws.
CD
Replace
the
cover.
D To
A/V
input
terminal
VC-V826U
,.,
A/V
output
cable
~
(optional)
To
AV OUT
connector
Screws Knife
contacts
Clamp Collar
•Simply
connect
the AV OUT
connector
of
the
GR·
A30U
to
the VIDEO
and
AUDIO
IN
connectors
of
the
television using
the
optional VC-V826U A/V
output
cable.
•The
optional VC-V826U A/V
output
cable can be
extended
by 5 m (16 ft) with
the
optional
VC-P1
U
A/V extension cable.
•Use
the
VIDEO (
or
A/V)
mode
specified on the
television, instead of
tuning
to
channel 3
or
4.
TAPE DUBBING OR EDITING
Dubbing
onto
a standard recorder
Connection
1.
Connect
the
AV OUT
connector
of
the
GR-A30U
to
the
AUDIO
and
VIDEO
IN
connectors
of
the video
recorder usi
ng
the
opt
ional VC-V826U
A/V
output
cable.
2.
Connect
a television
to
the
video recorder using the optional VC-V826U A/V
output
cable.
Operation
To
AV
OUT
connector
rn
m~mm
VC-V826U
A/V
output
cable
(optional)
@"
To
VIDEO
IN
and
AUDIO
IN
connectors
lD
•Put
the
GR·A30U in the Play
mode
and
the
connected
recorder
in
the
Record
mode
to
copy
the
recording.
To
edit
out
unwanted
material, press
the
recorder's PAUSE
button.
1!
This manual suits for next models
1
Table of contents
Other JVC Camcorder manuals

JVC
JVC GZ-HD520BEK User manual

JVC
JVC GZ-MG130E/EK User manual

JVC
JVC GR-AX480 User manual

JVC
JVC GR-AXM100 User manual

JVC
JVC GR-AXM70 User manual

JVC
JVC LYT1439-001B User manual

JVC
JVC GR-AX910 User manual

JVC
JVC GR-AX510 User manual

JVC
JVC Everio GZ-MG630 Manual

JVC
JVC GY-HD250U - 3-ccd Prohd Camcorder Guide

JVC
JVC GR-AX770U User manual

JVC
JVC GY-DV5100U - 3-ccd Professional Dv Camcorder User manual

JVC
JVC GZ-MG620 Manual

JVC
JVC GZ-MG330HEK User manual

JVC
JVC GR-D820EK User manual

JVC
JVC GZ-MG20US - Everio Camcorder - 680 KP Instruction sheet

JVC
JVC Everio GZ-R10 User manual

JVC
JVC GZ-MS130BU Manual

JVC
JVC GV-LS1 U User manual

JVC
JVC GR-AXM710 User manual