König DVB-T2 FTA10 User manual

DVB-T2 FTA10
MANUAL (p. 2)
ANLEITUNG (S. 24)
MODE D’EMPLOI (p. 49)
GEBRUIKSAANWIJZING (p. 74)
MANUALE (p. 99)
MANUAL DE USO (p. 124)
MANUAL (p. 148)
HASZNÁLATI ÚTMUTATÓ (o. 171)
KÄYTTÖOHJE (s. 194)
BRUKSANVISNING (s. 217)
NÁVOD K POUŽITÍ (s. 240)
MANUAL DE UTILIZARE (p. 263)
ΕΓΧΕΙΡΙΔΙΟ XPHΣHΣ (σελ. 286)
BRUGERVEJLEDNING (s. 311)
VEILEDNING (s. 334)
ИНСТРУКЦИЯ (357 стр.)
KILAVUZ (s. 382)
FULL HD FTA RECEIVER

ENGLISH
2
GENERAL INFORMATION
This Digital Terrestrial Receiver (DTR) will bring you into the new and exciting world
of digital television world of crystal clear widescreen pictures, digital sound, more
information and new services. All this and more is on “Free to Air” digital television.
To make full use of your new DTR, please take the time to familiarise yourself with the
extensive features of the unit detailed in this User’s Guide.
If you need help in setting up please call your retailer or a customer service adviser.
Main Features
• SD MPEG-2/HD H.264 & fully DVB-T compliant
• Automatic PAL/NTSC conversion
• 1000 channels TV and Radio programmable
• 8 dierent favourite group selections
• Multi-lingual On Screen Display
• Fully supports 7 days Electronic Program Guide (EPG)
• Picture in Graphics (PIG) support
Contents
GENERAL INFORMATION ................................................................................. 2
Main Features ........................................................................................................................2
For your safety.......................................................................................................................3
General information............................................................................................................5
General Operation................................................................................................................5
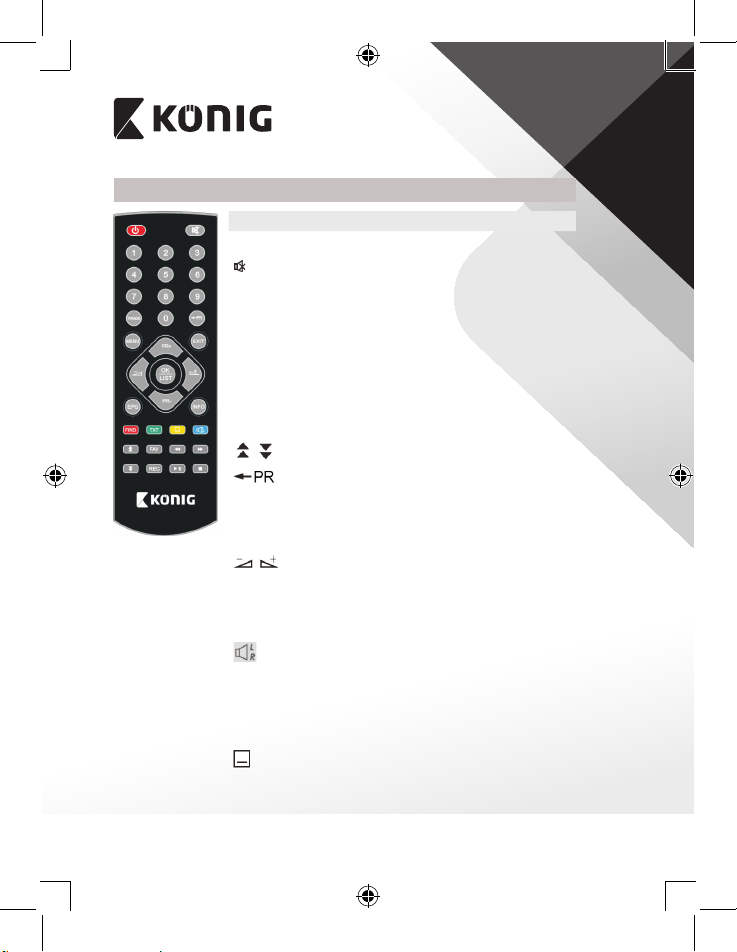
Remote control......................................................................................................................6
INSTALLATION.................................................................................................. 7
INSTALLATION GUIDE ...................................................................................... 8
MAIN MENU....................................................................................................... 9
1. Program..........................................................................................................................10
2. Picture.............................................................................................................................12
3. Channel search............................................................................................................13
4. Time.................................................................................................................................14
5. Option.............................................................................................................................15
6. System ............................................................................................................................15
7. USB...................................................................................................................................17
8. Hotkey.............................................................................................................................19
TROUBLESHOOTING....................................................................................... 22

ENGLISH
3
• 256 colours On Screen Display
• Channel search in automatic and manual search
• Various channel editing functions (favourite, move, lock, rename and sort)
• Parental control for channels
• Easy to use Menu System
• Software upgrades through USB port
• Time set by GMT oset automatically and manually, summer time support
• Automatic turn on/o by Timer setting (multiple options)
• Subtitle support DVB EN300743 and EBU
• Teletext support DVB ETS300472 by VBI and OSD
• Automatic save for the last channel
• Support Logic Channel Number (LCN)
• Support FAT16/FAT32/FAT12/NTFS (Option)
• MP3/JPEG/BMP/OGG les
• Default 2 hours, user can set the end time (Support subtitle), record scramble
program and descramble program
• Lock/Delete/Rename, Preview playback, Browse record les information
• Play/Pause/Stop
• Fast Forward/Fast Backward 2/4/8/16/32
For your safety
To avoid the risk of electric shock, do
not open the cabinet, refer to qualied
personnel only.
Keep the receiver away from ower
vases, tubs, sinks etc. in order to avoid
damaging the equipment.

ENGLISH
4
Do not expose the receiver to sunlight
and keep it away from any heat source.
Do not block the ventilation holes of
the receiver so that air can circulate
freely.
When this occurs you must cut o the
power immediately.
Do not touch the receiver during
thunderstorms, since that may create
electric shock hazards.
Switch the receiver o whenever it
will be out of service for an extended
period.
Be sure to turn the receiver o and
disconnect the power before cleaning.
Only use mild soapy water and wring
out the cloth thoroughly.

ENGLISH
5
General information
DVB-T2FTA10
DVB-T2FTA10W
MANUAL(p. 2)
ANLEITUNG(S. 25)
MODED’EMPLOI (p. 50)
GEBRUIKSAANWIJZING(p. 75)
MANUALE(p. 100)
MANUALDE USO (p. 125)
MANUAL(p. 149)
HASZNÁLATIÚTMUTATÓ (o. 172)
KÄYTTÖOHJE(s. 195)
BRUKSANVISNING(s. 218)
NÁVOD K POUŽITÍ (s. 241)
MANUALDE UTILIZARE (p. 264)
ΕΓΧΕΙΡΙΔΙΟ XPHΣHΣ (σελ. 287)
BRUGERVEJLEDNING(s. 312)
VEILEDNING(s. 335)
ИНСТРУКЦИЯ (358 стр.)
KILAVUZ(s. 383)
FULL HD FTARECEIVER
1x Remote control 2x AAA batteriy 1x User manual
General Operation
Throughout this manual you will notice that the everyday operation of the receiver
is based on a series of user friendly on screen displays and menus. These menus will
help you get the most from your receiver, guiding you through installation, channel
organising, viewing and many other functions.
All functions can be carried out using the buttons on the RCU, and some of the
functions can also be carried out using the buttons on the front panel.
The receiver is easy to use, always at your command and adaptable for future
upgrades.
Please be aware that new software may change the functionality of the receiver.
Should you experience any diculties with the operation of your receiver, please
consult the relevant section of this manual, including the Trouble Shooting secton.
If this does not have the desired eect, please call your dealer or a customer service
adviser.

ENGLISH
6
Remote control
Key: Function:
OTurns power ON/OFF
Key:
Mute sound
0~9 To select the number of the menu or the channel
to watch
TV/RADIO Switch between TV and radio
SHIFT Time shift function key
FAV Displays the favourite group list
FIND Displays the “FIND” window
INFO Show information
MENU Press once to run MENU on screen
Key:
Moves up/down a page in the list
Switch back to the previous channel
OK/LIST Executes the selected item in the menu screen or
enters the desired value in any input mode.
PR+, PR- Channel up/down or move up/down in a menu.
To adjust the volume or move left/right in the
menu.
EXIT Return to the previous menu or escape from
the menu.
EPG Call the Electronic Program Guide (EPG)
Key:
Displays the audio window
V-MODE Switch the video between current video mode
and YUV 576i
V-FORMAT Change the HD format
TXT Switch to teletext mode
Switch to subtitle mode
SLEEP Enter sleep mode

ENGLISH
7
RECORD Record the program
>Play
*Stop
=Pause and resume play
¯ ˘ Fast forward or rewind
” ’ Previous and next
INSTALLATION
Rear panel:
CONNECT TO DIGITAL AMPLIFIER
CONNECT TO TV USING A
SCART CABLE
CONNECT TO TV’S HDMI INPUT
CONNECT TO USB DEVICE
ANT IN: CONNECT TO ANTENNA
LOOP OUT: CONNECT TO ANOTHER RECEIVER

ENGLISH
8
Connecting to TV using SCART/HDMI support:
Antenna
TV
Antenna
TV

ENGLISH
9
INSTALLATION GUIDE
When powering on for the rst time, the Installation Guide will display as below.
Press PR+ and PR− to move the highlighted bar
to select OSD language, Country and Channel
Search.
Press to move the cursor to choose
your choice.
Move the highlighter to the Channel Search
option and press OK to search channels.
Press [EXIT] to exit this menu.
MAIN MENU
When you press [MENU], you enter the Main Menu.
This menu consists of 7 major sub-menus as
follows.
- Program
- Picture
- Channel Search
- Time
- Option
- System
- USB

ENGLISH
10
1. Program
This menu consists of 4 major sub-menus as
follow:
- Program edit
- EPG
- Sort
- LCN
1.1 Program edit
Press OK to pop up the “Input Password”
dialogue box. You cannot open into the menu
unless the correct password is input. The default
password is “000000”.
1. Press PR+, PR− keys to select the programme
that you want to play, and then press OK to
view the programme in the small window.
If you move the yellow cursor to select
up or down, you will see a gray line which
indicates the playing program in the small
window.
2. Select the program and press FAV to pop
up the favourite type list. In the list, select
the favourite type that you want and press
OK, and then you will nd the favourite
icon is displayed to the right of the selected
program.
Select Disable in favourite type list to
remove all the favourite types you selected,
and the favourite icon will disappear behind
the programme.
3. Select the program and press the yellow key
to mark this program with the Lock icon. You
can cancel this icon by pressing the yellow
key once more.

ENGLISH
11
4. Select the programme and press the green
key to mark this program with the skip icon.
You can cancel this mark by pressing the
green key once more.
5. Select the program and press the blue key
to pop up a warning dialogue box: “Do you
want to delete this?” Press OK to delete it
and press EXIT to cancel.
6. Press to pop up the rename window.
Press to move the cursor left or right
to select the characters.
1.2 EPG
You can nd information for a programme in
the EPG window. Programmes are in the left
side list and details of the program are shown
on the right side. At the bottom of the window
you can see the function keys.
Press the blue key to page up in the program
list. Press the yellow key to page down in the
program list. Press the green key to page up
in the detail list and press the red key to page
down in the detail list.

ENGLISH
12
Press OK to select the program. You can see the
programme you selected in the book list.
In EPG mode you can press INFO to enter the
booking list. All the programmes you booked
will be in the schedule.
Press the red key to add a programme to the
booking list, and press the green key to edit the
programme. Press the blue key to delete the
programme.
Press EXIT to exit the booking list window.
1.3 SORT
Select by service ID, LCN, ONID or service name.
1.4 LCN
Select between On and O.
2. Picture
This menu consists of 4 major sub-menus as
follows:
- Aspect Ratio
- Resolution
- TV Format
- Video Output
2.1 Aspect Ratio
Select between 16:9 Pillar Box, 16:9 Pan&Scan, 4:3 Letter Box, 4:3 Pan&Scan, 4:3 Full,
16:9 Wide Screen and Auto.
2.2 Resolution
Select between 1080i, 1080p, 576i, 576p, 480i and 720p.
2.3 TV Format
Select between PAL and NTSC.

ENGLISH
13
2.4 Video Output
Select between CVBS and RGB.
3. Channel search
This menu consists of 4 major sub-menus as
follows:
- Auto Search
- Manual Search
- Country
- Antenna Power
3.1 Auto search
Press OK on Auto Search to search channels.
For the rst searching, all searched TV channels
and radio channels will be displayed on the list
in order. Through one colour bar at the bottom
of the search window, users can know the
searching progress of the current channel. The
TV and Radio Channels you searched will be
shown in the list, you can know the number of
programmes at the top of the window. During
the search, you can press EXIT to cancel. After
searching, press EXIT to return to the normal
mode.
3.2 Manual search
Frequency channel: Press to select the
channel.
Frequency: Press the number key to input.
Bandwidth: Press to select between 6,
7 and 8M.
Through two colour bars at the bottom of the
search window, users can see the signal quality
and strength of the current channel.
After setting, press OK to enter the searching
window.

ENGLISH
14
3.3 Country
Press to select the country.
3.4 Antenna power
Select On or O.
4. Time
There are 5 sub-menus in this menu
- Time Oset
- Country region
- Time zone
- Sleep
- Power On/O
Select between Auto and Manual. If you select
Auto, the time zone item will turn grey. If you
select Manual, you can edit the time zone item,
but the country region item will turn grey.
4.1 Country Region
Press to select.
4.2 Time zone
Press to select from GMT-12 to GMT+12
4.3 Sleep
Press to select among O, 1 hour or 12 hours.
4.4 Power On/O
Power On/O: Select Disable or Enable. When
selecting Enable you can edit Power On/O
Time by pressing the number keys.
Power On/O Time: Press the number key to
input.

ENGLISH
15
5. Option
There are 5 sub-menus in this menu
- OSD Language
- Subtitle Language
- Audio Language
- Digital Audio
- Audio Description
5.1 OSD language
Press to select the language in the circle.
5.2 Subtitle language
Press to select the language in the circle.
5.3 Audio language
Press to select the language in the circle.
5.4 Digital audio
Press to select between PCM, RAW/HDMI RAW, RAW/HDMI PCM and O.
5.5 Audio description
Select from 1-31 and O.
6. System
There are 5 sub-menus in this menu.
- Parental Guidance
- Set Password
- Restore Factory Default
- Information
- Software update

ENGLISH
16
6.1 Parental guidance
The consumer can select an age from 4-18 or
O.
6.2 Set password
Input the old password: Input the password by
pressing the number keys 0-9.
Input the new password: Input the password
by pressing the number keys 0-9.
Conrm the new password: Press the number
keys 0-9 to input the new password again.
Note: The default password is: 000000. Please
record your new password. If your new
password is lost, please contact your service
provider.
6.3 Restore factory default
Choose the option of Restore Factory Default and press [OK] to restore.
Press [OK] to start and press [EXIT] to quit.
Note: Please use this function carefully.
6.4 Information
When you enter the Information menu, the
screen displays the receiver information, such
as model, SW version and so on.
Press [EXIT] to leave this menu.

ENGLISH
17
6.5 Software upgrade
There are 2 Update modes: OTA update and
USB update.
6.5.1 OTA upgrade
1. Status: Select between On and O. If you
select O, the Start Time turns grey.
2. Start Time: Select between 00:00 to 23:00.
6.5.2 USB upgrade
Press OK to upgrade through a USB Device.
7. USB
This menu has 5 sub-menus such as:
Multimedia, Photo Conguration, Movie
Conguration, PVR conguration and Record.
7.1 Multimedia
There are 4 sub-menus in this menu.
- Music
- Photo
- Movie
- PVR
These menus will be disabled when no USB
device is plugged in.

ENGLISH
18
7.1.1 Music
Press OK to enter the Music window. Press PR+,
PR- to move the cursor up and down. Press
to go back to the folder. Select the
music and press OK to play it. Press >and =to
play or pause and press *to stop playing.
7.1.2 Photo
Select the picture and press >to enter the slide
show mode.
Press the blue key to enter grid show mode. In
this mode, select the picture and press the OK
to see it in full screen.
7.1.3 Movie
Select the movie you want to watch and press
the red key to enter full screen mode.
7.1.4 PVR
In normal mode, press the RECORD on RCU,
then will appear on the screen. It
means you are recording the program now.
Press “*” and a dialogue box will pop up: “Do
you want to stop recording?” Press OK to stop
recording and save it or press EXIT to continue
recording.
If you choose to stop recording, the program
you recorded will be added to the PVR RECORD
folder in PVR submenu.

ENGLISH
19
In PVR menu you can see the programme you
recorded.
Press the red key to switch to full screen mode
and press the exit key to go back to preview
mode. Press the yellow key to delete the
program. Press the green key to rename the
program. Press OK or >to play the programme.
Press *to stop playing.
Press ¯ ˘ to fast forward or rewind.
7.2 Photo conguration
1. Slide time: Select between 1 s – 8 s.
2. Slide mode: Select between 0 – 59 or
random.
3. Aspect ratio: Select between keep and
discard.
7.3 Movie conguration
1. Subtitle specic: Select normal, big or small.
2. Subtitle background: Select transparent,
grey, white, and yellow green.
3. Subtitle font color: Select red, white, black,
blue or green.
7.4 PVR conguration
1. Record device: Here you see the information
of the USB device
2. Format: Press OK to format the disk.
8. Hotkey
8.1 Number
Use the numeric keys (0-9) to input the number of the desired channel. If the input
number is beyond the valid channel number, the system will read “Invalid number”,
press OK to close this message.

ENGLISH
20
8.2 TV/Radio
In normal mode, press TV/RADIO to switch between TV mode and Radio mode.
8.3 Up/down
Press PR+, PR- to change the channel up or down.
8.4 Left/Right (VOL +/-)
Press or VOL+, VOL- to change the volume. Press to decrease the
volume, or press to increase the volume.
8.5 Mute
Press to mute the volume. You can press once again to restore the volume, or
press to restore the volume.
8.6 Teletext
Press the Text to open teletext on the screen.
8.7 Find
Press the red (Find) key to pop up the Find
window.
Press to enter into the character.
8.8 OK
1. During the viewing or listening, press OK to
pop up the TV programme list or the radio
programme list.
2. Press PR+, PR- to select the channel up or
down and then press the OK to play this
channel in Full-screen.
3. Press MENU or EXIT to close this window.
8.9 Audio
1. Press AUDIO to enter the Audio window.
2. Press to select between Left-Left,
Right-Right and Left-Right.
3. Changing the audio mode is only connected
with the current channel, not all the
channels.
4. Press EXIT to close this window.
Table of contents
Languages: