König HAV-MCS54 User manual

253
INTERNETOVÝ MIKRO SYSTÉM
200
INTERNET-MIKROJÄRJESTELMÄ
142
MICROSISTEMA DE INTERNET
86
INTERNET MICROSYSTEEM
29
INTERNET MICROSYSTEM
281
MICROSISTEM INTERNET
226
INTERNET MIKROSYSTEM
171
INTERNETES MIKRORENDSZER
114
MICROIMPIANTO INTERNET
58
MICROSYSTÈME INTERNET
INTERNET MICROSYSTEM
HAV-MCS54

2
ENGLISH
WARNING: DANGER OF RADIATION
This device uses a laser. Opening the CD compartment lid and/or breaking the safety
interlocks will expose the user to radiation from the laser beam. Do not stare into the
laser while it is operating.
1) Getting started
This section helps you to position and install the unit.
1. Connect the FM antenna wire to the connection
2. Connect the speakers to the speaker connectors
3. Connect an Ethernet cable to connect the radio to a network
4. Connect to a 220 V power outlet
Back of the
main unit
(optional)
Connecting the speakers
Each speaker has a red and a black wire.
When connecting the speakers match
the red wires to the red terminals and the
black wires to the black terminals on the
main unit.
Speaker Wire Connection
Release speaker
terminal tab to inser
wire.
Return tab to lock
wire in the terminal.
NOTE: Ensure insulation is completely removed
from the ends of the speaker wires at all
connection points.

3
Connect the Ethernet cable
Use an Ethernet cable if you don’t have a WiFi access point. If you already have a
WiFi access point, no connection is required as this unit is equipped with a built-in
WiFi network card.
Connect the power
This system is designed to operate on 230 V 50 Hz AC. Connecting this unit to
any other voltage could result in damage to the unit which is not covered by your
warranty.
2) Basic system setup
AUX
You can connect an auxiliary audio device to this system to play audio from other
devices over the speakers of this system. Use the AUX input connection for this
purpose.
Battery installation
Insert two AAA batteries into the remote control and make sure you insert them
according to the indicated polarity.
Power ON the Main Unit
Press the STANDBY button and the device will turn on. The unit will now stay in
standby mode.

4
3) General controls
Main unit
Front view Top view
1. Remote sensor
2. Display
3. Standby - turn the unit on or off
4. Function - select the sound source
(CD, Internet Radio, FM Tuner, USB,
SD/MMC iPod, Music Player and
AUX)
5. Select - make selection in menus
6. previous, scan back, reverse,
menu back; next, scan/fast
forward, menu forward
7. - stop playback
8. start or pause playback
9. Headphone jack
10. /- Menu up/down, select FM
radio frequency
11. Info - show information of the current
disc, file, station
12. SD/MMC card - SD/MMC card slot
13. Mute/Snooze - cut or restore audio
output; turn off the alarm temporarily
14. ¬- USB connector
15. Volume - volume control
16. Memory - store station or track into
program
17. Menu - access the setup menu
18. iPod®connection dock
19. Disc compartment (press down to
open or close the door)

5
Remote control
1. Standby turn on or off (standby) the unit
2. 0-9 - select preset station or a track directly
3. Select the corresponding sound source
4. Menu - access the setup menu
5. Memory - store a station or track into program
6. Ok - make selection in menus (same function as Select on
main unit)
7. - previous, scan back, reverse, menu back
- next, scan/fast forward, menu forward
8. STOP - stop playback (same function as on main unit)
9. - start or pause playback
10. Alarm - show the alarm setting menu
Repeat - select a repeat playback mode
Random -select random playback mode
Timer - show information setting menu
Info - show information of the current disc file, station
Dimmer - select a brightness level of the display
Clock - show the clock setting menu
ST.Mo - select stereo or mono sound for FM tuner
11. DBBS - turn on or off the bass boost sound
Sleep - Set amount of time before auto shut off
EQ - select an equalizer mode
Mute - cut or restore audio output
Snooze - turn off the alarm temporarily
12. VOL +/− - volume control
13. /- menu up/down, folder up/down. select FM radio, frequency (same function
as /on main unit)
14. Autoscan - auto-search for the next available FM station in FM mode
Using the menus
The display shows the playback screen, browse screen, settings screen, messages
etc. What appears in the display varies, depending on the function you are using. To
display the different menus press the MENU key. To navigate through the menus use
the and buttons to navigate and press SELECT to confirm a selection.
To input characters:
Some menus require you to input characters. When you are inputting characters use
and to select the desired alpha/numeric characters. The selected character
will be shown in the display. Press OK or SELECT to confirm. Press the and to
select numbers, uppercase, lowercase and special characters. If you make a mistake
you can use the and to navigate to the “<” symbol and press OK or SELECT
to confirm. When you are finished use the and to navigate to the “↵” symbol
and press OK or SELECT to confirm. To exit the inputting procedure without saving
navigate to the C and press OK or SELECT.

6
Turning the unit ON/OFF
Press STANDBY to turn the unit on or off
(standby mode)
Audio controls
• Rotate the VOLUME knob on the
main unit or press VOL +/− on remote
control to adjust sound level. The
current volume shows in the display
temporarily before returning to the
previous display.
• Press EQ repeatedly to select a
preset equalizer mode (Flat, Rock,
Pop, Classic and Jazz). The selected
EQ mode shows at the bottom of that
display
• Press DBBS to turn bass boost on or
off. When selected DBBS shows at
the bottom of the display
• Press MUTE to cut the sound output
temporarily. When sound is cut, “Mute”
shows at the bottom of the display. To
return the sound output, press MUTE
again or press VOL + or –.
Dimmer
Press DIMMER button to dim the display
press again to brighten.
Display
The dot-matrix display is a dynamic
and intuitive interface that provides the
necessary information for operation.
Some of the key displays are illustrated
below for your easy reference.
Current time and day
Timer activated
Wi-Fi signal
strength
Operation
in progress
Volume
level
Current
mode
Sleep function activated
Alarm
activated
Internet setup
Introduction
You must connect to the internet in order
to use the Internet Radio
Before you can use the Internet part of the
unit you must have a working broadband
Internet connection:
A wireless (WiFi) access point (AP)
ADSL or cable
modem
Wireless
broadband router
This unit
PC or media server
or
An Ethernet connection with an RJ45
plug.
This unit
PC or media server
ADSL or cable
modem
Broadband
router
Ethernet
Ethernet
• If your wireless network is already in
use it might have Wired Equivalent
Privacy (WEP) or Wi-Fi Protected
Access (WPA) data encryption.
You will need to enter the WEP or
WPA key into the unit so that it can
communicate with the router.

7
• The ‘access point’ in a wireless
network has a name known as the
‘SSID’. You will need to ‘tell’ the unit
the ‘SSID’ when setting it up for the
first time.
• Usually the SSID starts out as the
brand and model of the router,
although it is a good idea to change
it if there are other networks, so
identification of the correct network
(SSID) is easier. Legally speaking,
you should not connect to the Internet
through someone else’s network.
Apart from the legal aspect sharing a
wireless link will make audio from the
Internet more prone to interruptions.
• Wireless router range is usually
enough for domestic use but can be
adversely affected by some building
materials and interference sources
such as nearby wireless networks
If your internet connection is not working
after finishing all the settings, please
try to turn everything off (you may need
to disconnect the devices from the wall
outlet) and turn it back on in this order:
1. Modem. Wait a minute for the
indicator lights to settle down
2. Router (if separate). Again, wait a
minute for the indicator lights to settle
down
3. Computer(s)re-start
4. This unit
Internet connections
To connect to the Internet via the
Wizard of the unit:
1. Press STANDBY to turn on the unit.
2. Press FUNCTION on the main unit
or iRadio, FM or M. Player on the
remote control.
• Do not select CD, USB, SD/MMC,
iPod®or AUX mode.
3. Press MENU and then press or
to select Main menu and then press
OK or SELECT.
4. Press or to select System Setup
and then press OK or SELECT.
5. Press or to select Internet Setup
and then press OK or SELECT.
6. Press or to select Wizard
and press OK or SELECT. The
connection wizard will look for all
available Internet networks in your
surroundings and list them on the
display.
7. Press or to select your Internet
network (SSID) and then press OK or
SELECT.

8
8. If your network is password protected,
please input the password. If you
input the correct password the radio
will connect to the internet.
To connect to the Internet manually:
1. Press STANDBY to turn on the unit.
2. Press FUNCTION on the main unit
or iRadio, FM or M. Player on the
remote remote control
• Do not select CD, SD/MMC, iPod®or
AUX mode
3. Press MENU and then press or
to select Main menu and then press
OK or SELECT.
4. Press or to select System Setup
and then press OK or SELECT.
5. Press or to select Internet Setup
and then press OK or SELECT.
6. Press or to select Manual Setting
and then press OK or SELECT.
7. Depending on your connection
settings, press or to select Wired
or Wireless and then press OK or
SELECT.
8. Press or to select DHCP enable
or DHCP disable and then press OK
or SELECT.
• DHCP (Dynamic Host Configuration
Protocol) helps you obtaining various
parameters necessary for the client
to operate in an Internet Protocol (IP)
network with minimum or no manual
configurations Check with your
service provider if your network is
equipped with such device
• If you have selected Wired in step 7,
you will be connected to the Internet
9. Enter your network name (SSID), refer
to instructions on page 5 for more
information on inputting characters.
10. Press or to select OPEN, WEP,
WPA or WPA2 according to your
security settings and then press OK
or SELECT.

9
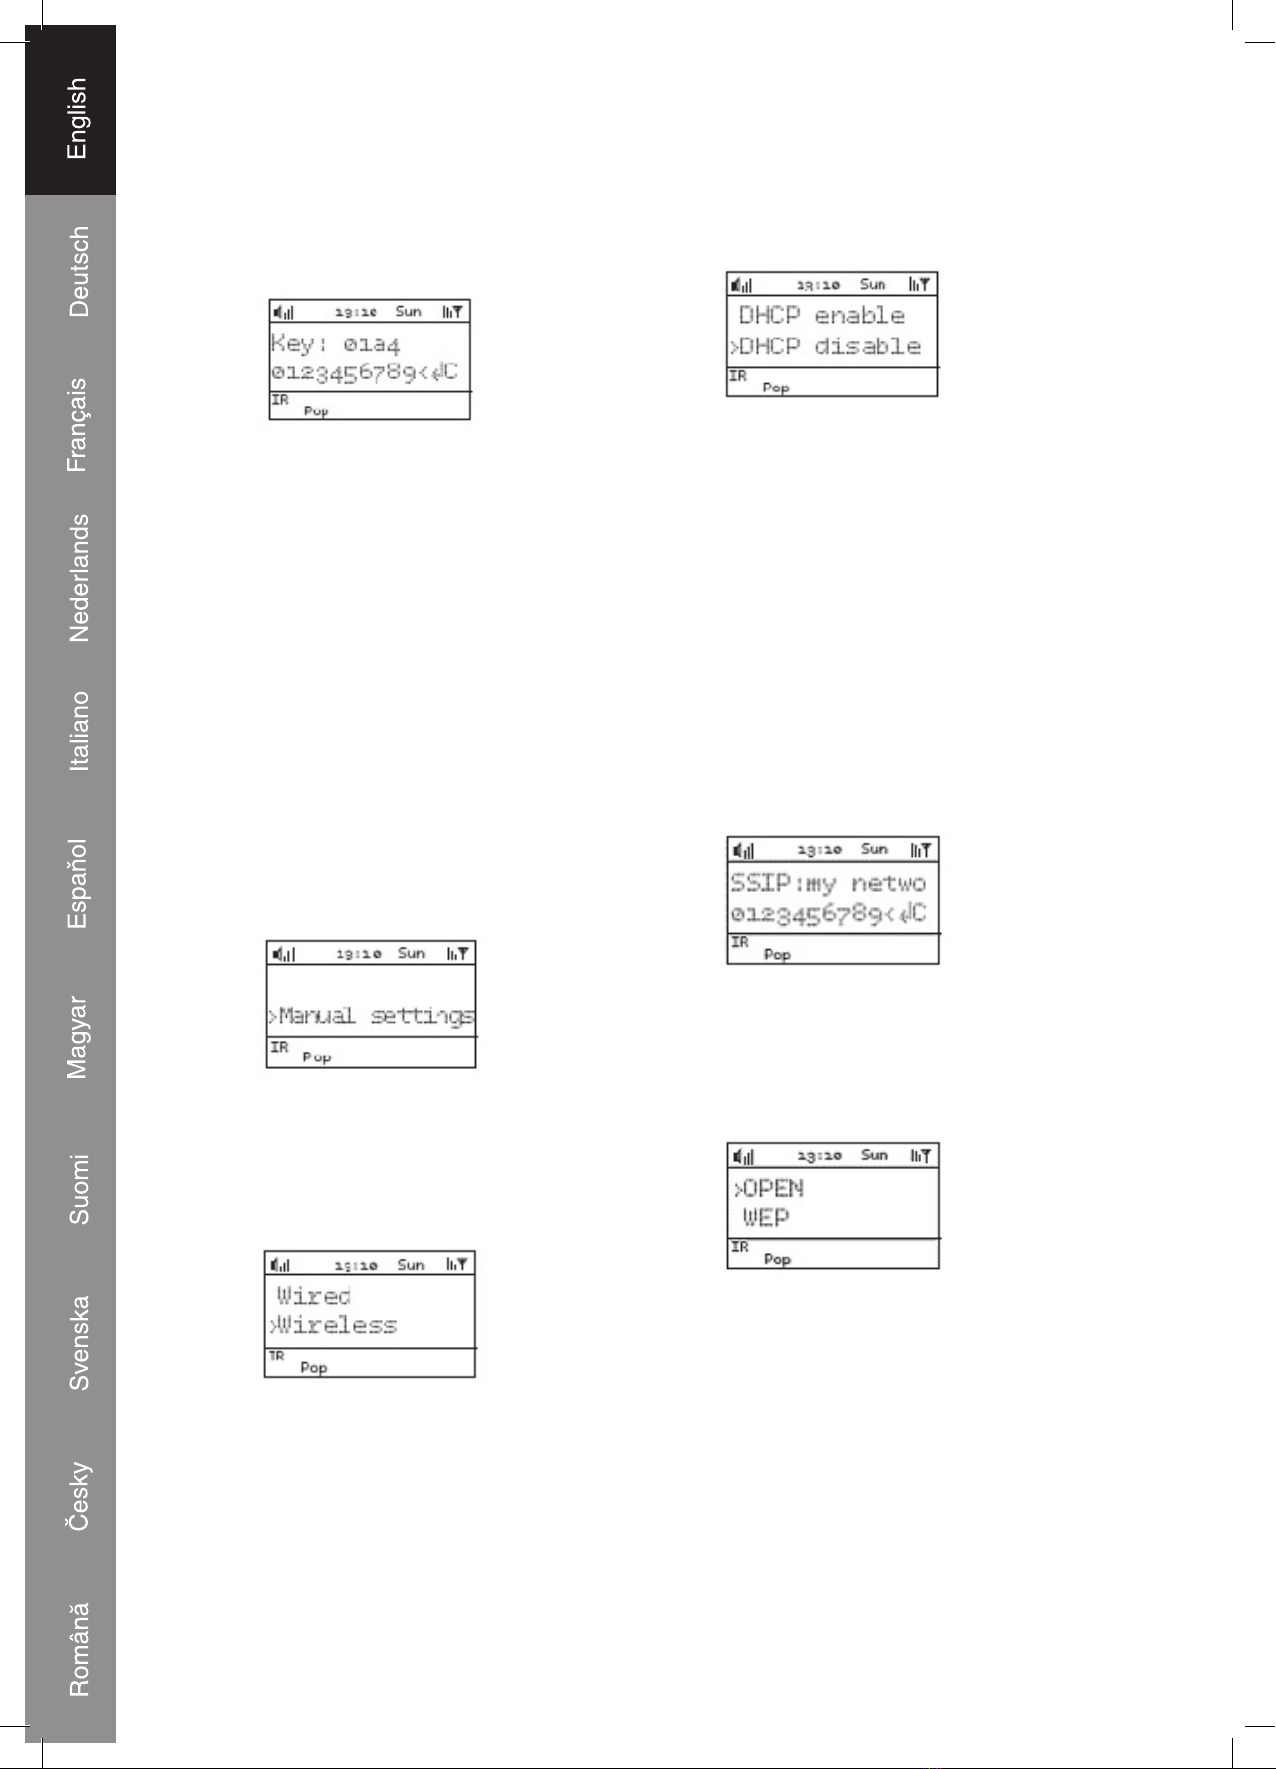
11. If your network is password-protected
enter the password now with
reference to instructions on page 5.
You will then be connected to the
Internet.
To view your current Internet setting:
1. Press STANDBY to turn on the unit.
2. Press FUNCTION on the main unit
or iRadio, FM or M. PLAYER on the
remote control.
• Do not select CD, USB, SD/MMC,
iPod®or AUX mode
3. Press MENU and then press or
to select Main menu and then press
OK or SELECT.
4. Press or to select System Setup
and then press OK or SELECT.
5. Press or to select Internet Setup
and then press OK or SELECT.
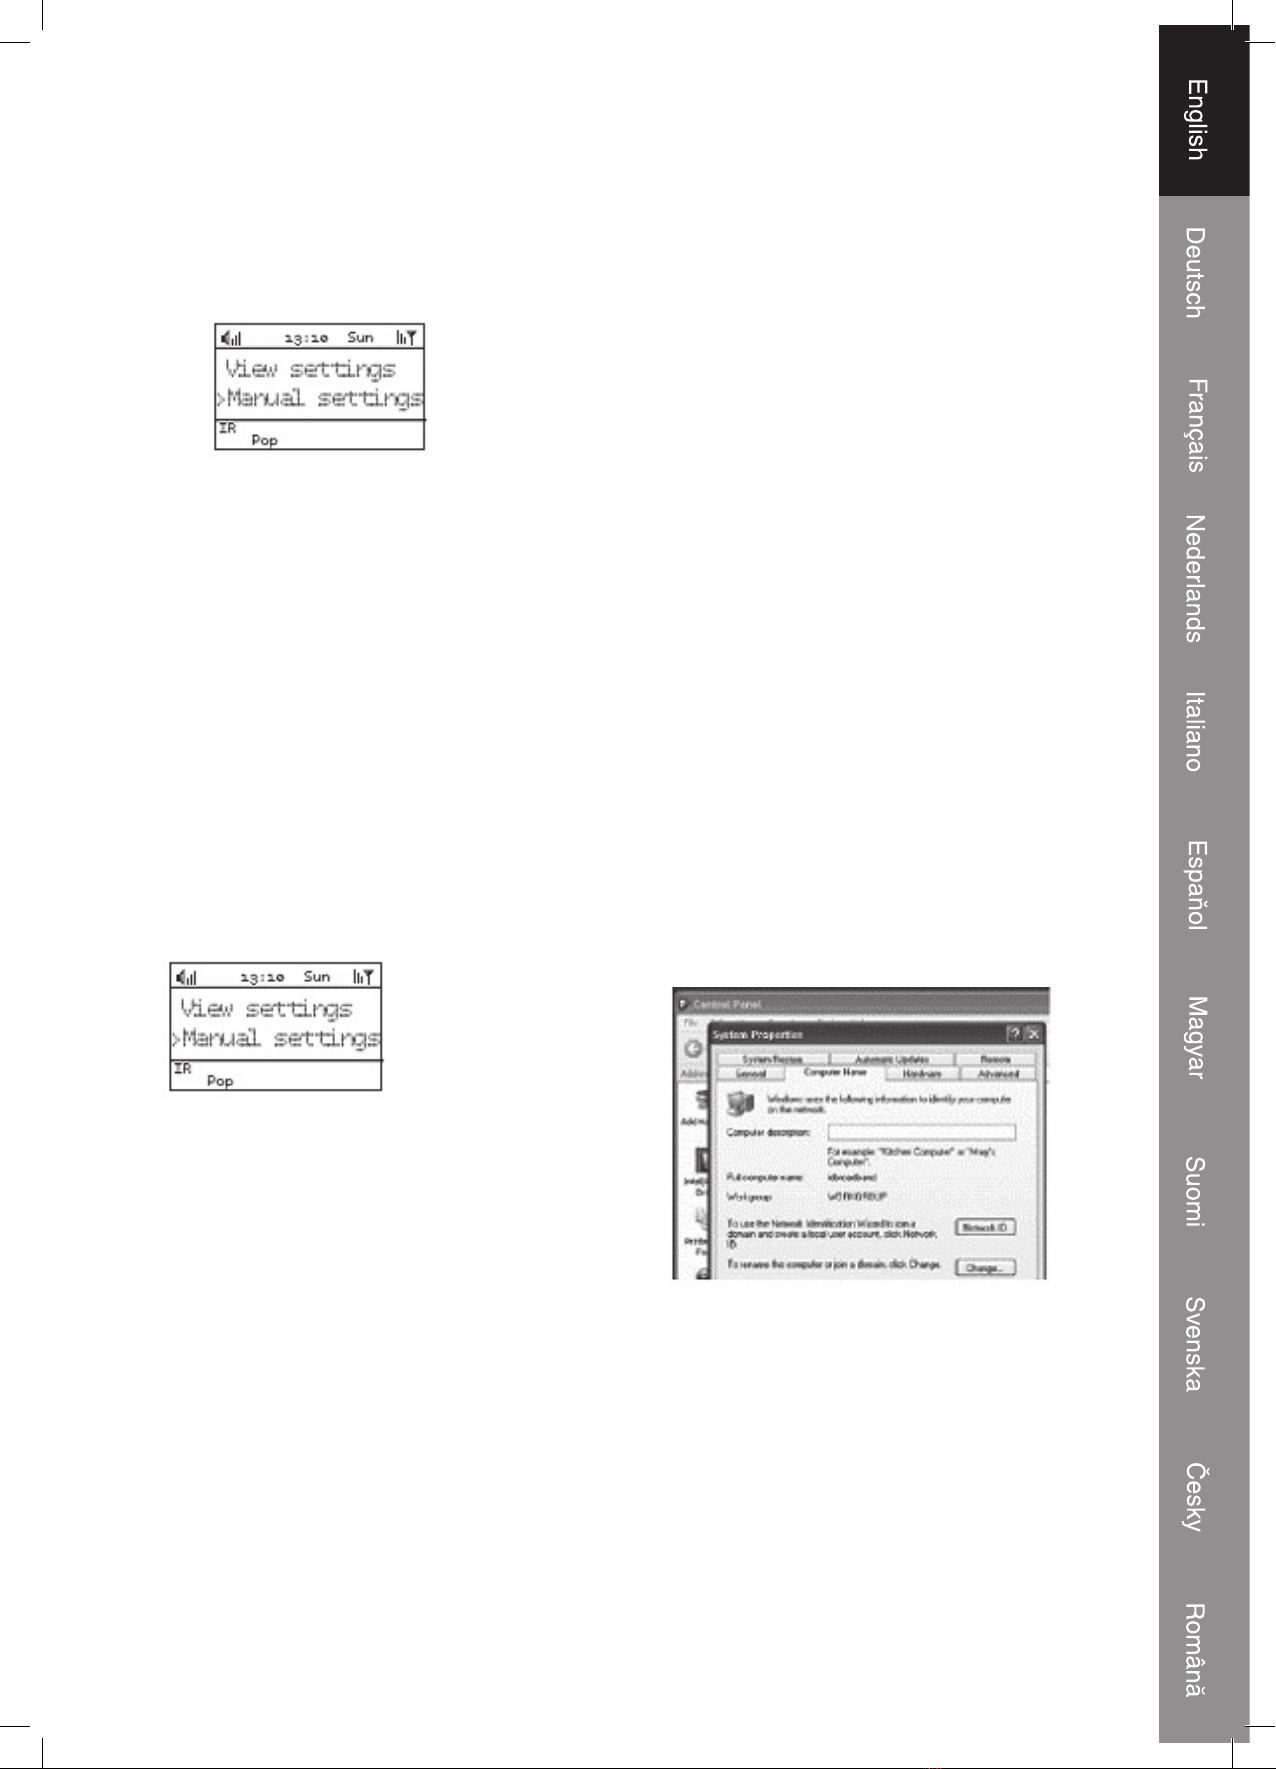
6. Press or to select View settings
and then press OK or SELECT.
7. Press or to select one of the items
below and then press OK or SELECT
to view their current settings.
• Active adapter (wired/wireless)
• MAC address
• DHCP (enable/disable)
• PC settings (Username and
password)
• SSID
• IP settings (IP address, subnet mask,
gateway address, primary DNS and
secondary DNS)
PC setup
The unit can access a shared folder/
media on your PC and playback music
files stored in it. To do so, you can either
setup a shared folder on your PC or use
UPnP (universal plug and play) on your
PC.
Using a shared folder on the PC
To setup a shared folder on your PC:
1. Configure Domain/Workgroup on
your PC
• In order to setup the unit to play back
music stored on a shared network
folder, the username, password
and domain settings must first be
configured. This is only required if
you have set a password on your
shared folders. You can configurate
the domain on a XP computer by
following the instructions below:
1.1 From the start menu, select Control
> System and then select the
Computer Name tab. The Domain
or Workgroup that your Computer is a
member of, is displayed in this tab.

10
1.2 If your PC is not a member of any
Domain or Workgroup then one must
be joined. To do so, click on the
Change button on the Computer
Name tab and enter the name of the
domain (default on Windows XP is
MSHOME).
1.3 A restart of the PC may be necessary
if the Domain or Workgroup has been
changed.
2. Setup a new user account
• The unit requires a user account to
be set up on each PC that you wish
to browse. By default most PC’s have
at least one user account associated
with it. The username and password
(optional) needs to be the same on
each PC as the unit can only store
one username and password. For
Windows XP this can be set up as
described below:
2.1 From the Start menu, select Control
Panel > User accounts.
2.2 Click Create a New Account and
then enter the new username and
the Domain/Workgroup setting as
mentioned in step 1. Select the type
of user(restricted) and then click
Finish.
2.3 Select the user you just created,
select create a new password.
2.4 Note the username and password
• Note for Windows Vista Users:
you have to turn on Guest account
via Manage User Account in the
Control Panel. Then add access to
either “Everyone” or “Guest” on the
shared drive. You can also create a
new account for sharing with the unit.
with a password, if you are concerned
about security. The Guest account
has no password by default and the
unit will connect to it from its factory
default settings.
3. Configure a shared folder
3.1 From the Start menu, select My
Computer and navigate to the folder
you wish to share.
3.2 Right click on the folder and select
Sharing and Security.

11
3.3 Select Share this folder. Create the
folder name in the Share name field.
By Default it will have the name of the
folder already listed and then click
Permissions.
3.4 Click Add
3.5 Enter the username in the dialog
box This is the username you have
created in step 2 Click OK when
finished
3.6 Check the appropriate permissions
to share your files. We recommend
you check Read Acces to the shared
folder and the click finish.
4. Store the username and password
in the unit
• Before the radio can stream music
from your PC, you need to enter
the username and password for the
shared folder you have created (as
instructed above)
4.1 Press STANDBY to turn on the unit
4.2 Press FUNCTION on the main unit
or iRadio, FM or M. Player on the
remote control.
• Do not select CD, USB, SD/MMC,
iPod®or AUX mode.
4.3 Press MENU and then press or
to select Main menu and then press
OK or SELECT.
4.4 Press or to select Internet Setup
and then press OK or SELECT.
4.5 Press or to select PC Settings
and then press OK or SELECT.

12
4.6 Press or to select User Name
or Password and then press OK or
SELECT Enter the username and
password in the corresponding menu.
Refer to page 5 for more information
on inputting characters.
• The PC is now ready to stream music
to the unit.
• Refer to Media Player on page 18-19
for more information on streaming
music from your PC in this unit
Using shared media (UPnP)
To setup media sharing via Windows
Media Player (WMP):
Media sharing uses Windows Media
Player (WMP) 11 and above as media
server. If you use this method you don‘t
have to set anything in your radio, but you
do have to permit acces to your PC. You‘ll
only have to this once, please follow the
steps described below.
1. Make sure your PC is on the same
network (wired or wireless) that will
be used to share music with the unit.
2. Press STANDBY to turn on the unit.
3. Launch Windows Media Player on
your PC and add media to the library.
(Library > Add to Library)
4. In the WMP main window, click on
Library, then Media Sharing. The
following screen appears:
5. The unit is shown as an “unknown”
device Select this “unknown device”
and then click Allow and then OK
• The PC is now ready to stream music
to the unit
• Refer to Media Player on page 18-19
for more information on streaming
music from your PC on this unit.
Clock, alarm, timer and sleep function
Clock
To set the time and date manually:
1. Press CLOCK on the remote control
Set hour will show in the display.
2. Press or to set the hour,
then press OK or SELECT
3. Press or to set the minute,
then OK or SELECT
4. Press or to set the day,
then press OK or SELECT
5. Press or to change between
12 or 24 hour clock, then press OK or
SELECT
• Time and day are now set.
Alarm
The unit includes an alarm function. Make
sure you have correctly set the clock time
to use the alarm function.
To activate the alarm:
1. Press ALARM on the remote control.
Enable or Disable will show in the
display

13
2. Press or to select Enable
(to active the alarm) and then press
OK or SELECT.
3. When Set Alarm Timer shows in the
display, press OK or SELECT.
4. Press or to set the hour
time of the alarm and then press OK
or SELECT.
5. Press or to set the minute
time of the alarm and then press OK
or SELECT.
6. When Set mode shows in the display,
press OK or SELECT.
7. Press or to select the alarm
sound source and then press OK or
SELECT.
• Alarm sound sources: Buzzer, FM,
CD USB, CARD or iPod®
8. When Set day shows on the display,
press OK or SELECT
9. Press or to select alarm
frequency
• Alarm frequencies: Once, daily,
weekday, or weekend.
• The alarm is now set, press ALARM
to return to to confirm the alarm
settings.
• When the alarm is activated, an alarm
icon will show at the lower left
corner of the display.
• If the selected source (e.g. CD, iPod®,
USB CARD) is not available when the
alarm time has reached, buzzer will
sound instead.
Turning off the alarm
To stop the alarm when it sounds:
Press ALARM to turn off the alarm
To silence the alarm temporarily
(Snooze)
Press SNOOZE. The alarm will sound
again when the snooze period (9 min) is
over.
To deactivate the alarm completely:
Press ALARM and then or to
select Disable. The alarm icon will
disappear from the display
Timer
The unit includes a timer function to turn
on and off the unit at a specific time. Make
sure you have correctly set the clock time
to use the timer function
To activate the timer:
1. Press TIMER on the remote control.
Enable or Disable will show in the
display
2. Press or to select Enable
(to active the timer) and then press
OK or SELECT

14
3. When Set on time shows on the
display press OK or SELECT
4. Press or to set the hour
time and press OK or SELECT.
5. Press or to set the minute
time and then press OK or SELECT
• The hour and minute set above is the
time to turn on the unit
6. When Set mode shows on the
display, press OK or SELECT
7. Press or to select the timer
sound source and then press OK or
SELECT
• Timer sound sources: FM, CD, USB
CARD or iPod®
8. When Set day shows on the display,
press OK or SELECT
9. Press or to select timer
frequency then press OK or SELECT
• Alarm frequencies: once, daily,
weekday or weekend
10. When Set off time shows on the
display press OK or SELECT
11. Press or to set the hour
time and then press OK or SELECT
12. Press or to set the minute
time and then press OK or SELECT
• The hour and minute set above is the
time to turn off the unit
• The timer is now set, press TIMER
to confirm the timer settings
• When the timer is activated a timer
icon will show at the lower left
corner of the display.
To deactivate the timer:
Press TIMER and then or to
select Disable. The timer icon will
disappear from the display.
Sleep function
The unit includes a programmable sleep
function to play the unit for a set length of
time before turning off automatically.
To use the sleep function:
1. Press STANDBY to turn on the unit
and select a sound source to play
2. Press SLEEP on the remote control.
The display will show Sleep time
15 min.
3. Press SLEEP repeatedly to select a
desirable length of time (15, 30, 45,
60, 90 and off) before the unit turns
off automatically.
• Select OFF if you want to cancel
using this function.
• The display will return to the previous
display after a few seconds. The
sleep function is now set. A small
clock icon will show at the
lower right corner of the display with
the remaining length of time next to
it.
• For CD mode, the unit will only
operate until the CD ends. If you set

15
the Sleep function for 90 minutes but
your CD can only run for 45 minutes,
the unit will stop playback after
45 minutes.
Internet radio
With Internet Radio, you can listen to
music or Podcasts in other countries or
from your hometown. It offers a wide range
music station from all over the world.
Listening to Internet Radio
To access the Internet radio mode:
Press FUNCTION repeatedly on the main
unit until Internet radio mode is selected,
or press iRadio on the remote control.
To browse and listen to an Internet
radio station:
1. In iRadio mode, press MENU
2. Press or to select Station list and
then press OK or SELECT
3. Press or to select Stations and
then press OK or SELECT
4. Internet radio station are categorized
according to Genre (e.g. Blues, Rock,
Talk). Location (e.g. Germany, USA)
and Popular stations. Press or
to select a category or sub-category
and then press OK or SELECT.
5. When a station is selected, press OK
or SELECT to start listening.
To browse and listen to a Podcast:
1. In iRadio mode, press MENU
2. Press or to select Station list and
then press OK or SELECT
3. Press or to select Podcasts and
then press OK or SELECT
4. Podcast are categorized according to
Genre (e.g. Health, History), Location
(e.g. Germany, USA). Press or
to select a category or sub-category
and then press OK or SELECT.
5. When a Podcast is selected, press
OK or SELECT to start listening
To search for an Internet radio station:
1. In iRadio mode, press MENU
2. Press or to select Station list
and then press OK or SELECT
3. Press or to select Stations and
then press OK or SELECT

16
4. Press or to select Search
Stations and then press OK or
SELECT
5. Enter the station name and then
start the searching. Refer to page 5
for more information on inputting
characters
• You may also enter only a letter and
search for all stations starting with
the entered letter.
To search for a Podcast:
1. In iRadio mode, press MENU
2. Press or to select Station list
and then press OK or SELECT
3. Press or to select Podcasts and
press OK or SELECT
4. Press or to select Search
Podcasts and then press OK or
SELECT
5. Enter the Podcast name and then
start the searching. Refer to page 5
for more information on inputting
characters
• You may also enter only a letter and
search for all Podcasts starting with
the entered letter.
To listen to one of the 10 last listened
stations:
1. In iRadio mode, press MENU
2. Press or to select Last listened
and then press OK or SELECT
3. Press or to select a previously
listened station and then press OK or
SELECT to start listening.
To check out the newly added Internet
radio stations:
Newly added Internet radio stations are
automatically updated in the unit
1. In iRadio mode, press MENU
2. Press or to select Station list
and then press OK or SELECT
3. Press or to select Stations and
then press OK or SELECT
4. Press or to select New Stations
and then press OK or SELECT
5. Press or to browse and select
a newly added Internet radio station
and then press OK or SELECT to
start listening.
To view station information:
While listening to a station or Podcast,
press INFO repeatedly to cycle through
the station/Podcast information which
scroll on the display.
Internet radio:
• Playback status
• Signal strength (indicated by solid
bars. the more, the stronger the signal
is)
• Format
• Reliability

17
• Description
• Genre
• Location
• Name
Podcast
• Playback status
• Signal strength (indicated by solid
bars, the more, the stronger the signal
is)
• Episode name
• Episode description
• Episode URL
• Show description, genre, language,
city state, country and bookmark
Manage your stations
Log on to Frontier Silicon Internet Radio
Portal (www.wifiradio-frontier.com) to
add new stations and create a list of My
favorite stations.
To register in the Internet Radio Portal
1. In iRadio mode, press MENU
2. Press or to select Station list
and then press OK or SELECT
3. Press or to select Help and then
press OK or SELECT
4. Press or to select Get Access
Code and then press OK or
SELECT
• Remember or write down the access
code
5. Go to www.wifiradio-frontier.com from
PC and then click Register here from
the left menu.
6. Create a user account by following
the instructions on the web page.
Enter your access code here as noted
in step 4
To mark stations as your favorites:
1. LogontoFrontierSiliconInternetRadio
Portal (www.wifiradio-frontier.com)
from your PC.
2. Browse and find your favorite stations
from the left menu. Mark your favorite
stations by clicking next to the
station name.
• Your favorite stations will be
synchronized with the unit
automatically
3. On the unit, press MENU in iRadio
mode
4. Press or to select Station list
and then press OK or SELECT
5. Press or to select My favorites
and then press OK or SELECT
6. Press or to browse and select a
favorite station and then press OK or
SELECT to start listening

18
To add new stations that are not in the
list:
1. LogontoFrontierSiliconInternetRadio
Portal (www.wifiradio-frontier.com)
from your PC.
2. From the main page of the Internet
Radio Portal, click →under My
added stations.
3. Enter the information of the new
station as instructed and then click
→
4. On the unit, press MENU in iRadio
mode
5. Press or to select Station list
and then press OK or SELECT
6. Press or to select My Added
Stations and then press OK or
SELECT
7. Press or to browse and select
an added station then press OK or
SELECT to start listening.
To store a station as a preset:
1. While listening to a desired station,
press MEMORY
2. Press or to select a preset
number
3. Press and hold OK or SELECT to
save the station as a preset station
• If your selected channel number is
already occupied by a station, the
existing station will be replaced with
the new one.
To listen to a preset station:
1. In iRadio mode, press MEMORY
2. Press or to select a preset
number
3. Press OK or SELECT to listen to the
selected preset stations.
Alternatively:
In iRadio mode, press the number buttons
(0-9) to select a preset station.
To get help regarding Internet radio:
1. In iRadio mode, press MENU
2. Press or to select Station list
and then press OK or SELECT
3. Press or to select Help and then
press OK or SELECT
4. Press or to select FAQ and then
press OK or SELECT
5. Press or to browse questions and
then press OK or SELECT to view
the answer for the selected question
Music player
With Music Player, you can listen to music
files stored in a shared folder/media on
your PC or via Media Sharing on your
PC.
To access the Music Player mode:
Press FUNCTION repeatedly on the main
unit until Music Player mode is selected,
or press M. Player on the remote control
To play a music file from the shared
folder on your PC:
Make sure you have already setup your
PC for media sharing and ensure that
the username and password have been
configured. Read page 9-12 for details

19
1. In Music Player mode, press or
to select Shared folders and then
press OK or SELECT. The unit will
connect to your PC (make sure you
have turned on your PC).
2. Press or to select the desired
domain (if more than one available)
from the display and then press OK
or SELECT.
3. Press or to select the desired PC
(if more than one available) from the
list and then press OK or SELECT.
4. Once a domain and PC have been
selected a list of all shared folders in
the system is displayed. Press or
to select a folder or file to play and
then press OK or SELECT to start
the playback.
5. Press to pause or resume
playback
6. Press MENU, then or and OK or
SELECT to select Browse to search
for another file for playback in another
shared folder or media.
CD playback
Compatible disc types
This unit supports playback of CD disc of
the following types:
• CD Audio
• CD-R
• CD-RW
• The ability to play certain recordable
discs may depend on the quality
or physical condition of the disc,
the quality of the recording or
characteristics of the recording
device or software application.
Playback cannot be guaranteed in all
situations. This is not an indication of
any problems with the unit.
Compatible audio formats
• The unit supports playback of songs
in CD-audio (pre-recorded CDs) mp3
and Windows Media formatted Audio
(WMA). This unit does not support
tracks equipped with DRM. Neither
it can play files in AAC, or ATRAC
format. This means the device is not
suitable to play music from some
online retailers. It may be possible
to convert your music to one of the
playable compressed formats, or
burn it to an audio CD, depending on
the DRM restrictions
• Recorded CD discs should be created
in accordance with the ISO09660
CD-ROM file system. The system can
read media containing up to 16 levels
of directories, 99 total directories
and up to 999 total files. Chinese
characters cannot be displayed
however files featuring them can be
played back. File extensions should
be mp3, MP3, wma or WMA. WMA.
version 7.0-11.0 are supported at
8-384kbps encoding rate (including
VBR encoding), 32/44, 1/48kHz,
16.22,05/42kHz and 8/11,0.25/12kHz
sampling rate. MP3 files are
supported at 8-384kbps encoding
rate (including VBR encoding), 32/44,
1/48kHz sampling rate

20
CD playback operations
To access the CD mode:
Press FUNCTION repeatedly on the main
unit CD mode is selected, or press CD on
the remote control.
To start CD playback:
1. Press the disc compartment door
down and open it. OPEN shows in
the display.
2. Load an audio CD or data CD with
MP3 or WMA files into the disc tray.
3. Press the disc compartment door
down and close it. The unit should
read the disc information and start
playback automatically
• As MP3 or WMA discs contain much
more information than normal CDs,
the unit may take longer to read
the information from them. This
is completely normal and not an
indication of any problems with the
unit.
To operate the playback:
1. Press to pause playback, press
again to resume.
2. Press or to skip to the
previous or next track
3. Press the number keys (0-9) to
directly input the track number and
start playback from the selected
track. The track number can be up to
3 digits
4. Press and hold or to scan
backward or forward within the same
track. Release the button to resume
to playback at normal speed.
5. Press STOP to stop the playback
To select folder and file on an mp3/
wma disc:
For MP3 or WMA disc, press or to
select a folder before you press
or to select a file within a selected
folder. The currently selected folder is
shown in the display.
folder
number
To view the ID3 tag information from
mp3/wma disc:
ID3 tag information (e.g. file name, artist
name and album name) will scroll thru
the display automatically if available.
Otherwise, UNKOWN will show in the
display.
To activate repeat or random playback
mode:
• Press Repeat repeatedly to select a
repeat mode (repeat one, repeat all,
or cancel repeat)
• For MP3 or WMA CD, repeat folder is
also available to repeat all files within
the current folder.
• Press RANDOM repeatedly to turn
on or off the random playback mode
• The selected repeat or random mode
will show at the lower right corner of
the display
To program the playback:
The program playback mode lets you
program a total of 20 tracks/files in any
desired order. You can also program the
same track/file to play several times within
a program sequence.
1. In CD mode, press STOP to stop any
disc playback
Table of contents
Languages: