Kaito KA1102 User manual

INDEX
POWER SOURCES........................................................... 1
OPERATING ON BATTERY............................................... 1
OPERATING ON AC ADAPTOR........................................ 2
POWER INDICATION....................................................... 3
BATTERY CHARGE........................................................... 3
CLOCK FUNCTION..........................................................4
SET THE CLOCK...........................................................4
SELECT TIME MODE......................................................5
MW STEP 9K/10KSELECTION.............................................5
TURN ON /OFF THE UNIT.................................................. 6
POWER ON /OFF........................................................ 6
AUTO TURN ON /OFF ..................................................6
SLEEP......................................................... ...............6
BAND SELECTION.......................................................... .7
METER BAND.................................................................7
LOCAL / DX SWITCH........................................................7
PAGE FUNCTION............................................................8
TUNING INTO STATIONS................................................... 8
MANUAL TUNING........................................................ 8
AUTO SCAN TUNING.................................................... 9
SPEED CHANGE TUNING............................................ 10
DIRECT FREQUENCY ENTRY......................................... 11
MEMORY SCAN TUNING............................................. 13
PRESET STATIONS...........................................................14
RANDOM PRESET.......................................................14

BAND PRESET.........................................................15
ATS ......................................................................17
COPY FUNCTION.......................................................19
DELETE PRESET STATIONS............................................ 20
RECEIVE SSB &CW.................................................... 21
SET ALARM BY BEEP.................................................... 22
AUTO POWER ON / OFF .......... ................................... 24
SET SLEEP TIME..........................................................26
LOCK FUNCTION.......................................................27
BACK LIGHT FUNCTION
WIDE / NARROW BAND.
...............................................27
.............................................. 28
STEREO / MONO / BASS.............................................. 28
AUTO RESET.............................................................. 28
SIGNAL STRENGTH / FM STEREO....................................29
AUDIO OUTPUT..........................................................29
LISTENING WITH EARPHONES....................................... 30
USING FOLDING STAND.............................................. 30
USING ANTENNA....................................................... 31
CAUTIONS................................................................33
SPECIFICATIONS....................................................... 34
INDEX
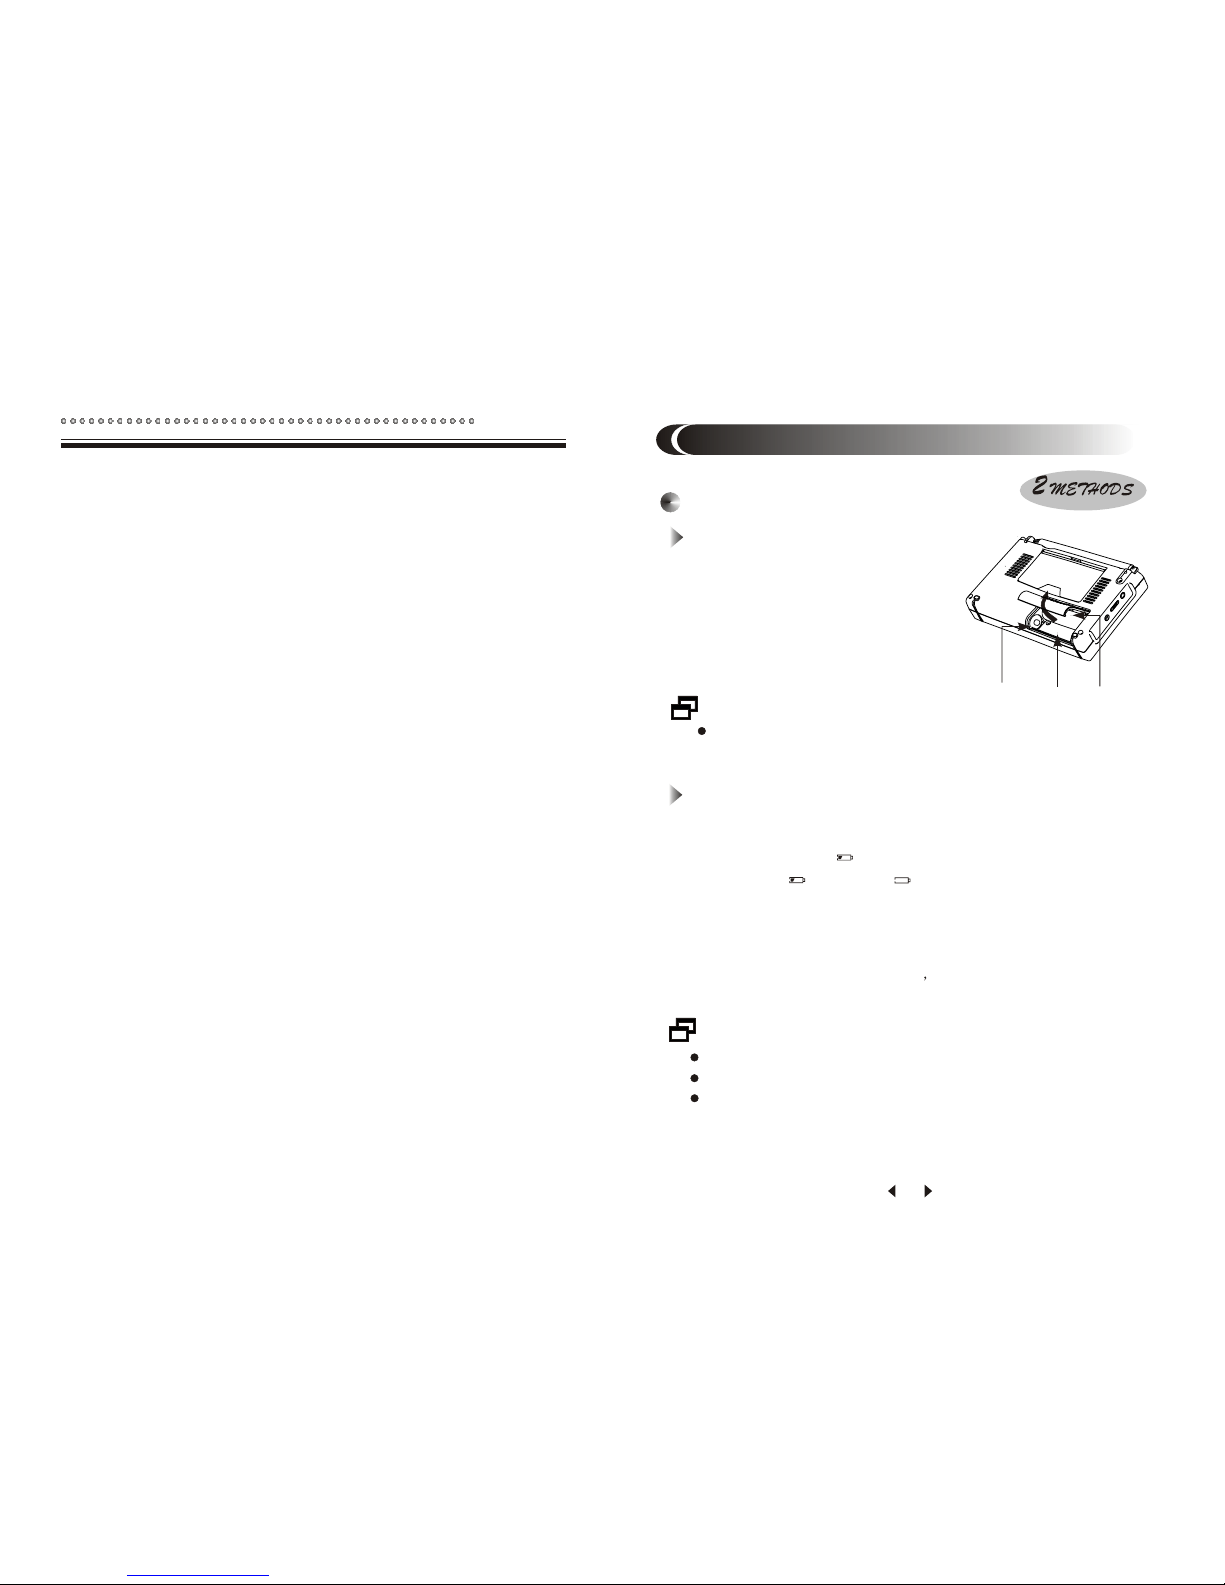
1. Slide thebattery lid.
2. Insert threeAAbatteries with
correct polarity asshown in
the compartment.
3. Close thelid of compartment.
OPERATING ON BATTERY
Disconnect external power source before operating on
battery power.
BATTERY REPLACEMENT
1. When the sound becomes weak and distorted, and battery
power indicates , replace batteries immediately,
otherwise will turn to , then the unit will shut off
automatically.
2. All memories (station presets) are permanently stored.
However, when the batteries are removed, the clock reverts
to the default setting of 12:00 and the last beep setting is
cancelled. They need to be reset.
POWER SOURCES
12
3
1
BATTERY INSTALLATION
Do not tryto recharge dry batteries.
Do not mixold batteries with new ones.
Remove the batteriesif the unit will not beused for a
long period oftime.

When the unitis not being used for along period of time,
remove the batteriesto avoid damage from battery leakage
and corrosion.
If battery leakageoccurs, wipe the battery compartment
with a softcloth before inserting new batteries.
OPERATING ON AC ADAPTOR
1. Plug theadaptor into an 220V AC power outlet.
2. Insert theadaptor5s small connector plug into the DC
JACK , appearsin the display.
3. Turnon the unit.
220·ü½»Á÷µç²å×ù
If theAC adaptor is connected, the unitautomatically
switches to the AC adaptorpower, and installed batteries
are no longer in use.
If the adaptor is connected whilethe backlight is
illuminated, the illumination will remain on.
Remove the batteries if you wantto use AC adaptor for
a long period of time.
23
2
Left Side
The battery power is divided into 4 levels.
Full
Medium
Exhausted, auto shut off Lower
POWER INDICATION
BATTERY CHARGE
When battery power indicates from to , the unit will
shut off automatically.
While the unit is on, if appears in the display when using
rechargeable batteries, batteries need to be charged.
3
1. Install three AA rechargeable batteries with correct polarity.
2. onnect the
other side securely to DC Jack .
Plug the adaptor into an 220V AC power outlet, c
23
3. With the radio turned off, press the CHARGE button , the
power indicator will flash for 4 seconds. Press number
button 1..9 to select charging hours according to battery
capacity in flashing time, otherwise the unit will exit from
charge mode.
4. The charging time indicates in the display. When charging has
been completed, the unit stops charging automatically.
5
If charge time is not been set, the unit will exit from the charge
mode.
Keep the unit off when charging.
Battery charge will be terminated once the unit turns on.

4
CLOCK FUNCTION
The unit has two clock modes (12H/24H) for user to select.
The default time of the unit is 12:00. Set the clock to the current
time.
1. If the unit is turned on, press POWER button to turn it off.
2. Press ENTER button twice, indicator flashes for six
seconds.
3. While is flashing, press number button to set current time.
SET THE CLOCK
ENTER
20
button 0~9
6
ENTER
+
CLOCK FUNCTION
The unit will adjust the current speed automatically during
charging.
Use NiMH batteries, and do not charge them for more than
seven hours.
When using new rechargeable batteries or those which have
not been used for a long time, charge them fully, then use them
until they have completely run down. Repeat this cycle two
more times, then those batteries can be used normally.
Do not leave fully charged batteries unused for a long time.
CHECK CURRENT TIME
1. When the unit is off, current time indicates in the display.
2. When the unit is on, hold down EXIT button about 0.5 second
to display current time 3 seconds.
5
SELECT TIME MODE
9
Press button 1 or 2
1. Disconnect the AC adaptor, remove the batteries, till nothing
appears in the display.
2. About 30 seconds later, connect the AC adaptor or insert
batteries: SET appears in the display.
3. Quickly press ENTER button twice, 12-24 appears in the
display for 3 seconds. Please see below .
4. Press number button 1 or 2 to select 12H or 24H time mode.
1/2
ENTER
ENTER
+
To meet your listening requirement in different countries, MW
step can be selected.
North and South America 10KHz
Other Countries 9KHz
MW STEP 9K/10K SELECTION
1. Disconnect the AC adaptor, remove the batteries, till nothing
appears in the display.
2. About 30 seconds later, connect theAC adaptor or insert
batteries, SET appears in the display.

6
1
9
ENTER
3. Press ENTER button, 9-10 appears in the display for three
seconds, 9 indicates the medium wave AM channel spacing
is 9KHz while 10 means it is 10KHz.
4. Press number 1 to select 9K step press number 2 to select
10K step.
Press button 1 or 2
/2
Press POWER button to turn onthe unit manually, the
unit will receivethe last channel you ever heard.After
listening, press POWERbutton again to turn it off.
1
TURN ON / OFF THE RADIO
If AUTO TURN ON FUNCTION is activated, the unit will
automatically turn on at presetting time.
You can set SLEEP time after setting auto turn on time or
turning on the unit. The unit will automatically turn off when
the set time reaches.
Volume is controlled by
press VOL+ or VOL-
button. Volume indicator
indicates the volume
level.
DIGITAL VOLUME CONTROL
Increase
Decrease
VOL
7
BAND SELECTION
Press FM button to select FMband; Press MW button
to select MWband. Press SW button to select SW band.
METER BAND
In SW orFM band, set LOCAL/DX switch to a proper
position can increasereception.
In general, set the switch inDX position unless there is a
strong interference or when you arelistening to local stations.
LOCAL / DX SWITCH
Press METER BANDbutton repeatedly to select your
desired meter band.
49M 41M 31M 25M 22M
Meter Band Circulation
14
DX LOCAL
22
19M
16M
FM, MW, SW band can be select by pressing corresponding
band button.
16
15
14
SW/METER

5
8
1. Press POWERbutton to turn on the unit.
2. Select desiredband.
3. Set scanmethod to STEP by press SCANbutton till
"STEP" appears in the display.
4. Press SCAN+or SCAN- button repeatedly to tune into the
desired station.
Manual Tuning
ÊÖ¶¯ËÑË÷
TUNING INTO A STATION
PAGE
9
There are total 10 pages for you to store stations. Each page
can store 19 stations. Stations can be random stored on page
1-6. Page 7-9 are assigned to different band. Page 0 is edit page.
Select Page
1. When the unit is on, press PAGE button , page indicator
P will flash for 3 seconds.
2. Press your desired page number while P is flashing.
DE1102
123
DEL
CHARGE
SCAN
AM:W/N
POWER VOL
S. STRENGTH
FM ST
FM:ST/MONO
PLL FM STEREO/MW.SW DUAL CONVERSION
SYNTHESIZED WORLD RECEIVER
190
ÖÇÄܳäµç
³¬ÖصÍÒô
/
ÐÅ
ºÅ
Ç¿
¶È
Ö¸
ʾ
2
ENTER
EXIT
M/LOCK
FM/BASS MW SW/METER
SSB/190MEMORY/ATS
ÊÖ¶¯ËÑË÷
1.
3.
4.
2.
Auto Scan Tuning
1. Press POWERbutton to turn on the unit.
2. Select desiredband, select page from 1-6.
3. Set scanmethod to STEP by press SCANbutton till
" STEP" appears in the display.
.
9
9
The frequency changesin the channel steps shown
below each timethe button is pressed.
Manual scan issuitable for weak signal stations.
Page Band Step
0 - 6 FM
7FM 10K
8MW
SW
9
SW
MW
50K
5K
9K / 10K
1K
1K
DE1102
123
DEL
CHARGE
SCAN
AM:W/N
POWER VOL
S. STRENGTH
FM ST
FM:ST/MONO
PLL FM STEREO/MW.SW DUAL CONVERSION
SYNTHESIZED WORLD RECEIVER
190
ÖÇÄܳäµç
³¬ÖصÍÒô
/
ÐÅ
ºÅ
Ç¿
¶È
Ö¸
ʾ
2
ENTER
EXIT
M/LOCK
FM/BASS MW SW/METER
SSB/190MEMORY/ATS
1.
3.
4.
2.

4. Hold downSCAN+ or SCAN- button for about1 second,
release when the frequency changes, theunit starts to tune
into the stations automatically. When a stationis tuned in,
scanning stops and the tuned stationis heard. Repeat
above to go on scan.
Auto scan tuningon page 1-6 the frequency stepis 100K
for FM, 9K/10Kfor MW and 5K forSW.
10
Page 7 8 9 do not support auto scantuning.
If the scannedstation is not you want, repeatabove
operation to skipthe station and scan again.
Press any buttonwill stop scan tuning.
Scan tuning ismore suitable for strong signal broadcasting,
it may notstop if broadcast signals are weak.
If tuning becomeslowly in a frequency range, trymanual
tuning to seeif there are some weak stations.
SPEED CHANGE TUNING
DE1102
123
DEL
CHARGE
SCAN
AM:W/N
POWER VOL
S. STRENGTH
FM ST
FM:ST/MONO
PLL FM STEREO/MW.SW DUAL CONVERSION
SYNTHESIZED WORLD RECEIVER
190
ÖÇÄܳäµç
³¬ÖصÍÒô
/
ÐÅ
ºÅ
Ç¿
¶È
Ö¸
ʾ
2
ENTER
EXIT
M/LOCK
FM/BASS MW SW/METER
SSB/190MEMORY/ATS
1.
3.
2. 4.
Speed change tuning only can be used on page 9.
Speed change tuning not only will increase the scan speed,
but also will not miss the weak stations.
1. Press POWER button to turn on the unit.
2. Turn to Page 9.
3. till
appears in the display.
4. Hold down SCAN+ or SCAN- button, frequency changes in
the step of 1K, the scan speed is changed from slow to fast,
when a strong signal is searched, signal strength indicator
appears, the scan speed decrease, then the speed will increase
again to continue auto scan.
Direct Frequency Entry
Direct frequency entry makes it extremelyeasy to tune
into a station that you knowsits exact frequency.
11
9
1. Press POWERbutton to turn on the unit.
2. Select thedesired band.
3.
6
Press ENTER button , the frequency disappears
DE1102
123
DEL
CHARGE
SCAN
AM:W/N
POWER VOL
S. STRENGTH
FM ST
FM:ST/MONO
PLL FM STEREO/MW.SW DUAL CONVERSION
SYNTHESIZED WORLD RECEIVER
190
ÖÇÄܳäµç
³¬ÖصÍÒô
/
ÐÅ
ºÅ
Ç¿
¶È
Ö¸
ʾ
2
ENTER
EXIT
M/LOCK
FM/BASS MW SW/METER
SSB/190MEMORY/ATS
1.
2.
3.
4.

898
Example 2: To enter SW6.255MHz
Example 1: Toenter FM89.80MKz,
or
You must go tonext step in 6 seconds, otherwisethe
unit will exitdirect entry mode.
If the lastfrequency number is 0, you canpress ENTER
button to supersedeinput 0.
898
ENTER
0
625 5
ENTER ENTER
ENTER
12
If a wrongnumber is entered, press EXIT button to clear it.
If an invalidfrequency is entered, ERR will flash inthe
display.
Press EXIT button can exit from frequency entry immediately.
Before manual scanor auto scan, you can usequickly input
function to quicklygo to a frequency range.
Example: The frequency range of FM is 70.00-108.00MHz,
if you enter100MHz, you can :
1. Select FMband.
2. Press ENTERbutton.
3. Press number1, then press ENTER button,
100.00MHz will display.
Quickly Input
from the display for 6 seconds.
4. Press thenumber button with complete frequency,
the unit will tune into theentered frequency.
¼ÇÒäµç̨
1. Set thescan method to MEM by press till MEM
appears in the display.
2. Press SCAN+or SCAN- repeatedly to display thedesired
preset number.
Memory Scan Tuning
If you rememberthe preset page and preset numberclearly,
you can pressthem directly to tune into thestation.
After the highestpreset number has been scanned, the
unit will returnto the smallest preset number andscan
again.
The unit willcirculated scan between page 1-6.
9
13
DE1102
123
DEL
CHARGE
SCAN
AM:W/N
POWER VOL
S. STRENGTH
FM ST
FM:ST/MONO
PLL FM STEREO/MW.SW DUAL CONVERSION
SYNTHESIZED WORLD RECEIVER
190
ÖÇÄܳäµç
³¬ÖصÍÒô
/
ÐÅ
ºÅ
Ç¿
¶È
Ö¸
ʾ
2
ENTER
EXIT
M/LOCK
FM/BASS MW SW/METER
SSB/190MEMORY/ATS
2.
1.

14
There are total 10 pages (Page 0-9) for you to preset stations.
Up to 19 stations can be preset on each page. All preset stations
are permanent store. Each page is assigned as:
Page 1 to 6 : Random preset, no band limited
Page 7 : For FM band only.
Page 8: For MW band only.
Page 9: For SW band only.
Page 0: For ATS function, random preset.
Random Preset (On Page 1-6)
PRESET STATIONS
1. Turn on the unit.
2. Tune into a desired station by manual tuning, scan tuning or
direct entry.
3. Press Page button , page indicator P will flash for 3
seconds, page number disappears for you to enter.
5
DE1102
123
DEL
CHARGE
SCAN
AM:W/N
POWER VOL
S. STRENGTH
FM ST
FM:ST/MONO
PLL FM STEREO/MW.SW DUAL CONVERSION
SYNTHESIZED WORLD RECEIVER
190
ÖÇÄܳäµç
³¬ÖصÍÒô
/
ÐÅ
ºÅ
Ç¿
¶È
Ö¸
ʾ
2
ENTER
EXIT
M/LOCK
FM/BASS MW SW/METER
SSB/190MEMORY/ATS
4. Press the desired number from 1-6 while P is flashing.
5. Press M/LOCK button , M flashes for 5 seconds.
6. Press a preset number from 1-19 to memorize the station. The
corresponding number constant indicates in the display.
12
If a station is already stored, the new frequency with same
preset number replaces the old one.
Example 1 input 10 +
Double-digit Number Input
When you want to input a double digit number, press number
0 first, 1- appears in the display, then press the last number.
Example 2 input 15 +
0
0
0
5
Band Preset (On Page 7-9)
Page 7 8 9 is assigned to different band. Page 7 is assigned
to FM stations page 8 for MW stations, and page 9 for SW
stations.
15

1. Turn on the unit.
2. Press Page button , page indicator P flashes 3 seconds,
page number disappears for you to enter.
3. Press corresponding page number of each band.
4. Tune into a desired station by manual tuning, scan tuning or
direct entry.
6. Press M/LOCK button , indicator M flashes for 5 seconds,
the preset number disappears for you to enter.
7. Press a preset number from 1-19 to memorize the station. The
indicator M constantly display.
5
12
16
DE1102
123
DEL
CHARGE
SCAN
AM:W/N
POWER VOL
S. STRENGTH
FM ST
FM:ST/MONO
PLL FM STEREO/MW.SW DUAL CONVERSION
SYNTHESIZED WORLD RECEIVER
190
ÖÇÄܳäµç
³¬ÖصÍÒô
/
ÐÅ
ºÅ
Ç¿
¶È
Ö¸
ʾ
2
ENTER
EXIT
M/LOCK
FM/BASS MW SW/METER
SSB/190MEMORY/ATS
1.
3.
4.
2.
5.
6.
17
ATS
ATS Preset
5
9
1. Turn on the unit.
2. Press page button , then press number 0 goes to page 0.
3. Select desired band.
4. Press SCAN button till STEP
If you don't want to start scan from current frequency, press
Enter button to input start frequency.
Check if there is already a preset number, press SCAN+ or
SCAN- button to clear it, the scanned stations will be stored
from no. 1, otherwise, the scanned stations will be preset after
that number.
7. Hold down SCAN+ or SCAN- button for 1 second, ATS function
runs. The unit begins to scan in ascending or descending order
from current frequency. When tuning into a station, It will store
on page 0 automatically. When 19 memories are full or scan
back to beginning frequency, scan stops.
( On PageO)
DE1102
123
DEL
CHARGE
SCAN
AM:W/N
POWER VOL
S. STRENGTH
FM ST
FM:ST/MONO
PLL FM STEREO/MW.SW DUAL CONVERSION
SYNTHESIZED WORLD RECEIVER
190
ÖÇÄܳäµç
³¬ÖصÍÒô
/
ÐÅ
ºÅ
Ç¿
¶È
Ö¸
ʾ
2
ENTER
EXIT
M/LOCK
FM/BASS MW SW/METER
SSB/190MEMORY/ATS
1.
6.\7.
2.
3.
4.
5.

18
Repeat ATS
After a ATS operation, if the preset number is not full or some
scanned stations are unnecessary, you can delete some stations,
and repeat ATS operation.
1. Set the scan method to MEMO by press SCAN button till
MEM
2. Delete the unnecessary stations by memory scan. After deleting,
the unit will adjust the preset number automatically.
3. Press SCAN+/- to find the highest preset number.
4. Set the scan method to STEP by press SCAN button till STEP
appears in the display.
5. Hold down SCAN+ or SCAN- to repeat ATS operation, till all
stored stations are satisfied to you.
19
COPY FUNCTION
All stored stations on Page 0 can be copied to other page. If
copy to page 7-9, please note the band must be constant.
1. Turn to Page 0, make sure there are stations stored.
2. Press button P , P will flash 3 seconds, page number
0 disappears.
3. While P is flashing, press number 0, 0 will flash for 3 seconds.
4. While 0 is flashing, press the page number you want to copy
to.
5. Copy succeed.
New stations copied from Page 0 will cover the old ones
which preset on that page before.
5
DE1102
123
DEL
CHARGE
SCAN
AM:W/N
POWER VOL
S. STRENGTH
FM ST
FM:ST/MONO
PLL FM STEREO/MW.SW DUAL CONVERSION
SYNTHESIZED WORLD RECEIVER
190
ÖÇÄܳäµç
³¬ÖصÍÒô
/
ÐÅ
ºÅ
Ç¿
¶È
Ö¸
ʾ
2
ENTER
EXIT
M/LOCK
FM/BASS MW SW/METER
SSB/190MEMORY/ATS
2.
3.
4.

20
Delete Single Station
1. Turnon the unit.
2. Set thescan method to MEM by press SCAN button
till MEM appears in the display.
3. Press SCAN+/ - to select unnecessary stations.
4. Press DELbutton , DEL appears in the display,
and preset number flashes for 3seconds.
5. Press DELbutton again whilethe preset number is
flashing, the stored station is deleted.
DELET STATIONS
9
8
Delete Whole Page
1. Turnon the unit.
2. Press Pbutton and page number you wantto delete.
3. Hold downDEL button for 1 second, DEL appears
in the display, and pagenumber flashes for3 seconds.
4. Press DELbutton again whilepage number is flashing,
all the stations on this pagewill be delete.
DE1102
123
DEL
CHARGE
SCAN
AM:W/N
POWER VOL
S. STRENGTH
FM ST
FM:ST/MONO
PLL FM STEREO/MW.SW DUAL CONVERSION
SYNTHESIZED WORLD RECEIVER
190
ÖÇÄܳäµç
³¬ÖصÍÒô
/
ÐÅ
ºÅ
Ç¿
¶È
Ö¸
ʾ
2
ENTER
EXIT
M/LOCK
FM/BASS MW SW/METER
SSB/190MEMORY/ATS
1.
2.
4./5.
3.
21
MUSIC NEWS
LINE OUT
SSB FINE
P9
On page 0, the preset number order will be adjusted
automatically when a preset station is deleted.
If a preset station on page1~9 is deleted, the deleted preset
number is blank. It can be used on next preset.
RECEIVING SSB & CW
1. Turn on the unit.
2. Press P button , P flashes for 3 seconds.
3. Press number 9 goes to page 9 while P is flashing.
4. Press W/N button , set it to N.
5. Press SSB button , SSB appears in the display.
6. Press SCAN button , set the scan method to STEP.
8. Tune the SSB FINE Knob slowly to have the best reception.
7. Press SCAN+ or SCAN- button to search for SSB signal.
5
9
27
5.
13
26
8.
DE1102
123
DEL
CHARGE
SCAN
AM:W/N
POWER VOL
S. STRENGTH
FM ST
FM:ST/MONO
PLL FM STEREO/MW.SW DUAL CONVERSION
SYNTHESIZED WORLD RECEIVER
190
ÖÇÄܳäµç
³¬ÖصÍÒô
/
ÐÅ
ºÅ
Ç¿
¶È
Ö¸
ʾ
2
ENTER
EXIT
M/LOCK
FM/BASS MW SW/METER
SSB/190MEMORY/ATS
1.
2. 4.
3.
7.
6.

22
Set Beep Time
SET ALARM BY BEEP
When alarm indicator constantly displays, alarm function runs.
The unit will beep when the preset time reaches.
6
1. With theunit turned off, press ENTERbutton thrice, the
last setting time appears in thedisplay. ( If the beep time
has not been set before, --:-- appears , will flashfor 6
seconds.
2. Press numberbutton to enter the desired beeptime
while is flashing.
3. Aftersetting, constantly appearsin the display, the
unit returns to clock mode.
4. When thesetting time reaches, the beeper willkeep on
beep for 60 seconds unless youpress any button to stop
it.
DE1102
123
DEL
CHARGE
SCAN
AM:W/N
POWER VOL
S. STRENGTH
FM ST
FM:ST/MONO
PLL FM STEREO/MW.SW DUAL CONVERSION
SYNTHESIZED WORLD RECEIVER
190
ÖÇÄܳäµç
³¬ÖصÍÒô
/
ÐÅ
ºÅ
Ç¿
¶È
Ö¸
ʾ
2
ENTER
EXIT
M/LOCK
FM/BASS MW SW/METER
SSB/190MEMORY/ATS
1.
20
2.
3.
23
You have to goto the next step in 6seconds, or the unit
will exit fromthe beep setting and return toclock mode.
The beep volumeis not controlled by digit volumebutton.
If the presettime is not changed or cancelled,the beeper
beeps at thepreset time everyday.
If power istoo weak, beep function does notwork.
The beep soundwill cover the broadcast if theunit is on
at beep time.
If beep andauto turn on time is setas the same, the unit
will turn onafter beep.
If the powersource is disconnected, the preset beeptime
will be cancelled.
If the earphoneis connect with the unit, thebeep function
does not work.
Cancel Beep Setting
In power off mode, press ENTER button thrice, flashes,
press EXIT button while is flashing, beep settingis
cancelled with disappears,the unit returns to clock mode.
Check Beep Time
When the unitis off, hold down EXIT button about 0.5s,
flashes and the last preset beeptimedisplays, 3 seconds
later, theunit returns to clock mode.
7
7
6

24
Set Auto Turn On Time
Total three groups of different auto turn on / off time can be set in
24 hours. The band, frequency and volume are also can be set.
AUTO TURN ON / OFF THE UNIT
1
2
3
6
14
15
16
1. With the unit turned off, press ENTER button , SET
displays for 2 seconds.
2. A. Press first setting button , indicator flashes, and the last
preset time appears.
B. Press second setting button , indicator flashes, and
the last preset time appears.
C. Press the third setting button , indicator flashes, and
the last preset time appears.
Press number button to input the desired auto turn on time,
then the unit goes into frequency preset.
DE1102
123
DEL
CHARGE
SCAN
AM:W/N
POWER VOL
S. STRENGTH
FM ST
FM:ST/MONO
PLL FM STEREO/MW.SW DUAL CONVERSION
SYNTHESIZED WORLD RECEIVER
190
ÖÇÄܳäµç
³¬ÖصÍÒô
/
ÐÅ
ºÅ
Ç¿
¶È
Ö¸
ʾ
2
ENTER
EXIT
M/LOCK
FM/BASS MW SW/METER
SSB/190MEMORY/ATS
1./5.
2.
3.
4.
25
Check Auto Turn On Time
With the unit turned off, press ( or ) button, the preset
time is displayed for 3 seconds.
Cancel AutoTurn On Time
With the unit turned off, press ( or ) , ( or ) flashes,
while it is flashing, press EXIT button, ( or ) is cleared
from the display, the setting has been cancelled.
1
1
2
2
3
3
3. Press number button to input the desired frequency. Press
ENTER button to confirm the last preset frequency.), Then
the unit goes into volume control mode.
4. Press VOLUME + or - button to adjust the desired volume.
5. Press ENTER button, the unit enters to sleep time setting and
is flashing. Press desired sleep time directly from 1 to 99
minutes.
6. After above setting, the auto turn on indicator constantly displays,
the unit will turn on at the preset time, frequency and volume, it
will turn off when preset sleep time reaches.
1
1
33
3
122
2
The cancelled autoturn on time can be resumedby press
( or ) and ENTER button.

26
1. Press POWERbutton to turn on the unit.
a. Set sleep time: while theunit is on, default sleep time99
and flashes for2 seconds.
b. Reset the sleep time: afterturn on the unit, hold downEXIT
button for 0.5second, clock indicator flashes, while itis
flashing, press enterbutton to go into sleep set mode.
flashes.
2. While isflashing,
a. Press EXITbutton will cancel the sleep function,
disappears.
b. Press ENTERbutton, appears.
3. Quickly pressnumber button to set the desired sleep time
from 1 to99 minutes
For example: ifyour desired sleep time is 60 minutes, direct
press number button6 & 0, the unit will shut off 60 minutes
later.
4. If thereisn't any operation in 2 seconds, indicator constantly
appears, the unit will turn off 99 minutes (default time) later.
--
When sleep timesetting is over, constantly displays.
The rest sleeptime indicates in FM or MW band.
If there isno further action to next step in 6 seconds,the
unit will exitthe sleep time setting, and default 99 minutes
as sleep time.
SET SLEEP TIME
MHz
ST
97 10
60
FM
VOL
M
/
P
MEM
8 7
POWER
MHz
ST
97 10
99
FM
VOL
M
/
P
MEM
8 7
6
0
+
27
LOCK FUNCTION
The lock functioncan be used to avoid anyaccidental
operation when theunit is being carried or used.
Hold down LOCKbutton for 2 seconds till appearsin
the display, lock function is activated, allbuttons except
LOCK button becomeinoperative.
Hold down LOCKbutton for 1 second to cancellock function.
disappears from the display.
M/LOCK M/LOCK
BACKLIGHT FUNCTION
There are 3 kinds of back light modeto select: normal,
always-on and backlightoff.
1. Normally, press any button in darkplace will start up the
backlight of thedisplay and buttons. The backlight will
turn off automatically if no further operation in8 seconds.
2. When thebacklight is illuminated, connect theAC adaptor
will remain theillumination. Disconnect the AC adaptor, the
backlight will off and return to normal mode.
3. With theunit turned off, if youhold down thebacklight
button for 0.5second, the backlight will off. Hold down
again to resume.
Backlight consumes littlebattery power.
12
9
20
20

28
AUTO RESET
If the unitoperates erratically, just removethe batteries or
disconnect theAC adaptor for about 30 seconds,then
insert the batteriesor connect the AC adaptor, the unitwill
resume to normaloperation.
Reset function willnot erase all of the memoriesexcept
the clock timeand beep setting.
WIDE / NARROW BAND
Press AM:W/N button repeatedly to select wideband or
narrow band whenlistening MW or SW broadcasting.
Wide band hasa better tone reception than narrowband, but
it is noisierthan narrow band reception.
STEREO / MONO / BASS
Stereo/ Mono: stereois suitable forstrong signal music
broadcast, mono issuitable for weak signal
and voice program.
News / Music: push the switchto corresponding position
when listen newsor music.
Bass: it is more suitable forstrong signal stereo music
broadcast. If youlistening radio with speaker,
keep the BASSfunction off.
29
AUDIO OUTPUT
SIGNAL STRENGTH / FM STEREO
MUSIC NEWS
LINE OUT
SSB FINE
P9
DEGEN
DE511
REC
DIGITALVOICE
RECORDER
PLAY/PAUSE
DELETE/STOP
FORWARD BACKWARD
MODE
FOL
SETTIME
REP
Line out jack
The unit has signal strength and
FM stereo indicator.
In MW and SW band, light 1.2.3.
4 on or off to indicate received
signal strength.
In FM band, light 1.2.3 indicates
signal strength, light 4 indicates
FM stereo.
You can output the radio broadcasting by connecting the unit to
external appliance with a connecting cable inserted into LINE
OUT jack.
Adjusting the VOLUME+ or - on the radio, and news/music
selection will effect the audio output.
DE1102
123
456
89
7
0
P
123
ENTER
EXIT
DEL
CHARGE
LOCK
SCAN
AM:W/N
METER
POWER VOL
S. STRENGTH
FM ST
PLL FM STEREO/MW.SW DUAL CONVERSION
SYNTHESIZED WORLD RECEIVER
FM:ST/MON
FM
BASS
M
MW SW
190
ÖÇÄܳäµç
³¬ÖصÍÒô
/
ÐÅ
ºÅ
Ç¿
¶È
Ö¸
ʾ
2
DE1102
123
456
89
7
0
P
123
ENTER
EXIT
DEL
CHARGE
LOCK
SCAN
AM:W/N
METER
POWER VOL
S. STRENGTH
PLL FM STEREO/MW.SW DUAL CONVERSION
SYNTHESIZED WORLD RECEIVER
FM:ST/MON
FM
BASS
M
MW SW
190
ÖÇÄܳäµç
³¬ÖصÍÒô
/
ÐÅ
ºÅ
Ç¿
¶È
Ö¸
ʾ
2
1234

MUSIC NEWS
LINE OUT
SSB FINE
P9
30
Pull out thefolding stand in rear panel,
extending the telescopicantenna straight
upward.
When listening tostereo reception, normally use
earphone and setMONO/STEREO button
to STEREO.
Speaker has MONOeffect only.
LISTENING WITH EARPHONES
Avoid using earphones at high volume, if youexperience
a ringing inyour ears, reduce volume or stopusing it.
Shut down theradio before sleeping.
Do not useearphones while driving or cycling, itcan also
be potentially dangerousto play your earphones at high
volume while walking,especially at pedestrian crossing.
Notes On Earphones
USING FOLDING STAND
Earphone Jack
MUSICNEWS
LINE OUT
SSBFINE
P9
31
MW Reception
Ferrite antenna inside the unit functions as MW antenna, it is
strongly effected by the reception direction.
When listening to MW broadcast, rotate the unit to find the
position which gives the best reception.
FM Reception
Telescopicantenna functions as FM
antenna, keep itextended and change
its length anddirection to find the
position which givesthe best reception.
MW
USING ANTENNA
FM

32
SW Reception
Telescopicantenna functions as
SW antenna. Extendingthe
antenna straight upwardto get
the best reception.
External Antenna
If FM orSW reception is too weak,
switch Local /DX to DX, then
use a externalantenna to improve
reception.
Do not useexternal
antenna during athunder
storm.
(SW)
22
!
Outdoors
DE1102
123
DEL
CHARGE
SCAN
AM:W/N
POWER VOL
S. STRENGTH
FM ST
FM:ST/MONO
PLL FM STEREO/MW.SW DUAL CONVERSION
SYNTHESIZED WORLD RECEIVER
190
ÖÇÄܳäµç
³¬ÖصÍÒô
/
ÐÅ
ºÅ
Ç¿
¶È
Ö¸
ʾ
2
ENTER
EXIT
M/LOCK
FM/BASS MW SW/METER
SSB/190MEMORY/ATS
33
CAUTIONS
Avoid exposure to temperature extremes, direct sunlight,
moisture, sand, dustor mechanical shock.
Should anything gowrong with the radio, please remove
the batteries andhave the unit checked by qualified
personnel before operatingit any further.
Use only powersources specified in this manual.
When the unitis not being used for a long period oftime,
remove the batteriesto avoid damage from battery
leakage and corrosion.
The LCD displaymay become hard to see or slow down
when using theunit at high temperatures (above 40 C)
or at lowtemperatures (below 0 C). At room temperature,
the display willreturn to its normal operating condition.

34
SPECIFICATIONS
FM 70.00 -108.00 MHz
MW 520 - 1710 KHz
SW 3.000 - 29.995 MHz
2. MemoryStations (190)
Random preset on page 1~6 band preseton page 7 8 9
ATSpreset on page 0
90m 3.160 - 3.455 MHz
75m 3.860 - 4.055 MHz
60m 4.710 - 5.105 MHz
49m 5.910 - 6.255 MHz
41m 7.010 - 7.405 MHz
31m 9.170 - 9.995 MHz
25m 11.510 - 12.155 MHz
22m 13.510 - 13.905 MHz
19m 15.010 - 15.705 MHz
16m 17.260 - 18.105 MHz
13m 21.410 - 21.955 MHz
11m 25.610 - 26.100 MHz
1. Frequency Range
8. Dimensions: Approx. 143 X 88 X 28.5mm
9. Mass: Approx. 280g (excl. Battery)
6. Speaker: D66mm
7. External Earphone: D3.5mm
5. Power Supply:
Battery: 3 AA batteries
External power: DC in 6V 300mA
Recharing Time: 1-9 Hours
3. Noise LimitSensitivity
FM 10 V
MW 1mv/m
SW 20 V
4. SWSelection Wide band 20dB Narrow band 80dB
Table of contents