Kaito KA801 User manual

KA801
FM STEREO · MW(AM) · SW DSP WORLD
RECEIVER / MP3 PLAYER / DIGITAL RECORDER
Operation Manual

INDEX
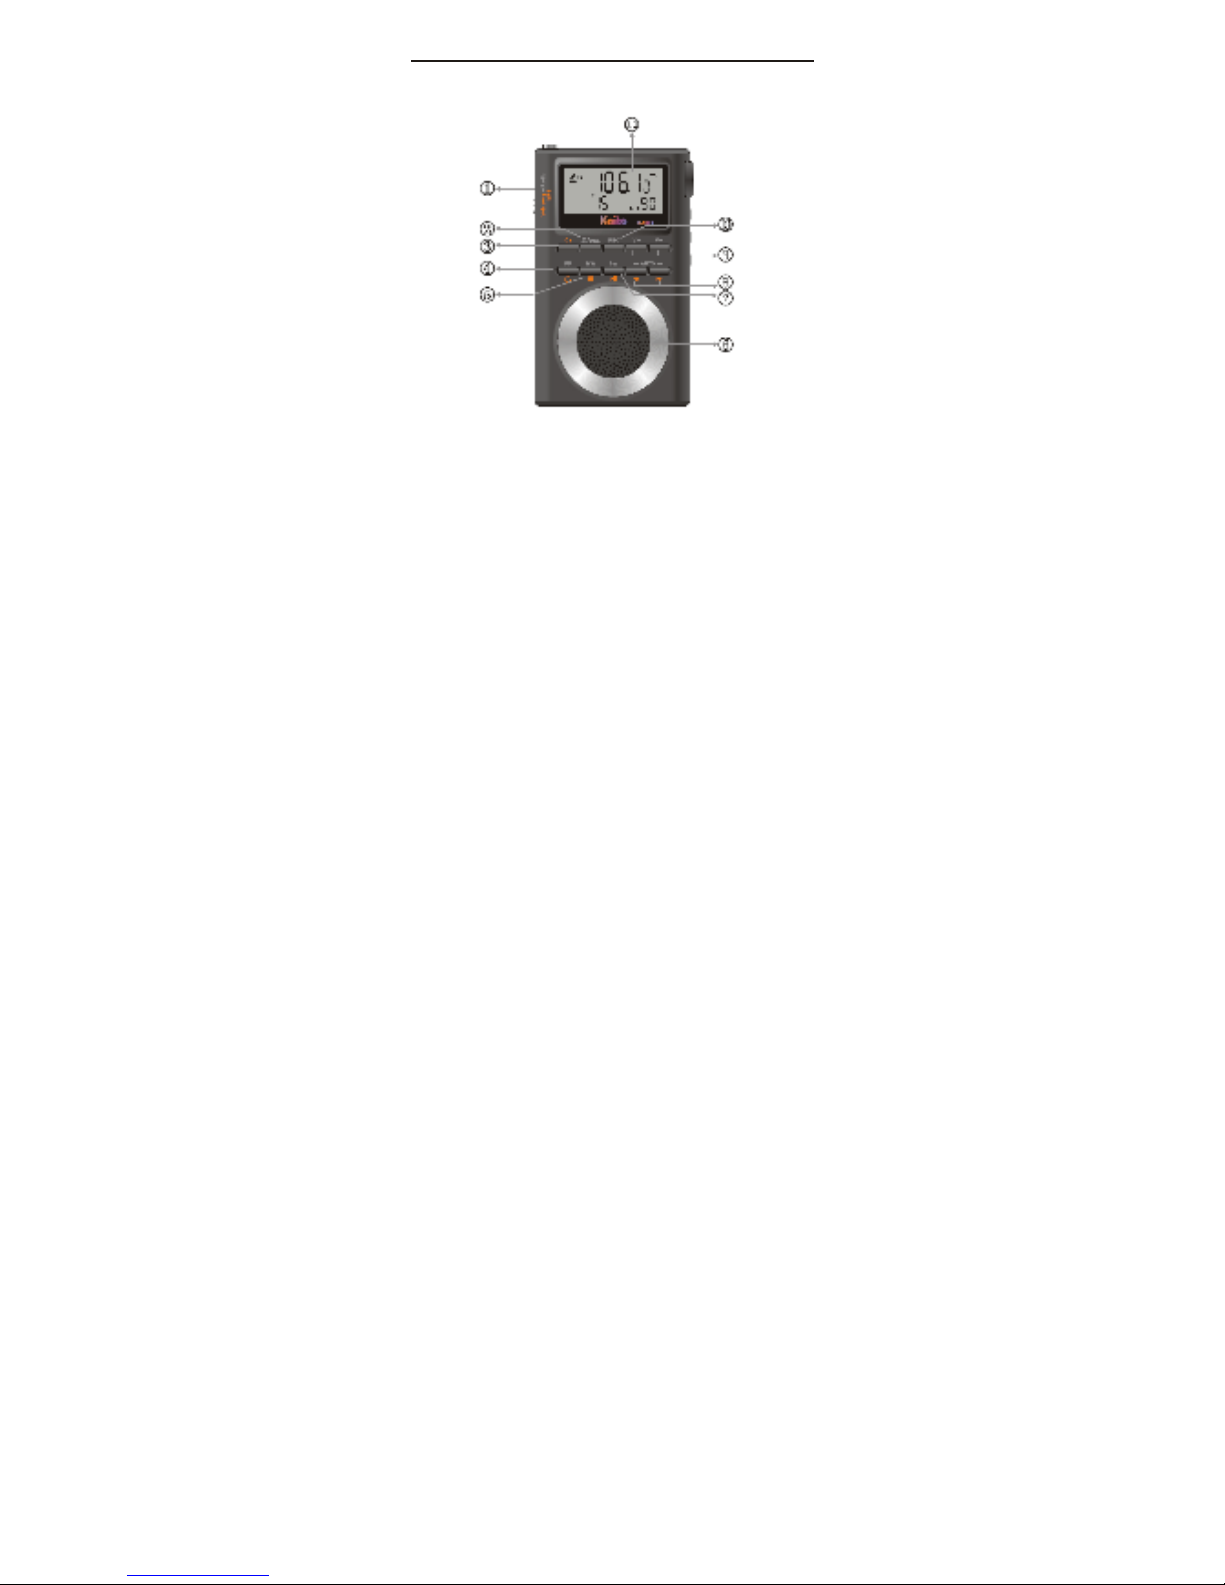
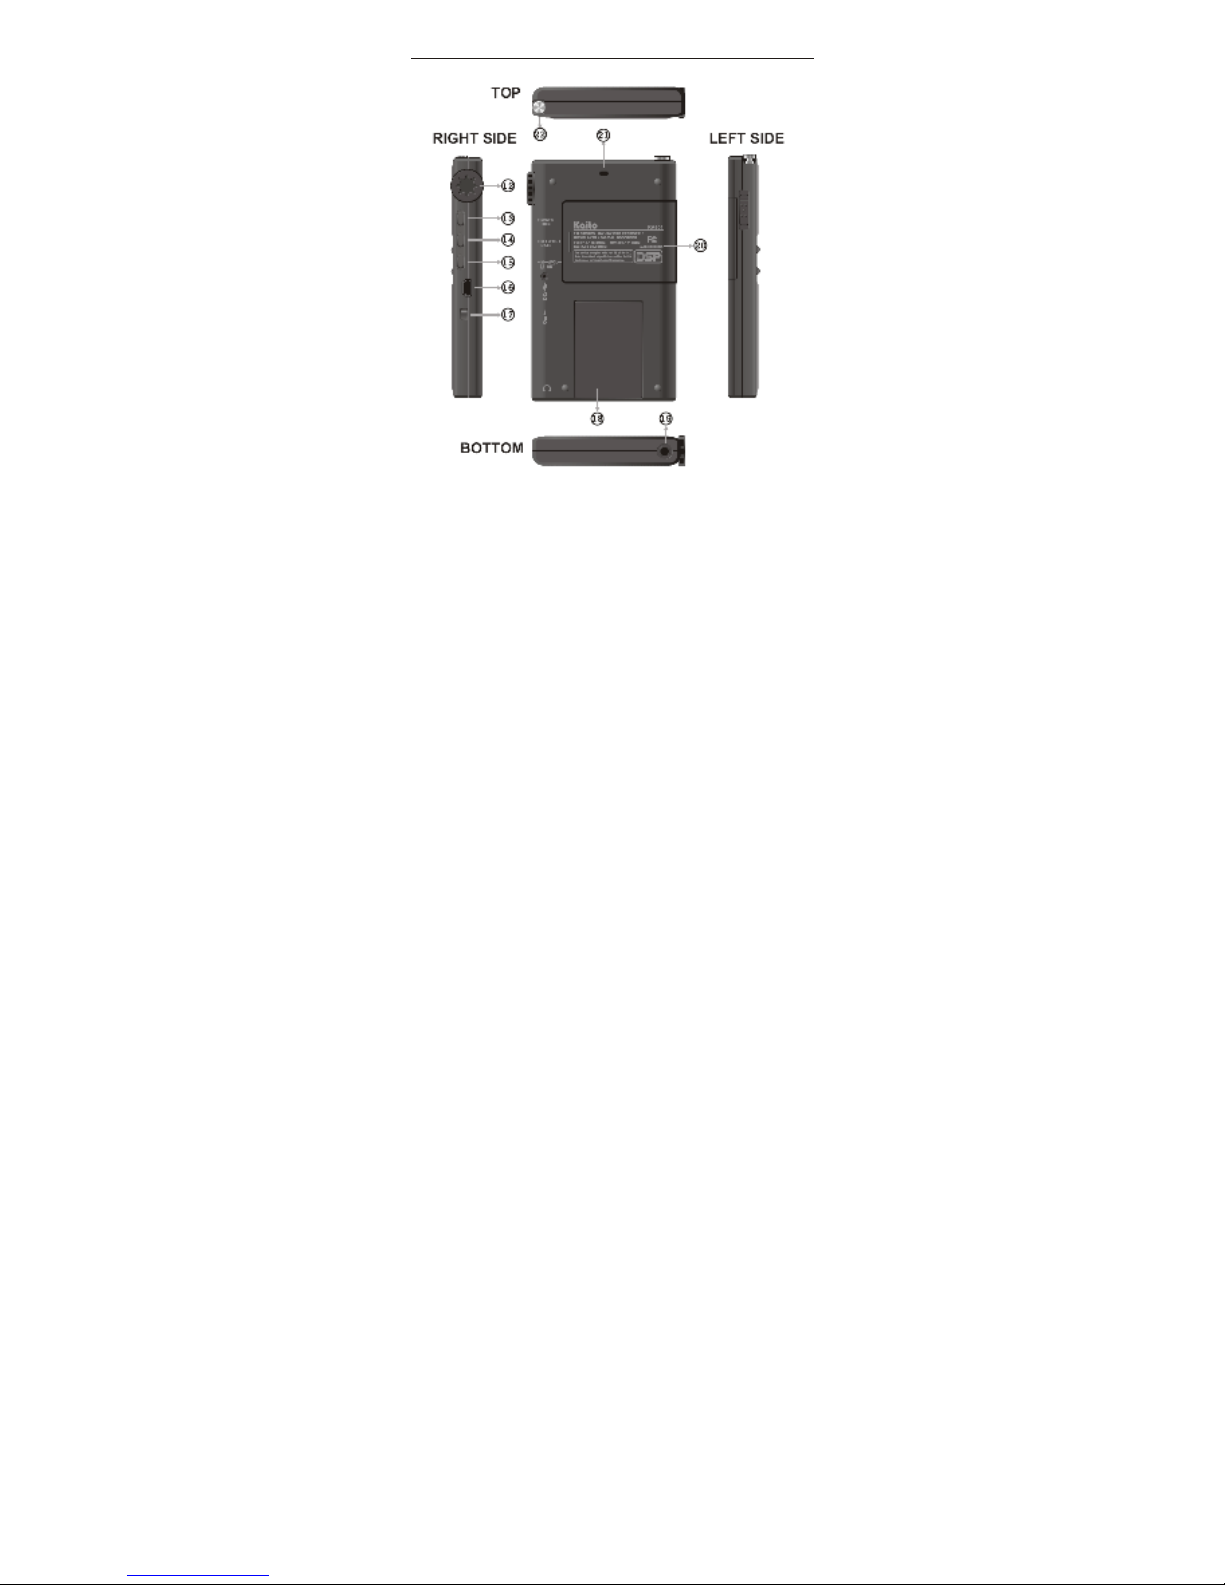
LOCATION OF CONTROLS...............................................1
LCD DISPLAY.....................................................................3
BATTERY & ADAPTOR......................................................4
SUPPORT BL-5C LITHIUM BATTERY………….........4
SPECIAL AC/DC ADAPTOR...................................... 4
POWER SUPPLY........................…....................................5
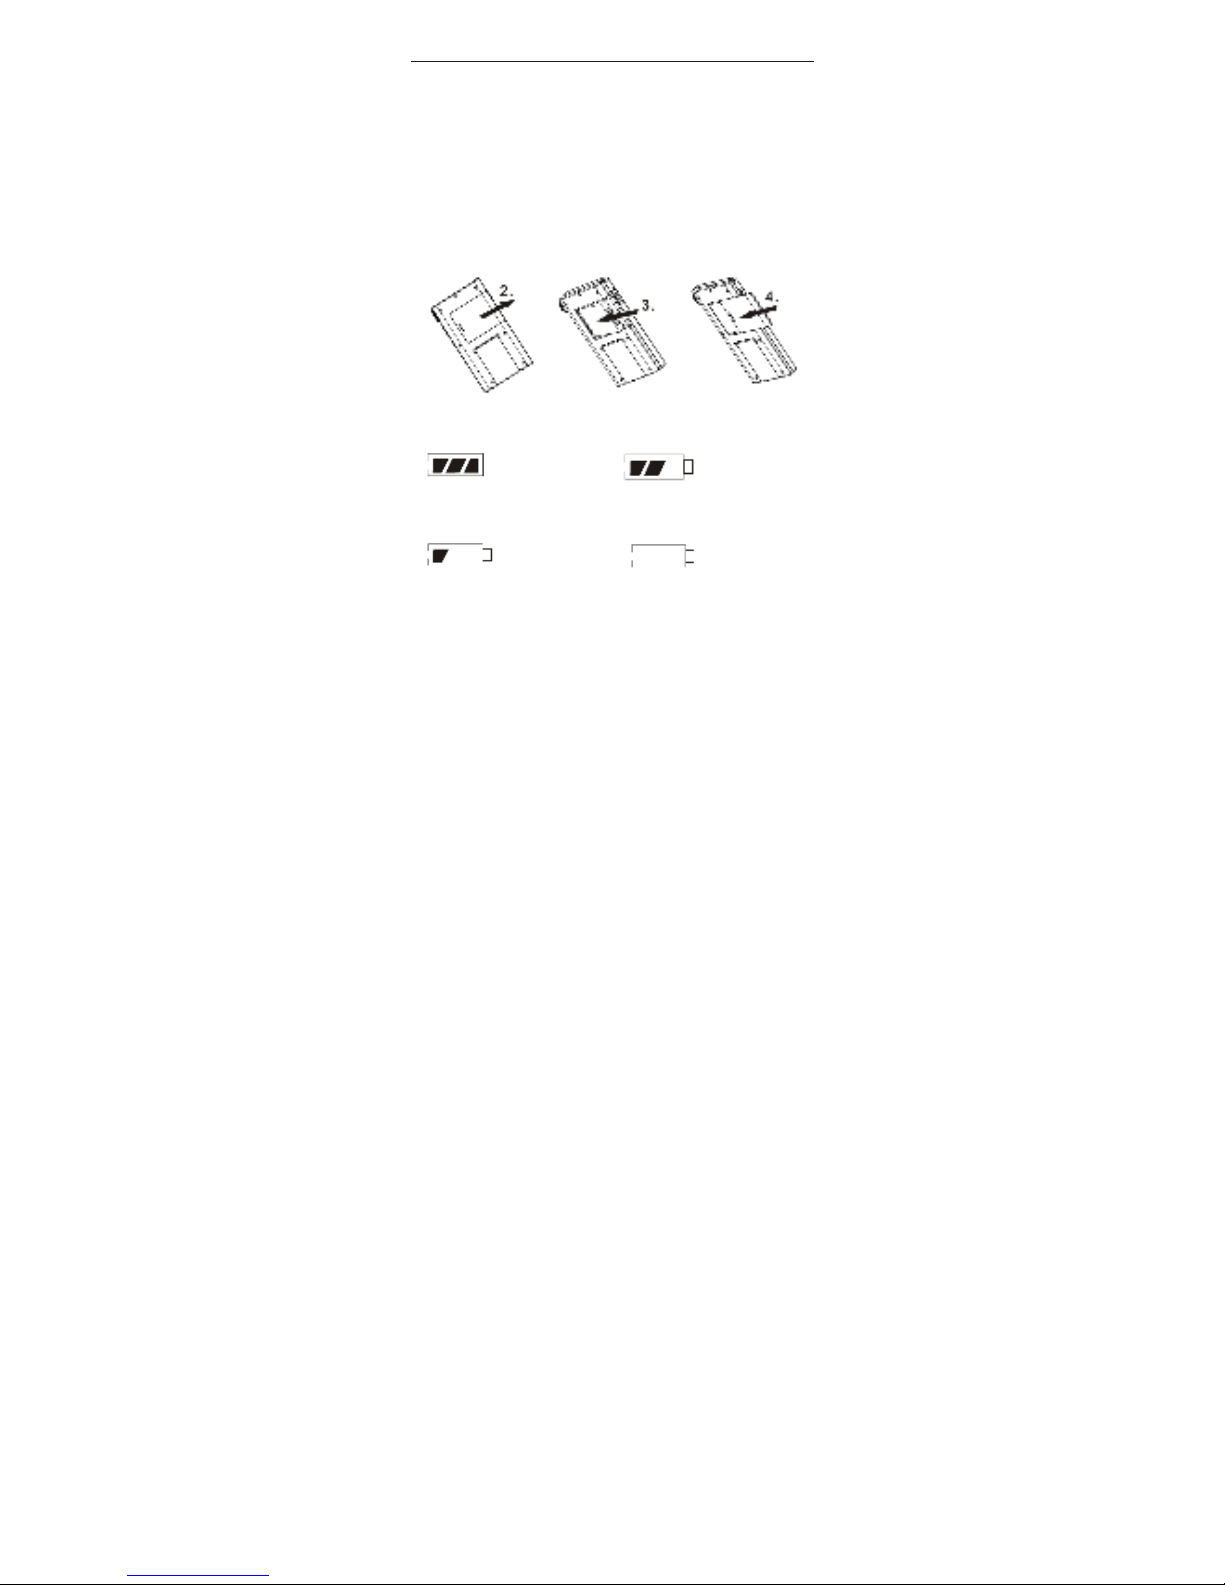
REPLACING THE BATTERY.......................................5
BATTERY CONSUMPTION INDICATION...................5
CHARGING THE BATTERY........................................5
POWER ON/OFF...............….............................................7
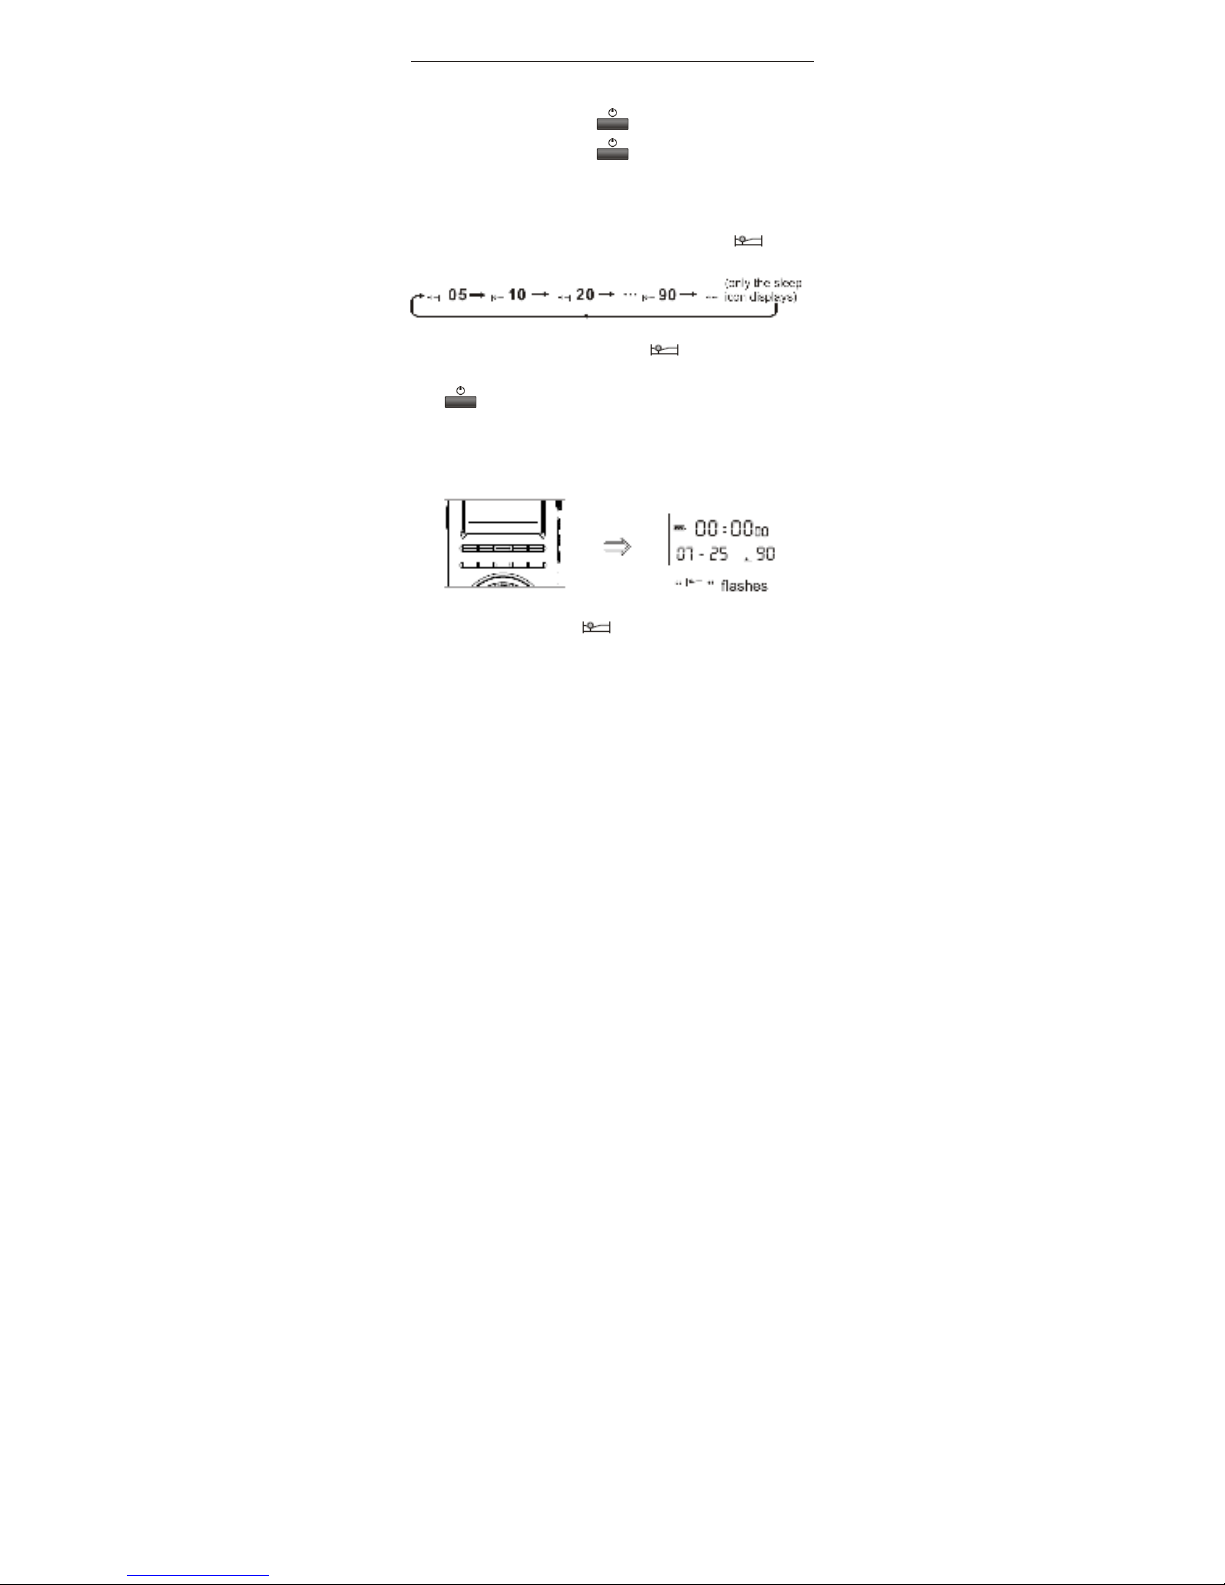
POWER ON/OFF.........................................................7
SLEEP TIMER SETTING.............................................7
AUTO TURN OFF in MP3 & Voice mode)..................8
AUTO TURN ON.........................................................8
LOCK SWITCH & USING THE BACKSTAND....................9
RADIO OPERATION........................................................10
LISTENING TO THE RADIO.....................................10
Radio Mode Selection........................................10
Band Selection...................................................10
Adjust the Volume..............................................10
Using the Antenna..............................................10
TUNING IN STATIONS..............................................11
MANUALLY STORING STATIONS...........................13
RECALLING THE STORED FREQUENCY..............13
DELETING PRESET STATIONS..............................14
DIRECT FM/MW AM)/SW RECORDING......….........15

INDEX
DATE, TIME & CLOCK MODE SETTING..........................17
SET THE MW AM) STEP & ALARM TIME.......................19
DOWNLOADING THE MUSIC FILES FROM YOUR PC..20
PLAYING YOUR MUSIC...................................................21
TO PLAY THE MUSIC...............................................21
SELECT THE PLAY MODE.......................................21
A-B REPEAT..............................................................21
SELECT THE FOLDER.............................................22
DELETE THE MUSIC FILES.....................................22
RECORD FILES................…............................................23
ONE TOUCH RECORD FUNCTION.........................23
AUTO RECORD FUNCTION.....................................23
PLAY THE RECORDED FILES..........................…...........24
DELETE THE RECORDED FILES............................24
PLAY THE RECORDED FILES.................................24
ERROR MESSAGES........................................................25
SPECIFICATIONS............................................................26

1
LOCATION OF CONTROLS
FRONT
1. Working Mode Selector Radio/MP3/Voice)
2. Radio: Delete Memory; MP3: Delete Music File;
Voice: Delete Record File;
When Radio Powered Off: Turn On/Off the Alarm Function
3. Main Power On/Off
4. Radio: FM Band; MP3: Play Mode Selection
5. Radio: MW AM) Band; MP3/Voice: Stop Playing
6. Speaker
7. For Radio: SW Band; For MP3/Voice: Play & Pause
8. Radio: Frequency +/-; MP3/Voice: Music +/-, FF/RW
9. VOL +/- Volume Control
10. Radio: Directly FM/MW AM)/SW Recording;
Voice: Environment Voice Recording;
MP3/Voice: A-B Repeat; When in Power Off: Alarm Setting
11. LCD Display

2
LOCATION OF CONTROLS
12. Radio: Tuning Knob; Power Off: Alarm Time Setting
13. Radio: Manual Saving & ATS Auto Tuning Storage);
Power Off: Time Setting;
Power Off: 12H/24H Clock Mode Setting
14. Radio: Station +; MP3: Folder +; Power Off: Date Setting;
Power Off: MW AM) Step 9K/10K Setting
15. Radio: Station -; MP3: Folder -;
Power Off: Auto Turn On Setting
16. USB Jack / Charging Jack
17. Lock Switch 18. Backstop
19. Earphone Jack 20. Battery Compartment
21. Strap Hole 22. Telescopic Antenna

3
LCD DISPLAY
POWER OFF STATUS
WHILE LISTENING TO FM STATIONS
WHILE PLAYING THE MUSIC

4
ATTERY & ADAPTOR
SUPPORT L-5C LITHIUM ATTERY
Please use the lithium battery which is certified by our
company. The model number of supplied lithium battery is
BL-5C. You can buy it from us or from our agents, you can
buy from market too. Please visit our website
www.kaitousa.com to purchase the battery. If you use the
lithium battery with other models, it may cause damage to the
radio, such as burning, exploding etc. If the lithium battery
does not last long after a fully charge, replace it with a new
one immediately.
SPECIAL ADAPTOR
The supplied adaptor is specially made for this unit. Please
use this adaptor to charge the unit only, don't use it to charge
other things. While taking the adaptor out of the AC socket,
pull the adaptor out, do not hold the wire to pull it, that will
break the wire.

5
POWER SUPPLY
REPLACING THE ATTERY
1. Turn off the unit before taking the battery out. Install a new
battery within 20 seconds, or you have to reset clock once
again after turning on the unit.
2. Open the battery cover.
3. Install a new battery correctly according to the polarity,
then there will be something showing in the display.
4. Close the battery cover and then turn on the unit.
ATTERY LEVEL INDICATION
1. Full 2. Medium
3. Lower, please charge 4. Exhausted, the unit will
the battery. turn off automatically.
CHARGING THE ATTERY
Charge by the Special Adaptor
For the first time use, please discharge and charge the battery
fully for three times in order to extend the battery's life.

6
POWER SUPPLY
1. Install the lithium battery correctly.
2. Plug one port of the supplied USB cable into the USB jack
of the supplied adaptor, plug the other port into the USB
jack of the unit.
3. Plug the supplied adaptor into the AC socket. The adaptor
indicator " " appears in the display. While charging,
the battery power icon " " flows.
4. When the battery power is full, " " stops flowing.
Please disconnect the adaptor and the radio first and then
disconnect the adaptor and the AC socket.
NOTE:
1. Please don't listen to the radio while charging the radio via
adaptor.
2. Please only use the supplied adaptor or another adaptor
which is ratified by our company) to charge the lithium
battery which is also ratified by our company.
3. If other adaptor is used to charge the battery, it may cause
damage to the radio and battery.
Charge by the PC
1. Plug one port of the supplied USB cable into the USB jack
of the PC and the other port into the USB jack of the radio.
2. While charging, the battery power icon " " flows.
3. When the battery power is full, " " stops flowing.
Please disconnect the PC and the radio.

7
POWER ON/OFF
POWER ON/OFF
In radio OFF mode, press < > button shortly to turn it on;
In radio ON mode, press < > button shortly to turn it off.
SLEEP TIMER SETTING
1. In radio OFF mode, press <AUTO-> or <AUTO+> button
shortly to select the sleep timer 05 ~ 90 or " "
permanently ON).
2. While the sleep timer indicator " " and the sleep
timer numbers are both flashing in the display, press
< > button shortly to turn on the unit, the sleep
power off time when is in SW band, it doesn't appear) and
sleep timer indicator will be set and show in the display.
3. The radio will turn off automatically when reaching your
preset sleep timer.
NOTE: 1.When there is " " in the display, the sleep
timer function is activated.
2. You have to turn on the radio before the flashing goes out
to activate the timer.

8
POWER ON/OFF
AUTO TURN OFF (in MP3 & Voice mode)
In MP3 & Voice mode, if the unit stops playing and you don't
do any operations for 5 minutes, the unit will turn off
automatically to save the battery power.
AUTO TURN ON
After setting the alarm time, the unit will turn on automatically
when reaching your preset alarm time:
1. In radio OFF mode, press <M-/FOL-/ SET> button
shortly in right side of radio. The alarm icon " " appears
and the hour flashes in the display.
2. Press <AUTO-> or <AUTO+> button shortly or rotate the
tuning knob) to adjust the hour.
3. After adjusting the hour, press <M-/FOL-/ SET> button
shortly once again, the minute flashes in the display.
4. Press <AUTO-> or <AUTO+> button shortly or rotate the
tuning knob) to adjust the minute.
5. After adjusting the minute, press <M-/FOL-/ SET>
button shortly once again to confirm and exit.
If you want to listen to the radio after the unit turns on
automatically, please push the <Working Mode Switch> to
"Radio"; If you want to listen to the music, please push the
<Working Mode Switch> to "MP3"; if you want to record,
please push the <Working Mode Switch> to "Voice".
Activation and Deactivation
Turn off the radio, press <DEL> button shortly with " "
displays to activate the alarm. The unit will turn on
automatically when reaching the alarm time. Then it will turn
off automatically when reaching the sleep off time which you
set last time.) Shortly press <DEL> button again with " "
disappears to deactivate.

9
LOCK SWITCH & USING THE ACKSTAND
LOCK SWITCH
Push the <Lock Switch> upwards with " " the key
symbol displayed on the screen to lock all buttons, push it
downwards to unlock all buttons.
USING THE ACKSTAND
Extend the stand on the rear of the unit to make the unit
stand upright on the desk.

10
RADIO OPEATION
LISTENING TO THE RADIO
Radio Mode Selection
Push the <Working Mode Switch> to "Radio" to select the
radio mode. You can tune and save stations in this working
mode.
and Selection
After turning on the radio, select "Radio" working mode.
Press <FM> button shortly to select the FM band;
Press <MW> button shortly to select the MW AM) band;
Press <SW> button shortly to select the SW band.
While listening to the SW program, press <SW> button
shortly to select the meter band.
Adjust the Volume
Press <V+> or <V-> button to adjust the volume.
Using the Antenna
1. While listening to the FM and SW station, please adjust the
length of the telescopic antenna to get the best reception.
2. The MW AM) ferrite-bar antenna is located inside the
radio. It is strongly affected by the direction you put it in.
While listening to the MW AM) station, rotate the radio to
find the position which gives the best reception.

11
RADIO OPEATION
TUNING IN STATIONS
You can select your desired tuning mode as below for tuning
in stations:
1. Key: Using <AUTO-> or <AUTO+> button to select the
frequency.
2. Tuning Knob: Rotate the <Tuning Knob> to select the
frequency.
3. Auto Tuning Storage (ATS): Using <M/ATS/TIME>
button to tune and store automatically.
NOTE: While tuning the stations in door, the best reception is
near a window or upstairs.
1. Key
1) Turn on the radio, select the radio working mode.
2) Select your desired band.
3) Long press hold button for 2 seconds) <AUTO-> or
<AUTO+> button. This will search the tuning dial with
frequency increasing or decreasing in the display. The unit
will stop tuning when it finds a clear signal. If you reach a
station and the frequency has a little static, please press
<AUTO-> or <AUTO+> button quickly to fine tune the
reception, this will help to find a weak station.

12
RADIO OPEATION
2. Tuning Knob
1) Turn on the radio, select the radio working mode.
2) Select your desired band.
3) Rotate the <Tuning Knob> with the frequency increasing
or decreasing on display. Stop tuning as soon as you
receive a clear signal.
If "H" is displayed in the bottom left of
the display, it means you can't tune in
the station by rotating the <Tuning Knob> as normal. In this
case press <AUTO-> or <AUTO+> button quickly to enter
the Frequency Tuning mode and then you can tune in your
desired station as normal.
The Sign of “H” & “E”:
“H” means the radio is in Preset Frequency Tuning Mode.
“E” means the radio is in Frequency Tuning Mode.
3. Auto Tuning Storage (ATS)
1) Turn on the radio, select the
radio working mode.
2) Select your desired band.
3) Press & hold <M/ATS/TIME> button with the frequency
increasing or decreasing. You will notice the signal
strength indicator changing and the stored addresses
memory preset locations) increasing in display. Once you
see this, release the button. The unit is auto tuning and
saving all strong signals into memory. FM and SW
frequency will be saved from the address 50), MW AM)
frequency will be saved from the address 15).
NOTE:
1. While in ATS Auto Tuning Storage), the best reception
can be achieved when near a window or outdoors.
2. When you use ATS, the new frequencies will replace the
old ones when in the Auto Tuning Storage mode.
3. Do not use ATS while charging.

13
RADIO OPEATION
MANUAL STORING STATIONS
1. Tune in a station by the direct entry keypad or tuning knob.
2. Press <M/ATS/TIME> button quickly, there will be an "E"
or "H" appears in the display by turns. Before E or H
disappear, quickly do the next step.
3. Press <M+/FOL+/DATE> or <M-/FOL-/ SET> button
quickly or rotate the <Tuning Knob> to select a stored
address.
4. Press <M/ATS/TIME> button shortly once again to store
the frequency into memory.
NOTE: If "C" shows after the "E" or "H", it means this address has
been saved with a frequency. If you select this address memory
preset) to save a new frequency, the old frequency will be replaced by
the new one.
“H” means the radio is in Preset Frequency Tuning Mode.
“E” means the radio is in Frequency Tuning Mode.
“C” mean the memory is not empty.
FM band: can save 100 00 ~ 99) frequencies;
MW(AM) band: can save 25 00 ~ 24) frequencies;
SW band: can save 100 00 ~ 99) frequencies.
RECALLING THE STORED FREQUENCY
1. Turn on the radio and select the radio working mode.
2. Select your desired band.
3. Press <M+/FOL+/DATE> or <M-/FOL-/ SET> button
shortly or rotate the <Tuning Knob> to select your desired
station.
NOTE:
When you rotate the <Tuning Knob> to select your desired
station, if only the frequency changes, it is because the unit is
now in the Frequency Tuning mode. Please press
<M+/FOL+/DATE> or <M-/FOL-/ SET> button to change
to the Preset Frequency Tuning mode. That's to say, there is
"H" near the stored address. Then you can use the <Tuning
Knob> to select your desired station.

14
RADIO OPEATION
DELETING THE PRESET STATIONS
1. Turn on the radio and select the radio working mode.
2. Select your desired band.
Delete all the Preset Stations
Press & Hold <DEL> button with " "
in the display and then release it. While
" " is flashing, press <DEL> button
quickly once again to delete all. If you
don't want to delete, press any key to exit.
Delete One Preset Station
Press <M+/FOL+/DATE> or
<M-/FOL-/ SET> button quickly
to select your desired memory. Then
press <DEL> button quickly again .
The selected stored memory station will start to flash. Then
press <DEL> button quickly once again to delete this
stored frequency. If you don't want to delete, press any key
to exit.

15
RADIO OPEATION
DIRECT FM/MW(AM)/SW RECORDING
While listening to the FM/MW AM)/WB station, you can
record the programs directly into the memory.
1. Press & Hold <REC> button for about 2 seconds, "
●
"
and the record file number appear in the display. The
record time and the frequency will then appear in the
display and the unit will start to record.
2. While recording, press <REC>
button quickly to pause. Press it
once again to keep on recording.
3. Press <REC> button quickly to
stop recording.
NOTE:
1. The record file numbers will be in order. If you have
deleted some recorded files, the new record file numbers
will be the deleted numbers in the same order sequence.
2. While recording, please use the speaker on low volume
level or use the earphone in order to reduce the battery
consumption. This has no impact on the recording.

16
RADIO OPEATION
DIRECT FM/MW(AM)/SW RECORDING
3. When press record button to record, there is a waiting sign
shows for a short time, after the sign, there is a time
HOUR:MINUTE shows on the LCD, it is the time that left
on the memory that you can record. If there is an “E”
shows in front of the HOUR, it means the available record
time is over 99 hours, for example, E9:35, it means the
available record time is 99+9 hours+35 minutes. After a
few seconds, it starts to record.
4. You can find and play back all the recorded files in voice
mode.
5. The recording time is displayed in minutes and seconds
only. If the recording time is more than one hour, the
display will continue to show the minutes and seconds for
next hour.
6. If E5:E5 shows on the LCD, it means the system is busy,
wait till it is back to normal, or restart the radio. For other
error info, check the error message list.
7. You can save 99 01~99) files at most. Please delete any
files not needed so you have free file space.
8. If the memory is at minimum, it would not record. It jumps
back to where you press record button.

17
DATE, TIME & CLOCK MODE SETTING
DATE SETTING
With a new radio or you remove the battery from the unit for over
20 seconds, you lose the date setting and will then need to reset
it, as follows.
1. Turn off the unit first.
2. Press <M+/FOL+/DATE> button quickly. The year will flash.
Then press the <AUTO-> or <AUTO+> button quickly or
rotate the <Tuning Knob>) to adjust the year.
3. After adjusting the year, press <M+/FOL+/DATE> button
shortly. The month will flash and then press <AUTO-> or
<AUTO+> button quickly or rotate the <Tuning Knob>) to
adjust the month.
4. After adjusting the month, press <M+/FOL+/DATE> button
quickly, and the date flashes. Then press <AUTO-> or
<AUTO+> button quickly or rotate the <Tuning Knob>) to
adjust the date.
5. When all set, press <M+/FOL+/DATE> button quickly again to
exit setting mode. The date is set.
TIME SETTING
With a new radio or remove the battery from the unit, you lose
time setting and will then need to reset it, as follows.
1. Turn off the unit first.
2. Press <M/ATS/TIME> button quickly. The hour will flash. Then
press <AUTO-> or <AUTO+> button quickly or rotate the
<Tuning Knob>) to adjust the hours.
3. After adjusting the hour, press <M/ATS/TIME> button quickly,
the minutes flash and then press <AUTO-> or <AUTO+>
button quickly or rotate the <Tuning Knob>) to adjust the
minutes.
4. When all set, press <M/ATS/TIME> button quickly again to exit
time set mode, the time is set,
NOTE: You don't need adjust the seconds. The seconds will start
from 00 once again after adjusting the hours and minutes.