Kalenji 500 SD User manual

Kalenji:
User manual for the 500 SD
watches with accelerometer
W 500 SD
Watch with accelerometer
CW 500 SD
Heart rate monitor with accelerometer
CW 500 SD PC
Heart rate monitor with accelerometer and PC connection

1 Usage and precautions for use............................................................................................................ 1
2. A word from the product manager. .................................................................................................... 2
3. Contents of the box............................................................................................................................. 2
4. Watch configuration............................................................................................................................ 3
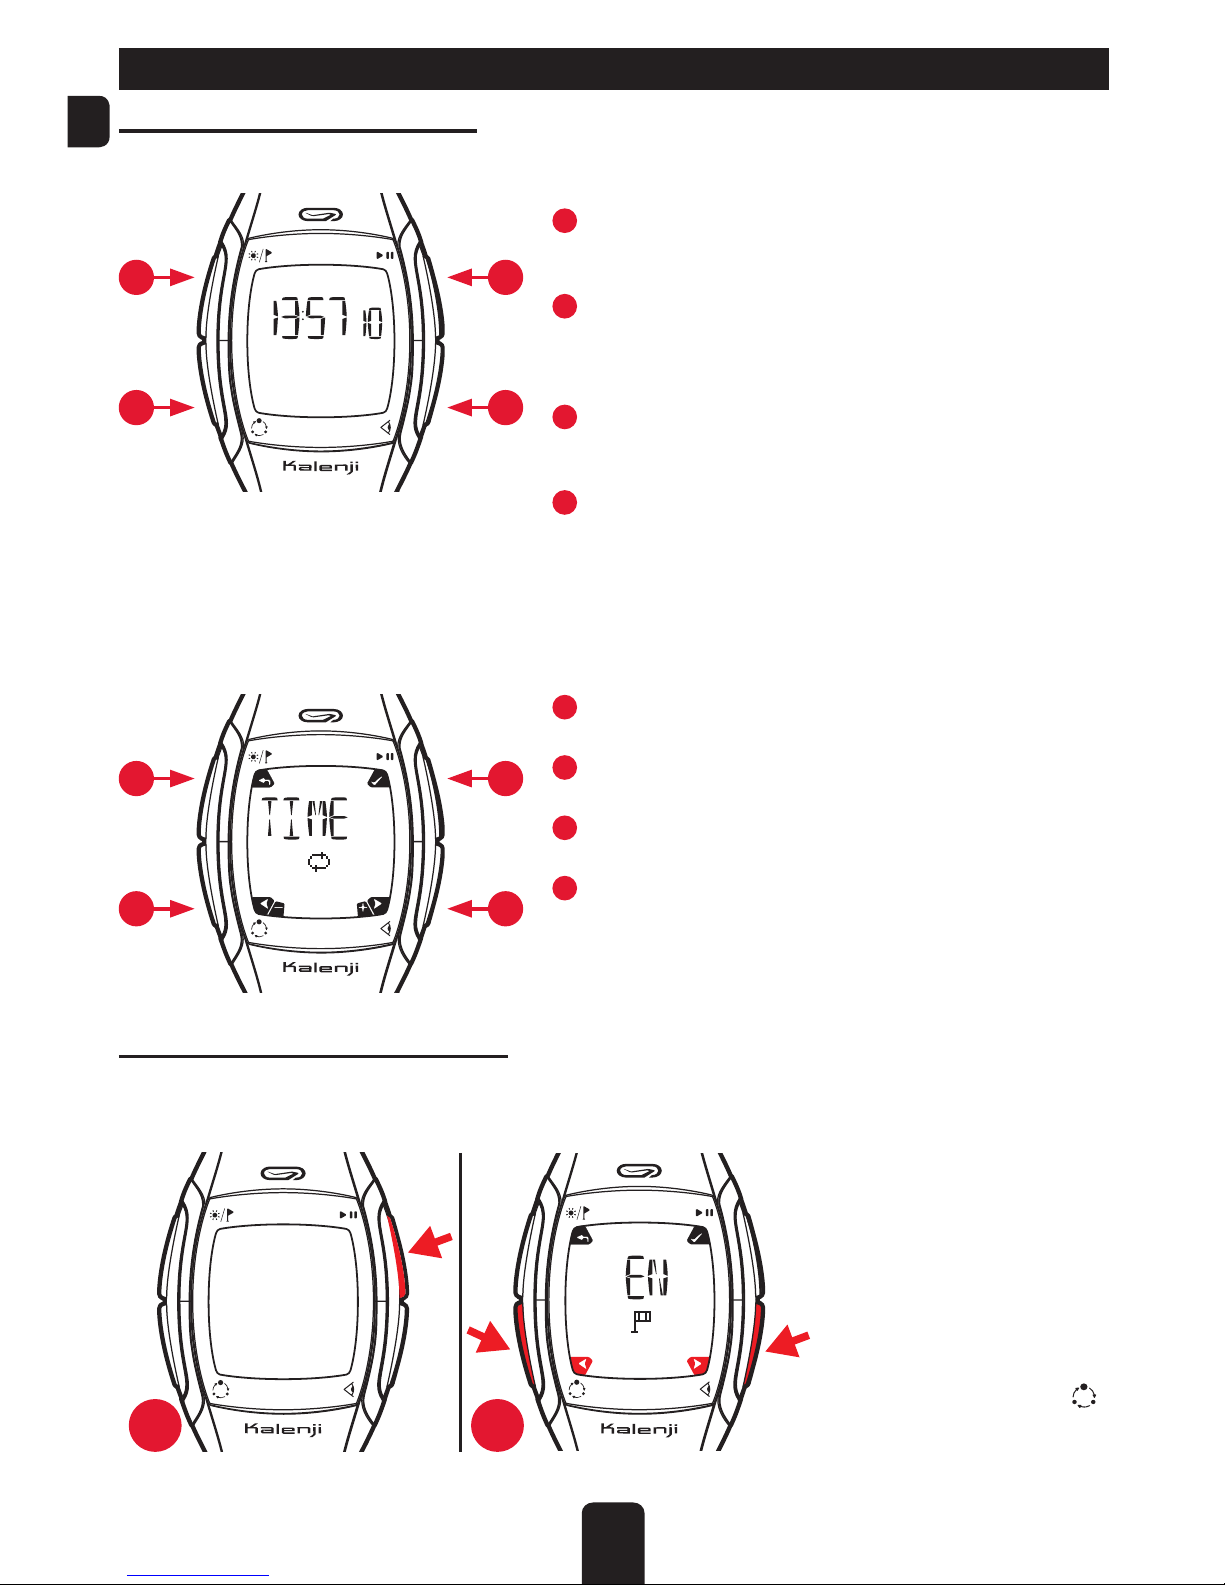
4.1. Functions of the buttons................................................................................................................ 3
4.2. Start-up and configuration............................................................................................................ 3
5. Fitting the different sensors................................................................................................................. 4
5.1. Accelerometer............................................................................................................................... 4
5.1.1 Positioning on the shoe. .......................................................................................................... 4
5.1.2. Positioning in the shoe............................................................................................................ 4
5.2. Heart rate monitor belt (except W 500 SD).................................................................................. 4
6. Homepage screen: TIME. .................................................................................................................... 5
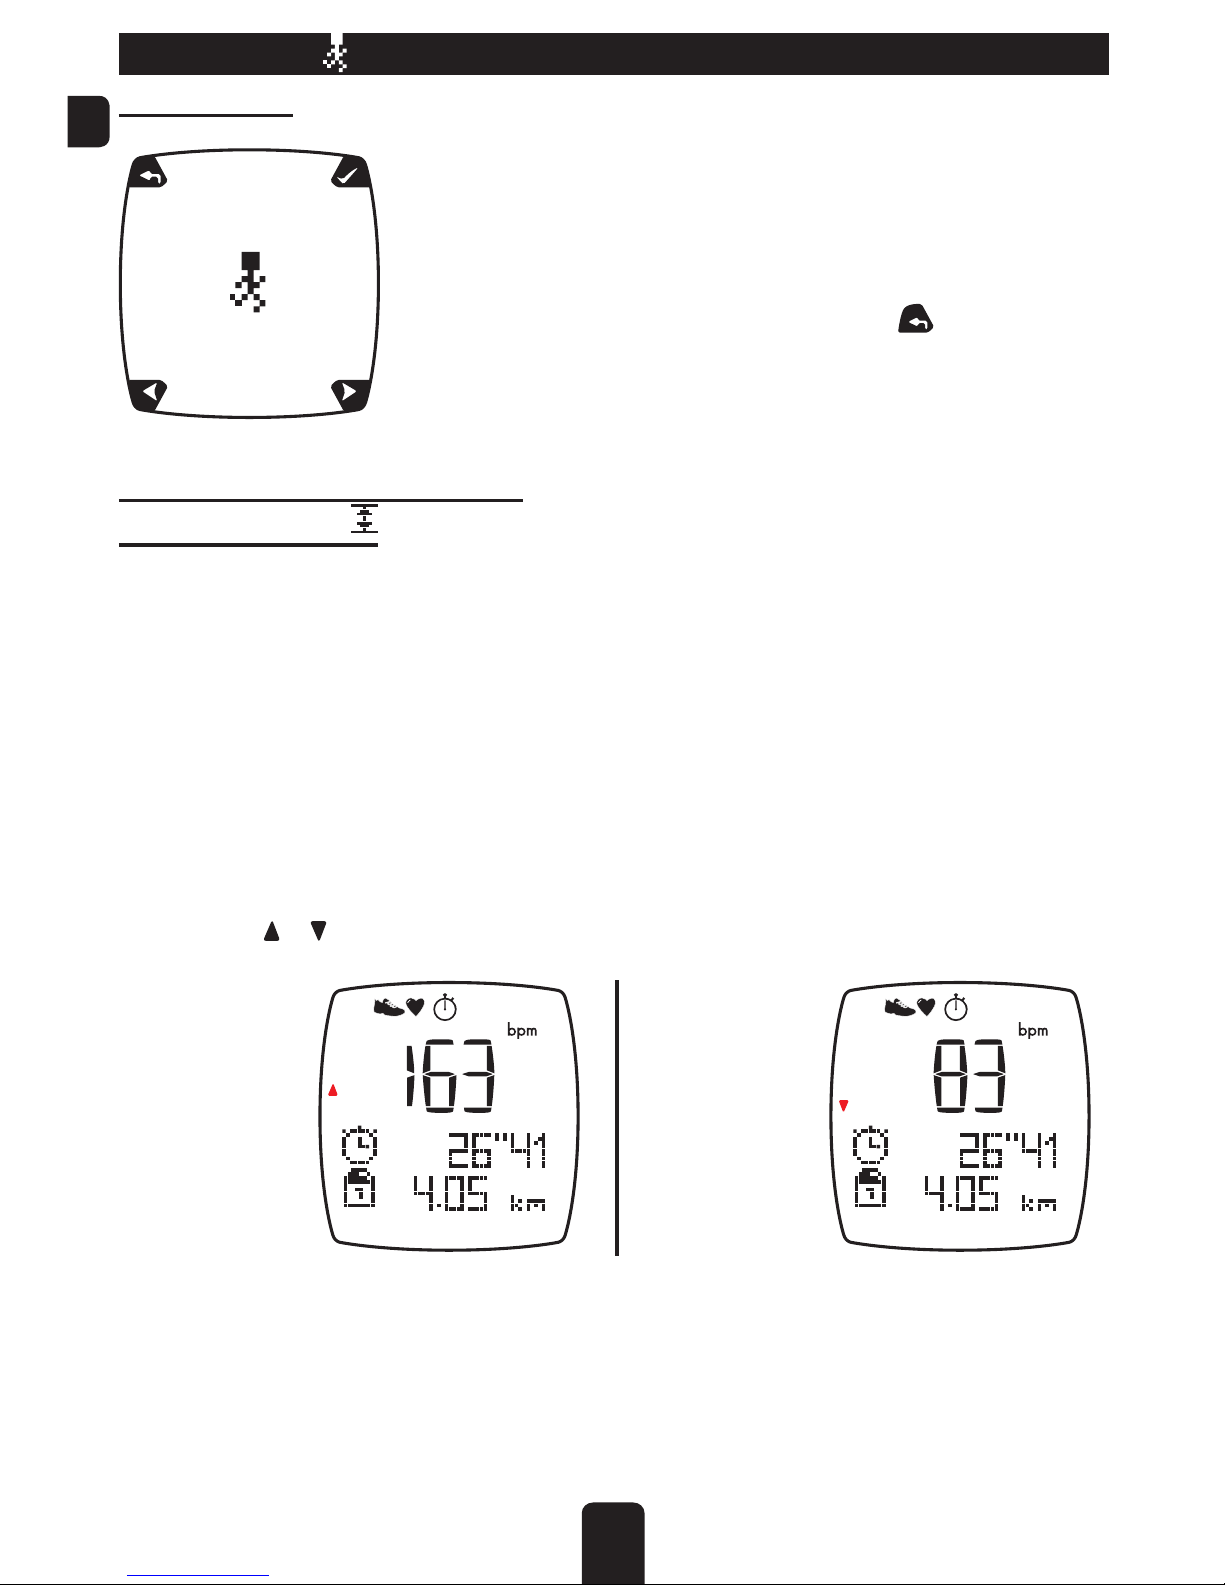
7. Navigation in the modes..................................................................................................................... 5
8. FREE Mode ........................................................................................................................................... 6
8.1. Configuration in FREE mode.......................................................................................................... 6
8.1.1. Target zone. ............................................................................................................................ 6
8.1.2. Lap information ...................................................................................................................... 7
8.2. Search for sensors......................................................................................................................... 7
8.3. Using the FREE mode..................................................................................................................... 8
8.3.1. Changing the indicators displayed on the screen................................................................ 8
8.3.2. Start / stop the stopwatch and its recording......................................................................... 9
8.3.3. Recording manual laps.......................................................................................................... 9
9. INTERVALS . .......................................................................................................................................... 9
9.1. Configuration in INTERVALS mode. ............................................................................................. 10
9.2. Search for sensors....................................................................................................................... 10
9.3. Using the INTERVALS mode.......................................................................................................... 11
9.3.1. Changing the indicators displayed on the screen.............................................................. 11
9.3.2. Warm-up phase..................................................................................................................... 11
9.3.3. 1st series. ............................................................................................................................... 12
9.3.4. Series break and following series......................................................................................... 13
9.3.5. Warming down...................................................................................................................... 14
10. CHALLENGE mode . ......................................................................................................................... 14
10.1. Configuration in CHALLENGE mode.......................................................................................... 15
10.1.1. Distance ............................................................................................................................. 15
10.1.2. Time / speed ...................................................................................................................... 15
10.1.3. Lap information .................................................................................................................. 15
10.2. Search for sensors..................................................................................................................... 16
10.3. Using the CHALLENGE mode..................................................................................................... 16
10.3.1. Changing the indicators displayed on the screen............................................................ 16
10.3.2. Start / stop you challenge.................................................................................................. 17
10.3.3. Recording manual laps...................................................................................................... 18
11. DATA. ............................................................................................................................................... 18
11.1. Using the DATA mode................................................................................................................ 18
11.2. Viewing data . ........................................................................................................................... 19
11.3. Transferring data ...................................................................................................................... 20
11.4. Memory management. ............................................................................................................. 20
12. SETTINGS mode................................................................................................................................ 22
12.1. Your user settings: . ................................................................................................................... 22
12.2. Run intensity ............................................................................................................................. 22
12.2.1. Target zone ......................................................................................................................... 23
12.2.2. Lap information .................................................................................................................. 23
12.3. Your watch ................................................................................................................................ 24
12.4. Your display .............................................................................................................................. 24
12.4.1. Number of indicators on the screen .................................................................................. 24
12.4.2 Manage your list of favourite indicators ............................................................................ 25
12.4.3. Display mode without sensor.............................................................................................. 27
12.5. Your sensors .............................................................................................................................. 27
12.5.1. Pairing the sensors ............................................................................................................. 27
12.5.2. Searching for sensors: ........................................................................................................ 28
12.5.3. Calibrating the accelerometer .......................................................................................... 29
12.5.4. Activating the sensors . ...................................................................................................... 30
12.6. Default settings . ....................................................................................................................... 30
12.7. Battery management................................................................................................................ 30

13. Troubleshooting............................................................................................................................... 31
13.1. Abnormal heart rhythm............................................................................................................. 31
13.2. Abnormal speed and distance................................................................................................. 32
13.3. Low battery for the watch......................................................................................................... 32
13.4. No access to certain modes or functions. ............................................................................... 32
13.5. Detecting the sensors. .............................................................................................................. 33
13.6. Inability to configure lap information....................................................................................... 33
13.7. Inability to configure lap information....................................................................................... 33
13.8. Restore the factory settings...................................................................................................... 33
14. Technical features........................................................................................................................... 34
15. Guarantees...................................................................................................................................... 35
16. Compatible accessories................................................................................................................. 35
17. Battery replacement. ...................................................................................................................... 35
17.1. Replacing the watch’s battery.................................................................................................. 35
17.2. Replacing the accelerometer’s battery. .................................................................................. 36
17.3. Replacing the heart rate monitor belt’s battery....................................................................... 36
18. Contact us....................................................................................................................................... 37
19. Index................................................................................................................................................ 38

1
EN
1 Usage and precautions for use.
The watch is designed to be worn on the wrist during running sessions in a temperate climate.
WARNING!!! For the models with a heart rate monitor function (CW 500 SD-CW 500 SD PC).
This equipment is designed for sports and leisure use. It is not a medical monitoring
device. The information provided by this equipment or manual is only used by way
of example and must only be used to monitor a medical disorder after consulting
and obtaining agreement from your doctor. Similarly, healthy athletes must be
aware of the significant impact that the personal training zone settings will have on
programming an effective and risk-free training session.
We recommend that you seek the advice of your doctor or health adviser to set your maximum
heart rate, your upper and lower heart rate limits and the frequency and duration of exercise that
is suitable for your age, physical condition and desired results. Finally, as a result of possible distur-
bances caused by the radio transmission system, we do not recommend that users of heart stimu-
lators use a heart rate monitor which uses this form of technology. Not observing these precautions
may put your life at risk.

2
EN
2. A word from the product manager.
Thank you for choosing this Kalenji product for your running sessions. Depending on the model you
have chosen, you will be able to measure your speed and distance covered when running (W 500
SD), as well as your heart rate (CW 500 SD) and transfer your data to your PC (CW 500 SD PC).
Thanks to the technology used, this product will allow you to measure speeds and distances cove-
red with 98% accuracy. This product was designed so that you can get even more enjoyment from
your running sessions. That’s why it is fitted with a large, highly legible screen, menu navigation help
using the help symbols as well as Ant + technology to facilitate the use of the different sensors: ac-
celerometer and heart rate monitor belt. Good luck with your running sessions using your new aid.
3. Contents of the box.
W 500 SD CW 500 SD CW 500 SD PC
Watch s s s
Accelerometer s s s
Heart rate monitor belt
s s
USB flash drive for data transfer
to a PC
"S&D Connect"
s

3
EN
4. Watch configuration.
4.1. Functions of the buttons.
This watch has 4 buttons:
2
1
4
3
1
Light / Lap: to activate the backlight (long press) or
to indicate a new lap.
2
Mode: to access the different modes: FREE, INTER-
VALS, CHALLENGE, to the DATA of the previous ses-
sions or to the SETTINGS of your watch.
3
Start/Stop: to start or pause the stopwatch and the
recording.
4
View: to scroll through the indicators displayed on
the 2
nd
and 3
rd
row (short press) during your ses-
sion.
To navigate through the menus, select or enter values, these 4 buttons have other functions.
These functions are then identified by the symbols shown at the corners of the screen, next to the
buttons:
2
1
4
3
1
Return to the previous screen up to the TIME mode.
2
Previous selection in the list or: Reduce the value.
3
Confirm a selection.
4
Next selection in the list or: Increase the value.
autolap
4.2. Start-up and configuration.
When using for the first time, you must configure your watch. Switch the watch on by holding down
the button shown.
1 2
Configure your product by
entering your language,
units, gender, age, weight,
height, the time and date.
If your watch is already on,
you can access the SET-
TINGS by pressing the
button several times.
language

4
EN
5. Fitting the different sensors.
5.1. Accelerometer.
5.1.1 Positioning on the shoe.
1 2 3
- Slide the lace clip under the laces, lengthwise, on the flattest part of the shoe (inaccurate readings
will occur if its angle from horizontal is greater than 30°);
- Clip the accelerometer (oval capsule) under the rear trough of the lace clip, with the accelero-
meter notch pointing forwards;
- Press the front section of the lace clip and the front of the accelerometer at the same time to lock
the notch of the accelerometer in the clip’s slot;
- Tighten your laces enough to keep the accelerometer in place.
Removing the accelerometer: Press the tab at the front of the lace clip to remove the accelero-
meter.
5.1.2. Positioning in the shoe.
Some models of shoe have a housing, under the insole to
accommodate the accelerometer. In this case, you do not
need the lace clip.You just have to make sure that the accele-
rometer is pointing in the right direction in the shoe’s housing.
It must be positioned with its back pointing upwards (you can
identify this by the ANT+ logo and the battery compartment).
5.2. Heart rate monitor belt (except W 500 SD).
Setting up:
1 2 3
Sensors
Reception cone:
*118.08 inchs

5
EN
6. Homepage screen: TIME.
In TIME mode:
- An initial press on the button displays the date;
- A subsequent press on controls the alarm mode status.
After 5 secs, the date or alarm display disappears from the screen.
7. Navigation in the modes.
FREE
SETTINGS
DATA CHALLENGE
INTERVALS
From the Time screen, press the button to access the FREE mode. Pressing on the button indi-
cated by the symbol will scroll through the menus set out below in clockwise order ( ).
Pressing on the button indicated by the symbol will scroll through the menus set out below in
anticlockwise order ( ).

6
EN
8. FREE Mode .
In TIME mode:
FREE
The FREE mode allows you to run as you want, depending on your
mood, while controlling different parameters: running time, speed, dis-
tance, heart rate (except model W 500 SD), calories burnt...
To exit the mode, press the button shown by the symbol as many
times as is necessary (except when the stopwatch is running, in which
case you will have to stop the session to exit the mode).
8.1. Configuration in FREE mode.
8.1.1. Target zone.
By default, it is not active, "NO" is displayed on the screen. You can configure a target zone based
on the following selection:
- HR: the heart rate, (except W 500 SD);
- SPEED: the speed in km/h;
- PACE: the pace in min / km;
- CAL: the calories per hour.
The speed and pace parameters are interdependent. A change in the speed parameter will be
converted to the equivalent pace parameter and vice versa.
Whatever the type of target zone selected, you will set your upper (max) and lower (mini) limit and
activate the beep or not. During your exercise, the beep will warn you if you are going outside your
target zone. A or arrow will show you whether your are above or below your target zone.
Above the
target zone
Below the
target zone

7
EN
8.1.2. Lap information .
You can also see the autolap information in terms of one of the following 2 parameters:
- DIST: the distance, for each lap, the watch will show you the time taken to cover the selected dis-
tance. You can choose a distance from the list available from 0.1 km to 5 km or specify your own
by selecting USER in the list.
- TIME: the time, for each lap, the watch will show you the distance covered. You can choose a time
from the list available from 30 secs to 10 mins or specify your own by selecting USER in the list.
The lap information cannot be less than 30 secs or 0.1 km. If a lower value is confir-
med, the symbol will appear and the entered value will flash for 3 seconds before
you can enter a new value.
A beep will warn you at each lap and the information relating to the
completed lap will appear for 5 seconds (split time since the begin-
ning of the session, lap number, lap time or distance).
lap 1
8.2. Search for sensors.
Once the configuration of your target zone and/or the lap information has been completed, you
can go on to the next stage by selecting (OK).
The watch will then search for available sensors: accelerometer and heart rate monitor (except
W 500 SD).
In the search screen, the sen-
sors found are identified by the
symbol and the sensors not
found by the symbol.
The heart rate monitor belt is
symbolized by the symbol
and the accelerometer by the
.
symbol.
searching searching

8
EN
1
Accelerometer found.
2
Heart rate monitor belt found.
1 2
Once the sensors have been found, you can start your exercise. The sensors found are displayed
at the top of the screen:
If the sensors cannot be found by the watch, please refer to section 13 Troubleshooting.
8.3. Using the FREE mode.
8.3.1. Changing the indicators displayed on the screen.
Press to scroll through the indicators displayed in the 2
nd
and 3
rd
rows.
1
Information row 1.
2
Information row 2.
3
Information row 3.
1
2
3
1 long press on allows you to shift the indicator on the 2
nd
row up to the first row (the first row and
2
nd
row flash). The indicator on the 1
st
row moves to the 2
nd
row.
To choose your indicators and manage their order in the list, refer to section 12.4 Your display.

9
EN
8.3.2. Start / stop the stopwatch and its recording.
Press to start the stopwatch. The recording begins.
The stopwatch appears. The recording has begun.
The time is counted down.
A subsequent press on will pause the stopwatch and the recording. The stopwatch symbol
and the first row flash to indicate this pause mode. You can then choose from the following
selection:
- Resume: restarts your stopwatch;
- Stop: stops your recording and gives you the following choice:
- Save?: your record;
- Clear? your record.
- Settings: go to settings.
8.3.3. Recording manual laps.
The button allows you to count a lap manually and view:
- The split time (from the beginning of the session) in the 1
st
row;
- The lap number in the 2
nd
row;
- The lap time in the 3
rd
row.
9. INTERVALS .
It allows you to manage repeated exercises that alternate
between action and recovery phases. In this way, you can
let your watch guide you throughout the exercise so that
you can concentrate on your pace.
To exit the mode, press the button shown by the
sym-
bol as many times as is necessary (except when the stop
watch is running, in which case you will have to stop the ses-
sion to exit the mode).
INTERVALS

10
EN
9.1. Configuration in INTERVALS mode.
You can configure a session as follows: 20 min warm-up - 2 series of 4 repeated 300 m intensive -
100m recovery runs.
- warm-up: allows you to configure a warm-up. The warm-up time will be recorded in your
session.You do not need to plan its time period.
- action: plan an intensive running time or distance according to preference.
- TIME: the intensive running time, 15 sec, 30 sec, 45 sec, 1 min, 1min 30 sec, 2 min,
3 min, 4 min, 5 min, 6 min, 8 min, 10 min, 12 min, 15 min;
- DIST:the intensive running distance(100 m,150 m,200m,400 m,600m,800m,1000m,
2000 m, 3000 m, 5000 m); You can choose on the values from the list shown above or
specify your own. In this case, select USER in the list.
The lap information cannot be less than 30 secs or 0.1 km. If a lower value is confir-
med, the symbol will appear and the entered value will flash for 3 seconds before
you can enter a new value.
- rest: plan a recovery time (TIME), or a distance (DIST), or a heart rate (HR) to reach in order to
start the following action phase (except W 500 SD). By default, the watch shows you a recovery
heart rate (75% of the maximum heart rate), but you can adjust the value yourself by selecting
USER in the list.
- repeats: allows you to plan the number of times you want to repeat the Action + rest phases;
- series: allows you to plan the number of times you want to repeat the series;
- cool: allows you to configure a warm-down phase. The warm-down time will be recorded in
your session.You do not need to plan its time period.
9.2. Search for sensors.
Once the configuration of your exercise has been completed, you can go on to the next stage by selecting (OK).
The watch will then search for available sensors: accelerometer and heart rate monitor (except W 500 SD).
In the search screen, the sen-
sors found are identified by the
symbol and the sensors not
found by the symbol.
The heart rate monitor belt is
symbolized by the symbol
and the accelerometer by the
.
symbol.
Once the sensors have been found, you can start your exercise. The sensors found are displayed at the top of the screen.
If the sensors cannot be found by the watch, please refer to section 13 troubleshooting.
searching searching

11
EN
9.3. Using the INTERVALS mode.
9.3.1. Changing the indicators displayed on the screen.
In this menu, the first row is fixed and cannot be swapped with the second row. During the warm-
up phases, series breaks and warm-down, it is devoted to the stopwatch. During the action or rest
phases it is devoted to the timer, the distance or the heart rate depending on the criteria you have
chosen.
Press to scroll through the indicators displayed in the 2
nd
and 3
rd
rows.
1Information row 1.
2Information row 2.
3Information row 3.
1
2
3
To choose your indicators and manage their order in the list, refer to section 12.4 Your display.
9.3.2. Warm-up phase.
Press to start the stopwatch. The recording starts and the training begins with the warm-up
phase if you have configured it. The stopwatch appears, showing that it has started and that the
recording has begun.
The watch shows you that you are in the warm-up phase with:
1
A temporary mention on the 2nd row;
2
A permanent symbol located at the bottom
of the screen.
1
2
warm-up

12
EN
Press to stop the warm-up. The stopwatch and the recording will pause. The stopwatch
symbol and the first row flash to indicate this pause mode.
You can then choose from the following selection:
- resume: restarts your stopwatch in warm-up mode;
- go to series: to start your first series (choice by default);
- stop: stops your recording and gives you the following choice:
- save ? your record;
- clear ? your record.
- Settings: go to settings.
9.3.3. 1st series.
After the warm-up, if you have chosen - go to series, the stopwatch stops in countdown mode
and displays the time or the distance chosen for the action phase. Pressing a second time
triggers the stopwatch.
If you have not planned a warm-up, you can immediately begin your training with a series.
The watch shows you that you are in the warm-up phase with:
action
1
A temporary "ACTION" message and the number of
repeats in progress and the number of programmed
repeats.
2
A permanent symbol located at the bottom of the
screen.
1
2
During the action phase, the indicator that you chose (time or distance) will be displayed in the first row. Your
remaining intensive running time (or distance) will be counted down until the recovery phase.
At the end of the intensive running phase, begin the recovery phase. The watch shows you that you
are in the recovery phase with:
1
A temporary "rest" message and the number of repeats
in progress and the number of programmed repeats.
2
A permanent symbol located at the bottom of the
screen.
1
2
rest

13
EN
The sequence of action and rest phases will continue in this way until you have reached the pro-
grammed number of repetitions.
At any time during an action or rest phase you can pause your stopwatch using the button.You
can then choose from the following selection:
- resume: restarts your stopwatch at the point where you had stopped it;
- rest: if you were in an action phase, selecting this takes you to the next rest;
- action: if you were in a rest phase, selecting this takes you to the next action;
- go to cool: takes you directly to the go to cool phase if it has been programmed;
- Stop: stops your recording and gives you the following choice:
- save ? your record ;
- clear ? your record.
- Settings: go to settings.
9.3.4. Series break and following series.
inter series
If you have programmed several series, you will be offered a rest
series break with a temporary series break screen, at the end of
the first series.
The watch shows you that you are in a series break phase with:
1
A permanent symbol located at the bottom of the screen.
1

14
EN
You can stop this series break phase and start the next series using the button and you will get
the following selection:
- resume: restarts your stopwatch in series break mode.
- action: to the 1st action phase of the next series.
- stop: stops your recording and gives you the following choice:
- save ? your record;
- clear ? your record.
- Settings: go to settings.
9.3.5. Warming down.
This phase must be configured at the beginning of the exercise in order to be offered at the end of
your last series. The watch shows you that you are in a go to cool phase with:
1
A permanent pictogram located at the bottom of the
screen.
1
As with the warm-up or series break phases, its time period cannot be configured. You end it when
you want using the button and you get the following selection:
- resume: restarts your stopwatch in go to cool mode.
- stop: stops your recording and gives you the following choice:
- save your record;
- clear your record.
- Settings: go to settings.
10. CHALLENGE mode .
CHALLENGE
This allows you to run against a virtual rival represented by a ghost
by being constantly informed of your position and the gap
between you and your rival.
To exit the mode, press the button shown by the symbol as
many times as is necessary (except when the stopwatch is run-
ning, in which case you will have to stop the session to exit the
mode).

15
EN
10.1. Configuration in CHALLENGE mode.
10.1.1. Distance .
You can configure a distance selected from the list (2 km, 3 km, 5 km, 8 km, 10 km, 12 km, 15 km)
or specify your own (USER).
The distance cannot be less than 0.1 km. If a lower value is confirmed,the symbol
will appear and the entered value will flash for 3 seconds before you can enter a
new value.
You can also choose not to configure the distance. (NO)
10.1.2. Time / speed .
If you have configured the distance, you can choose to configure a time or a distance in km/h or
a pace in min/km (time/speed). If you have not configured the distance, you will not be able to
configure a speed or a pace.
The speed, pace and time can be entered without restriction (no preset list).
Confirming a parameter systematically corrects the value of the other parameters. Example: you
have configured a distance of 10 km to complete in one hour. Your speed will consequently be
adjusted to 10 km/h (that is a pace of 6 min/km).
The lap challenge time cannot be less than 30 seconds. If a lower value is confir-
med, the symbol will appear and the entered value will flash for 3 seconds before
you can enter a new value.
10.1.3. Lap information .
You can also have the autolap information in terms of one of the following 2 parameters :
- DIST: the distance, for each lap, the watch will show you the time taken to cover the selected
distance.You can choose a distance from the list available from 0.1 km to 5 km or specify your own
by selecting USER in the list;
- TIME: the time, for each lap, the watch will show you the distance covered. You can choose a time
from the list available from 30 secs to 10 mins or specify your own by selecting USER in the list.
The lap information cannot be less than 30 secs or 0.1 km. If a lower value is confir-
med, the symbol will appear and the entered value will flash for 3 seconds before
you can enter a new value.
A beep will warn you at each lap and the information relating to the
completed lap will appear for 5 seconds (split time since the begin-
ning of the session, lap number, lap time or distance).
lap 1

16
EN
10.2. Search for sensors.
Once the configuration of your lap information has been completed, you can go on to the next
stage by selecting (OK).
The watch will then search for available sensors: accelerometer and heart rate monitor (except
W 500 SD).
In the search screen, the sen-
sors found are identified by the
symbol and the sensors not
found by the symbol.
The heart rate monitor belt is
symbolized by the symbol
and the accelerometer by the
.
symbol.
searching searching
1
Accelerometer found.
2
heart rate monitor belt found.
1 2
Once the sensors have been found, you can start your exercise. The sensors found are displayed
at the top of the screen.
If the sensors cannot be found by the watch, please refer to section13 troubleshooting.
10.3. Using the CHALLENGE mode.
10.3.1. Changing the indicators displayed on the screen.
Press to scroll through the indicators displayed in the 2nd and 3rd rows.
1
Information row 1.
2
Information row 2.
3
Information row 3.
1
2
3
1 long press on allows you to shift the indicator on the 2
nd
row up to the first row (the first row and
2
nd
row flash). This function is not activated for the animated feature showing the gap between you
and your rival. The indicator on the 1
st
row moves to the 2
nd
row. Exception: the animated feature
showing the gap between you and your rival cannot be moved up to row 1.

17
EN
To choose your indicators and manage their order in the list, refer to section 12.4 Your display.
10.3.2. Start / stop you challenge.
Press to start the stopwatch. A 3-sec countdown starts to show start time.
By default the watch shows you the gap between you and your rival
in the 2
nd
row. You are represented by the symbol and your rival is
represented by the symbol. The right hand symbol is the one lea-
ding the run.
A subsequent press on will pause the stopwatch and the recording. The stopwatch symbol
and the first row flash to indicate this pause mode. You can then choose from the following
selection:
- resume: restarts your stopwatch and your recording;
- stop: stops your recording and gives you the following choice:
- save ? your record;
- Clear ? your record.
- settings: go to settings.
Table of contents
Other Kalenji Watch manuals