Kamasa-TOOLS K 10250 User manual

Operating instructions K 10250
Cordless
two speed
drill/driver

2 Kamasa Tools is a trade mark of KG Knutsson AB, SE 191 81 Sollentuna, Sweden, Phone +46 8 92 30 00 www.kamasatools.com
Operational precautions
General safety instructions
WARNING!
1. Consider work area environment. Do not expose tools to rain. Do not use tools in damp or wet
locations – Keep work area clean and well lit. Do not use tools in the present of ammable liquids
or gases.
2. Guard against electric shock. Avoid body contact with earthed or grounded surfaces.
3. Keep children away. Do not let visitors touch the tools or extension cord. All visitors should be kept
away from work area.
4. Store idle tools. When not in use, tool should be stored in a dry locked up place, out of reach of
children.
5. Do not force the tool. It will do the job better and safer at the rate for which it was intended.
6. Stay alert. Watch out what you are doing–Use common sense. Do not operate tool when you are
tired. Check damaged parts. Before further use of the tool, a guard or other part is damaged should
be carefully checked to determine that it will operate properly and perform its intended function.
7. Check for alignment of moving parts, blinding of moving parts, breakage of parts, mounting and any
other condition that may affect its operation.
8. A guard or other parts that is damaged should be properly repaired or replaced by an authorized
service center unless otherwise indicated in this instruction manual. Have defective switches
replaced by an authorized service center. Do not use tool if switch does not turn it on.
9. To ensure the designed operational integrity of power tools, do not remove installed cover or screws.
10. Use your tool at lower input than specied on the nameplate, otherwise, the nish may be spoiled and
working efciency reduced by motor overload.
11. Do not wipe plastic parts with solvent. Solvents such as gasoline, thinner, benzene, carbon
tetrachloride, alcohol, ammonia and oil containing chloric annex may damage and crack plastic
parts. Do not wipe them with such solvent. Wipe plastic parts with a soft cloth lightly dampened
with soap water.
12. Dress properly. Do not wear loose clothing or jewellery. Contain long hair keep your hair, clothing,
and gloves away from moving parts.
13. Use safety equipment. Always wear eye protection, non-skid safety shoes, hard hat, or hearing
protection.
14. Do not overreach. Proper footing and balance enables better control of the tool in unexpected
situations.

Kamasa Tools is a trade mark of KG Knutsson AB, SE 191 81 Sollentuna, Sweden, Phone +46 8 92 30 00 www.kamasatools.com 3
Product safety instructions
WARNING!
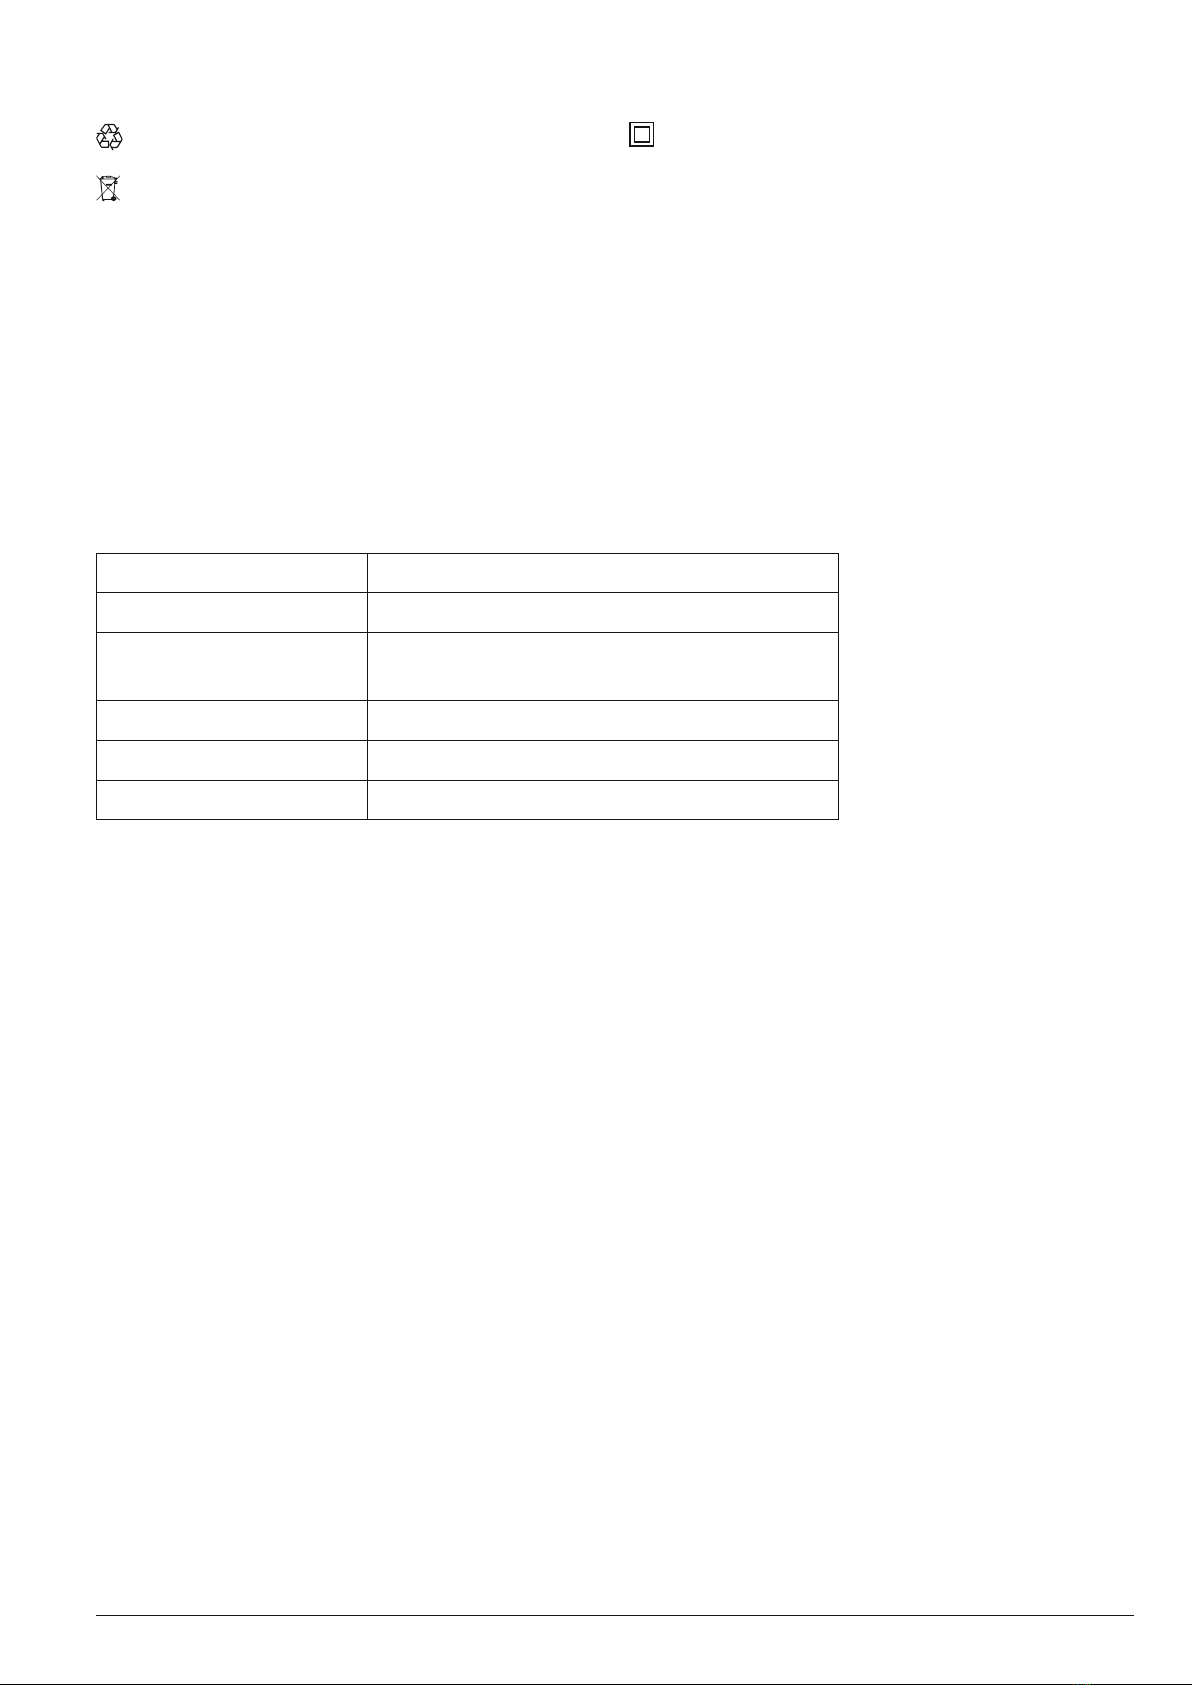
1. Disconnect battery pack from tool or place the main switch in the locked or off position before
making any adjustments, changing accessories, or storing the tool. Such preventative safety
measures reduce the risk of starting the tool accidentally.
2. Remove adjusting keys or wrenches before turning the tool on. A wrench or a key that is left attached
to a rotating part of the tool may result in personal injury.
3. Use clamps or other practical way to secure and support the work piece to a stable platform. Holding
the work by hand or against your body is unstable and may lead to a loss of control.
4. Maintain tools with care. Keep cutting tools sharp and clean. Properly maintained tools, with sharp
cutting edges are less likely to bind and are easier to control.
5. Use only accessories that are recommended by the manufacturer for your model. Accessories that
may be suitable for one tool may create a risk of injury when used on another tool.
Important safety instructions for charger & battery pack
WARNING!
1. Caution: To reduce risk of injury, charge only specic type rechargeable battery packs. Other types of
battery packs may burst causing personal injury and damage.
2. Before using charger, read all instructions and cautionary markings on battery packs and chargers.
3. Do not expose charger to rain or snow.
4. To reduce the risk of damage to electric plug and cord, pull by plug rather than cord when
disconnecting charger.
5. Use of an attachment not recommended or sold by the charger manufacture may result in a risk of
re, electric shock, or injury to persons.
6. Make sure cord is located so that it will not be stepped on, tripped on, tripped over, or otherwise
subjected damage or stress.
7. Do not operate charger with damaged cord or plug. Replace them immediately.
8. Do not operate charger if it has received a sharp blow, been dropped, or otherwise damage in any
way, take it to qualied center.
9. To reduce risk of electric shock, unplug charger from outlet before attempting any maintenance
or cleaning. Turning off controls will not reduce this risk.
10. Do not disassemble charger or battery pack, take it to a qualied service center while repair is
required. Incorrect reassembling may result in a risk of electric shock or re.

4 Kamasa Tools is a trade mark of KG Knutsson AB, SE 191 81 Sollentuna, Sweden, Phone +46 8 92 30 00 www.kamasatools.com
Additional safety rules for charger & battery pack
WARNING!
1. Do not charge battery pack when temperature is below 10°C (50°F) or above 40°C (104°F).
2. Do not attempt to use a set-up transformer, an engine generator or DC power receptacle.
3. Do not allow anything to cover or clog the charger vents.
4. Always cover the battery pack terminals with the battery pack cover when the battery pack: is
not used.
5. Do not short the battery pack.
6. Do not touch the terminals with any conductive material.
7. Avoid storing battery pack in a container with other metal objects such as nails, coins, etc.
8. Do not expose battery pack to water or rain, A battery pack short can use large current ow,
overheating, possible burns and even a breakdown.
9. Do not store the machine and battery pack in locations where the temperature may reach or
exceed 50°C (122°F)
10. Do not incinerate the battery pack even if it is severely damaged or completely worn out.
The battery pack can explode in a re.
11. Be careful not drop, shake or strike battery pack.
12. Do not charge inside a box or container of any kind. The battery pack must be placed in a well
ventilated area during charging.
13. Do not leave batteries unused for extended period of time. Recharge the battery every 3–6 months
and bring Li-Ion battery to 40–80% charge level before storage.
14. Li-Ion batteries are sensitive to high temperature and should be kept in a cool, dry and out of direct
light exposure. Ideal temperature for operation and storage is below 25°C (77°F).
15. This product is designed with low voltage protection, which prevents the tool from over discharging
and prolong battery’s life span.

Kamasa Tools is a trade mark of KG Knutsson AB, SE 191 81 Sollentuna, Sweden, Phone +46 8 92 30 00 www.kamasatools.com 5
Model No. K 10250 (Replaceable carbon brush motor)
Voltage 10.8V dc
No load speed/min Low: 0–360 rpm
High: 0–1550 rpm
Max Torque 24 Nm (17.7 ft-lb)
Tool weight (with battery) 1.045 kg (battery 0.185 kg)
Charging Time 1 hour Auto Cut-Off
Recycle
Do not throw in garbage
a.c. Alternating current
W Watts
mm Millimeter
Nm Newton meter
rpm Revolutions or Reciprocations per minute
Class II tool
V Volts
Hz Hertz
kg Kilograms
d.c. Direct current
ft-lb Foot-Pound
Specic safety rules and/or symbols

6 Kamasa Tools is a trade mark of KG Knutsson AB, SE 191 81 Sollentuna, Sweden, Phone +46 8 92 30 00 www.kamasatools.com
Major components
Accessory
Torque adjustment ring High/Low speed knob
Chuck
LED
Main switch
Battery pack
Charger
Side panel
Forward/Reverse knob
Battery knob

Kamasa Tools is a trade mark of KG Knutsson AB, SE 191 81 Sollentuna, Sweden, Phone +46 8 92 30 00 www.kamasatools.com 7
Fig 1
Fig 2
Fig 3
Operating Instructions
Installing or Removing Battery Pack
(See Fig.1 Fig.2)
1. Always switch off the machine before insertion or removal of the
battery pack.
2. To remove the battery pack, pull out the set plate on the machine
and grasp both sides of the battery pack while withdrawing it from
the machine.
3. To insert the battery pack, align the tongue in the battery pack with the
groove in the housing and slip it into place. Snap the set plate back into
place. Be sure to close the set plate fully before using the machine.
4. Do not use force when inserting the battery pack. If the battery pack
does not slide in easily, it is not being inserted correctly.
Charging The Battery Pack
(See Fig.3)
1. Plug the fast charger into the power source.
2. Slide the battery pack into the charger as the arrow direction shown
on the charger.
3. Push the battery pack into place and make sure the red light on the
charger is “ON”. The battery pack is now starting the charging cycle.
4. After nish the charging cycle, the light will turn into green.
The battery pack is now ready for use.
5. Your new battery pack is not charged. You need to charge it before use.
6. Always use the specied charger to charge the battery. When the
battery pack is inserted into the charger correctly, the red light will
come on and charging will begin.
7. When you charge a new battery pack or a battery pack which has not
been used for a long period, it may not accept a full charge. This is a
normal condition and does not indicate a problem. You can recharge
the battery pack fully after discharging it completely a couple of times.
8. Unplug the charger from the power source after nish the charge.
9. Please remove the battery from the unplugged charger for storage.
1
2

8 Kamasa Tools is a trade mark of KG Knutsson AB, SE 191 81 Sollentuna, Sweden, Phone +46 8 92 30 00 www.kamasatools.com
LED light on the charger
Power On (Green light ashes slowly)
Battery low (Red light stays illuminated)
Battery charged 80% (Green light ashes rapidly)
Battery charged 100% (Green light stays illuminated)
Battery pack temperature is too hot or too cold (Red light ashes slowly)
Battery pack malfunction (Red and Green lights stay illuminated)
WARNING!
1. Charger can only be plugged into a 100-240V a.c outlet.
2. If the battery pack is too hot or too cold, the charger will not fast charge the battery pack and the red
Indicator light is “blinking”. When the battery pack temperature returns to between 0°C and 50°C,
the charger will automatically begin charging.
3. If both red and green indicator lights are “ON” the battery pack either does not comply or is defective.
Please contact your retailer.
4. Do not charge the battery pack in rain, snow or high temperature environment.
5. Do not charge battery pack when temperature is below 10°C (50°F)or above 40°C (104°F)
6. While charging a cool battery pack (below 5°C or 41°F) in warm indoor temperatures, keep the battery
pack in the room for one hour to warm up before charging. A cool battery may charge unsaturated.
7. Remove the plug after nishing the charge.
8. Do not use generator for charging the battery pack

Kamasa Tools is a trade mark of KG Knutsson AB, SE 191 81 Sollentuna, Sweden, Phone +46 8 92 30 00 www.kamasatools.com 9
Tool operating
How to insert and remove bits
1. To insert a bit, turn the chuck clockwise.
2. To remove a bit, turn the chuck counterclockwise.
Forward/Reverse knob selection button
3. Select the forward or reverse direction of the tool by pushing
the Forward/Reverse knob.
Select the speed by pushing the High/Low speed knob
Low speed
(For screwdriver)
High speed
(For drill)
Forward/Reverse knob
Chuck

10 Kamasa Tools is a trade mark of KG Knutsson AB, SE 191 81 Sollentuna, Sweden, Phone +46 8 92 30 00 www.kamasatools.com
High/Low speed selection
Use the “High” for drilling application.
Use the “Low” form screwdriver application.
Select the applied torque
Use the 10 sections adjustment ring to select the right torque for your application.
Drill mode
Turn the torque ring to the sign for the maximum torque position if you would like to drill on wood.
Replacement of the carbon brush
Replace the carbon brush while the motor is not rotated and the carbon brush is run out.
(Replace the motor after the carbon brush has been replaced 2–3 times)
Replacement procedure is as follows:
1. Use T10 size bit to loosen the side panel screws and remove side panel by hand. (Fig.1)
2. Take out the carbon brush. (Fig.2)
3. Put the new carbon brush and side panel into the housing in proper order.
4. Refer to picture for the direction of installing the carbon brush. (Fig.3-4)
5. Lock the side panel clockwise by using T10 size bit. (Fig.5)
Fig 1
Fig 4 Fig 5
Fig 2 Fig 3

Kamasa Tools is a trade mark of KG Knutsson AB, SE 191 81 Sollentuna, Sweden, Phone +46 8 92 30 00 www.kamasatools.com 11
01 02
03
06
05
07 10 11
12
14 22
20
21
19
18
17
09
04
08
13
10
12
11
14
15
16
No Parts name Qt Spare part No
1 Chuck screw 1
2 3/8 keyless chuck 1
3Gear box ass’y 1 K 10260
4Motor ass’y 1 K 10261
5 Speed change spring 1
6High/low speed knob 1 K 10262
7Knob spring 1
8Forward/reverse knob 1
9PCB & Main switch ass’y 1
10 Housing L&R 1
11 Carbon brush 2 K 10264
No Parts name Qt Spare part No
12 Carbon brush panel 2
13 Housing xture 1
14 M 3.0 screw 9
15 Housing label (L) 1
16 Housing label (R) 1
17 Battery pack 1 K 10254
18 Battery label 1
19 Charger 1 K 10257
20 Charger upper label 1
21 Charger lower label 1
22 Power cord 1
K 10250

Kamasa Tools is a trade mark of
KG Knutsson AB,
SE 191 81 Sollentuna, Sweden,
Phone +46 8 92 30 00
www.kamasatools.com
Table of contents