KAVIR S4 150 User manual

KAVIR S4 150
OWNER MANUAL
KAVIR YEKTAZ CYCLET CO.


1
USER’S MANUAL Instructions to Users
Precautions
Please read this User’s Manual carefully before operating this
product!
Warning
* Please observe traffic laws and regulations carefully and drive safely.
* Make sure not to lend this motorcycle to be driven by a person not holding a driver’s license.
* Make sure not to hang anything on the direction handgrip, otherwise the driving safety may be affected.
* Please wear your protective articles such as helmet, dust goggles, gloves for the sake of your safety.
* Make sure not to use this model to participate in any kind of competition. Otherwise, any mechanical breakdown, injury or death arising wherefrom
shall be on your own account.
* The temperature of exhaust silencer is high when the motorcycle is running. Drivers shall be careful not to touch it to burn them.
* Don’t wear loose clothes or slippers when driving it. Otherwise, it may hook the control grip and accessories, and thus cause potential safety
hazards.
Caution
* After opening the packaging box, please check the accessories and various documents delivered with the motorcycle according to the packing
list.
* The motorcycle accommodates two persons, and the maximum payload is 150kg. The moped accommodates 1 person, and the maximum
payload is 75kg.
* It is not allowed to modify any part of the motorcycle. Otherwise, the reliability, stability and comfortableness of the motorcycle may be affected.
* Only the fuel with a grade specified on the fuel tank or above can be used. Otherwise, the dynamic performance, economy, and safety of the
motorcycle may be damaged, and the service life of the motorcycle will be shortened. If any mechanical breakdown occurs due to this, you shall be
solely responsible for it.
Suggestion
* This Manual is a necessity for the use of the motorcycle. If the motorcycle is transferred to any other person, this Manual should be transferred
together with the motorcycle.
* When it is necessary to adjust the air valve clearance of the motorcycle, please do it in a professional motorcycle maintenance shop or in a
designated after-sales service center.

2
Instructions to Users USER’S MANUAL
Motorcycle Vehicle Identification Number (VIN) and Engine Number
Motorcycle Vehicle Identification Number (VIN) , Engine Number and Quality Certificate, used for obtaining
the motorcycle driving license and motorcycle registry
Please fill in appropriate numbers for future reference:
Please fill in appropriate numbers for future reference:
Motorcycle VIN:
Engine Number:
① The motorcycle Vehicle Identification Number
(VIN) is printed on the vertical tube of the frame.
②The product nameplate is riveted on
the right lower part of the frame.
③The Engine Number is printed on the
left lower part of the crankcase.
3
USER’S MANUAL Instructions to Users
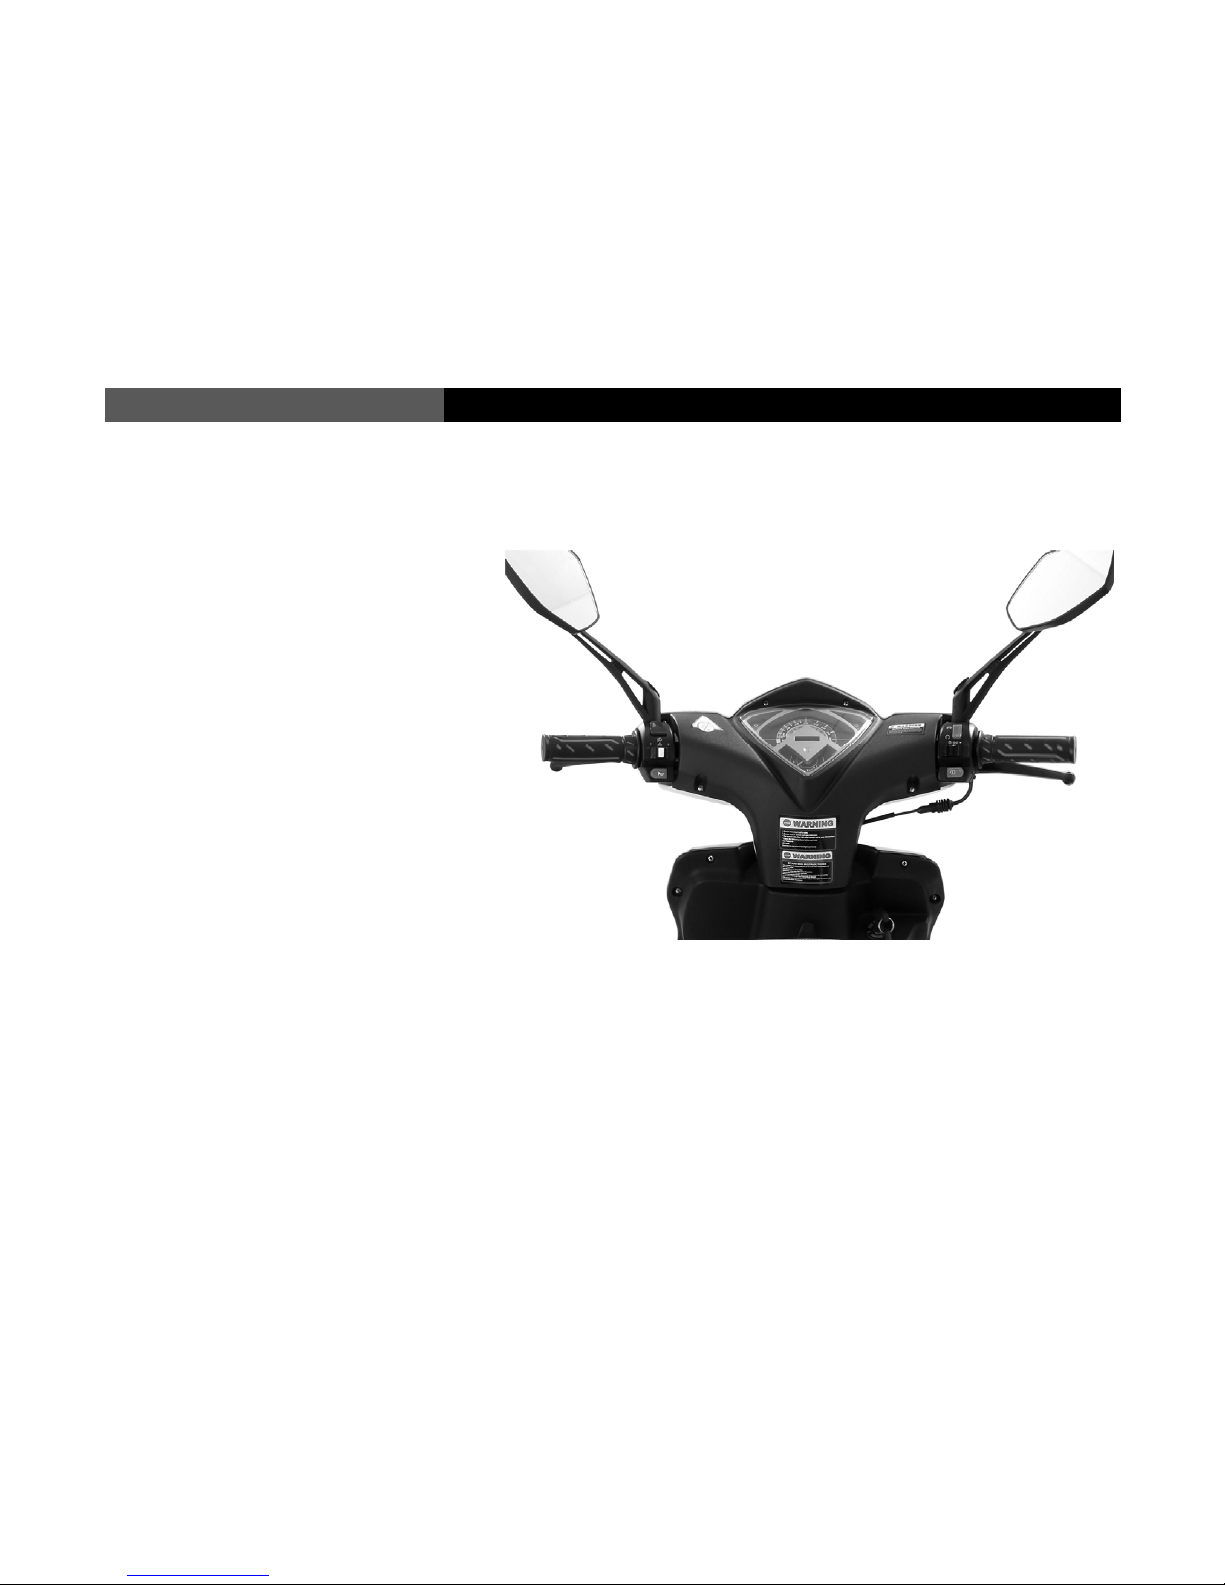
Brief Introduction to the Whole Motorcycle
①. Rearview mirror
②. Left handgrip
③. Left combination switch
④. Instrument combination
⑤. Ignition lock switch
⑥. Right combination switch
⑦. Accelerator handgrip

4
Instructions to Users USER’S MANUAL
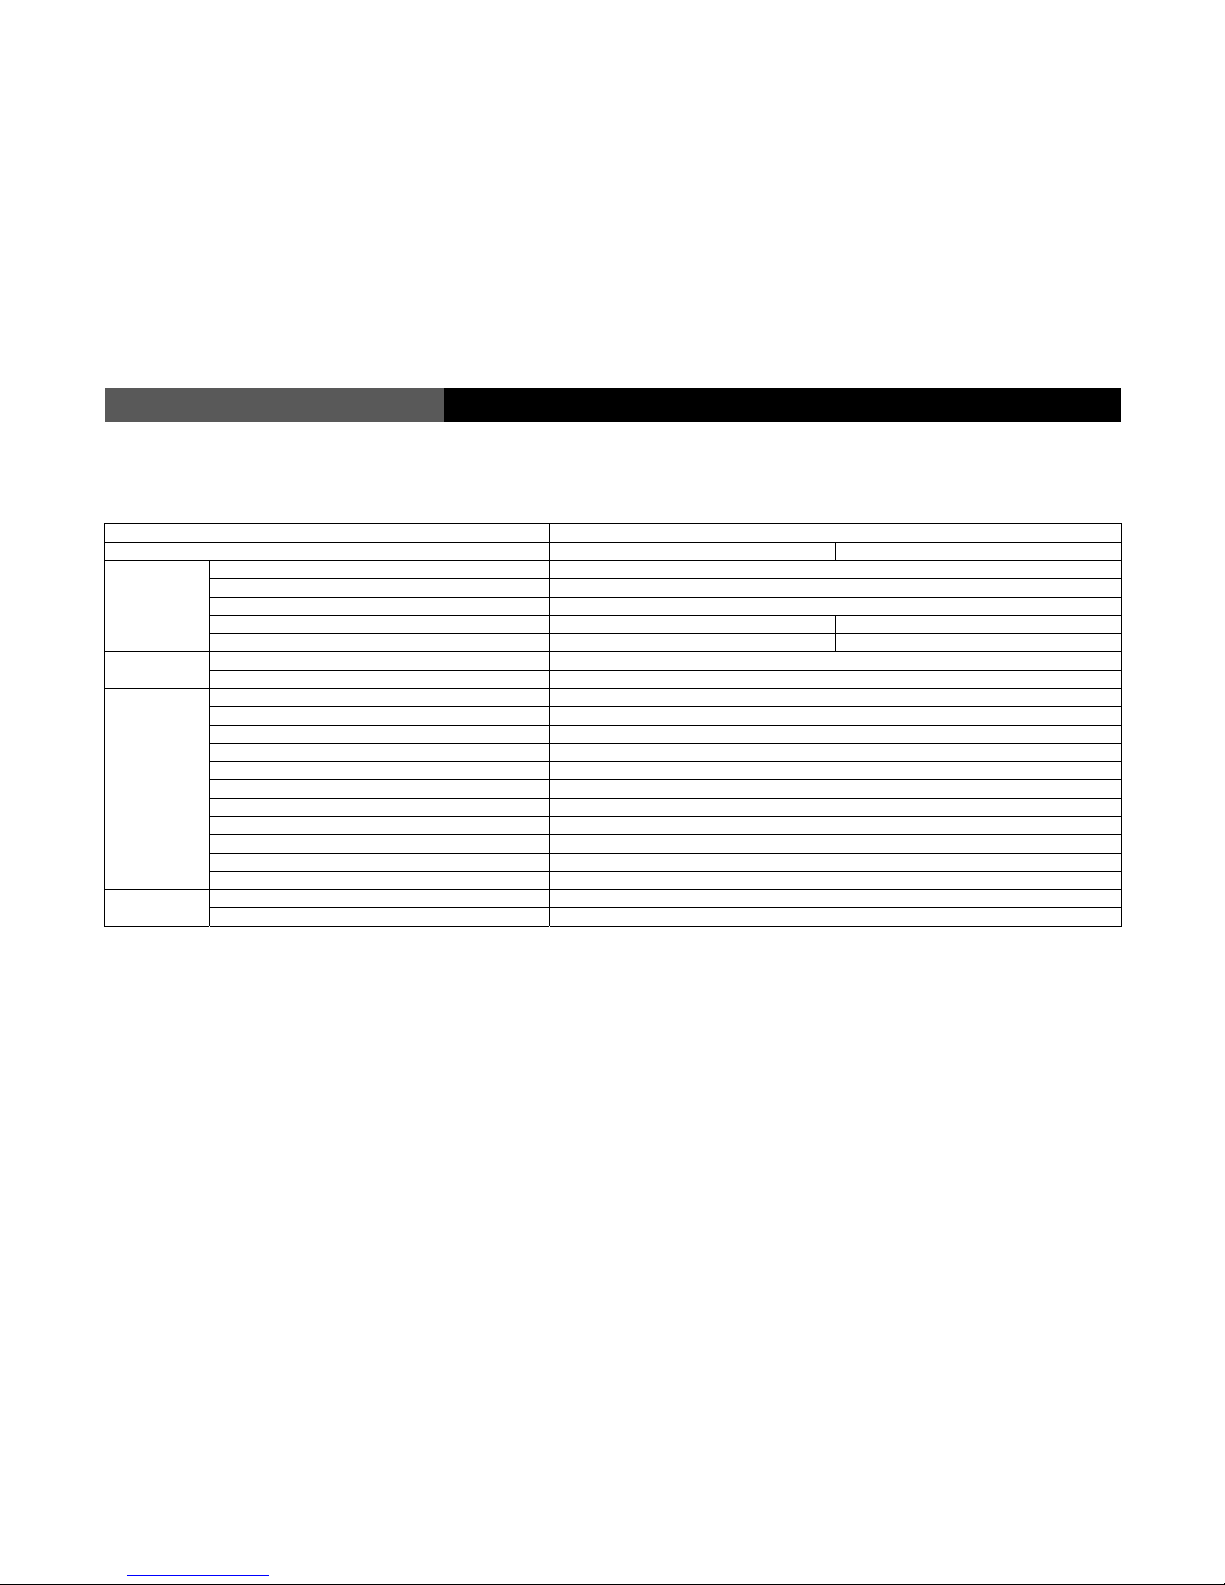
Technical Specifications and Performance Parameters
Item Specification
Displacement 50cc 125cc
Overall dimensions(L*W*H) 1825m×680mm×1145mm 1825mm×680mm×1145mm
Wheelbase 1280mm 1300mm
Minimum ground clearance 115mm 130mm
Complete vehicle shipping mass 92kg 105kg
Maximum payload 75kg 150kg
Engine model 159QMA 152QMI
Engine form Single-cylinder, four-stroke, air-cooled
Engine
Bore×Stoke 39mm×41mm 52.4mm×57.8mm
Working volume of cylinder 49.6mL 124.6mL
Compression ratio 10.2:1 9.0:1
Model of carburetter PD18J PD24J
Air filter Sponge filter element
Method of lubrication Force-feed and splash
Startup way Foot-stepped /electric start-up
Maximum power/corresponding speed 2.10kW/7500r/min 5.5kW/7000r/min
Maximum torque/corresponding speed 2.80N.m/7000r/min 8.0N.m/6000r/min
Minimum idling stabilized speed (1500±100)r/min (1600±100)r/min
Economic fuel consumption 2.0L/100km 2.8L/100km
Travelling
system
Model of shock absorber Hydraulic spring combined type
Drive mode Belt drive
Specification/air pressure of tire Front wheel 120/70-12 175kpa Rear wheel 120/70-12 225kpa
5
USER’S MANUAL Instructions to Users
Technical Specifications and Performance Parameters
Item Specification
Displacement 50cc 125cc
Drive system
Clutch type Dry-type automatic centrifugal
Transmission type Automatic
Front wheel type Aluminum alloy wheel
Continuous transmission ratio 1.5-0.6 2.66 0.866
Fixed transmission ratio 13.33 8.615
Braking
system
Front brake Disc brake
Rear brake Disc brake
Electric
system
Ignition way CDI
Model of spark plug CR7HSA
Spark plug gap 0.6mm~0.7mm
Specification of accumulator cell 12V9Ah
Fuse 15A
Head Light 12V 35W/35W
Tail light/Braking light 12V 5W/21W
Turning signal light 12V10W×4
Turn signal indication lamp 12V1.7W×2
Instrument light 12V1.7W×2
Front Position Lamp 12V5W
Fuel & oil Fuel tank 5.5L
Engine oil 800mL

6
Instructions to Users USER’S MANUAL
Instrument combination
① Left turning indicator lamp:
When the turning indicator lamp “ ” flashes, it indicates that “Turning signal
light” is open.
② Tachometer pointer:
It indicates the current engine speed of the motorcycle.
③ High beam indicator lamp:
When the high beam indicator lamp “ ” is on, it indicates that the “High
beam lamp” is on.
④ Speedometer:
It indicates the current driving speed of the motorcycle.
⑤ Odometer:
It records the accumulative travel miles of the motorcycle.
⑥ Fuel gauge:
It indicates how much fuel is left in the fuel tank of the motorcycle.
⑦ Right turning indicator lamp:
When the right turning indicator lamp“ ” flashes, it indicates that the “Right
turning signal light” is on.
⑧ Battery Meter:
It indicates the remaining capacity of the accumulator cell of the motorcycle.
⑨ Power-on indicator lamp

7
USER’S MANUAL Instructions to Users
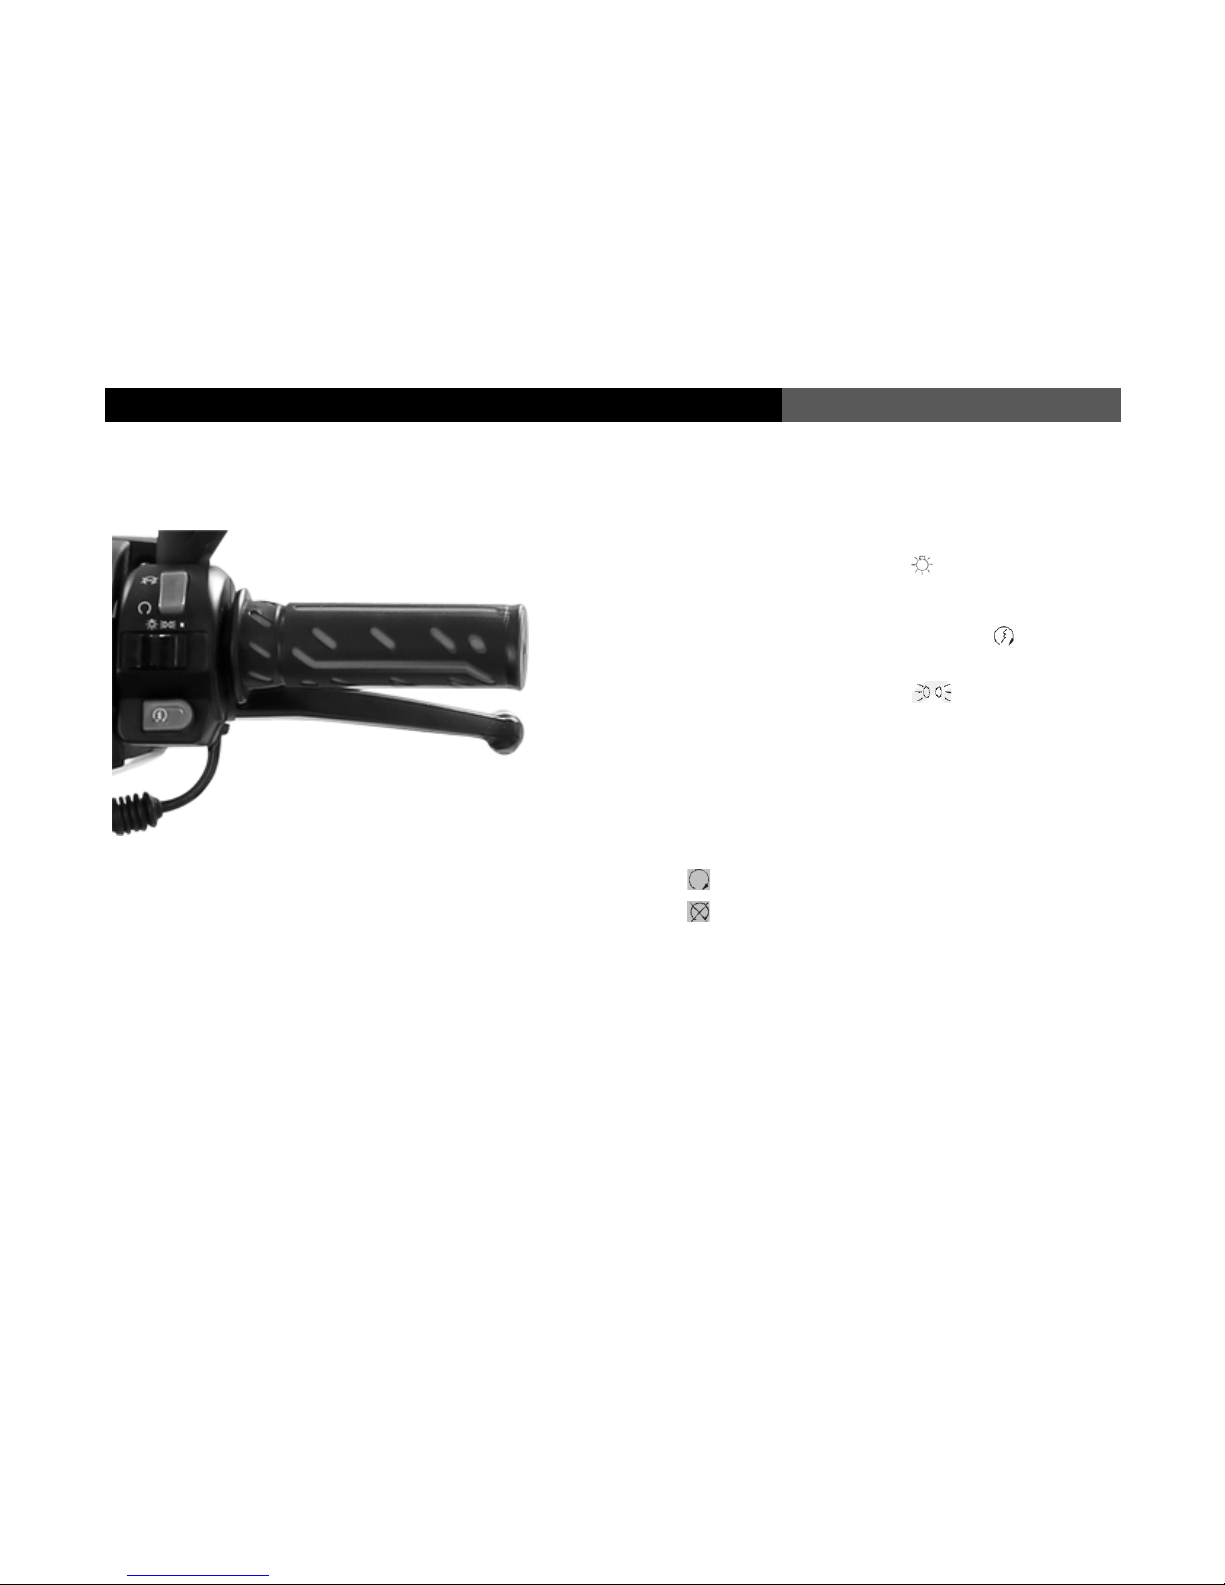
Left combination switch
① High beam lamp switch:
When the motorcycle needs to use the “High beam lamp”, turn the lighting
switch to the status “ ”.
② low beam lamp switch:
When the motorcycle needs to use the “Low beam lamp”, turn the lighting
switch to the position “ ”.
③ Horn button:
When the motorcycle needs to horn, press the button “ ”.
④ Turning signal light switch:
When the motorcycle needs to change its travelling direction, switch to “ ” or
“” to turn left r right. When the motorcycle needs to stop turning, simply switch
the turning button to the middle.
8
Instructions to Users USER’S MANUAL
Right combination switch
① Head Light switch:
Turn the “Head Light switch” to the position “ ”, the high beam and low
beam of the head light is open.
② Electric start button:
When the motorcycle needs electric start, press the button “ ”.
③ Position lamp switch:
Turn the “Head Light switch” to the position“ ”, the position lamp of
instruments, head light and tail light are open.
④ Main switch of lighting lamps:
Turn the “Head Light switch” to the position “”; the lighting system of the
motorcycle is closed.
⑤ Accelerator handgrip:
It is mainly use to control the fuel flow rate of the carburetor.
Engine is on“ ”
Engine is off“ ”
Table of contents


 Supplementary service manual")


