manuals.online logo
Brands
  1. Home
  2. •
  3. Brands
  4. •
  5. Kayo
  6. •
  7. Offroad Vehicle
  8. •
  9. Kayo eA110 User manual

Kayo eA110 User manual

KAYO USA INC
eA110 Electric ATV
Assembly Manual
WWW.RIDEKAYO.COM
1. The picture on the left shows the tools required
for unpacking & assembling the eA110.
① Ft lbs. torque wrench
② Socket extension
③ 6mm hex wrench
④ 12mm socket
⑤ 8mm wrench
⑥ 10mm-12mm wrench
⑦ 12mm-14mm wrench
⑧ 8mm T-wrench (or socket)
⑨ Needle nose pliers
2. Remove straps and cardboard cover.
3. Remove hardware box and components from
crate.
4. Picture shows contents of packaged
components。
5. Contents of hardware inside packaged box.
Hardware chart on next page.
Name Quantity
A
Dust cover 4
B
electric lock 1
C
padding 1
D
Screw M8 x 25mm 2
Bolt M10 x 40 x 1.25 3
Nut M10 x 1.25 3
Bolt M8 x 20mm 4
Nut M8 12
Washer 5.5 x 14.5 x 2 2
Washer 6 x 18 x 1.5 2
Nut M5 2
H
Key 1
I Cable tie 2
J
User’s manual 1
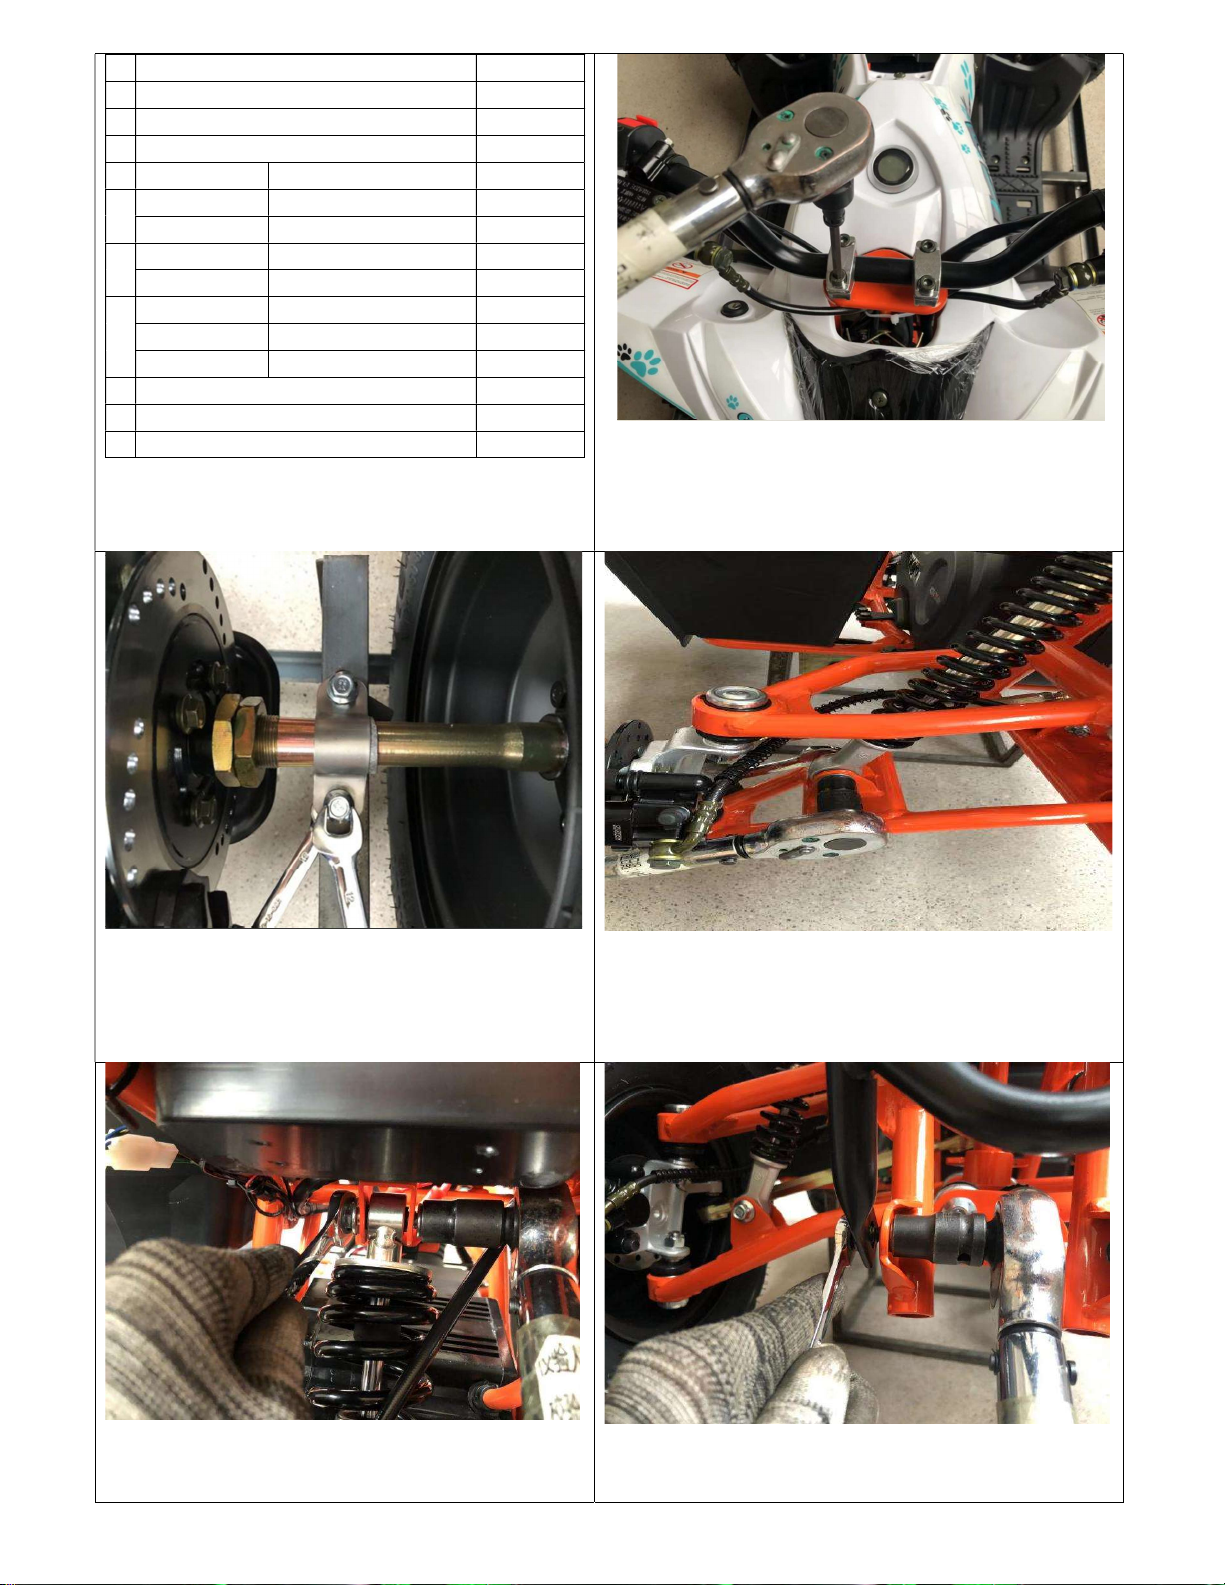
6. Install handlebars using risers with hex bolts
provided in hardware kit. Tighten by hand to get
threads started and prevent cross threading.
Tighten bolts evenly with a torque wrench
Note: Torque requirement 25-30N.m
7.Remove rear axle crate fixture with 12mm
wrench. Repeat process for other side.
8. Lift front end of ATV in center using a jack. With
front raised and secured, install lower shock mount
with supplied M10 x 40mm bolt & M10 locking nut.
Bolt head facing forward.
Note: Torque requirement 49-59N.m
9. Install rear shock upper mount using supplied
M10 x 40mm bolt & lock nut.
Note: Torque requirement 49-59N.m
10. Install front bumper with supplied M8 x 20mm
bolts(4 qty, 2 qty M8 lock nuts for bottom mounts)
Note: Torque requirement 25-30N.m
11. Install the rear light using 8mm wrench.
Hand tighten, do not exceed 4ft-lbs.
12. Install front wheels with valve stem facing
outwards using M8 locking nuts. Start threading
nuts by hand minimum 2 full rotations. After use
torque wrench to tighten to spec.
Note: Torque requirement 25-30N.m
13. Install dust cover as shown in picture.
Press-in until cover seat in hub grove evenly.
14. Connect the power plug to the controller plug.
This goes in one position with corresponding red
(+) & black (-) terminals.
15. Install handlebar pad as seen in picture
above.
Please note: Graphics may differ.
16. Use PDI check list and thoroughly inspect all
hardware.

Other Kayo Offroad Vehicle manuals

Kayo eA70 User manual

Kayo

Kayo eA70 User manual

Kayo Bull AU Series User manual

Kayo

Kayo Bull AU Series User manual

Popular Offroad Vehicle manuals by other brands

Polaris Sportsman 570 EFI owner's manual

Polaris

Polaris Sportsman 570 EFI owner's manual

Polaris RANGER XP 1000 EPS 2018 owner's manual

Polaris

Polaris RANGER XP 1000 EPS 2018 owner's manual

Yamaha Tri Moto 125 Service manual

Yamaha

Yamaha Tri Moto 125 Service manual

APRILIA QUASAR 100 manual

APRILIA

APRILIA QUASAR 100 manual

Yamaha YFM350X Warrior owner's manual

Yamaha

Yamaha YFM350X Warrior owner's manual

Polaris RZR 900 owner's manual

Polaris

Polaris RZR 900 owner's manual

Baja motorsports ATV 90 Setup instructions

Baja motorsports

Baja motorsports ATV 90 Setup instructions

Suzuki LT-A700X owner's manual

Suzuki

Suzuki LT-A700X owner's manual

Ski-Doo SCANDIC WT Operator's guide

Ski-Doo

Ski-Doo SCANDIC WT Operator's guide

Polaris Sportsman 550 XP EPS owner's manual

Polaris

Polaris Sportsman 550 XP EPS owner's manual

Arctic Cat 120 sno pro Operator's manual

Arctic Cat

Arctic Cat 120 sno pro Operator's manual

Yamaha RS90PB owner's manual

Yamaha

Yamaha RS90PB owner's manual

Arctic Cat ALTERRA 450 Service manual

Arctic Cat

Arctic Cat ALTERRA 450 Service manual

Dinli DL702 Service manual

Dinli

Dinli DL702 Service manual

Polaris RZR XP 1000 Service manual

Polaris

Polaris RZR XP 1000 Service manual

Polaris Sportsman 9922233 owner's manual

Polaris

Polaris Sportsman 9922233 owner's manual

Yamaha SXV70ML owner's manual

Yamaha

Yamaha SXV70ML owner's manual

Ski-Doo SKANDIC Operator's guide

Ski-Doo

Ski-Doo SKANDIC Operator's guide

manuals.online logo
manuals.online logoBrands
  • About & Mission
  • Contact us
  • Privacy Policy
  • Terms and Conditions

Copyright 2025 Manuals.Online. All Rights Reserved.