Kedacom DSJ-U1-LPN User manual

KEDACOM
Body Worn Camera DSJ-U1-LPN
User Manual
V3
July, 2018

1
Contents
1Instruction............................................................................................................1
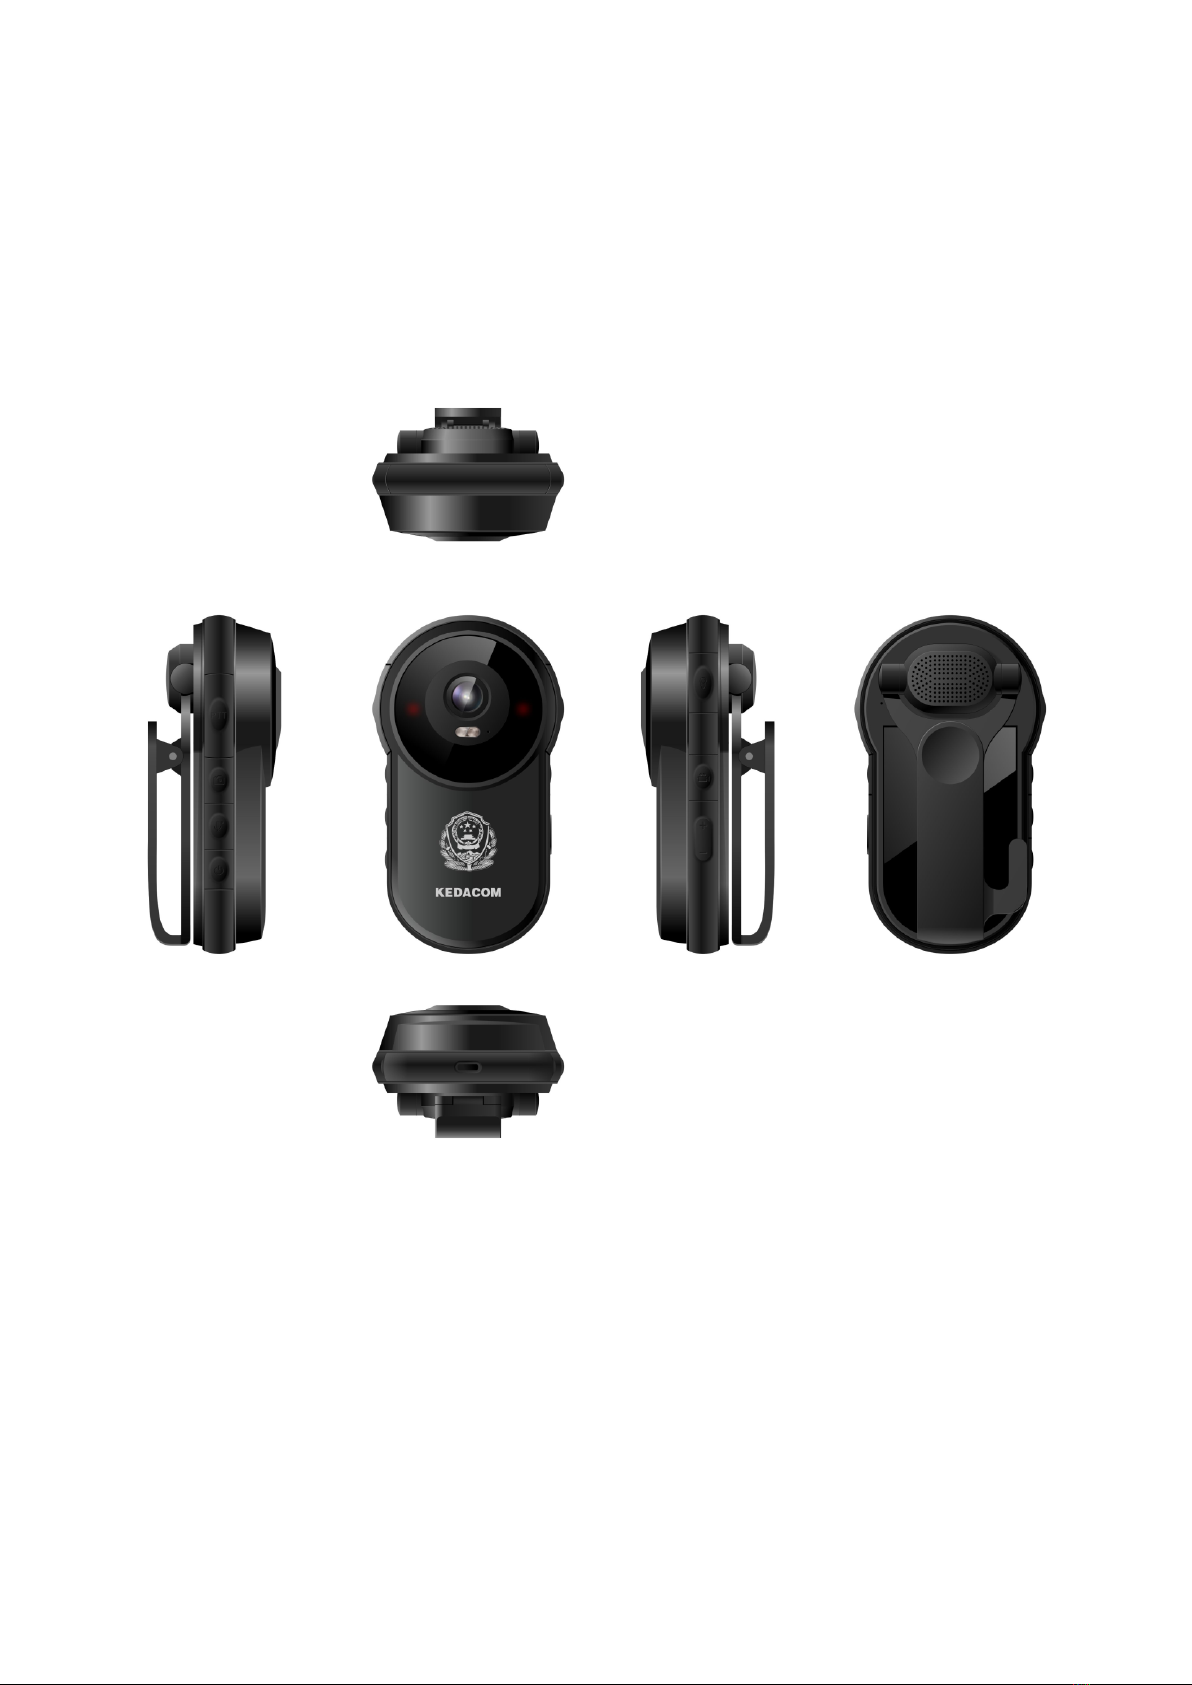
1.1 Appearance........................................................................................................1
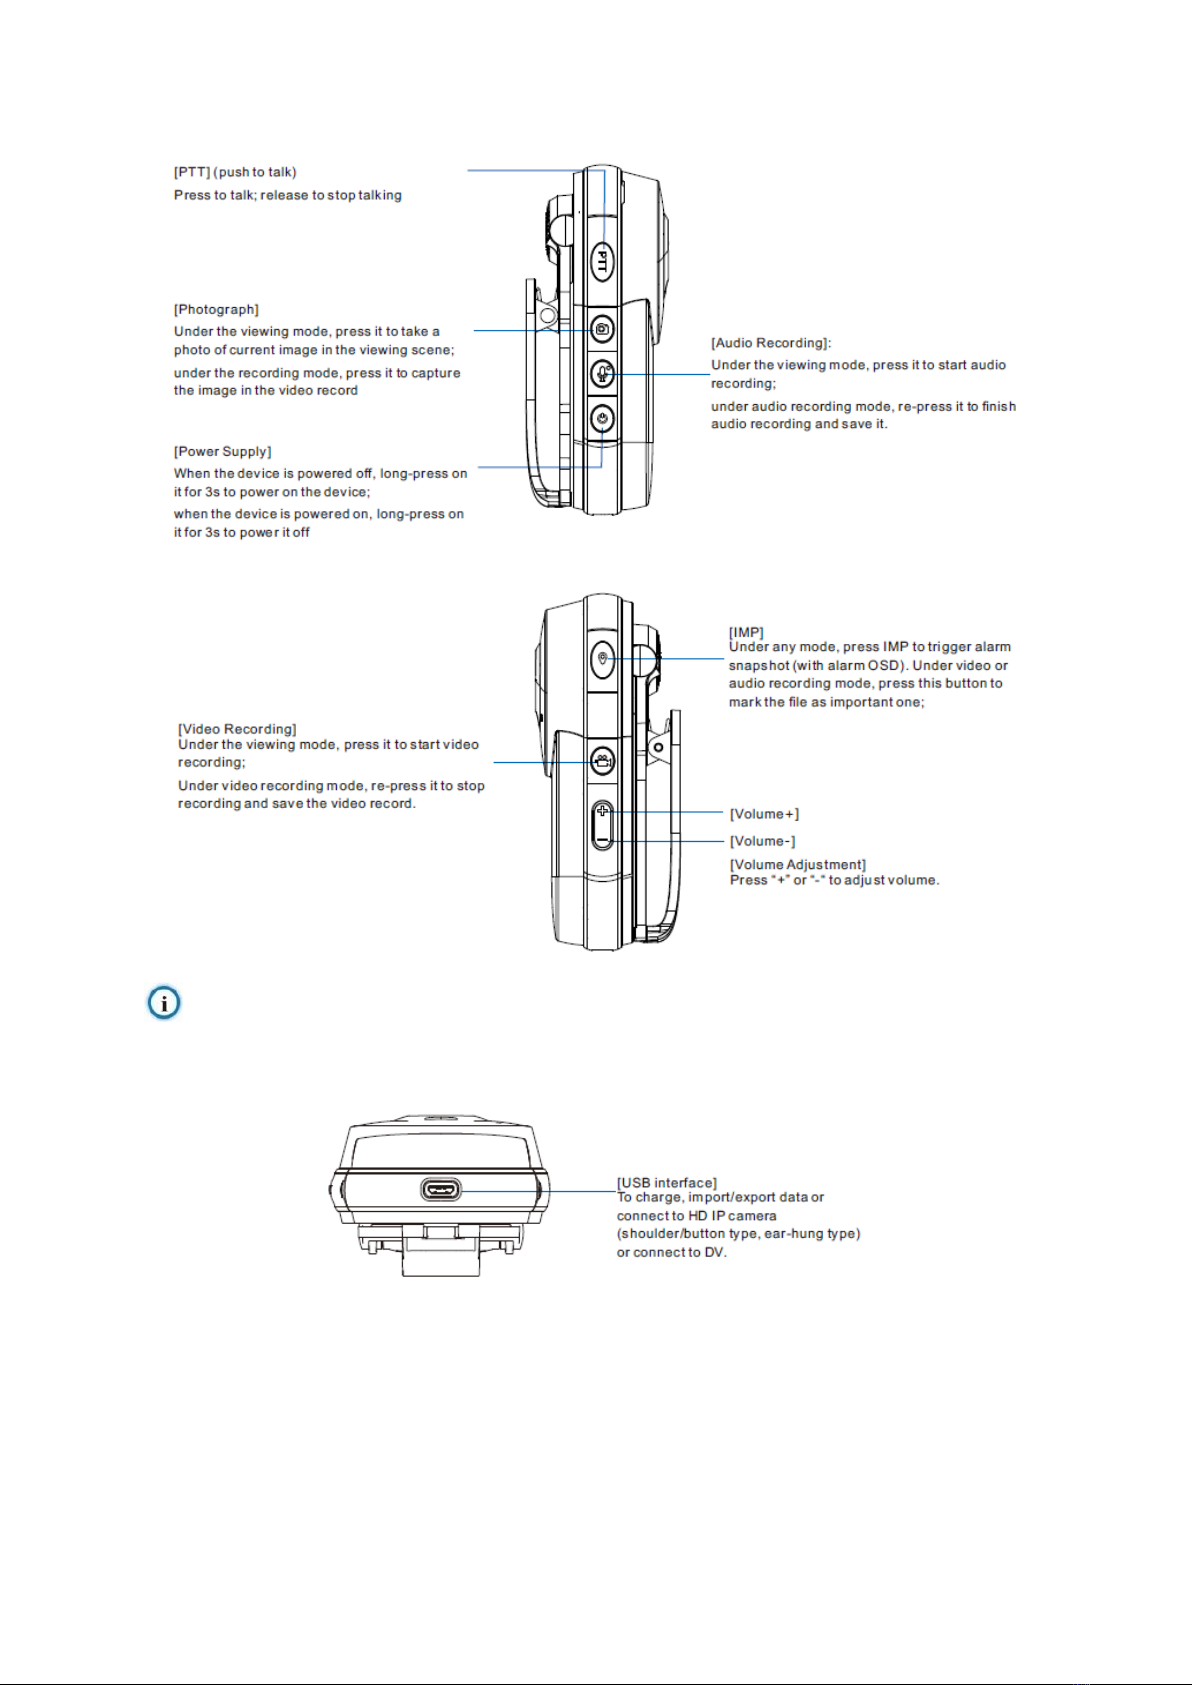
1.2 Function Buttons ................................................................................................2
2Safety Instructions..............................................................................................4
3Startup..................................................................................................................5
3.1 Start Device........................................................................................................5
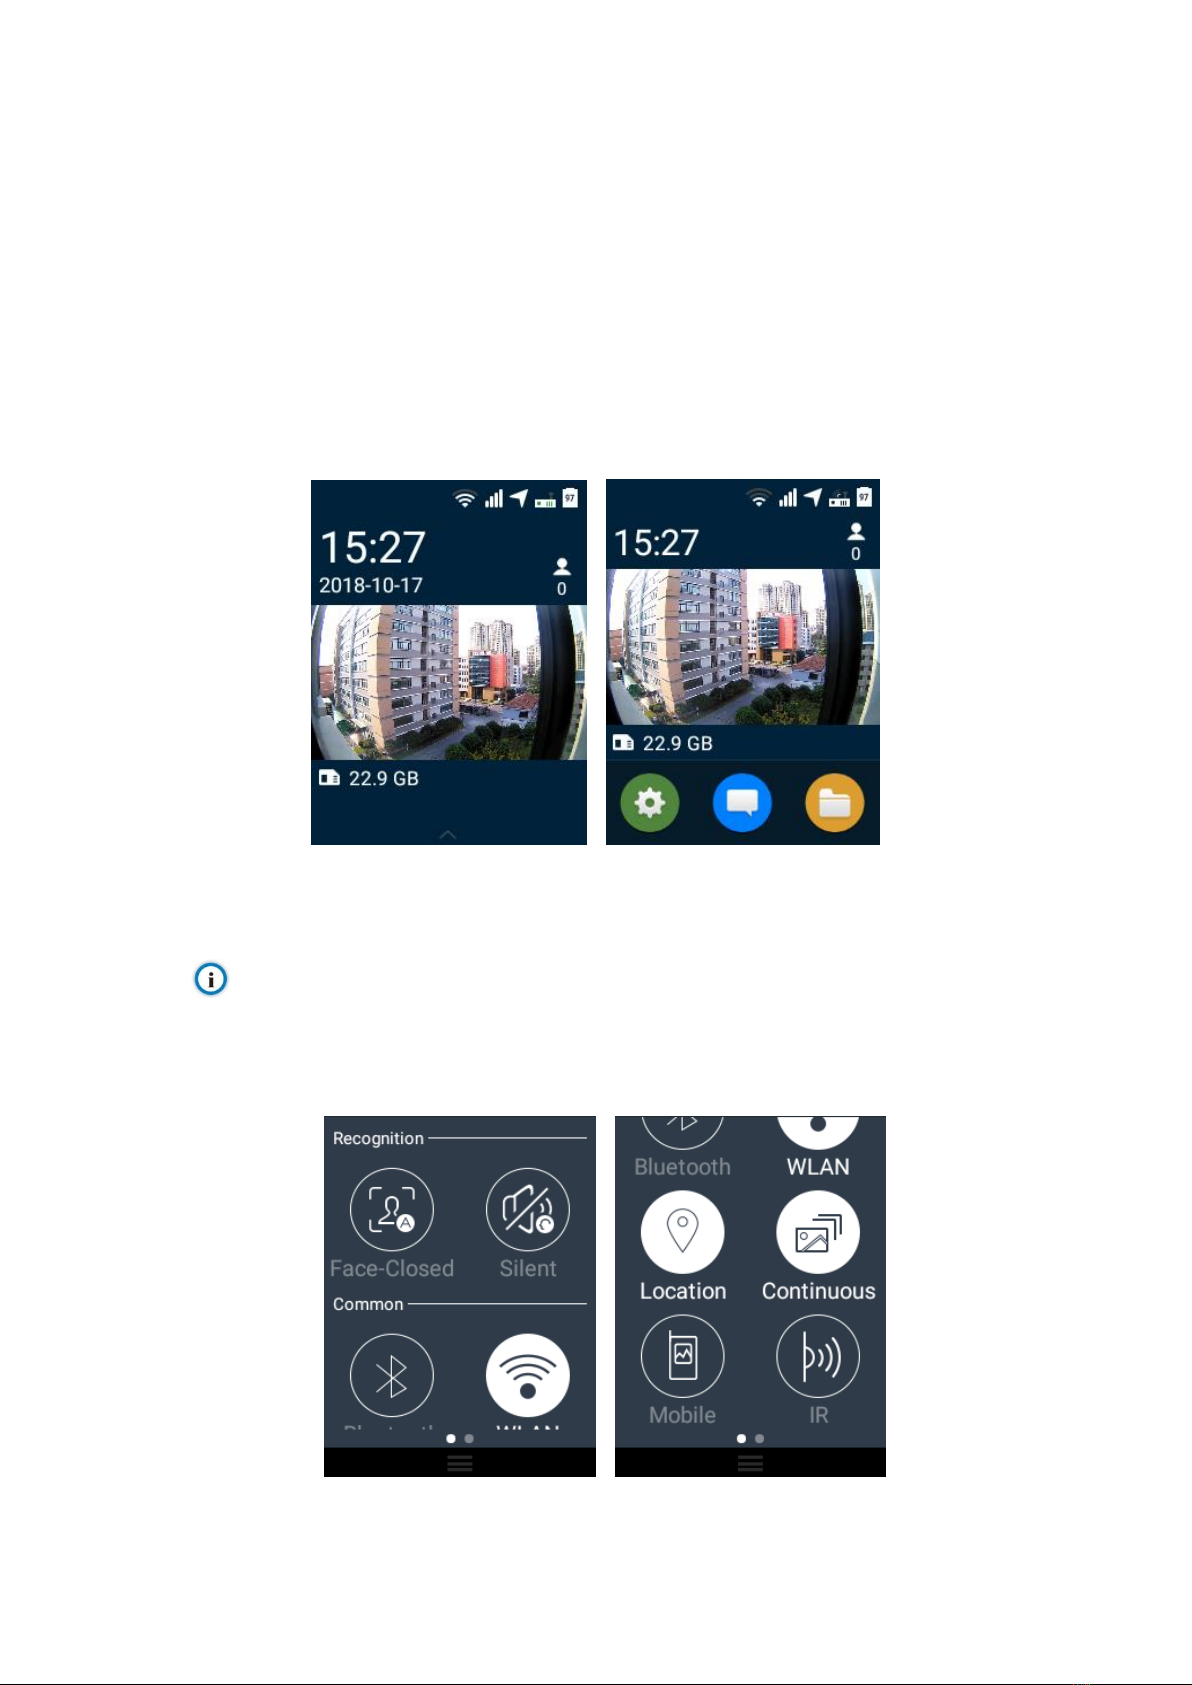
3.2 Viewing Interface................................................................................................5
4Basic Functions...................................................................................................7
4.1 Video Recording.................................................................................................7
4.2 Audio Recording.................................................................................................9
4.3 Photograph.......................................................................................................10
4.3.1 Continuous Shooting.....................................................................................10
4.3.2 Snapshot.......................................................................................................11
4.4 Text-Overlay Info..............................................................................................11
5Settings ..............................................................................................................12
5.1 Scan QR Code.................................................................................................12
5.2 QR Code ..........................................................................................................12
5.3 Case Linkage ...................................................................................................12
5.4 Mobile...............................................................................................................13
5.5 Advanced .........................................................................................................16
5.5.1 Video parameters..........................................................................................16
5.5.2 Protocol Access.............................................................................................17
5.5.2.1 GB................................................................................................................................17
5.5.2.2 VIID..............................................................................................................................22
5.5.2.3 ONVIF..........................................................................................................................24
5.5.3 Other .............................................................................................................24
5.5.4 Audio Compression.......................................................................................25
5.5.5 Audio Mixing..................................................................................................25
5.5.6 Timezone.......................................................................................................25
5.5.7 Video Format.................................................................................................26
5.5.8 Audio Format.................................................................................................26
5.5.9 Picture Resolution.........................................................................................26
5.5.10 Number of Continuous Shootings...............................................................27
5.5.11 Notice Tone..................................................................................................27
5.5.12 Screen Brightness.......................................................................................27
5.5.13 Auto Lock ....................................................................................................28
5.5.14 Lock Screen ................................................................................................28

1
5.5.15 Record Duration..........................................................................................29
5.5.16 IR Settings...................................................................................................29
5.5.17 Pre-Recording Settings...............................................................................29
5.5.18 Limited Functionality ...................................................................................29
5.6 Location............................................................................................................30
5.7 WiFi..................................................................................................................31
5.8 Bluetooth..........................................................................................................32
5.9 Intelligent Recognition......................................................................................33
5.10 Wireless Transmission...................................................................................33
5.11 VLine Settings ................................................................................................35
5.12 VLine Storage Space......................................................................................36
5.13 Wake Up with Any Key...................................................................................36
5.14 About..............................................................................................................37
6VLine Functions ................................................................................................38
6.1 Chats................................................................................................................38
6.1.1 Create Chat Group........................................................................................38
6.1.2 Group Chat....................................................................................................39
6.2 Contacts ...........................................................................................................40
6.2.1 Groups...........................................................................................................40
6.2.2 Private Call....................................................................................................41
7File Management...............................................................................................43
7.1 Faces................................................................................................................43
7.2 Pictures ............................................................................................................44
7.3 Video ................................................................................................................44
7.4 Audio................................................................................................................45
8Specification......................................................................................................46

Body Worn Camera DSJ-U1-LPN User Manual
1
1 Instruction
Based on Qualcomm platform and meeting GA/T947-2015 standard of the public security industry,
DSJ-U1-LPN is a body worn camera for the policemen to record live video, take photos and record
audio as evidences during law enforcement.
1.1 Appearance
Dimensions of the device are 111.3mm (L) * 62.1mm (W) * 30.3mm (H), and it has irreplaceable
built-in EMMC storage card.
Picture 1-1 Appearance

Body Worn Camera DSJ-U1-LPN User Manual
2
1.2 Function Buttons
Picture 1-2 Back panel
Note: When the light is dim and short-distance shooting is necessary, long-press on [IMP] button
for 3s to enable the LED lamp.
Picture 1-3 Front panel

Body Worn Camera DSJ-U1-LPN User Manual
3
Picture 1-4 Side buttons 1
Picture 1-5 Side buttons 2
Note: Under the video recording mode, press audio recording button and after the notice tone
sounds, the video record will be saved and the audio recording starts; the indicator turns from red to
yellow. Under the audio recording mode, press video recording button and after the notice tone sounds,
the audio record will be saved and the video recording starts; the indicator turns from yellow to red.
Picture 1-6 USB interface

Body Worn Camera DSJ-U1-LPN User Manual
4
2 Safety Instructions
DSJ-U1-LPN is a custom precise electronic device. To prevent damage on device caused by improper
operation during using, please follow the instructions below:
Use only the attached battery or battery and adaptor authenticated by this company. Never
electrify the device with power adaptor over the rated voltage; otherwise, the device may
be damaged.
Note: This device is equipped with replaceable battery and the design of the battery compartment
is intrinsically safe. If installing a wrong model battery or the polarity is inversed, it may cause
explosion or fire.
Do not use the device under temperature out of the specified range (-30degree ~ 60
degree) or the battery may be damaged.
Never make the battery short circuit, decomposed or throw it into fire.
Do not shield the heat dissipation part of the device.
If any liquid enters the device by accident, take out the battery immediately.
If the device is not used for a long time, take out the battery.
Battery replacement should be done within 30 minutes to avoid system time abnormality.
Charging Operation
You can charge the device in either of the following methods:
USB wire connecting to PC;
Attached power adaptor.
For repairing, please contact professional technicians or this company. Never
disassemble the device or transform it by yourself.
Disclaimer
KEDACOM body worn camera DSJ-U1-LPN reaches the industrial protection level IP67. If
you want to open the battery cover, please keep the device dry and away from water or other
liquids; when recovering the battery cover, make sure all sides are tightly locked; otherwise,
its waterproofness may be affected.

Body Worn Camera DSJ-U1-LPN User Manual
5
3 Startup
3.1 Start Device
Start device: Long-press on the power button for 3s and it takes about 24s to enter the
system.
3.2 Viewing Interface
After starting the body worn camera, it is the viewing interface, from which user can see live
images through the camera.
Picture 3-1 Viewing interface
Status bar: icons of time, location info status, VMS registration status or viewing interface of
device through VMS, WiFi status, SIM card and battery status.
Note: If removing the battery for more than 10 hours and installing it again, the system will
restore to the default time: 8:00 a.m., Jan. 1st, 2016.
Quick setting: under the viewing mode, slide down from the top of the screen with a finger
and the quick setting interface will show. Enable or disable the functions displayed.
Picture 3-2 Quick Setting

Body Worn Camera DSJ-U1-LPN User Manual
6
Information bar: show the date and available storage of the device. When recording video or
audio, show the icons of recording duration and recording status.
Viewing frame: image displaying in the pattern of 16:9.
Setting: go to the setting interface and configure device parameters and information display.
File management: browse or search videos, audios or pictures.
VLine: fixed group talking, temporary group talking, private call, contacts list management.
Picture 3-3 Interface

Body Worn Camera DSJ-U1-LPN User Manual
7
4 Basic Functions
4.1 Video Recording
Under the viewing mode, press [Video Recording] button on the device and it will start recording after
the notice tone sounds. There will be a flashing icon on the screen which means the device is
recording a video. Behind the icon is the recording duration and the working indicator is constantly red.
Under the video recording mode, press [IMP] button on the device and after the notice tone sounds,
letters of “IMP” will show behind the recording duration and meanwhile it will capture a picture, which
means current recording is marked as important video. On the interface of video file searching, user
can check the “IMP” checkbox to search and playback important videos, or search and filter important
files through the management software.
Short-press on “IMP” button anytime to trigger an alarm and meanwhile capture a picture (with alarm
text) and save it in the body worn camera. If the body worn camera is registered to the VMS, the alarm
text will also be sent to the VMS.
Picture 4-1 Video recording
Under video recording mode, re-press [Video Recording] button on the device and after hearing the
notice tone, the video is completed and saved. Meanwhile, the device stops recording and the red
indicator turns green.
The max duration of a video can be configured in Settings > Advanced > Record Duration. When
the recording time exceeds the configured duration, it will be divided into multiple records. The body
worn camera applies automatic segmentation to record time and the max interval between 2 adjacent
records is no more than 0.1s.
Tap Settings > Advanced > Notice Tone > Recording > Flash Blink to enable flash blink during
video recording, and the LED lamp will flash every 3 seconds during video recording.

Body Worn Camera DSJ-U1-LPN User Manual
8
Note: Under video or audio recording mode, short-press [IMP] button and an alarm picture (with
alarm text) will be captured at mean time, and all the video or audio files starting from the moment
of pressing the button till the end of recording are marked as important files.
Note: The body worn camera can register to the VMS. Login to the CU client of VMS to view the
viewing interface of the body worn camera, start or stop video recording and etc. The following is
an example of CU client of VMS version 2.0.
Picture 4-2 Viewing interface of body worn camera through CU of VMS 2.0

Body Worn Camera DSJ-U1-LPN User Manual
9
Picture 4-3 Start video recording of body worn camera through CU of VMS 2.0
4.2 Audio Recording
Under the viewing mode, press [Audio Recording] button on the device and it will start audio recording
after the notice tone sounds. There will be a flashing icon on the screen which means the device is
recording audio voice. Behind the icon is the recording duration and the working indicator is
constantly yellow.
Under the audio recording mode, press [IMP] button on the device, letters of “IMP” will show behind
the recording duration and meanwhile it will capture a picture, which means current recording is
marked as important audio. On the interface of audio file searching, user can check the “IMP”
checkbox to search and playback important audio files, or search and filter important files through the
management software.

Body Worn Camera DSJ-U1-LPN User Manual
10
Picture 4-4 Audio recording
Under audio recording mode, re-press [Audio Recording] button on the device and after hearing
notice tone, the audio file is completed and saved. Meanwhile, the device stops recording and the
yellow indicator turns green.
The max duration of an audio file can be configured in Settings >Advanced > Record Duration. When
the recording time exceeds the configured duration, it will be divided into multiple records. The body
worn camera applies automatic segmentation to record time and the max interval between 2 adjacent
records is no more than 0.1s.
Note:
1) Under video or audio recording mode, short-press [IMP] button and an alarm picture (with
alarm text) will be captured at mean time, and all the video or audio files starting from the
moment of pressing the button till the end of recording are marked as important files.
2) Short-press [PTT] button to capture current viewing image and mark it as important file. When
viewing this snapshot, you will find that its resolution is the same as the video file.
4.3 Photograph
Under the viewing mode, press [Photograph] button on the device to take a photo of the viewing image
and generate a .jpeg image.
Go to Settings > Advanced to set the resolution.
4.3.1 Continuous Shooting
Under the viewing mode, go to Quick Setting interface and tap the icon of “Continuous Shooting”.
Then press the [Photograph] button on the device and the device will shoot pictures in the viewing
scene continuously and save them.
Go to Settings > Advanced and set resolution and shoot count.

Body Worn Camera DSJ-U1-LPN User Manual
11
4.3.2 Snapshot
Under the video recording mode, press the [Photograph] button on the device to capture current image
in the recording. The resolution of the snapshot is the same as that of the video. If continuous shooting
is enabled, it will capture images continuously.
4.4 Text-Overlay Info
Images in the videos, photos and snapshots are all overlaid with text automatically.
Information on photos include time, serial No., user info, unit info, video source, longitude and latitude.
Information on videos and snapshots include time, serial No., user info (user ID + username), unit info
(unit ID + unit name), video source, 3G Beacon, rec tag, longitude and latitude. Among them the 3G
Beacon include 1-5 columns of signal status and the rec tag is a circle with “rec” in it.
Text content: time, serial No. and user ID.
Video source: max 64 characters can be entered.
Time format: YYYY-MM-DD HH:MM:SS, at the top right corner of the image.
Device ID: group of 7 digits or letters, at the bottom left corner of image.
User info: user ID (max 18 digits or letters) + space key + username (max 32 digits or letters), at
the bottom right corner of image.
Unit info: unit ID (max 12 digits or letters) + space key + unit name (max 32 digits or letters), at
the bottom right corner of image.
Longitude and latitude: the location info of the device.

Body Worn Camera DSJ-U1-LPN User Manual
12
5 Settings
Go to Settings to perform simple configurations to the device.
Tap the Settings icon on the main interface and enter the interface.
5.1 Scan QR Code
Tap “Scan QR Code” and scan the QR code generated in iMMS and save the parameters into the body
worn camera. Steps to generate the QR code can be referred to in the User Manual of iMMS.
Picture 5-1 Scan QR code
Note: Please disconnect the USB port before scan QR code.
5.2 QR Code
Import BWC QR code by consulting the customer service personnel and click “QR Code” to show
device QR code. You can use other devices to scan the QR code of BWC and obtain the setting
parameters of it directly.
Picture 5-2 QR code
5.3 Case Linkage
Go to Case Linkage interface to enable “Start Recording” or “Stop Recording” and tap “OK”.

Body Worn Camera DSJ-U1-LPN User Manual
13
Picture 5-3 Case linkage
5.4 Mobile
When the body worn camera is of mobile version and the SIM card works normally, user can enable /
disable mobile data; configure APN, VPN and traffic threshold; and view SIM card status.
Mobile data: enable or disable Mobile data.
Picture 5-4 Mobile data
APN: Tap to enterAPN setting interface. When user needs to access to the network with
specific APN, perform the following settings:
Enable “Mobile data”, tap “APN” to enter the default interface of APN setting.
Tap to add specific APN, select authentication type, enterAPN access point name,
APN, proxy, port and username, and tap “Save”, as shown below.

Body Worn Camera DSJ-U1-LPN User Manual
14
Picture 5-5 APN setting
VPN setting: If user needs to access to the server of company intranet remotely, perform the
following steps to configure VPN:
Enable “Mobile data”, tap “VPN” to enter the interface of VPN setting. Tap icon to
enter the interface of “Edit VPN profile”.
Tap icon to show complete interface. Enter VPN name, select type, enter server
address, and tap “Save”.
Picture 5-6 VPN setting
The VPN interface shows the list of saved VPN. Tap the needed VPN and a window of
“Connect to xVPN” pops up. Enter “Username” and “Password”, and tap “CONNECT”.
Long-pressing the configuration file to edit or delete it, as shown below.

Body Worn Camera DSJ-U1-LPN User Manual
15
Picture 5-7 Connect to VPN
On VPN interface, there is “Connecting” displaying under the configuration file. If
connecting succecessfully, it will show “Connected”, which means this network can be
used normally.
Note: Tap the icon behind the needed VPN and the interface of “Edit VPN profile” pops
up. Tap “Save” to save edition and tap “Cancel” to delete the VPN.
Picture 5-8 Edit VPN profile
Traffic threshold: tap and enable Traffic Monitor. Set Monthly Upper Limit and Monthly
Warning. Afterwards, tap “OK”.

Body Worn Camera DSJ-U1-LPN User Manual
16
Picture 5-9 Traffic threshold
SIM status: tap to view SIM card status.
Picture 5-10 SIM card status
5.5 Advanced
5.5.1 Video parameters
Main Stream/Secondary Stream: set main/secondary stream Resolution, Video Compression,
Bitrate, Frame Rate and Max Key Frame Interval. Default values are recommended. If the
network is too poor and the video blocks, adjust the main/secondary stream parameters such as
reducing resolution, bitrate or frame rate.
Picture 5-11 Main/Secondary Stream

Body Worn Camera DSJ-U1-LPN User Manual
17
5.5.2 Protocol Access
5.5.2.1 GB
Tap Settings > Advanced > Protocol Access > GB to configure the GB protocol parameters. The
body worn camera can access to VMS 2.0 through GB protocol. Tap “Enable” and configure the
parameters and tap “OK”. After the BWC is added to the VMS, you can view the viewing interface
of the BWC at CU and perform other operations. Steps to add a BWC to the VMS through GB
protocol are as follows:
1.Add DSJ-U1-LPN to VMS on PMC.
1) Choose Manage Device > Add/Delete Model.
Picture 5-12 VMS PMC > Device
2) In the displayed Add/Delete Model dialog box, tap Add.
Picture 5-13 Add device
3) In the Add model dialog box, configure parameters displayed.
Table of contents
Other Kedacom Digital Camera manuals