Kenwood C-BX3-B User manual

GVT0349-001A [E]
© 2012 JVC KENWOOD Corporation
COMPACT HI-FI COMPONENT SYSTEM
C-BX3
INSTRUCTION MANUAL
Glass inside
EN_C-BX3[E]f.indd 1EN_C-BX3[E]f.indd 1 7/13/12 11:24:37 AM7/13/12 11:24:37 AM

2C-BX3
Warnings, Cautions and Others
¤CAUTION
The button in any position does not disconnect the mains line.
Disconnect the mains plug to shut the power off completely (the
STANDBY lamp goes off). The MAINS plug or an appliance coupler
is used as the disconnect device, the disconnect device shall remain
readily operable.
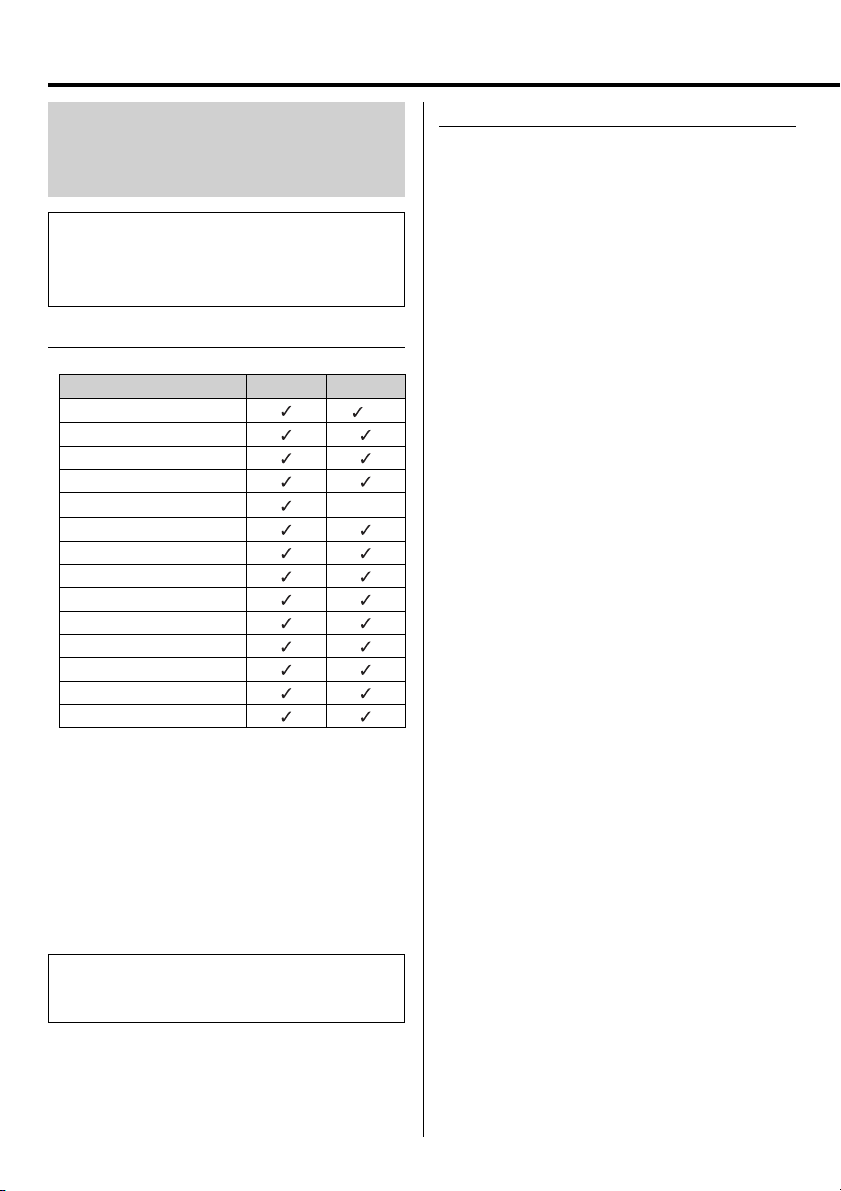
When the System is on standby, the STANDBY lamp lights red.•
When the System is turned on, the STANDBY lamp goes off.•
The power can be remote controlled.
¤ CAUTION
Battery shall not be exposed to excessive heat such as sunshine, fire
or the like.
¤ CAUTION
To reduce the risk of electrical shocks, fire, etc.:
Do not remove screws, covers or cabinet.1.
Do not expose this appliance to rain or moisture.2.
¤ CAUTION
Do not block the ventilation openings or holes. (If the ventilation•
openings or holes are blocked by a newspaper or cloth, etc., the
heat may not be able to get out.)
Do not place any naked flame sources, such as lighted candles, on•
the apparatus.
When discarding batteries, environmental problems must be•
considered and local rules or laws governing the disposal of these
batteries must be followed strictly.
Do not expose this apparatus to rain, moisture, dripping or•
splashing and that no objects filled with liquids, such as vases, shall
be placed on the apparatus.
Do not apply strong force or hit a hard material on the top glass;•
otherwise, the top glass may be broken and injury may result.
Do not drag or push the main unit/stand base on the floor or table.•
Otherwise the foot spacers at the bottom of the main unit/stand
base may peeled off or drop.
¤ CAUTION
Do not place a device weighing more than 20 kg on the apparatus.•
Doing so may result in the device to falling down or the apparatus
to toppling over, and injury may result.
Do not place a TV on the edge of the apparatus; otherwise, the•
apparatus may topple over or break, and injury may result.
Do not apply strong force or hit a hard material on the top glass.•
The top glass is made of tempered glass. However, incorrect usage
may result in the glass being broken and injury may result. Do not
scratch the glass with a sharp material. If a scratch remains on the
tempered glass for a long period, the glass may eventually break
by itself. If the glass is scratched, contact your dealer.
Assemble the apparatus with two or more persons. Otherwise,•
backache or injury may result since the apparatus is heavy. Be
careful not to catch your fingers between the parts. Be sure to
tighten the screws securely on each part to maintain the strength;
otherwise, the apparatus may topple over, and injury may result.
Be careful about following when moving the apparatus.•
Remove any items on the top of the apparatus before moving it.–
Do not hold the top glass when you move the apparatus, or–
injury may result.
Before moving the apparatus, turn the power off and remove–
the connection cords of any connected devices; otherwise, an
accident may result.
Do not climb on to or sit on the apparatus; otherwise, the•
apparatus may toppled over, and injury may result. Be especially
careful where children are concerned. Do not place a device
weighing more than 20 kg on the apparatus.
Take measures to prevent the apparatus from falling down or•
toppling over. The apparatus or devices such as TVs may fall down
and injury may result due to an accident such as an earthquake. Be
sure to take appropriate measures.
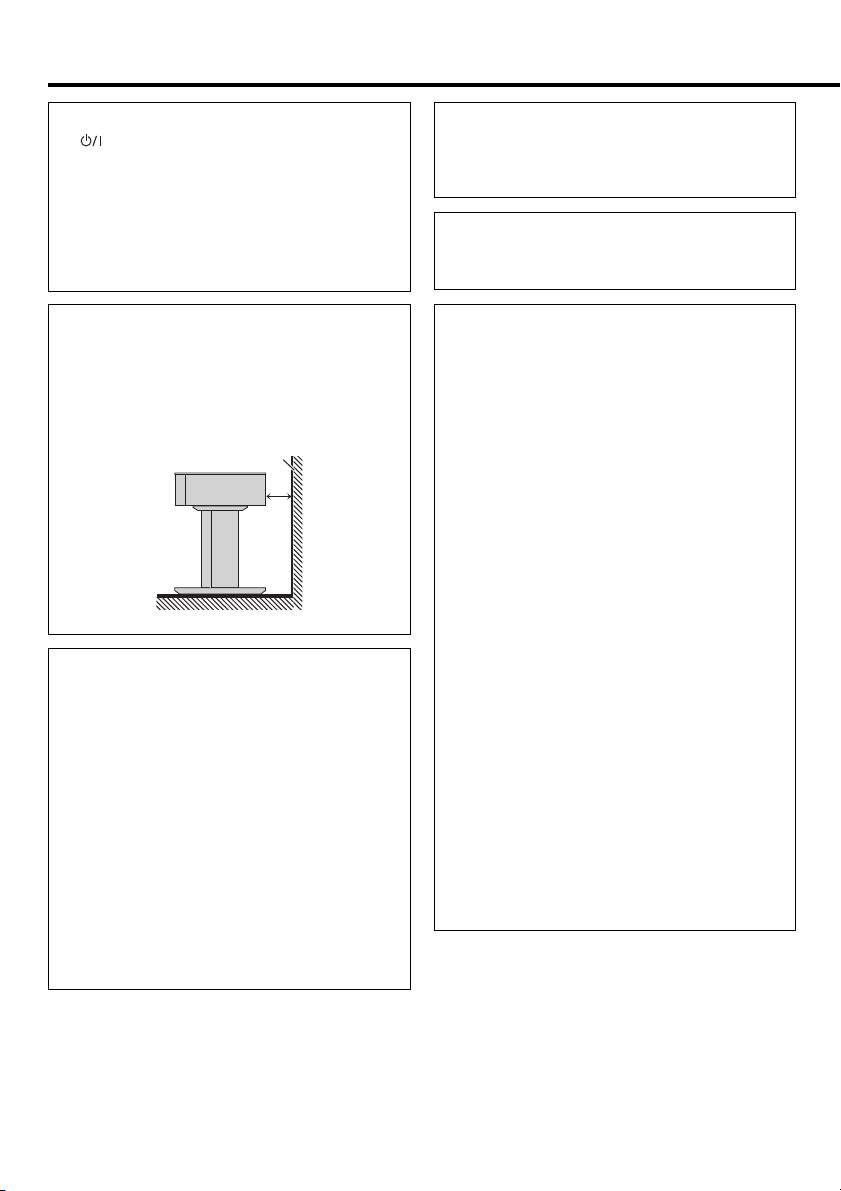
¤ CAUTION: Proper Ventilation
To avoid risk of electric shock and fire, and to prevent damage, locate
the apparatus as follows:
Front: No obstructions and open spacing.1.
Sides/Back: No obstructions should be placed in the areas shown2.
by the dimensions below.
Bottom: Place on the level surface.3.
10 cm
Side view
(Front)
Wall
EN_C-BX3[E]f.indd 2EN_C-BX3[E]f.indd 2 7/4/12 9:44:41 AM7/4/12 9:44:41 AM

3
English
CONTENTS
Warnings, Cautions and Others
........ 2
Introduction ................................. 4
Playable iPod models............................................. 4
Notes on handling................................................... 4
Part list and supplied accessories................... 5
Getting started............................. 5
Unpacking and assembling the
system.......................................................................... 5
Placing the system................................................... 5
About measures to prevent falling
down and toppling over.................................. 6
Preparing the remote control........................... 6
Using the core filter................................................. 7
Connecting the TV — viewing the
video/picture from iPod on your TV ......... 7
Connecting external components................ 7
Connecting the DC power cord...................... 8
Operations.................................... 8
Basic operation .......................................................... 8
Adjusting the sound level................................... 9
Using the surround mode .................................. 9
Playing back iPod ..................................................... 9
Buttons and lamps on the front
panel............................................................................. 10
Troubleshooting .......................... 11
Specifications ............................... 11
Information on Disposal of Old Electrical and
Electronic Equipment and Batteries (applicable
for EU countries that have adopted separate
waste collection systems)
Products and batteries with the symbol
(crossed-out wheeled bin) cannot be disposed
as household waste.
Old electrical and electronic equipment and
batteries should be recycled at a facility capable
of handling these items and their waste
byproducts.
Contact your local authority for details in
locating a recycle facility nearest to you.
Proper recycling and waste disposal will
help conserve resources whilst preventing
detrimental effects on our health and the
environment.
Notice: The sign “Pb” below the symbol for
batteries indicates that this battery
contains lead.
Declaration of Conformity with
regard to the EMC Directive
2004/108/EC
Manufacturer:
JVC KENWOOD Corporation
3-12, Moriyacho, Kanagawa-ku, Yokohama-shi,
Kanagawa, 221-0022, Japan
EU Representative's:
Kenwood Electronics Europe BV
Amsterdamseweg 37, 1422 AC UITHOORN,
The Netherlands
EN_C-BX3[E]f.indd 3EN_C-BX3[E]f.indd 3 7/4/12 9:44:41 AM7/4/12 9:44:41 AM

4C-BX3
Introduction
Auto power save function
When no operation is done in certain situations for 29 minutes, the
unit turns off automatically. This function is on at the initial setting.
For details, refer to “Operations.”
In this manual, the remote control buttons are used for explaining
the operations unless mentioned otherwise. However, if the System
has the same or similar button names, they can also be used for the
operations.
Playable iPod models
Compatible iPod:•
Made for Audio Video
iPod nano (6th generation)
*1
iPod nano (5th generation)
iPod nano (4th generation)
iPod nano (3rd generation)
iPod nano (2nd generation)
–
iPod touch (4th generation)
iPod touch (3rd generation)
iPod touch (2nd generation)
iPod touch
iPod classic
iPhone 4S
iPhone 4
iPhone 3GS
iPhone 3G
*1Only for still picture
Also refer to the instruction manual for iPod.•
If incompatible iPod is connected, NOT SUPPORT scrolls on the•
display, then NO SUPP appears.
If iPod does not play correctly, update iPod software to the latest•
version.
For details about updating iPod, check on the Apple web site•
<http://www.apple.com/>.
For the latest information on compatible iPod models, check on our•
web site.
In this manual, “iPod” refers to iPod, iPod touch and iPhone devices.
When iPod touch or iPhone device is referred to directly, “iPod
touch” or “iPhone” is used.
Notes on handling
Important cautions
Installation of the System
Select a place which is level, dry, and neither too hot nor too cold;•
between 5°C and 35°C.
Do not use the System in a location near heat sources, or in a place•
subject to direct sunlight, excessive dust, or vibration.
Install the System in a location with adequate ventilation to prevent•
internal heat buildup.
Power cord
Do not handle the power cord with wet hands.•
A small amount of power is always consumed while the power cord is•
connected to the wall outlet.
Do not pull on the cord to unplug the power cord. When unplugging•
the power cord, always grasp and pull the plug so as not to damage
the cord.
To prevent malfunctions of the System
There are no user-serviceable parts inside. If anything goes wrong,•
unplug the power cord and consult your dealer.
Do not insert any metallic objects or liquids into the System.•
Safety precautions
Avoid malfunction and/or injury
Do not let children climb up or let anyone sit on top the System.•
Do not place anything heavier than 20 kg on top of the System.•
Avoid moisture, water, and dust
Do not place the System in moist or dusty places.
Avoid high temperatures
Do not expose the System to direct sunlight and do not place it near any
heating devices.
When you are away
When away on holiday or for other reasons for an extended period of
time, disconnect the power cord from the wall outlet.
Do not block the vents
Blocking the vents may damage the System.
Care of the glass top
Use only cleaning materials which are free of grit and debris to avoid•
scratching and marking of the glass surface.
Use only detergents and cleaning solutions which are recommended•
for cleaning glass should be used.
Care of the cabinet
Stains on the System should be wiped off with a soft cloth. If the•
System is heavily stained, wipe it with a cloth soaked in water diluted
neutral detergent and wrung well, then wipe clean with a dry cloth.
EN_C-BX3[E]f.indd 4EN_C-BX3[E]f.indd 4 7/4/12 9:44:42 AM7/4/12 9:44:42 AM

5
English
Since the System may deteriorate in quality, become damaged or get•
its paint peeled off, be careful about the following:
DO NOT wipe it forcefully.–
DO NOT wipe it with thinners, benzines or other organic solvents–
including disinfectants.
DO NOT apply any volatile substances such as insecticides to it.–
DO NOT allow any rubber or plastic to remain in contact withit for–
a long time.
The manufacturer accepts absolutely no liability for any accidents or•
damage resulting from inadequate assembly or mounting, insufficient
strength of attachment, misuse or abuse, or natural disasters.
If water gets inside the System
Turn the System off and disconnect the power cord from the wall outlet,
then call the store where you purchased this System. Using the System
in this condition may cause a fire or electrical shock.
Part list and supplied accessories
Check to make sure you have all of the parts for main system and
supplied accessories.
If anything is missing, contact your dealer immediately.
Parts for main system:
Main body (× 1)•
Top glass (× 1)•
Stand system:•
(Refer to “How to assemble the system” on a separate manual.)
Strap band (× 1)•
Screw (for strap band) (M5 × 10 mm) (× 1)•
Supplied accessories:
AC adaptor (AC-190337A) (× 1)•
AC power cord (× 1)•
Digital optical cord (× 1)•
Remote control RC-F0325E (× 1)•
Lithium coin battery CR2025 (× 1)•
The battery has been installed in the remote control when shipped–
from the factory.
Core filter (large × 1, small × 2)•
Adhesive tape (× 2)•
For holding the power cord at the bottom of the stand base. For–
details, refer to “Connecting the DC power cord.”
Getting started
DO NOT connect the power cord until all other
connections have been made.
Unpacking and assembling the
system
For details, refer to “How to assemble the system” on a separate
manual.
Placing the system
Be careful of the following when placing the system.•
Leave 10 cm or more space between the rear of the system and–
the wall.
Place the system on a level surface and alongside a wall. Do not–
place the system on a unstable place.
The AC adaptor should not be hanging/placed above any other–
item. Place the AC adaptor on the flat floor only.
Be careful of the following when placing a TV or other devices.•
Place a TV with more than two persons, and be careful not to catch–
your fingers between the system and the TV.
See also the supplied instructions and confirm the safety cautions–
for each device when placing the device.
Do not place a device weigh more than 20 kg.–
Place a device (such as a TV) so as not to protrude from the top–
glass. If the device is not placed on the center (ex. the base of
the TV is protruding), it may cause the device to fall down or the
system to topple over, and injury may result.
Place a device (such as a TV) on the center of the top glass.–
When moving the device placed on the top glass, lift it up and–
move it. Dragging it may damage the top glass.
⁄
Do not climb on to or sit on the system.•
Do not place any object filled with liquids such as vases.•
When you place an object on the system, see also “Warnings, Cautions•
and Others”.
You can use the system without attaching the stand. In this case,
place the main unit on the audio rack, etc.
EN_C-BX3[E]f.indd 5EN_C-BX3[E]f.indd 5 7/4/12 9:44:42 AM7/4/12 9:44:42 AM

6C-BX3
About measures to prevent falling
down and toppling over
Be sure to take measures to prevent falling down and toppling over•
due to earthquakes (for both the system and the device placed on
the system).
The effectiveness of measures to prevent falling down and toppling•
over may be decreased depending on the strength of the wall. In such
cases, reinforce the measures appropriately.
The measures to prevent falling down and toppling over are intended•
for reducing the risk of injury, but may not be effective for all
earthquakes.
To prevent the system from falling dawn
and toppling over
Use the supplied strap band to fix the system to the wall.
Screw (not supplied)
See the illustration below for the size
of this screw.
A: 2-3 mm
B: Minimum φ11 mm
(screw head diameter)
C: φ4 mm (screw diameter)
D: Minimum 20 mm
(Wall)
Screw (M5 × 10 mm) (supplied)
Rear side (Main unit)
Strap band (supplied)
To prevent the TV from falling down or
toppling over
When you place a TV on the system, see the instructions supplied for
your TV and fix the TV to the wall. Do not fix the TV to the system.
When you fix your TV to the wall, use appropriate screws, string or•
chains separately purchased and suitable for the quality of the wall.
The wall should have sufficient strength to fix your TV. Consult the•
contractor of the structure regarding the strength of the wall.
Preparing the remote control
When you use the remote control for the first time, pull out the
insulation sheet.
If the range or effectiveness of the remote control decreases, replace
the battery.
To replace the battery in the remote control
Insert the battery into the remote control by matching the polarities
(+ and –) correctly.
¤ CAUTION
Danger of explosion if battery is incorrectly replaced.
Replace only with the same or equivalent type.
⁄
Store the battery in a place where children cannot reach. If a child•
accidentally swallows the battery, consult a doctor immediately.
To prevent the battery from overheating, cracking, or starting a fire:•
Do not recharge, short, disassemble or heat the battery, or dispose–
of it in a fire.
Do not leave the battery with other metallic materials.–
Wrap the battery with tape and insulate when throwing away or–
saving it.
Do not poke the battery with tweezers or similar tools.–
Dispose of the battery in the proper manner, according to federal, state,•
and local regulations.
Lithium coin battery
(product number: CR2025)
Getting started (continued)
EN_C-BX3[E]f.indd 6EN_C-BX3[E]f.indd 6 7/4/12 9:44:42 AM7/4/12 9:44:42 AM

7
English
Using the core filter
To reduce interference, be sure to attach the provided core filters to the
power cord and the external component cord.
Run the cable through the core filter, and wind it firmly once inside.
Close the core filter until it clicks shut. (You can wind the cords
together.)
¤ CAUTION
Do not damage the cord by applying expressive force when winding.
Connecting the TV — viewing the
video/picture from iPod on your TV
You can view a video/picture from iPod connected to the unit on your
TV. Connect the video input terminal on your TV, etc. to the VIDEO OUT
terminal with the video cord (not supplied).
DC power cord (to DC IN jack)
Digital coaxial cord (to DIGITAL IN 2 terminal)
Audio cord (to ANALOG IN terminal)
Composite video cord
(to VIDEO OUT terminal)
RCA pin plug cord (to SUBWOOFER PRE-OUT terminal)
Core filter (large)
Core filter (small)
Core filter (small)
Setting the video output
While the source is selected to IPOD and iPod is not connected to the
unit...
Press and hold iPod 6(main unit).
Each time you press and hold the button, VIDEO OFF and VIDEO ON
scroll on the display.
VIDEO OFF : The video/picture from iPod is shown on iPod itself.
VIDEO ON : The video/picture from iPod is shown on the TV.
Connecting external components
You can connect an analog component to the ANALOG IN terminal
and digital components to the (OPTICAL) DIGITAL IN 1 and (COAXIAL)
DIGITAL IN 2 terminals.
You can also connect a subwoofer to the SUBWOOFER PRE-OUT
terminal.
(COAXIAL)
*2Make the setting on TV, DVD player, etc.to output the Linear PCM signal.
Rear of the unit
TV, etc. (not supplied)
Composite video
cord (not supplied)
Rear of the unit
RCA pin plug
cord (not
supplied)
WhiteRed
Digital
optical cord
(supplied)
DVD Player, etc.
(not supplied)
TV, etc. (not supplied)
Digital coaxial
cord (not
supplied)
Subwoofer
(not supplied)
RCA pin plug
cord (not
supplied)
EN_C-BX3[E]f.indd 7EN_C-BX3[E]f.indd 7 7/4/12 9:44:42 AM7/4/12 9:44:42 AM

8C-BX3
Getting started (continued)
Connecting the DC power cord
1Insert the DC power cord into the hole on the center of the
stand base.
2Lace the DC power cord into the groove at the bottom of the
stand base. Then, stick the supplied adhesive tapes at the
recommended positions (as illustrated below) to hold the
power cord.
3Align the DC power cord in between the side columns.
4Connect the AC adapter to the DC IN jack on the rear of the
unit.
5Plug the AC power cord (supplied) into a wall outlet.
¤ CAUTION
Make sure the DC power cord is firmly laced in the groove, otherwise, it•
may cause the stand to be unstable.
Disconnect the power cord before cleaning or moving the unit.•
Do not place the AC adaptor in the column.•
To avoid the risk of fire and to prevent damage,•
Do not use any AC adaptors other than the one supplied.–
Do not use the supplied AC adaptor for other equipment.–
Rear of the unit
Wood pin
Wood pin
Side columns
Stand base
To a wall outlet
AC adaptor (supplied)
Basic operation
Turning on/off the power
Press .
⁄
A small amount of power is consumed even when the power is turned•
off (standby mode). During standby mode, the STANDBY indicator
lamp on the front panel lights up. Unplug the power cord from the AC
outlet to turn the power off completely.
You can also turn on the power by pressing one of the input buttons•
(DIGITAL1, DIGITAL2, ANALOG, or iPod 6).
Activating/deactivating APS (Auto Power
Save)
The System automatically turns off to save the power.
Press and hold APS.
Each time you press and hold the button for 2 seconds, Auto Power Save
is toggled on or off (APS ON or APS OFF scrolls on the display).
The System automatically turns off to save the power when one of the•
following situations continues for 29 minutes:
For all sources:
When the volume is set to 0.–
When muting is activated.–
For DIGITAL 1/DIGITAL 2:
When the optical cord or coaxial cord is not connected, or there is–
no signal.
For iPod:
When iPod is not connected to the unit.–
Operations
Bottom of stand base
Adhesive tape
EN_C-BX3[E]f.indd 8EN_C-BX3[E]f.indd 8 7/4/12 9:44:42 AM7/4/12 9:44:42 AM

9
English
When one of the situations occurs...
The APS indicator is shown for 1 second every 1 minute and starts
flashing 30 seconds before the System turns off.
Selecting the input source
Press one of the input buttons (DIGITAL1, DIGITAL2,
ANALOG) to select the input source.
DIGITAL1 (for the optical connection)•
DIGITAL2 (for the coaxial connection)•
ANALOG (for the analog connection)•
Adjusting the volume
Press VOLUME +/–.
Adjusts the volume within the range of 0 (MIN) to 40 (MAX).
¤ CAUTION
Set the volume to the minimum level before starting any source. If the
volume is set to a high level, the sudden blast of sound may damage your
hearing and blow out the speakers.
Turning off the sound temporarily
Press MUTING.
To restore the sound, press the button again or press VOLUME + to•
adjust the volume.
Maintaining steady volume level
You can set your desired volume level for different input sources to
avoid volume fluctuation when changing from one source to the
other—TruVolume (TVOL).
Press TVOL.
Each time you press the button, TruVolume is turn on and off (TVOL ON
and TVOL OFF scroll on the display).
Changing the display brightness
Press DIMMER.
Each time you press the button, the display brightness changes with the
following scrolling message:
DIMMER OFF (normal) \DIMMER 1 (darker) \DIMMER 2 (darkest)
Adjusting the sound level
You can adjust the bass and treble sound level within the range of –3
to +3.
1Press BASS/TREBLE repeatedly to select the sound you
want to adjust.
Each time you press the button, BASS and TREBLE alternates on the
display.
– BASS: Adjusts the bass sound level.
– TREBLE: Adjusts the treble sound level.
2Press UP or DOWN to adjust the level.
⁄
The change in the bass and treble sound level of the speakers differ
depending on the incoming signal of the input source.
Using the surround mode
You can listen to a more realistic sound than stereo sound using
surround—StudioSound HD (SSHD).
Press SSHD.
Each time you press the button, surround mode is toggled on or off
(SSHD ON or SSHD OFF scrolls on the display).
Playing back iPod
Connecting iPod
While the power of the main unit is turned off...
1Push the tray (8) to open the dock for iPod.
2Connect iPod to the connector.
You cannot connect iPod to the unit if it is covered by something or•
with accessories attached. Remove them before connecting.
Keep iPod in a straight position while connecting/disconnecting it.•
Do not carry the unit with iPod connected. It might cause damage to•
the dock for iPod or you might drop iPod.
Do not touch or hit the iPod terminal pins or connector pins in the•
dock for iPod directly. Doing so might cause damage to the connector
pins.
While the power is turned on, iPod can be charged.•
Playing back
Press iPod 6.
While the power is turned off, simply pressing iPod• 6turns on
the power and plays back iPod.
iPod (not supplied)
EN_C-BX3[E]f.indd 9EN_C-BX3[E]f.indd 9 7/4/12 9:44:42 AM7/4/12 9:44:42 AM

10C-BX3
Operations (continued)
Pausing/resuming playback
Press iPod 6.
Skipping forward/back
Press and hold ¢or 4.
Skipping to the next track
Press ¢.
Skipping back to the previous track
Press 4twice or more repeatedly.
Returning to the beginning of the track
Press 4once.
Putting iPod in sleep mode
Press and hold iPod 6.
Displaying a menu/Returning to the
previous menu
Press MENU.
Selecting an item on the menu
Press UP or DOWN, then press SELECT.
⁄
Operate iPhone or iPod touch itself in the following cases:•
When operating the home button.–
When selecting application icons on the home screen.–
When dragging the slider.–
Sound distortion may occur when playing back audio sources with high•
recording levels. If distortion occurs, it is recommended to turn off the
equalizer of iPod.
You can select the video signal format (NTSC or PAL) in the setting•
menu on iPod.
1(power) button
2INPUT button
Press the button repeatedly to select the input source
(DIGITAL 1 (DGTL1), DIGITAL 2 (DGTL2), ANALOG).
3iPod 6button
Press the button to play back iPod.
4SSHD button
Press to turn on/off StudioSound HD.
5VOLUME +/– buttons
Adjusts the volume within the range of 0 (MIN) to 40 (MAX).
6Remote sensor
Receives the signal from the remote control.
7STANDBY indicator lamp
Lights up while the power is turned off.
SSHD indicator lamp
Lights up while StudioSound HD is activated.
TVOL indicator lamp
Lights up while TruVolume is activated.
8Tray for iPod dock
Push the tray to open the dock for iPod.
9Display
Shows the volume level, the current source and the settings.
Buttons and lamps on the front panel
EN_C-BX3[E]f.indd 10EN_C-BX3[E]f.indd 10 7/4/12 9:44:42 AM7/4/12 9:44:42 AM

11
English
Troubleshooting
If you have a problem with this System, check this list for a possible
solution before calling for service.
Power
Power does not come on.
The power cord is not inserted securely. Plug it in securely.=
The unit suddenly turns off.
Auto power save function is on. Refer to “Activating/deactivating=
APS (Auto Power Save)” in “Basic operation.”
Remote control
The remote control does not work.
Pull out the insulation sheet.=
Sunlight is shining directly on the remote sensor. Hide the remote=
sensor from direct sunlight.
The path between the remote control and the remote sensor on=
the front panel is blocked.
Point the remote control at the remote sensor on the front panel.=
Signals cannot reach the remote sensor. Move closer to the unit.=
The battery is exhausted. Replace the battery.=
External components
No sound can be heard when DIGITAL 1 or DIGITAL 2 is
selected as a source.
Check the output setting of the connected digital components.=
Set the output setting to PCM signal. (Refer to “Specifications” for
more information.)
iPod
iPod cannot be connected firmly.
Check to see whether the connector between iPod and the unit is=
not damaged, and connect it.
iPod does not provide sound.
iPod is not properly connected. Remove iPod from the unit, and=
then connect it again.
iPod cannot be charged.
iPod is not properly connected. Remove iPod from the unit, and=
then connect it again. After connecting iPod, turn on the power
again.
Specifications
Output Power : 30 W + 30 W RMS (1 kHz, 10% T.H.D., 4 Ω)
Audio section
Input Terminals : ANALOG IN : 1 V/50 kΩ
Digital Input Terminals* :
DIGITAL IN 1 (OPTICAL) : –21 dBm to –15 dBm (660 nm ±30 nm)
DIGITAL IN 2 (COAXIAL) : 0.5 Vp-p/75 Ω
Output Terminals : SUBWOOFER PRE-OUT : 400 mV/10 kΩ
Speaker section
Type : Bass-Reflex Type
Speaker : 80 mm cone × 2
Impedance : 4 Ω
Frequency Range : 50 Hz to 25 kHz
Sound Pressure Level : 84 dB/W•m
General
Power Source (DC IN) : DC 19 V 3.37 A
AC Adaptor (AC-190337A) :
Input : AC 110 – 240 V , 50 Hz/60 Hz, 1.5 A – 0.9 A
Output : DC 19 V 3.37 A
Power Consumption : 0.5 W or less (in Standby mode)
Dimensions (W × H × D) :
Whole system (assembled) : 500 mm × 550 mm × 400 mm
Main unit (with top glass) : 500
mm × 110
mm × 300
mm
Weight (nett) :
Whole system (assembled) : 13.2 kg
Main unit (with top glass) :
8.0 kg
Maximum loadable weight :
20.0 kg
iPod
Output Power : DC 5 V 1 A
Video Out (VIDEO OUT) : Composite
*Corresponding to Linear PCM only (with sampling frequency — 32 kHz,
44.1 kHz, 48 kHz)
When an audio signal other than Linear PCM comes in, NONPCM–
appears on the display.
Design and specifications are subject to change without notice.
EN_C-BX3[E]f.indd 11EN_C-BX3[E]f.indd 11 7/4/12 9:44:42 AM7/4/12 9:44:42 AM

“Made for iPod” and “Made for iPhone” mean that an electronic accessory has been designed to connect specifically to iPod or iPhone,•
respectively, and has been certified by the developer to meet Apple performance standards. Apple is not responsible for the operation of this
device or its compliance with safety and regulatory standards. Please note that the use of this accessory with iPod or iPhone may affect wireless
performance.
iPhone, iPod, iPod classic, iPod nano and iPod touch are trademarks of Apple Inc., registered in the U.S. and other countries.•
• is a trademark of SRS Labs, Inc.
StudioSound HD technology is incorporated under license from SRS Labs, Inc.•
SSHD: StudioSound HD by SRS Labs, Inc. SRS StudioSound HD™ provides an immersive and engaging surround sound experience, while•
maintaining steady volume and delivering rich bass and clear dialog.
TVOL: TruVolume by SRS Labs, Inc. SRS TruVolume™ maintains a steady volume, allowing listeners to set their desired volume level once to enjoy•
television, music and all other content without annoying volume fluctuations.
EN_C-BX3[E]f.indd 12EN_C-BX3[E]f.indd 12 7/4/12 9:44:42 AM7/4/12 9:44:42 AM
Table of contents
Other Kenwood Stereo System manuals

Kenwood
Kenwood UD-351M User manual

Kenwood
Kenwood UD-413 User manual

Kenwood
Kenwood UD-351M User manual

Kenwood
Kenwood RXD-355 User manual

Kenwood
Kenwood K-525 User manual

Kenwood
Kenwood RXD-M52-L User manual

Kenwood
Kenwood M-720DAB User manual

Kenwood
Kenwood AVS-1002B Instruction manual

Kenwood
Kenwood RD-HD5MD User manual

Kenwood
Kenwood RXD-M31 User manual

Kenwood
Kenwood HM-382MD User manual

Kenwood
Kenwood XD-750 User manual

Kenwood
Kenwood MS-A7 User manual

Kenwood
Kenwood UD-NF7 User manual

Kenwood
Kenwood XD-A3 User manual

Kenwood
Kenwood M-909DV User manual

Kenwood
Kenwood RD-C414-S User manual

Kenwood
Kenwood R-K1 User manual

Kenwood
Kenwood RXD-803 User manual

Kenwood
Kenwood MS-5 User manual