Kenwood HM-537WM User manual

ENGLISH FRANÇAIS DEUTSCH NEDERLANDS ITALIANO ESPAÑOL
HM-537WM
COMPACT Hi-Fi COMPONENT SYSTEM
INSTRUCTION MANUAL
B60-5572-08 00 C (E) 0501
5572/01-07/EN 05.3.29, 5:36 PM1

2EN
ENGLISH
THE EXCLAMATION POINT WITHIN AN EQUILATERAL TRIANGLE IS INTENDED TO ALERT THE USER
TO THE PRESENCE OF IMPORTANT OPERATING AND MAINTENANCE (SERVICING) INSTRUCTIONS
IN THE LITERATURE ACCOMPANYING THE APPLIANCE.
THE LIGHTNING FLASH WITH ARROWHEAD SYMBOL, WITHIN AN EQUILATERAL TRIANGLE, IS IN-
TENDED TO ALERTTHE USER TOTHE PRESENCE OF UNINSULATED “DANGEROUS VOLTAGE” WITHIN
THE PRODUCT’S ENCLOSURE THAT MAY BE OF SUFFICIENT MAGNITUDE TO CONSTITUTE A RISK
OF ELECTRIC SHOCK TO PERSONS.
CAUTION: TO REDUCE THE RISK OF ELECTRIC SHOCK,
DO NOT REMOVE COVER (OR BACK). NO USER-SER-
VICEABLE PARTS INSIDE. REFER SERVICING TO QUALI-
FIED SERVICE PERSONNEL.
Before applying power
Caution : Read this page carefully to ensure
safe operation.
Safety precautions
WARNING : TO PREVENT FIRE OR ELECTRIC SHOCK, DO NOT
EXPOSE THIS APPLIANCE TO RAIN OR MOISTURE.
CAUTION
RISK OF ELECTRIC SHOCK
DO NOT OPEN
Units are designed for operation as follows.
Europe .......................................... AC 230 V only
The marking of products using lasers
The marking this product has been classified as Class 1. It
means that there is no danger of hazardous radiation out-
side the product.
Location: Bottom
CLASS 1 LASER PRODUCT
LASER KLASSE 1
APPAREIL A LASER DE CLASSE 1
LUOKAN 1 LASERLAITE
KLASS 1 LASERAPPARAT
Unpacking
Unpack the unit carefully and make sure that all
accessories are present.
AM loop antenna .........................................(1)
FM indoor antenna ...................................... (1)
Remote control unit .................................... (1)
Batteries(R6/AA) .......................................... (2)
If any accessories are missing, or if the unit is
damaged of falls to operate, notify your dealer
immediately. If your unit was shipped to you
directly, notify your shipper immediately.
KENWOOD recommend that you retain the
original carton and packing materials in case you
need to move or ship the unit in the future.
Keep this manual handy for future reference.
5572/01-07/EN 05.3.29, 4:53 PM2

3EN
ENGLISH
Before applying power
Media that can be played back
with this unit
This unit is capable of playing back Audio CD and
CD-R/RW (CD-DA) discs.
This unit is capable of playing back the music files
recorded in the MP3/WMA audio compression
format on CD-R/RW discs. This unit may also be
incapable of playing certain discs depending on
their properties, recording conditions, etc.
Usable media:
CD-ROM (CD-R/CD-RW)
Usable formats:
ISO 9660 Level 1 or 2
Joliet
Files that can be played back:
MP3 files and WMA files (Version 9)
•This unit can display the ID3 Tag information
recorded in the disc.
•Please set up the transfer bit rate setting for
the compression software when compressing
MP3 and WMA files as follows:
MP3 Files : 128kbps recommended
WMA Files : 64kbps recommended
•This unit is compatible with 32kHz, 44.1kHz
(recommended) and 48kHz sampling frequen-
cies.
•This unit can play back only the closed ses-
sions. This unit is compatible with multi-ses-
sion discs.
•The maximum numbers of folders and files in
the disc played with this unit are respectively
limited to 255 (including root folder) folders and
511 (including the number of folders) files.
•The maximum number of files per folder is lim-
ited to 510 (including the number of folders)
files.
•There are cases where it is not possible to save
folders in the desired sequence depending on
the software being used.
•If the MP3 or WMA extension logs are added
to any files other than “ .MP3” and “ .WMA”
files, the equipment will assume that they can
be played back, and this will produce no sound
and skip to the next file automatically.
Contents
Caution : Read the pages marked carefully
to ensure safe operation.
Before applying power ................................ 2
Safety precautions ................................. 2
Unpacking ................................................... 2
Media that can be played back with this unit ....
3
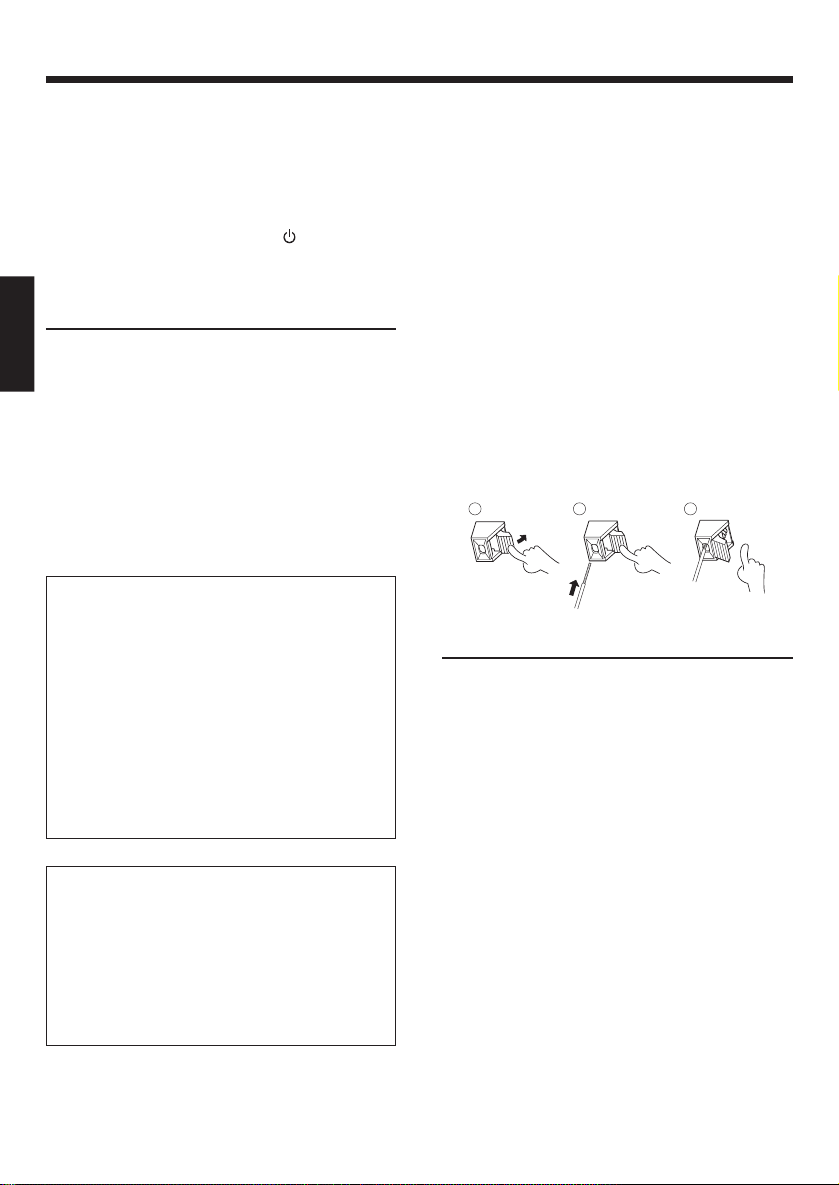
Preparing the remote control ...................... 4
Connections ................................................ 4
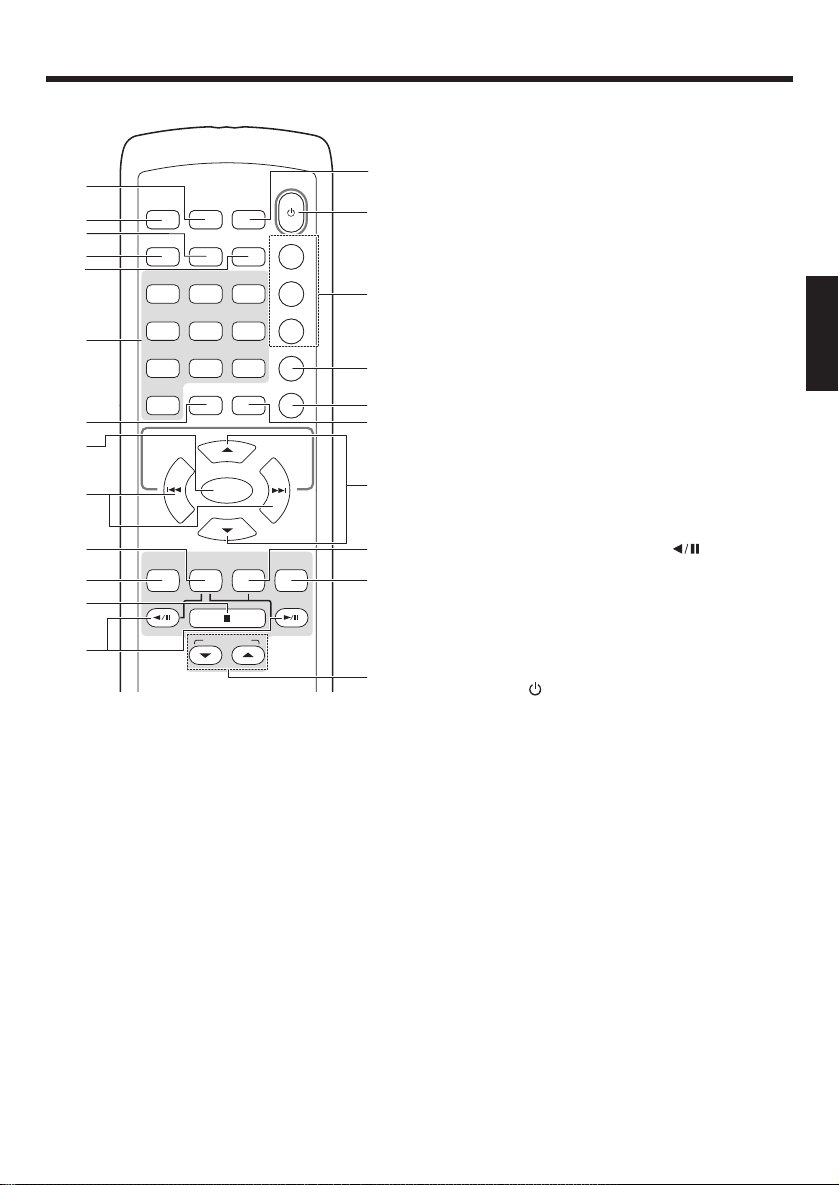
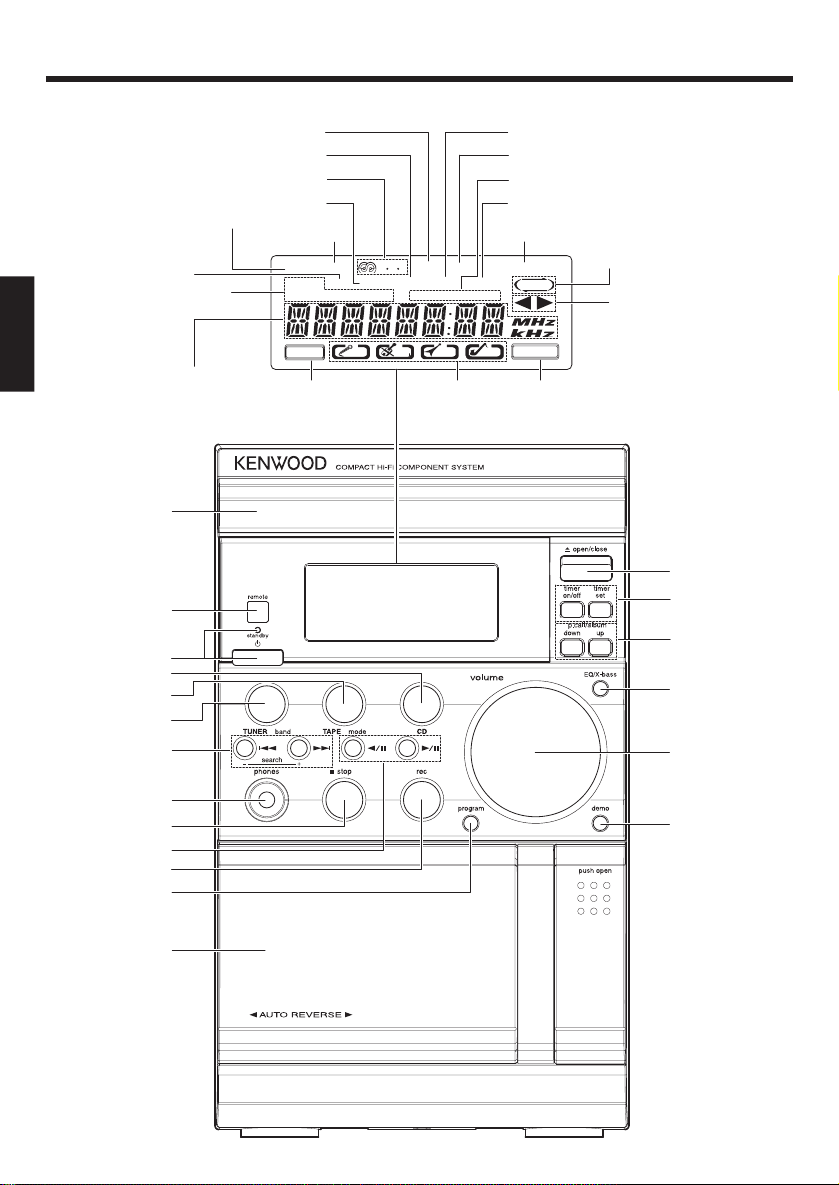
Names and functions of parts .......................... 5
Remote control unit .................................... 5
Main unit ..................................................... 6
Basic function ................................................... 8
Demonstration mode .................................. 8
Switching the system on............................. 8
Switching the system to standby mode...... 8
Volume control ............................................ 8
Sound control .............................................. 8
Headphones ................................................ 8
Using the CD/MP3-CD/WMA-CD ..................... 9
Loading a disc ............................................. 9
Playing a normal disc................................... 9
Selecting a desired track/passage ............... 9
Selecting a desired album/file
(For MP3-CD and WMA-CD only) ........... 9
Programming tracks .................................. 10
Programming tracks
(For MP3-CD and WMA-CD only) ..........11
Random ......................................................11
Repeat ....................................................... 12
Intro scan .................................................. 12
Using the RDS/DISPLAY button ................ 12
Listening to the sound of your personal
computer with this unit ............................... 13
Preparations before listening to sound
from the USB terminal ......................... 13
Listening the sound of your computer ...... 13
Using the radio ............................................... 15
Tu ning in radio stations ............................. 15
Storing preset ........................................... 15
Tuning to a preset radio station ................. 15
Using RDS (Radio Data System) ............... 15
Using the RDS/DISPLAY button ................ 16
Tuning by Program TYpe (PTY search) ....... 16
Using the cassette ......................................... 17
Playing a cassette tape ............................. 17
Recording on a cassette tape .................... 17
Clock/timer operation ..................................... 19
View clock ................................................. 19
Clock setting .............................................. 19
Timer setting ............................................. 19
To activate/deactivate the timer ................ 20
Sleep timer setting .................................... 20
General information ........................................ 21
Maintenance ............................................. 21
In case of difficulty ......................................... 22
Specifications ................................................. 23
5572/01-07/EN 05.4.5, 4:09 PM3

4EN
ENGLISH
Before applying power
Preparing the remote control
Insert batteries type R6/LR6 (“AA” size) into the
remote control.
Operation
When the standby indicator is lit, the power turns
ON when you press the POWER button on the
remote control. When the power comes on, press
the button you want to operate.
Notes:
•The supplied batteries may have shorter lives than
ordinary batteries due to use during operation
checks.
•When the remote-controllable distance gets shorter
than before, replace both batteries with new ones.
•Placing the remote sensor in direct sunlight, or in
direct light from a high frequency fluorescent lamp
may cause a malfunction.
In such a case, change the location of the system
installation to prevent malfunction.
Connections
Connecting the FM antenna
Adjust the position of the FM antenna for the best
reception.
Connecting the AM antenna
Set up the AM loop antenna, and then connect it.
Speakers connection
•Connect the right speaker to terminal marked
“R” , with the red wire to + and the black wire
to –.
•Connect the left speaker to terminal marked
“L” , with the red wire to + and the black wire
to –.
•Clip the stripped portion of the speaker wire
as shown.
1 2 3
Notes:
•For optimal sound performance, it is recommended
to use the supplied speakers.
•Do not connect more than one speaker to any one
pair of +/– speaker terminals.
Connecting the USB cable
Connect a commercially available USB cable to
the USB port on the rear panel and connect the
other end of the USB cable to the USB port of
your personal computer.
(See “Preparations before listening to sound from
the USB terminal” on page 13.)
CAUTION
Be sure to adhere to the following, or proper
ventilation will be blocked causing damage
or fire hazard.
•Do not place any objects impairing heat
radiation onto the top of the unit.
•Leave some space around the unit (from the
largest outside dimension including
projection) equal to or greater than, shown
below.
Top panel : 50 cm
Back panel : 10 cm
CAUTION
•Place the unit where the AC power cord can
be easily unplugged.
•The power in this unit will not be completely
cut off from the AC wall outlet when the
power switch is turned OFF. To cut off the
power completely, unplug the AC power
cord from the AC wall outlet.
5572/01-07/EN 05.3.29, 4:53 PM4

5EN
ENGLISH
Names and functions of parts
Remote control unit
1RDS/DISPLAY button
To change the display for RDS; to view the
current status of the system; to change the
time display for CD; to change the information
display for MP3-CD and WMA-CD.
2PTY button
To carry out PTY search.
3RANDOM button
To carry out random playback for CD.
4INTRO button
To play first several seconds for each track of CD.
5REPEAT button
To repeat one track or all tracks for CD.
6digit (0 ~ 9/WXYZ) buttons
To select a track number for CD; to select a
preset radio station for TUNER; to enter file
names in file search mode for MP3-CD and
WMA-CD.
7PROGRAM button
To program disc tracks for CD; to program
preset radio stations for TUNER; to set or reset
clock for clock; to set or reset timer for timer.
8ENTER button
To confirm the selection in file search mode
for MP3-CD and WMA-CD.
9SEARCH/SKIP/TUNING +/–¢/ 4buttons
To search forward/backward to next/previous
track for CD; to skip tracks for CD; to search
forward/backward or to skip to the next/
previous album for MP3 and WMA; to fast
forward or rewind a tape; to tune to higher/
lower radio frequency or search radio stations
for TUNER; to set the hour and minutes for
clock; to set timer function for timer.
0TAPE/MODE button
To select TAPE input or turn the system on to
TAPE input. When in TAPE input, press to select
a tape reverse mode.
!TUNER/BAND/USB button
To select TUNER input or turn the system on
to TUNER input. When in TUNER input, press
the select the waveband: FM or AM.
To select USB input by pressing the button repeatedly.
@7button
To stop playback for CD or TAPE; to stop program for CD.
#FWD PLAY 6/ RVS PLAY buttons
To start or interrupt playback for CD. (FWD
PLAY 6button only)
To start or interrupt playback for TAPE.
$STEREO/MONO button
To switch between stereo mode and mono
mode (on FM band only) for TUNER.
%POWER button
To switch the system on or to standby mode.
^Clock and timer related buttons
TIMER SET button to view the clock or set the clock.
TIMER ON/OFF button to switch the timer on/off.
SLEEP button to select the sleep time.
&EQ/X-BASS button
To select the desired sound effect: POP,
CLASSIC, ROCK, JAZZ or FLAT; to switch on/
off X-BASS mode.
*MUTE button
To interrupt and resume sound reproduction.
(FILE SEARCH button
To select a desired file in an MP3 and a WMA disc.
)VOLUME UP/DOWN 5/∞buttons
To increase or decrease the volume.
¡CD button
To select CD input or turn the system on to
CD input.
™REC button
To record fromTUNER, CD or USB to a cassette tape.
£P.CALL +/–5/∞buttons
To select a preset radio stations for TUNER.
POWER
CD
TUNER/BAND
USB
TAPE
/MODE
SEARCH
/SKIP
/TUNING
SEARCH
/SKIP
/TUNING
TIMER SET
– P.CALL +
–+
REPEAT
TIMER
ON/OFF
RANDOM
INTRO
SLEEP
PTY
RDS/
DISPLAY
REC
EQ/X-BASS
MUTE
12/ABC 3/DEF
4/GHI
FILE SEARCH
PROGRAM
5/JKL 6/MNO
7/PQRS 8/TUV 9/WXYZ
0
FWD PLAY
RVS PLAY
VOLUME UP
VOLUME DOWN
ENTER
STEREO
/MONO
3
5
7
8
$
%
^
&
*
(
)
¡
™
£
1
2
4
6
9
0
!
@
#
5572/01-07/EN 05.3.29, 4:53 PM5

6EN
ENGLISH
Names and functions of parts
Main unit
TIMER ON OFF
TOTAL REMAIN
FILE-SEARCH
INTRO
SLEEP
SYNC REC.
PROGRAM RANDOM
REPEAT ALB. ALL
MP3
STEREO
R D S
POP
CLASSIC
ROCK JAZZ
X-BASS
USB
2
1
7
8
9
0
!
@
#
3
4
5
6
$
%
^
&
*
(
INTRO icon
SLEEP icon
TOTAL icon
RDS icon
X-BASS
icon
Play icons
SYNC icon
MP3 icon
ALB. icon
Frequency display
Preset channel display
Playback time display etc.
STEREO
icon
Sound effect
icons
Play mode icons
Reverse mode icon
TIMER icons
ALL icon REMAIN icon
REC. icon
FILE SEARCH icon
5572/01-07/EN 05.3.29, 4:53 PM6

7EN
ENGLISH
Names and functions of parts
1CD tray
2Remote sensor
3button
To switch the system on or to standby mode.
standby indicator
4CD button
To select CD input or turn the system on to CD
input.
5TAPE mode button
To select TAPE input or turn the system on to
TAPE input. When in TAPE input, press to
select a tape reverse mode.
6TUNER band/USB button
To select TUNER input or turn the system on
to TUNER input. When in TUNER input, press
the select the waveband: FM or AM.
To select USB input by pressing the button
repeatedly.
7search +/–¢/ 4buttons
To search forward/backward to next/previous
track for CD; to skip tracks for CD; to search
forward/backward or to skip to the next/
previous album for MP3 and WMA; to fast
forward or rewind a tape; to tune to higher/
lower radio frequency or search radio stations
for TUNER; to set the hour and minutes for
clock; to set timer function for timer.
8phones jack
97stop button
To stop playback for CD or TAPE; to stop pro-
gram for CD.
06buttons
To start or interrupt playback for CD. (6button
only)
To start or interrupt playback for TAPE.
!rec button
To record fromTUNER, CD or USB to a cassette
tape.
@program button
To program disc tracks for CD; to program
preset radio stations for TUNER. To set or reset
clock for clock. To set or reset timer for timer.
#Cassette tape compartment
$0open/close button
To open the CD tray.
%Clock and timer related buttons
timer on/off button
To switch the timer on/off.
timer set button
To view the clock or set the clock.
^p.call/album down/up buttons
To select a preset radio stations for TUNER.
To select an album of MP3 and WMA.
&EQ/X-bass button
To select the desired sound effect: POP,
CLASSIC, ROCK, JAZZ or FLAT; to switch on/
off X-BASS mode.
*VOLUME knob
To increase or decrease the volume.
(demo button
To activate/deactivate the demonstration in
power on mode.
Standby mode
While the standby indicator is lit, a small amount
of power is supplied to the system to back up the
memory. This is called standby mode. Under the
condition, the system can be turned ON by the
remote control unit.
5572/01-07/EN 05.3.29, 4:53 PM7

8EN
ENGLISH
Demonstration mode
The system is equipped with a demonstration
function (only display).The demonstration consists
of sequential change of display and indicators
showing the operations, but the audio itself does
not change. The demonstration function can be
cancelled as follows.
To deactivate the demonstration
Press demo button during demonstration.
To activate the demonstration
After turning the power on, press demo button.
Note:
The demonstration operates automatically when; a
power has failed and then recovered, or the plug of the
power cable has been pulled out while the power was
on and then plugged back in.
Switching the system on
Press button on the unit or POWER button
on the remote control; or CD, TUNER band/USB
(TUNER/BAND/USB on the remote control), or
TAPE mode button (TAPE/MODE on the remote
control).
The standby LED will go out.
•The system will switch to the last selected
source or the selected source.
Switching the system to standby
mode
Press button on the unit or POWER button
on the remote control.
•The clock will be displayed.
Volume control
Turn volume knob to the right (press VOLUME
UP 5button on the remote control) to increase,
or turn volume knob to the left (press VOLUME
DOWN ∞button on the remote control) to de-
crease the volume level.
“VOL XX” will be displayed. “VOL XX” denotes
the volume level.
The volume can be adjusted in 30 steps from
minimum to maximum.
Basic function
To switch off the volume temporarily
Press MUTE button on the remote control.
Playback will continue without sound only system
speaker output and the icon “MUTE” appears on
the display.
To restore the volume, press MUTE button on the
remote control again or adjust the volume.
Sound control
EQ/X-BASS
The sound control system feature enables you to
enjoy special sound effects that have preset equal-
izer settings, providing the best music reproduc-
tion.
Press EQ/X-BASS button
To select the desired sound effect: POP, CLAS-
SIC, ROCK, JAZZ or FLAT.
To switch the X-BASS on/off
Press and hold the EQ/X-bass button on the unit
(EQ/X-BASS button on the remote control).
If X-BASS is switched on, “BASS ON” will appear
then disappear on the display and the icon “X-
BASS” will appear on the display. If X-BASS is
switched off, “BASS OFF” will appear then disap-
pear on the display and the icon “X-BASS” will
disappear.
Note:
EQ and X-BASS functions are not applied to the record-
ing sound.
Headphones
To listen to your stereo with headphones (not in-
cluded), use the 3.5 mm phones jack on the top
of the unit.
5572/08-24/EN 05.3.29, 4:54 PM8

9EN
ENGLISH
Using the CD/MP3-CD/WMA-CD
Loading a disc
1Press CD button to select CD mode.
2Press 0open/close button to open the CD
tray.
3Place a disc into the tray with the label facing
up.
4Press 0open/close button to close the CD
tray.
The total playtime and total number of tracks
will appear in the display.
5To remove the disc, press 0open/close but-
ton, grasp the disc by its edges, and carefully
pull it out.
For MP3-CD and WMA-CD only
Load a MP3 or WMA format music disc on the
disc tray.
•The total album number and total track num-
ber will appear on the display.
Notes:
•To ensure good system performance; wait until the
unit completely reads the disc before proceeding.
•If the CD tray is not loaded with a disc or the disc is
unreadable, the message “NO PLAY” will be shown.
•For MP3-CD and WMA-CD, the disc reading time
may exceed 10 seconds due to the large number of
songs compiled into one disc.
•For MP3-CD and WMA-CD, “A” on the display rep-
resents ALBUM.
•For MP3-CD and WMA-CD, the total album number
on the display indicates the number of all the al-
bums recorded in the disc.
•
The icon “MP3” appears only when an MP3-file is
played. It does not appear when playing a WMA-file.
Playing a normal disc
1Press 6button to start playback.
The track number and elapsed playing time of
the current track appear on the display.
To interrupt playback, press 6button.
The playing time will start flashing.
To resume playback, press 6button again.
2To stop playback, press 7stop button.
Selecting a desired track/passage
To select a desired track
Press 4or ¢button (4or ¢SEARCH/SKIP/
TUNING button on the remote control) repeatedly
until the desired track appears on the display.
•If playback is stopped, press 6button to start
playback.
•The digit buttons (0~9) on the remote control
can also be used to select a track.
Press the digit buttons as shown below:
To select track 2 : 2and ENTER
To select track 23 : 2, 3and ENTER
To select track 120
(MP3-CD and WMA-CD only) : 1, 2and 0
To search for a particular passage during
playback
Press and hold 4or ¢button (4or ¢
SEARCH/SKIP/TUNING button on the remote
control) and released it when the desired passage
is located for CD.
Selecting a desired album/file (For
MP3-CD and WMA-CD only)
To select a desired album
Press p.call/album up or down button on the
unit until the desired album number appears on
the display.
•“Axxx xxx” will appear on the display. “Axxx”
indicates album number and “xxx” indicates
the file number.
To select a desired file
Press 4or ¢button (4or ¢SEARCH/
SKIP/TUNING button on the remote control) re-
peatedly until the desired file from the current al-
bum appears on the display.
•“Axxx xxx” will appear on the display. “Axxx”
indicates album number and “xxx” indicates
the file number.
•The digit buttons (0~9) on the remote control
can also be used to select a file.
5572/08-24/EN 05.3.29, 4:54 PM9

10 EN
ENGLISH
To search a desired file by file name
1Press FILE SEARCH button on the remote
control.
2Press the digit buttons to enter the first char-
acter of the file name you wish to search and
press ENTER button.
Repeat this procedure to enter the rest of the
file name.
3Press FILE SEARCH button on the remote
control.
The icon “FILE SEARCH” will appear on the
display.
If the unit finds an appropriate file, the file name
will be scrolled on the display.
If there is no appropriate file, “NO FILE” will
be appeared.
4Press 6button to start playback.
Programming tracks
Programming tracks of a disc is possible when
playback is stopped. Up to 60 tracks can be stored
in the memory in any order.
1In stop mode, press program button on the
unit (PROGRAM button on the remote control)
to enter program setting.
The icon “PROGRAM” and “– – P–01” will
appear on the display. “– –” indicates track
number of the CD and “P–01” indicates pro-
gram number.
2Press 4or ¢button (4or ¢SEARCH/
SKIP/TUNING button on the remote control)
to select the desired track.
The digit buttons (0~9) on the remote control
can also be used to select tracks.
The icon “PROGRAM” and program number
will start flashing.
3Press program button on the unit ( PROGRAM
button on the remote control) to store the se-
lected track.
The track number returns to “– –” and the next
program number will appear on the display.
4Repeat steps 2to 3to select and store other
desired tracks in this way.
The icon “PROGRAM” will appear on the dis-
play and “FULL” will start flashing if you attempt
to program more than 60 tracks.
Press program button on the unit ( PROGRAM
button on the remote control) in stop mode to
review the program sequence.
5Press 6button to play the programmed
tracks.
If you press REPEAT button on the remote
control during programmed playback, the cur-
rent track or all programmed tracks will be
played repeatedly.
The icon “REPEAT” or “REPEAT ALL” and the
icon “PROGRAM” will appear on the display.
6Press 7stop button once to stop program play-
back or twice to clear the program.
The icon “PROGRAM” will disappear from the
display.
Using the CD/MP3-CD/WMA-CD
5572/08-24/EN 05.3.29, 4:54 PM10

11 EN
ENGLISH
Programming files (For MP3-CD and
WMA-CD only)
Programming files of a disc is possible when play-
back is stopped. Up to 60 files can be stored in
the memory in any order.
1In stop mode, press program button on the
unit (PROGRAM button on the remote control)
to enter program setting.
The icon “PROGRAM” and “– – – P–01” will
appear on the display. “– – –” indicates file
number of the disc and “P–01” indicates pro-
gram number.
2Press p.call/album up or down button to se-
lect the desired album and press 4or ¢
button (4or ¢SEARCH/SKIP/TUNING
button on the remote control) to select the de-
sired file.
The digit buttons (0~9) on the remote control
can also be used to select files.
The icon “PROGRAM” and program number
will start flashing.
3Press program button on the unit ( PROGRAM
button on the remote control) to store the se-
lected file.
The file number returns to “– – –” and the next
program number will appear on the display.
4Repeat steps 2to 3to select and store other
desired files in this way.
The icon “PROGRAM” will appear on the dis-
play and “FULL” will start flashing if you attempt
to program more than 60 files.
Press program button on the unit ( PROGRAM
button on the remote control) in stop mode to
review the program sequence.
Using the CD/MP3
5Press 6button to play the programmed files.
If you press REPEAT button on the remote
control during programmed playback, the cur-
rent file or all programmed files will be played
repeatedly.
The icon “REPEAT” or “REPEAT ALL” and the
icon “PROGRAM” will appear on the display.
6Press 7stop button once to stop program play-
back or twice to clear the program.
The icon “PROGRAM” will disappear from the
display.
Notes:
• “P” represents PROGRAM.
•The program is automatically cleared as soon as the
CD tray is opened.
•The function of program setting is disabling in PLAY/
PAUSE mode.
Random
You can play all the tracks in random order.
1During playing, pause or stop mode, press
RANDOM button on the remote control to
enable random play mode.
The icon “RANDOM” will appear on the dis-
play.
2To exit random mode, press RANDOM button
again. The icon “RANDOM” will disappear
from the display.
Note:
If the program function enabled or the repeat function
is set on, will disable the random play mode.
5572/08-24/EN 05.3.29, 4:54 PM11

12 EN
ENGLISH
Using the CD/MP3-CD/WMA-CD
Repeat
You can play the current track or the whole disc
repeatedly.
To repeat all the tracks/files
Press REPEAT button on the remote control once
in play or pause mode.
The icon “REPEAT ALL” will appear on the dis-
play.
•All tracks/files will be repeated continuously.
•To cancel repeat play, repress REPEAT button
on the remote control twice for a normal CD
and 3 times for an MP3-CD and a WMA-CD.
To repeat a single track/file
Press REPEAT button twice for a normal CD and
3 times for an MP3-CD and a WMA-CD in play or
pause mode.
The icon “REPEAT” will appear on the display.
•To cancel repeat play, repress REPEAT button
on the remote control once.
To repeat one album (For MP3-CD and WMA-
CD only)
Press repeat button (REPEAT button on the re-
mote control) twice in play or pause mode.
The icon “REPEAT ALB.” will appear on the dis-
play.
•To cancel repeat play, repress REPEAT button
on the remote control twice.
Note:
In program mode, you can only select repeat one or
repeat all function.
Intro scan
This function let you listen to the first 10 seconds
of each track throughout the disc.
Press INTRO button on the remote control to start
scanning, and the icon “INTRO” will appear on
the display.
To stop the intro scan
Press INTRO button on the remote control again.
The unit enters normal play mode and starts play-
ing from where you stop the scanning.
Using the RDS/DISPLAY button
Pressing RDS/DISPLAY button on the remote con-
trol shows various display information of the disc,
such as time information of the current track or a
whole disc, program number during program play,
file and artist name during MP3 or WMA mode,
and etc.
5572/08-24/EN 05.3.29, 4:54 PM12

13 EN
ENGLISH
Listening to the sound of your personal computer with this unit
When connecting this unit to your computer
with a USB cable for the first time, the set up
operation may be needed on your computer
before use.
Preparations before listening to
sound from the USB terminal
1Turn on your computer and make sure the sys-
tem is completely started.
2Turn on this unit and connect it to your com-
puter with a USB cable.
For Windows®XP or 2000:
By simply connecting this unit to your com-
puter, the driver is installed automatically to
your computer, and this unit is recognized as
“USB AUDIO”.
For Windows®Me:
1. When this unit is connected to your com-
puter, the display of “Found New Hardware
Wizard” is opened. Check “Install the soft-
ware automatically (Recommended)” and
click on “Next”.
2.The installation is completed. Click on “Fin-
ish”.
Listening the sound of your com-
puter
1Turn on your computer and make sure the sys-
tem is completely started.
2Turn on this unit and connect it to your com-
puter with a USB cable.
•Do not insert and remove the USB cable while
the computer is finding this unit.
•If this unit is not detected after a several sec-
onds, try the following things.
– Connect the USB cable again.
– Restart your computer.
3Press TUNER band/USB button (TUNER/
BAND/USB on the remote control) and select
USB.
“USB” will appear on the display.
•When this unit is connected to your computer
with a USB cable and the unit detects the com-
puter, “USB LINK” is displayed.
4Perform the playback operation on your com-
puter.
For the operation of your computer, refer to
the instruction manual of your computer or the
manual of the audio reproduce software.
5Adjust the volume with this unit.
Notes:
•This unit supports the Windows personal comput-
ers with USB ver. 1.1 compliant USB ports, such as
Windows®XP, Me and 2000.
•This unit is compatible with 48 kHz,
44.1 kHz and 32 kHz sampling frequencies.
It is also capable of receiving 16-bit stereo and mon-
aural data.
•When connecting this unit to your computer using
the USB port, make sure this unit and the computer
are both turned on.
•The USB port of this unit is input only. The sound
played by this unit cannot be recorded on your com-
puter.
•In case this unit is connected to your computer and
the both are turned off, turn on this unit first.
5572/08-24/EN 05.4.1, 09:4313

14 EN
ENGLISH
Listening to the sound of your personal computer with this unit
If any problems occur during use, check the
following items.
If this unit is not recognized:
•Connect the USB cable securely between this
unit and the computer.
•If a USB hub is used and the USB cable is con-
nected to that, make sure the hub is function-
ing properly. Or try changing the port where
the USB cable is attached.
If there is no sound or the volume is very low:
Example of Windows®XP:
•Open [Start] =[Control Panel] =[Sounds and
Audio Devices Properties] =[Audio] and check
if the “Default device” is “USB AUDIO”. If it is
not “USB AUDIO”, click the ∨∨
∨∨
∨to open the pull-
down menu, then select “USB AUDIO”.
•Open [Start] =[Control Panel] =[Sounds and
Audio Devices Properties] =[Volume] and
check if the volume level is very low or if there
is a check mark in the “Mute” box. If the vol-
ume level is low, move the slider to raise the
volume level. If there is a check mark in the
“Mute” box, remove it.
If there are breaks in the sound:
•The sound may be broken during audio output
if an operation in the computer puts a heavy
load on the CPU. Avoid performing operations
that put a heavy load on the CPU.
•There may be breaks in the sound if another
USB cable is connected or disconnected dur-
ing audio output. Do not connect or discon-
nect the USB cables of other devices during
operation of this unit.
A lot of noise is generated:
•Alot of noise will be generated if the speaker
system is placed next to a device that gener-
ates a strong electromagnetic field (such as a
television). Install the speaker system in a place
that is far enough away from the source of the
strong electromagnetic field to eliminate inter-
ference.
Windows®are registered trademarks or trade-
marks in the USA and other countries of
Microsoft Corporation.
5572/08-24/EN 05.3.29, 4:54 PM14

15 EN
ENGLISH
Tuning to a preset radio station
Press p.call/album up button (P. CALL + button
on the remote control) or p.call/album down
button (P. CALL – button on the remote control) or
digit buttons (0~9) on the remote control to se-
lect the desired preset number.
•The preset number and radio frequency will
appear on the display.
STEREO/MONO
Press the STEREO/MONO button on the remote
control to select mono or stereo mode.
•When stereo mode is selected, the icon “STE-
REO” will appear on the display (if current sta-
tion is FM stereo).
Note:
You are able to select stereo or mono mode in FM band
only.
Using RDS (Radio Data System)
RDS is a system that transmits useful informa-
tion (in the form of digital data) for FM broadcasts
along with the broadcast signal. Tuners and receiv-
ers designed for RDS reception can extract the
information from the broadcast signal for use with
various functions, such as automatic display of the
station name.
RDS functions:
PTY (Program TYpe Identification) Search
Automatically tunes to a station that is currently
broadcasting the specified program type (genre).
PS (Program Service Name) Display:
Automatically displays the station name transmit-
ted by the RDS station.
Radio Text function:
Displays the radio text data transmitted by some
RDS stations when you press the RDS/DISPLAY
button. There is “NO TEXT” display if no text data
is transmitted.
•The icon “R·D·S” appears on the display when
an RDS broadcast (signal) is received.
continued to next page
Using the radio
Tuning in radio stations
1Press TUNER band/USB button (TUNER/
BAND/USB button on the remote control) to
select the desired waveband: FM or AM.
2Press and hold 4or ¢button (4or ¢
SEARCH/SKIP/TUNING button on the remote
control).
Repeat this procedure until the desired station
is reached.
To tune to a weak station briefly press 4or
¢button (4or ¢SEARCH/SKIP/TUN-
ING button on the remote control) repeatedly
until the display shows the desired frequency
or when the best reception has been obtained.
Storing preset
You can store up to 20 for FM and 20 for AM radio
stations in the memory. When a preset radio sta-
tions selected. The preset number appears on the
display.
1Press TUNER band/USB button (TUNER/
BAND/USB button on the remote control) to
select the desired waveband: FM or AM.
2Press 4or ¢button (4or ¢SEARCH/
SKIP/TUNING button on the remote control)
to tune to the desired frequency.
3Press program button (PROGRAM button on
the remote control) so that “– –” will start flash-
ing.
4If you wish to store the radio station to another
preset number, p.call/album up button (P.
CALL + button on the remote control) or p.call/
album down button (P. CALL – button on the
remote control) to select the desired preset
number.
5Press program button (PROGRAM button on
the remote control) again to store the radio
station.
Repeat steps 2to 5to store other preset ra-
dio stations.
Note:
During program, if no button is press within 20 sec-
onds, the system will exit program mode automatically.
5572/08-24/EN 05.3.29, 4:54 PM15

16 EN
ENGLISH
Using the radio
Program type table
Program Type Name Display
News NEWS
Current Affairs AFFAIRS
Information INFO
Sport SPORT
Education EDUCATE
Drama DRAMA
Culture CULTURE
Science SCIENCE
Varied Speech VARIED
Pop Music POP M
Rock Music ROCK M
Easy Music EASY M
Light Classical Music LIGHT M
Serious Classical Music CLASSICS
Other Music OTHER M
Weather WEATHER
Finance FINANCE
Children’s Program CHILDREN
Social Affairs SOCIAL
Religion RELIGION
Phone In PHONE IN
Travel TRAVEL
Leisure LEISURE
Jazz Music JAZZ
Country Music COUNTRY
National Music NATION M
Oldies Music OLDIES
Folk Music FOLK M
Documentary DOCUMENT
4Press 4or ¢button (4or ¢SEARCH/
SKIP/TUNING button on the remote control)
to start searching.
Notes:
•Under certain receiving conditions, it may take more
than 1 minute to complete the search.
•If the desired program type cannot be found, “NO
MATCH” is displayed, then after several seconds
the display returns to the original display.
Note:
Some functions and function names may differ certain
countries and areas.
Using the RDS/DISPLAY button
While receiving a RDS station, pressing the RDS/
DISPLAY button on the remote control changes
the contents of the display.
Every time the button is pressed, the display
changes in a following order :
PS (Program Service name) display
↓
PTY (Program TYpe) display
↓
RT (Radio Text) display
↓
Frequency display and preset number display
Tuning by Program TYpe (PTY
search)
This function lets you set the tuner to automati-
cally search for stations which are currently broad-
casting the type of program (genre) you want to
listen to.
1Press TUNER band/USB button (TUNER/
BAND/USB button on the remote control) to
select FM.
2Press PTY button on the remote control.
If the current station is with RDS, the program
type of the station is displayed.
3Press PTY button on the remote control to
select your desired program type.
5572/08-24/EN 05.3.29, 4:54 PM16

17 EN
ENGLISH
4Press 6or button to begin recording.
5Press 7stop button to end recording.
Radio recording tip
•To temporarily pause the recording, press rec
button (REC button on the remote control).
Press 6or button to resume recording.
Recording from a CD/MP3-CD/WMA-CD
1Insert a blank cassette tape into the tape deck.
2Press CD button to CD.
3Insert a disc and make sure that the unit is in
stop mode.
4Press 4or ¢button (4or ¢SEARCH/
SKIP/TUNING button on the remote control)
to select the first track/file you want to record.
5Press rec button (REC button on the remote
control) to set the unit into recording standby
mode.
The icon “REC.” appears on the display.
6Press 6button or button to begin re-
cording.
Press rec button (REC button on the remote
control) to interrupt recording. Press 6or
button to resume recording.
7Press 7stop button to end recording.
Notes:
•To ensure good system performance, wait until the
unit completely reads the disc before recording.
•During recording, it is not possible to listen to an-
other source.
Using the cassette
Playing a cassette tape
1Press TAPE mode button (TAPE/MODE but-
ton on the remote control) to TAPE.
2Press the area marked push open to open the
cassette compartment door.
3Insert cassette tape into the compartment with
the open edge facing down.
4Close the door securely.
5Press TAPE mode button (TAPE/MODE but-
ton on the remote control) to select the de-
sired reverse mode.
icon : plays only one side of the tape
and stops.
icon : plays both side and stops.
icon : plays both side endlessly.
6Press 4or ¢button to move tape to the
desired starting point.
7Press 6or button to select the tape run-
ning direction and begin playing the tape.
8Turn volume knob (press VOLUME UP or
DOWN button on the remote control) and press
EQ/X-bass button (EQ/X-BASS on the remote
control) to desired listening level.
Recording on a cassette tape
You can record from the radio or the CD player.
For best recording, use a normal bias tape (Type 1
only).
Recording from the radio
1Insert a cassette tape into the tape compart-
ment and close door.
2Press TUNER band/USB button (TUNER/
BAND/USB button on the remote control) to
TUNER and select a radio station.
3Press rec button (REC button on the remote
control) to set the unit into recording standby
mode.
The icon “REC.” appears on the display.
5572/08-24/EN 05.3.29, 4:54 PM17

18 EN
ENGLISH
Program recording from a CD/MP3-CD/WMA-
CD
Desired CD tracks/MP3 files/WMA files can be
programmed in the desired sequence and re-
corded onto a tape.
1Insert a blank cassette tape into the tape deck.
2Press CD button to CD.
3Insert a disc and make sure that the unit is in
stop mode.
4Program the desired sequence of CD tracks/
MP3 files/WMA files.
See page 10 and 11 for programming proce-
dure.
5Press rec button (REC button on the remote
control) to set the unit into recording standby
mode.
The icon “REC.” appears on the display.
6Press 6button or to begin recording.
7Press 7stop button to end recording.
Using the cassette
Recording from your personal computer
1Insert a blank cassette tape into the tape deck.
2Press TUNER band/USB button (TUNER/
BAND/USB on the remote control) and select
USB.
•When this unit is connected to your computer
with a USB cable and the unit detects the com-
puter, “USB LINK” is displayed.
See page 13 for the procedure.
3Perform the playback operation on your com-
puter.
For the operation of your computer, refer to
the instruction manual of your computer or the
manual of the audio reproduce software.
4Press rec button (REC button on the remote
control) to set the unit into recording standby
mode.
The icon “REC.” appears on the display.
5Press 6button or to begin recording.
6Press 7stop button to end recording.
5572/08-24/EN 05.3.29, 4:54 PM18

19 EN
ENGLISH
Clock/timer operation
Timer setting
The system can switch on to CD, TUNER or TAPE
mode automatically at a preset time, serving as
an alarm to wake you up.
The timer recording of radio programs onto a cas-
sette tape is also possible.
Important!
Before setting the timer, ensure that the clock
is set correctly.
When setting the timer (playback or record-
ing) for TUNER, be sure to select the station
you wish to tune in beforehand.
1Turn the system on.
2Press timer set button (TIMER SET button on
the remote control) twice to enter timer set-
ting mode.
The icon “TIMER ON” will start flashing on the
display.
3Press program button (PROGRAM button on
the remote control).
The hour indication will start flashing.
4Set the time to start playback.
Press 4or ¢button (4or ¢SEARCH/
SKIP/TUNING button on the remote control)
to set timer start hours and press program
button (PROGRAM button on the remote con-
trol) to store the setting.
Repeat the same procedure to set the minutes.
5Press timer set button (TIMER SET button
on the remote control).
The icon “TIMER OFF” will start flashing.
6Repeat the step 3and 4to set the time to
stop the timer (off time).
7Press timer set button (TIMER SET button on
the remote control).
The icon “TIMER” will flash and the source
display will appear.
View clock
The clock (if it is set) will be shown in standby
mode.
To view the clock in any source mode (CD, TUNER
or TAPE), press timer set button (TIMER SET
button on the remote control). The clock will be
displayed.
If the clock has not been set, “0:00” will start flash-
ing.
Clock setting
Before carrying out the clock setting, ensure
that the system is in standby mode.
1Press program button (PROGRAM button on
the remote control) to enter the hour setting
mode.
The hour indication will start flashing.
2Press 4or ¢button (4or ¢SEARCH/
SKIP/TUNING button on the remote control)
to set the hours.
3Press program button (PROGRAM button on
the remote control) to enter the minute set-
ting mode.
The minute indication will start flashing.
4Press 4or ¢button (4or ¢SEARCH/
SKIP/TUNING button on the remote control)
to set the minutes.
5Press program button (PROGRAM button on
the remote control) to store the setting.
The clock will start working.
To exit without storing the setting, turn on the
system.
Notes:
•The clock setting will be erased when the power
cord is disconnected or a power failure occurred.
•The clock can be set in either 12 or 24-hour mode.
To change the mode : When the system is in standby
mode, press timer on/off button while pressing 7
stop button.
continued to next page
5572/08-24/EN 05.4.1, 09:4319

20 EN
ENGLISH
8Press program button (PROGRAM button on
the remote control).
9Press 4or ¢button (4or ¢SEARCH/
SKIP/TUNING button on the remote control)
to select the desired source and press pro-
gram button (PROGRAM button on the remote
control) to store the setting.
The source switches as follows :
“CD” →“TUNER” →“TAPE” →“REC TU”
(recording tuner)
0Press timer set button (TIMER SET button
on the remote control).
The icon “TIMER” will flash and the volume
display will appear.
!Press program button (PROGRAM button on
the remote control).
@Press 4or ¢button (4or ¢SEARCH/
SKIP/TUNING button on the remote control)
to set volume level and press program button
(PROGRAM button on the remote control) to
store the setting.
#Press timer set button (TIMER SET button
on the remote control).
$Press timer on/off button (TIMER ON/OFF
button on the remote control) to activate timer
mode.
The icon “TIMER” changes from flashing to
steadily lit.
The timer is now set.
%Switch the system to standby mode.
When reached the preset timer, the selected
source will play or switch to standby mode if
the timer has been activated.
To activate / deactivate the timer
Press timer on/off button (TIMER ON/OFF but-
ton on the remote control). If activated, the icon
“TIMER” will appear on the display.
Notes:
•The timer off will not be activated if the starting and
stopping time are the same.
•If the selected source (“CD”, “TAPE” or “REC TU”)
is not available when preset timer is reached, TUNER
will be selected automatically.
•During timer setting, if no button is press within 7
seconds, the system will exit timer setting mode
automatically.
Sleep timer setting
If the sleep timer is activated, the system will
switch to standby mode after the selected time
has expired.
Each press of the SLEEP button on the remote
control decreases the timer period by 10 minutes.
The sleep timer can be set up to 90 minutes.
The display will change to sleep time display and
change as follows:
90 min - 80 min -70 min - 60 min - 50 min - 40 min
- 30 min - 20 min - 10 min - OFF - 90 min - 80 min...
The icon “SLEEP” will appear on the display.
While sleep mode is in active:
To deactivate the sleep timer
Press SLEEP button on the remote control or press
the button to turn the power off.
Note:
If timer off and the sleep off are all activated, the sys-
tem will switch to standby mode by the earlier timer
set.
Clock/timer operation
5572/08-24/EN 05.3.29, 4:54 PM20
Table of contents
Other Kenwood Stereo System manuals

Kenwood
Kenwood RD-M52MD User manual

Kenwood
Kenwood XD-302 User manual

Kenwood
Kenwood HM-DV77 User manual

Kenwood
Kenwood UD-901 User manual

Kenwood
Kenwood XD-9580MD User manual

Kenwood
Kenwood RD-C717 User manual

Kenwood
Kenwood C-707I User manual

Kenwood
Kenwood M-420DAB User manual

Kenwood
Kenwood HD-5MD User manual

Kenwood
Kenwood UD-952 User manual

Kenwood
Kenwood UD-900 User manual

Kenwood
Kenwood RD-C414-S User manual

Kenwood
Kenwood HM-DV7 User manual

Kenwood
Kenwood M-9000S User manual

Kenwood
Kenwood UD-901 User manual

Kenwood
Kenwood RXD-M52-L User manual

Kenwood
Kenwood MS-A7 User manual

Kenwood
Kenwood R-K711 User manual

Kenwood
Kenwood R-K731-B User manual

Kenwood
Kenwood SRC-702 User manual