Kestrel Ballistics HUD User manual

www.kestrelballistics.com
Instructions
Kestrel HUD Heads Up Display
for 5700 Ballistics Meters

CONTENTS
Get to Know Your Kestrel HUD ...................................... 4
Out of the Box.................................................................. 5
Hardware Installation .................................................... 6
Optional Remote Accessory .......................................... 9
HUD + Kestrel Connectivity......................................... 10
Screen Views & Features.............................................. 14
Settings Menu ............................................................... 20
Firmware Updates ........................................................ 22
Specications................................................................ 23

3
For additional help, support
videos and a full manual visit
www.kestrelballistics.com/help
or contact us at (610) 447-1555
LEAVE SCREEN PROTECTOR ON
HUD
CONGRATULATIONS ON THE PURCHASE OF YOUR KESTREL HUD
Point the camera in your
phone at the QR code
to watch installation and
getting started video.

4
SETTINGS/EXIT BUTTON:
Enter/Exit Settings
OFF
(Hold 1 second)
NAVIGATION BUTTONS:
Left (Up), Right (Down) and
Select Buttons
MODE BUTTON:
Change between screens
(Hold 2 seconds)
BACKLIGHT ON/OFF:
(Double Tap)
BATTERY
LIFE
STAGE
TIMER
BLUETOOTH
INDICATOR
NOTE: The function of the three buttons on the optional HUD remote mirrors the
three center navigation buttons on the HUD.
GET TO KNOW YOUR HUD
1

5
Remove HUD from clip and insert battery:
To remove the HUD from the clip, push back on the clip tab and pull the HUD forwards.
Press the button to open battery door.
OUT OF THE BOX
1Battery Door Release
Push clip tab back
Pull HUD forward

6
Insert HUD in clip:
Nest the notch on the front of HUD with the groove on the clip arm & line up the clip
with the clip retention slots on the rear of the HUD, then press HUD into clip.
NOTE: If using the remote, always detach the cable before inserting or removing
the HUD from the clip.
HARDWARE INSTALLATION
2
with the clip retention slots on the rear of the HUD, then press HUD into clip.
If using the remote, always detach the cable before inserting or removing
Clip Retention Slots 3

7
Attach Clip to Mount:
Use the included 3/32 hex key to attach the HUD clip to the mount. The clip can be
mounted higher or lower depending on the holes chosen.
NOTE: The HUD mount can be set up for left-handed shooters by removing the center
screw and re-attaching the mount arm in the opposite conguration.
(Thread locker and 1/8’’ hex key required.)
screw and re-attaching the mount arm in the opposite conguration.
(Thread locker and 1/8’’ hex key required.)
Left-handed shooters
3

8
Mount HUD on Gun:
Find a Picatinny rail spot on your rie and hand tighten the mount securely.
4

9
Based on your preference, you can choose to mount the HUD remote towards the front of the
gun for use with your trigger nger or at the rear of the gun for use with your support hand.
(If front mounting, ensure there is no interference with your bolt.)
OPTIONAL REMOTE ACCESSORY
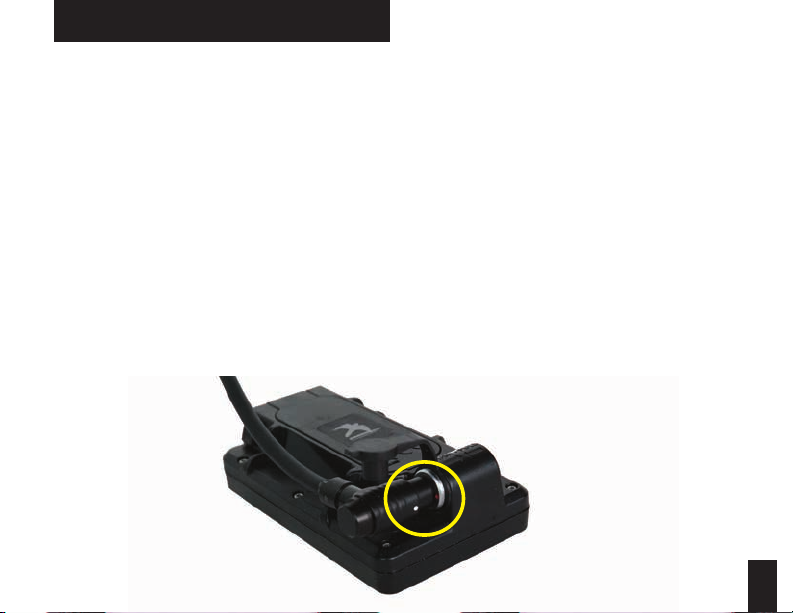
1. Connect the HUD to your rie and insert the remote connector to the cable port on the rear of the HUD. Make
sure to line up the white dot on the remote cable with the red dot on the HUD cable port.
2. Conrm the location you want to place the HUD remote on your rie. With the included alcohol wipe, clean
both the rear of the HUD remote and the location on your rie where you’d like to attach the remote.
3. Remove the adhesive backing from one side of the hook and loop fastener and apply it to the back of the
remote. Remove the other side of the adhesive backing and apply it to your rie. To conrm good adhesion, let
sit for at least an hour.
4. Use the included cable fastener to secure any additional cable to your rie. (Wrapping additional cable around
your scope can help to secure additional cable as well.)

10
Turn HUD and Kestrel ON
Press and hold the power button on the HUD.
Press and hold the power button on the Kestrel.
HUD + KESTREL CONNECTIVITY
5

11
Connect HUD to your Kestrel
» Enter the Kestrel’s Settings Menu by pressing the Settings Button.
» Scroll down to Bluetooth line, ensure Bluetooth is toggled‘On’
and press the center button.
» Toggle Conct to Device using the left or right buttons.
(Steps continued on next page.)
6

12
» Scroll down to HUD Connect and press Select.
» In the Name eld, scroll left or right till New is shown
and press select, then select your HUD from the list
of available devices within range.
NOTE: Check to the serial number either from the‘About’
menu in the HUD Settings, or from the serial number sticker
on the the back of your HUD to conrm it matches the HUD
you choose to connect.
NOTE: If your HUD does not appear, check the Bluetooth ON/
OFF setting in your HUD’s Settings menu and make sure you
are within Bluetooth range.
6a

13
» Selecting your HUD will bring up the HUD Management screen.
Once the connection is established the Rename eld will change
from being underlined to being highlighted in black, indicating
the connection is fully active.
» Exit the Bluetooth menu by pressing the
Settings Button until you return to the
Solutions Screen.
» Your Kestrel and HUD are now
connected! Solutions from your Kestrel
will show up automatically on your HUD.
NOTE: When your Kestrel is connected to the HUD,
you will not be able to simultaneously connect to the
LiNK Ballistics app. In order to reconnect to the LiNK
Ballistics app, go back to the Conct screen and toggle
to Conct PC/Mobile. You will then be able to connect
with the app.
6b

14
Single Target Screen - Regular Font
HUD Remote
SCREEN VIEWS & NAVIGATION
(On HUD or Remote if available)
» Enter the Settings Menu and go to Single Target setup to change the
values displayed on the two user settable elds, Single Target Row 1
and Single Target Row 2.
» Enter the Settings Menu to change the Stage Timer setting.
» Press and hold the square button for 2 seconds to move to the next
screen available.
Start/Stop Stage Timer
Change Target Range
Change Wind
Direction
Function Buttons
or
1.
3.
2. N/A
or or

15
NOTE: Stage Timer not available on Single Target Large Font Screen.
HUD Remote
(On HUD or Remote if available)
or
Change Target Range
Change Wind
Direction
Function Buttons
or
Single Target Screen - Large Font
1.
3.
2. N/A
or

16
*Target Card and DOPE Card screens
available only when paired with the
Kestrel 5700 Elite model.
HUD Remote
(On HUD or Remote if available)
or
Start/Stop Stage Timer
Change Third Column
Function Buttons
» Enter the Settings Menu to change the Stage Timer Limit value.
Target Card Screen - Regular Font
or

17
HUD Remote
(On HUD or Remote if available)
or
Start/Stop Stage Timer
Change Targets
Function Buttons
» Enter the Settings Menu to change the Stage Timer setting.
Target Card Screen - Large Font
or
*Target Card and DOPE Card screens
available only when paired with the
Kestrel 5700 Elite model.

18
*Target Card and DOPE Card screens
available only when paired with the
Kestrel 5700 Elite model.
» Enter DOPE Card in the Settings Menu to update DOPE card data from
a paired Kestrel. Set up the Range Card in your Kestrel rst as the HUD
DOPE Card will mirror the Gun prole, Environmentals, Wind etc in
the Kestrel. If your direction of re is expected to change, set DoF and
Ideg to 0 and wind direction to 3:00 to make a generic DOPE card and
minimize direction related error.
HUD Remote
(On HUD or Remote if available)
or
Scroll Target Ranges
Change Third Column
Function Buttons
DOPE Card Screen
or
or
or
1.
2.
3.

19
Settings Menu Navigation
HUD Remote
(On HUD or Remote if available)
or
Scroll Up/Down
Enter Sub Menu /
Start Command
Make setting editable
or start command
Change setting
Accept setting
Exit Settings Menu
Function Buttons
or
or
or
or
N/A
1.
2.
3.

20
Bluetooth:
» Bluetooth On/O - Turn Bluetooth o to lock HUD values and disable the radio.
» Unlock (Appears if HUD is locked by a Kestrel)
Stage Timer (Press center button to enter sub menu):
» Timer Limit - Sets the starting amount of time on the stage timer.
» Timer Start - Sets if the timer starts with the button press or on a 3 second delay.
» Timer Warning - Sets when the timer color inverts to warn time is about to end.
Screens (Allows user to turn o unwanted screens):
» Single Target Regular Font On/O
» Single Target Large Font On/O
» Target Card Regular Font On/O
» Target Card Large Font On/O
» DOPE Card On/O
SETTINGS MENU
Table of contents