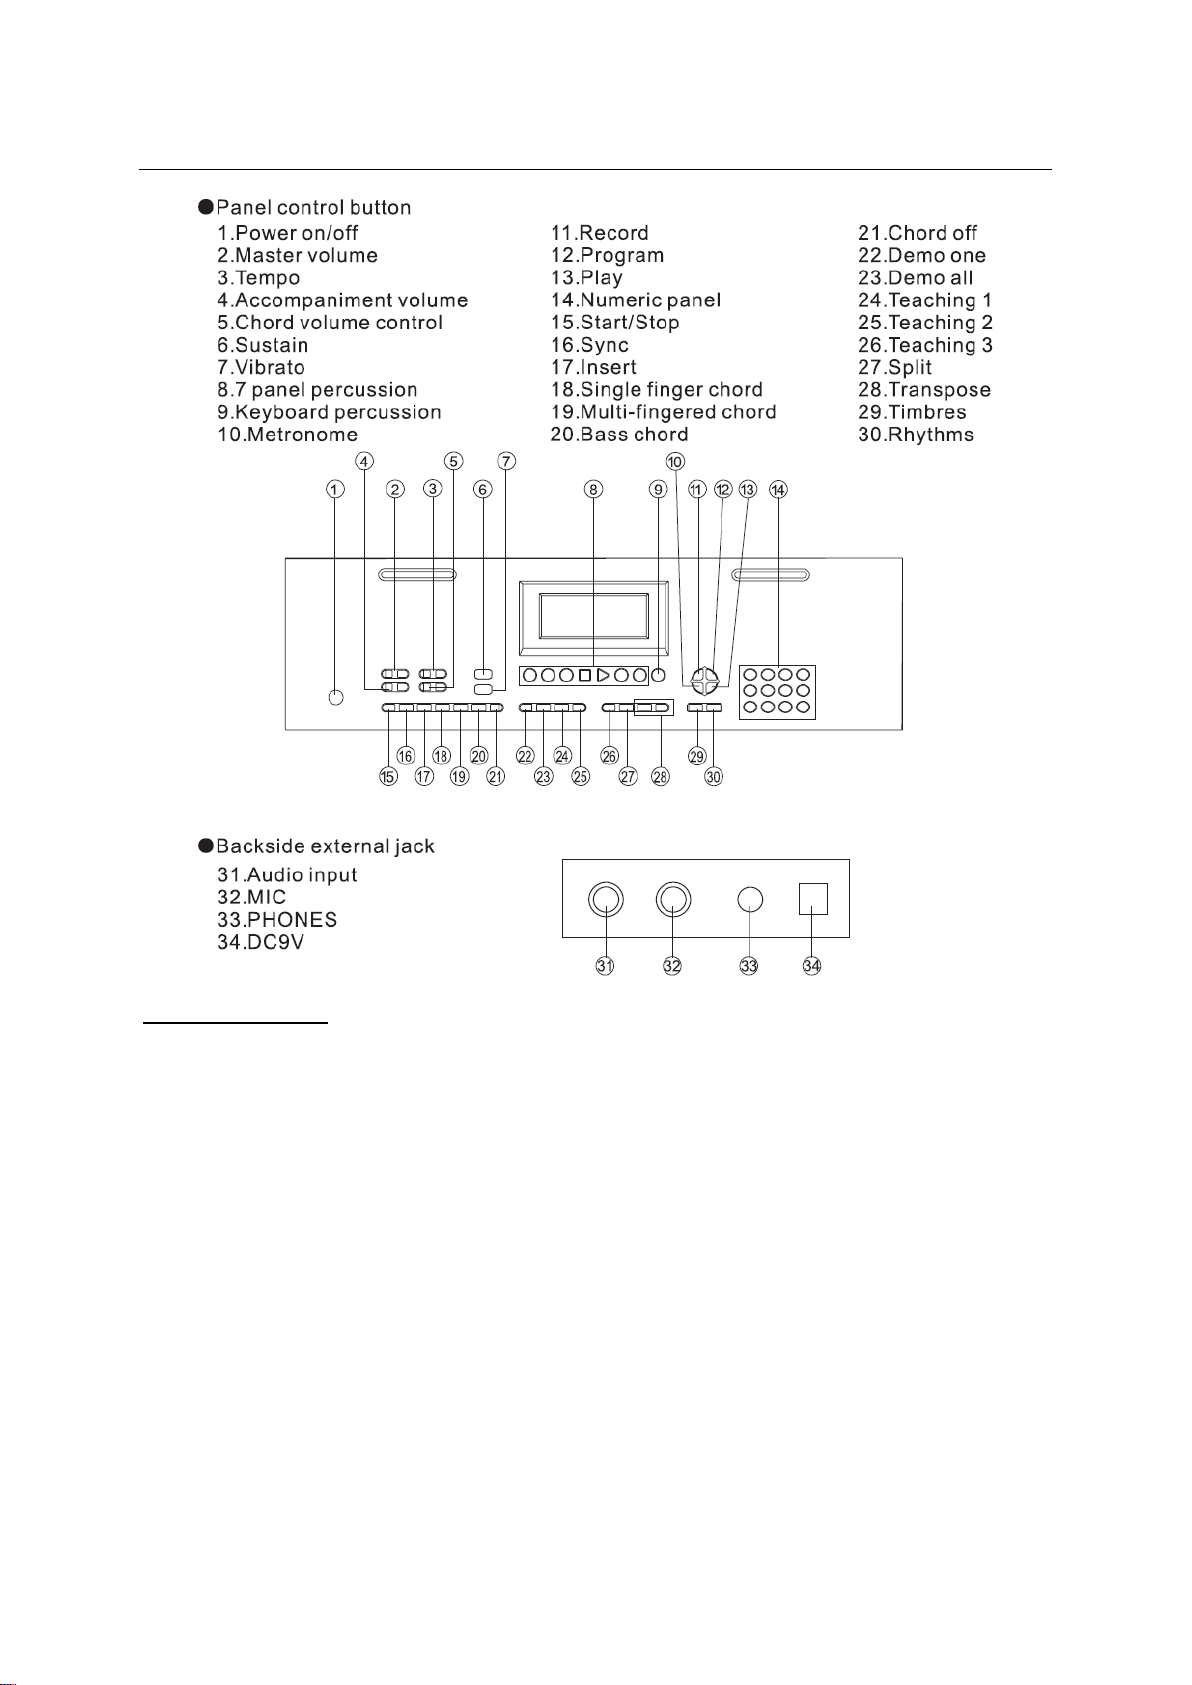
keymaXX PK-254 User manual

PK-254
02/2023
KEY0005410-000
user manual

Congratulations on your new keymaXX PK-254 keyboard!
Thank you for choosing a keymaXX product. Thanks to efficient development and
economical production, keymaXX makes high-quality products at a fantastic price possible.
Please read these operating instructions carefully to be informed about all functions of
this product and keep them for future reference
Have fun with your new product!
Your keymaXX Team
Guarantee:
The current
general terms and conditions and guarantee conditions of Music Store
professional GmbH apply.
Can be viewed under: www.musicstore.de
If you have any questions or suggestions, please contact us:
Music Store professional GmbH Istanbulstr. 22-26
51103 Köln
Managing Director: Michael Sauer WEEE-Reg.-Nr. DE 41617453
Tel: +49 221 8884-0
Fax: +49 221 8884-2500
Intended use:
The keymaXX PK-254 is a digital home keyboard, designed to play sounds on the keyboard
and make them audible through built-in speakers or headphones. Improper use of the
product is considered improper and can lead to personal injury or property damage. No
liability is assumed for damage resulting from improper use.
It must be ensured that the device is operated exclusively by trained and competent users
who are in full possession of their mental, physical and sensory abilities. The use by other
persons is only permit-ted under the supervision or guidance of a person responsible for their
safety.

Important safety instructions! Please read before connection!
CAUTION! (Electro Magnetic Interference)
The normal function of the product may be disturbed by Strong Electro Magnetic
Interference. If so, simply reset the product to resume normal operation by following
the owner‘s manual. In case the function could not resume, please use the product
in other location.
DANGER! (For babies and children)
Dispose of or store any packaging material properly! Packaging material must be
kept out of the reach of babies and children due to the
danger of suffocation
.
Make sure that children never use the device unattended! In addition, make sure
that children do not remove (small) parts from the device, as they could suffocate
by
swallowing parts!
DANGER! (Electric shock due to high voltages in the device)
The housing must not be removed! There are
no
parts to be maintained in the
device. Inside the unit there are components which are under high electrical
voltage.
Before each use, check the device for damage or the absence of components,
protective devices or housing parts. If this is the case, do not use the device! Leave
maintenance and repair work to a qualified service workshop or contact
your
dealer.
DANGER! (Electric shock due to short circuit)
Modifications to the power cord or plug are prohibited. If the power cord is dama-
ged, it must be replaced immediately with an original spare part from the
manufacturer. Failure to do so may result in fire or death due to electric shock!
WARNING! (Damage to hearing)
The unit may generate volumes that may cause temporary or permanent hearing-
loss. Over time, even seemingly uncritical levels can cause hearing damage.
Reduce the volume immediately if ear noise or hearing loss occurs. If this is not
possible,
keep a greater distance or use adequate hearing protection.
Hint! (Fire hazard due to overheating)
The maximum permissible ambient temperature of this device is
40°C.
Ensure that the unit is placed in a place with adequate ventilation, out of the reachof
direct heat sources, naked flames and combustible materials and liquids.
The ventilation slots of the device must not be taped or covered.

Hint! (Operating conditions)
Due to its structural characteristics, the device is designed for indoor operation
(IP20). Never expose the device to rain, moisture or liquids as this may cause
damage.
Vibrations, dust or solar radiation can also lead to damage, avoid them!
Do not
apply excessive force to the switches or controls.
Do not let paper, metallic, or other objects into the instrument. If this happens,
remove the electric plug from the outlet. Then have the instrument inspected by
qualified service personnel.
Disconnect all cables before moving the instrument.
Hint! (Power supply)
It is essential that you check that the device voltage matches your local mains
voltage. It is
highly recommended
that you fuse your mains socket with a residual
current circuit breaker (FI).
Please connect the designated AC adaptor to an AC outlet.
If you do not use your device for a longer period of time, disconnect it from the
power supply in order to minimize danger. The same applies to storm conditions
such as thunderstorms, floods, etc.
Hint! (Commissioning)
All connections of the device should be made before switching on.
Use only high-
quality cables for connections.
Hint! (Installation)
Be sure to inspect the device for damage before using. Optimum use of the
original packaging or suitable transport or storage packaging to protect the product
when not in use. Optimally against influences such as dust or moisture, etc.
Hint! (Possible damage due to magnetic fields)
Loudspeakers generate a static magnetic field. Please keep an appropriate
distance from other equipment that may be affected or damaged by an external
magnetic
field.

Hint! (Interferences with other electrical devices)
Radios and televisions placed nearby may experience reception interference.
Operate this unit at a suitable distance from radios and televisions.
If this equipment does cause harmful interference to radio or television reception,
which can be determined by turning the equipment off and on, the user is
encouraged to try to correct the interference by one or more of the following
measures:
Reorient or relocate the receiving antenna
Increase the separation between the equipment and receiver.
Connect the equipment into an outlet on a circuit different from that to
which
the receiver is connected.
Consult the dealer or an experienced radio/TV technician for help.
THE FCC REGULATION WARNING (for USA)
This equipment has been tested and found to comply with the limits for a Class B
digital device,
pursuant to Part 15 of the FCC Rules.
These limits are designed to provide reasonable protection against harmful interference in a
residential installation. This equipment generates, uses, and can radiate radio frequency energy
and, if not installed and used in accordance with theinstructions, may cause harmful interference
to radio communications. However, there is no guarantee that interference will not occur in a
particular installation.
Symbols on device and packaging:
The lightning flash symbol warns the user about non-insulated current and the risk
of electrocution
The exclamation mark symbol warns the user about important maintenance and
operating instructions in the manual
Intended for indoor use
Read manual

Cleaning:
A regular cleaning of the device from impurities and dust increases the durability of the product.
Always disconnect the device from the power supply before cleaning it! Never clean the appliance
wet! Optical lenses should be cleaned with a dry microfiber cloth to optimize light output. Ventilation
grilles and openings should always be cleaned of dust and dirt. Suitable compressed air sprays
are
recommended for this application.
Environmental Protection:
The company MUSIC STORE professional GmbH always strives to reduce the
burden of packaging to a minimum. The use of environmentally friendly and
recyclable materials is of fundamental importan
ce to us. Please recycle the
packaging components after use.
Disposal of packaging:
Ensure that paper packaging, plastic material, etc. are recycled separately. Observe
the labels and the corresponding regulations.
Disposal of batteries:
Batteries do not belong in the garbage! Please dispose of batteries in accordance
with official regulations at collection points or disposal stations.
Disposal of your old device:
Do not dispose of the device with household waste! This device is subject to the
WEEE Directive (Waste Electrical and Electronic Equipment) in its currently valid
version.
The device is to be disposed of by an approved disposal company or your local
waste disposal service. The regulations applicable in your country must be
obser
ved!
Manufacturer: MUSIC STORE professional GmbH,
Istanbulstr. 22-26, 51103 Cologne, Germany

INSTRUCTIONS FOR PANEL CONTROL AND EXTERNAL JACKS
POWER SUPPLY
Battery
This keyboard use 6 piece battery double A. Battery jar is in the backside of the keyboard.
Please make sure the battery are right putted inside. When the battery power runs out,
thekeyboard will not pronounce or the tone will be distorted. Please replace a new sei of
batteries. Please remove batteries when no using for a long time.
AC adapter
You must use the adapter packed with this keyboard. Please note !hat the inputvoltage must
be the same as the mains voltage when using the power adapter!
Unplug the AC plug when
you are not using the keyboard.
External jack use
MIC: Insert the microphone plug into the MIC jack to sing.
PHONES OUTPUT: Insert the earphone plug into the PHONES OUTPUT Jack to
avoid affecting
others during personal practice. This jack can also be connected with other sound
reinforcement audio equipment to obtain a more powerful and beautiful sound effect.
AUDIO INPUT: This keyboard has stereo audio input function, which support audio signals
playing from mobile phones, music players, and computers to the
keyboard.
First turn off the power, then connect the audio device and AUDO INPUT jack by
audio cable,
and then turn on the power.

FUNCTIONS
Pressing the [Power] switch, the LCD screen will illuminate and the
keyboard is on
working.
1. Timbres selection
Pressing [Timbres] button to enter timbres selection mode, and choose the timbre
you
need by numeric panel. Under chord mode, the 19 keys on the left of the keyboard
are chordtones,instead of corresponding tones.
2. Sustain & Vibrato
Sustain: automatic extension of the end of a note played
Vibrato: the pitch of a note
quivers in a small range Sustain and Vibrato are only effective for playing mode.
3. Automatic accompaniment function
Rhythms selection: Pressing [Rhythms] button to enter rhythms selection
mode, and choose the rhythms you need by numeric panel. Pressing
[Start/Stop] button to stop.
Accompaniment selection: lt can be divided into single- finger chord and
multi- finger chord. Without rhythm playing, the chord will be manual chord
playing. With rhythm playing, the chord will be automatic chord of the
corresponding rhythm.
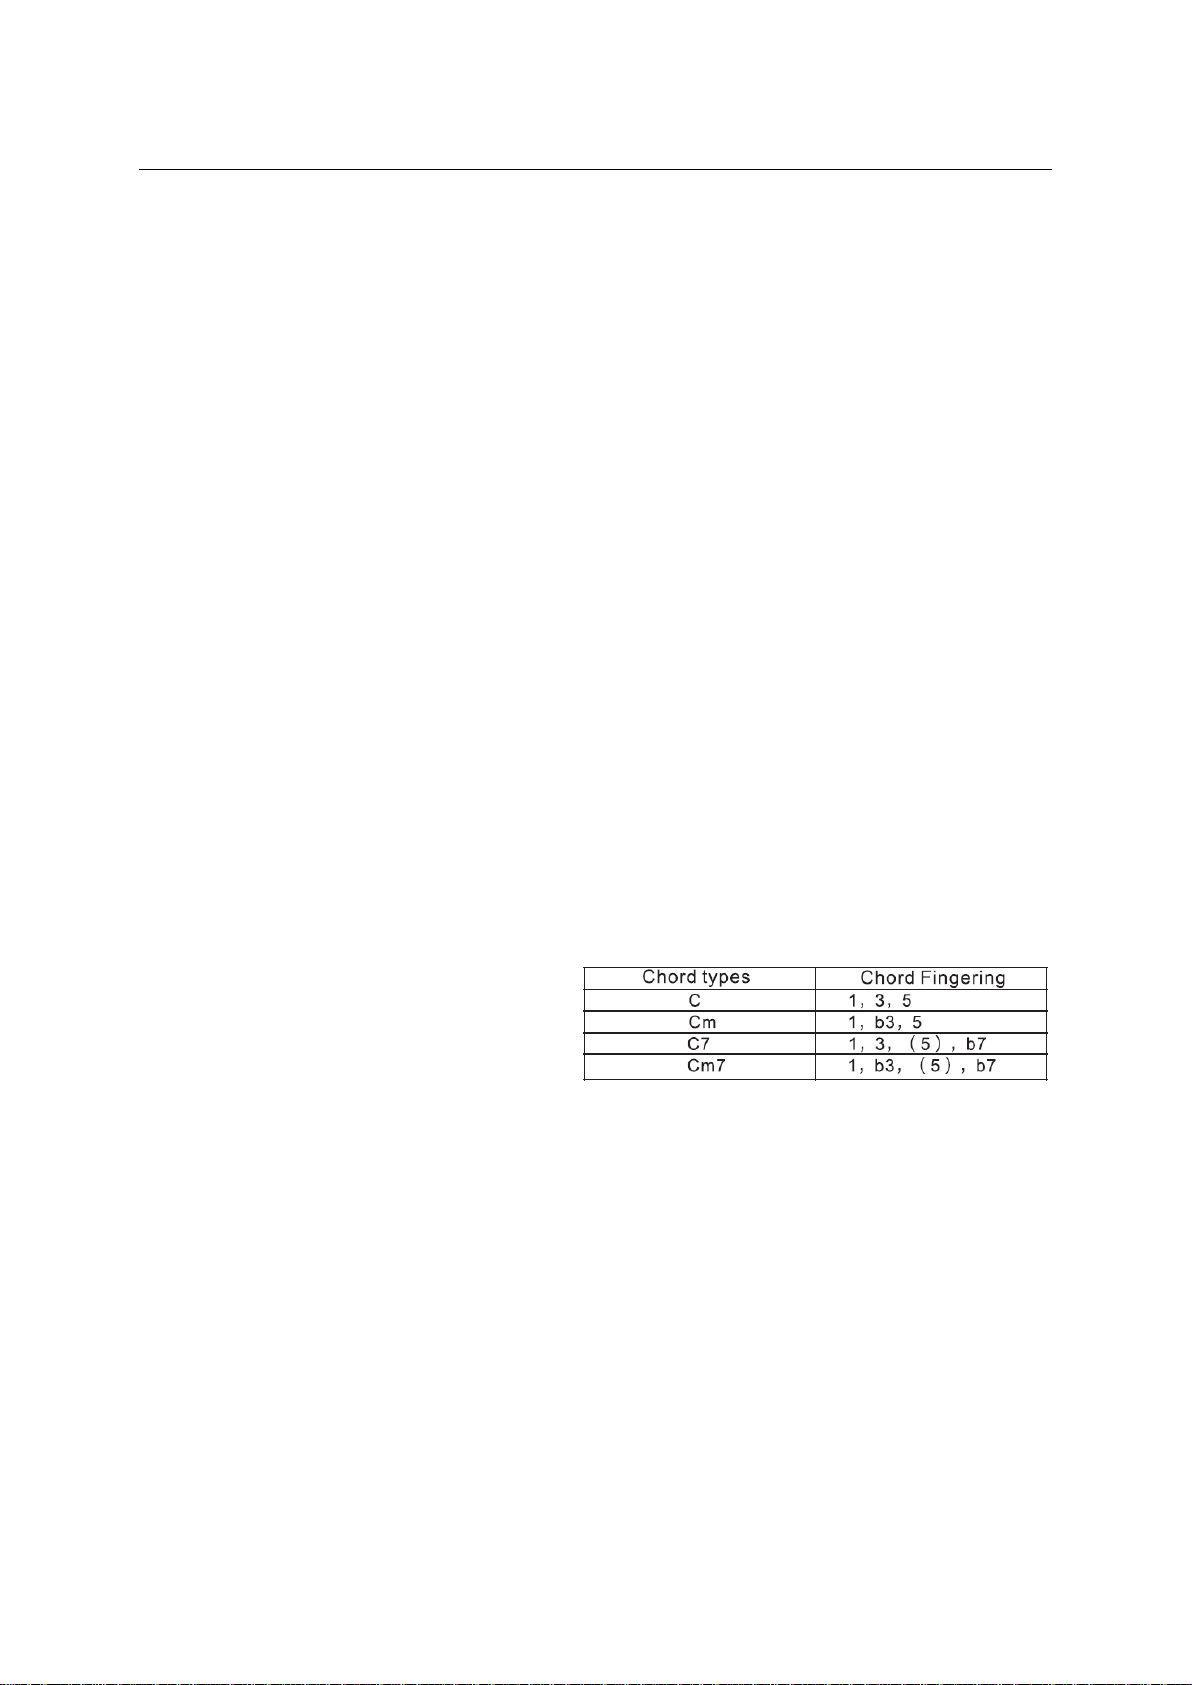
Single- finger chord: Pressing [Single finger] button to turn on/off.See below
single finger chord playing:
Major triad: Root playing
Minor triad: Pressing root and one black key on its left at the same time Dominant
7th: Pressing root and one white key on its left at the same time.
Minor seventh chord: Pressing root and one white key and one black key on
its leftat the same time.
Multi-fingered chord: Pressing [Multi finger] button to turn on/off. See below
single finger chord playing:
Note: ( ) means support for simplified identification fingering types
Under rhythm playing mode, turn on single finger or multi-finger chord, and the
corresponding accompaniment will be added automatically when playing chord. Turn off
single finger or multi finger or chord off, the accompaniment will stop, but the rhythm will
continue.
lf pressing [Chord off] button, chord functions or accompaniment are off. All keys will
back to normal.
Chord timbres selection: Pressing [Bass chord] to change chord timbres. Automatie
accompaniment control
Under rhythm playing, pressing [Insert] button to insert a interlude. Keep pressing
[Insert] button can replay this interlude.
Sync: Pressing [Sync] button to enter sync function. The automatic rhythm or
accompaniment starts when pressing keys in accompaniment area first time.
Pressing this key during the rhythm will stop the rhythm and enter the synchronization
state.
Tempo: [Tempo] button is effective for demos and rhythms. Pressing +/- at the same
will back to the default speed.

FUNCTIONS
4.
Volume control
Master volume control: 8 levels in total. The default volume is level 4. Pressing [+][-]
to adjust.
Chord volume: 8 levels in total. Adjust the chord volume.
Accompaniment volume: 8 levels in total. Pressing [+][-] to adjust the percussion
volume.
Pressing the [+] and [-] button of the corresponding volume at the same time for
about 2 seconds, and the corresponding volume will restore the default value.
5.
Percussion
There are 61 percussion sounds. Pressing [Percussion] button, then the keyboard
will convert into keyboard percussion keys. Each key corresponds to a percussion
instrument.
6.
Metronome
Pressing [Metronome] button to start the metronome. The metronome effect will be
added when playing. Continuous pressing are: 1/4 beat 2/4 beat; 3/4 beat; 4/4 beat:
stop.
7. Split
Pressing [Split] button, 61 black and white keys are divided into two keyboard areas.
Then 24 keys on the left are separated from the original keyboard,which the pitch
raised 8 degrees, and keep original timbre.
The pitch of the right part decreases 8 degrees, which is consistent with the left one.
The right part timbres can be selected as required, and the left and right part can
play different timbres at the same time.
8. Transposition control
Pressing [Transpose +] or [Transpose -] to change the playing method, which the
entire keyboard pitch change in semitones. The adjustment range is between "+6"
and "-6”.
9. Record and Program
(
Maximum 45 notes)
Pressing [Record] button to enter the recording mode. Under recording mode,
pressing keys to record notes. Chord and percussion cannot be recorded
when full and notes recorded will not be affected. After you stop recording,
press the [Play]
button to play the recorded notes one by one. Press [Play] again
to stop playback.
New recording can be continued while playback is stopped.
Pressing [Play] button to play recorded notes successively. Pressing again to
stop.
Under recording mode, pressing [Record] or [Stop] button to exit recording
function.
Maximum 32 percussions can be edited.
Pressing [Program] button enter program mode. Under the program mode,
pressing the keys to edit drum sounds (percussion). Percussions can't be
programmed when it's full. After finishing programming, pressing [PLAY]
button to play percussion successively. Pressing again to stop. New
programming can be continued while playback is stopped.
Under programming mode, pressing [Program] or [Stop] button to exit
program function.

FUNCTIONS
10. Demos
Demo one: Pressing [Demo one] button to Single tune repeat. Pressing
again or[Start/Stop] button to exit.
Demo all: Pressing [Demo one] button to Single tune repeat. Pressing again
or[Start/Stop] button to exit.
Under demos playing mode, you can select the corresponding song by
numericpanel or +/- numeric panel.
11.Teaching mode
Pressing (Teach 1], [Teach 2], (Teach 3] button to enter corresponding teaching mode.
Teach 1: No matter what the note you play right or not, the keyboard will still
play correctly.
Teach 2: Only the note playing is right, the keyboard will continue, or it will
stop until you play right.
Teach 3: The main note will be not played, which similar to the Karaoke
function, and the accompaniment will not stop. lf no notes played in 3s, the
main notes will display.
Pressing any button of teaching mode to exit.
DEMO SONGS

300 TIMBRES

300 TIMBRES

300 RHYTHMS

300 RHYTHMS
Table of contents
Other keymaXX Keyboard manuals
Popular Keyboard manuals by other brands

Lenovo
Lenovo Preferred Pro user guide

Teletek electronics
Teletek electronics BRAVO KBD Installation and Operation User Manual

GMK electronic design
GMK electronic design UNIQEY Q100 operating manual

Commodore
Commodore VIC-20 Programmer's reference guide

Trust
Trust DIRECT ACCESS II quick start guide

KLIM
KLIM DUO quick guide