KHIND RF200 User manual

www.khind.com.my
model / 型号
RF200/RF270/RF350
P/N: 40-51359-00
Instruction Manual / 说明指示书/Buku Panduan
Please read this manual carefully before operating this product. Keep this manual handy for further reference.
请在使用此产品前,详读此说明书。并将之收藏以作日后参考。
Sila baca buku panduan ini dengan teliti sebelum menggunakan produk ini. Simpanlah untuk rujukan masa depan.
Important / 重要/Mustahak
This manual is also available online.
Refrigerator
/
冰箱
/
Peti Ais

1 2
Safety Precaution Information
!Safety Precaution Information
!
Daily Use
1. Do not put hot on the plastic parts in the appliance.
2. Frozen food must not be re-frozen once it has been thawed out.
3. Store pre-packed frozen food in accordance with the frozen food manufactures instructions.
4. Appliances manufacturer’s storage recommendations should be strictly adhered to. Refer to relevant instructions.
5. Do not place carbonated of frizzy drinks in the freezer compartment as it creates pressure on the
container, which may cause it to explode, resulting in damage to the appliance.
6. Ice lollies can cause frost burns if consumed straight from the appliance.
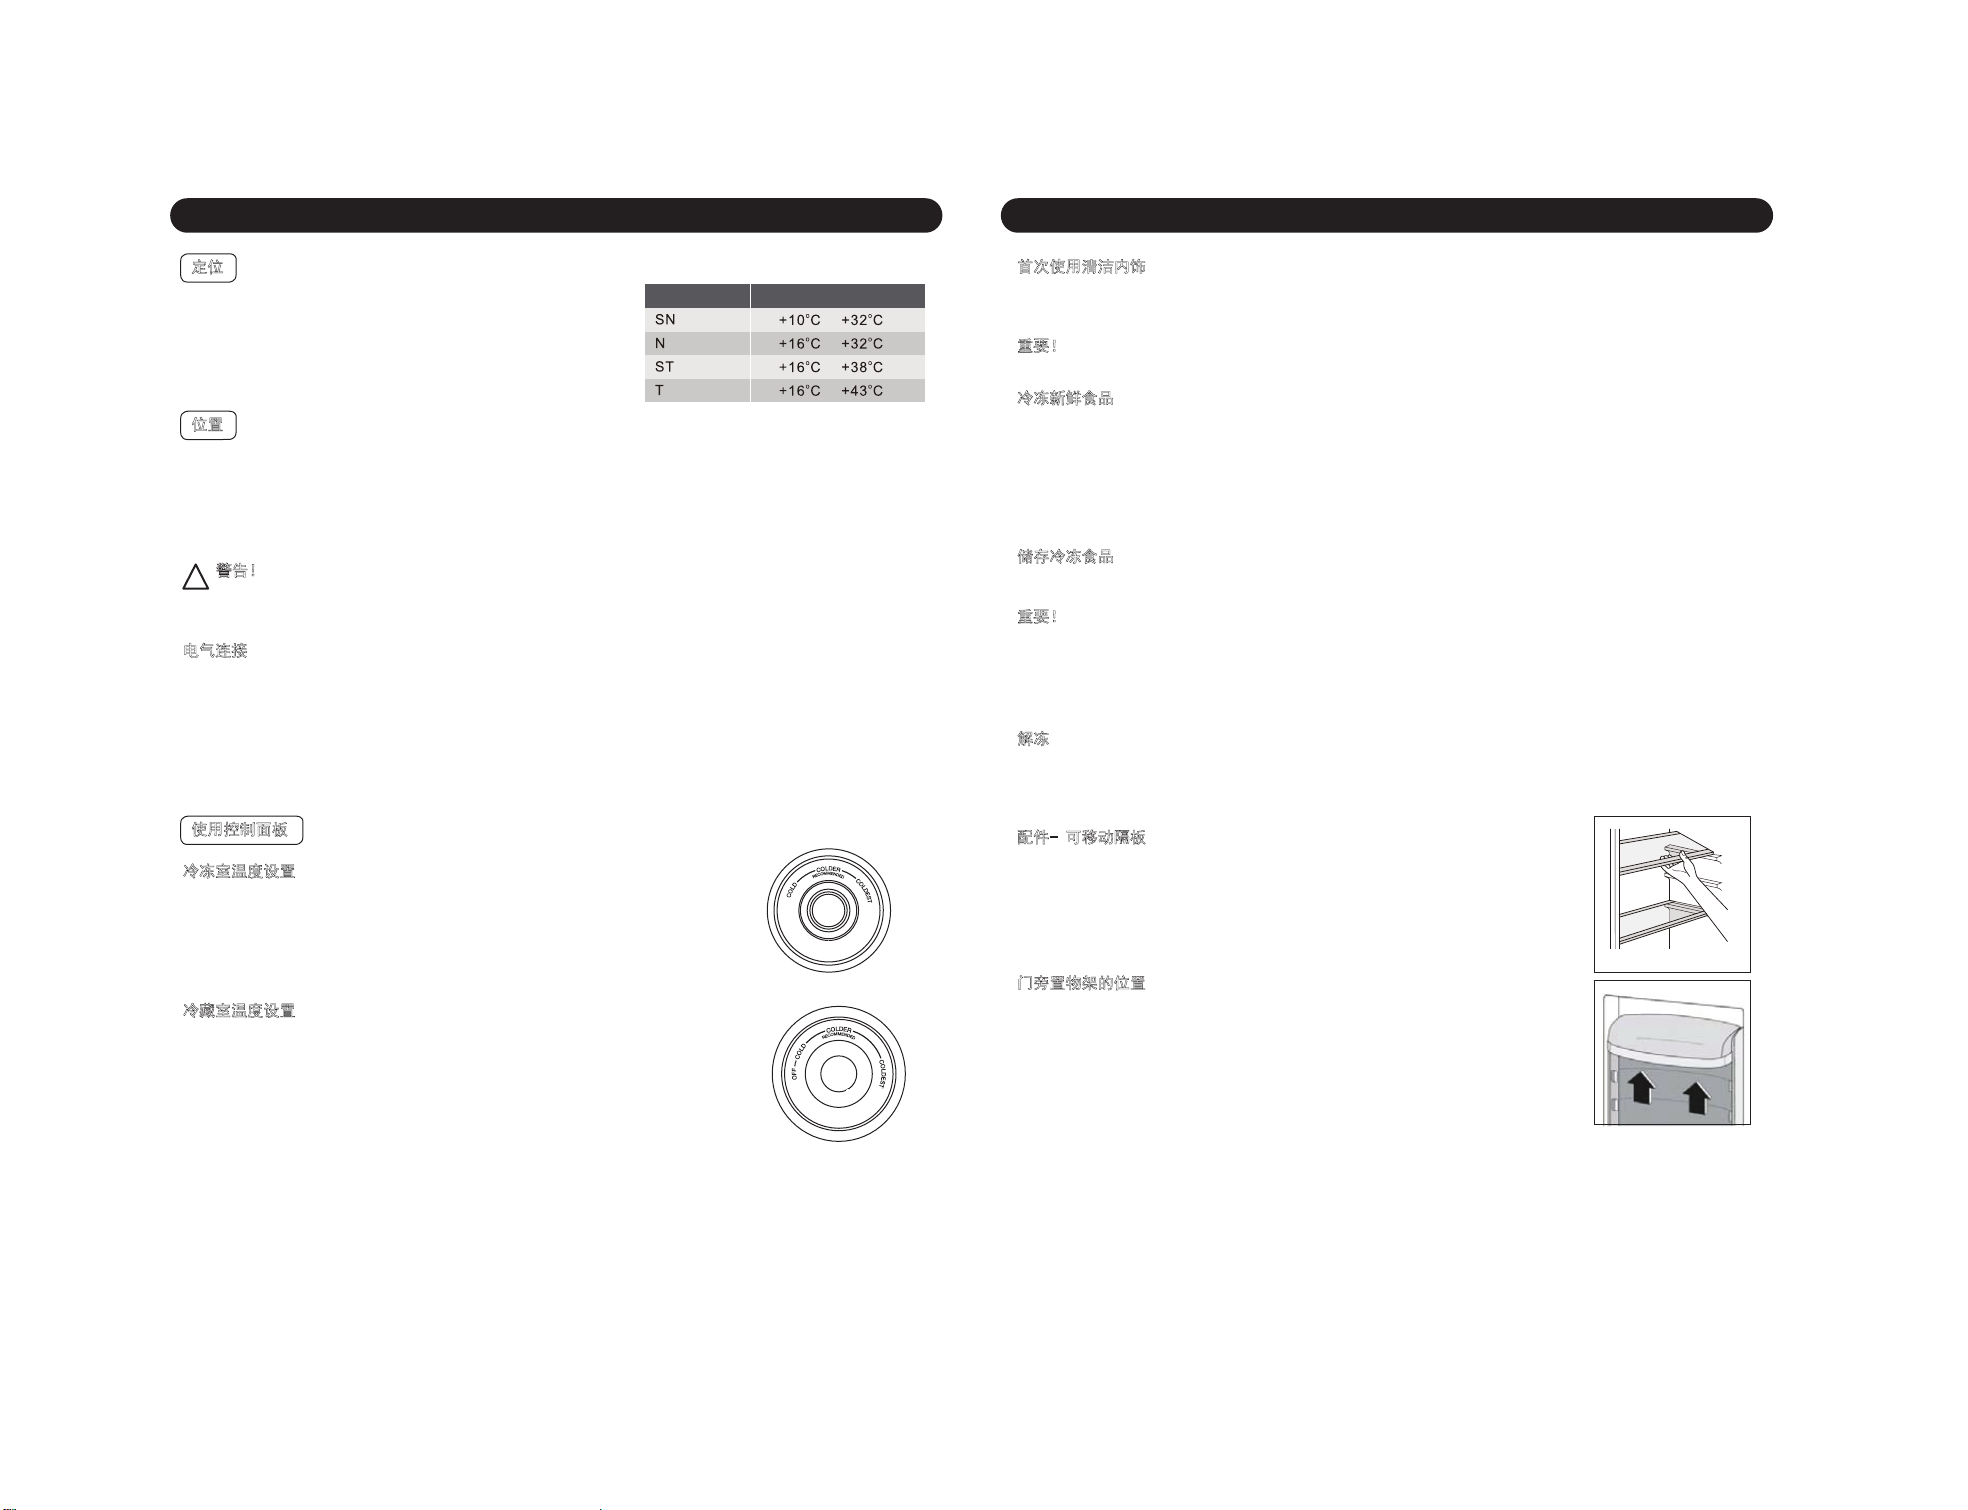
Energy Saving
1. Do not put hot food in the appliance.
2. Do not pack food close together as this prevents air circulating.
3. Make sure food don’t touch the back of the compartments.
4. If the electricity goes o, don’t open the door.
5. Do not open the doors frequently.
6. Do not keep the doors open for too long time.
7. Do not set exceeding cold temperatures.
8. Some accessories, such as drawer can be removed to get larger storage volume and lower energy consumption.
Service
Any electrical work required to do the servicing of the appliance should be carried out by a qualied electrician
or competent person. This product must be serviced by an authorized service centre and only genuine spare
parts must be used.
Attentions
Before using this product, please read through the instruction manual, and preserve the booklet for the later
reference.
Safety & warning information
1. Always operate the appliance from a power source of the same voltage, frequency and rating as indicated on
the appliance’s rating marking.
2. This appliance is intended for household use only. Do not use outdoors. Do not use the appliance for any other
purposes other than its intended use.
3. This appliance is not intended for use by persons (including children) with reduced physical, sensory or mental
capabilities, or lack of experience and knowledge, unless they have been given supervision or instruction
concerning use of the appliance by a person responsible for their safety.
Children should be supervised to ensure that they do not play with the appliance.
4. WARNING! Keep ventilation openings, in the appliance enclosure or in the built-in structure, clear of obstruction.
5. WARNING! Do not use mechanical devices or other means to accelerate the defrosting process, other than those
recommended by the manufacturer.
6. WARNING! Do not damaged the refrigerant circuit.
7. WARNING! Do not use other electrical appliances (such as ice cream makers) inside of food storage compartment
of the appliances, unless they are of the type recommended by the manufacturer.
8. WARNING! Any electrical components (plug, power, compressor and etc.) must be replaced by a certied service
agent or qualied service personnel.
9. WARNING! If the supply cord is damaged, it must be replaced by the manufacturer, its service agent or similarly
qualied persons in order to avoid a hazard.
10. WARNING! When positioning the appliance, ensure the supply cord is not trapped or damaged.
11. WARNING! Do not locate multiple portable socket outlet or portable power supplies at the rear of the appliance.
12. WARNING! Risk of re/ ammable materials
13. Do not store explosive substances such as aerosol cans with a ammable propellant in this appliance.
14. Do not stored bottled or canned drinks (especially carbonated drinks) in the freezer compartment.
15. The refrigerant isobutane (R600a) is contained within the refrigerant circuit of the appliance, a natural gas with a
high level of environmental compatibility, which is nevertheless ammable.
16. It is dangerous to alter the specications or modify this product in any way. Any damage to the cord may cause
a short circuit, re and or electric shock.
17. This appliance should be placed in a cool dry place where there is no vicinity of water splashing or high humidity.
This appliance should not be used in the immediate vicinity of water, such as bathtub, washbowls, swimming
pools etc.
18. Always switch o and unplug the plug from outlet when not in use and before cleaning.
19. When the appliance is operating, the condenser and compressor will be hot.
20. Do not remove nor touch items from the freezer compartment if your hands are damp/wet, as this could cause
skin abrasions or frost/freezer burns.
21. This appliance will create frost in the freezer compartment if the environment has high humidity or the appliance
door is opened frequently.
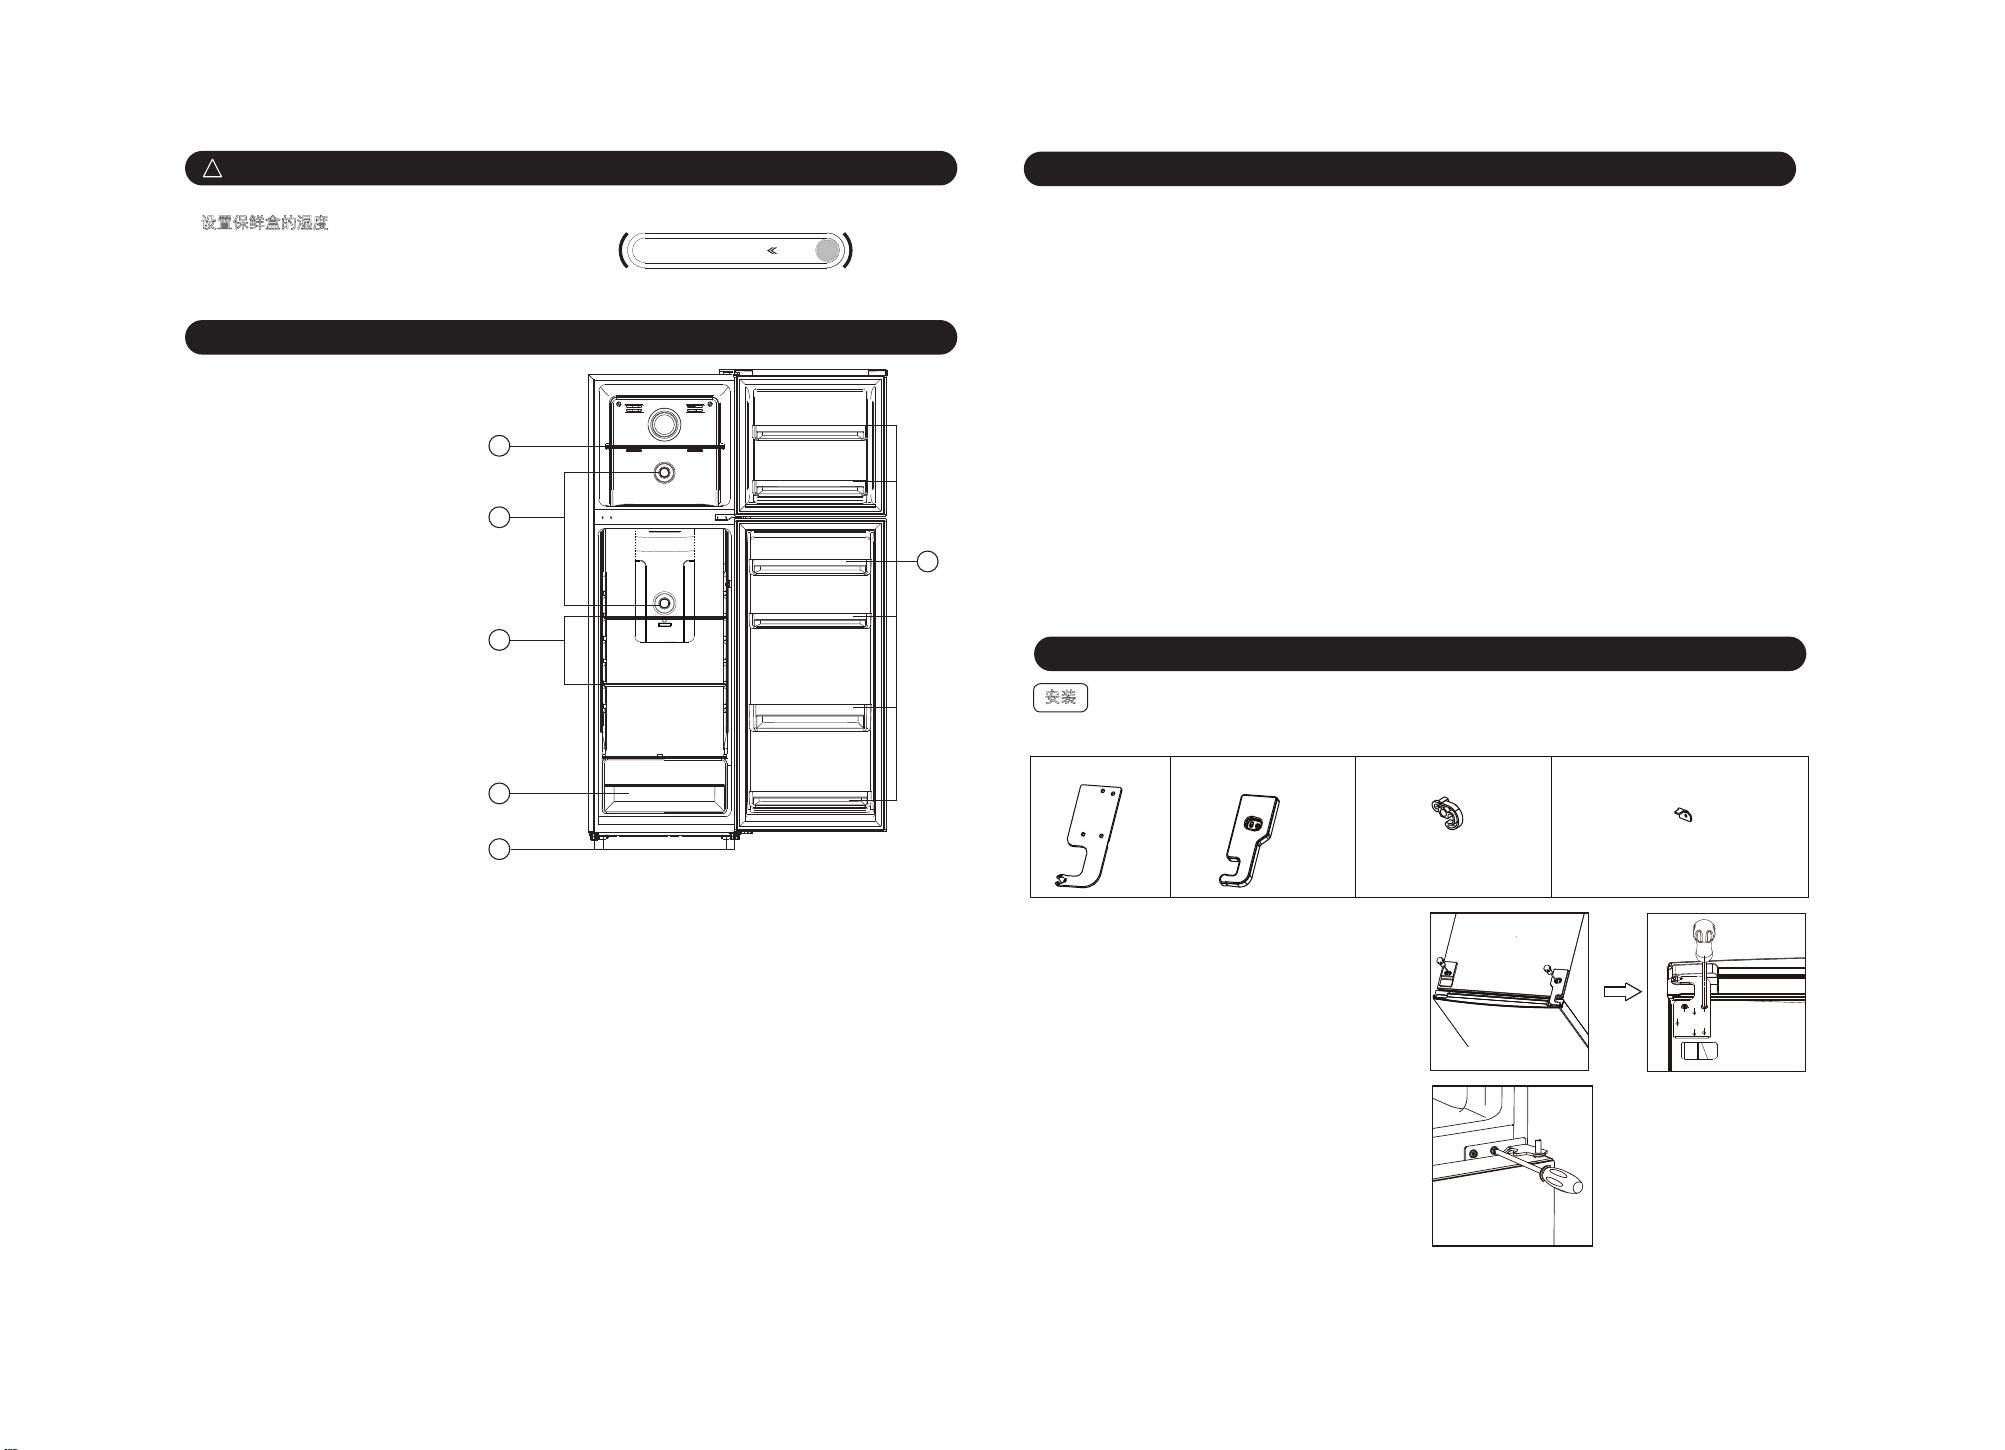
Installation
1. Unpack the appliance and check if there are damages on it. Do not connect the appliance if it is damaged. Report
possible damages immediately to the place you bought it. In that case retain packing.
2. This appliance must be grounded and the ground wire should not be connected to any heating pipe and gas pipe.
3. It is advisable to wait at least 4 hours before connecting the appliance to allow the oil to ow back in the
compressor.
4. During transportation and installation of the appliance, be certain that none of the components of the refrigerant
circuit become damaged.
5. Avoid open ames and sources of ignition. The appliance must not be located to radiators or cookers.
6. Thoroughly ventilate the room in which the appliance is situated. Adequate air circulation should be around the
appliance.
7. Never put the product against the wall or other products to avoid touching or catching warm parts (compressor,
condenser) to prevent possible burn. There should be at least 10 cm of free space from the back side, left/right
sides, and the upper side of the product. Do not put things on top of the product. Make sure that the mains
plug is accessible after installation of the appliance.
Disposal
If you are discarding the appliance, pull the plug out of the socket, cut the connection cable (as close to the
appliance as you can) and remove the door to prevent playing children to suer electric shock or to close
themselves into it.
This symbol on the product or on its packaging indicates that this product may not be treated as household
waste. Instead, it should be taken to the appropriate collection point for the recycling of electrical and electronic
equipment. By ensuring this product is disposed of correctly, you will help prevent potential negative consequences
for the environment and human health, which could otherwise be caused by inappropriate waste handling of this
product. For more detailed information about recycling of this product, please contact your local council, your
household waste disposal service or the shop where you purchased the product.

34
Parts Identications
1. Shelf
2. Temperature Control Knob
3. Shelves
4. Crisper
5. Level Feet
6. Balconies
* Pictures are for illustration purpose only.
Setting the humidity in the crisper.
Low humidity : move the regulator to the left.
High humidity : move the regulatory to the right. Fruits Vegetables
1
4
5
2
3
6
Safety Precaution Information
!
Cleaning & Maintenance
For hygenic reasons the appliance interior, including interior accessories, should be cleaned regularly.
1. Always switch o the appliance and disconnect the mains plug from the mains socket before maintenance
or cleaning the appliance.
2. Wrap the food and keep them in cool place.
3. Do not use chemical, steel, wooden or abrasive cleaners to clean the appliance.
4. Do not clean the appliance with metal objects.
5. Do not use sharp objects to remove frost or ice from the appliance. Use a plastic scraper.
6. Ethereal oils and organic solvents can attack plastic parts, e.g., lemon juice or the juice from orange peel,
butyric acid, cleanser that contain acetic acid. Do not allow such substance to come into contact the
appliance parts.
7. Never clean the appliance with a steam cleaner. Moisture could accumulate in electrical components, danger
of electrical shock! Hot vapours can lead to the damage of plastic parts.
8. Clean the appliance and the interior accessories with a cloth and lukewarm water.
9. Use warm water to clean the oil and stains on the gasket in order to keep its elasticity.
10. After cleaning, wipe the appliance until it is completely dry. The appliance must be dry before it is placed back
into service.
11. Regularly examine the drain in the refrigerator for defrosted water. If the drain is blocked, water will collect
in the bottom of the appliance.
Specications
How to Use
Before reversing the door, please be prepared below tools and material: straight screwdriver, cross screwdriver,
spanner and the components included in the poly bag:
Left hinger x 1 Left hinge cover x 1 left middle stopper x 1 left middle stopper metal block x 1
1. Close upper door, take out the screw from the top
hinge covers by cross screwdriver. Take o hinge
cover, then unscrew top hinge and take o upper
door.
2. Unscrew from the middle hinge by cross
screwdriver, then take o the lower door.
* Specications are subject to change without prior notice.
Model
Voltage
Current
Total Input Power
Total Defrost Power
Refrigerant
Compressor Type & Number
Condenser Type
Temperature Control
Net Weight
Gross Weight
Net Volume
Gross Volume
Product Dimension
(LxWxH)mm
Box Dimension (LxWxH)mm
:
:
:
:
:
:
:
:
:
:
:
:
:
:
:
RF200
220-240V~ 50Hz
0.7A
110W
150W
R600a(51g)
Hermatic/1
Hidden
Electronic
46kg
50kg
197L
(Fridge:144L ; Freezer: 53L)
216L
550 x 600 x 1430mm
575 x 622 x 1462mm
RF270
220-240V~ 50Hz
0.7A
110W
150W
R600a(52g)
Hermatic/1
Hidden
Electronic
50kg
54kg
251L
(Fridge:198L ; Freezer: 53L)
269L
550 x 600 x 1670mm
575 x 622 x 1710mm
RF350
220-240V~ 50Hz
0.7A
110W
150W
R600a(52g)
Hermatic/1
Hidden
Electronic
57kg
63kg
333L
(Fridge:256L ; Freezer: 77L)
356L
600 x 660 x 1700mm
640 x 702 x 1784mm
Installation

5 6
How to Use
3. Laying down the refrigerator, take out the adjusting feet as below, then
unscrew the lower hinge by cross screwdriver.
5. Ret the bracket tting the bottom hinge pin. Replace both adjustable
feet. Transfer the lower door to the property position.
6. Make the middle hinge reverse the direction 180˚C, then transfer it to the
left property position. Make the middle hinge pin in the upper hole of the
lower door, then tight the screws.
7. Unscrew right middle stopper with metal block from
bottom of upper door and then install left middle
stopper and metal block in left side of bottom of
upper door.
4. Unscrew and remove the bottom hinge,
turn the bracket over and replace it.
How to Use
8. Install the upper door, x the upper door hinge onto the cabinet.
9. Take left hinge cover from accessories bag and install it with top hinge. Then
install hole cover at right side.
1. Select a location without direct exposure to sunlight.
2. Select a location with enough space for the refrigerator doors to open easily.
3. Select a location with level (ornearly level) ooring.
4. Allow sucient space to install the refrigerator on a at surface.
5. Allow clearance to the right, left, back and top when installing. This will help reduce power consumption and
keep your energy bills lower.
Levelling the unit
- To do this adjust the 2 levelling feet at front of the unit.
- If the units is not level, the doors and magnetic seal alignments will
not be covered properly.
Space Requirement
980mm
910mm
135˚

How to Use
First use cleaning the interior
Before using the appliance for the rst time, wash the interior and all the internal accessories with lukewarm water
and some neutral soap so as to remove the typical smell of a brand new product, then dry throughly.
Important! Do not use detergents or abrasive powders, as these will damage the nish.
Freezing fresh food
- The freezer compartment is suitable for freezing fresh food and storing frozen and deep-froozen food for a long
time.
- Place the fresh food to be frozen in the bottom compartment.
- The maximum amount of food taht can be frozen in 24 hours is specied on the rating plate.
- The freezing process lasts 24 hours during this period do not add other food to be frozen.
Storing frozen food
When rst starting-up or after a period out of use, before putting the product in the comparment let the appliance
run at least 2 hours on the higher settings.
Important! In the event of accidental defrosting, for example the power has been o for longer than the value
shown in the technical characteristics under “risingtime”, the defrosted food must be consumed quickly or cooked
immediately and then re-frozen (after-cooked).
Thawing
Deep frozen or frozen food, prior to be used, can be thawed in the fridge compartment or at room temperature,
depending on the time available for this operation.
Small pieces may even be cooked still frozen, directly from the freezer. In this case, cooking will take longer.
Accessories- Movable shelves
The walls of the refrigerator are equipped with a seeries of runners so that the shelves
can be positioned as desired.
Positioning the door balconies
To permit storage of food packages of various sizes, the door balconies can be placed
at dierent heights. To make these adjustments proceed as follows: gradually pull the
balcony in the direction of the arrows until it comes free, then reposition as required.
7 8
How to Use
Install this appliance at a location where the ambient temperature
corresponds to the climate class indicated on the rating plate of
the appliance:
Positioning
The appliance should be installed well away from sources of heat such as radiators, boilers, direct sunlight etc.
Ensure that air can circulate freely around the back of the cabinet. To ensure best performance, if the appliance
is positioned below an overhanging wall unit, the minimum distance between the top of the cabinet and the
wall unit must be at least 100mm. Ideally, however the appliance should not be positioned below overhanging
wall units. Accurate leveling is ensured by one or more adjustable feet at the base of the cabinet.
Electrical Connection
Before plugging in, ensure that the voltage and frequency shown on the rating plate correspond to your
domestic power supply. The appliance must be earthed. The power supply cable plug is provided with a contact
for this purpose. If the domestics power supply socket is not earthed, connect the appliance to a separate earth
in compliance with current regulations, consulting a qualied electrician.
The manufacturer declines all responsibility if the above safety precautions are not observed.
This appliance complies with the E.E.C.Directives.
Freezer compartment temperature setting
- Plug on your appliance. The internal temperature is controlled by a sensor.
There are 3 settings: Cold, Colder & Coldest.
- The appliance may not operate at the correct temperature if it is in a particularly
hot or if you open the door often.
Fridge compartment temperature setting
- Plug on your appliance. The internal temperature is controlled by a sensor.
There are 4 settings: OFF, COLD, COLDER & COLDEST. COLD is warmest setting
and COLDEST is coldest setting, OFF is o
- The appliance may not operate at the correct temperature if it is in a particularly
hot or if you open the door often.
- Neither fridge or freezer compartment works when the setting is OFF.
Location
Using the Control Panel
WARNING! It must be possible to disconnect the appliance from the mains power supply; the plug must
therefore be easily accessible after installation.
!

9 10
How to Use
Hints for freezing
To help you make the most of the freezing process, here are some important hints:
1. The maximum quantity of food which can be frozen in 24 hours, is shown on the rating plate.
2. The freezing process takes 24 hours. No further food to be frozen should be added during this period.
3. Only freeze top quality, fresh and throughly cleaned, foodstus.
4. Prepare food in small portions to enable to be rapidly and completely frozen and to make it possible
subsequently to thaw only the quantity required.
5. Wrap up the food in aluminium foil or polythene ans make sure that the package are airtight
6. Do not allow fresh, unfrozen food to touch food which is already frozen, thus avoiding a rise in temperature of
the latter.
7. Lean foods store better and longer than fatty ones, salt reduces the storage life of food.
8. Water ices, if consumed immediately after removal from the freezer comparment, can possibly cause the skin to
be freeze burnt.
9. It is advisable to show the freezing in date on each individual pack to enable tou removal from the freezer
compartment, can possibly cause the skin to be freese burnt.
10. It is advisable to show the freezing in date om each individual pack to enable you to keep tab of the storage
time.
Hints for stroage of frozen food
To obtain the best performance from this appliance, you should
- Make sure that the commercially frozen foodstus were adequately stored by the retailer, be sure that frozen
foodstus are transferred from the food store to the freezer in the shortest possible time.
- Not open the door frequently or leave it open longer than absolutely necessary.
- Once defrosted, food deteriorates rapidly and cannot be refrozen.
- Do not exceed the storage period indicated by the food manufacture.
Hints for fresh food refrigeration
To obtain the best performance :
- Do not store warm food or evaporating liquids in the refrigerator
- Do cover or wrap the food, particularly if it has a strong avour.
Hints for refrigeration
Useful hints :
- Make (all types): wrap in polythene bags and place on the glass shelves above the vegetable drawer.
- For safety, store in this way only one or two days at the most.
- Cooked foods, cold dishes, etc... these should be covered and may be placed on any shelf.
- Fruit and vegetables: these should be thoroughly cleaned and placed in the special drawer provided.
- Butter and cheese: there should be placed in special airtight containers or wrapped in aluminium foil of polythene
bags to exclude as much air as possible.
- Milk bottle: these should have a cap and should be stored in the balconies on the door.
- Bananas, potatoes, onions and garlic, if not packed must not be kept in the fridge.
Troubleshooting
Caution! Before troubleshooting, disconnect the power supply. Only a qualied electrician or competent
person must do the troubleshooting that is not in this manual.
Important! There will be some sound/noise during normal operation (compressor or refrigerant circulation)
Problem
Insert mains plug.
Check fuse, replace if necessary.
Mains mulfunctions are to be corrected
by an electrician.
Main plug is not plugged in or is loose.
Fuse has blown or is defective.
Socket is defective.
Appliance does not work
Possible Cause Solution
Turn the temperature regulatory to a
warmer setting temporarily.
Temperature is set too cold.
Appliance freezes or
cools too much
Please look in the initial temperature
setting section.
Open the door only as long as
necessary.
Turn the temperature regulation to a
colder setting temporarily.
Please look in the installation location
section.
Temperature is not properly
adjusted.
Door was open for an extended
period.
A large quantity of warm food was
placed in the appliance within the last
24 hours.
The appliance is near a heat source.
The food is not frozen
enough.
Carefully warm the leaking section of
the door seal with a hair dryer (on a cool
setting). At the same time shape the
warmed door seal by hand such that
it sits correctly.
Door seal is not air tight.
Heavy build up of frost
on the door seal.
Re-adjust the feet.
Move the appliance slightly.
If necessary, carefully bend the
component out of the way.
Appliance is not level.
The appliance is touchong the wall or
other objects.
A component, e.g. a pipe on the rear of
the appliance is touching another part
of the appliance or the wall.
Unusual noises
!

11 12
日常使用
1. 请勿将热的东西放置在电器内的塑料部件上。
2. 冷冻食品解冻后不得再重新冷冻。
3. 按照冷冻食品制造商的说明储存预先包装好的冷冻食品。
4. 应严格遵守电器制造商的存储建议。 请参阅相关说明。
5. 不要将碳酸饮料放入冷冻室,因为它会对容器产生压力,这可能会导致容器爆炸,从而导致设备损坏。
6. 如果直接从设备中食用冰棍会导致冻伤。
节能
1. 请勿将热食直接放入冰箱里 。
2. 不要将食物包装在一起,因为这会阻止空气流通。
3. 请确保食物不会接触到隔间的背面。
4. 如果停电的时候,请勿打开冰箱门。
5. 请勿频繁打开冰箱门。
6. 冰箱门打开的时间请勿过长。
7. 请勿将冰箱的温度设置过冷。
8. 一些冰箱配件,如抽屉,是可拆卸,以获得更大的存储空间和更低的能耗。
安全注意事项
!安全注意事项
!
安全和警告信息
安装
1.拆开设备包装并检查是否有损坏。 如果设备损坏,请勿连接此设备。请立即向您购买它的地方报告可能
损坏的情况。在这种情况下,请保留包装。
2.此设备必须接地,地面电线不应连接到任何加热管道和煤气管道。
3.建议在连接设备前至少等待 4 小时,以便让油回流到压缩机中。
4.在设备的运输和安装过程中,请确保制冷剂回路的任何部组件没有损坏。
5.避免明火和点火源。 设备不得放置于散热器或炊具旁。
6.确保设备所在地地方可以彻底通风。设备周围应有足够的空气流通。
7.切勿将产品靠在墙壁上或其他产品上,以免接触或碰到发热的部件(压缩机、冷凝器),以防止可能的
烫伤。 产品的背面、左侧/右侧和上侧应至少应有 10 厘米的可用空间。 请勿在产品上方放置物品。
确保在安装设备后可以接触到电源插头。
注意事项
使用本产品前,请仔细阅读此使用说明书,并妥善保管本手册以备日后参考。
1. 始终使用与设备额定值标记上显示的电压、频率和额定值相同的电源来操作设备。
2. 本电器仅供家庭使用。请勿在户外使用。除设定的用途外,请勿使用本设备作其他用途。
3. 本设备不适用于身体、感官或精神状态不佳,或缺乏相关经验和知识的人(包括儿童),除非安全人员为
他们对设备的使用进行监督或指导。
儿童应受到监督,以确保他们不玩电器。
4. 警告!保持设备外壳或内置结构中的通风口畅通无阻。
5. 警告!请勿使用机械装置或其他方式来加速除霜过程,除了由制造商所建议的方式。
6. 警告!不要损坏制冷剂回路。
7. 警告!请勿将其他电器(如冰淇淋机)放在电器的食品储藏室内,除非它们是制造商推荐的类型。
8. 警告!任何电气组件(插头、电源、压缩机等)必须由经过认证的服务代理或合格的服务人员来进行更换。
9. 警告!如果电源线损坏,则必须由制造商,其授权代理商或具有类似资格的技术人员进行更换,以免造
成危险。
10.警告!当放置设备时,必须确保电源线没有被夹住或损坏。
11.警告!请勿将多个便携式插座插座或便携式电源放置在设备后部。
12.警告! 火灾风险或易燃材料的风险。
13.请勿在本设备中存放爆炸性物质,例如装有易燃推进剂的气雾罐。
14.请勿将瓶装或罐装饮料(尤其是碳酸饮料)存放在冷冻室中。
15.制冷剂异丁烷 (R600a) 包含在设备的制冷剂回路中,这是一种具有高水平环境兼容性的天然气,但易
燃性仍然高。
16.以任何方式更改规格或修改本产品,这是很危险的。电源线的任何损坏都可能导致短路、火灾或触电。
17.本电器应放置在阴凉干燥的地方,附近不会溅水或高湿度的地方。本电器不应在靠近水源的地方使用,
例如浴缸、洗脸盆、游泳池等。
18.不使用时和清洁之前,请务必关闭电源并从插座上拔下插头。
19.当设备运行时,冷凝器和压缩机的温度会很热。
20.如果您的手处于潮湿的状态,请勿从冷冻室中取出或触摸物品,因为这可能会导致皮肤擦伤或霜冻或冷
冻灼伤。
21.如果环境湿度高或设备的门经常打开,本设备会在冷冻室内产生结霜。
服务
维修设备所需的任何电气工作都应由合格的电工或合格人员进行。 本产品必须由授权服务中心进行维修,
并且只能使用原厂备件。
弃置
I如果您要弃置此设备,请将插头从插座中拔出,切断连接电缆(尽可能靠近设备)并取下门,以防止玩耍
的儿童受到电击或将自己关在里面。
产品或其包装上的此符号表示该产品不得作为生活垃圾处理。 相反,它应该被带到适当的收集点以回
收电器和电子设备。 通过正确的方式处置本产品,您将有助于防止对环境和人类健康造成潜在的负面后果,
否则这些后果会因对本产品的废物处理不当而产生。 有关回收该产品的更多详细信息,请联系您当地的
市政府、您的家庭垃圾处理服务机构或您购买该产品的商店。
清洁保养
出于卫生原因,建议定期清洁冰箱内部,包括了内部的配件。
1. 在维护或清洁设备之前,请务必关闭设备并从电源插座上拔下电源插头。
2. 应将食物包裹好并放在阴凉处。
3. 请勿使用化学清洁剂、钢质清洁剂、木质或研磨性清洁剂来清洁设备。
4. 请勿使用金属物品进行清洁。
5. 请勿使用锋利的物体清除设备上的霜或冰。 建议使用塑料刮刀。
6. 精油和有机溶剂会腐蚀塑料部件,例如柠檬汁或橙皮汁、丁酸、含有乙酸的清洁剂。请勿让
此类物质接触到设备配件。
7. 切勿使用蒸汽清洁器清洁设备。蒸汽水分可能会积聚在电气元件中,这会导致有触电的危险!
热蒸汽也会导致塑料部件损坏。
8. 建议使用布和温水清洁设备和内部配件。
9. 使用温水清洗垫片上的油污和污渍,以保持其弹性。
10.清洁后,将设备擦拭至完全干燥。必须确保设备在使用之前处于干燥状态。
11.定期检查冰箱排水管是否有除霜水。如果排水管堵塞,水会积聚在设备底部。

13 14
1. 冰箱隔板
2. 温度控制旋钮
3. 冰箱隔板
4. 保鲜盒
5. 水平脚
6. 冰箱置物架
设置保鲜盒的湿度
低湿度:将调节器向左移动。
高湿度:将调节器向右移动。 低
水果
蔬菜
1
4
5
2
3
6
!
在移除冰箱门之前,请准备好以下工具和材料:一字螺丝刀、十字螺丝刀、扳手及塑料袋内的组件:
左铰链x1 左铰链盖x1 左中间挡块x1 左中间挡块金属块x1
1. 关闭冰箱上门,用十字螺丝刀从顶部铰链盖上
取出螺丝。 取下铰链盖,然后拧下顶部铰链并
取下上门。
2. 用十字螺丝刀从中间铰链上拧下,然后取下冰
箱下门。
模型
电压
电流
总输入功率
总除霜功率
制冷剂
压缩机类型和编号
冷凝器类型
温度控制
净重
总重量
净体积
总容量
产品尺寸(长x宽x高)mm
箱体尺寸 (长x宽x高)mm
:
:
:
:
:
:
:
:
:
:
:
:
:
:
:
RF200
220-240V~ 50Hz
0.7A
110W
150W
R600a(51g)
Hermatic/1
隐藏
电子
46公斤
50公斤
197升
(冰箱:144升; 冷藏: 53升)
216升
550 x 600 x 1430mm
575 x 622 x 1462mm
RF270
220-240V~ 50Hz
0.7A
110W
150W
R600a(52g)
Hermatic/1
隐藏
电子
50公斤
54公斤
251升
(冰箱:198升; 冷藏: 53升)
269升
550 x 600 x 1670mm
575 x 622 x 1710mm
RF350
220-240V~ 50Hz
0.7A
110W
150W
R600a(52g)
Hermatic/1
隐藏
电子
57公斤
63公斤
333升
(冰箱:256升; 冷藏: 77升)
356升
600 x 660 x 1700mm
640 x 702 x 1784mm
安装
安全注意事项
!
零件名称
* 图片仅供参考。
规格
* 规格如有更改,恕不另行通知。
如何使用

15 16
3. 放下冰箱,取出如图下的调节脚,然后用十字螺丝刀拧下下铰链。
5. 重新安装底部铰链销的支架。 将两个可调支脚更换。 将下层门转移
到正确的位置。
6. 将中间的铰链反转180˚C,然后将其转移到左侧的正确位置。 在下门
的顶部的孔中放置中间铰链销,然后拧紧螺钉。
7. 从上门底部拧下带有金属块的右中间挡块,然后
将左中挡块和金属块安装在上门底部的左侧。
4. 拧下并卸下底部铰链,将支架翻转过
来并进行更换。
8. 安装上门,将上门铰链固定在冰箱柜子上。
9. 从配件袋中取出左铰链盖,并用顶部铰链安装。 然后在右侧安装孔盖。
1. 选择不会直接暴露在阳光下的位置。
2. 选择一个有足够空间的位置,以便冰箱门可以轻松的打开。
3. 选择具有水平(或接近水平)的地板位置。
4. 确保有足够的空间可将冰箱安装在地板表面上。
5. 安装时要在左右两侧和顶部留出空隙。 这将有助于降低功耗并降低您的能源费用。
平整设备
- 若要平整设备,请调整设备前面的 2 个调平脚。
- 如果设备水平不齐,门和磁性密封对齐将无法正确覆盖。
空间要求
980mm
910mm
135˚
如何使用 如何使用

首次使用清洁内饰
首次使用电器之前,请用温水和一些中性肥皂清洗内部和内部所有配件,以便去除全新产品的典型气味,然
后彻底使内部和配件彻底干燥。
重要! 请勿使用清洁剂或研磨粉,因为这会损坏内部或配件表面。
冷冻新鲜食品
- 冷冻室适用于冷冻新鲜食品和长时间储存冷冻和深度冷冻的食品。
- 将要冷冻的新鲜食品放入底部隔间。
- 额定板上规定了 可在24 小时内冷冻的最大食物量。
- 冷冻过程将持续 24 小时,在此期间不要添加其他要进行冷冻的食品。
储存冷冻食品
首次使用或停用一段时间后,在将食品放入隔间之前,让产品在较高设置下运行至少 2 小时。
重要! 若食品意外的被解冻,例如断电时间超过“上升时间”下技术特性中显示的值,解冻的食物必须迅速
食用或立即煮熟,然后重新冷冻(煮熟后)。
解冻
深度冷冻或冷冻食品在烹饪前可以在冷藏室或室温下解冻,解冻时间将取决于此操作的可用时间。
小块的冷冻食品可以直接在冷冻的情况下进行烹饪。 但是在这种情况下,烹饪时间会更长。
配件- 可移动隔板
冰箱的墙壁配备了一系列滑轨,以便可以根据需要放置隔板。
门旁置物架的位置
为了可以存放各种尺寸的食品包装,门旁置物架可以根据需要放置在不同的高度。
要进行这些调整,请按以下步骤进行:沿箭头方向逐渐拉动置物架直至其松开,然
后根据需要重新放置置物架。
17 18
将此设备安装在环境温度与设备额定值板上指示的气候等级相对
应的位置:
定位
设备应安装在远离热源的地方,如散热器、锅炉、阳光直射等。必须确保空气可以在机柜背面自由流通。
为了确保最佳性能,如果设备位于悬垂的墙壁装置下方,机柜顶部与墙壁装置之间的最小距离必须至少为
100 毫米。 理想情况下,该设备不应放置在悬垂的墙壁装置下方。 机柜底部的一个或多个可调节支脚可
以确保准确调平水平。
电气连接
在连接之前,请确保额定板上显示的电压和频率与您的家用电源相符。 设备必须接地。 为此,电源电缆
插头配有一个触点。 如果家用电源插座未接地,请根据现行法规将设备连接到单独的接地,并咨询合格
的电工。
如果不遵守上述安全预防措施,制造商将不承担任何责任。
本设备符合 E.E.C.指令。
冷冻室温度设置
- 将设备连接电源。 内部温度将由传感器控制。
冷冻室有3 种设置:冷(COLD)、更冷(COLDER)和最冷(COLDEST)。
- 若设备处于特殊热的环境或经常将冰箱门打开,这会导致设备可能无法在正
确的温度下运行。
冷藏室温度设置
- 将设备连接电源。 内部温度将由传感器控制。 冷藏室有 4 种设置:关闭
(OFF)、冷(COLD)、更冷(COLDER) 和 最冷(COLDEST)。 COLD 是最暖的
设置,COLDEST 是最冷的设置,OFF 是关闭设置。
- 若设备处于特殊热的环境或经常将冰箱门打开,这会导致设备可能无法在正
确的温度下运行。
- 当设置为 OFF 时,冷藏室或冷冻室将不会运作。
位置
使用控制面板
警告! 必须确保可以轻易将设备与主电源断开; 因此,安装后必须确保插头易于接触。
!
气候等级 环境温度
至
至
至
至
如何使用 如何使用

19 20
冷冻小贴士
为了帮助您充分利用冷冻过程,以下是一些重要提示:
1. 额定板上标明了 24 小时内可冷冻的最大食物量。
2.冷冻过程需要24小时。在此期间不应再添加任何欲冷冻的食物。
3. 建议冷冻优质、新鲜和彻底清洁的食品。
4. 将食物分小份准备,以便可以快速和完全冷冻,并且随后可以只解冻所需的份量。
5. 用铝箔或聚乙烯包裹食物并确保包装密封。
6. 请勿让新鲜和未冷冻的食品直接接触已经冷冻的食品,这会导致猴子的温度升高。
7. 瘦肉食品比脂肪食物储存的时间更好和更长,盐会缩短食物的保质期。
8. 冰块如果从冷冻室中取出后立即食用,这可能会导致皮肤被冻伤。
9. 建议在每个单独的包装上显示冷冻日期,以便从冷冻室中取出,这可能会导致皮肤被冻伤。
10. 建议在每个单独的包装上显示冷冻日期,以便您了解储存时间。
冷冻食品储存的提示
欲从此设备获得最佳的性能,您应该
- 确保商业冷冻食品已经由零售商充分的冷冻起来,确保冷冻食品在最短的时间内从食品商店转移到冰
箱里。
- 请勿频繁打开冰箱门或将冰箱门打开的时间超过必要的时间。
- 一旦解冻,食物会迅速变质,无法再冷冻。
- 请勿超过食品制造商规定的储存期限。
新鲜食品冷藏的提示
欲获得最佳的性能:
- 请勿将温热的食物或蒸发的液体存放在冰箱中。
- 请盖上或包裹食物,特别是如果它有强烈的味道。
冷藏小贴士
实用的提示:
- 制作(所有类型):用聚乙烯袋包裹并放在蔬菜抽屉上方的玻璃架上。
- 为安全起见,以这种方式最多只能存放一至两天。
- 熟食、冷盘等这一类食品应该盖好,并且可以放在任何架子上。
- 水果和蔬菜:这些应彻底清洁并放入提供的专用抽屉中。
- 黄油和奶酪:应放置在特制的密闭容器中或用铝箔聚乙烯袋包裹,尽可能的排除空气。
- 牛奶瓶:牛奶泡应配有一个盖子,这应该存放在门上的储存架上。
- 香蕉、土豆、洋葱和大蒜,如果没有包装不得存放在冰箱中。
警告!在排除故障之前,请先断开电源。 只有合格的电工或有合格的人员才能执行本手册中未包含的
故障排除。
重要!在正常运行期间(压缩机或制冷剂循环)会有一些声音/噪音。
插入电源插头。
检查保险丝,必要时更换。
电源故障应由电工纠正。
主插头未插入或松动。
保险丝熔断或有缺陷。
插座有缺陷。
设备无法运作
将温度调节暂时调至较暖的设置。温度设置太冷。
设备冻结或冷却太多
请查看初始温度设置部分。
只有在必要时打开冰箱门。
暂时将温度调节调至较冷的设置。
请查看安装位置部分。
温度调节不当。
冰箱门被打开了一段时间。
过去 的24 小时内在电器中存放
了大量的温热食品。
此电器靠近热源。
食物不够冷冻
可用吹风机(在凉爽的环境)小心地
加热门密封条的泄漏部分。 同时可
使用手来塑造加热后的门封条,使其
可以正确放置。
冰箱门没有密封妥当。
门封条上严重结霜
重新调整水平脚。
轻轻移动设备。
如有必要,请小心地弯曲组件。
电器不水平
电器正在接触墙壁或其他物体。
组件,例如 设备背面的管道正在接
触设备的另一部分或墙壁。
异常噪音
问题 问题的原因 解决方案
!
如何使用 故障排除

21 22
Kegunaan Harian
1. Jangan letakkan barangan panas pada bahagian dalam plastik peralatan.
2. Makanan sejuk beku tidak boleh dibekukan semula setelah dicairkan.
3. Simpan makanan sejuk beku yang dibungkus mengikut arahan pengeluaran makanan sejuk beku.
4. Saranan penyimpanan peralatan oleh pengilang perlu dipatuhi dengan teliti. Rujuk arahan yang berkaitan.
5. Jangan letakkan minuman berkarbonat pada bahagian sejuk beku kerana boleh menghasilkan tekanan pada beka
dan meletup, menyebabkan kerosakan pada peralatan.
6. Lolipop ais boleh menyebabkan luka akibat sejuk jika dimakan terus dari peralatan.
Penjimatan Tenaga
1. Jangan letakkan makanan panas dalam peralatan.
2. Jangan simpan makanan secara rapat kerana menghalang peredaran udara.
3. Pastikan makanan tidak menyentuh bahagian belakang peralatan.
4. Jangan buka pintu peralatan jika elektrik terpadam.
5. Jangan selalu membuka pintu peralatan.
6 Jangan buka pintu peralatan terlalu lama.
7. Jangan laraskan melebihi suhu sejuk.
8 Aksesori seperti laci boleh dikeluarkan untuk ruangan simpanan yang lebih besar dan penggunaan tenaga yang
lebih rendah.
Servis
Sebarang kerja elektrik yang memerlukan servis peralatan mesti dilakukan oleh juruelektrik yang berkelayakan atau
orang yang pakar. Produk ini mesti diservis oleh pusat servis yang sah dan menggunakan alat ganti yang asli sahaja.
Pembuangan
Sekiranya anda membuang peralatan, tanggalkan plag dari soket, potong kabel sambungan (sehingga rapat dengan
peralatan) dan tanggalkan pintu bagi mengelakkan kanak-kanak bermain dan terkena kejutan elektrik atau terkunci
dari dalam.
Simbol pada produk atau bungkusan ini menunjukkan bahawa produk tidak boleh dibuang sebagai sampah dari
rumah. Sebaliknya, ia harus dibawa ke tempat pembuangan peralatan elektrik dan elektronik yang sesuai untuk dikitar
semula. Bagi memastikan produk ini dibuang dengan betul, anda akan membantu mencegah kesan negatif terhadap
alam sekitar dan kesihatan manusia, yang mungkin disebabkan oleh pengendalian sisa produk yang tidak sesuai.
Untuk maklumat lebih terperinci mengenai kitar semula produk ini, sila hubungi majlis bandaraya anda, perkhidmatan
pembuangan sampah perumahan anda atau kedai di mana anda membeli produk tersebut.
Maklumat Langkah-langkah Keselamatan
!Maklumat Langkah-langkah Keselamatan
!
Maklumat-maklumat Keselamatan dan Peringatan
Pemasangan
1. Buka peralatan dan periksa jika ada kerosakan. Jangan sambungkan hidupkan peralatan sekiranya ia rosak. Jika
ada kerosakan, segera membuat aduan di tempat anda beli. Dalam masa yang sama, simpan bungkusan.
2. Peralatan ini mesti diletakkan pada permukaan lantai bawah dan wayar bawah tidak boleh disambungkan bersama
paip gas atau paip pemanas lain.
3. Sebaiknya tunggu sekurang-kurangnya 4 jam sebelum menghidupkan peralatan bagi melancarkan minyak supaya
mengalir kembali ke kompresor.
4. Semasa mengangkat dan memasang peralatan, pastikan tiada komponen litar penyejuk yang rosak.
Perhatian
Sila baca manual arahan ini dengan teliti sebelum menggunakan produk, dan simpan buku ini untuk rujukan semula.
1. Sentiasa menggunakan peralatan dari sumber kuasa dengan voltan, frekuensi dan taraf yang sama seperti yang
ditunjukkan pada tanda penilaian peralatan.
2. Peralatan ini hanya untuk kegunaan di dalam rumah sahaja. Jangan gunakan di luar rumah. Jangan gunakan
peralatan ini bagi tujuan lain.
3.Peralatan ini bukan untuk digunakan oleh orang kurang upaya (termasuk kanak-kanak) fizikal, deria atau kemampuan
mental, atau kurang pengalaman dan pengetahuan, melainkan mereka dikawalselia atau mendapat tunjuk ajar yang
sewajarnya berkaitan penggunaan peralatan ini oleh orang yang bertanggungjawab terhadap keselamatan mereka.
Kanak-kanak perlu dikawalselia bagi memastikan mereka tidak bermain dengan peralatan ini.
4. PERINGATAN! Pastikan tiada halangan pada bukaan pengudaraan di dalam atau di luar struktur peralatan.
5. PERINGATAN! Jangan gunakan alatan mekanikal atau alatan lain untuk mempercepatkan proses pencairan, selain
yang disarankan oleh pengilang.
6. PERINGATAN! Jangan rosakkan litar penyejuk.
7. PERINGATAN! Jangan gunakan peralatan elektrik lain (seperti pembuat aiskrim) di dalam ruangan simpan makanan,
melainkan jenis peralatan yang disarankan oleh pengilang.
8. PERINGATAN! Sebarang komponen elektrik (plag, kuasa, pemampat dan lain-lain) perlu diganti oleh wakil servis
atau servis-servis yang berkelayakan.
9. PERINGATAN! Jika kod kuasa telah rosak, ia mesti diganti oleh pengilang, wakil servis atau orang yang
berkelayakan untuk mengelakkan sebarang bahaya.
10. PERINGATAN! Pastikan kabel bekalan tidak tersepit atau rosak semasa meletakkan peralatan.
11. PERINGATAN! Jangan gunakan soket pelbagai guna atau sumber kuasa mudah alih pada belakang peralatan.
12. PERINGATAN! Risiko kebakaran / bahan mudah terbakar.
13. Jangan simpan bahan mudah meletup dalam peralatan ini seperti tin aerosol dan semburan mudah terbakar.
14. Jangan simpan botol atau tin minuman (terutamanya minuman berkabonat) di dalam ruangan sejuk beku.
15. Penyejuk isobutana (R600a) terletak bersama dalam litar penyejuk peralatan, merupakan gas asli dengan tahap
kesesuaian persekitaran yang tinggi, tetapi tetap mudah terbakar.
16. Mengubah spesifikasi atau mengubah produk ini dengan cara lain adalah berbahaya. Sebarang kerosakan pada kod
boleh menyebabkan litar pintas, terbakar atau kejutan elektrik.
17. Peralatan ini perlu diletakkan di tempat kering yang sejuk di mana tiada percikan air atau kelembapan tinggi.
Peralatan ini tidak boleh digunakan berdekatan air, seperti tab mandi, sinki, kolam renang dan lain-lain.
18. Sentiasa matikan suis dan tanggalkan plag dari soket apabila tidak digunakan dan sebelum membersihkan.
19. Semasa peralatan beroperasi, kondensor dan kompresor akan panas.
20. Jangan keluarkan atau sentuh barangan dari peti ais semasa tangan anda lembap / basah, kerana boleh
menyebabkan kulit melecet atau membeku / luka akibat sejuk.
21. Peralatan ini akan menghasilkan sejuk beku di ruangan penyejuk beku sekiranya persekitaran berkelembapan tinggi
atau pintu peralatan selalu dibuka.
5. Elakkan dari tempat api yang terbuka dan sumber nyalaan api. Peralatan tidak boleh diletakkan pada radiator
atau periuk pemasak.
6. Pastikan pengudaraan yang baik pada ruang peralatan ditempatkan. Peralatan memerlukan peredaran udara
yang mencukupi pada bahagian sekeliling.
7. Jangan letakkan peralatan ini atau produk lain pada dinding supaya tidak bersentuhan atau terkena bahagian
pana (kompresor, kondensor) untuk mengelakkan dari terbakar. Pastikan terdapat 10 cm ruang kosong pada
bahagian belakang, sisi kiri/ kanan, dan atas produk. Pastikan plag utama boleh dicapai selepas pemasangan.

23 24
1. Rak
2. Tombol Kawalan Suhu
3. Rak-rak
4. Krisper
5. Aras Kaki
6. Balkoni
Tetapkan kelembapan pada krisper.
Kelembapan rendah : laraskan ke arah kiri.
Kelembapan tinggi : laraskan ke arah kanan Buahan Sayuran
1
4
5
2
3
6
!
Sebelum memasang pintu berlawanan arah, sediakan alatan dan bahan di bawah: pemutar skru lurus, pemutar skru
silang, sepana dan komponen dalam beg poli:
Engsel kiri x 1 Penutup engsel kiri x 1 Penyekat tengah kiri x 1 Blok logam penyekat tangah kiri x 1
1. Tutup pintu atas, keluarkan skru dari penutup engsel
atas dengan pemutar skru silang. Tanggalkan
penutup engsel, kemudian buka penutup engsel atas
dan tanggalkan pintu atas.
2. Buka penutup engsel tengah dengan pemutar skru
silang, kemudian tanggalkan pintu bawah.
* Spesifikasi adalah subjek yang boleh berubah tanpa sebarang notis.
Model
Voltan
Arus
Jumlah Input Kuasa
Jumlah Input Pencairan
Penyejuk
Jenis & Nombor Kompresor
Jenis Kondenser
Kawalan Suhu
Berat Bersih
Berat Kasar
Isipadu Bersih
Isipadu Kasar
Dimensi Produk(LxWxH)mm
Dimensi Kotak (LxWxH)mm
:
:
:
:
:
:
:
:
:
:
:
:
:
:
:
RF200
220-240V~ 50Hz
0.7A
110W
150W
R600a(51g)
Hermatic/1
Tersembunyi
Elektronik
46kg
50kg
197L (Peti Ais:144L ;
Penyejuk Beku: 53L)
216L
550 x 600 x 1430mm
575 x 622 x 1462mm
RF270
220-240V~ 50Hz
0.7A
110W
150W
R600a(52g)
Hermatic/1
Tersembunyi
Elektronik
50kg
54kg
251L(Peti Ais:198L ;
Penyejuk Beku: 53L)
269L
550 x 600 x 1670mm
575 x 622 x 1710mm
RF350
220-240V~ 50Hz
0.7A
110W
150W
R600a(52g)
Hermatic/1
Tersembunyi
Elektronik
57kg
63kg
333L(Peti Ais:256L ;
Penyejuk Beku: 77L)
356L
600 x 660 x 1700mm
640 x 702 x 1784mm
Pemasangan
Maklumat Langkah-langkah Keselamatan
!
Pembersihan & Penyelenggaraan
Untuk menjaga kebersihan, bahagian dalam peralatan dan aksesori dalaman perlu dibersihkan selalu.
1. Sentiasa matikan peralatan dan tanggalkan plag utama dari soket utama sebelum menyelenggara atau membersihkan
peralatan.
2. Balut makanan dan simpan di tempat yang sejuk.
3. Jangan gunakan bahan kimia, pencuci keluli, kayu atau cecair yang menghakis untuk membersihkan peralatan.
4. Jangan bersihkan alat dengan objek logam.
5. Jangan gunakan objek tajam untuk menanggalkan ketulan beku atau ais dari peralatan. Gunakan pengikis plastik.
6. Minyak dari tumbuhan dan pelarut organik boleh menghakis bahagian plastik, sebagai contoh, jus lemon atau jus
dari kulit oren, asid butirik, pembersih yang mengandungi asid asetik. Jangan biarkan bahan tersebut menyentuh
bahagian peralatan.
7. Jangan membersihkan peralatan dengan pembersih wap. Kelembapan boleh terkumpul dalam komponen elektrik,
bahaya dari kejutan elektrik! Wap panas menyebabkan kerosakan bahagian plastik.
8. Bersihkan peralatan dan aksesori dalaman dengan kain dan air suam.
9. Gunakan air suam untuk membersihkan kesan minyak dan sisa melekat pada getah penghadang untuk menjaga
keanjalannya.
10. Setelah membersihkan, lap alatan sehingga kering. Perkakas mesti kering sebelum dipasang semula.
11. Sentiasa periksa saluran pembuangan air di dalam peti sejuk. Sekiranya saluran air tersumbat, air akan terkumpul
di bahagian bawah peralatan.
Rendah
Pengenalan Bahagian
* Gambar-gambar adalah bertujuan ilustrasi sahaja
Spesifikasi
Cara-cara Penggunaan

25 26
3. Baringkan peti ais, keluarkan kaki penyesuaian seperti di bawah, kemudian
buka penutup engsel bawah dengan pemutar skru silang.
5. Pasang semula pendakap yang sesuai dengan ruang pin engsel. Gantikan
kedua-dua kaki yang boleh dilaraskan. Pindahkan pintu bawah pada
kedudukan yang betul.
6. Laraskan engsel tengah melawan arah 180˚, kemudian pindahkan ke
kedudukan kiri yang betul. Laraskan pin engsel tengah pada lubang atas
pintu bawah, kemudian ketatkan skru.
7. Buka penutup penyekat tengah kanan dengan blok
logam dari bahagian bawah pintu atas dan kemudian
pasangkan penyumbat tengah kiri dan blok logam pada
bahagian kiri bawah pintu atas.
4. Buka penutup dan tanggalkan engsel
bawah, pusingkan pendakap dan
gantikannya.
9. Pasang pintu atas, laraskan engsel pintu atas ke kabinet.
9. Ambil penutup engsel kiri dari beg aksesori dan pasangkan dengan engsel atas.
1. Pilih tempat yang tidak terdedah kepada cahaya matahari secara terus.
2. Pilih tempat dengan ruang yang cukup supaya pintu peti ais dapat dibuka dengan mudah.
3. Pilih tempat pada aras lantai bawah (aras mendatar).
4. Pastikan ada ruang yang mencukupi untuk memasang peti ais pada permukaan rata.
5. Pastikan ada ruang kosong pada kanan, kiri, belakang dan atas semasa memasang.Ini akan membantu mengurang
kan penggunaan tenaga dan
Melaraskan unit
- Laraskan 2 kaki depan unit tersebut.
- Jika unit tidak rata, pintu dan getah magnet yang tidak selaras tidak
dapat tutup dengan betul.
Keperluan Ruang
980mm
910mm
135˚
Cara-cara Penggunaan Cara-cara Penggunaan
Skru
Buka skru

Penggunaan pertama membersihkan bahagian dalam
Sebelum menggunakan peralatan pada pertama kali, bersihkan bahagian dalam dan semua aksesori dalaman
menggunakan air suam dan sedikit sabun neutral untuk menghilangkan bau produk baru, kemudian biarkan kering.
Mustahak! Jangan gunakan bahan pencuci atau serbuk penghakis, kerana boleh menyebabkan kerosakan.
Membekukan makanan segar
- Peti sejuk beku sesuai untuk membekukan makanan segar dan menyimpan makanan sejuk beku dalam masa yang
lama.
- Letakkan makanan segar untuk dibekukan di ruangan bawah.
- Jumlah maksima makanan yang boleh dibekukan dalam masa 24 jam dinyatakan pada plat penilaian.
- Proses pembekuan berjalan 24 jam, dalam tempoh ini jangan tambahkan makanan lain untuk dibekukan.
Menyimpan makanan sejuk beku
Sebelum meletakkan produk di dalam ruangan, biarkan peralatan beroperasi selama 2 jam pada tetapan tinggi
apabila memulakan atau selepas tidak digunakan.
Mustahak! Jika berlaku berlaku pencairan, sebagai contoh kuasa dimatikan lebih lama dari nilai yang ditunjukkan
pada ciri-ciri teknikal dibawah “peningkatan masa” makanan yang tidak sejuk perlu dimakan atau dimasak segera
dan kemudian bekukan semula (selepas dimasak).
Pencairan
Sebelum digunakan, makanan sejuk beku atau beku boleh dicairkan di dalam peti ais atau pada suhu bilik,
bergantung pada masa yang tersedia untuk operasi ini. Kepingan kecil boleh dimasak terus semasa beku, dari peti
sejuk beku. Dalam kes ini, memasak akan memakan masa lebih lama.
Aksesori-Rak Mudah Alih
Dinding peti ais dilengkapi dengan rangkaian pelari supaya rak dapat diletakkan
mengikut keperluan.
Menempatkan balkoni pintu
Bagi memastikan penyimpanan bungkusan makanan pelbagai saiz, balkoni pintu boleh
dilaraskan pada ketinggian berbeza. Untuk melakukan penyesuaian ini, ikut langkah
seperti berikut: tarik balkoni secara beransur ke arah anak panah sehingga boleh
digerakkan dengan bebas kemudian ubah semula seperti yang diperlukan.
27 28
Pasang peralatan di lokasi bersuhu persekitaran yang sesuai dengan
kelas iklim seperti ditunjukkan pada plat nilaian peralatan:
Kedudukan
Peralatan perlu dipasang jauh dari sumber panas seperti radiator, pendidih, cahaya matahari secara terus dan
lain-lain. Pastikan udara dapat beredar bebas pada bahagian belakang kabinet. Jika peralatan diletakkan pada
bawah unit dinding gantung, jarak minima antara bahagian atas kabinet dan unit dinding perlu sekurang-kurangn-
ya 100mm, bagi memastikan prestasi yang bagus. Sebaiknya, jangan letakkan peralatan di bawah unit dinding
yang tergantung. Aras permukaan rata yang tepat perlu dipastikan oleh satu kaki atau lebih pada tapak kabinet.
Sambungan Elektrik
Sebelum menghidupkan peralatan, pastikan voltan dan frekuensi yang ditunjukkan pada plat penilaian sesuai
dengan bekalan kuasa domestik anda. Peralatan perlu bersambung dengan kuasa. Plag kabel bekalan kuasa
dilengkapi dengan penghubung bagi tujuan ini. Sekiranya tiada soket bekalan kuasa domestik, sambungkan
peralatan
pada bekalan berlainan sesuai dengan peraturan semasa, hubungi juruelektrik yang berkelayakan.
Pengilang menolak semua tanggungjawab sekiranya langkah keselamatan di atas tidak dipatuhi.
Peralatan ini mematuhi Arahan E.E.C..
Tetapan suhu peti ais beku
- Hidupkan peralatan anda. Suhu dalaman dikawal menggunakan sensor. Terdapat 3
tetapan: SEJUK, LEBIH SEJUK & PALING SEJUK.
- Peralatan tidak beroperasi pada suhu yang betul jika sangat panas atau jika anda
kerap membuka pintu.
Tetapan suhu peti ais sejuk
- Hidupkan peralatan anda. Suhu dalaman dikawal menggunakan sensor.
Terdapat 4 tetapan: OFF, SEJUK, LEBIH SEJUK & PALING SEJUK. SEJUK
adalah tetapan paling kurang sejuk dan PALING SEJUK adalah tetapan tertinggi
sejuk, OFF adalah tutup.
- Peralatan tidak beroperasi pada suhu yang betul jika sangat panas atau jika anda
kerap membuka pintu.
- Peti ais sejuk dan peti ais beku tidak berfungsi pada tetapan OFF.
Lokasi
Penggunaan Panel Kawalan
PERINGATAN! Sebaiknya, dapat menanggalkan plag peralatan dari bekalan kuasa; Oleh itu, plag perlu
mudah dicapai selepas pemasangan.
!
Cara-cara Penggunaan Cara-cara Penggunaan
Kelas iklim Suhu sesuai
+10˚C hingga +32˚C
+16˚C hingga +32˚C
+16˚C hingga +38˚C
+16˚C hingga +43˚C

29 30
Petunjuk untuk pembekuan
Untuk membantu anda memanfaatkan sepenuhnya proses pembekuan, berikut adalah beberapa petunjuk penting:
1. Kuantiti maksima makanan yang boleh dibekukan dalam 24 jam, ditunjukkan di plat penilaian.
2. Proses pembekuan mengambil masa 24 jam. Tiada makanan tambahan yang perlu dibekukan dalam tempoh ini.
3. Hanya bekukan bahan makanan berkualiti tinggi, segar dan bersih.
4. Sediakan makanan dalam bentuk kecil untuk disejuk bekukan dengan cepat dan kemudian dapat dicairkan untuk
kuantiti yang diperlukan sahaja.
5. Balut makanan dalam kerajang aluminium atau politena dan pastikan bungkusan kedap udara.
6. Jangan biarkan makanan segar dan tidak beku menyentuh makanan yang sudah beku, perkara ini dapat mengelak
kan kenaikan suhu.
7. Makanan tanpa lemak lebih baik dan tahan lama daripada yang berlemak, kerana garam mengurangkan jangka
hayat makanan.
8. Jika meminum air ais yang dikeluarkan terus dari ruangan penyejuk beku, boleh menyebabkan kulit membeku.
9. Digalakkan untuk menunjukkan tarikh pembekuan pada setiap pek individu apabila keluarkan dari peti sejuk beku,
kerana boleh menyebabkan kulit terluka akibat sejuk.
10. Digalakkan untuk menunjukkan tarikh pembekuan pada setiap pek individu supaya anda dapat menjaga tempoh
masa penyimpanan.
Petunjuk untuk menyimpan makanan sejuk beku
Untuk mendapatkan prestasi terbaik dari peralatan ini, anda perlu :
- Pastikan bahan makanan sejuk beku disimpan dengan baik oleh peruncit, pindahkan makanan sejuk beku yang dibeli
dari kedai ke dalam peti ais dalam masa yang singkat.
- Jangan kerap membuka pintu atau biarkan terbuka lama.
- Setelah dicairkan, makanan merosot dengan cepat dan tidak dapat dibekukan semula.
- Jangan simpan makanan melebihi tempoh yang ditunjukkan oleh pengeluar makanan.
Petunjuk untuk penyejukan makanan segar
Untuk mendapatkan prestasi terbaik :
- Jangan simpan makanan panas atau cecair penyejat di dalam peti sejuk.
- Jika makanan berbau kuat, tutup atau balut makanan dengan rapi.
Petunjuk untuk penyejukan
Petunjuk berguna :
- Balut (semua jenis): atau bungkus dalam beg politena dan letakkan di rak kaca di atas laci sayur.
- Bagi tujuan keselamatan, simpan dengan cara ini selama satu atau dua hari.
- Makanan yang dimasak, masakkan sejuk, dan lain-lain perlu ditutup dan boleh diletakkan pada semua rak.
- Buah-buahan dan sayur-sayuran: perlu dibersihkan dengan betul dan diletakkan dalam laci khas yang disediakan.
- Mentega dan keju: perlu diletakkan di dalam bekas kedap udara khas atau dibungkus dengan beg kerajang
aluminium politena untuk keluarkan semua udara.
- Botol susu: botol yang mempunyai penutup perlu disimpan di balkoni pintu.
- Bahan makanan seperti pisang, kentang, bawang merah dan bawang putih, perlu disimpan dalam peti ais jika tidak
dibungkus atau dibalut.
PERINGATAN! Sebelum mengenal-pasti masalah, matikan bekalan kuasa. Juruelektrik atau orang berkelaya-
kan sahaja dibenarkan untuk mengenal-pasti masalah yang tiada di dalam manual ini.
Mustahak! Beberapa bunyi akan kedengaran semasa operasi normal (kompresor atau peredaran penyejuk)
Masalah
Masukkan plag utama.
Periksa fius, ganti jika perlu.
Kerosakan utama perlu dibaiki oleh
juruelektrik.
Plag utama tidak dipasang atau longgar.
Fius terbakar atau rosak.
Socket rosak.
Peralatan tidak berfungsi
Sebab-sebab Penyelesaian
Laraskan tombol suhu pada tetapan
kurang sejuk untuk sementara.
Suhu ditetapkan terlalu sejuk.
Peralatan terlebih
membeku atau menyejuk
Sila lihat pada bahagian tetapan suhu
awal.
Buka pintu peti ais apabila perlu sahaja.
Laraskan tombol suhu pada tetapan
ebih sejuk untuk sementara.
Sila lihat kedudukan lokasi peralatan
dipasang.
Suhu tidak dilaraskan dengan betul.
Pintu terbuka terlalu lama.
Meletakkan kuantiti makanan panas
yang besar pada perlatan dalam tempoh
24 jam.
Sumber haba panas berdekatan dengan
peralatan.
Makanan tidak membeku
sepenuhnya
Panaskan bahagian bocor penghadang
pintu dengan pengering rambut (tetapan
sejuk). Bentukkan penghadang pintu
dengan betul menggunakan tangan.
Door seal is not air tight.
Ketulan ais tebal pada
penghadang pintu
Laraskan kaki peralatan.
Alihkan kedudukan peralatan sedikit.
Jika perlu, bengkokkan komponen keluar
dengan berhati-hati
Appliance is not level.
The appliance is touchong the wall or
other objects.
A component, e.g. a pipe on the rear of
the appliance is touching another part
of the appliance or the wall.
Bunyi bising
!
Cara-cara Penggunaan Mengenal pasti Masalah
This manual suits for next models
2
Table of contents
Languages:
Other KHIND Refrigerator manuals