manuals.online logo
Brands
  1. Home
  2. •
  3. Brands
  4. •
  5. Kia
  6. •
  7. Automobile
  8. •
  9. Kia Venga 2015 User manual

Kia Venga 2015 User manual

1
EXTERIOR OVERVIEW (FRONT)
1. Front removable towing hook .................6-38
2. Front windscreen wiper ..........................7-37
3. Outside rearview mirror ..........................4-36
4. Door lock ................................................4-13
5. Head lamp.....................................4-63, 7-64
6. Front fog lamp.........................................4-65
7. Bonnet ...................................................4-24
8. Tyre and wheel .......................................7-42
OYN015001R
YN leaflet-ENG(RHD)-A1PO-EA48A(L).qxp 11/6/2014 5:08 PM Page 1
2
EXTERIOR OVERVIEW (REAR)
1. Roof antenna ........................................4-100
2. Rear window defroster............................4-72
3. Rear wiper.....................................4-69, 7-38
4. Rear parking assist system ....................4-57
5. Child-protector rear door lock.................4-16
6. Fuel filler .................................................4-26
7. Rear towing hook....................................6-38
8. Rear combination lamp ..........................7-68
9. Tailgate handle switch ...........................4-17
10. High mounted stop lamp ......................7-70
11. Rearview camera..................................4-60
OYN015002L
YN leaflet-ENG(RHD)-A1PO-EA48A(L).qxp 11/6/2014 5:08 PM Page 2
3
INTERIOR OVERVIEW
1. Inside door handle ............................4-14
2. Outside rearview mirror folding
button*...............................................4-39
3. Outside rearview mirror control
switch ................................................4-38
4. Power window lock button* ...............4-22
5. Power window switches*...................4-20
6. Bonnet release lever .........................4-24
7. Fuse box ............................................7-52
8. Head lamp levelling device*..............4-66
9. ISG OFF button*...............................5-14
10. ESP OFF button*............................5-29
11. Instrument panel illumination*.........4-42
12. Parking assist OFF button*.............4-57
13. Steering wheel ................................4-33
14. Steering wheel tilt lever...................4-33
15. Seat...................................................3-2
16. Fuel filler lid release lever ...............4-26
* if equipped
OYN025001R
YN leaflet-ENG(RHD)-A1PO-EA48A(L).qxp 11/6/2014 5:08 PM Page 3
4
INSTRUMENT PANEL OVERVIEW
1. Driver’s front air bag* .......................3-45
2. Light control / Turn signals ...............4-61
3. Instrument cluster.............................4-40
4. Wiper/Washer...................................4-67
5. Steering wheel audio controls* ......4-126
6. Auto cruise controls* / Speed limiter*
..................................................5-35/5-39
7. LCD display* / Trip computer* ..4-93/4-44
8. Audio controls* ................................4-101
9. Hazard warning flasher switch....4-61/6-2
10. Central door lock/unlock button......4-14
11. Seat warmer* ...................................3-9
12. Climate control system*..................4-73
13. Passenger’s front air bag*..............3-45
14. Glove box .......................................4-91
15. Power outlet* / Cigarette lighter*
...............................................4-96/4-93
16. Shift lever* ......................................5-19
17. Parking brake .................................5-25
18. Brake pedal ....................................5-24
19. Accelerator pedal .............................5-6
20. Vent controls...................................4-76
21. Steering wheel warmer*
.....See the page 11 in this supplement.
* if equipped
OYN025002R
* The actual instrument panel in the vehicle may differ from the illustration.
YN leaflet-ENG(RHD)-A1PO-EA48A(L).qxp 11/6/2014 5:09 PM Page 4
5
ENGINE COMPARTMENT - DIESEL ENGINE
OYN075002R
❈The actual engine room in the vehicle
may differ from the illustration.
1. Engine coolant reservoir................7-25
2. Engine oil filler cap ........................7-24
3. Brake fluid reservoir.......................7-28
4. Positive battery terminal ................7-38
5. Negative battery terminal...............7-38
6. Fuse box ........................................7-52
7. Air cleaner......................................7-33
8. Auto transaxle oil dipstick*.............7-29
9. Radiator cap ..................................7-27
10. Engine oil dipstick........................7-24
11. Windscreen washer fluid reservoir .7-31
12. Fuel filter ......................................7-32
* if equipped
YN leaflet-ENG(RHD)-A1PO-EA48A(L).qxp 11/6/2014 5:09 PM Page 5
❖❖Please see this page instead of page 3-2 in owner's manual.
6
SEATS
Driver’s seat
(1) Seat adjustment, forward / backward
(2) Seatback recliner
(3) Seat adjustment, height*
(4) Seat warmer*
(5) Armrest*
(6) Headrest adjustment
Front passenger seat
(7) Seat adjustment, forward /
backward
(8) Seatback recliner
(9) Seat warmer*
(10) Headrest adjustment
Rear seat
(11) Seat adjustment, forward / backward
(12) Armrest*
(13) Headrest adjustment
(14) Split folding rear seat
* if equipped
OYN035001R
YN leaflet-ENG(RHD)-A1PO-EA48A(L).qxp 11/6/2014 5:09 PM Page 6
7
❖❖Please see this page instead of page 4-2 in owner's manual.
Seat warmer (if equipped)
The seat warmer is provided to warm the
front seats during cold weather. With the
ignition switch in the ON position, push
either of the switches to warm the driver's
seat or the front passenger's seat.
The seat warmer defaults to the OFF
position whenever the ignition switch is
turned on.
During mild weather or under conditions
where the operation of the seat warmer
is not needed, keep the switches in the
"OFF" position.
• Each time you press the button, the
temperature setting of the seat will
change as follows :
Key operations
• Used to start the engine.
• Used to lock and unlock the doors.
Type B
To unfold the key, press the release but-
ton then the key will unfold automatically.
To fold the key, fold the key manually
whilst pressing the release button.
Type C
To remove the mechanical key, press and
hold the release button and remove the
mechanical key.
To reinstall the mechanical key, put the
key into the hole and push it until a click
sound is heard.
KEYS
CAUTION
Do not fold the key without press-
ing the release button. This may
damage the key.
OYN049001
■Type A
■Type B
OXM043003
■Type C
ORP042001
OYN035009L
OFF → HIGH( ) → LOW( )
→
YN leaflet-ENG(RHD)-A1PO-EA48A(L).qxp 11/6/2014 5:09 PM Page 7
❖❖Please see this page instead of page 4-5 in owner's manual.
8
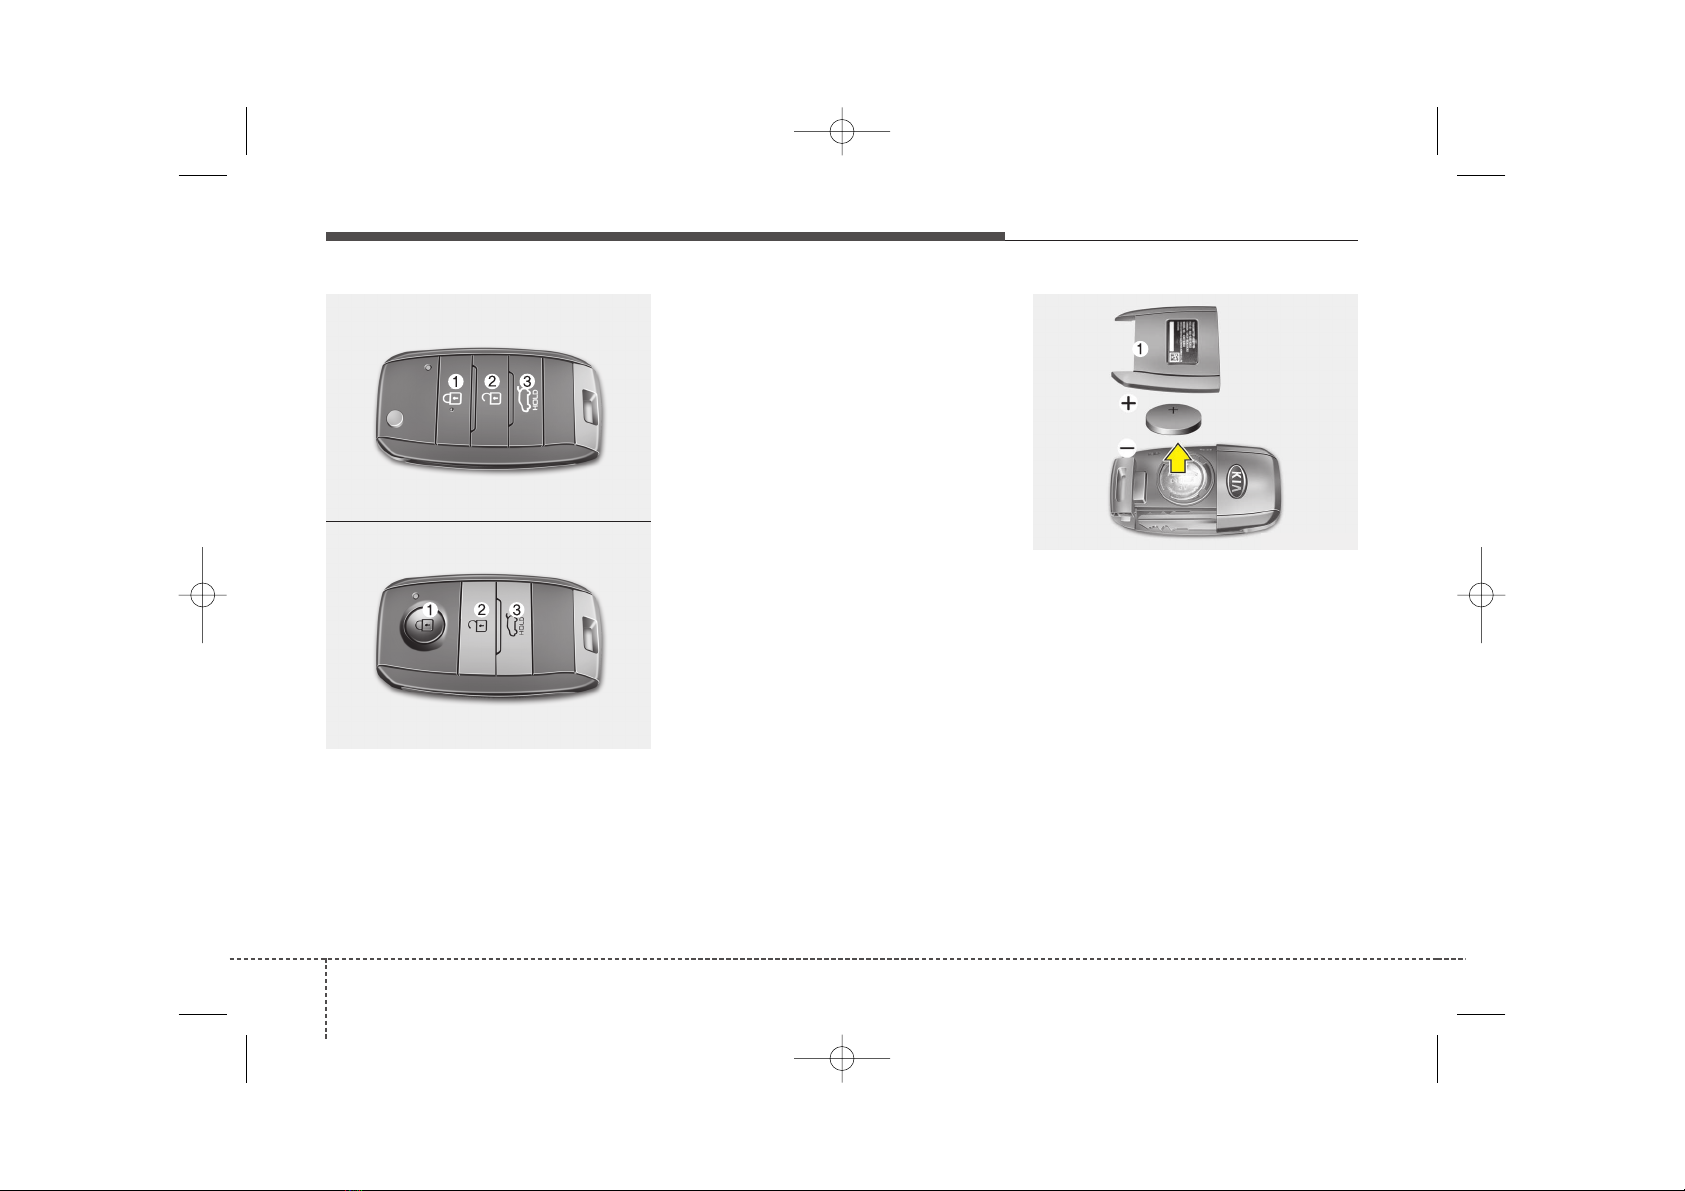
Remote keyless entry system
operations
Lock (1)
All doors are locked if the lock button is
pressed.
If all doors are closed, the hazard warning
lights blink once to indicate that all doors are
locked. If any door is opened when the lock
button is pressed, all doors will not lock.
Unlock (2)
All doors are unlocked if the unlock but-
ton is pressed.
The hazard warning lights will blink twice
to indicate that all doors are unlocked.
After depressing this button, the doors
will be locked automatically unless you
open any door within 30 seconds.
Tailgate unlock (3, if equipped)
The tailgate is unlocked if the button is
pressed for more than 1 second.
The hazard warning lights will blink twice
to indicate that the tailgate is unlocked.
After depressing this button, the tailgate
will be locked automatically unless you
open the tailgate within 30 seconds.
Also, once the tailgate is opened and
then closed, the tailgate will be locked
automatically.
❈The word “HOLD” is written on the but-
ton to inform you that you must press
and hold the button for 1 second.
Battery replacement
The transmitter uses a 3 volt lithium bat-
tery which will normally last for several
years. When replacement is necessary,
use the following procedure.
1. Insert a slim tool into the slot and gen-
tly pry open the transmitter centre
cover (1).
2. Replace the battery with new one.
When replacing the battery, make sure
the battery position.
3. Install the battery in the reverse order
of removal.
For transmitter replacement, we recom-
mend that you contact an authorised Kia
dealer.
REMOTE KEYLESS ENTRY (IF EQUIPPED)
ORP042235
OXM043002
■Type A
■ Type B OYDDCO2005
YN leaflet-ENG(RHD)-A1PO-EA48A(L).qxp 11/6/2014 5:09 PM Page 8
9
❖❖Please see this page instead of page 4-13 in owner's manual.
Operating door locks from inside
the vehicle
With central door lock switch
It is operated by depressing the door lock
switch.
• When pushing the door lock switch, all
vehicle doors will lock and the indicator
light on the switch will illuminate.
If any door is opened when the switch
is pushed, all doors will not lock.
• If any door is unlocked, the indicator of
the door lock switch will blink. If you
push the switch when the indicator is
blinking, all doors will lock.
• When pushing the door lock switch
again, all vehicle doors will unlock and
the indicator light on the switch will not
illuminate.
DOOR LOCKS
OYN045009L
YN leaflet-ENG(RHD)-A1PO-EA48A(L).qxp 11/6/2014 5:10 PM Page 9
10
Roller blind
The roller blinds are installed inside of
the sunroof and glass roof.
Open or close it manually when you need
to.
Before opening or closing the sunroof,
open the roller blind.
✽✽NOTICE
It is normal for wrinkles to form on the
blind because of its material character-
istic.
PANORAMA SUNROOF (IF EQUIPPED)
❖❖Please see this page instead of page 4-29 in owner's manual.
OYN049027
YN leaflet-ENG(RHD)-A1PO-EA48A(L).qxp 11/6/2014 5:10 PM Page 10
❖❖Please see this page instead of page 4-33 in owner's manual.
Tilt steering
To change the steering wheel angle, pull
down the lock release lever (1), adjust
the steering wheel to the desired angle
(2) and height (3), then pull up the lock-
release lever (4) to lock the steering
wheel in place. Be sure to adjust the
steering wheel to the desired position
before driving.
Heated steering wheel
(if equipped)
With the ignition switch in the ON posi-
tion, pressing the heated steering wheel
button warms the steering wheel.
✽✽NOTICE
The heated steering wheel will turn off
automatically approximately 30 minutes
after the heated steering wheel is turned
on.
Horn
To sound the horn, press the horn sym-
bol on your steering wheel.
Check the horn regularly to be sure it
operates properly.
✽✽NOTICE
To sound the horn, press the area indi-
cated by the horn symbol on your steer-
ing wheel (see illustration). The horn will
operate only when this area is pressed.
STEERING WHEEL
OYN045028R OYN045146L
CAUTION
Do not install any grip to operate the
steering wheel. This causes damage
to the heated steering wheel system.
11
CAUTION
Do not strike the horn severely to
operate it, or hit it with your fist. Do
not press on the horn with a sharp-
pointed object.
YN leaflet-ENG(RHD)-A1PO-EA48A(L).qxp 11/6/2014 5:10 PM Page 11
12
❖❖Please see this page instead of page 4-40 in owner's manual.
INSTRUMENT CLUSTER
OYN045042L/OYN045043L
* The actual cluster in the vehicle may differ from the illustration.
■Diesel Engine
Type A
Type B
1. Tachometer
2. Turn signal indicators
3. Speedometer
4. Warning and indicator lights
5. Automatic transaxle shift position indicator*
or Manual transaxle shift indicator*
6. Odometer/Tripmeter*
7. Fuel gauge
* if equipped
YN leaflet-ENG(RHD)-A1PO-EA48A(L).qxp 11/6/2014 5:10 PM Page 12
13
❖❖Please see this page instead of page 4-61 in owner's manual.
The hazard warning flasher should be
used whenever you find it necessary to
stop the vehicle in a hazardous location.
When you must make such an emergen-
cy stop, always pull off the road as far as
possible.
The hazard warning lights are turned on
by pushing in the hazard switch. Both
turn signal lights will blink. The hazard
warning lights will operate even though
the key is not in the ignition switch.
To turn the hazard warning lights off,
push the switch again.
HAZARD WARNING FLASHER
OYN065023L
OYN065024L
■Type A
■ Type B
YN leaflet-ENG(RHD)-A1PO-EA48A(L).qxp 11/6/2014 5:10 PM Page 13
14
Rear window defroster
The defroster heats the window to
remove frost, fog and thin ice from the
interior and exterior of the rear window,
whilst engine is running.
To activate the rear window defroster,
press the rear window defroster button
located in the centre facia switch panel.
The indicator on the rear window
defroster button illuminates when the
defroster is ON.
If there is heavy accumulation of snow on
the rear window, brush it off before oper-
ating the rear defroster.
The rear window defroster automatically
turns off after approximately 20 minutes
or when the ignition switch is turned off.
To turn off the defroster, press the rear
window defroster button again.
Outside mirror defroster
(if equipped)
If your vehicle is equipped with outside
mirror defrosters, they will operate at the
same time when you turn on the rear
window defroster.
Front windscreen deicer
(if equipped)
If your vehicle is equipped with front
windscreen deicer, they will operate at
the same time when you turn on the rear
window defroster.
DEFROSTER
❖❖Please see this page instead of page 4-72 in owner's manual.
OYN045050L
OYN045051L
■Type A
■ Type B
YN leaflet-ENG(RHD)-A1PO-EA48A(L).qxp 11/6/2014 5:10 PM Page 14
❖❖Please see this page instead of page 4-73 in owner's manual.
MANUAL CLIMATE CONTROL SYSTEM (IF EQUIPPED)
OYN045052L
1. Fan speed control knob
2. Mode selection buttons
3. Temperature control knob
4. Front windscreen defroster button
5. Rear window defroster button
6. Air intake control button
7. Air conditioning button
15
YN leaflet-ENG(RHD)-A1PO-EA48A(L).qxp 11/6/2014 5:10 PM Page 15
16
Heating and air conditioning
1. Start the engine.
2. Set the mode to the desired position.
To improve the effectiveness of heat-
ing and cooling :
- Heating:
- Cooling:
3. Set the temperature control to the
desired position.
4. Set the air intake control to the outside
(fresh) air position.
5. Set the fan speed control to the
desired speed.
6. If air conditioning is desired, turn the
air conditioning system (if equipped)
on.
OYN045096R
YN leaflet-ENG(RHD)-A1PO-EA48A(L).qxp 11/6/2014 5:10 PM Page 16
17
Mode selection
The mode selection button controls the
direction of the air flow through the venti-
lation system.
Air can be directed to the floor, dash-
board outlets, or windscreen. Five sym-
bols are used to represent Face, Bi-
Level, Floor, Floor-Defrost and Defrost
air position.
Face-Level (B, D)
Air flow is directed toward the upper body
and face. Additionally, each outlet can be
controlled to direct the air discharged
from the outlet.
Bi-Level (B, D, C, E)
Air flow is directed towards the face and
the floor.
Floor-Level (C, E, A, D)
Most of the air flow is directed to the
floor, with a small amount of the air being
directed to the windscreen and side win-
dow defrosters.
Floor/Defrost-Level (A, C, E, D)
Most of the air flow is directed to the floor
and the windscreen with a small amount
directed to the side window defrosters.
Defrost-Level (A, D)
Most of the air flow is directed to the
windscreen with a small amount of air
directed to the side window defrosters.
OYN045054L
YN leaflet-ENG(RHD)-A1PO-EA48A(L).qxp 11/6/2014 5:10 PM Page 17
18
Temperature control
The temperature control knob allows you
to control the temperature of the air flow-
ing from the ventilation system. To
change the air temperature in the pas-
senger compartment, turn the knob to
the right position for warm and hot air or
left position for cooler air.
Air intake control
This is used to select outside (fresh) air
position or recirculated air position.
To change the air intake control position,
push the control button.
Fan speed control
The ignition switch must be in the ON
position for fan operation.
The fan speed control knob allows you to
control the fan speed of the air flowing
from the ventilation system. To change
the fan speed, turn the knob to the right
for higher speed or left for lower speed.
Setting the fan speed control knob to the
“0” position turns off the fan.
OYN045057L OYN045058L OYN045059L
YN leaflet-ENG(RHD)-A1PO-EA48A(L).qxp 11/6/2014 5:10 PM Page 18
19
To turn off the blowers
To turn off the blowers, turn the fan
speed control knob to the “0” position.
Air conditioning (if equipped)
Press the A/C button to turn the air con-
ditioning system on (indicator light will
illuminate) and set the fan speed control
knob to the first position or higher. Press
the button again to turn the air condition-
ing system off.
OYN045145L OYN045060L
YN leaflet-ENG(RHD)-A1PO-EA48A(L).qxp 11/6/2014 5:10 PM Page 19
20
❖❖Please see this page instead of page 4-82 in owner's manual.
AUTOMATIC CLIMATE CONTROL SYSTEM (IF EQUIPPED)
OYN045062L/OYN045141L
1. AUTO (automatic control) button
2. Temperature control knob
3. OFF button
4. Mode selection button
5. Fan speed control knob
6. Air conditioning button
7. Front windscreen defroster button
8. Rear window defroster button
9. Air intake control button
10. A/C display*
11. Climate button*
* if equipped
■Type A
■Type B
YN leaflet-ENG(RHD)-A1PO-EA48A(L).qxp 11/6/2014 5:11 PM Page 20

Other Kia Automobile manuals

Kia Rondo 2012 User manual

Kia

Kia Rondo 2012 User manual

Kia K900 2017 Parts list manual

Kia

Kia K900 2017 Parts list manual

Kia 2010 CEED User manual

Kia

Kia 2010 CEED User manual

Kia Sorento 2018 Parts list manual

Kia

Kia Sorento 2018 Parts list manual

Kia Spectra User manual

Kia

Kia Spectra User manual

Kia 2016 forte User manual

Kia

Kia 2016 forte User manual

Kia Ceed 2006 User manual

Kia

Kia Ceed 2006 User manual

Kia Carnival 2023 User manual

Kia

Kia Carnival 2023 User manual

Kia 2010 CEED User manual

Kia

Kia 2010 CEED User manual

Kia CADENZA 2020 Parts list manual

Kia

Kia CADENZA 2020 Parts list manual

Kia stinger 2022 User manual

Kia

Kia stinger 2022 User manual

Kia Optima Hybrid 2013 User manual

Kia

Kia Optima Hybrid 2013 User manual

Kia Rio 2006 User manual

Kia

Kia Rio 2006 User manual

Kia Soul 2018 User manual

Kia

Kia Soul 2018 User manual

Kia Sorento 2013 User manual

Kia

Kia Sorento 2013 User manual

Kia Sorento 2022 User manual

Kia

Kia Sorento 2022 User manual

Kia quoris User manual

Kia

Kia quoris User manual

Kia SORENTO hybrid 2021 Parts list manual

Kia

Kia SORENTO hybrid 2021 Parts list manual

Kia Carens 2022 User manual

Kia

Kia Carens 2022 User manual

Kia Forte 2015 User manual

Kia

Kia Forte 2015 User manual

Kia Sedona 2005 User manual

Kia

Kia Sedona 2005 User manual

Kia Soul 2010 User manual

Kia

Kia Soul 2010 User manual

Kia Niro HEV User manual

Kia

Kia Niro HEV User manual

Kia SOUL 2016 User manual

Kia

Kia SOUL 2016 User manual

Popular Automobile manuals by other brands

Lincoln 2013 MKZ owner's guide

Lincoln

Lincoln 2013 MKZ owner's guide

BMW 2010 M3 owner's manual

BMW

BMW 2010 M3 owner's manual

HOLDEN VE II UTE Series 2011 Owner's handbook

HOLDEN

HOLDEN VE II UTE Series 2011 Owner's handbook

Mazda 2006 RX-8 owner's manual

Mazda

Mazda 2006 RX-8 owner's manual

Bajaj QUTE user manual

Bajaj

Bajaj QUTE user manual

Scion iQ EV 2013 Quick reference guide

Scion

Scion iQ EV 2013 Quick reference guide

GMC 1994 Yukon owner's manual

GMC

GMC 1994 Yukon owner's manual

Toyota YARIS SEDAN 2010 Quick reference guide

Toyota

Toyota YARIS SEDAN 2010 Quick reference guide

Mitsubishi Pajero II owner's manual

Mitsubishi

Mitsubishi Pajero II owner's manual

SMART fortwo 2015 owner's manual

SMART

SMART fortwo 2015 owner's manual

Volvo XC 70 owner's manual

Volvo

Volvo XC 70 owner's manual

BMW 1992 525i Electrical troubleshooting manual

BMW

BMW 1992 525i Electrical troubleshooting manual

GMC 2004 Envoy owner's manual

GMC

GMC 2004 Envoy owner's manual

Mazda 2007 Mazdaspeed 3 Smart start guide

Mazda

Mazda 2007 Mazdaspeed 3 Smart start guide

Toyota RAV4 (RHD) - MMC owner's manual

Toyota

Toyota RAV4 (RHD) - MMC owner's manual

Pontiac 1997 Grand Prix owner's manual

Pontiac

Pontiac 1997 Grand Prix owner's manual

Rolls-Royce T Series Workshop manual

Rolls-Royce

Rolls-Royce T Series Workshop manual

Chevrolet T-Series owner's manual

Chevrolet

Chevrolet T-Series owner's manual

manuals.online logo
manuals.online logoBrands
  • About & Mission
  • Contact us
  • Privacy Policy
  • Terms and Conditions

Copyright 2025 Manuals.Online. All Rights Reserved.