manuals.online logo
Brands
  1. Home
  2. •
  3. Brands
  4. •
  5. Kicker
  6. •
  7. Subwoofer
  8. •
  9. Kicker PSON13 User manual

Kicker PSON13 User manual

1

PSON13
Designed for 2013 and newer Chevrolet® Sonic vehicles without MyLink™
©2015 Stillwater Designs
PSON13-A4-20150930
SubwooferPower
Harness
Fuse
WireTiesX6
FoamStrip
WireTapsX2
AdaptorHarness
SubwooferHarness
SubwooferAssembly
2

Amplifier/Bracket
Assembly
Fuse
WireTiesX6
AmplifierPower
Harness
AmplifierHarness
3

Power Harness Routing
1. Disconnect negative battery cable from battery.
2. Using a razor knife make a cross shaped incision in the large rubber grommet from inside
the vehicle and
feed the power harnesses from the engine compartment to the cabin. Using
a fish tape wire is recommended.
Fig. 1
3. Pull the power harnesses through the grommet until the sheathing touches the grommet.
4. Remove the fuse box cover under the hood. Remove the fuses from the fuse holders on
both
power harnesses and connect the power harnesses to the accessory lug. Torque to
9 +/- 1.5 Nm. Make sure that the
wires exit on the side closest to the battery. Fig. 2
5. Install the white three pin power connector on the amplifier power harness. Close the
retainer. Fig. 3
Note: The terminals are keyed so that they
only install one way. If the terminal doesn’t
want to slide completely into the connector,
it may need to be rotated 180 degrees. It
does not matter which red wire goes in what
position of the connector.
6. Install the black two pin power connector on the
subwoofer power harness by first inserting the
terminal fully into the connector and then
depressing the blue retainer. Fig. 4
Note: Make sure the blue retainer in the
center of the connector is not depressed – it
should be flush with the front of the
connector. If the retainer is depressed, the
terminal will not fully seat in the connector
body. Make sure the terminal is installed
into position 1 on the connector body. There
should be a block-out plug installed in
position 2 in order to prevent the terminal
from being installed into the wrong position
on the connector.
Fig. 1
CutgrommethereFig. 2
Wireshouldexitin
directionofarrow
Fig. 4
Insert
terminal
first
Then
depress
blue
retainer
Fig. 3
Insert terminals first.
Any wire can be in
any position.
Then
close
retainer
4

Amplifier and Subwoofer Harness Routing
7. Remove the driver’s side front kick/threshold
panel by loosening the retainer at the top and
then pulling loose. Fig. 5
8. Remove the driver’s side rear threshold panel
along the bottom of the door opening
9. Remove the lower portion of the driver’s side B
pillar post cover between the front and rear door
opening.
10.Remove the lower portion of the rear seat by
pulling straight up on the front edge.
11.Remove both of the covers directly in front of the
console. The driver’s side requires removing the
plastic retainer with a Phillip’s screwdriver and then pulling loose cover. The passenger’s side
has no plastic retainer and can simply be pulled off. Fig. 6
12.Remove the radio trim bezel by carefully prying loose with a plastic panel removal tool. Start
at the corners and work around the bezel. Fig. 7
13.Remove the four screws securing the radio, pull radio from dash and disconnect all wiring.
14.Route the amplifier harness from the right side of the radio opening down to the area in front
of the console.
15.Connect the radio speaker/power connector to the amplifier harness and push the connecter
up toward the air vents to allow radio enough clearance to be reinstalled.
16.Connect the other end of the amplifier harness to the back of the radio and reconnect the
other radio connection then reinstall radio.
17.Route the power and ground wires of the amplifier harness under the carpet and toward the
driver’s side kick panel.
18.Route the white two-pin connector of the
subwoofer harness under the carpet toward the
amp and connect it to the white two-pin
connector of the amplifier harness.
19.Connect the black ground wires of the subwoofer
harness and the amplifier harness to the factory
ground point near the driver’s side kick panel.
Torque to 9 +/- 1.5 Nm. Fig. 8
Fig. 5
Retainer–Rotate
counterclockwise
Fig. 6 Fig. 7
Fig. 8
Connectgroundwireshere
5

20.Connect the amplifier three-pin power connector to the three-pin power harness connector.
21.Connect the subwoofer harness black two pin power connector to the power harness two pin
connector.
22.Continue running the subwoofer harness down the driver’s side of the car to and under the
rear seatback. It is helpful to rotate the seatback down to allow clearance for the connecters.
Secure any excess harness to the factory harness under the driver’s side rear threshold
panel.
Amplifier Installation
23.Remove the three nuts securing the SIR module on the center hump in front of the console.
Fig. 9 Do NOT disconnect the wiring from the module.
24.Lift the module off the studs and set the amplifier/bracket assembly over the studs. Reinstall
the module over the studs and on top of the amplifier bracket and retighten the nuts. Fig. 10
25.Connect the amplifier harness to the amplifier.
Subwoofer Installation Hatchback
26.Remove the spare tire to retrieve the spare tire
safety strap equipped with the vehicle, and then
replace the spare tire. (Refer to owner’s manual,
beginning in section 10-67, for proper removal
and reinstallation of spare tire.) The safety strap
will be used to insure the sub- woofer enclosure
does not strike someone in the event of a
collision.
27.Place the supplied foam strip on the plastic
quarter panel cover in the position shown in Fig.
11 to prevent the enclosure from contacting the
panel.
28.Lay the poly bag that the subwoofer is packaged in on top of the carpet behind the driver’s
side seat- back. (The poly bag prevents the Velcro® from engaging the carpet prematurely.
Set the subwoofer on top of the poly bag and connect the subwoofer harness.
Fig. 11
Installfoamstriphere
Fig. 9
Module
Fig. 10
Amplifier
installedover
module
6

29.Run one end of the safety strap under the bracket on the side of the enclosure and then
connect both ends to the cargo tie-down on the driver’s side of the car. Fig. 12 and Fig. 13
30.With the seatback in the up position set the
subwoofer in place against the back of the
seatback. Release the seatback and while
holding the top of the subwoofer against the
seatback slowly rotate the seatback forward until
the subwoofer bracket slides under the anchor
point on the seatback. Continue to hold the
subwoofer against the seat while rotating the
seatback rearward until it locks into the fully back
position. Fig. 14
31.Hold firm pressure against the bottom of the
subwoofer while pulling the poly bag from beneath it.
Subwoofer Installation Sedan
32.Find the anchor point on the driver’s side of the
rear seatback. The anchor point is
approximately 17 inches from the load floor and
7 inches left of the gap between the seatbacks.
Make a vertical incision in the carpet seatback
approximately 2-3 inches long. Fig. 15
33.Lay the poly bag that the subwoofer is packaged
in on top of the carpet behind the seatback to
prevent the Velcro® on the bottom of the
subwoofer from engaging the carpet prematurely.
34.With the seatback in the up position, set the
subwoofer in place against the back of the seatback. Release the seatback and while holding
the top of the subwoofer against the seatback, slowly rotate the seatback forward until the
subwoofer bracket slides under the anchor point on the seatback. Continue to hold the
subwoofer against the seatback while rotating the seatback rearward until it locks into the fully
back position.
35.Hold firm pressure against the bottom of the subwoofer while pulling the poly bag from
beneath it.
36.Reinstall all previously removed parts in reverse order.
37.Install fuse into fuse holder.
38.Reconnect negative battery cable to battery.
Fig. 12
Installfoamstriphere
Fig. 13
Installfoamstriphere
Fig. 14
Fig. 15
7
inches
17
inches
7

Troubleshooting the Kicker Integrated Systems
If you experience a problem once the subwoofer or amplifier are installed use this guide to locate the trouble.
The radio is working, but the Subwoofer is not working:
Check the battery voltage to make sure it is not discharged below 11 volts.
Check the negative battery cable to see if it has been securely tightened back on the battery.
Check the inline fuse located near the battery to make sure it is plugged in completely, and not blown.
Check the inline +12 volt power connector near the firewall to make sure it is plugged in securely.
Check the inline connectors near the subwoofer enclosure to make sure they are plugged securely.
Check the ground wire connection to make sure it is tightly secured to the proper ground in the vehicle.
Check the audio input signal connection to make sure it is secure and connected to the proper wiring.
Test with different music in case there is no low frequency audio in the initial sound check.
There is a problem with the multi-channel stereo amplifier:
Check the battery voltage to make sure it is not discharged below 11 volts.
Check the negative battery cable to see if it has been securely tightened back on the battery.
Check the inline fuse located near the battery to see if it is plugged in completely and not blown.
Check the multi-pin connectors at the back of the radio and at the amplifier chassis to make sure they are
plugged all the way in.
Check the ground wire connection to make sure it is tightly secured to the proper ground in the vehicle.
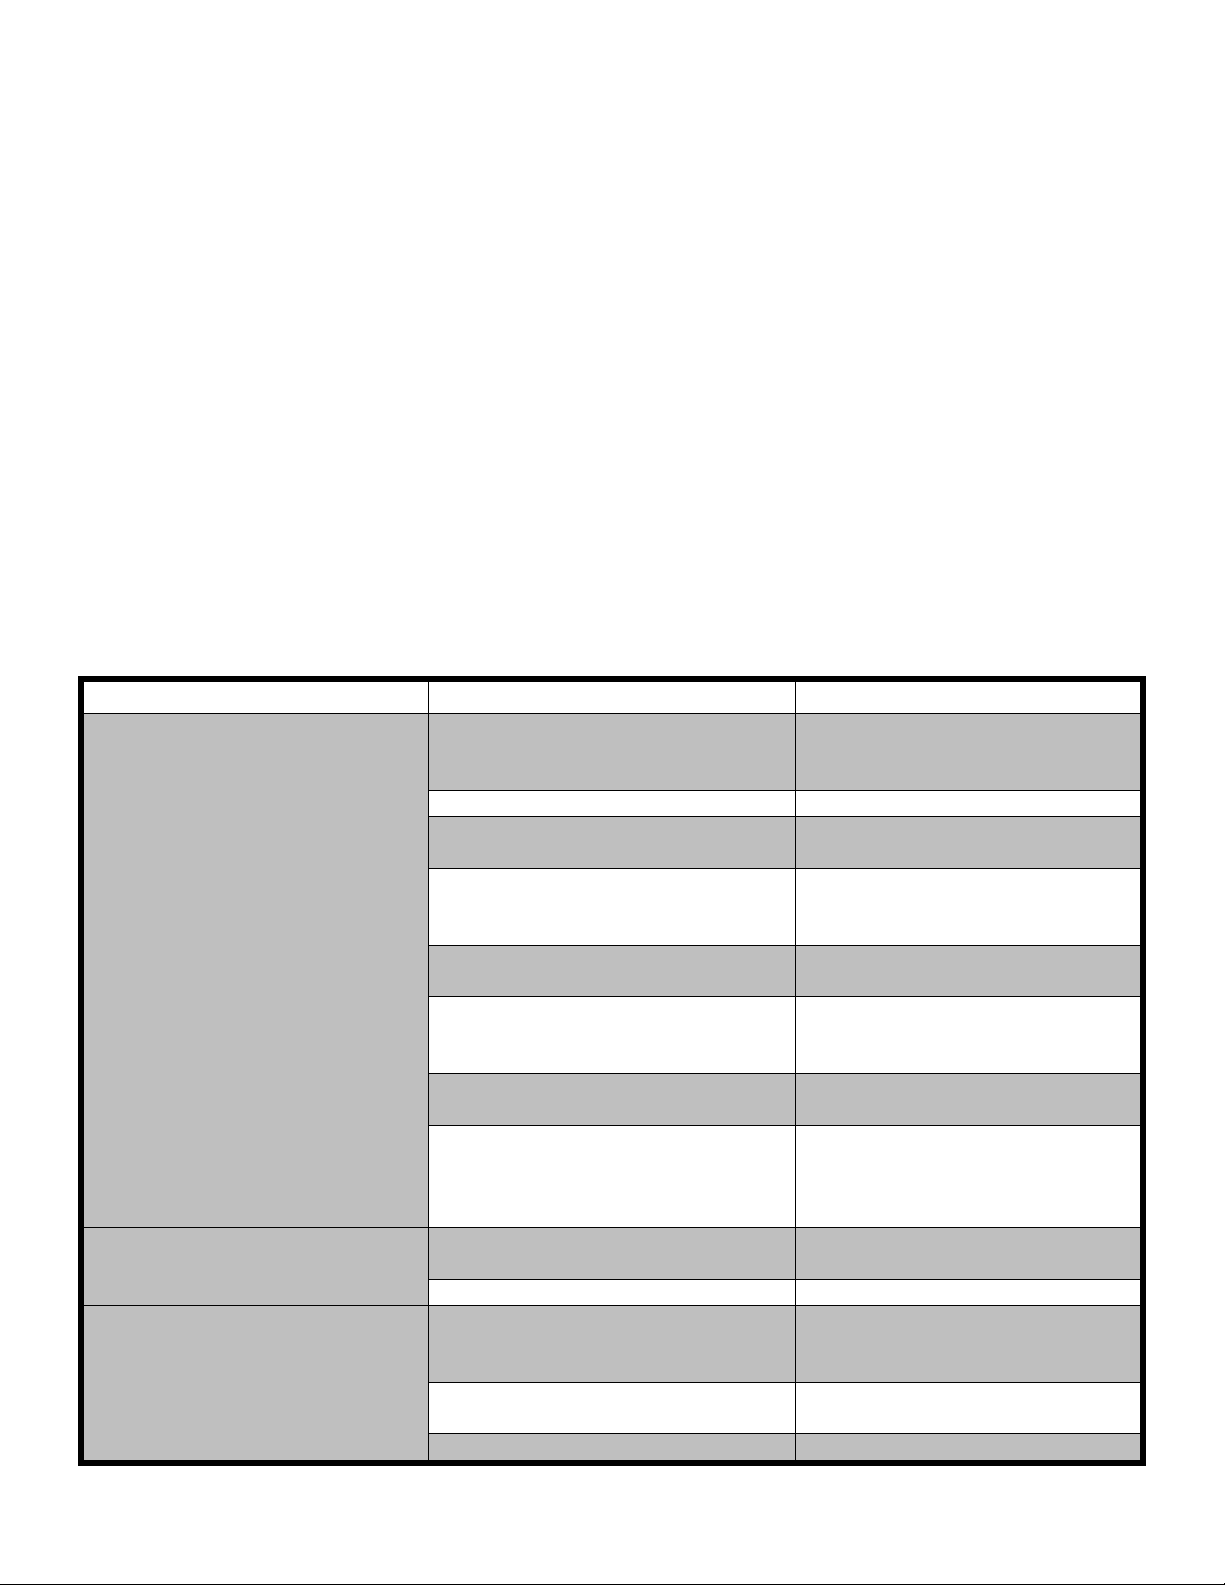
Symptom Possible Cause Solution
No Subwoofer Output
Fuse not installed in inline fuse
holder on subwoofer and/or
amplifier power harness
Install fuse into fuse holder.
Refer to instructions for correct
placement
Low battery voltage Recharge the battery
Negative battery cable not
connected Reconnect negative battery
cable
Power wire connector not
connected to body harness
Connect power wire to body
harness. Check for loose
connection
Ground wire not grounded properly Check ground wire with voltmeter
to insure it is a good ground
Balance and/or fader controls not
set to neutral position
Set balance and fader control to
center settings. (only affects
stand-alone subwoofer kit)
No low frequency information in
music Test with several different songs
Subwoofer harness not
properly/completely connected to
subwoofer
Securely fasten both of the
connectors on the subwoofer
harness to the subwoofer.
Check for loose connectors.
Radio Not Coming On Blown radio fuse Refer to owner’s manual for radio
fuse location and value
Low battery voltage Recharge the battery
Radio Comes On, But No
Sound From Any Speakers
Fuse not installed in inline fuse
holder on amplifier harness
Install fuse into fuse holder.
Refer to instructions for correct
placement
Ground wire not grounded properly Check ground wire with voltmeter
to insure it is a good ground
Low battery voltage Recharge the battery
8

If you continue to experience problems after troubleshooting, please contact KICKER Technical Support at
(800) 256-0808 ext. 6009, or [email protected].
P.O. Box 459 • Stillwater, Oklahoma 74076 • USA • (405) 624–8510

Other Kicker Subwoofer manuals

Kicker COMPVT CVT124 User manual

Kicker

Kicker COMPVT CVT124 User manual

Kicker COMP8 User manual

Kicker

Kicker COMP8 User manual

Kicker 19417166 User manual

Kicker

Kicker 19417166 User manual

Kicker Comp12D4 User manual

Kicker

Kicker Comp12D4 User manual

Kicker KM10 User manual

Kicker

Kicker KM10 User manual

Kicker CompVR DCVR10 User manual

Kicker

Kicker CompVR DCVR10 User manual

Kicker Solo-Baric S15L5 User manual

Kicker

Kicker Solo-Baric S15L5 User manual

Kicker SWRA211 User manual

Kicker

Kicker SWRA211 User manual

Kicker KM10 User manual

Kicker

Kicker KM10 User manual

Kicker S18XSP User manual

Kicker

Kicker S18XSP User manual

Kicker CompVX CVX10 User manual

Kicker

Kicker CompVX CVX10 User manual

Kicker Solo-Baric S1L7 User manual

Kicker

Kicker Solo-Baric S1L7 User manual

Kicker COMP8 User manual

Kicker

Kicker COMP8 User manual

Kicker CompVR C12VR User manual

Kicker

Kicker CompVR C12VR User manual

Kicker SOLOX User manual

Kicker

Kicker SOLOX User manual

Kicker Solo-Baric S8L7 User manual

Kicker

Kicker Solo-Baric S8L7 User manual

Kicker Comp TC10 User manual

Kicker

Kicker Comp TC10 User manual

Kicker V55 PWRA207 User manual

Kicker

Kicker V55 PWRA207 User manual

Kicker Solo-Baric L5 User manual

Kicker

Kicker Solo-Baric L5 User manual

Kicker PWRA4P11 User manual

Kicker

Kicker PWRA4P11 User manual

Kicker Comp VC12 User manual

Kicker

Kicker Comp VC12 User manual

Kicker PSIEXT07 User manual

Kicker

Kicker PSIEXT07 User manual

Kicker L7R Series User manual

Kicker

Kicker L7R Series User manual

Kicker SoundGate SWRA411 User manual

Kicker

Kicker SoundGate SWRA411 User manual

Popular Subwoofer manuals by other brands

Behringer Truth B2092A user manual

Behringer

Behringer Truth B2092A user manual

JL Audio M3-10IB owner's manual

JL Audio

JL Audio M3-10IB owner's manual

Artcoustic IMPACT 1 owner's manual

Artcoustic

Artcoustic IMPACT 1 owner's manual

OSD Audio FORZA10 install guide

OSD Audio

OSD Audio FORZA10 install guide

Boss Audio Systems Chaos EXXTREME CX124DVC user manual

Boss Audio Systems

Boss Audio Systems Chaos EXXTREME CX124DVC user manual

Clarion SFW Specifications

Clarion

Clarion SFW Specifications

YORKVILLE PS210PX - SERVICE manual

YORKVILLE

YORKVILLE PS210PX - SERVICE manual

XTZ 99 W12.18 ICE user manual

XTZ

XTZ 99 W12.18 ICE user manual

Atlantic Technology 222 PBM instruction manual

Atlantic Technology

Atlantic Technology 222 PBM instruction manual

Vibe OPTISOUNDGAME5-V1 instruction manual

Vibe

Vibe OPTISOUNDGAME5-V1 instruction manual

Harman JBL STUDIO 650P owner's manual

Harman

Harman JBL STUDIO 650P owner's manual

Kenwood KFC-W2511 instruction manual

Kenwood

Kenwood KFC-W2511 instruction manual

Klipsch R-110SW user manual

Klipsch

Klipsch R-110SW user manual

YORKVILLE YS1052 owner's manual

YORKVILLE

YORKVILLE YS1052 owner's manual

Sony SA-WM40 Service manual

Sony

Sony SA-WM40 Service manual

Ground Zero RADIOACTIVE Series owner's manual

Ground Zero

Ground Zero RADIOACTIVE Series owner's manual

Sony XS-AW850 Service manual

Sony

Sony XS-AW850 Service manual

Blaupunkt VPw 1500 Pro quick start guide

Blaupunkt

Blaupunkt VPw 1500 Pro quick start guide

manuals.online logo
manuals.online logoBrands
  • About & Mission
  • Contact us
  • Privacy Policy
  • Terms and Conditions

Copyright 2025 Manuals.Online. All Rights Reserved.