manuals.online logo
Brands
  1. Home
  2. •
  3. Brands
  4. •
  5. kim lighting
  6. •
  7. Outdoor Light
  8. •
  9. kim lighting KLV205 User manual

kim lighting KLV205 User manual

Accent Light - KLV205 Installation Instructions
P.O. Box 60080 •16555 East Gale Ave.
City of Industry, California 91716-0080
626/968-5666 •FAX 626/330-3861
INSTRUCTIONS PERTAINING TO A RISK OF FIRE OR INJURY TO PERSONS
IMPORTANT SAFETY INSTRUCTIONS!
WARNING: To reduce the risk of FIRE, or INJURY TO PERSONS: Do not overdrive fixtures with greater
than 12 volts or fixture over-heating and short lamp life will occur. Do not overload the transformer by
installing (or relamping) higher wattage lamps than planned. Note: Total wattage of all lamps connected to one
transformer must not exceed the capacity of that transformer. Do not install luminaire within 10 feet (3.04m) of a
pool, spa, or fountain. DO NOT operate luminaire with missing or damaged lens.
SAFETY WARNING: When relamping, be sure electrical supply is OFF. Low voltage fixtures can become
very HOT depending on the lamp wattage used. Glass lenses and metal areas above & around the lamp
can become HOT enough to blister hands. Use discretion when touching fixture and be sure to allow fixture to
cool before relamping. When relamping fixture avoid touching the lamp envelope with bare hands. If touching
the lamp is necessary during installation, clean the envelope with alcohol and dry with a clean, soft cloth before
turning ON. Contamination of the envelope may reduce lamp performance.
MAINTENANCE: To maintain light efficiency and prevent fixture-overheating, glass lenses and enclosure must
be kept clean and free of dirt, dust, leaves, trash (combustible materials) and mineral deposits from water.
Particular care should be taken not to locate fixtures where small children can reach them if higher wattage's are
used.
Note: Keep the lamp free from impact while burning, as this may deform the filament and shorten the lamp life.
N
Unit intended for mounting with Diffuser/Glass Barrier and Lamp Holder greater than 2 in. (5.08 cm)
from the ground plane.
OT INTENDED FOR INDOOR USE. All electrical work should be done by a qualified electrician.
KEEP THIS SHEET FOR FUTURE REFERENCE.
Part No. 95489EC 111014007 Status 18
Tools Required:F” Allen Wrench Flat Blade Screwdriver Adjustable Wrench
B" Allen Wrench Philips Screwdriver
!
4. To install lamp, remove four shield
screws.
KLV205
Shield Lens Gasket
Assembly
Screws
Drain Hole
1. Remove coupling from fixture. 2. Tighten coupling onto
mounting device.
5. Remove shield and lens gasket
assembly.
3. Install fixture onto coupling. Attach fixture
leads. Note: KIM KLV Mounting Options can
be installed before fixture is attached.
!
IMPORTANT!
DO NOT overload the transformer by
installing (or relamping) higher
wattage lamps than planned.
Remember, the total wattage of all
lamps connected to one trans-former
must not exceed the capacity of that
transformer.
6. Install lamp of type and wattage
shown on fixture label and chart on
page 2.
Installation Instructions:Make certain the electrical supply is OFF before starting fixture installation.
!
Revision 10/14/11
Page 2 Kim Lighting • 16555 E. Gale Ave. • P.O. Box 60080 • City of Industry, Ca 91716-0080 • 626/968-5666 • FAX 626/330-3861
9. To adjust angle, loosen swivel
screw, do not disengage. Hold
fixture at desired angle and tighten
swivel screw. Fixture may be
aimed up or down.
Accent Light KLV205 Installation Instructions
*
90°
Note: Swivel stem must be installed
with the mounting threads facing
down-to-horizontal. Fixtures may not
be installed with mounting threads
facing upward unless shielded from
rain or sprinklers.
*
LAMP INFORMATION
Cat. No. Lamp Type Max. Watts
KLV205 MR-16 Bi-Pin 75
10.Connect fixture
cable to main
system cable with
a sealed
connector.
KIM LIGHTING LIMITED WARRANTY
When installed in accordance with Kim Installation Instructions and accepted trade practices, the following shall apply:
General Product Limited Warranty Coverage
All material and component parts used in the manufacture of Kim Products, are warranted to be free from defects of material
and/or workmanship for a period of 1 year from date of sale, with the following exceptions:
uxiliary Equipment
All auxiliary equipment (such as lamps, ballasts, and transformers) provided by and/or included in Kim Products shall carry the
component manufacturer's warranty.
Copper and Bronze Landscape Components
Copper and Bronze Landscape fixture components shall be warranted against defects of material and/or workmanship, and
failure due to corrosion, for a period of 25 years from date of sale.
Composite In-Grade Components
Composite In-Grade fixture components installed below grade, shall be warranted against defects of material and/or
workmanship, and failure due to corrosion, for a period of 7 years from date of sale.
Aluminum Landscape Components
Aluminum Landscape fixture components not in direct contact with soil, shall be warranted against defects of material and/or
workmanship for a period of 3 years from date of sale. Aluminum fixture components in direct contact with soil shall be warranted
from defects of material and failure from corrosion for a period of 1 year from date of sale.
Limit of Liability and General Conditions
Only products which are installed, used and maintained in accordance with applicable Kim instructions, specifications and
accepted trade practices, are covered by the Kim Warranty. During the warranty period, with proof of purchase, Kim will repair or
replace with the same or similar product, at Kim's option, without charge. Labor costs are the owner's responsibility and are
excluded from this warranty. This warranty is void if the product is modified, tampered with, misapplied, poorly installed,
improperly maintained, or subjected to abnormal conditions.
Repair or replacement as provided under this warranty is the exclusive remedy of the purchaser. This warranty is in lieu of all
other warranties, expressed or implied, including any implied warranty of fitness for a particular application. Kim Lighting shall not
be liable to the purchaser for indirect or consequential damages.
How may we serve you better? Please let us know.
Visit our website at: www.kimlighting.com
Your concerns are important to us.
Additional wire and connectors may
be purchased from Kim Lighting.
KLV427 #12-2 Cable
KLV432 #8-2 Cable
KLV410 Connector
KLV411 Connector
Note: Low voltage cable is intended
for shallow burial, maximum of 6"
(152 mm).
Drain Hole
(Must face down)
7. Replace lens (convex side out)
fitting lens gasket assembly into
the recess on fixture body.
Replace light shield over lens after
making sure the drain hole is
down, so water will not stand on
lens. Tighten opposing screws
progressively and evenly.
8. Loosen set screw, adjust fixture
rotation, and tighten set screw.

Other kim lighting Outdoor Light manuals

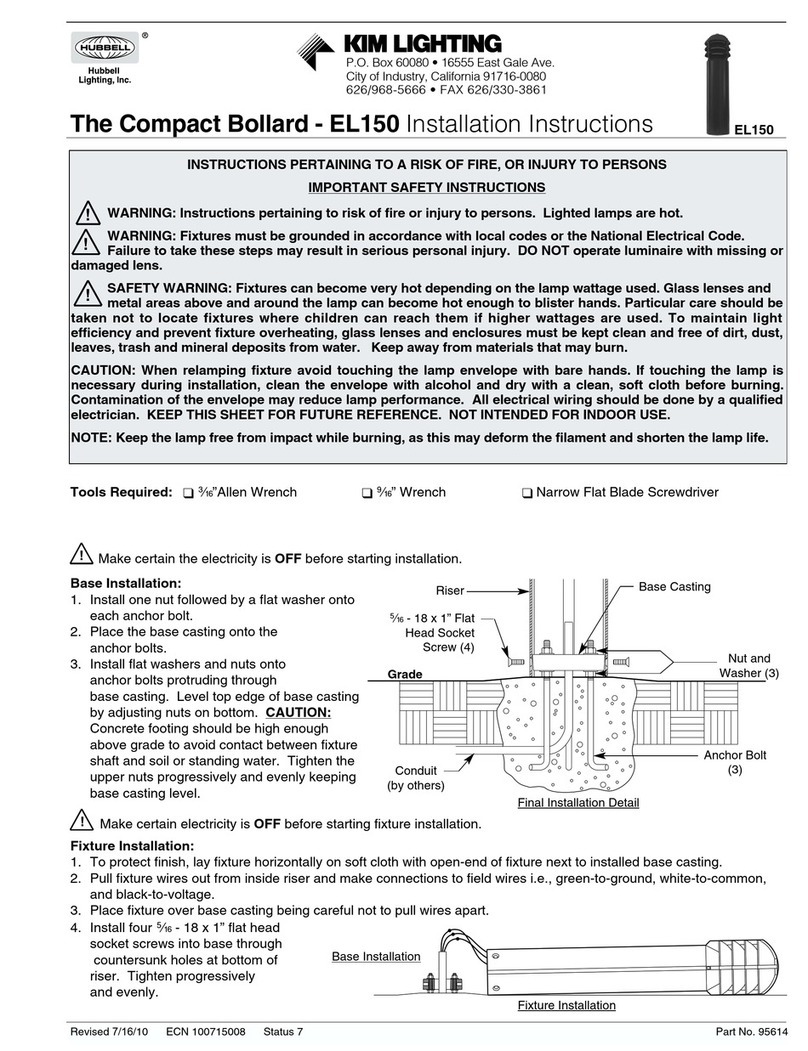
kim lighting EL150 User manual

kim lighting

kim lighting EL150 User manual

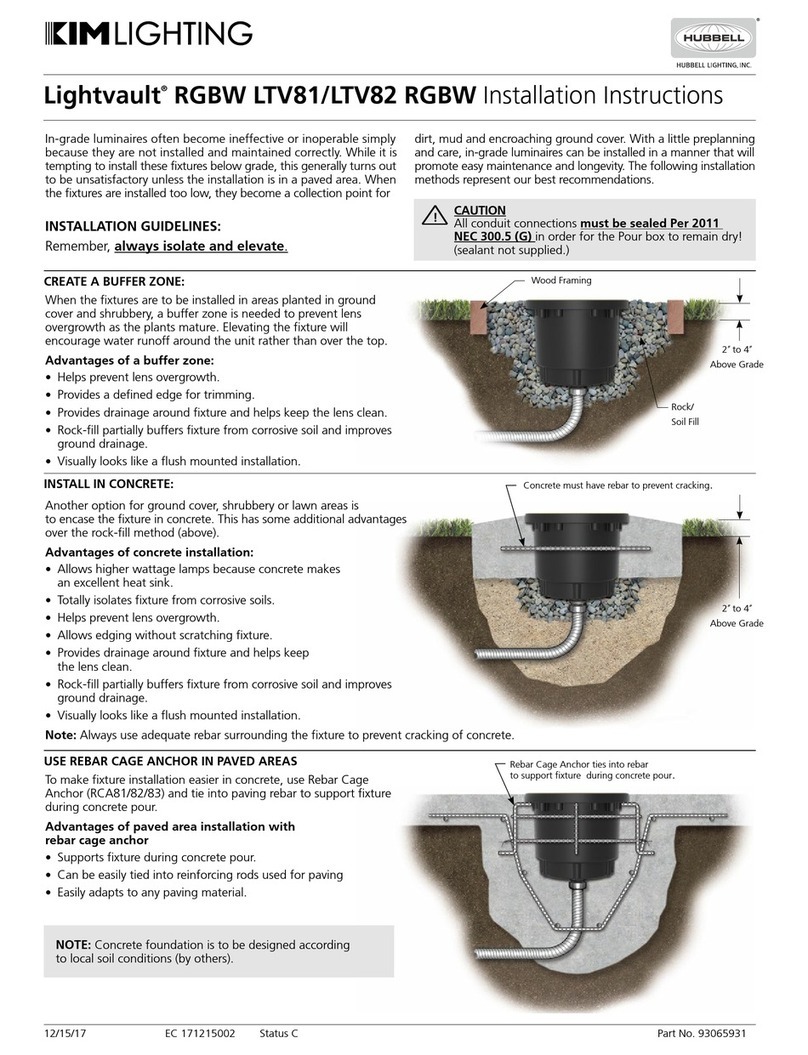
kim lighting Lightvault RGBW LTV81 User manual

kim lighting

kim lighting Lightvault RGBW LTV81 User manual

Popular Outdoor Light manuals by other brands

Kichler Lighting HELEN 37536 instructions

Kichler Lighting

Kichler Lighting HELEN 37536 instructions

Thorn OXANE L installation instructions

Thorn

Thorn OXANE L installation instructions

esotec Solar Globe Light multicolor 20 operating instructions

esotec

esotec Solar Globe Light multicolor 20 operating instructions

mitzi HL200201 ELLIS Assembly and mounting instructions

mitzi

mitzi HL200201 ELLIS Assembly and mounting instructions

HEPER TILA S AFX 3 Module Installation & maintenance instructions

HEPER

HEPER TILA S AFX 3 Module Installation & maintenance instructions

Designplan TRON 180 installation instructions

Designplan

Designplan TRON 180 installation instructions

Sealey LED37 instructions

Sealey

Sealey LED37 instructions

nordlux VEJERS Mounting instruction

nordlux

nordlux VEJERS Mounting instruction

SImx ELITE LED LHTC637 installation instructions

SImx

SImx ELITE LED LHTC637 installation instructions

GEV CAROLINE 10833 manual

GEV

GEV CAROLINE 10833 manual

WE-EF PFL540 LED Installation and maintenance instructions

WE-EF

WE-EF PFL540 LED Installation and maintenance instructions

HEPER DOGO Side LW6048.585-US Installation & maintenance instructions

HEPER

HEPER DOGO Side LW6048.585-US Installation & maintenance instructions

BEGA 84 253 Installation and technical information

BEGA

BEGA 84 253 Installation and technical information

HEPER LW8034.003-US Installation & maintenance instructions

HEPER

HEPER LW8034.003-US Installation & maintenance instructions

HEPER MINIMO Installation & maintenance instructions

HEPER

HEPER MINIMO Installation & maintenance instructions

LIGMAN BAMBOO 3 installation manual

LIGMAN

LIGMAN BAMBOO 3 installation manual

Maretti TUBE CUBE WALL 14.4998.04 quick start guide

Maretti

Maretti TUBE CUBE WALL 14.4998.04 quick start guide

Maxim Lighting Carriage House VX 40428WGOB installation instructions

Maxim Lighting

Maxim Lighting Carriage House VX 40428WGOB installation instructions

manuals.online logo
manuals.online logoBrands
  • About & Mission
  • Contact us
  • Privacy Policy
  • Terms and Conditions

Copyright 2025 Manuals.Online. All Rights Reserved.