Kingdy SP User manual

Aluminum Bezel Front
Panel PCs
SP/HP-EL/LN

2
Index
Package Contents...........................................................................................................................................3
Safety Instructions...........................................................................................................................................4
Regulatory Compliance Statements.............................................................................................................5
Introduction.......................................................................................................................................................6
Features............................................................................................................................................................7
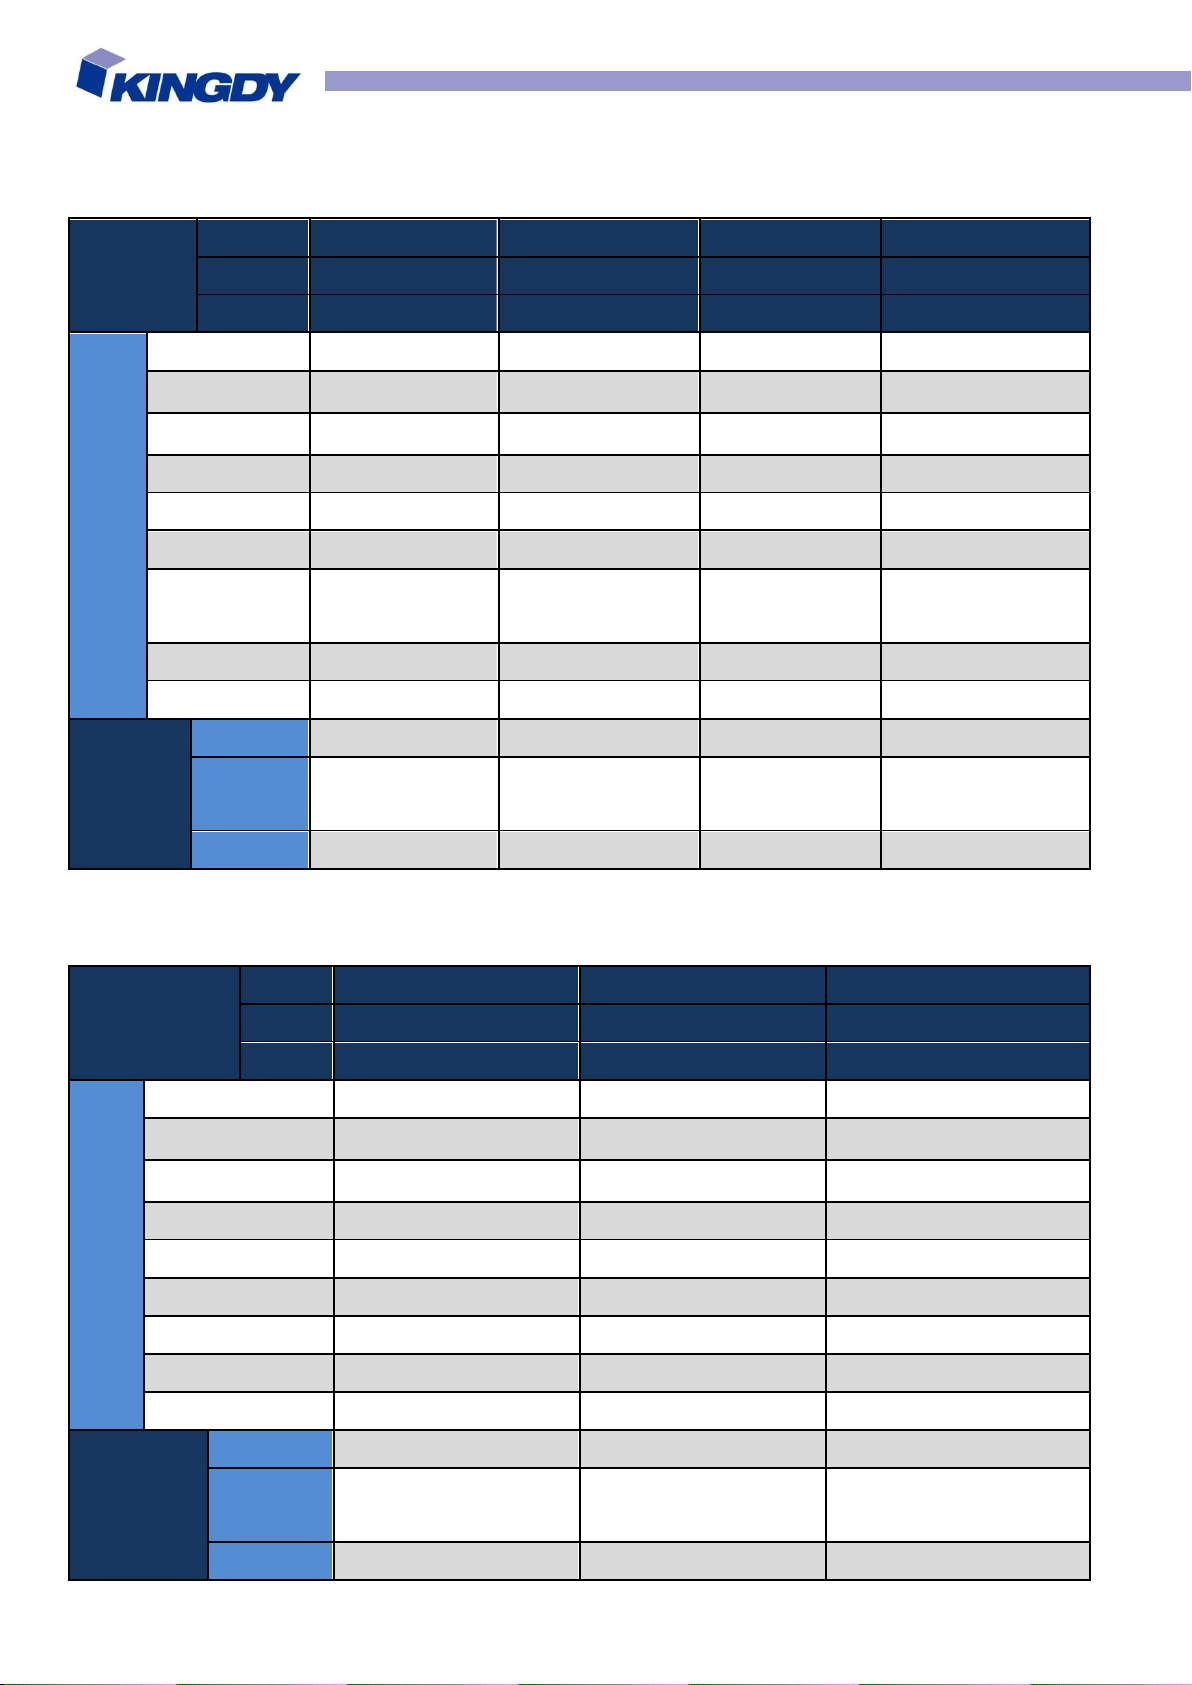
System Specification ......................................................................................................................................8
Panel Specification .........................................................................................................................................9
SP-EL/EN (Standard).............................................................................................................................9
HP-EL/EN (Sunlight Readable ) .........................................................................................................12
Screw Mounting Installation.........................................................................................................................14
VESA Mounting Installation.........................................................................................................................15
Clip Mounting Installation.............................................................................................................................16
BIOS Setup ....................................................................................................................................................17
Entering Setup.......................................................................................................................................17
Control Keys...........................................................................................................................................18
The Menu Bar........................................................................................................................................19
Main.........................................................................................................................................................20
Advanced................................................................................................................................................21
Boot.........................................................................................................................................................25
Security...................................................................................................................................................26
Chipset....................................................................................................................................................30
Power......................................................................................................................................................31
Save & Exit.............................................................................................................................................33
GPIO sample code........................................................................................................................................34
Watch Dog Timer Sample Code .................................................................................................................36

3
Package Contents
Please make sure that the items shown below are included in the package. Should an item be
missing, please contact the local retailer from which you purchased this product:
•1 x Industrial Touch Panel PC
•1 x DC in Power adapter
•1 x Power cord
•1 x CD
•4 x screws (M3 x 4) for 2.5”HDD or SSD
•(If customers order 2.5”HDD or SSD from our side, we don’t offer 4 screws)

4
Safety Instructions
1. Read Instructions: All the safety and operating instructions should be read before the equipment is
operated.
2. Retain Instructions: The safety and operating instructions should be retained for future reference.
3. Cleaning: Unplug this equipment from the outlet before cleaning. Do not use liquid cleaners or
aerosol cleaners. Use a damp cloth for cleaning.
4. Water and Moisture: Do not use this equipment near water.
5. Ventilation: The openings on the enclosure are provided for ventilation to ensure reliable operation of
the equipment and to protect it from overheating. These openings should never be blocked.
6. Power Sources: This equipment should be operated only from the type of power source indicated on
the rating label. If you are not sure of the type of power supply, consult your dealer or local power
company.
7. Heed Warnings:All warnings on the equipment and in the operating instructions should be adhered
to.
8. Object and Liquid Entry: Never push objects of any kind into this equipment through openings as
they may touch dangerous voltage points or shout-out parts that could result in a fire or electric shock.
Never spill liquid of any kind on the equipment.
9. Servicing: Do not attempt to service this equipment yourself as opening or removing covers may
expose you to dangerous voltage or other hazards. Refer all servicing to qualified service personnel.
10. Damage Requiring Service: Unplug this equipment from the outlet and refer servicing to qualified
service personnel under the following conditions: a) if the power cord or plug is damaged; b) if liquid
has penetrated into the equipment; c) if the equipment has been exposed to moisture; d) if the
equipment does not work well, or you cannot get it to work according to the user’s manual; e) if the
equipment has been dropped and damaged; f) if the equipment has obvious signs of breakage.
11. Do not leave this equipment in an environment where the storage temperature is below -10°C or
above 70°C. It may damage the equipment.
12. Do not open the sealed enclosure / case of equipment. Once enclosure is disassembled without
approval, it will lead in abnormal operating of water proof gel. For Guarantee of water proof function,
please make sure configuration / peripheral has been confirmed to install before shipping.

5
Regulatory Compliance Statements
FCC
This device complies with Part 15 FCC Rules. Operation is subject to the following two
conditions:
(1) this device may not cause harmful interference, and
(2) this device must accept any interference received including interference that may cause
undesired operation.
CE
The product(s) described in this manual complies with all applicable European Union (CE)
directives if it has a CE marking. For computer systems to remain CE compliant, only
CE-compliant parts may be used. Maintaining CE compliance also requires proper cable and
cabling techniques.

6
Introduction
Brained with Intel J1900, SP-EL/EN Series is a mid-level device and intended for
manufacturers providing a cost-effective solution to their automation, monitoring, control or data
processing systems.
Equipped with Full-size Mini PCIe (one w/ m SATA) , it provides you possibility to expand
more applications.
In addition, the waterproof sponge design and an external antenna, USB and
RS-232/422/485 are offered optionally for advanced protection from water intrusion and I/O for
connecting other devices.
You can also choose to integrate a RFID sensor into the device for RFID technology
application, such as logistics, warehousing, distribution or industrial automation (identification of
work piece carriers on assembly lines, material flow control, identification of containers and
other receptacles).

7
Features
●Intel® Bay Trail Quad J1900 Core 2.0GHz CPU
●LCD touch panel from 8.4" to 21.5"
●High Brightness:2000/1600/1000/800 nit for (HP-EL/EN)
●Widescreen solution for SP-EL/EN:15.6", 17.3", 18.5" and 21.5"
●Widescreen solution for HP-EL/EN:18.5" and 21.5"
●Powerful performance but low power consumption under fanless design
●Great graphic performance
●Compact design
●DC input: 12V or 12/19/24V
●12V: up to 1 x GLAN, 3 x COM, 6 x USB, 1 x VGA
●12/19/24V: 2 x GLAN, 2 x COM, 4 x USB, 1 x VGA, 1 x HDMI
●1 x PCIe slot (12V) / 1 x PCI slot (12/19/24V), 1 x Mini PCIe slot (with mSATA function)
●Waterproof sponge design (optional)
●IP65 aluminum front bezel
●Silver aluminum or front bezel with hairy brushed
●External DVD-RW driver (optional)
●RFID sensor (optional)

8
System Specification
Model Number
SP/HP-ELXXRS
SP/HP-ENXXRF
SP/HP-ENXXRS
CPU
Intel® Bay Trail D-J1900 2.0GHz Quad Core Processor
Memory
1 x 204-pin DDR3L SODIMM
up to 8 GB
1 x 204-pin DDR3L
SODIMM
up to 8 GB
2 x 204-pin DDR3L SODIMM
up to 8 GB
H/W Monitor
256-Level Watchdog Timer
Monitor Size
8.4”,10.4”
12.1”,15”,15.6,17”,17.3”,
18.5”,19”,21.5”
12.1”,15”,15.6,17”,17.3”,
18.5”,19”,21.5”
Power Supply
DC in 12V / 19V / 24V
DC in 12V
DC in 12V / 19V / 24V
I/O Port
1XRS232(10.4”)
1XVGA
1X HDMI
4X USB
2X GLAN
2X RS232
1X VGA
1X HDMI
4X USB
2X GLAN
1X RS232
1X VGA
1X Line out / Mic In
4X USB
1X GLAN
2X RS232
1X VGA
1X HDMI
4X USB
2X GLAN
1X Line in /Line out /Mic in
Storage
1 x SATA 2.0 2.5” HDD/SSD
Expansion
2 x Full-size
(one w/ mSATA)
1 x Full-size
(one w/ mSATA)
1 x Full-size
(one w/ mSATA)
Operation Temp
0 ~ 45°C
Storage Humidity
10 ~ 90%, non-condensing
Mount
Clip mount &Panel mount
VESA mounting-75X75mm(8.4”,10.4”,12.1”),100X100mm(15”~21.5”)
OS Support
Win 7 Pro, Embedded 7, Win 8 Pro, Embedded 8
Optional
USB X 1,
External Antenna
X 1 or 2,
Waterproof
Sponge X 1
External Antenna
X 1 or 2,
Waterproof Sponge
X 1,
RS232/RS422/RS485
X1
Line in out / Mic in X 1
External Antenna X 1 or 2,
Waterproof Sponge X 1,
RS232 X 2
External Antenna X 1 or 2,
Waterproof Sponge X 1,
RS232/RS422/RS485 X1
PCI Slot X 1
For high chassis as below
PCIe Slot X1
Second LAN X1
2 Memory Slot X 1

9
Panel Specification
SP-EL/EN (Standard)
Model Name
SP-ELR08RS
SP-ELL10RS
SP-ELS10RS
Display
Size / Aspect Ratio
8.4" TFT (4:3)
10.4" TFT (4:3)
10.4" TFT (4:3)
Backlight
LED
LED
LED
Resolution
800 x 600
800 x 600
1024 x 768
Colors
16.2 M
16.2M
16.2 M
Luminance (cd/m2)
400
230
350
Contrast Ratio
600:1
500 : 1
1200:1
Viewing Angle (H/V°)
160/120
160 / 130
176/176
MTBF (hrs)
50,000
50,000
50,000
Touch Screen
5-wire resistive
5-wire resistive
5-wire resistive
Dimension (W x H x D, mm)
265.9 x 207 x 71 (4kg)
302 x 224 x 71(4.5kg)
Model Name
12/19/24V
SP-ELS12RS
SP-ELL12RS
SP-ELL15RS
SP-ELD15RS
12V
SP-ENS12RF
SP-ENL12RF
SP-ENL15RF
SP-END15RF
12/19/24V
SP-ENS12RS
SP-ENL12RS
SP-ENL15RS
/
Display
Size / Aspect Ratio
12.1" TFT (4:3)
12.1" TFT (4:3)
15" TFT (4:3)
15.6" TFT (16:9)
Backlight
LED
LED
LED
LED
Resolution
1024 x 768
800 x 600
1024 x 768
1366 x 768
Colors
16.2 M
16.2M
16.2 M
16.7 M
Luminance (cd/m2)
500
400
400
400
Contrast Ratio
700:1
600:1
700:1
500:1
Viewing Angle
(H/V°)
160/160
160/120
160/160
170/160
MTBF (hrs)
50,000
50,000
50,000
50,000
Touch Screen
5-wire resistive
5-wire resistive
5-wire resistive
5-wire resistive
Dimension
W x H x D, mm
SP-ELXXRS
354.9 x 264.7 x72(8kg)
400.9 x 303.7x71(10kg)
454 x 272.4 x 75(13kg)
SP-ENXXRF
354.9 x 264.7 x72(8kg)
354.9x264.7x99(7.5kg)
354.9 x 264.7 x72(8kg)
354.9 x264.7x99(7.5kg)
400.9 x 303.7x71(10kg)
400.9 x 303.7 x 93(9kg)
454 x 272.4 x 75(13kg)
SP-ENXXRS
354.9 x264.7x99(7.5kg)
400.9 x 303.7 x 93(9kg)
454 x 272.4 x 75(13kg)

10
Model Name
12/19/24V
SP-ELS15RS
SP-ELL17RS
SP-ELD17RS
SP-ELD18RS
12V
SP-ENS15RF
SP-ENL17RF
SP-END17RF
SP-END18RF
12/19/24V
/
SP-ENL17RS
SP-END17RS
SP-END18RS
Display
Size / Aspect Ratio
15.6" TFT (16:9)
17" TFT (4:3)
17.3" TFT (16:9)
18.5" TFT (16:9)
Backlight
LED
LED
LED
LED
Resolution
1920 x 1080
1280 x 1024
1920 x 1080
1366 x 768
Colors
16.2M
16.7 M
16.7 M
16.7 M
Luminance (cd/m2)
400
350
400
300
Contrast Ratio
500:1
1000:1
600:1
1000:1
Viewing Angle
(H/V°)
140/120
140/170
160/140
170/160
MTBF (hrs)
50,000
50,000
50,000
50,000
Touch Screen
5-wire resistive
5-wire resistive
5-wire resistive
5-wire resistive
Dimension
W x H x D, mm
SP-ELXXRS
454 x 272.4x75(13kg)
453.5 x 352 x74(14kg)
483 x318.5x73.8(14kg)
521.7 x317.6 x74(14kg)
SP-ENXXRF
454 x 272.4x75(13kg)
453.5 x 352 x74(14kg)
453.5 x 352 x 90(13kg)
483x318.5x73.8(14kg)
483x318.5x87(13.5kg)
521.7 x317.6 x74(14kg)
521.7 x317.6x95(13.5g)
SP-ENXXRS
454 x 272.4x75(13kg)
453.5 x 352 x 90(13kg)
483 x318.5x87(13.5kg)
521.7 x317.6x95(13.5kg)
Model Number
12/19/24V
SP-ELS18RS
SP-ELL19RS
SP-ELD21RS
12V
SP-ENS18RF
SP-ENL19RF
SP-END21RF
12/19/24V
SP-ENS18RS
SP-ENL19RS
SP-END21RS
Display
Size / Aspect Ratio
18.5" TFT (16:9)
19" TFT (4:3)
21.5" TFT (16:9)
Backlight
LED
LED
LED
Resolution
1920 x 1080
1280 x 1024
1920 x 1080
Colors
16.7 M
16.7 M
16.7 M
Luminance (cd/m2)
350
250
300
Contrast Ratio
1000:1
1000:1
3000:1
Viewing Angle (H/V°)
170/160
170/160
178/178
MTBF (hrs)
50,000
50,000
50,000
Touch Screen
5-wire resistive
5-wire resistive
5-wire resistive
Dimension
W x H x D, mm
SP-ELXXRS
521.7 x317.6 x 74 (14kg)
483 x 376.8 x 74.8(14kg)
581.3 x337.2 x 74(14kg)
SP-ENXXRF
521.7 x317.6 x 74 (14kg)
521.7 x317.6 x 95(13.5kg)
483 x 376.8 x 74.8(14kg)
483 x 376.8 x 93.9(13.5kg)
581.3 x337.2 x 74(14kg)
581.3 x337.2 x 93.6(13.5kg)
SP-ENXXRS
521.7 x317.6 x 95(13.5kg)
483 x 376.8 x 93.9(13.5kg)
581.3 x337.2 x 93.6(13.5kg)

11
Model Number
12V
SP-GNS18RF
SP-GNL19RF
SP-GND21RF
19~24V
SP-GNS18RW
SP-GNL19RW
SP-GND21RW
Display
Size / Aspect Ratio
18.5" TFT (16:9)
19" TFT (4:3)
21.5" TFT (16:9)
Backlight
LED
LED
LED
Resolution
1920 x 1080
1280 x 1024
1920 x 1080
Colors
16.7 M
16.7 M
16.7 M
Luminance (cd/m2)
350
250
300
Contrast Ratio
1000:1
1000:1
3000:1
Viewing Angle (H/V°)
170/160
170/160
178/178
MTBF (hrs)
50,000
50,000
50,000
Touch Screen
5-wire resistive
5-wire resistive
5-wire resistive
Dimension
W x H x D, mm
521.7 x317.6 x 74 (14kg)
483 x 376.8 x 74.8(14kg)
581.3 x337.2 x 74(14kg)

12
HP-EL/EN (Sunlight Readable )
Model Name
HP-ELR08RS
HP-ELL10RS
HP-ELS10RS
Display
Size / Aspect Ratio
8.4" TFT (4:3)
10.4" TFT (4:3)
10.4" TFT (4:3)
Backlight
LED
LED
LED
Resolution
800 x 600
800 x 600
1024 x 768
Colors
16.2 M
16.2M
16.2 M
Luminance (cd/m2)
1600
2000
1600
1000
Contrast Ratio
600:1
400 : 1
800 : 1
Viewing Angle (H/V°)
160/140
130/110
176/176
MTBF (hrs)
50,000
50,000
50,000
Touch Screen
5-wire resistive
5-wire resistive
5-wire resistive
Dimension (W x H x D, mm)
265.9 x 207 x 71 (4kg)
302 x 224 x 71(4.5kg)
Model Name
12/19/24V
HP-ELS12RS
HP-ELL12RS
HP-ELL15RS
12V
HP-ENS12RF
HP-ENL12RF
HP-ENL15RF
12/19/24V
HP-ENS12RS
HP-ENL12RS
HP-ENL15RS
Display
Size / Aspect Ratio
12.1" TFT (4:3)
15" TFT (4:3)
Backlight
LED
LED
LED
Resolution
800 x 600
1024 x 768
1024 x 768
Colors
262K
16.2M
262K
16.2M
16.2 M
16.7 M
16.7 M
16.2 M
16.7 M
Luminance (cd/m2)
1000
1600
1000
800
2000
1600
1000
1000
800
Contrast Ratio
1000:1
700:1
700:1
1700:1
700:1
Viewing Angle
(H/V°)
178/178
160/160
160/160
170/170
160/160
MTBF (hrs)
50,000
50,000
50,000
Touch Screen
5-wire resistive
5-wire resistive
5-wire resistive
Dimension
W x H x D, mm
HP-ELXXRS
354.9 x 264.7 x72(8kg)
400.9 x 303.7 x 71(10kg)
HP-ENXXRF
354.9 x 264.7 x72(8kg)
354.9 264.7x99(7.5kg)
354.9 x 264.7 x72(8kg)
354.9 x264.7x99(7.5kg)
400.9 x 303.7 x 71(10kg)
400.9 x 303.7 x 93(9kg)
HP-ENXXRS
354.9x264.7x99(7.5kg)
354.9 x264.7x99(7.5kg)
400.9 x 303.7 x 93(9kg)

13
Model Name
12/19/24V
HP-ELL17RS
HP-ELD18RS
12V
HP-ENL17RF
HP-END18RF
12/19/24V
HP-ENL17RS
HP-END18RS
Display
Size / Aspect Ratio
17" TFT (4:3)
18.5" TFT (16:9)
Backlight
LED
LED
Resolution
1280 x 1024
1366 x 768
Colors
16.7 M
16.7 M
Luminance (cd/m2)
1600
1000
800
1000
Contrast Ratio
1000:1
1250:1
Viewing Angle
(H/V°)
170/170
160/160
160/160
170/160
MTBF (hrs)
50,000
50,000
Touch Screen
5-wire resistive
5-wire resistive
Dimension
W x H x D, mm
HP-ELXXRS
453.5 x 352 x74(14kg)
521.7 x317.6 x74(14kg)
HP-ENXXRF
453.5 x 352 x74(14kg)
453.5 x 352 x 90(13kg)
521.7 x317.6 x74(14kg)
521.7 x317.6x95(13.5g)
HP-ENXXRS
453.5 x 352 x 90(13kg)
521.7 x317.6x95(13.5g)
Model Number
12/19/24V
HP-ELL19RS
HP-ELD21RS
12V
HP-ENL19RF
HP-END21RF
12/19/24V
HP-ENL19RS
HP-END21RS
Display
Size / Aspect Ratio
19" TFT (4:3)
21.5" TFT (16:9)
Backlight
LED
LED
Resolution
1280 x 1024
1920 x 1080
Colors
16.7 M
16.7 M
Luminance (cd/m2)
1600
1000
1000
800
1600
Contrast Ratio
1000:1
2000:1
1000:1
1000:1
900:1
Viewing Angle (H/V°)
170/160
178/178
160/170
170/160
178/178
MTBF (hrs)
50,000
50,000
Touch Screen
5-wire resistive
5-wire resistive
Dimension
W x H x D, mm
HP-ELXXRS
483 x 376.8 x 74.8(14.5kg)
581.3 x337.2 x 74(14kg)
HP-ENXXRF
483 x 376.8 x 74.8(14.5kg)
483 x 376.8 x 93.9(13.5g)
581.3 x337.2 x 74(14kg)
581.3 x337.2 x 93.6(13.5kg)
HP-ENXXRS
483 x 376.8 x 93.9(13.5g)
581.3 x337.2 x 93.6(13.5kg)

14
Screw Mounting Installation
Front Side of the Mounting Wall
Back Side of the Mounting Wall
Panel Mount PC
(Front Side)
Mount Wall (Front Side)
Mount Wall (Back Side)
Screw Holes for Screw
Mounting Installation
Cut Out
Panel Mount PC
(Back Side)
Align the bottom of panel housing with the bottom edge of the cut out

15
VESA Mounting Installation
Mount Wall or Object
······ Sep 1: screw the VESAmounting plate to the Panel PC
······ Step2: screw the VESAmounting bracket to the front of a wall or the front / back of an object dependingly
······ Step3: slide the VESA mounting plate onto the VESA mounting bracket
VESA Mounting Bracket
Screws
Screw Holes for VESA
Mounting Installation
Panel PC
(Back Side)

16
Clip Mounting Installation
※Before Installing, make sure the number of clips are correct. 8.4", 10.4", 12.1" are 8pcs;
15", 17", 19". 15.6", 17.3"18.5”,21.5" are 10pcs
Front Side of the Mounting Wall
Back Side of the Mounting Wall
Step 1: Insert the panel pc in the cut out.
Step 2: Fasten all clips and screw them on the wall tightly.
Step 3: Check all clips are hooked around the panel PC and screwed on the wall tightly to avoid it falling.
Cut Out

17
BIOS Setup
Entering Setup
Power on the computer and the system will start POST (Power On Self Test) process. When the
message below appears on the screen, press <DEL> or <F2> key to enter Setup.
Press DEL or F2 to enter SETUP
If the message disappears before you respond and you still wish to enter Setup, restart the system
by turning it OFF and On or pressing the RESET button. You may also restart the system by
simultaneously pressing <Ctrl>, <Alt>, and <Delete> keys.
Important
※Caution
The items under each BIOS category described in this chapter are under continuous update for
better system performance. Therefore, the description may be slightly different from the latest BIOS
and should be held for reference only.

18
Control Keys
Getting Help
After entering the Setup menu, the first menu you will see is the Main Menu.
Main Menu
The main menu lists the setup functions you can make changes to. You can use the arrow keys
( ↑↓ ) to select the item. The on-line description of the highlighted setup function is displayed at
the bottom of the screen.
Sub-Menu
If you find a right pointer symbol appears to the left of certain fields that means a sub-menu can be
launched from this field. A sub-menu contains additional options for a field parameter. You can use
arrow keys ( ↑↓ ) to highlight the field and press <Enter> to call up the sub-menu. Then you can
use the control keys to enter values and move from field to field within a sub-menu. If you want to
return to the main menu, just press the <Esc >.
General Help <F1>
The BIOS setup program provides a General Help screen. You can call up this screen from any
menu by simply pressing <F1>. The Help screen lists the appropriate keys to use and the possible
selections for the highlighted item. Press <Esc> to exit the Help screen.

19
The Menu Bar
Main
Use this menu for basic system configurations, such as time, date, etc.
Advanced
Use this menu to set up the items of special enhanced features.
Boot
Use this menu to specify the priority of boot devices.
Security
Use this menu to set supervisor and user passwords.
Chipset
This menu controls the advanced features of the onboard chipsets.
Power
Use this menu to specify your settings for power management.
Save & Exit
This menu allows you to load the BIOS default values or factory default settings
into the BIOS and exit the BIOS setup utility with or without changes.

20
Main
System Date
This setting allows you to set the system date. The date format is <Day>,
<Month> <Date> <Year>.
System Time
This setting allows you to set the system time. The time format is <Hour>
<Minute> <Second>.
SATA Mode Selection
This setting specifies the SATA controller mode.
This manual suits for next models
2
Table of contents
Other Kingdy Desktop manuals