Kino Flo SYS-S30-230U User manual

Operation Manual
Select LED 30/20
Part No. 3100088 Rev B 10-14-2016

Select LED System Components
Select LED Systems
LED-150X-120U
Select LED 150 DMX Controller, Univ 120U
LED-150X-230U
Select LED 150 DMX Controller, Univ 230U
CFX-SL30 Select LED 30 Fixture
CFX-SL20 Select LED 20 Fixture
SYS-S30-120U Select LED 30 DMX System, Univ 120U
SYS-S30-230U Select LED 30 DMX System, Univ 230U
SYS-S20-120U Select LED 20 DMX System, Univ 120U
SYS-S20-230U Select LED 20 DMX System, Univ 230U
MTP-BC41 Kino 41K Mount w/
Baby Receiver Curve (16mm)
X12-25 Select 150 Extension, 25ft
2
Each Select LED System consists of:
1 LED Fixture
1 Mounting Plate
1 Extension Cable
1 LED Controller
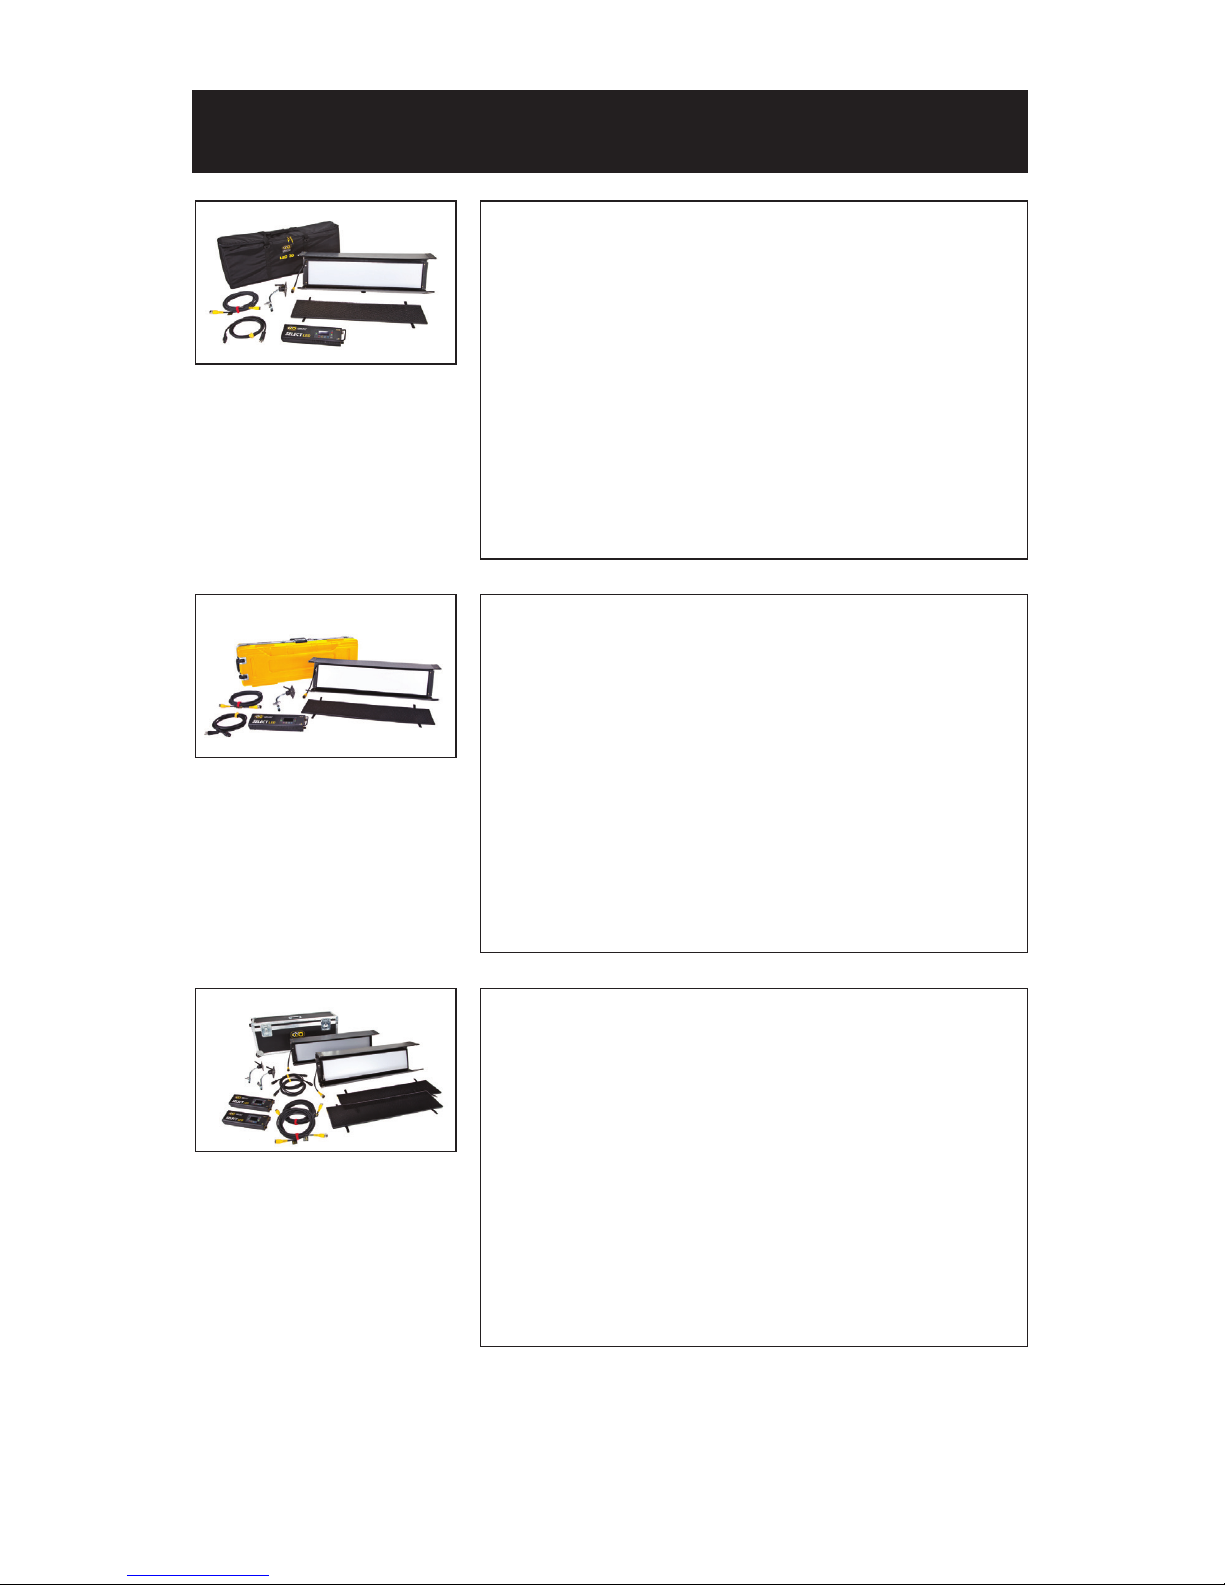
Select LED 30 DMX Kits
KIT-S30B-120U
Select LED 30 DMX Kit, Univ 120U w/ Soft Case
KIT-S30B-230U
Select LED 30 DMX Kit, Univ 230U w/ Soft Case
Kit Contents: Dimensions:
1 Select LED 30 Fixture 42.5 x 7.5 x 16.5”
1 Select LED 150 DMX Controller (108 x 19 x 42cm)
1 MTP-BC41 Mount
w/ Baby Receiver Curve (16mm) Weight:
1 Extension, 25ft 26 lb
1 Soft Case (12kg)
KIT-S30-120U
Select LED 30 DMX Kit, Univ 120U w/ Flight Case
KIT-S30-230U
Select LED 30 DMX Kit, Univ 230U w/ Flight Case
Kit Contents: Dimensions:
1 Select LED 30 Fixture 46 x 11 x 16.5”
1 Select LED 150 DMX Controller (117 x 28 x 42cm)
1 MTP-BC41 Mount
w/ Baby Receiver Curve (16mm) Weight:
1 Extension, 25ft 46.5 lb
1 Flight Case (21kg)
KIT-S32-120U
Gaffer LED 30 DMX Kit, Univ 120U (2-Unit)
KIT-S32-230U
Gaffer LED 30 DMX Kit, Univ 230U (2-Unit)
Kit Contents: Dimensions:
2 Select LED 30 Fixture 43.5 x 13 x 18.5”
2 Select LED 150 DMX Controller (110.5 x 33 x 47cm)
2 MTP-BC41 Mount
w/ Baby Receiver Curve (16mm) Weight:
2 Extension, 25ft 69 lb
1 Ship Case (31kg)
Select LED 30
DMX Kit w/ Soft Case
Select LED 30
DMX Kit w/ Flight Case
Gaffer LED 30 DMX Kit
(2-Unit)
3

Select LED 20 DMX Kits
KIT-S20B-120U
Select LED 20 DMX Kit, Univ 120U w/ Soft Case
KIT-S20B-230U
Select LED 20 DMX Kit, Univ 230U w/ Soft Case
Kit Contents: Dimensions:
1 Select LED 20 Fixture 31 x 7.5 x 18”
1 Select LED 150 DMX Controller (79 x 19 x 46cm)
1 MTP-BC41 Mount
w/ Baby Receiver Curve (16mm) Weight:
1 Extension, 25ft 23 lb
1 Soft Case (10.5kg)
KIT-S20-120U
Select LED 20 DMX Kit, Univ 120U w/ Flight Case
KIT-S20-230U
Select LED 20 DMX Kit, Univ 230U w/ Flight Case
Kit Contents: Dimensions:
1 Select LED 20 Fixture 30 x 10.5 x 21”
1 Select LED 150 DMX Controller (76 x 27 x 53cm)
1 MTP-BC41 Mount
w/ Baby Receiver Curve (16mm) Weight:
1 Extension, 25ft 38 lb
1 Flight Case (17kg)
KIT-S22-120U
Interview LED 20 DMX Kit, Univ 120U (2-Unit)
KIT-S22-230U
Interview LED 20 DMX Kit, Univ 230U (2-Unit)
Kit Contents: Dimensions:
2 Select LED 20 Fixture 36 x 13 x 20.5”
2 Select LED 150 DMX Controller (91.5 x 33 x 52cm)
2 MTP-BC41 Mount
w/ Baby Receiver Curve (16mm) Weight:
2 Extension, 25ft 63.5 lb
1 Ship Case (29kg)
Select LED 20
DMX Kit w/ Soft Case
Select LED 20
DMX Kit w/ Flight Case
Interview LED 20
DMX Kit (2-Unit)
4

5
Mounting the Fixture
Align the center pin of the mounting plate to the
center hole on the mating plate.
Rotate plate clockwise until the four shoulder rivets
drop into the receptacle. A locking pin will snap into
place when the plate is properly seated.
The yellow wire loop provides an attachment point
for a safety chain.
To remove the plate, pull up on the locking pin and
reverse the mounting procedure.
A 180° turn loosens the orientation of the mount.
A right turn tightens the mount.
The tension on the lock lever may be adjusted by
pulling the handle away from the mount.
This disengages the handle from the screw
mechanism and allows the lever to be reoriented.
Lollipops are interchangeable.
MTP-L Kino 41 Lollipop w/ 3/8” Pin (10mm)
MTP-LBC Kino 41 Lollipop w/ Baby Rcvr Curve
(16mm)
MTP-LBS Kino 41 Lollipop w/ Baby Rcvr Short
(16mm)
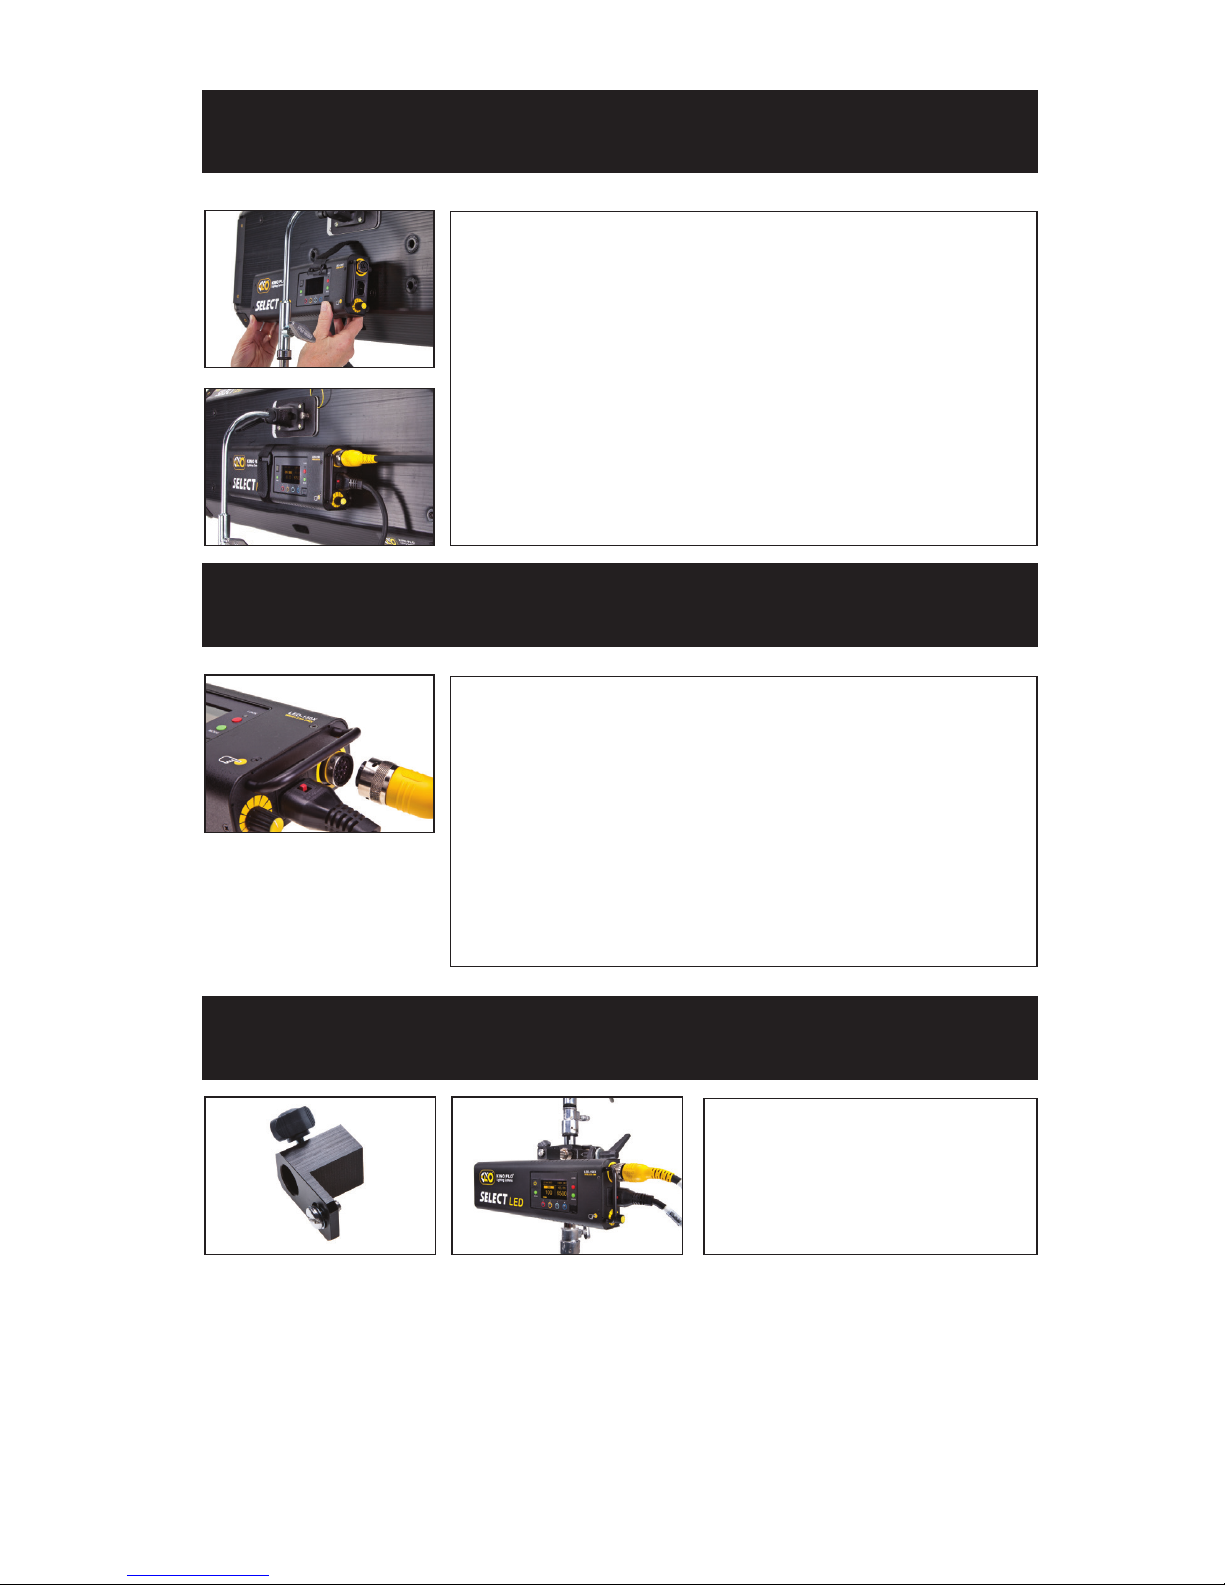
Mounting the Controller
Extension Cable
Insert the 4 rubber feet of the controller into the
4 holes in the xture.
Secure the Controller to the xture with the Velcro
fastening strap.
Connect the harness to the Controller. Align the
key ways on the harness connector with the circular
receptacle on the ballast. Rotate the silver locking
ring until it clicks into the lock position.
The Select LED xture can be used with the
controller directly attached or remotely, using a
25ft extension cable. Remote operation of the
controller provides more rigging options.
To insert the cable, align the key ways on the
extension cable with the circular receptacle on the
controller. Rotate the silver locking ring until it clicks
into the lock position.
Mount Options
The Controller can be
mounted to a stand with a
ballast mount accessory,
MTP-BAL and mafer clamp.
6
MTP-BAL

7
Power
DC Input
The Select LED 150 DMX can also be operated on 24VDC (input range 18-36VDC)
through a 3-Pin XLR. The pin polarity is:
Pin # 1 – Ground
Pin # 2 + 18-36VDC
Pin # 3 not used
AC Input
The Select LED 150 DMX Controller is
powered AC and includes an IEC
connection. It also includes a 12ft
power cord with a locking IEC connector.
The Select LED 150 DMX Controller has
a built-in power supply with universal
input from 100-240VAC.
Ambient Operating Temperature
The Select LED 150 DMX is designed
to operate at temperatures from 14°F to
104°F (-10°C to 40°C).
Note:
A low voltage warning will display
if input DC voltage is under 18VDC.
Photo example: LOW VDC: 17

8
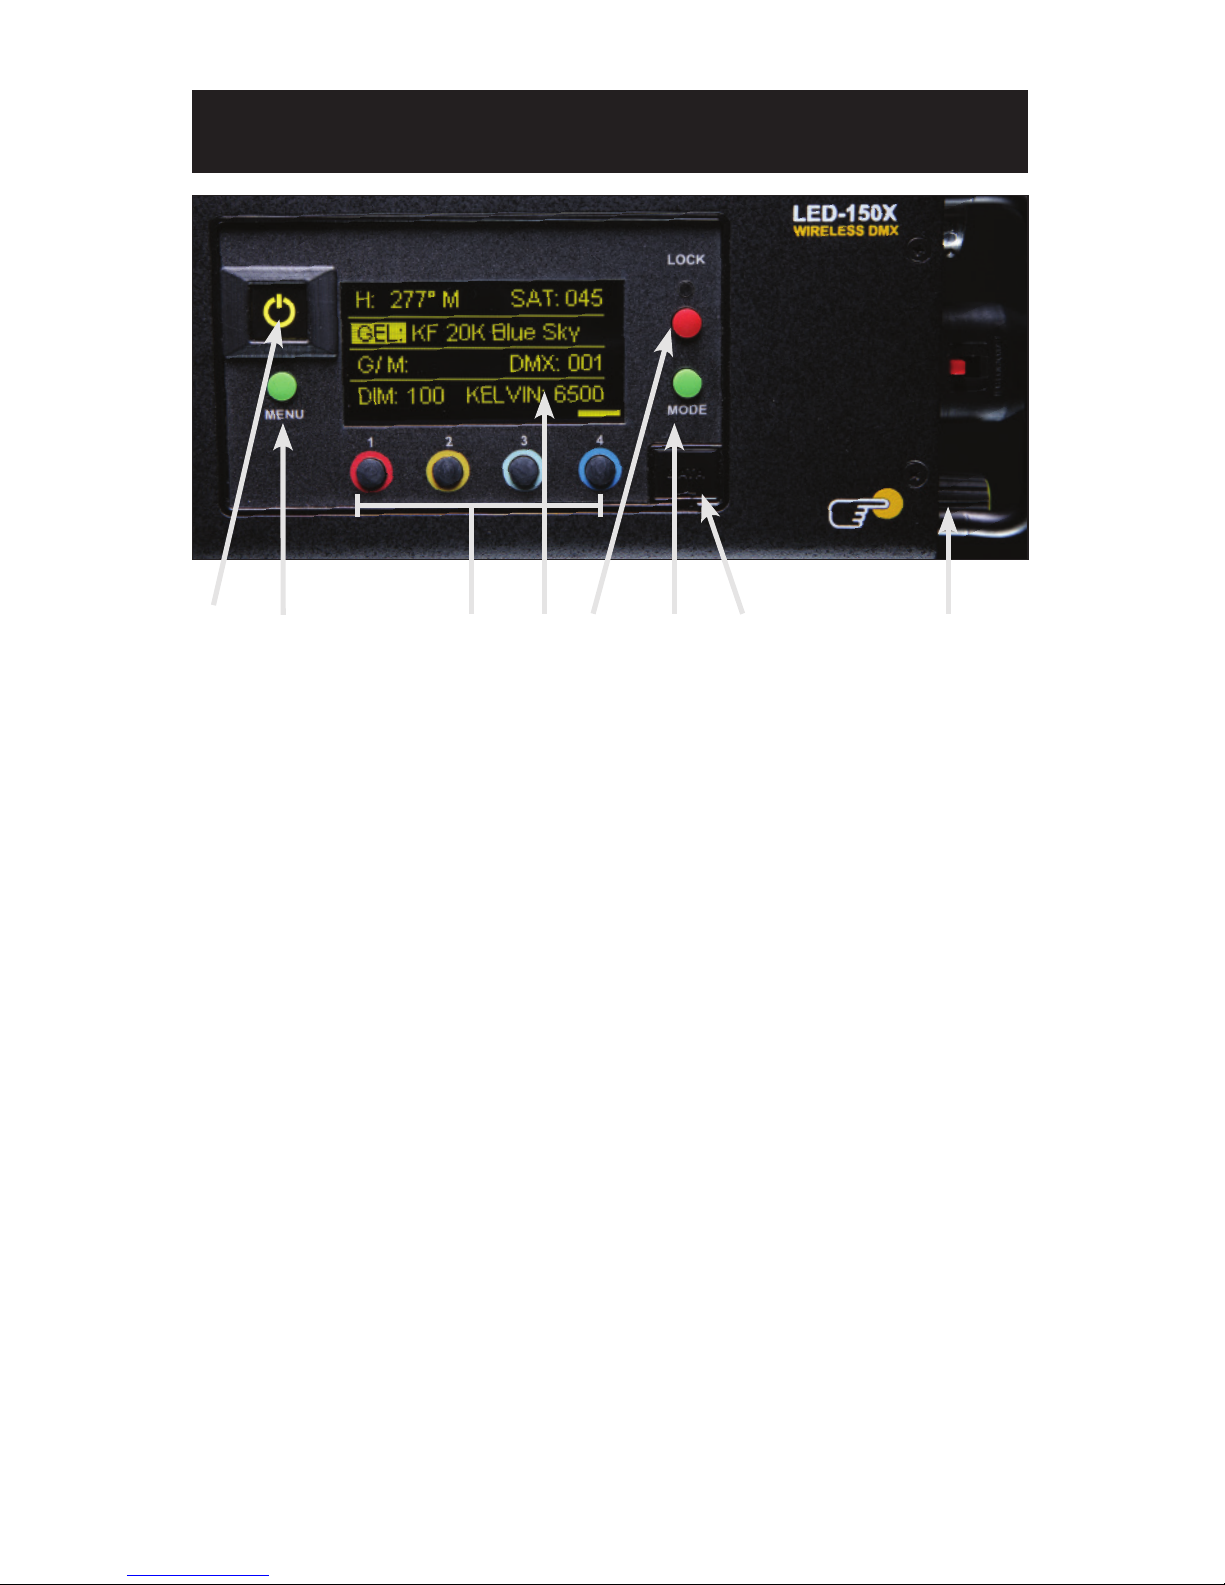
Control Panel - White Mode
ABCD E F G H
A) On /Off: On = Green light displayed. Off = Red light displayed. The display and
all menu settings can be operated while the power button is in the Off position,
as long as power is applied to the controller. The On /Off button only controls the
light source.
B) Menu: Provides access to menu options such as General settings, Reset, DMX and
DMX Wireless settings. Tip: While on control screen, press and hold for 3 seconds to
switch to Color mode.
C) Kelvin & G/M (Green/Magenta) Preset Buttons: Factory defaults left to right are:
2700K, 3200K, 5000K and 6500K. G/M default value is 000. User can also use
these preset buttons to store custom Kelvin and G/M settings.
D) Display: Provides access to Dim, Kelvin, G/M, and DMX channel.
Factory reset will show: Dim = 10%, Kelvin = 2700K, G/M = 000, DMX = 001.
E) Lock: Press the Lock button to disable all buttons and control knob.
Press for 3 seconds to restore presets to default factory settings.
F) Mode: Press to navigate from Dim to Kelvin and G/M settings. When in sub-menus,
pressing Mode always returns you to main display. When DMX is applied, use Mode
to access DMX channel on main display. Tip: Long press will bring you back one step.
G) Data Port: Mini B USB for software updates.
H) Dimmer Knob: Manually adjusts Dim, Kelvin, G/M levels and DMX address.
Press the knob to toggle between ne and coarse adjustments or when selecting
options within menus.
DMX Note: Each Select LED 150 DMX Controller has an “AUTO TERMINATE” feature.
The last xture that does not have an XLR cable attached to the DMX “Out” port will
automatically terminate.
9
Control Panel - Color Mode
ABCD E F G H
A) On /Off: On = Green light displayed. Off = Red light displayed. The display and
all menu settings can be operated while the power button is in the Off position,
as long as power is applied to the controller. The On /Off button only controls the
light source.
B) Menu: Provides access to menu options such as General settings (Color Mode),
Reset, DMX and DMX Wireless settings. Tip: While on control screen, press and
hold for 3 seconds to switch to White mode.
C) Kelvin, G/M (Green/Magenta) Gel, Hue & Saturation Preset Buttons:
Factory defaults left to right are: 2700K, 3200K, 5000K and 6500K. G/M default
value is 000. User can also use these preset buttons to store custom Kelvin
between 2500K and 9900K and custom G/M, Gel, Hue and Saturation settings.
D) Display: Provides access to Dim, Kelvin, G/M, Gel, Hue Saturation and DMX
channel. Factory reset will show: Dim = 10%, Kelvin = 2700K, G/M = 000,
DMX = 001.
E) Lock: Press the Lock button to disable all buttons and control knob.
Press for 3 seconds to restore presets to default factory settings.
F) Mode: Press to navigate from Dim to Kelvin, G/M, Gel, Hue and Saturation
settings. When in sub-menus, pressing Mode always returns you to main display.
When DMX is applied, use Mode to access DMX channel on main display.
Tip: Long press will bring you back one step.
G) Data Port: Mini B USB for software updates.
H) Dimmer Knob: Manually adjusts Dim, Kelvin, G/M, Hue Saturation levels and
DMX address. Press the knob to toggle between ne and coarse adjustments or
when selecting options within menus.
DMX Note: Each Select LED 150 DMX Controller has an “AUTO TERMINATE” feature.
The last xture that does not have an XLR cable attached to the DMX “Out” port will
automatically terminate.

10
Menu Overview
This manual suits for next models
3
Table of contents
Popular Home Lighting manuals by other brands


JONATHAN Y
JONATHAN Y JYL6007A quick start guide

Philips
Philips Ledino 31606/11/16 Specifications

Safavieh Lighting
Safavieh Lighting CANDRI TBL4427A manual

Hunter
Hunter Bullet Spotlight Kit Owner's guide and installation manual

Philips
Philips 405441213 user manual

Philips
Philips Halogen Light Brochure & specs


