KitchenAid KUBL204EPA User manual

BEVERAGE CENTER
OVERLAY MODEL
Use & Care Guide
For questions about features, operation/performance, parts, accessories, or service, call: 1-800-422-1230 or visit our website at...
www.kitchenaid.com
In Canada, call: 1-800-807-6777, or visit our website at...
www.KitchenAid.ca
REFRIGERADOR PARA BEBIDAS
MODELO RECUBIERTO
Manual de uso y cuidado
Si tiene preguntas respecto a las características, funcionamiento, rendimiento, partes, accesorios o servicio técnico, llame al:
1-800-422-1230 o visite nuestro sitio de internet en...
www.kitchenaid.com
En Canadá, llame al: 1-800-807-6777, o visite nuestro sitio de internet en...
www.KitchenAid.ca
RÉFRIGÉRATEUR POUR BOISSONS
MODÈLE À PANNEAU DÉCORATIF
Guide d’utilisation et d’entretien
Au Canada, pour assistance, installation ou service, composez le 1-800-807-6777 ou visitez notre site web à...
www.KitchenAid.ca
Table of Contents/Índice/Table des matières ..................................................................2
W10741573C/8336460126900C

2
TABLE OF CONTENTS
BEVERAGE CENTER SAFETY ......................................................3
INSTALLATION REQUIREMENTS................................................4
Tools and Parts ............................................................................4
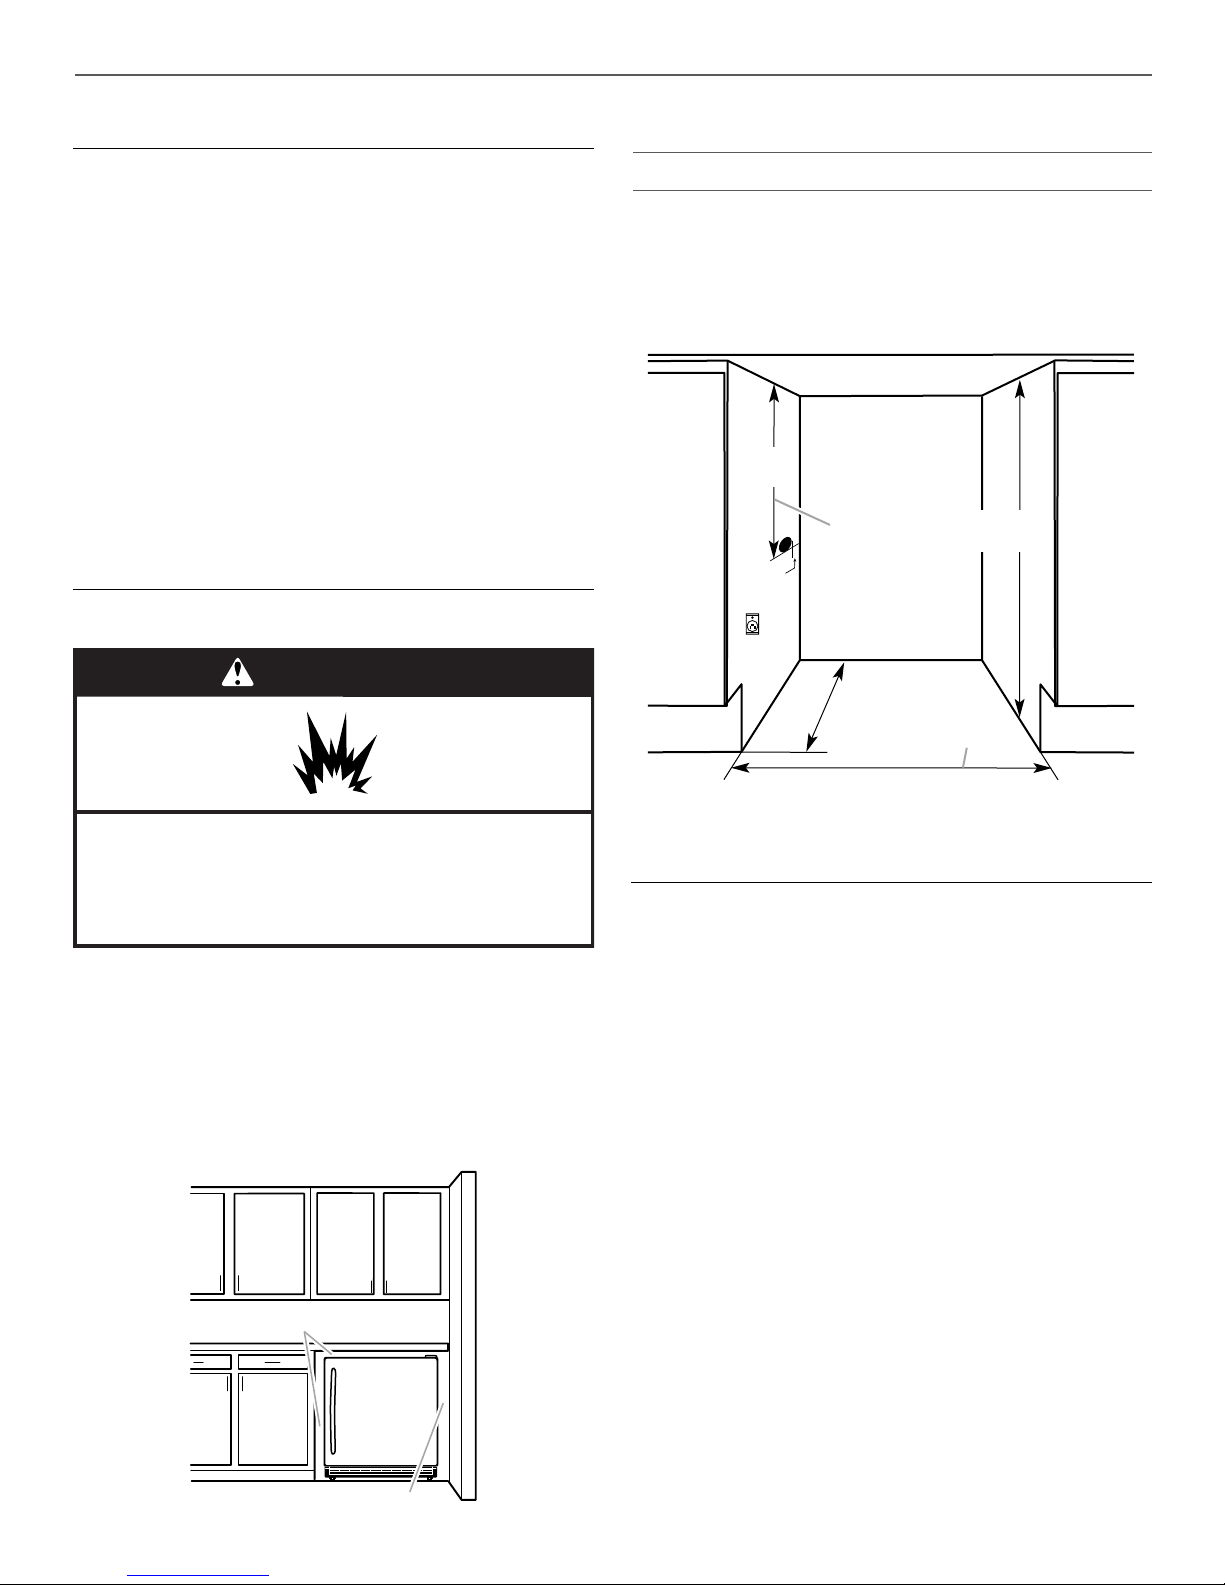
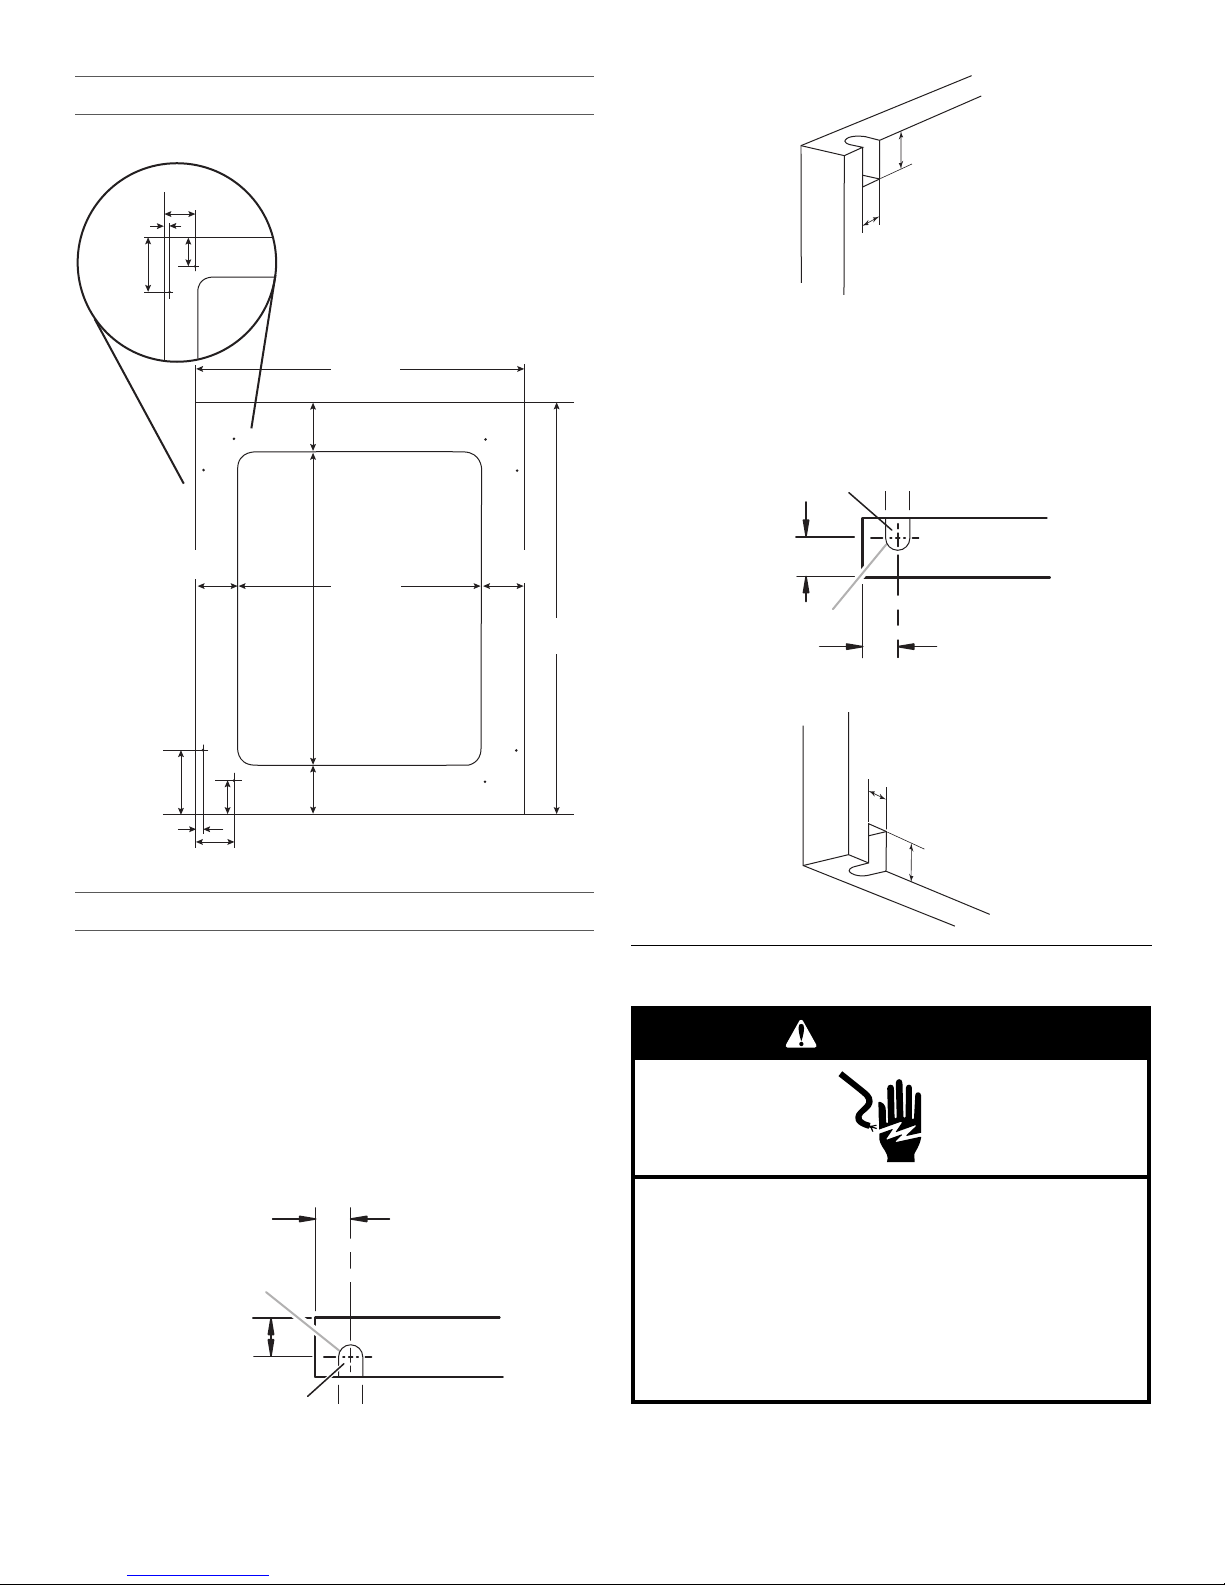
Location Requirements................................................................4
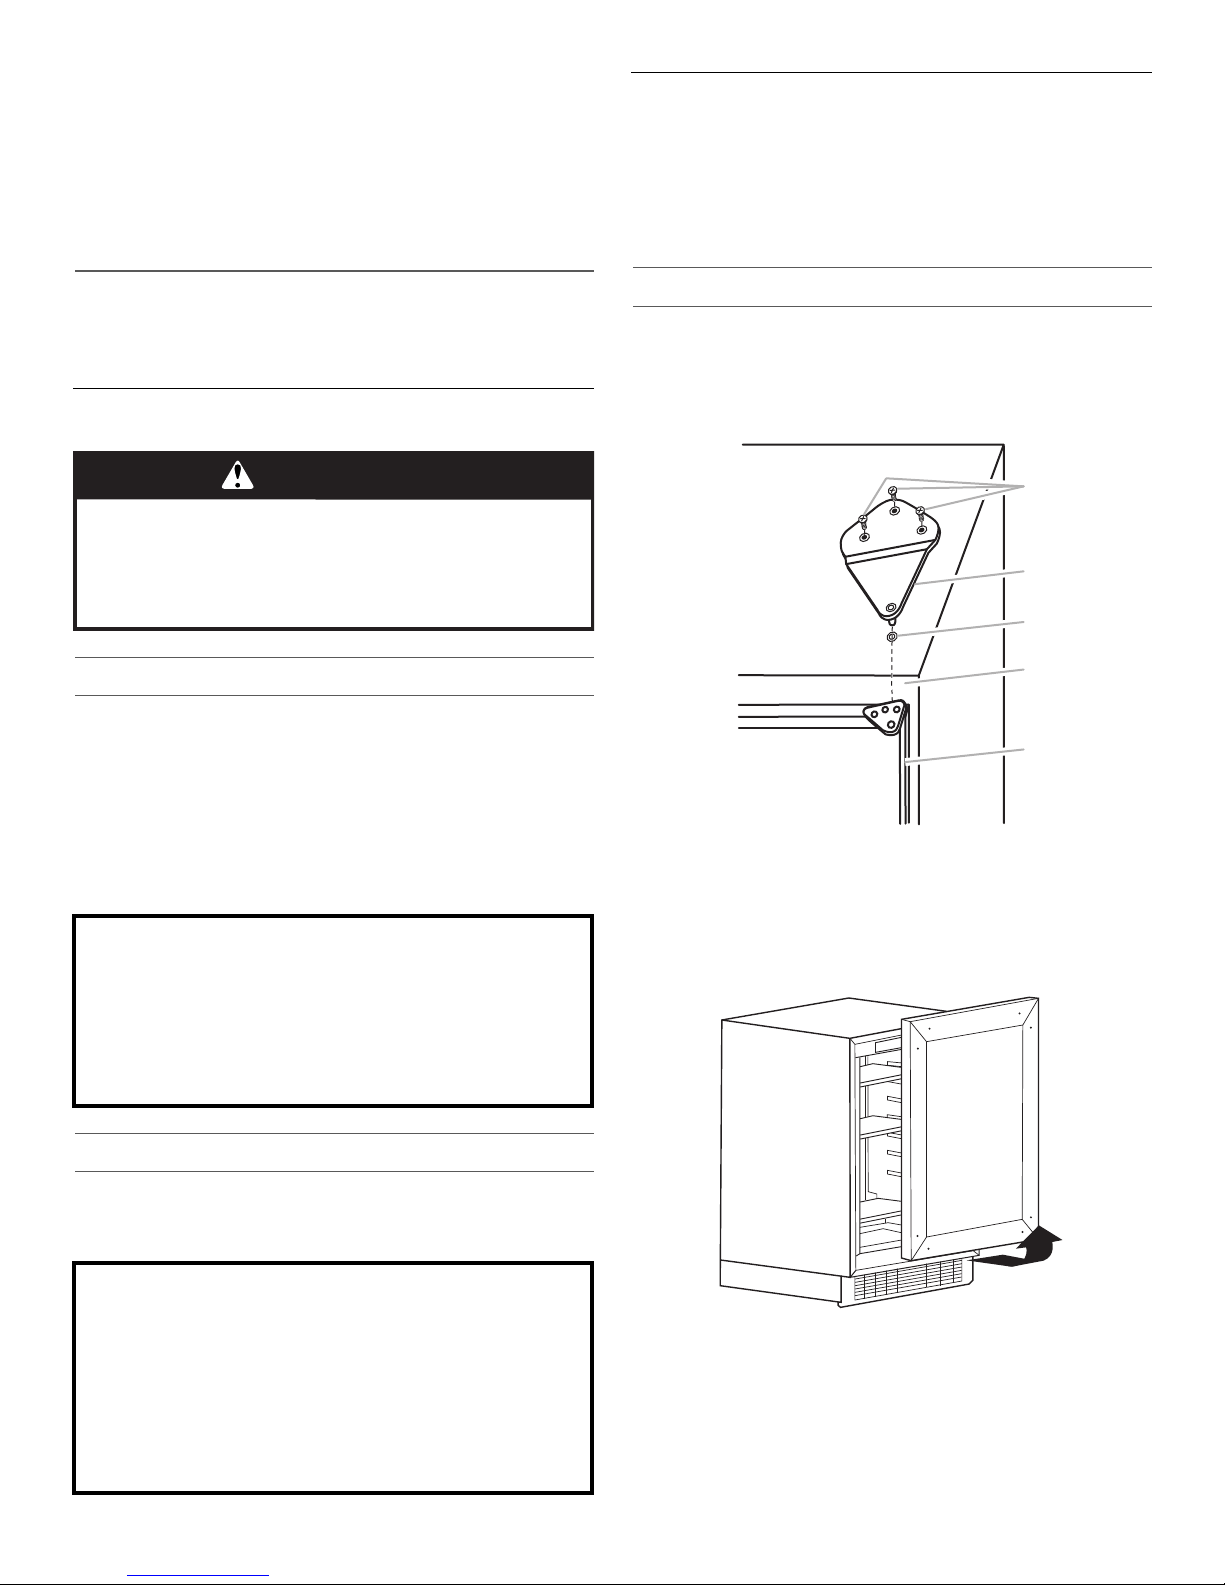
Custom Overlay Frame ................................................................4
Electrical Requirements ...............................................................5
INSTALLATION INSTRUCTIONS..................................................6
Unpack the Beverage Center.......................................................6
Install Custom Overlay Frame......................................................6
Door Closing.................................................................................8
BEVERAGE CENTER USE.............................................................8
Normal Sounds ............................................................................8
Using the Controls .......................................................................8
Beverage Shelf/Wine Racks.......................................................10
Stocking the Beverage Center...................................................10
BEVERAGE CENTER CARE ........................................................11
Base Grille ..................................................................................11
Cleaning......................................................................................11
Vacation and Moving Care.........................................................12
TROUBLESHOOTING ..................................................................12
ASSISTANCE OR SERVICE.........................................................13
In the U.S.A. ...............................................................................13
In Canada ...................................................................................13
Accessories ................................................................................13
WARRANTY ..................................................................................14
ÍNDICE
SEGURIDAD DEL REFRIGERADOR PARA BEBIDAS ..............15
REQUISITOS DE INSTALACIÓN.................................................16
Herramientas y piezas................................................................16
Requisitos de ubicación.............................................................16
Marco recubierto a la medida....................................................16
Requisitos eléctricos..................................................................18
INSTRUCCIONES DE INSTALACIÓN.........................................18
Desempaque del refrigerador para bebidas..............................18
Cómo instalar el marco
recubierto a la medida ...............................................................18
Cierre de la puerta......................................................................20
USO DEL REFRIGERADOR PARA BEBIDAS ............................21
Sonidos normales ......................................................................21
Uso de los controles ..................................................................21
Estante para bebidas/portabotellas...........................................23
Cómo almacenar en el refrigerador
para bebidas...............................................................................24
CUIDADO DEL REFRIGERADOR PARA BEBIDAS ...................24
Rejilla de la base.........................................................................24
Limpieza .....................................................................................24
Cuidado durante las vacaciones y mudanzas...........................25
SOLUCIÓN DE PROBLEMAS......................................................26
AYUDA O SERVICIO TÉCNICO...................................................27
En los EE.UU. .............................................................................27
En Canadá..................................................................................27
Accesorios..................................................................................27
GARANTÍA.....................................................................................28
TABLE DES MATIÈRES
SÉCURITÉ DU RÉFRIGÉRATEUR POUR BOISSONS ..............30
EXIGENCES D’INSTALLATION...................................................31
Outillage et pièces......................................................................31
Exigences d'emplacement.........................................................31
Cadre décoratif personnalisé.....................................................32
Spécifications électriques..........................................................33
INSTRUCTIONS D’INSTALLATION ...........................................33
Déballage du réfrigérateur pour boissons .................................33
Installation du cadre décoratif personnalisé..............................33
Fermeture de la porte.................................................................35
UTILISATION DU RÉFRIGÉRATEUR POUR BOISSONS..........36
Sons normaux ............................................................................36
Utilisation des commandes........................................................36
Tablette à boissons/casiers à vin...............................................38
Stockage dans le réfrigérateur pour boissons...........................39
ENTRETIEN DU RÉFRIGÉRATEUR POUR BOISSONS ............39
Grille de la base..........................................................................39
Nettoyage ...................................................................................39
Précautions à prendre pour les vacances et avant
un déménagement .....................................................................40
DÉPANNAGE.................................................................................41
ASSISTANCE OU SERVICE.........................................................42
Aux États-Unis............................................................................42
Au Canada..................................................................................42
Accessoires ................................................................................42
GARANTIE.....................................................................................43

3
BEVERAGE CENTER SAFETY
Proper Disposal of Your Old
Refrigerated Appliance
IMPORTANT: Child entrapment and suffocation are not problems
of the past. Junked or abandoned beverage centers are still
dangerous – even if they will sit for “just a few days.” If you are
getting rid of your old beverage center, please follow these
instructions to help prevent accidents.
Before You Throw Away Your Old Refrigerated appliance:
■Take off the door.
■Leave the shelves in place so that children may not easily
climb inside.
You can be killed or seriously injured if you don't immediately
You can be killed or seriously injured if you don't follow
All safety messages will tell you what the potential hazard is, tell you how to reduce the chance of injury, and tell you what can
happen if the instructions are not followed.
Your safety and the safety of others are very important.
We have provided many important safety messages in this manual and on your appliance. Always read and obey all safety
messages.
This is the safety alert symbol.
This symbol alerts you to potential hazards that can kill or hurt you and others.
All safety messages will follow the safety alert symbol and either the word “DANGER” or “WARNING.”
These words mean:
follow instructions.
instructions.
DANGER
WARNING
IMPORTANT SAFETY INSTRUCTIONS
WARNING: To reduce the risk of fire, electric shock, or injury when using your beverage center, follow these basic
SAVE THESE INSTRUCTIONS
■Plug into a grounded 3 prong outlet.
■Do not remove ground prong.
■Do not use an adapter.
■Do not use an extension cord.
■Disconnect power before servicing.
■Replace all parts and panels before operating.
■Remove door or drawer(s) from your old refrigerated
appliance.
■Use nonflammable cleaner.
■Keep flammable materials and vapors, such as gasoline,
away from beverage center.
■Use two or more people to move and install beverage
center.
precautions:
State of California Proposition 65 Warnings:
WARNING: This product contains one or more chemicals known to the State of California to cause cancer.
WARNING: This product contains one or more chemicals known to the State of California to cause birth defects or other
reproductive harm.
WARNING
Suffocation Hazard
Remove door or drawer(s) from your old refrigerated
appliance.
Failure to do so can result in death or brain damage.
Important information to know about disposal of
refrigerants:
Dispose of refrigerator in accordance with Federal and Local
regulations. Refrigerants must be evacuated by a licensed,
EPA certified refrigerant technician in accordance with
established procedures.

4
INSTALLATION REQUIREMENTS
Tools and Parts
Tools Needed
Gather the required tools and parts before starting installation.
Read and follow the instructions provided with any tools listed
here.
Parts Needed
Parts Supplied
Location Requirements
To ensure proper ventilation for your beverage center, allow for a
¹⁄₄" (6.35 mm) space on each side and at the top. When installing
your beverage center next to a fixed wall, leave 2¹⁄₂" (6.35 cm)
minimum clearance on the hinge side to allow for the door to
swing open.
NOTE: It is recommended that you do not install the beverage
center near an oven, radiator, or other heat source. Do not install
in a location where the temperature will fall below 55°F (13°C). For
best performance, do not install the beverage center behind a
cabinet door or block the base grille.
Opening Dimensions
■Height dimensions are shown with the leveling legs extended
to the minimum height.
NOTE: When leveling legs are fully extended, add ⁵⁄₈" (15 mm)
to the height dimensions.
■If the floor of the opening is not level with the kitchen floor,
shim the opening to make it level with the kitchen floor.
Custom Overlay Frame
If you plan to install a custom overlay frame, you will need to
create the frame yourself or consult a qualified cabinetmaker or
carpenter. See dimension drawings for frame specifications.
IMPORTANT:
■The thickness of the overlay frame must be ³⁄₄" (19 mm).
■The overlay frame must not weigh more than 10 lbs (4.54 kg).
Overlay frames weighing more than recommended may
cause damage to your appliance.
■Overlay frame drawings show the rear view of the frame.
■Cordless drill
■¹⁄₁₆" and ³⁄₈" Brad point
doweling drill bit
■Phillips screwdriver
■Rotary tool
■Scissors
■C-clamp
■Masking tape
■Tape measure
■Petroleum jelly
■Custom Overlay Frame—See “Overlay Frame—Rear
View.”
■Flat-head screws (TRUSS M4x34 Tapping) (8)
WARNING
Explosion Hazard
Keep flammable materials and vapors, such as
gasoline, away from beverage center.
Failure to do so can result in death, explosion, or fire.
¹⁄₄" (6.35 mm)
2¹⁄₂" (6.35 cm)
Critical Dimensions:
A. 14
³⁄₄
" (37.5 cm) utility opening
B. 24" (60.96 cm) minimum opening width
¹⁄₂"
(1.3 cm)
A
14³⁄₄"
(37.5 cm)
24"
(60.96 cm)
min.
24" (60.96 cm) min.
34³⁄₈" (87.3 cm) min.
35" (88.9 cm) max.
B

5
Overlay Frame Dimensions—Rear View
1. Create a custom overlay frame using the dimensions shown.
Door Hinge Holes
■The views of the top and bottom hinge pin hole show a right-
hand hinge. Mirror the image for a left-hand hinge.
■We recommend using a C-clamp and two pieces of scrap
wood (front and back) to help reinforce the overlay frame
when drilling the hinge pin holes.
1. Using a ³⁄₈" brad point doweling drill bit, drill a hole, ¹⁄₄"
(6.35 mm) deep, into the top of the overlay frame for the top
hinge pin. Remove the excess wood, surrounding the hole, by
using the rotary tool to complete the hinge depression as
shown.
Top View
2. Using a ³⁄₈" brad point doweling drill bit, drill a hole, ³⁄₈"
(9,5 mm) deep, in the bottom of the overlay frame for the
bottom hinge pin. Remove the excess wood, surrounding the
hole, by using the rotary tool to complete the hinge
depression, as shown.
Bottom View
Electrical Requirements
Before you move your beverage center into its final location, it is
important to make sure you have the proper electrical
connection.
A. Diameter ³
⁄₈
" (10.0 mm)
22³⁄₄"
(57.8cm)
4⁵⁄₈"
(11.7 cm) 2³⁄₈"
(6.1 cm)
¹⁄₂"
(1.4 cm) 2³⁄₄"
(7.0 cm)
3¹⁄₂"
(9.0 cm)
3"
(7.7 cm)
Top
Hole
Reverse Side
Bottom
23¾"
(60.3cm)
29¹³⁄₁₆"
(75.8cm)
17¹³⁄₁₆"
(45.2 cm)
3"
(7.7 cm)
3¹⁄₂"
(9.0 cm)
2³⁄₄"
(7.0 cm)
¹⁄₂"
(1.4 cm)
4⁷⁄₈"
(12.4 cm)
2³⁄₄"
(7.0 cm)
A
Back Surface
Front Surface
³⁄₈" (10.0 mm)
¹⁄₂" (13.5 mm)
¹⁄₂" (13.5 mm)
Depth
¹⁄₄"
(7.0 mm)
A. Diameter ³
⁄₈
" (10.0 mm)
¹⁄₄"
(7.0 mm)
³⁄₈" (9.5 mm)
Front
Front Surface
Back Surface
Depth
³⁄₈" (10.0 mm)
¹⁄₂" (13.5 mm)
A
³⁄₈"
(10.0 mm)
¹⁄₂" (13.5 mm)
³⁄₈" (10.0 mm)
³⁄₈" (10.0 mm)
Front Surface
Electrical Shock Hazard
Plug into a grounded 3 prong outlet.
Do not remove ground prong.
Do not use an adapter.
Do not use an extension cord.
Failure to follow these instructions can result in death,
fire, or electrical shock.
WARNING

6
Recommended Grounding Method
A 115 volt, 60 Hz., AC only, 15- or 20-amp fused, grounded
electrical supply is required. It is recommended that a separate
circuit serving only your beverage center be provided. Use an
outlet that cannot be turned off by a switch. Do not use an
extension cord.
NOTE: Before performing any type of installation, cleaning, or
removing a light bulb, unplug beverage center or disconnect
power.
INSTALLATION
INSTRUCTIONS
Unpack the Beverage Center
Remove the Packaging
■Remove tape and glue residue from surfaces before turning
on the beverage center. Rub a small amount of liquid dish
soap over the adhesive with your fingers. Wipe with warm
water and dry.
■Do not use sharp instruments, rubbing alcohol, flammable
fluids, or abrasive cleaners to remove tape or glue. These
products can damage the surface of your beverage center.
For more information, see “Beverage Center Safety.”
■Dispose of/recycle all packaging materials.
Clean Before Using
After you remove all of the packaging materials, clean the inside
of your beverage center before using it. See the cleaning
instructions in “Beverage Center Care.”
Install Custom Overlay Frame
IMPORTANT:
■Create custom overlay frame according to the specifications
in the “Custom Overlay Frame” section.
■KitchenAid is not responsible for the removal or addition of
molding or decorative frames that would not allow access to
the appliance for service.
Remove the Door
IMPORTANT: Do not remove the grease from the washer, top
spacer or top hinge pin. Be sure to set aside the top hinge, top
spacer and washer for later use.
1. Using a Phillips screwdriver, remove the three screws from
the top hinge. Remove the top hinge.
2. Remove the washer. Keep in a safe place for later use.
3. Open the door. Lift the front of the door up, pulling straight
out to remove as shown.
WARNING
Excessive Weight Hazard
Use two or more people to move and install
beverage center.
Failure to do so can result in back or other injury.
When MovingYour Beverage Center:
Your beverage center is heavy. When moving the appliance
for cleaning and service, be sure to cover the floor with
cardboard or hardboard to avoid floor damage. Always pull
the appliance straight out when moving it. Do not wiggle or
“walk” the appliance when trying to move it, as floor
damage could occur.
Important information to know about glass shelves
and covers:
Do not clean glass shelves or covers with warm water when
they are cold. Shelves and covers may break if exposed to
sudden temperature changes or impact, such as bumping.
Tempered glass is designed to shatter into many small,
pebble-size pieces. This is normal. Glass shelves and covers
are heavy. Use both hands when removing them to avoid
dropping.
A. Screws (3)
B. Top hinge
C. Washer
D. Top spacer
E. Door
C
D
E
A
B

7
Attach the Overlay Frame
1. Gently pull back the gasket from all four corners. Pull back far
enough that two screws are visible in each corner (eight total
screws). Remove all eight screws.
2. Position the overlay frame so that the holes in the frame align
with the holes in the door liner.
NOTE: C-clamps are recommended to keep the overlay frame
and door liner aligned and to limit movement of the pieces.
3. Once all holes are aligned, fasten the custom frame to the
door using the screws provided as shown.
NOTE: The screws for this step are in a small plastic bag, located
in the interior of the beverage center.
Install the Door
IMPORTANT: To ensure proper operation, be sure to grease the
top hinge, top spacer and washer with petroleum jelly.
1. Using petroleum jelly, grease the bottom spacer hole and the
bottom hinge pin. Align the washer with the bottom spacer
hole.
2. Install the door by inserting the bottom hinge pin into the
bottom space hole. Be sure the washer stays in place. Slowly
lower the door straight down and evenly onto the bottom
hinge pin.
3. Close the door and check that it is aligned with the cabinet.
NOTE: Provide additional support for the door when moving the
hinges. Do not depend on the door magnets to hold the door in
place while you are working.
4. Using masking tape, secure the door to the cabinet before
installing the spacer, as shown.
5. Place the washer on the top spacer and align the holes.
Grease the top hinge pin, top spacer and washer with
petroleum jelly. Insert the top hinge pin into the washer and
top spacer.
6. Using a Phillips screwdriver and three screws, attach the top
hinge to the cabinet as shown.
7. Remove the masking tape from the door.
A. Hinge plate
B. Screws
C. Door
D. Gasket
A. Custom frame
B. Gasket
C.Door frame
A
B
C
D
A
B
C
Repeat on
thisside
A. Top spacer
B. Masking tape
A. Screws (3)
B. Top hinge
C. Washer
D. Top spacer
E. Door
F. O v erla y fra m e
A
B
C
D
E
A
B
F

8
Door Closing
Door Closing
Your beverage center has four leveling legs. If your beverage
center seems unsteady or you want the door to close more easily,
adjust the beverage center’s tilt using the instructions below.
1. Plug into a grounded 3 prong outlet.
2. Move the beverage center into its final location.
3. Turn the leveling legs to the right to lower the beverage center
or turn the leveling legs to the left to raise it. It may take
several turns of the leveling legs to adjust the tilt of the
beverage center.
NOTE: Having someone push against the top of the beverage
center takes some weight off the leveling legs. This makes it
easier to adjust the leveling legs.
4. Make sure that the door closes as easily as you like. If not, tilt
the beverage center slightly more to the rear by turning both
front leveling screws to the left. It may take several more
turns, and you should turn both leveling legs the same
amount.
BEVERAGE CENTER USE
Normal Sounds
Your new beverage center may make sounds that your old one
didn’t make. Because the sounds are new to you, you might be
concerned about them. Most of the new sounds are normal. Hard
surfaces, such as the flooring and surrounding structures, can
make the sounds seem louder. The following describes the kinds
of sounds and what may be making them.
■Your beverage center is designed to run more efficiently to
keep your food items at the desired temperatures and to
minimize energy usage. The high efficiency compressor and
fans may cause your beverage center to run longer than your
old one. You may also hear a pulsating or high-pitched sound
from the compressor or fans adjusting to optimize
performance.
■Rattling noises may come from the flow of refrigerant or items
stored inside the beverage center.
■As each cycle ends, you may hear a gurgling sound due to
the refrigerant flowing in your beverage center.
■You may hear water running into the drain pan when the
beverage center is defrosting.
■You may hear clicking sounds when the beverage center
starts or stops running.
Using the Controls
The control panel for the beverage center is located on the
middle separator (mullion) of the beverage center. The control of
the beverage center has no mechanical parts or buttons. When
disconnected, the control panel displays nothing and may be
difficult to locate.
Turning Control On/Off
■The first time that the beverage center is plugged in, the
control will be in Cool Off mode. Cool On and Cool Off will be
the only options that display.
■Press COOL ON for 3 seconds to turn on the beverage
center. All menus and recommended temperature settings
will be displayed.
Electrical Shock Hazard
Plug into a grounded 3 prong outlet.
Do not remove ground prong.
Do not use an adapter.
Do not use an extension cord.
Failure to follow these instructions can result in death,
fire, or electrical shock.
WARNING
WARNING
Excessive Weight Hazard
Use two or more people to move and install
beverage center.
Failure to do so can result in back or other injury.

9
■The left temperature and preset touch pads control the
temperature of the upper compartment.
■The right temperature and preset touch pads control the
temperature of the lower compartment.
Viewing Celsius Temperatures
■Press the F/C touch pad to toggle between displaying the
temperature in degrees Fahrenheit and degrees Celsius. The
corresponding indicator will illuminate.
Adjusting the Control
When the beverage center is turned On for the first time, the
temperature defaults to the recommended setting. There are two
adjustable temperature controls, with one for each compartment.
■To adjust set point temperatures, press “+” (plus) or “-”
(minus) until the desired temperature setting is reached.
NOTE: The set point for the beverage center is 37°F (3°C) for the
upper compartment and 50°F (10°C) for the lower compartment.
The set point range for the upper compartment is 33°F to 40°F
(0°C to 4°C) and 42°F to 64°F (5°C to 17°C) for the lower
compartment.
The control is set correctly when your beverages are as cold as
you like them.
NOTE: Wait at least 24 hours between adjustments for the
beverage center to acclimate. Recheck the temperatures before
making further adjustments.
Using Presets
For your convenience, your beverage center also has controls
that are preset to recommended storage temperatures for
specific beverages.
Pressing any preset option will set the temperature to the
recommended temperature for the specified beverages:
■Beverage: 34°F (1°C)
■Party: 37° (3°C)
■Red Wine: 64°F (17°C)
■White Wine: 50°F (10°C)
■Champagne: 46°F (7°C)
■Sweet Wine: 42°F (5°C)
Auto Light
The beverage center has a sensor that will turn on the interior
display light automatically when someone walks by. When motion
is no longer detected, the interior display light will go off after
2minutes.
■Press the Auto Light option to activate this feature.
■When the Auto Light is not activated, the interior display light
will only turn on when the door is opened.
NOTES:
■Leaving the light on for an extended period of time will slightly
increase the temperature of the beverage center.
■The light is an LED, which does not need to be replaced.
However, if the LED does not illuminate when the door is
opened, call Service to check the problem and replace if
necessary. See “Assistance or Service” for contact
information.
Sabbath Mode
Sabbath Mode is designed for the traveler or for those whose
religious observances require turning off the lights. By selecting
this feature, the temperature set points remain unchanged but
the control panel lights, interior lights, and control audio turn off.
For most efficient beverage center operation, it is recommended
to exit the Sabbath Mode when it is no longer required.
■Press and hold SABBATH for 3 seconds to turn on the
feature. After the 3-second countdown, the feature will
activate and all other displays will turn Off.
■Press and hold SABBATH for 3 seconds to turn off the feature
and turn on the display.
Door Open
If the door is open longer than 5 minutes, an alarm will sound
every 2 minutes until the door is closed or any control is pressed.
A. F/C touch pad
A

10
Over Temp Alarm
The Over Temperature feature is designed to let you know when
the beverage center temperature rises above 70°F (21°C) for
4 hours or longer. The audio alarm will shut off automatically
when the temperature returns to normal. To let you know an Over
Temperature condition occurred, the indicator light will continue
to flash until the Reset Alarm touch pad is pressed.
If the over temperature condition is still present when an Over
Temp reset is performed, the indicator light will continue to
reactivate every 4 hours until the beverage center temperature is
below 70°F (21°C).
NOTE: These features will not appear on your control unless your
beverage center is over temperature and the alarm requires a
reset.
Lock Mode
The Lock mode deactivates all other options to avoid any
changes being made to your desired temperature settings.
■To activate Lock mode, press and hold LOCK for 3 seconds.
After the countdown, all other displays will turn off and
become unavailable except Cool On, Cool Off and Lock.
Showroom Mode
This mode is used only when the beverage center is on display in
a retail store. If you unintentionally turn on Showroom mode, Cool
Off will light up on the display and the controls will appear to
work. Exit Showroom mode by pressing and holding COOL ON
and SABBATH at the same time for 3 seconds.
Beverage Shelf/Wine Racks
Remove and Replace the Top Shelf
1. Lift the front of the shelf up and away from the ledge on the
front of the shelf support.
2. Pull the shelf forward and lift it up and out of the shelf
supports.
3. Replace the shelf by inserting the back edge of the shelf
against the rear support in the back of the compartment.
4. Align the front of the shelf to the ledge on the front of the shelf
support.
5. Gently place the shelf into place.
Remove and Replace the Wine Racks
NOTE: When storing large bottles or magnums, remove the rack
directly above.
1. Pull the rack forward until it stops.
2. Lift up on the left-hand lever while pressing down on the
right-hand lever to release the rack. Pull the rack forward and
lift it up and out of the rack supports.
3. Replace the rack by inserting the rack into the supports and
sliding it toward the rear of the beverage center.
Stocking the Beverage Center
NOTES:
■For optimum wine storage, place white wines on the upper
rack of the beverage center and place red wines on the lower
rack of the beverage center.
■The wine racks can be stocked with the bottles facing either
direction, however, to optimize storage adjacent bottles
should be facing in opposite directions.
A. Lever
A

11
To Stock the Beverage Center:
1. Starting on the left-hand side of the bottom rack, place the
first bottle with the neck of the bottle facing the front of the
beverage center.
2. Place the next bottle on the rack with the neck of the bottle
facing the back of the beverage center. Alternate the direction
of the bottles, in this manner, until the display rack is full.
3. Slide the bottom rack into place and pull the next rack
forward. Stock the remaining rack as described In the
previous steps.
4. Place juices, sodas or other canned beverages on the glass
shelves.
BEVERAGE CENTER CARE
Base Grille
You must remove the base grille to access the condenser coils
for cleaning.
To Remove the Base Grille:
1. Open the beverage center door.
2. Using a Phillips screwdriver, remove the two screws.
3. Push both tabs in toward the center to release the base grille
from the cabinet and remove.
To Replace the Base Grille:
1. Open the beverage center door.
2. Position the base grille so that both tabs align and the base
grille snaps into place. Replace the two screws. Tighten the
screws.
Cleaning
Clean the beverage center about once a month to avoid buildup
of odors. Wipe up spills immediately.
To Clean Your Beverage Center:
1. Unplug beverage center or disconnect power.
2. Remove all racks and shelves from inside the beverage
center.
3. Hand wash, rinse, and dry removable parts and interior
surfaces thoroughly. Use a clean sponge or soft cloth and a
mild detergent in warm water.
■To avoid damaging wooden tines and trim pieces, wipe
them off with a clean sponge or soft cloth and warm
water. Do not use detergent or immerse the entire rack
into water when cleaning.
■Do not use abrasive or harsh cleaners such as window
sprays, scouring cleansers, flammable fluids, cleaning
waxes, concentrated detergents, bleaches or cleansers
containing petroleum products on plastic parts, interior
and door liners or gaskets. Do not use paper towels,
scouring pads, or other harsh cleaning tools. These can
scratch or damage materials.
■To help remove odors, you can wash interior walls with a
mixture of warm water and baking soda (2 tbs to 1 qt
[26 g to 0.95 L] of water).
4. Wash stainless steel and painted metal exteriors with a clean
sponge or soft cloth and a mild detergent in warm water. Do
not use abrasive or harsh cleaners, or cleaners containing
chlorine. These can scratch or damage materials. Dry
thoroughly with a soft cloth.
NOTE: To keep your stainless steel beverage center looking
like new and to remove minor scuffs or marks, it is suggested
that you use the manufacturer’s approved Stainless Steel
Cleaner and Polish. To order the cleaner, see “Accessories.”
IMPORTANT: This cleaner is for stainless steel parts only!
Do not allow the Stainless Steel Cleaner and Polish to come
into contact with any plastic parts such as the trim pieces,
dispenser covers or door gaskets. If unintentional contact
does occur, clean plastic part with a sponge and mild
detergent in warm water. Dry thoroughly with a soft cloth.
5. Replace the racks and shelves.
6. Clean the condenser coils regularly. They are located behind
the base grille. Coils may need to be cleaned as often as
every other month. This may help save energy.
■Remove the base grille. See “Base Grille.”
A. Tabs
B. Screws
BAA
WARNING
Explosion Hazard
Use nonflammable cleaner.
Failure to do so can result in death, explosion, or fire.

12
■Use a vacuum cleaner with an extended attachment to
clean the condenser coils when they are dusty or dirty. ■Replace the base grille.
7. Plug in beverage center or reconnect power.
Vacation and Moving Care
Vacations
If you choose to turn the beverage center off before you leave,
follow these steps.
1. Remove all wine bottles from the beverage center.
2. Unplug the beverage center.
3. Clean the beverage center. See “Cleaning.”
4. Tape a rubber or wood block to the top of the door to prop it
open far enough for air to get in. This stops odor and mold
from building up.
Moving
When you are moving your beverage center to a new home,
follow these steps to prepare it for the move.
1. Remove all wine bottles from the beverage center.
2. Unplug the beverage center.
3. Clean, wipe, and dry it thoroughly.
4. Take out all removable parts, wrap them well, and tape them
together so they don’t shift and rattle during the move.
5. Tape the doors shut and tape the power cord to the beverage
center.
When you get to your new home, put everything back and refer to
the “Installation Instructions” section for preparation instructions.
TROUBLESHOOTING
Try the solutions suggested here first in order to avoid the cost of an unnecessary service call.
Your beverage center will not operate
■Is the power supply cord unplugged? Plug into a grounded
3 prong outlet.
■Has a household fuse blown, or has a circuit breaker
tripped? Replace the fuse or reset the circuit.
■Is the Beverage Center Control in Control Off mode? See
“Using the Controls.”
The motor seems to run too much
■Is the temperature outside hotter than normal? Expect the
motor to run longer under warm conditions. At normal
temperatures, expect your motor to run about 40% to 80% of
the time. Under warmer conditions, expect it to run even
more of the time.
■Is the door opened often? Expect the motor to run longer
when this occurs. In order to conserve energy, try to get
everything you need out of the beverage center at once, keep
wine bottles positioned label side up so that they are easy to
find, and close the door as soon as the wine is removed.
■Is the control set correctly for the surrounding
conditions? See “Using the Controls.”
■Is the door closed completely? Push the door firmly shut. If
it will not shut all the way, see “The door will not close
completely” later in this section.
■Are the condenser coils dirty? This obstructs air transfer
and makes the motor work harder. Clean the condenser coils.
See “Cleaning.”
Temperature is too warm
■Is the door opened often? Be aware that the beverage
center will warm when this occurs. In order to keep the
beverage center cool, try to get everything you need out of
the beverage center at once, keep wine bottles positioned
label side up so that they are easy to find, and close the door
as soon as the wine is removed.
■Is the control set correctly for the surrounding
conditions? See “Using the Controls.”
■Is the base grille blocked? For best performance, do not
install the beverage center behind a cabinet door or block the
base grille.
There is interior moisture buildup
■Is the door opened often? To avoid humidity buildup, try to
get everything you need out of the beverage center at once,
keep wine bottles positioned label side up so that they are
easy to find, and close the door as soon as the wine is
removed. When the door is opened, humidity from the room
air enters the beverage center. The more often the door is
opened, the faster humidity builds up, especially when the
room itself is very humid.
■Is it humid? It is normal for moisture to build up inside the
beverage center when the air is humid.
■Is the control set correctly for the surrounding
conditions? See “Using the Controls.”
Electrical Shock Hazard
Plug into a grounded 3 prong outlet.
Do not remove ground prong.
Do not use an adapter.
Do not use an extension cord.
Failure to follow these instructions can result in death,
fire, or electrical shock.
WARNING

13
The door is difficult to open
■Is the gasket dirty or sticky? Clean the gasket and the
surface that it touches. Rub a thin coat of paraffin wax on the
gasket following cleaning.
The door will not close completely
■Are the racks or shelves out of position? Put the racks or
shelves back into their correct positions. See “Beverage
Center Use” for more information.
■Is the gasket sticking? Clean the gasket and the surface
that it touches. Rub a thin coat of paraffin wax on the gasket
following cleaning.
ASSISTANCE OR SERVICE
Before calling for assistance or service, please check
“Troubleshooting.” It may save you the cost of a service call. If
you still need help, follow the instructions below.
When calling, please know the purchase date and the complete
model and serial number of your appliance. This information will
help us to better respond to your request.
If You Need Replacement Parts
If you need to order replacement parts, we recommend that you
only use factory specified replacement parts. Factory specified
replacement parts will fit right and work right because they are
made with the same precision used to build every new
KITCHENAID®appliance.
To locate factory specified replacement parts in your area, call us
or your nearest designated service center.
In the U.S.A.
Call the KitchenAid Customer eXperience Center
toll free: 1-800-422-1230.
Our Consultants Provide Assistance With:
■Features and specifications on our full line of appliances.
■Installation information.
■Use and maintenance procedures.
■Accessory and repair parts sales.
■Specialized customer assistance (Spanish speaking, hearing
impaired, limited vision, etc.).
■Referrals to local dealers, repair parts distributors, and
service companies. KitchenAid designated service
technicians are trained to fulfill the product warranty and
provide after-warranty service anywhere in the United States.
To locate the KitchenAid designated service company in your
area, you can also look in your telephone directory Yellow Pages.
For Further Assistance
If you need further assistance, you can write to KitchenAid with
any questions or concerns at:
KitchenAid Brand Home Appliances
Customer eXperience Center
553 Benson Road
Benton Harbor, MI 49022-2692
Please include a daytime phone number in your correspondence.
In Canada
Call the KitchenAid Canada Customer eXperience Centre toll
free: 1-800-807-6777.
Our Consultants Provide Assistance With:
■Features and specifications on our full line of appliances.
■Use and maintenance procedures.
■Accessory and repair parts sales.
■Referrals to local dealers, repair parts distributors, and
services companies. KitchenAid Canada designated service
technicians are trained to fulfill the product warranty and
provide after-warranty service, anywhere in Canada.
For Further Assistance
If you need further assistance, you can write to KitchenAid
Canada with any questions or concerns at:
KitchenAid Canada
Customer eXperience Centre
200 – 6750 Century Ave.
Mississauga, Ontario L5N 0B7
Please include a daytime phone number in your correspondence.
Accessories
The following accessories are available for your beverage center.
To order an accessory, contact us and ask for the Part Number.
In the U.S.A., visit our webpage
www.kitchenaid.com/accessories or call 1-800-442-9991.
In Canada, visit our webpage www.whirlpoolparts.ca or call
1-800-807-6777.
Stainless Steel Cleaner and Polish
Order Part #4396095
WARNING
Explosion Hazard
Use nonflammable cleaner.
Failure to do so can result in death, explosion, or fire.
WARNING
Explosion Hazard
Use nonflammable cleaner.
Failure to do so can result in death, explosion, or fire.

14
11/14
KITCHENAID®
REFRIGERATION LIMITED
WARRANTY
ATTACH YOUR RECEIPT HERE. PROOF OF PURCHASE IS REQUIRED
TO OBTAIN WARRANTY SERVICE.
Please have the following information available when you call the
Customer eXperience Center:
■Name, address and telephone number
■Model number and serial number
■A clear, detailed description of the problem
■Proof of purchase including dealer or retailer name and address
IF YOU NEED SERVICE:
1. Before contacting us to arrange service, please determine whether your product requires repair. Some
questions can be addressed without service. Please take a few minutes to review the Troubleshooting or
Problem Solver section of the Use and Care Guide, scan the QR code on the right to access additional
resources, or visit http://kitchenaid.custhelp.com.
2. All warranty service is provided exclusively by our authorized KitchenAid Service Providers. In the U.S. and
Canada, direct all requests for warranty service to:
KitchenAid Customer eXperience Center
In the U.S.A., call 1-800-422-1230. In Canada, call 1-800-807-6777.
If outside the 50 United States or Canada, contact your authorized KitchenAid dealer to determine whether another warranty applies.
http://kitchenaid.custhelp.com
FIVE YEAR LIMITED WARRANTY
WHAT IS COVERED WHAT IS NOT COVERED
LIMITED WARRANTY
For one year from the date of purchase, when this major appliance is
installed, operated and maintained according to instructions
attached to or furnished with the product, KitchenAid brand of
Whirlpool Corporation or Whirlpool Canada LP (hereafter
“KitchenAid”) will pay for Factory Specified Replacement Parts and
repair labor to correct defects in materials or workmanship that
existed when this major appliance was purchased, or at its sole
discretion replace the product. In the event of product replacement,
your appliance will be warranted for the remaining term of the original
unit's warranty period.
SECOND THROUGH FIFTH YEAR LIMITED WARRANTY ON
CAVITY LINER AND SEALED REFRIGERATION SYSTEM
In the second through fifth years from the date of purchase, when
this major appliance is installed, operated and maintained according
to the instructions attached to or furnished with the product,
KitchenAid brand will pay for factory specified replacement parts and
repair labor for the following components to correct non-cosmetic
defects in materials and workmanship in this part that prevent
function of the refrigerator and that existed when this major
appliance was purchased:
■Refrigerator/freezer cavity liner if the part cracks due to defective
materials or workmanship.
■Sealed Refrigeration system (includes compressor, evaporator,
condenser, dryer and connecting tubing).
YOUR SOLE AND EXCLUSIVE REMEDY UNDER THIS LIMITED
WARRANTY SHALL BE PRODUCT REPAIR AS PROVIDED HEREIN.
Service must be provided by a KitchenAid designated service
company. This limited warranty is valid only in the United States or
Canada and applies only when the major appliance is used in the
country in which it was purchased. This limited warranty is effective
from the date of original consumer purchase. Proof of original
purchase date is required to obtain service under this limited
warranty.
1. Commercial, non-residential or multiple-family use, or use inconsistent
with published user, operator or installation instructions.
2. In-home Instruction on how to use your product.
3. Service to correct improper product maintenance or installation,
installation not in accordance with electrical or plumbing codes or
correction of household electrical or plumbing (i.e. house wiring, fuses or
water inlet hoses).
4. Consumable parts (i.e. light bulbs, batteries, air or water filters,
preservation solutions, etc.).
5. Defects or damage caused by the use of non-genuine KitchenAid parts
or accessories.
6. Damage from accident, misuse, abuse, fire, floods, acts of God or use
with products not approved by KitchenAid.
7. Repairs to parts or systems to correct product damage or defects
caused by unauthorized service, alteration or modification of the
appliance.
8. Cosmetic damage including scratches, dents, chips, and other damage
to appliance finishes unless such damage results from defects in
materials and workmanship and is reported to KitchenAid within 30 days.
9. Discoloration, rust or oxidation of surfaces resulting from caustic or
corrosive environments including but not limited to high salt
concentrations, high moisture or humidity or exposure to chemicals.
10. Food or medicine loss due to product failure.
11. Pick-up or delivery. This product is intended for in-home repair.
12. Travel or transportation expenses for service in remote locations where
an authorized KitchenAid servicer is not available.
13. Removal or reinstallation of inaccessible appliances or built-in fixtures
(i.e. trim, decorative panels, flooring, cabinetry, islands, countertops,
drywall, etc.) that interfere with servicing, removal or replacement of the
product.
14. Service or parts for appliances with original model/serial numbers
removed, altered or not easily determined.
The cost of repair or replacement under these excluded circumstances
shall be borne by the customer.
DISCLAIMER OF IMPLIED WARRANTIES
IMPLIED WARRANTIES, INCLUDING ANY IMPLIED WARRANTY OF MERCHANTABILITY OR IMPLIED WARRANTY OF FITNESS FOR A
PARTICULAR PURPOSE, ARE LIMITED TO ONE YEAR OR THE SHORTEST PERIOD ALLOWED BY LAW. Some states and provinces do not allow
limitations on the duration of implied warranties of merchantability or fitness, so this limitation may not apply to you. This warranty gives you
specific legal rights, and you also may have other rights that vary from state to state or province to province.
DISCLAIMER OF REPRESENTATIONS OUTSIDE OF WARRANTY
KitchenAid makes no representations about the quality, durability, or need for service or repair of this major appliance other than the
representations contained in this warranty. If you want a longer or more comprehensive warranty than the limited warranty that comes with this
major appliance, you should ask KitchenAid or your retailer about buying an extended warranty.
LIMITATION OF REMEDIES; EXCLUSION OF INCIDENTAL AND CONSEQUENTIAL DAMAGES
YOUR SOLE AND EXCLUSIVE REMEDY UNDER THIS LIMITED WARRANTY SHALL BE PRODUCT REPAIR AS PROVIDED HEREIN. KITCHENAID
SHALL NOT BE LIABLE FOR INCIDENTAL OR CONSEQUENTIAL DAMAGES. Some states and provinces do not allow the exclusion or limitation of
incidental or consequential damages, so these limitations and exclusions may not apply to you. This warranty gives you specific legal rights, and
you also may have other rights that vary from state to state or province to province.

15
SEGURIDAD DEL REFRIGERADOR PARA BEBIDAS
Cómo deshacerse adecuadamente de su refrigerador viejo
IMPORTANTE: El atrapamiento y asfixia de niños no es un
problema del pasado. Los refrigeradores para bebidas tirados y
abandonados son un peligro, aún si van a quedar ahí “por unos
pocos días”.
Si Ud. está por deshacerse de su refrigerador para bebidas viejo,
por favor siga las instrucciones que se dan a continuación para
prevenir accidentes.
Antes de descartar su viejo refrigerador para bebidas:
■Saque la puerta.
■Deje los portabotellas y estantes en su lugar así los niños no
pueden meterse adentro con facilidad.
Si no sigue las instrucciones de inmediato, usted puede
morir o sufrir una lesión grave.
Si no sigue las instrucciones, usted puede morir o sufrir
una lesión grave.
Todos los mensajes de seguridad le dirán el peligro potencial, le dirán cómo reducir las posibilidades de sufrir una lesión y lo que
puede suceder si no se siguen las instrucciones.
Su seguridad y la seguridad de los demás es muy importante.
Hemos incluido muchos mensajes importantes de seguridad en este manual y en su electrodoméstico. Lea y obedezca siempre
todos los mensajes de seguridad.
ADVERTENCIA
PELIGRO
Este es el símbolo de advertencia de seguridad.
Este símbolo le llama la atención sobre peligros potenciales que pueden ocasionar la muerte o una lesión a
usted y a los demás.
Todos los mensajes de seguridad irán a continuación del símbolo de advertencia de seguridad y de la palabra
“PELIGRO” o “ADVERTENCIA”. Estas palabras significan:
INSTRUCCIONES IMPORTANTES DE SEGURIDAD
ADVERTENCIA:
Para reducir el riesgo de incendio, choque eléctrico, o lesiones personales al usar su refrigerador para
GUARDE ESTAS INSTRUCCIONES
■
Conecte a un contacto de pared de conexión a tierra de
3 terminales.
■
No quite la terminal de conexión a tierra.
■
No use un adaptador.
■
No use un cable eléctrico de extensión.
■
Desconecte el suministro de energía antes de darle servicio.
■
Vuelva a colocar todos los componentes y paneles antes de
hacerlo funcionar.
■
Remueva la puerta o el(los) cajón(cajones) de su aparato
refrigerado viejo.
■
Use un limpiador no inflamable.
■
Mantenga los materiales y vapores inflamables, tales como
gasolina, alejados del refrigerador para bebidas.
■
Use dos o más personas para mover e instalar el
refrigerador para bebidas.
bebidas, siga estas precauciones básicas:
Advertencias de la Proposición 65 del estado de California:
ADVERTENCIA: Este producto contiene una o más sustancias químicas identificadas por el estado de California como
causantes de cáncer.
ADVERTENCIA: Este producto contiene una o más sustancias químicas identificadas por el estado de California como
causantes de defectos congénitos o algún otro tipo de daños en la función reproductora.
ADVERTENCIA
Peligro de Asfixia
Remueva la puerta o el(los) cajón(cajones) de su
aparato refrigerado viejo.
No seguir esta instrucción puede ocasionar la muerte
o daño al cerebro.

16
REQUISITOS DE
INSTALACIÓN
Herramientas y piezas
Herramientas necesarias
Reúna las herramientas y piezas necesarias antes de comenzar
la instalación. Lea y siga las instrucciones provistas con
cualquiera de las herramientas detalladas aquí.
Piezas necesarias
Piezas suministradas
Requisitos de ubicación
Para garantizar la ventilación adecuada del refrigerador para
bebidas, deje un espacio de ¹/₄" (6,35 mm) a cada lado y por
encima. Si Ud. instala el refrigerador para bebidas próximo a
una pared fija, deje como mínimo 2¹/₂" (6,35 cm) del lado de la
bisagra para permitir que la puerta abra bien.
NOTA: No se recomienda instalar el refrigerador para bebidas
cerca de un horno, radiador u otra fuente de calor. No instale en
un lugar donde la temperatura puede ser menor de 55°F (13°C).
Para obtener un óptimo funcionamiento, no instale el refrigerador
para bebidas detrás de la puerta de un armario ni bloquee la
rejilla de la base.
.
Medidas de la abertura
■Las medidas de altura indicadas consideran las patas
niveladoras extendidas a una altura mínima.
NOTA: Si las patas niveladoras están totalmente extendidas,
agregue ⁵⁄₈" (15 mm) a las medidas de altura.
■Si el piso de la abertura no está nivelado con el piso de la
cocina, ponga calzas en la abertura para que quede nivelado
con el piso de la cocina.
Marco recubierto a la medida
Si va a instalar un marco recubierto a la medida, deberá hacer
el marco usted mismo o consultar con un carpintero o fabricante
de armarios calificado. Para obtener información acerca de las
especificaciones del marco, vea los gráficos dimensionales.
IMPORTANTE:
■El grosor del marco recubierto debe ser de ³⁄₄" (19 mm).
■El marco recubierto no debe pesar más de 10 lbs (4,54 kg).
Los marcos recubiertos que pesan más de lo recomendado
pueden dañar su electrodoméstico.
■Los dibujos del marco recubierto muestran la vista trasera
del marco.
■Taladro inalámbrico
■Broca de barrena con
punta para cabillas de
¹⁄₁₆" y ³⁄₈"
■Destornillador Phillips
■Herramienta rotativa
■Tijeras
■Abrazadera en C
■Cinta adhesiva protectora
■Cinta de medir
■Vaselina
■
Marco recubierto a la medida - Vea “Marco recubierto –
Vista trasera”.
■Tornillos de cabeza plana (roscado M4x34 TRUSS) (8)
Información importante para saber acerca del desecho
de refrigerantes:
Deshágase del refrigerador siguiendo los reglamentos
federales y locales. Los refrigerantes deberán ser evacuados
por un técnico certificado en refrigeración por EPA (Agencia
de protección del medioambiente) según los procedimientos
establecidos.
ADVERTENCIA
Peligro de Explosión
Mantenga los materiales y vapores inflamables,
tales como gasolina, alejados del refrigerador.
No seguir esta instrucción puede ocasionar la muerte,
explosión, o incendio.
Dimensiones fundamentales:
A. Abertura de uso general de 14¾" (37,5 cm)
B. Ancho mínimo de la abertura de 24" (60,96 cm)
¹⁄₄" (6,35 mm)
2¹⁄₂" (6,35 cm)
¹⁄₂"
(1,3cm)
14³⁄₄"
(37,5 cm)
24"
(60,96 cm)
mín.
24" (60,96 cm) mín.
34³⁄₈" (87,3cm) mín.
35" (88,9 cm) máx.
A
B

17
Marco recubierto - Vista trasera
1. Cree un marco recubierto a la medida utilizando las medidas
que se muestran.
Orificios de la bisagra de la puerta
■Las vistas del orificio del pasador de la bisagra superior
e inferior ilustran una bisagra del lado derecho. Invierta
la imagen para una bisagra del lado izquierdo.
■Recomendamos usar una abrazadera en C y dos piezas
de madera sobrante (adelante y atrás) para ayudar a reforzar
el marco recubierto cuando taladre los orificios del pasador
de la bisagra.
1. Con una broca de barrena con punta para cabillas de ³⁄₈",
taladre un orificio con una profundidad de ¼" (6,35 mm) en
la parte superior del marco recubierto para el pasador de la
bisagra superior. Para terminar la hendidura para la bisagra,
quite el exceso de madera alrededor del orificio con la
herramienta rotativa, como se muestra.
Vista superior
2. Con una broca de barrena con punta para cabillas de
³⁄₈", taladre un orificio de ³⁄₈" (9,5 mm) en la base del marco
recubierto para el pasador de la bisagra inferior. Para
terminar la hendidura para la bisagra, quite el exceso de
madera alrededor del orificio con la herramienta rotativa,
como se muestra.
Vista inferior
22³⁄₄"
(57,8cm)
4⁵⁄₈"
(11,7 cm) 2³⁄₈"
(6,1 cm)
¹⁄₂"
(1,4 cm) 2³⁄₄"
(7,0 cm)
3¹⁄₂"
(9,0 cm)
3"
(7,7 cm)
Parte superior
Orificio
Dorso
Parte inferior
23³⁄₄"
(60,3cm)
29¹³⁄₁₆"
(75,8cm)
17¹³⁄₁₆"
(45,2 cm)
3"
(7,7 cm)
3¹⁄₂"
(9,0 cm)
2³⁄₄"
(7,0 cm)
¹⁄₂"
(1,4 cm)
4⁷⁄₈"
(12,4 cm)
2³⁄₄"
(7,0 cm)
A. Diámetro de ³
⁄₈
" (9,5 mm)
A. Diámetro de ³
⁄₈
" (10,0 mm)
A
³⁄₈" (9,5 mm)
¹⁄₂" (13,5 mm)
¹⁄₂" (13,5 mm)
Profundidad
¹⁄₄"
(7,0 mm)
Superficie frontal
Superficie posterior
¹⁄₄"
(7,0 mm)
³⁄₈" (9,5 mm)
Frontal
Profundidad
³⁄₈" (10,0 mm)
¹⁄₂" (13,5 mm)
A
³⁄₈"
(10,0 mm)
¹⁄₂" (13,5 mm)
Superficie posterio
r
Superficie frontal
³⁄₈" (10,0 mm)
³⁄₈" (10,0 mm)
Superficie frontal

18
Requisitos eléctricos
Antes de mover el refrigerador para bebidas a su ubicación final,
es importante asegurarse de que tiene la conexión eléctrica
adecuada.
Método de conexión a tierra recomendado
Se requiere una fuente de energía eléctrica de 115 Voltios,
60 Hz., CA solamente y con fusibles de 15 o 20 amperios,
debidamente conectada a tierra. Se recomienda que use un
circuito separado sólo para su refrigerador para bebidas. Use
un tomacorriente que no se pueda apagar con un interruptor.
No use un cable eléctrico de extensión.
NOTA: Antes de realizar cualquier tipo de instalación, limpieza o
de quitar un foco de luz, desenchufe el refrigerador para bebidas
o desconecte la fuente de energía.
INSTRUCCIONES DE
INSTALACIÓN
Desempaque del refrigerador para
bebidas
Cómo quitar los materiales de empaque
■Quite los restos de cinta y goma de las superficies de su
refrigerador para bebidas antes de encenderlo. Frote un poco
de detergente líquido para vajillas sobre el adhesivo con los
dedos. Limpie con agua tibia y seque.
■No use instrumentos filosos, alcohol para fricciones, líquidos
inflamables o productos de limpieza abrasivos para eliminar
los restos de cinta o goma. Estos productos pueden dañar
la superficie de su refrigerador para bebidas. Para más
información, vea “Seguridad del refrigerador para bebidas”.
■Deshágase de todos los materiales de embalaje o recíclelos.
Limpieza antes del uso
Una vez que usted haya quitado todos los materiales de
empaque, limpie el interior del refrigerador para bebidas antes de
usarlo. Vea las instrucciones de limpieza en “Cuidado de su
refrigerador para bebidas”.
Cómo instalar el marco
recubierto a la medida
IMPORTANTE:
■Cree un marco recubierto a la medida de acuerdo con
las especificaciones en la sección “Marco recubierto a
la medida”.
■KitchenAid no es responsable de la remoción o adición
de molduras o paneles decorativos que pudieran impedir
el acceso al refrigerador para darle servicio.
ADVERTENCIA
Peligro de Choque Eléctrico
Conecte a un contacto de pared de conexión a tierra de
3 terminales.
No quite la terminal de conexión a tierra.
No use un adaptador.
No use un cable eléctrico de extensión.
No seguir estas instrucciones puede ocasionar
la muerte, incendio o choque eléctrico.
ADVERTENCIA
Peligro de Peso Excesivo
Use dos o más personas para mover e instalar
el refrigerador para bebidas.
No seguir esta instrucción puede ocasionar una
lesión en la espalda u otro tipo de lesiones.
Cuando mueva su refrigerador para bebidas:
Su refrigerador para bebidas es muy pesado. Cuando
mueva el electrodoméstico para limpiarlo y darle servicio,
cerciórese de cubrir el piso con cartón o madera para evitar
daños en el mismo. Al mover el electrodoméstico, siempre
tire directamente hacia afuera. No menee el
electrodoméstico de lado a lado ni lo haga “caminar”
cuando lo trate de mover ya que podría dañar el piso.
Información importante para saber acerca de los estantes
y tapas de vidrio:
No limpie los estantes y tapas de vidrio con agua caliente
mientras están fríos. Los estantes y tapas pueden romperse
si se exponen a cambios bruscos de temperatura o impacto,
como sería un golpe brusco. El vidrio templado se ha
diseñado para hacerse añicos. Esto es normal. Los estantes
y tapas de vidrio son muy pesados. Use ambas manos al
sacarlos para evitar que se caigan.

19
Cómo quitar la puerta
IMPORTANTE: No quite la grasa de la arandela, del espaciador
superior o de la espiga de la bisagra superior. Asegúrese de
apartar la bisagra superior, el espaciador superior y la arandela
para su uso posterior.
1. Quite con un destornillador Phillips los tres tornillos de la
bisagra superior. Saque la bisagra superior.
2. Quite la arandela. Guárdela en un lugar seguro para utilizarla
después.
3. Abra la puerta. Levante la parte frontal de la puerta, jalando
directamente hacia fuera para quitarla como se muestra.
Cómo fijar el marco recubierto
1. Jale suavemente la junta hacia atrás de las cuatro esquinas.
Jale lo suficiente hacia atrás de modo que los dos tornillos
queden visibles en cada esquina (ocho tornillos en total).
Quite los ocho tornillos.
2. Coloque el marco recubierto de modo que los orificios del
marco queden alineados con los orificios del revestimiento
de la puerta.
NOTA: Se recomienda el uso de abrazaderas en C para
mantener el marco recubierto y el revestimiento de la puerta
alineados, y minimizar el movimiento de las piezas.
3. Una vez que se alinearon los orificios, fije el marco a la
medida a la puerta con los tornillos provistos tal como se
muestra.
NOTA: Los tornillos para este paso se encuentran en una
pequeña bolsa de plástico dentro del refrigerador.
A. Tornillos (3)
B. Bisagra superior
C. Arandela
D. Espaciador superior
E. Puerta
C
D
E
A
B
A. Placa de la bisagra
B. Tornillos
C. Puerta
D. Junta
A. Marco a la medida
B. Junta
C.Marco de la puerta
A
B
C
D
A
B
C
Repeat on
thisside

20
Cómo instalar la puerta
IMPORTANTE: Para asegurar el funcionamiento adecuado, no
olvide engrasar la bisagra superior, el espaciador superior y la
arandela con vaselina.
1. Engrase con vaselina el orificio del espaciador inferior y la
espiga de la bisagra inferior. Alinee la arandela con el orificio
del espaciador inferior.
2. Instale la puerta insertando la espiga de la bisagra inferior
en el orificio del espaciador inferior. Asegúrese de que la
arandela se mantenga en su lugar. Lentamente baje la puerta
en forma derecha y pareja hasta la espiga de la bisagra
inferior.
3. Cierre la puerta. Asegúrese de que la puerta esté
correctamente alineada con el gabinete.
NOTA: Provea un soporte adicional para la puerta mientras
mueve las bisagras. No se confíe en que los imanes de las
puertas van a sostener la puerta en su lugar mientras trabaja.
4. Asegure la puerta al gabinete con cinta adhesiva protectora
antes de instalar el espaciador, como se muestra.
5. Ubique la arandela en el espaciador superior y alinee los
orificios. Engrase la espiga de la bisagra superior, el
espaciador superior y la arandela con vaselina. Inserte la
espiga de la bisagra superior en la arandela y el espaciador
superior.
6. Ajuste la bisagra superior al gabinete con un destornillador
Phillips y tres tornillos, como se muestra.
7. Quite la cinta adhesiva protectora de la puerta.
Cierre de la puerta
Cierre de la puerta
Su refrigerador para bebidas tiene cuatro patas niveladoras. Si el
mismo parece inestable o usted quiere que las puertas se cierren
con mayor facilidad, ajuste la inclinación del refrigerador para
bebidas siguiendo las instrucciones a continuación.
1. Conecte a un contacto de pared de conexión a tierra de
3terminales.
A. Espaciador superior
B. Cinta adhesiva protectora
A
B
A. Tornillos (3)
B. Bisagra superior
C. Arandela
D. Espaciador superior
E. Puerta
F. Marco recubierto
C
D
E
A
B
F
ADVERTENCIA
Peligro de Choque Eléctrico
Conecte a un contacto de pared de conexión a tierra de
3 terminales.
No quite la terminal de conexión a tierra.
No use un adaptador.
No use un cable eléctrico de extensión.
No seguir estas instrucciones puede ocasionar
la muerte, incendio o choque eléctrico.
Table of contents
Languages:
Other KitchenAid Beverage Dispenser manuals
Popular Beverage Dispenser manuals by other brands

Cornelius
Cornelius Agitator Motor Universal 750 installation instructions

NESTLE
NESTLE Vitality Express Extended Shutdown and Startup Procedure

Bunn
Bunn FMD-2 Illustrated parts catalog

rosseto
rosseto LD116 quick start guide

Star
Star 1-9NRL Installation and operation instructions

Bunn
Bunn BUNN-O-MATIC ULTRA-1 Specifications

Cornelius
Cornelius Cornelius VANTAGE POST-MIX DISPENSER Service maintenance manual

Curtis
Curtis CFB2 user guide

Electrolux
Electrolux BEVERAGE CENTER II Service manual

Sunfreeze
Sunfreeze SUPERFREEZY Operator's manual

Bunn
Bunn Ultra NX Maintenance & Troubleshooting guide

Bunn
Bunn ThermoFresh 44050.0250 Use & care instructions