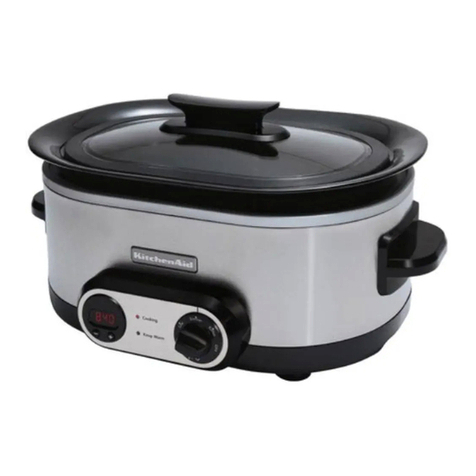
KitchenAid KSC700SS - 7-qt. Slow Cooker Quick guide

SLOW COOKER
INSTRUCTIONS AND RECIPES
COCOTTE MIJOTEUSE
INSTRUCTIONS ET RECETTES
OLLA LENTA
INSTRUCCIONES Y RECETAS
KSC700
U.S.A./É.-U./EE.UU.:
1-800-541-6390
Canada/Canadá:
1-800-807-6777
KitchenAid.com
KitchenAid.ca
400
WATT
VATIOS
7QT
6.6
6,6
L
FOR THE WAY IT’S MADE.
®
®
8212305A

Proof of Purchase and Product Registration
Always keep a copy of the sales receipt
showing the date of purchase of your
slow cooker. Proof of purchase will assure
you of in-warranty service.
Before you use your slow cooker, please
fill out and mail your product registration
card packed with the unit. This card will
enable us to contact you in the unlikely
event of a product safety notification and
assist us in complying with the provisions
of the Consumer Product Safety Act. This
card does not verify your warranty.
Please complete the following for your
personal records:
Model Number ______________________________________________________________
Serial Number _______________________________________________________________
Date Purchased ______________________________________________________________
Store Name and Location______________________________________________________
Preuve d’achat et enregistrement du produit
Veuillez conserver une copie du coupon de
caisse indiquant la date d’achat de votre
cocotte mijoteuse. La preuve d’achat vous
assure du service d’après-vente sous garantie.
Avant d’utiliser votre cocotte
mijoteuse, veuillez remplir et poster
la carte d’enregistrement du produit
accompagnant l’appareil. Grâce à cette
carte, nous pourrons vous appeler dans
l’éventualité improbable d’un avis de
sécurité et nous conformer plus facilement
aux dispositions de la loi sur la sécurité des
produits de consommation. Cette carte ne
confirme pas votre garantie.
Veuillez remplir ce qui suit pour vos
dossiers personnels :
Numéro de modèle __________________________________________________________
Numéro de série _____________________________________________________________
Date d’achat ________________________________________________________________
Nom du marchand et adresse __________________________________________________
Comprobante de compra y registro del producto
Siempre conserve una copia del recibo
de ventas que especifique la fecha de
compra de su olla lenta. El comprobante
de compra le asegurará el servicio técnico
bajo garantía.
Antes de utilizar la olla lenta, complete y
envíe por correo su tarjeta de registro del
producto que viene junto con la unidad.
Esta tarjeta nos permitirá contactarnos
con usted en el improbable caso de
una notificación de algún problema de
seguridad con el producto y nos ayudará a
cumplir con las cláusulas de la Consumer
Product Safety Act (Ley sobre la seguridad
de los productos para el consumidor). Esta
tarjeta no asegura su garantía.
Complete lo siguiente para su
registro personal:
Número del modelo __________________________________________________________
Número de serie _____________________________________________________________
Fecha de compra ____________________________________________________________
Nombre y dirección de la tienda ________________________________________________

ENGLISH
1
Table of Contents
INTRODUCTION
Proof of Purchase and Product Registration .......................................... Inside Front Cover
Slow Cooker Safety.........................................................................................................2
Electrical Requirements ...................................................................................................2
Important Safeguards .....................................................................................................3
FEATURES AND OPERATION
Slow Cooker Features......................................................................................................4
Preparing the Slow Cooker for Use .................................................................................6
Operating the Slow Cooker and Programmable Timer.....................................................6
Slow Cooker Setting Guidelines ......................................................................................8
Tips for Better Slow Cooking...........................................................................................9
CARE AND CLEANING
Care of Ceramic Pot and Cooker ...................................................................................10
Care and Cleaning ........................................................................................................11
Troubleshooting............................................................................................................12
RECIPES
Ancho Chile-rubbed Baby Back Riblets ..........................................................................14
Chocolate Chunk Bread Pudding...................................................................................15
Curried Green Chile Pork...............................................................................................15
Garlic Smashed Potatoes...............................................................................................16
Mocha Cocoa ...............................................................................................................16
Orange-glazed Cornish Hens.........................................................................................17
White Chili....................................................................................................................18
Sunday Pot Roast Dinner...............................................................................................19
Pulled BBQ Pork Sandwiches.........................................................................................20
Sausage and Egg Sourdough Strata..............................................................................21
Classic Beef Bourguignonne..........................................................................................22
Italian Meat Roll (Braciola) ............................................................................................23
Celebration Stuffing......................................................................................................24
Middle East Lentil and Vegetable Soup .........................................................................25
WARRANTY AND SERVICE INFORMATION
KitchenAid®Slow Cooker Warranty...............................................................................26
Hassle-Free Replacement Warranty – 50 United States and District of Columbia ...........27
Hassle-Free Replacement Warranty – Canada................................................................27
How To Arrange for Warranty Service in Puerto Rico.....................................................27
How To Arrange for Service after the Warranty Expires – All Locations..........................28
How To Arrange for Service Outside these Locations.....................................................28
How To Order Accessories and Replacement Parts.........................................................28

ENGLISH
2
Electrical Requirements
Volts: 120 V.A.C.
Hertz: 60 Hz
NOTE: This slow cooker has a 3-prong
grounded plug. To reduce the risk of
electrical shock, this plug will fit in an
outlet only one way. If the plug does
not fit in the outlet, contact a qualified
electrician. Do not modify the plug in
any way.
If a longer extension cord is used:
• The marked electrical rating of the
extension cord should be at least as
great as the electrical rating of the
appliance.
• The extension cord should be a
grounding-type 3-wire cord.
• The cord should be arranged so it
will not drape over the countertop or
tabletop where it can be pulled on by
children or tripped over.
Slow Cooker Safety
Your safety and the safety of others are very important.
We have provided many important safety messages in this manual and on your
appliance. Always read and obey all safety messages.
This is the safety alert symbol.
This symbol alerts you to potential hazards that can kill or hurt you
and others.
All safety messages will follow the safety alert symbol and either
the word “DANGER” or “WARNING.” These words mean:
You can be killed or seriously
injured if you don’t immediately
follow instructions.
You can be killed or seriously injured
if you don’t follow instructions.
All safety messages will tell you what the potential hazard is, tell you how to
reduce the chance of injury, and tell you what can happen if the instructions are
not followed.

ENGLISH
3
IMPORTANT SAFEGUARDS
When using electrical appliances, basic safety precautions should always be followed to
reduce the risk of fire, electric shock, and/or injury to persons including the following:
1. Read all instructions.
2. Do not touch hot surfaces. Use handles or knobs.
3. To avoid electrical shock do not immerse cord, plugs, or the slow cooker housing in
water or other liquid.
4. Close supervision is necessary when any appliance is used by or near children.
5. Unplug from outlet when not in use and before cleaning. Allow to cool before
putting on or taking off parts.
6. Do not operate any appliance with a damaged cord or plug or after the appliance
malfunctions or has been damaged in any manner. Return appliance to the nearest
Authorized Service Facility for examination, repair or adjustment.
7. The use of accessory attachments not recommended by KitchenAid may cause injuries.
8. Do not use outdoors.
9. Do not let cord hang over edge of table or counter, or touch hot surfaces.
10. Do not place on or near a hot gas or electric burner, or in a heated oven.
11. Extreme caution must be used when moving an appliance containing hot oil or
other hot liquids.
12. Do not use appliance for other than intended use.
13. This product is designed for household use only.
14. To disconnect, turn any control to “Off,“ then remove plug from wall outlet.
SAVE THESE INSTRUCTIONS

ENGLISH
4
Slow Cooker Features
MODEL KSC700
7-Qt (6.6 L)
Ceramic Pot with
Flared Rim Design
Programmable,
5-Setting Cook
and Serve Control
Large
Housing
Handles
Glass Lid with
Form-Fitting
Soft Seal
10-Hour
Cooking Time
Display Large, Nonslip
Rubber Feet
Large Lid Handle
This slow cooker was built and tested to
KitchenAid quality standards for optimum
performance and a long life.
Electronic Temperature
Management System
This system ensures consistent cooking
temperatures to help food stay moist and
avoid overcooking. With its electronic
temperature sensor, programmable
controls, and powerful 400-watt heating
element, the electronic temperature
management system offers an excellent
degree of responsiveness and accuracy at
all five of the cook or serve settings.
Powerful, 400-Watt Heating Element
The heating element provides 400 watts of
power for fast preheat times and optimal
cooking performance, enabling the slow
cooker to reach USDA recommended
temperatures quickly. Plus, it has reserve
power to help the slow cooker regain the
programmed cooking temperature after
a brief power outage, or when the lid is
removed during cooking.
Electronic Temperature Sensor
The electronic temperature sensor provides
precise temperature control.
Programmable, 5-Setting
Cook and Serve Control
Program up to 10 (9:59) hours of
adjustable cooking time on “Simmer,”
“Low,” “High” and “Auto.” User may
shut off the slow cooker at any time.
However if user is not available to shut
off the slow cooker, it will automatically
shift from the selected cook setting to
the “Keep Warm” mode and remain on
“Keep Warm” for 4 hours. The “Buffet”
setting will automatically shut off after
one hour of serving.

ENGLISH
5
Slow Cooker Features
10-Hour Cooking Time Display
Large display shows time remaining to
cook, counting down from 9:59
(9 hours, 59 minutes).
Food Temperature Alert
Electronic temperature sensor monitors
food temperature and display shows an
error code if food temperature falls below
recommended temperature range (for
example, after a power outage occurs).
7-qt (6.6 L) Ceramic Pot
with Flared Rim Design
Handsome, dishwasher-safe pot makes
an attractive serving dish at the dinner
table. Flared rim around entire pot helps
capture condensation when lid is removed,
and doubles as an easy-to-grab handle
for serving. Unique shape of pot is more
rectangular than oval to accommodate
roasts and poultry, offering more usable
space than oval pots. Unique “rounded
corner” design also aids with pouring any
remaining soups, stocks and stews.
NOTE: Pouring may be difficult if pot is full
or nearly full, so it is recommended that you
ladle the soup or stew out of the pot until
most of the contents are removed.
Glass Lid with Form-Fitting Soft Seal
Glass lid helps with viewing while food is
cooking. The removable, silicone soft seal
edging helps seal in moisture, reduces
chances of the lid chipping and quiets
lid placement. Both lid and seal are
dishwasher safe.
Large Lid Handle
The lid handle is large for easy lifting, plus
the material and design help reduce heat
transfer from the lid.
Capacity Markings
1- through 7-qt (0.9 to 6.6 L) markings on the
inside of the ceramic pot help when adding
liquids to the pot, and reduce guesswork
when choosing the appropriate-sized storage
container for leftover soups and stews.
Large, Nonslip Rubber Feet
Large rubber feet provide a stable base
during cooking and help avoid marring
and scratching – this is particularly helpful
when the slow cooker is used as a server
while set on the “Buffet” setting.
Large Housing Handles
The exterior housing handles are large, so
the 7-qt (6.6 L) slow cooker can be lifted
easily, even with oven mitts. The rugged,
reinforced housing eliminates bowing and
flexing when lifting the slow cooker by its
housing handles.
Wall Standoff Bumper
The standoff bumper on the back of the
slow cooker helps keep the metal housing
from being placed directly against a wall,
keeping surrounding areas cooler.
Integrated Cord Storage
The power cord, which includes a three-
prong grounded plug, stores neatly on the
bottom of the slow cooker housing.

6
ENGLISH
Preparing the Slow Cooker for Use
Before First Use
Before using your slow cooker for the
first time, wipe the metal housing and
cord with a clean, damp cloth. Wash the
ceramic pot and glass lid in hot soapy
water, then rinse and dry. The silicon lid
seal at the edge of the glass is removable
and should be washed individually. The
ceramic pot, glass lid and silicon lid seal
can also be washed in the dishwasher.
Slow Cooker Assembly
1. Place the ceramic pot in the metal
housing. Do not cook anything in
the metal housing. Avoid sudden
temperature changes such as adding
refrigerated foods into heated pot. The
ceramic pot must be placed in the metal
housing, and food placed in the ceramic
pot for cooking.
2. Plug into a grounded 3-prong outlet.
Slow cooker is now ready for operation.
Operating the Slow Cooker and
Programmable Timer
The KitchenAid®slow cooker provides an
unparalleled level of ver satility and control
through its programmable control panel,
which consists of a:
1. Programmable, 5-Setting Cook And
Serve Control,
2. “Cooking” and “Keep Warm” LED lights,
3. 10-Hour Cooking Time Display, and
4. “-” and “+“ Time-Adjustment buttons.
The “Cooking” and
“Keep Warm” LED lights.
These two indicator lights show when the
slow cooker is operating in any one of the
four “Cooking” modes or in the “Keep
Warm” mode.
The “Cooking” indicator light turns on
when the cook and serve control is set to
either “Simmer,” Low,” “High” or “Auto.”
This light is off when either the digital
timer counts down to 0:00, or when the
cook and serve control is set to “Buffet.”
The display and lights remain off until
the cook and serve control is turned from
“Off” to one of the four cook settings.
10-Hour Cooking Time Display
The 10-hour cooking time display defaults
and shows 9 hours and 59 minutes
of time remaining of cooking on the
“Simmer,” “Low,” and “Auto” temperature
settings, and 8 hours of time on the
“High” temperature setting. The display
immediately begins counting down from
the moment the unit is plugged in and the
temperature dial is set.
Once the timer display counts down to
“0:00,” the display will show “End.” If the
display shows an error code, then refer to
the “Troubleshooting“ section.

7
ENGLISH
Operating the Slow Cooker and
Programmable Timer
Programmable, 5-Setting Cook
and Serve Control
The dial turns the slow cooker on, and
allows the selection of one of four cook
settings (“Simmer,” “Low,” “High,” and
the stepped-temperature setting “Auto”)
plus one serve setting (“Buffet”). When
the dial is turned to one of the cook
settings, the cooking time display shows
the default time for the setting and begins
its countdown. When the dial is set to the
“Buffet” serve setting, “buF” is displayed.
The “Auto” setting is a preprogrammed
stepped setting, which starts cooking
on the “High” temperature for 2 hours
and reduces to the “Low” temperature
for a default time of 8 hours. The time
range for the “Low” temperature step is
programmable and may be adjusted by
pressing the “-“ or “+” buttons on the
control panel. After time on the “Low”
temperature step expires, the program
automatically switches the slow cooker to
the “Keep Warm” mode for 4 hours.
All settings, except for “Buffet,” will
automatically switch to the “Keep Warm”
mode after the programmed cook time
has expired.
Time Adjustment Buttons
To change the default time, press the “-“
or “+” buttons located just beneath the
three-digit display. These buttons can be
used at any point in the cooking cycle to
shorten or lengthen cook time.
Using the “Buffet” Setting
This setting is ideal for entertaining, or
other times when preheated foods need to
be kept warm for several hours.
Do not cook, defrost or preheat foods
on the “Buffet” setting. It is to be used for
keeping cooked, preheated foods warm
for serving.
1. Turn cook and serve control to the
“Buffet” setting, and the 3-digit display
will show “buF.” No LED indicator
lights will be on.
2. The slow cooker will operate at the
“Buffet” setting for up to 6 hours.
3. Once the 6-hour time limit is reached,
the display is turned off, and the unit
shuts off. Any remaining food should
be removed promptly and refrigerated
or frozen.
SETTING PROGRAM TEMPERATURE TIME
Buffet 165°F (74°C) 6 hours serve
Simmer 185°F (85°C) programmable up to 10 hours
165°F (74°C) 4 hours (keep warm)
Low 203°F (95°C) programmable up to 10 hours
165°F (74°C) 4 hours (keep warm)
High 212°F (100°C) programmable up to 10 hours
165°F (74°C) 4 hours (keep warm)
Auto 212°F (100°C) 2 hours
203°F (95°C) programmable up to 8 hours
165°F (74°C) 4 hours (keep warm)

8
ENGLISH
Operating the Slow Cooker and
Programmable Timer
Using the “Simmer,” “Low,” “High,”
and “Auto” settings
1. Turn the 5-setting cook and serve control
to either the “Simmer,” “Low,” “High,” or
“Auto” setting. The cooking time display
will show the default setting and begin its
countdown to 0:00.
2. Press the “-“ or “+” buttons to shorten
or lengthen cook time.
3. Once the timer display counts down
to “0:00,” the display will show “End,”
three 1-second beeps will signal the
end of cooking time, and the cooker
will automatically switch to “Keep
Warm” and continue on “Keep Warm”
for four hours.
4. Once the 4-hour time limit is reached,
all displays are turned off, and the unit
shuts off.
The multiple slow cooker settings, from “Auto”
to “Buffet,” allows the kind of cooking, or
serving, that lets you prepare a variety of foods
on different settings so you can adapt your
recipes to your changing schedule.
In general, use lower settings for longer cook
times. Try a higher setting when you start food
preparation later in the day and want to serve
the food that same evening. See KitchenAid®
slow cooker recipes for examples.
Slow Cooker Setting Guidelines
“Auto” – An excellent way to cook foods faster than using the “Low” or “Simmer”
settings, but allowing slower cooking than the “High” setting. Also, use it for foods
that require more than 10 hours of cooking time.
broth-based soup hot beverages dried beans/lentils
large pieces of squash thick pork chops beef rolls
beef roast pork roast beef/pork ribs
chicken/turkey pieces stewed chicken chicken or turkey casserole
wild rice casserole steamed/mashed potatoes
“High” – Try using this setting when a shorter cooking time is desired or for recipes
that are typically baked.
hot beverages “baked” egg-based puddings pudding/steamed cake
broth-based soup egg-based strata beef roast
pork roast chicken/turkey pieces stewed chicken
chicken or turkey casserole wild rice casserole cobbler/fruit dessert
dumplings steamed potatoes
“Low” – Appropriate for most recipes when there is time for long, slow cooking. It’s
an ideal setting for food started before going to work in the morning and served for
dinner in the evening.
beef chuck roast lamb shanks dressing/stuffing
split pea soup cheese- or cream-based soup rice pudding
stew beef roast pork roast
beef short ribs pork ribs chicken or turkey casserole
chicken/turkey pieces stewed chicken dried beans/lentils
wild rice casserole egg bake beef rolls
potato casserole chicken wings Cornish hens
pork chops soup with less tender cuts of meat

9
ENGLISH
Tips for Better Slow Cooking
Over the past few decades, as schedules
have become more hectic and lifestyles
more fast-paced, more and more people
have turned to slow cookers to help them
get a better handle on their time.
This KitchenAid®slow cooker offers
refinements in control and power controls
that help the cooker be a more useful tool,
and power to add responsiveness and
peace of mind.
Sure and Steady Cooking
A slow cooker is designed for you to put
food into it, walk away from it without a
worry, and return to a well-cooked meal. So
it’s important to let it do its job. That means
you should always cook with the ceramic
pot and glass lid in place, because removing
the lid reduces the temperature inside the
slow cooker and increases cooking time.
Except where a slow cooker recipe
specifically directs you to remove the lid, do
not remove or lift the lid until the minimum
suggested recipe-cooking time has elapsed.
If you want to view the food you’re cooking,
tap the glass lid to remove the condensation
that has collected, and look through the lid.
As for food temperature, at the end
of the cooking cycle, check the food
temperature with a thermometer to ensure
that the food has reached the target
temperature. Food cooked in a slow cooker
will usually have a higher temperature
compared to other methods of cooking.
This is because of the ratio between time
and temperature that is needed to assure
slow-cooked food is properly cooked.
Start With Food at the Right Temperature
Common sense is a good guide to
knowing the right temperature for food
when you start cooking in a slow cooker.
Foods typically stored in the refrigerator
should be added at their refrigerated
temperature. Frozen food, on the other
hand, should be thawed. And if you need
to sear meat or poultry, do that just before
adding it to the slow cooker – do not
partially cook meat or poultry and then
refrigerate before using.
Avoid adding liquids colder than normal
refrigerated temperatures. Adding near-
freezing liquids to a warm or hot pot may
damage the pot.
Slow Cooker Setting Guidelines
“Simmer”– Good for slow cooking soups and stews to develop full flavor.
stew soup lamb shanks
dried beans/lentils cheese-or cream-based soup dressing/stuffing
split pea soup beef roast pork roast
beef short ribs pork ribs pork chops
chicken/turkey pieces stewed chicken chicken wings
beef rolls rice pudding
broth-based soup with less tender cuts of meat

10
ENGLISH
Tips for Better Slow Cooking
A Slow Cooker is a Moist Environment
Slow cookers use a food’s own moisture
to cook the food. With the lid kept
on while cooking, very little moisture
evaporates and natural juices from the
food accumulates. For that reason, use less
liquid when using your favorite traditional
recipes for slow cooking.
Enhancing Texture and Flavor
The amount of seasonings, types of
ingredients, and when you add ingredients
can improve the texture and flavor of your
slow-cooked meals.
As a general rule for using your favorite
recipes in the slow cooker, increase the
amounts of herbs and seasonings to offset
the effect of longer cooking times.
Add garnishes, fresh herbs, and quick-
cooking vegetables toward the end of the
cooking cycle. For example, you can add
peas, corn and freshly sliced squash in the
last 10 to 20 minutes.
Also consider the differences between
related ingredients when cooking for
extended times. Dark meat poultry will
retain moisture better than white meat in
recipes cooked more than 7 to 9 hours.
Whole-grain rice, such as brown or wild
rice, retains its texture better than white
rice when it’s slow cooked. Over extended
periods, white rice can overcook and
become mushy.
Cut Food to Proper Size
The size you cut food into can affect its
taste and texture. To assure uniformity of
cooking, cut vegetables of similar density,
such as potatoes, carrots and parsnips
into similar-sized pieces. In general, dense
vegetables should be slightly smaller than
more tender vegetables.
Cutting meats into large pieces
allows longer cooking times and avoids
overcooking.
Serving Leftovers
Before placing in the slow cooker, leftovers
should be thoroughly heated to 165°F
(74°C), and sauces and soups should be
brought to a rolling boil, then kept warm
in slow cooker on buffet setting.
Reheating of leftovers in the slow cooker
is not recommended. A microwave oven
is ideal for this function. Do not use the
ceramic pot or glass lid in an oven, a
microwave, or on a cooktop, to reheat foods.
Here are a few simple tips to assure your
slow cooker gives you years of service.
• This is a large-capacity slow cooker and
it is recommended that you cook with at
least 1 qt (1 L) of food in the ceramic pot.
• Do not store the ceramic pot in the
refrigerator.
• If the ceramic pot has been inadvertently
left in the refrigerator, do not immediately
fill with hot or warm liquids. Wait until
the pot is at room temperature.
• If assembling a recipe in advance of
cooking, store ingredients in a covered,
separate container.
• After each use, always follow the “Care
and Cleaning“ instructions.
Care of Ceramic Pot and Cooker

11
ENGLISH
1. Check that the slow cooker is switched
off and unplugged before cleaning.
2. Allow the slow cooker to cool
completely before cleaning.
NOTE: Do not immerse the metal housing
in water.
NOTE: Do not use abrasive cleaners or
scouring pads.
3. Wipe the metal housing and cord with
a clean damp cloth.
4. Wash the ceramic pot, glass lid and
silicone lid seal in hot soapy water,
then rinse and dry. The ceramic pot,
glass lid and silicone lid seal can also
be washed in the dishwasher. To wash
the silicone lid seal in a dishwasher,
remove it from the glass lid.
NOTE: When cooking very thick mixtures,
such as polenta or many desserts, the
ceramic pot may be lightly coated with
no-stick cooking spray before cooking.
This coating will help make cleanup
easier after cooking.
To clean white residue from the
ceramic pot
Small amounts of calcium in wash water
may leave a white residue in the ceramic
pot after it has been washed. To clean the
residue, follow this procedure:
1. Pour a small amount of vinegar into
the pot and dilute it with an equal
amount of water.
2. Wipe the inside surfaces of the pot
with a soft pad. Be sure to wipe the
vinegar/water solution sufficiently over
all the affected areas.
3. Empty the pot, rinse with water, and
dry with a soft cloth or towel.
To eliminate residual odors on the
lid seal
1. Remove the seal from the lid.
2. In a bleach safe container, add 1 tbs
(15 mL) of regular strength liquid
bleach to 1 gal. (3.8 L) of warm tap
water.
3. Place the seal in the diluted solution
and soak for 3 hours.
4. Rinse thoroughly and wipe down the
seal with a dry cloth.
5. Allow the seal to completely air dry.
6. Fit the seal back onto the cleaned lid.
IMPORTANT: Wear rubber gloves when
cleaning. Refer to the bleach manufacturer's
instructions for proper use.
Fitting the removable Silicone Lid
Seal back onto the lid
After removing the silicone lid seal to
clean it, and allowing it to dry thoroughly,
here is a quick way to put it back on:
1. On a table or countertop, place the lid
upside down with the length of the lid
facing away from you.
2. Straighten out any twists or kinks in
the seal, and place the seal over the lid
to make sure the rounded corners of
the seal match up with the rounded
corners of the lid.
3. Start fitting the seal around the far
side of the lid and work toward the
other end.
Care and Cleaning

12
ENGLISH
4. Once the seal covers half the lid, flip
the lid over, so the end that had been
closest to you is now farthest away.
5. Now stretch the seal over the
remaining part of the lid.
6. If the seal appears uneven, you may
work the seal around the lid until the
seal is even.
Care and Cleaning
If your slow cooker should fail to
operate, check the following:
– See if the slow cooker is plugged into a
proper electrical outlet. If it is, unplug
the slow cooker.
– Plug in slow cooker.
– If the slow cooker still does not work,
check the household fuse or circuit
breaker on the electrical circuit the
slow cooker is connected to and make
sure the circuit is closed.
If the problem cannot be corrected:
– Or if the error codes have rendered the
slow cooker permanently inoperable,
see the KitchenAid Warranty and
Service sections. Do not return the
slow cooker to the retailer; retailers do
not provide service.
Troubleshooting

13
ENGLISH
Troubleshooting
Error Codes
Display will alternate
between “Err” and “1.”
• Food temperature alert.
• Control knob is not in
the “Off” position when
cooker is plugged in. To
correct, turn cooker to
“Off,” then turn knob
to desired setting.
Display will alternate
between “Err” and “2.”
• Temperature sensor
failure (unit is rendered
permanently inoperable,
contact KitchenAid).
Display will alternate
between “Err” and “3.”
• Stuck push-button /
button failure (unit is
rendered permanently
inoperable, contact
KitchenAid).
• If lights on the display are flashing: microprocessor failure (unit is rendered permanently
inoperable, contact KitchenAid). Dispose of food; it might not be thoroughly cooked.
• All Error Codes: Dispose of food; it might not be thoroughly cooked.

14
ENGLISH
Rub
4 tsp (20 mL) ground
cumin
4 tsp (20 mL) ancho
chile powder
2 tsp (10 mL)
garlic pepper
seasoning
1 tbs (15 mL)
brown sugar
1
1/2tsp (7 mL) salt
3
/4tsp (3 mL) ground
red pepper
1 tsp (5 mL) vegetable
oil
Ribs
33/4-4 lbs (1.8 kg) pork or
beef loin back ribs
(baby back ribs),
cut across bones by
butcher
3 cloves garlic, minced
1 medium onion, cut
into halves and thinly
sliced
Sauce
1/2cup (125 mL)
prepared chili sauce
1/3cup (75 mL) beef
broth or water
1/4cup (50 mL) dark
molasses
1/4cup (50 mL) cider
vinegar
1 tsp (5 mL) liquid
smoke flavor, if
desired
In small bowl, combine all ingredients used in the rub,
except oil. Stir in oil until well mixed. Rub evenly over
ribs. Place on broiler pan. Broil 4" to 6" (10 to 15 cm)
from heat, 3 to 5 minutes per side, or until browned but
not blackened. Cut into individual rib pieces.
Place ribs, garlic, and onion in slow cooker ceramic pot.
In small bowl, blend all sauce ingredients. Pour evenly
over ribs; stir to coat. Cover and cook at AUTO 31/2to
41/2hours, or until ribs are tender. Skim fat from sauce, if
desired, and serve with ribs.
Yield: 12 servings (4 riblets per serving).
Per Serving: About 300 cal., 15 g protein, 11 g carb,
21 g total fat, 8 g saturated fat, 70 mg cholesterol,
760 mg sodium.
Tip: Appetizer recipe may be doubled, if desired. For
4 main-dish servings, do not cut ribs across the bone.
Divide ribs into 4 portions instead of individual ribs.
Cover and cook at AUTO 41/2to 51/2hours.
Ancho Chile-rubbed Baby Back Riblets

ENGLISH
15
1 tbs (15 mL) butter,
softened
8 cups (1-in./2.5 cm
cubed) day-old
French bread (about
1/2loaf)
1 package (4 oz
113 g) German
sweet chocolate,
chopped
1/2cup (125 mL) golden
raisins
4 eggs
1 cup (250 mL) sugar
4 cups (1 qt/1 L) half-
and-half
2 tsp (10 mL) vanilla
Grease slow cooker ceramic pot with butter; add bread.
Sprinkle with chocolate and raisins. Toss lightly to mix.
In large bowl, beat eggs and sugar until well-mixed.
Stir in half-and-half and vanilla. Pour evenly over bread
mixture. Cover and cook at HIGH 2 to 21/2hours, or until
center is set. To check if center is set, insert a knife into
the center, if the knife pulls out clean then the center
is set. If desired, keep warm at BUFFET 1 to 2 hours.
Serve warm with vanilla ice cream, thawed sweetened
raspberries, or caramel sauce, if desired.
Yield: 10 servings.
Per Serving: About 400 cal., 9 g protein, 52 g carb, 18 g
total fat, 10 g saturated fat, 125 mg cholesterol, 270 mg
sodium.
Tip: To determine if pudding is set without removing lid,
tap lid to remove conden sation. Gently shake slow cooker
ceramic pot to determine if center jiggles or is firm.
Chocolate Chunk Bread Pudding
2
1/2 lbs (1.25 kg) lean
pork stew meat*
2 tbs (30 mL) curry
powder
1 tbs (15 mL) brown
sugar
1 tsp (5 mL) dried
thyme
3/4tsp (3 mL) ground
cumin
1
/2tsp (2 mL) salt
1
/4tsp (1 mL) ground
red pepper
3 cloves garlic, minced
1 tbs (15 mL) olive oil
1 large onion, coarsely
chopped
3-4 jalapeno peppers,
seeded and cut into
thin strips
1
/2cup (125 mL) chicken
broth
2 tbs (30 mL) all-
purpose flour
1 cup (250 mL)
coconut milk
Place pork in slow cooker ceramic pot. In small bowl,
combine curry powder, brown sugar, thyme, cumin, salt,
and red pepper. Stir in garlic and oil until well blended.
Add to pork; toss to coat evenly. Add onion, jalapeno
peppers, and chicken broth. Cover and cook at HIGH 31/2
to 41/2hours, or until pork is very tender.
In small bowl, blend flour into coconut milk. Stir into
pork mixture. Cover and cook at HIGH 10 to 20 minutes,
or until thickened. Serve with hot cooked rice or
couscous, if desired.
Yield: 6 servings (1 cup per serving).
Per Serving: About 370 cal., 31 g protein, 10 g carb,
23 g total fat, 12 g saturated fat, 100 mg cholesterol,
390 mg sodium.
Curried Green Chile Pork
*Four lbs (2 kg) pork shoulder blade roast, trimmed and
cut into 11/2" (3.75 cm) pieces, may be substituted for
stew meat.

16
ENGLISH
6 large (about 3 lb/
1.36 kg) yellow or
white thin-skinned
potatoes, cut into
quarters
8 medium (about
11/2lb/681 g) red
potatoes, cut into
quarters
1 cup (250 mL) chicken
or vegetable broth
1
/4cup (56 g) butter or
margarine, softened
1
/2tsp (2 mL) salt
1
/2tsp (2 mL) coarsely
ground black pepper
4 cloves garlic, minced
1 cup (250 mL) sour
cream
1
/3cup (75 mL) sliced
green onions
Combine potatoes, broth, butter, salt, pepper, and garlic
in slow cooker ceramic pot; mix well. Cover and cook at
AUTO 31/2to 41/2hours, or until potatoes are very soft.
With plastic potato masher or spoon, coarsely mash
potatoes. Stir in sour cream and green onions.
Yield: 16 servings (1/2cup [125 mL] per serving).
Per Serving: About 150 cal., 3 g protein, 23 g carb, 6 g
total fat, 3.5 g saturated fat, 20 mg cholesterol, 190 mg
sodium.
Garlic Smashed Potatoes
8 oz (227 g)
bittersweet chocolate,
chopped
2 cans (14 oz/396 g
each) sweetened
condensed milk
12 cups (3 qts/2.8 L)
whole milk
1/4cup (50 mL) instant
espresso granules
2 cinnamon sticks,
broken into 1"
(2.5 cm) pieces
Combine chocolate and sweetened condensed milk in
slow cooker ceramic pot. Cover and cook at HIGH 20 to
30 minutes, stirring every 10 minutes, or until chocolate
is melted. Stir in whole milk, espresso granules, and
cinnamon sticks. Cover and cook at LOW 4 to 6 hours,
or until hot. Keep warm at BUFFET. You may choose to
remove the cinnamon sticks when serving, or place stick
in cup and serve with the Mocha Cocoa.
Yield: 20 servings (3/4cup [175 mL] per serving).
Per Serving: About 280 cal., 9 g protein, 34 g carb, 13 g
total fat, 7 g saturated fat, 30 mg cholesterol, 115 mg
sodium.
Mocha Cocoa

17
ENGLISH
2 slices fresh orange
2 Cornish hens
(24 oz/681 g each),
completely thawed,
if frozen, and dried
12 pearl onions, peeled
4 small dark orange
sweet potatoes,
peeled and cut into
halves lengthwise
1
/2cup (125 mL) chicken
broth
1
/4cup (50 mL) white
wine or chicken
broth
2 tbs (30 mL) orange
juice
1 tsp (5 mL) grated
orange peel
2 tbs (30 mL) orange
marmalade
1 tbs (15 mL) butter,
softened
1 tbs (15 mL) soy sauce
2 tbs (30 mL) all-
purpose flour
1
/4cup (50 mL) water
Place orange slices in bottom of slow cooker ceramic
pot. Place hens on top of orange slices. Place onions and
sweet potatoes around hens. In small bowl, combine
broth, wine (if desired, or substitute broth for wine),
orange juice, and orange peel. Pour over hens and
vegetables. In small bowl, combine marmalade, butter,
and soy sauce. Spread over hens. Cover and cook at LOW
8 to 9 hours, or until hens are very tender.
With large slotted spoon, remove hens to cutting board.
Cut each hen into halves through breast and back. Place
hen halves on large platter; arrange onions and sweet
potatoes around hens. Cover with foil to keep warm.
Discard orange slices.
In small saucepan, combine flour and water. Mix in juices
from the slow cooker. Bring to a boil over medium-high
heat, stirring occasionally. Cook 1 minute. Serve with
hens and vegetables.
Yield: 4 servings.
Per Serving: About 630 cal., 39 g protein, 42 g carb,
32 g total fat, 10 g saturated fat, 220 mg cholesterol,
650 mg sodium.
Orange-glazed Cornish Hens

18
ENGLISH
1 package (1 lb/
454 g) dried navy
beans, rinsed and
sorted
6 cups (1.4 L) water
2 cans (101/2oz/
298 g each)
condensed chicken
broth
4 cups (1 qt/1 L) water
1 large onion, chopped
1 large carrot, finely
chopped
4 cloves garlic,
chopped
2-3 jalapeno peppers,
seeded and finely
chopped
2 tsp (10 mL) dried
oregano
1
1/2tsp (7 mL) ground
cumin
1
/4tsp (1 mL) ground
red pepper
1
1/4lbs (568 g) boneless
skinless chicken
thighs
2 cups (500 mL) frozen
shoepeg corn
1
/4cup (50 mL) fresh
lime juice
Combine beans and 6 cups (1.4 L) water in slow cooker
liner. Cover and soak overnight.
Drain and rinse beans. Return beans to slow cooker
ceramic pot. Add all remaining ingredients except corn
and lime juice. Cover and cook at LOW 8 to 10 hours, or
until beans are tender and chicken is thoroughly cooked.
Stir in corn and lime juice. Cover and cook at HIGH about
10 minutes. Stir well to break chicken into chunks.
Yield: 14 (1 cup [250 mL]) servings.
Per Serving: About 200 cal., 15 g protein, 26 g carb, 4 g
total fat, 1 g saturated fat, 30 mg cholesterol, 320 mg
sodium.
White Chili
This manual suits for next models
1
Table of contents
Languages:
Other KitchenAid Slow Cooker manuals

KitchenAid
KitchenAid KEWS105SSS User manual

KitchenAid
KitchenAid KSC700 Quick guide

KitchenAid
KitchenAid KSC6222SS User manual

KitchenAid
KitchenAid KSC700OB - Slow Cooker User manual

KitchenAid
KitchenAid KEWS145 User manual

KitchenAid
KitchenAid 9763141A User manual

KitchenAid
KitchenAid KSC62222 User manual

KitchenAid
KitchenAid KSC6223SS User manual

KitchenAid
KitchenAid KSC26223 User manual

KitchenAid
KitchenAid KEWS105 User manual