Klein Tools AEPJS2 User manual

AEPJS2
Wireless Speaker -
Instructions
Altavoz inalámbrico para el lugar de trabajo -
Instrucciones
Instructions
ESPAOL FRANAISENGLISH
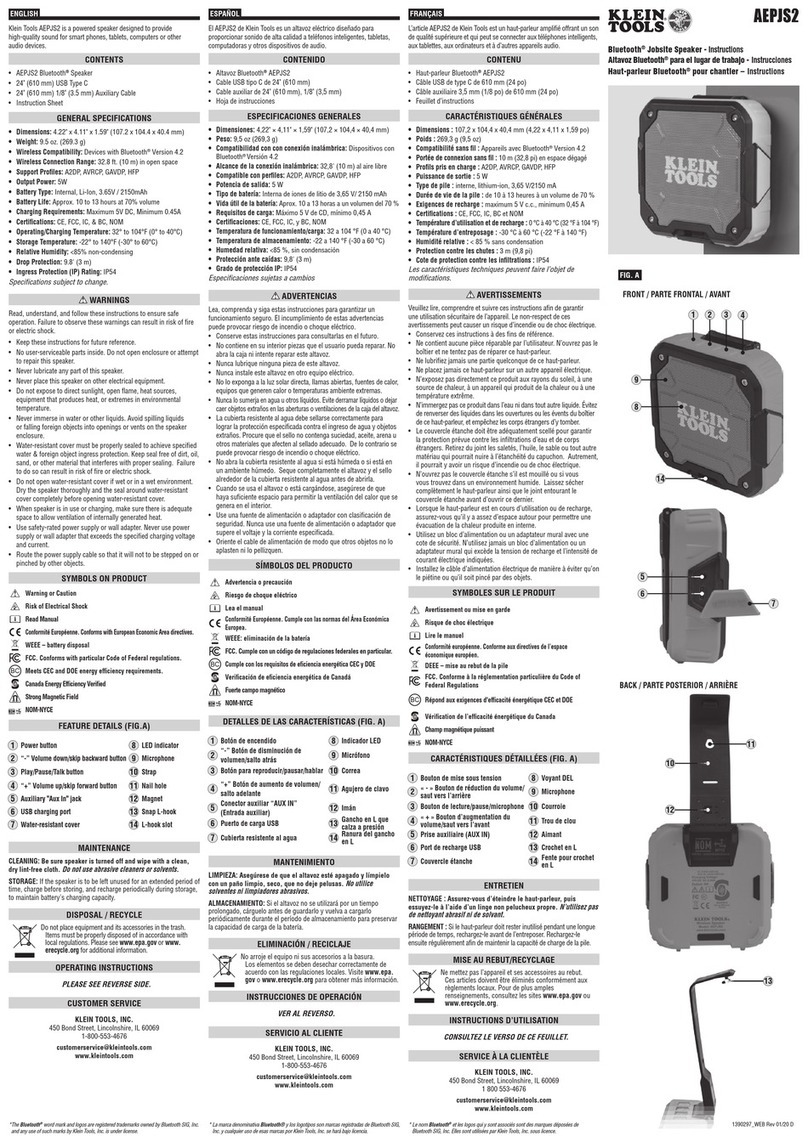
FIG. A
1390297 Rev 09/19 C
5
El AEPJS2 de Klein Tools es un altavoz eléctrico diseado para
proporcionar sonido de alta calidad a teléfonos inteligentes, tabletas,
computadoras y otros dispositivos de audio a través de una conexión
Bluetooth* o una entrada auxiliar con cable.
CONTENIDO
·Altavoz inalámbrico AEPJS2
·
·
·Hoja de instrucciones
ESPECIFICACIONES GENERALES
·Dimensiones:
·Peso:
·Compatibilidad con Bluetooth*:
Versión 4.2
·Alcance de la conexión Bluetooth*:
·
A2DP, AVRCP, GAVDP, HFP
·Potencia de salida:
·Tipo de batería:
·Vida útil de la batería:
·Requisitos de carga:
·
CE, FCC, IC, y BC, NOM
·Temperatura de funcionamiento/carga:
·Temperatura de almacenamiento:
·Humedad relativa:
·Protección ante caídas:
·Grado de protección IP:
IP54
Especificaciones sujetas a cambios
*Bluetooth es una marca registrada de Bluetooth Special Interest Group (SIG).
ADVERTENCIAS
Lea, comprenda y siga estas instrucciones para garantizar un
funcionamiento seguro. El incumplimiento de estas advertencias
puede provocar riesgo de incendio o choque eléctrico.
·Conserve estas instrucciones para consultarlas en el futuro.
·No contiene en su interior piezas que el usuario pueda reparar. No
abra la caja ni intente reparar este altavoz.
·Nunca lubrique ninguna pieza de este altavoz.
·Nunca instale este altavoz en otro equipo eléctrico.
·No lo exponga a la luz solar directa, llamas abiertas, fuentes de calor,
equipos que generen calor o temperaturas ambiente extremas.
·Nunca lo sumerja en agua u otros líquidos. Evite derramar líquidos
o dejar caer objetos extraos en las aberturas o ventilaciones de la
caja del altavoz.
·La cubierta resistente al agua debe sellarse correctamente para
lograr la protección especificada contra el ingreso de agua y objetos
extraos. Procure que el sello no contenga suciedad, aceite, arena u
otros materiales que afecten al sellado adecuado. De lo contrario se
puede provocar riesgo de incendio o choque eléctrico.
·No abra la cubierta resistente al agua si está húmeda o si está en
un ambiente húmedo. Seque completamente el altavoz y el sello
alrededor de la cubierta resistente al agua antes de abrirla.
·Cuando se usa el altavoz o está cargándose, asegúrese de que
haya suficiente espacio para permitir la ventilación del calor que se
genera en el interior.
·Use una fuente de alimentación o adaptador con clasificación de
seguridad. Nunca use una fuente de alimentación o adaptador que
supere el voltaje y la corriente especificada.
·Oriente el cable de alimentación de modo que otros objetos no lo
aplasten ni lo pellizquen.
SMBOLOS DEL PRODUCTO
Advertencia o precaución
Riesgo de choque eléctrico
Lea el manual
Conformité Européenne. Cumple con las normas del rea Económica
Europea.
WEEE: eliminación de la batería
FCC. Cumple con un código de regulaciones federales en particular.
BC
Cumple con las normas BCS de la Comisión de Energía de California.
Fuerte campo magnético
DETALLES DE LAS CARACTERSTICAS (FIG. A)
1
Botón de encendido
8
Indicador LED
2
“-” Botón de disminución de
volumen/salto atrás
9
Micrófono
3
Botón para reproducir/pausar/hablar
10
Correa
4
“+” Botón de aumento de volumen/
salto adelante
11
Agujero de clavo
5
Conector auxiliar “AUX IN”
(Entrada auxiliar)
12
Imán
6
Puerto de carga USB
13
Gancho en L que
calza a presión
7
Cubierta resistente al agua
14
Ranura del gancho
en L
MANTENIMIENTO
LIMPIEZA:
Asegúrese de que el altavoz esté apagado y límpielo
con un pao limpio, seco, que no deje pelusas.
No utilice
solventes ni limpiadores abrasivos.
ALMACENAMIENTO: Si el altavoz no se utilizará por un tiempo
prolongado, cárguelo antes de guardarlo y vuelva a cargarlo
periódicamente durante el período de almacenamiento para preservar
la capacidad de carga de la batería.
ELIMINACIN / RECICLAJE
No arroje el equipo ni sus accesorios a la basura.
acuerdo con las regulaciones locales. Visite www.epa.gov
o www.erecycle.org para obtener más información.
INSTRUCCIONES DE OPERACIN
VER AL REVERSO.
SERVICIO AL CLIENTE
KLEIN TOOLS, INC.
450 Bond Street, Lincolnshire, IL 60069
1-877-775-5346
www.kleintools.com
de qualité supérieure et qui peut se connecter aux téléphones intelligents,
aux tablettes, aux ordinateurs et à d’autres appareils audio par l’entremise
d’une connexion sans fil Bluetooth* ou d’une entrée auxiliaire filaire.
CONTENU
·Haut-parleur sans fil AEPJS2
·
·
·Feuillet d’instructions
CARACTRISTIQUES GNRALES
·
·
·
·
·
A2DP, AVRCP, GAVDP, HFP
·
·
·
·
·
CE, FCC, IC, BC et NOM
·
·
·
·
·
IP54
Les caractéristiques techniques peuvent faire l’objet de
modifications.
est une marque déposée de Bluetooth Special Interest Group (SIG).
AVERTISSEMENTS
Veuillez lire, comprendre et suivre ces instructions afin de garantir
une utilisation sécuritaire de l’appareil. Le non-respect de ces
avertissements peut causer un risque d’incendie ou de choc électrique.
·Conservez ces instructions à des fins de référence.
·Ne contient aucune pièce réparable par l’utilisateur. N’ouvrez pas le
botier et ne tentez pas de réparer ce haut-parleur.
·Ne lubrifiez jamais une partie quelconque de ce haut-parleur.
·Ne placez jamais ce haut-parleur sur un autre appareil électrique.
·N’exposez pas directement ce produit aux rayons du soleil, à une
source de chaleur, à un appareil qui produit de la chaleur ou à une
température extrême.
·N’immergez pas ce produit dans l’eau ni dans tout autre liquide. vitez
de renverser des liquides dans les ouvertures ou les évents du botier
de ce haut-parleur, et empêchez les corps étrangers d’y tomber.
·Le couvercle étanche doit être adéquatement scellé pour garantir
la protection prévue contre les infiltrations d’eau et de corps
étrangers. Retirez du joint les saletés, l’huile, le sable ou tout autre
matériau qui pourrait nuire à l’étanchéité du capuchon. Autrement,
il pourrait y avoir un risque d’incendie ou de choc électrique.
·N’ouvrez pas le couvercle étanche s’il est mouillé ou si vous
vous trouvez dans un environnement humide. Laissez sécher
complètement le haut-parleur ainsi que le joint entourant le
couvercle étanche avant d’ouvrir ce dernier.
·Lorsque le haut-parleur est en cours d’utilisation ou de recharge,
assurez-vous qu’il y a assez d’espace autour pour permettre une
évacuation de la chaleur produite en interne.
·Utilisez un bloc d’alimentation ou un adaptateur mural avec une
cote de sécurité. N’utilisez jamais un bloc d’alimentation ou un
adaptateur mural qui excède la tension de recharge et l’intensité de
courant électrique indiquées.
·Installez le cble d’alimentation électrique de manière à éviter qu’on
le piétine ou qu’il soit pincé par des objets.
SYMBOLES SUR LE PRODUIT
Avertissement ou mise en garde
Risque de choc électrique
Lire le manuel
Conformité européenne. Conforme aux directives de l’espace
économique européen.
FCC. Conforme à la réglementation particulière du Code of
Federal Regulations
BC
Conforme à la réglementation de la California Energy Commission
relativement aux systèmes de recharge de piles (BCS).
Champ magnétique puissant
1
Bouton de mise en marche
8
Voyant DEL
2
saut vers l’arrière
9
Microphone
3
Bouton de lecture/pause/microphone
10
Courroie
4
volume/saut vers l’avant
11
Trou de clou
5
Prise auxiliaire (AUX IN)
12
Aimant
6
Port de recharge USB
13
7
Couvercle étanche
14
Fente pour crochet
ENTRETIEN
Assurez-vous d’éteindre le haut-parleur, puis
essuyez-le à l’aide d’un linge non pelucheux propre.
N’utilisez pas
de nettoyant abrasif ni de solvant.
Si le haut-parleur doit rester inutilisé pendant une longue
période de temps, rechargez-le avant de l’entreposer. Rechargez-le
ensuite régulièrement afin de maintenir la capacité de charge de la pile.
MISE AU REBUT/RECYCLAGE
Ne mettez pas l’appareil et ses accessoires au rebut.
règlements locaux. Pour de plus amples renseignements,
consultez les sites www.epa.gov ou www.erecycle.org.
INSTRUCTIONS D’UTILISATION
CONSULTEZ LE VERSO DE CE FEUILLET.
SERVICE LA CLIENTLE
www.kleintools.com
FRONT / PARTE FRONTAL / AVANT
Klein Tools AEPJS2 is a powered speaker designed to provide high-
quality sound for smart phones, tablets, computers or other audio
devices equipped with a wireless Bluetooth* connection or wired
auxiliary input.
CONTENTS
·AEPJS2 Wireless Speaker
·24" (620 mm) USB Type C
·24" (610 mm) 1/8" (3.5 mm) Auxiliary Cable
·Instruction Sheet
GENERAL SPECIFICATIONS
·Dimensions:
4.22" x 4.11" x 1.59" (107.2 x 104.4 x 40.4 mm)
·Weight:
9.5 oz. (269.3 g)
·Bluetooth* Compatibility:
Version 4.2
·Bluetooth* Connection Range:
32.8 ft. (10 m) in open space
·
A2DP, AVRCP, GAVDP, HFP
·Output Power:
5W
·Battery Type:
Internal, Li-Ion, 3.65V / 2150mAh
·Battery Life:
Approx. 10 to 13 hours at 70% volume
·Charging Requirements:
Maximum 5V DC, Minimum 0.45A
·
CE, FCC, IC, & BC, NOM
·Operating/Charging Temperature:
32° to 104°F (0° to 40°C)
·Storage Temperature:
-22° to 140°F (-30° to 60°C)
·Relative Humidity:
<85% non-condensing
·Drop Protection:
9.8' (3 m)
·Ingress Protection (IP) Rating:
IP54
Specifications subject to change.
*Bluetooth is a registered trademark of Bluetooth Special Interest Group (SIG).
WARNINGS
Read, understand, and follow these instructions to ensure safe
operation. Failure to observe these warnings can result in risk of fire
or electric shock.
·Keep these instructions for future reference.
·No user-serviceable parts inside. Do not open enclosure or attempt
to repair this speaker.
·Never lubricate any part of this speaker.
·Never place this speaker on other electrical equipment.
·Do not expose to direct sunlight, open flame, heat sources,
equipment that produces heat, or extremes in environmental
temperature.
·Never immerse in water or other liquids. Avoid spilling liquids
or falling foreign objects into openings or vents on the speaker
enclosure.
·Water-resistant cover must be properly sealed to achieve specified
water & foreign object ingress protection. Keep seal free of dirt, oil,
sand, or other material that interferes with proper sealing. Failure
to do so can result in risk of fire or electric shock.
·Do not open water-resistant cover if wet or in a wet environment.
Dry the speaker thoroughly and the seal around water-resistant
cover completely before opening water-resistant cover.
·When speaker is in use or charging, make sure there is adequate
space to allow ventilation of internally generated heat.
·Use safety-rated power supply or wall adapter. Never use power
supply or wall adapter that exceeds the specified charging voltage
and current.
·Route the power supply cable so that it will not to be stepped on or
pinched by other objects.
SYMBOLS ON PRODUCT
Warning or Caution
Risk of Electrical Shock
Read Manual
Conformité Européenne. Conforms with European Economic Area directives.
WEEE – battery disposal
FCC. Conforms with particular Code of Federal regulations.
BC
Conforms with BCS regulations of California Energy Commission.
Strong Magnetic Field
FEATURE DETAILS (FIG.A)
1
Power button
8
LED indicator
2
"-" Volume down/skip backward button
9
Microphone
3
Play/Pause/Talk button
10
Strap
4
"+" Volume up/skip forward button
11
Nail hole
5
Auxiliary "Aux In" jack
12
Magnet
6
USB charging port
13
Snap L-hook
7
Water-resistant cover
14
L-hook slot
MAINTENANCE
CLEANING:
Be sure speaker is turned off and wipe with a clean,
dry lint-free cloth.
Do not use abrasive cleaners or solvents.
STORAGE: If the speaker is to be left unused for an extended period of
time, charge before storing, and recharge periodically during storage,
to maintain battery's charging capacity.
DISPOSAL / RECYCLE
Do not place equipment and its accessories in the trash.
Items must be properly disposed of in accordance with local
regulations. Please see www.epa.gov or www.erecycle.org
for additional information.
OPERATING INSTRUCTIONS
PLEASE SEE REVERSE SIDE.
CUSTOMER SERVICE
KLEIN TOOLS, INC.
450 Bond Street, Lincolnshire, IL 60069
1-877-775-5346
www.kleintools.com
67
BACK / PARTE POSTERIOR / ARRIRE
11
13
12
2
10
0
4
321
14
8
9
AEPJS2-1390297ART.indd 1 9/27/19 3:11 PM

ESPAÑOL FRANÇAISENGLISH
INSTRUCCIONES DE OPERACIÓN
CARGAR LA BATERÍA
Cargue el altavoz completamente antes de usarlo. La primera carga
Conecte el cable USB tipo C al puerto de carga USB
6
;
conecte el
otro extremo del cable a una computadora, a un adaptador de USB a
CA, o a otra fuente de alimentación USB (no incluida). El adaptador/
fuente de alimentación USB no debe superar el voltaje ni la corriente
Color del indicador LED Estado
Rojo fijo Batería cargándose (el LED se apaga cuando se
completa la carga)
Rojo intermitente Batería baja
Azul fijo Conexión Bluetooth activa
Azul intermitente lento Intento de conexión con el dispositivo Bluetooth
Azul intermitente rápido Intento de vinculación automática con el dispositivo
Bluetooth conectado
Verde fijo
Conexión de entrada de línea auxiliar (anula la
conexión Bluetooth)
LED apagado
La unidad está apagada, la batería está descargada o
se terminó de cargar
ENCENDIDO/APAGADO: Mantenga presionado el botón
1
NOTA:
Apague la unidad cuando no se usa para prolongar la vida
útil de la batería.
CONEXIÓN: Bluetooth se activa automáticamente y está listo para
conectarse cuando la unidad se enciende. Active Bluetooth en su
dispositivo Bluetooth y busque dispositivos que puedan conectarse.
Seleccione “AEPJS2” cuando aparezca (consulte el manual del usuario
de su dispositivo). Si es necesario, escriba “0000” como código de
acceso a la conexión. Sonará un tono cuando se logre la conexión.
NOTA: La unidad intenta conectarse automáticamente al último
dispositivo Bluetooth conectado, pero está lista para conectarse a
cualquier dispositivo Bluetooth si el último dispositivo conectado no
CANCELACIÓN DE LA CONEXIÓN: 1) Apague la unidad; -o- 2)
Presione dos veces el botón de encendido
1
(suena un tono); -o- 3)
Conecte un cable al conector auxiliar
5
; -o- 4) Apague el Bluetooth
en el dispositivo conectado
REINICIO DE BLUETOOTH O CONEXIÓN A DIFERENTES DISPOSITIVOS:
Presione dos veces el botón de encendido
1
(suena un tono). Repita
el procedimiento de conexión con varios dispositivos.
REPRODUCCIÓN DE AUDIO: Utilice su dispositivo o los botones de
control incorporados en el altavoz para controlar el altavoz.
• Presione el botón para reproducir/pausar/hablar
3
para
reproducir o pausar el audio en su dispositivo.
• Presione brevemente el botón “-”
2
o “+”
4
para ajustar
el volumen del altavoz. Sonará un tono cuando se alcance el
volumen máximo. El volumen también se puede controlar con su
dispositivo de audio.
• Mantenga presionado el botón “-”
2
o “+”
4
para saltar
adelante o atrás (respectivamente) durante una canción.
ENTRADA DE AUDIO AUXILIAR:
Conecte uno de los extremos del
cable auxiliar al conector auxiliar
5
del altavoz; conecte el otro
extremo del cable a la salida de línea o al conector de auriculares de
su dispositivo.
FUNCIONAMIENTO DEL ALTAVOZ:
• Al recibir una llamada, la música que se está escuchando se
silencia y suena un tono. Presione brevemente el botón para
reproducir/pausar/hablar
3
para responder la llamada, o
manténgalo presionado para rechazarla.
• Para finalizar la llamada, presione brevemente el botón para
reproducir/pausar/hablar
3
.
• Para volver a marcar la última llamada, mantenga presionado el
botón para reproducir/pausar/hablar
3
cuando el altavoz esté
reproduciendo música.
INDICACIÓN DE BATERÍA BAJA: Sonará un tono continuo dos
veces cuando el nivel de carga de la batería disminuya hasta
a cargar el altavoz lo antes posible.
INSTALACIÓN DEL ALTAVOZ:
• Asegúrese de que la parte delantera del altavoz no esté obstruida.
• Ubique el altavoz verticalmente sobre una superficie plana, nivelada
y estable.
• Adhiera el altavoz a una superficie metálica con el imán ubicado en la
parte posterior de la unidad
12
.
NO lo instale en equipos eléctricos.
• Cuélguelo de un clavo o elemento similar, abriendo la correa y
colocando el agujero de clavo por encima de la cabeza del mismo.
• Ajústelo a cualquier mochila, cinturón, tubo conduit de 1/2" o una
superficie redonda más pequeña, enlazando la correa alrededor y
calzando a presión el gancho en L en la ranura.
CONFORMIDAD
INSTRUCTIONS D’UTILISATION
RECHARGE DE LA PILE
Chargez complètement la pile du haut-parleur avant son utilisation.
6
,
puis
branchez l’autre extrémité du câble à un ordinateur, un adaptateur
Couleur du voyant DEL État
Rouge continu Recharge de la pile (le voyant s’éteint lorsque la pile
est chargée)
Rouge clignotant Pile faible
Bleu continu Connexion Bluetooth active
Bleu clignotant (lent) Tentative de jumelage d’un appareil Bluetooth en cours
Bleu clignotant (rapide) Tentative de liaison automatique à un appareil
Bluetooth déjà jumelé
Vert continu
Connexion auxiliaire avec fil (a priorité sur la
connexion Bluetooth)
Unité éteinte, pile déchargée ou recharge de pile
complété
Appuyez sur le bouton
1
de mise sous tension
signal sonore retentisse. L’appareil s’éteint automatiquement après
Éteignez l’appareil lorsque vous ne l’utilisez pas afin
de prolonger la durée de vie de la pile.
jumelage est possible dès que l’unité est mise sous tension. Sur
votre appareil Bluetooth, activez la fonction Bluetooth et recherchez
apparaît (se reporter au manuel d’utilisateur de l’appareil). Au besoin,
retentit lorsque le jumelage est réussi.
L’unité tente automatiquement de se connecter au
dernier appareil Bluetooth jumelé. S’il n’est pas détecté dans un délai
jumelée à n’importe quel appareil Bluetooth.
1) Éteignez l’unité; ou 2) Appuyez
deux fois sur le bouton d’alimentation
1
(tonalité); ou 3) Branchez
un câble dans la prise auxiliaire
5
; ou 4) Désactivez la fonction
Bluetooth de l’appareil jumelé.
RÉACTIVATION DE LA FONCTION BLUETOOTH OU JUMELAGE À DES
Appuyez deux fois sur le bouton d’alimentation
1
(tonalité). Répétez
la procédure de jumelage avec des appareils différents.
Utilisez votre appareil pour contrôler le haut-
parleur ou utilisez les boutons de commande intégrés.
• Appuyez sur le bouton de lecture/pause/microphone
3
pour faire jouer
le contenu audio sur votre appareil ou pour interrompre la lecture.
•
2
4
pour ajuster le
volume du haut-parleur. Un signal sonore retentit lorsque le
volume maximal est atteint. Le volume peut aussi être ajusté par
l’intermédiaire de votre appareil.
•
2
4
pour faire un saut vers l’arrière ou vers l’avant (respectivement)
pendant la lecture du contenu audio.
Branchez une
5
du haut-parleur,
puis branchez l’autre extrémité dans la prise de sortie ou d’écouteurs
de votre appareil.
• Lors d’un appel entrant, la lecture audio est mise en sourdine et
la sonnerie se fait entendre. Appuyez brièvement sur le bouton de
lecture/pause/microphone
3
pour répondre, ou plus longuement
pour ignorer l’appel.
• Pour raccrocher, appuyez brièvement sur le bouton de lecture/
pause/microphone
3
.
• Pour recomposer le dernier numéro, appuyez longuement sur le
bouton de lecture/pause/microphone
3
pendant la lecture audio.
Un double signal sonore continu retentit
Vous devez recharger le haut-parleur aussitôt que possible.
• Assurez-vous que le devant du haut-parleur n’est pas obstrué.
• Placez le haut-parleur debout sur une surface plane, à niveau et
stable.
• Fixez le haut-parleur à une surface métallique à l’aide de l’aimant
qui se trouve au dos de l’unité
12
.
NE placez PAS le haut-parleur
sur un appareil électrique.
• Suspendez-le à un clou ou à un élément similaire par la fente de la
courroie et placez le trou pour le clou par-dessus la tête du clou.
• Attachez-le à n’importe quels sac à dos, ceinture, conduite de
CONFORMITÉ
OPERATING INSTRUCTIONS
CHARGING BATTERY
Fully charge speaker before use. First-time charge should be at least
4 hours.
Connect the USB Type C cable connection to USB charging port
6
;
plug
the other end of cable to computer or USB AC adapter or other USB
power supply (not included). USB adapter/power supply should not
exceed the specified charging voltage and current (Max. 5V DC, min.
0.45A). Normal charging time is 4 to 6 hours.
LED Indicator Color Status
Solid Red Battery charging (LED off when fully charged)
Flashing Red Low battery
Solid Blue Active Bluetooth connection
Slow-Flashing Blue Attempting to pair with Bluetooth device
Quick-Flashing Blue Attempting to auto-link to paired Bluetooth device
Solid Green
Aux line-in connection (overrides Bluetooth connection)
No LED
Unit is off, battery is dead, or battery has finished charging
ON/OFF: Press & hold power button
1
for 3 seconds, a tone will
sound. Unit will automatically power off after 10 minutes of inactivity.
NOTE:
Turn unit off when not in use to prolong battery life.
PAIRING: Bluetooth activates automatically and is ready to pair when
unit is turned on. On your Bluetooth device, enable Bluetooth and
search/scan for devices that can be paired. Select “AEPJS2” when it
appears (refer to the user manual of your device). If necessary, enter
“0000” as pairing passcode. A tone sounds after a successful pairing.
NOTE: Unit automatically attempts to connect the last paired Bluetooth
device but is ready to pair with any Bluetooth device if the last paired
device is not detected within 5 seconds of powering on.
DISCONNECT PAIRING: 1) Turn unit off; -or- 2) Double-press Power
Button
1
(tone sounds); -or- 3) Plug a cable into Aux jack
5
; -or- 4)
turn off Bluetooth in paired device.
RESET BLUETOOTH OR PAIRING WITH DIFFERENT DEVICES:
Double-press Power Button
1
(tone sounds). Repeat Pairing
procedure with different devices.
PLAYING AUDIO: Use your device to control the speaker or use the
built-in control buttons on the speaker.
• Press Play/Pause/Talk button
3
to play or pause audio on your
device.
• Short-press the “-“
2
or “+”
4
button to adjust the speaker
volume. A tone will sound when maximum volume is reached.
Volume may also be controlled from your audio device.
• Long press the“-“
2
or “+”
4
button to skip backward or
forward (respectively) during a song.
AUXILIARY AUDIO-IN:
Connect one end of the auxiliary cable to the
AUX jack
5
of the speaker; plug the other end of cable to line-out or
headphone jack of your device.
SPEAKERPHONE OPERATION:
• When an incoming call occurs, playing music is muted & ring tone
sounds. Short-press Play/Pause/Talk
3
button to answer the call,
or long-press to ignore.
• To disconnect the call, short press the Play/Pause/Talk button
3
to hang up.
• To redial last call, long press Play/Pause/Talk button
3
when
speaker is playing music.
LOW BATTERY INDICATION: A continuous double-beep tone will
sound when battery level drops to approximately 10%. Speaker will
automatically power off when the battery level is below 3%. Recharge
speaker as soon as possible.
POSITIONING SPEAKER:
• Make sure that front of speaker is not obstructed.
• Stand speaker upright on a flat, level, stable surface.
• Attach speaker to a metal surface via the magnet on the back of the
unit
12
.
DO NOT mount to electrical equipment.
• Hang from a nail or like item by opening the strap and placing the
nail hole over the head of the nail.
• Strap to any backpack, belt, 1/2" conduit or smaller round surface
by looping the strap around and snapping the L-hook into the slot.
COMPLIANCE
FCC STATEMENT:
Changes or modifications not expressly approved by the party
responsible for compliance could void the user's authority to operate
the equipment.
for a Class B digital device, pursuant to Part 15 of the FCC Rules.
These limits are designed to provide reasonable protection against
harmful interference in a residential installation. This equipment
generates uses and can radiate radio frequency energy and, if not
installed and used in accordance with the instructions, may cause
harmful interference to radio communications. However, there is no
guarantee that interference will not occur in a particular installation. If
this equipment does cause harmful interference to radio or television
reception, which can be determined by turning the equipment off and
on, the user is encouraged to try to correct the interference by one or
more of the following measures:
• Reorient or relocate the receiving antenna
• Increase the separation between the equipment and receiver
• Connect the equipment into an outlet on a circuit different from
that to which the receiver is connected
• Consult the dealer or an experienced radio/TV technician for help
This device complies with part 15 of the FCC rules. Operation is
subject to the following two conditions (1) this device may not cause
harmful interference, and (2) this device must accept any interference
received, including interference that may cause undesired operation.
IC Statement
This device contains licence-exempt transmitter(s)/receiver(s)
that comply with Innovation, Science and Economic Development
Canada’s licence-exempt RSS(s). Operation is subject to the following
two conditions:
(1) This device may not cause interference; and
(2) This device must accept any interference, including interference
that may cause undesired operation of the device.
The term “IC:” before the certification/registration number only
signifies that the Industry Canada technical specifications were
met. This product meets the applicable Industry Canada technical
specifications.
AEPJS2-1390297ART.indd 2 9/27/19 3:11 PM
IC Statement
Cet appareil contient des émetteurs / récepteurs exemptés de licence
conformes aux RSS
(RSS) d'Innovation, Sciences et Développement économique Canada.
L'exploitation est autorisée aux deux conditions suivantes :
(1) l'appareil ne doit pas produire de brouillage,
et (2) l'utilisateur de l'appareil doit accepter tout brouillage
radioélectrique subi, même si le brouillage est susceptible d'en
compromettre le fonctionnement.
Other Klein Tools Speakers manuals

Klein Tools
Klein Tools AEPJS3 User manual

Klein Tools
Klein Tools AEPJS-1 User manual
Klein Tools
Klein Tools AEPJS3 User manual

Klein Tools
Klein Tools AEPJS3 User manual

Klein Tools
Klein Tools AEPJS-1 User manual

Klein Tools
Klein Tools AEPJS 2 User manual

Klein Tools
Klein Tools AEPJS1 User manual

Klein Tools
Klein Tools AEPJS-1 User manual

Klein Tools
Klein Tools AEPJS1 User manual

Klein Tools
Klein Tools AEPJS2 User manual


