Klip Xtreme BoomFire X KLS-652 User manual

KLS-652
BoomFire X

Congratulations on the purchase of your new Klip Xtreme®KLS-652 loudspeaker system with
wireless technology. To get the most of your loudspeaker system, please take a few minutes to
read the following instructions and familiarize yourself with the operation of the unit. We invite
you to visit us at www.klipxtreme.com for support and to find out more about this audio
system and other new and exciting products.
• 1,500 watts of maximum power output
• One 8-inch subwoofer and a 1.5-inch tweeter deliver powerful audio with deep bass
• Dynamic flame LED lights create brilliant and captivating music experiences every time
• Portable with rechargeable built-in battery offers up to 7 hours of music playback with the lights
on and up to 13 hours when the lights are off 2
• TWS (True Wireless Stereo) capability designed to connect and stream audio through two
identical units simultaneously4
• Includes a premium wired microphone for daring solos, or enjoy duet performances thanks
to its two inputs on the on the console
• Works with your favorite Bluetooth®V5.0-enabled devices
• Comes with bass and treble control knobs to adjust sound manually
• Aux 3.5mm input and integrated USB and microSD™ memory slots for added versatility
• Slot for placing tablets or smartphone
• Easy to read LED display
• Built-in FM
Before setting up the device, make sure that the following items are included the box.
• Loudspeaker system
• Premium wired microphone (1)
• DC 5V to USB charging cable (1)
• User’s manual (1)
Unpack your unit carefully. We recommend that you save the box and all original packing
materials, in case you wish to store the unit, or if you ever need to return it for service.
English
III. Product overview
Top panel
I. Introduction
Highlights
II. Package content
1 2 3 4 5
18 16 14 13 12 11
15
17
7
6
8
10
9
21
20
19
22

1. Mode Button/ LED
2. Mic Priority
3. Volume knob
4. Bass enhancement
5. On/Standby
6. Mute
7. Bluetooth shortcut key
8. TWS
9. Power on/off switch
10. Bass
11. USB port
12. TF Playing
13. Auxiliary jack line
14. Treble
15. Mic 2
16. Mic 1
17. LED Indicator
18. DC power jack
19. Mic volume
20. Next song
21. Previous song
22. Play and pause / FM radio scan
1. Carrying handle
2. Command console
5. LED lights
6. Metal grid
3. LED display
4. Subwoofer/ tweeter speakers
Press it to toggle through all audio source options/press and hold to change LED effect
It enhances the microphone sound for a better singing experience
It regulates the general volume for audio sources.
Press this button to get a more robust bass sound
Toggle between standby and active.
Toggle mute on and off.
Press this button to go directly to Bluetooth mode.
Press it to activate the True Wireless Stereo technology.
Use this switch to turn on and off the unit.
Use this knob to regulate the bass sound level.
Enables audio playback from compatible music files stored in a USB memory stick
Insert a microSD™ memory card to playback music files.
Connect a CD player, digital media player or other audio source to this stereo line-in connector
Use this knob to regulate the high sound level.
These stereo 1/4-inch jacks accept the input from a wired microphone
It turns red while charging, and off when fully charged.
Plug the supplied charging cable into this port
It regulates the volume for microphones.
Press this button briefly to play the next track.
Press this button briefly to play the previous track.
Press this button quickly to play or pause your music, or for three seconds to scan FM radio stations
Front and side panels
6
5
3
1
4
2
Button Function

IV. Initial setup
V. Operating modes
VI. Advanced operation
Pairing the speaker with wireless devices
1.Plug the DC jack charging cable into the speaker, and the other end to an adapter or Type A USB connector.
2. The LED charging indicator (on the top panel) will turn red while charging, and will turn off when fully charged
3. When the unit is not in use or switched off, it will automatically recharge the internal battery as long as it
remains connected to utility power.
Note: For your safety, read this manual and follow all safety instructions before using the product.
1. Auxiliary playback
Charging the battery
1. Turn the power on/off switch on the top panel.
2. Connect audio input devices first. Make sure all input sources, such as microphones or digital media
players, are turned off and volume is set to zero.
3. Slowly turn the volume clockwise until the sound output is at the desired level.
Powering on the unit
1. Plug the microphone and switch it on. The speaker will detect the device automatically.
2. When not in use, switch the microphone off.
Using the wired microphone
a)Use the supplied audio cable to connect the speaker to external audio devices through the Auxiliary
input on the top panel.
b) If the speaker is not set to Line, press the MODE button until the corresponding input mode
is found.
c) When the Line indicator is displayed on the screen, you can start streaming audio directly from
compatible multimedia sources.
d) Please note that the forward and backward song selection is not available in this mode.
2. USB/microSDTM playback
a) Insert an SDTM card or USB memory stick into the corresponding slot.
b) The device will automatically play any file in audio format stored on the memory.
3. FM radio mode
1.Press the MODE button briefly to toggle through the available audio sources and select FM.
2. Press and hold the PLAY/PAUSE button to start scanning for radio stations automatically, in the frequency
range between 87.5 and 108.0MHz.
3. Once the search is complete, the unit will save active stations automatically.
4. Use the and buttons to select stored channels.
Note: An optimal radio signal will depend on device location and the proximity of radio stations.
Note: Before installing this product, please make sure your device is compatible with Bluetooth®.
1. Enable the Bluetooth®feature on the selected source and set it to discover the wireless speaker.
2. Place your wireless device and the speaker no more than one meter away from each other.
3. Next, cycle to the Bluetooth®feature on the speaker by pressing the MODE button found on the media
panel and select it as the input source. The bt indicator blinks fast on the display to indicate that the speaker
has entered into the pairing mode.
4. Once the speaker appears listed (KLS-652) under the newly found Bluetooth®devices of your wireless
device, it will ask if you want to pair with it.
5. Accept by pressing Yes or Ok. If you have a lower Bluetooth®version, you may be prompted to enter the
passkey 0000 (4 zeros).
6. When pairing is successful, the indicator stops blinking indicating that the wireless connection has been
established. If after 60 seconds the pairing process fails, please repeat steps 1 through 5 described above.
7. You can now start streaming audio through the speaker wirelessly from your favorite Bluetooth®
enabled devices.
8. The speaker will re-pair automatically to the memorized device when the BT mode is selected on the unit
after being turned off and on again.
TWS connection
TWS connection allows two speakers to be linked at the same time, to amplify the sound.
1. Place the two speakers near each other, no more than 1 meter between them.
2. Turn ON both units and they will enter directly into “Bluetooth mode”.
3. On one of the units (this becomes the master unit), press and hold the TWS button now paired.
4. Enable the Bluetooth mode on your device and search for the KLS-652 speaker to connect (pair) to it.
5. Perform the audio test (from the smartphone music library or YouTube) and ensure audio is playing on both
speakers at the same time.
6. To unpair TWS mode, press and hold the TWS button until a tone is generated by both units. Units are now
unpaired from TWS mode.

VII. Troubleshooting Technical specifications
Issue Possible cause Solution
The display fails to turn on The speaker is not connected properly
Power switch is not on
Check the connection and plug in the AC adapter
Turn on the power switch
No sound Volume adjusted at the lowest level
Wrong input mode selected
Incorrect speaker connection.
Adjust the volume to a comfortable listening level
Choose the playback mode based on the
external source being used
Check all connections and try again
Distorted sound Master volume is too high
The speaker is damaged
Decrease the master volume.
Check or replace the speaker
Device
Speaker
Microphone
Connectivity
Battery
Portable party speaker
1500W
100W
5V 1A
Mode /Volume/ Bass enhance/On/Standby, mute /Bluetooth shortcut button/ TWS/ Power on
switch/ Bass/Play-Pause/Previous/Forward/Mic Priority/Mic Volume
8-inch subwoofer + one 1.5 in tweeter
100W
80Hz-15kHz
4.0 ohms
83dB ±3dB
75dB
1kHz, 0dB (±10%)
Wired (cable included)
Single point
100-12kHz
600 Ω±20%
-55.3±3dB
Wireless
Bluetooth®V5.0
Included
Included
microSDTM up to 32GB
Included
2.4GHz-2.480GHz
Up to 33ft
10m1
Aux. 3.5mm stereo
Two ¼in (6.5mm) mic
Type
Maximum Power Output (PMPO)
Maximum power output (Rated RMS)
Maximun DC input (current/voltage)
Buttons
Driver unit
Reference RMS power
Frequency
Impedance
Sensitivity
Signal to noise ratio
THD
Connectivity
Directivity
Frequency
Impedance
Sensitivity
Connection type
Bluetooth version
TWS function
Memory card slot
Memory card max capacity
USB slot
Wireless RF frequency
Wireless range
Audio input
Additional inputs
Battery
Highlighted features
Lithium battery, 4000mAh
6 hours
Up to 7 hrs with LEDs on / 13 hrs with LEDs off2
Up to 4 hrs with LEDs on /6 hrs LED off2
15 days
DC 5V/1A (Adapter not included)
Battery type
Battery charging time
Battery run time at 50% volume
Battery run time at 100% volume
Battery standby time
Battery charging method
Dynamic multicolor flame LED lighting
Included
Premium wired microphone included
Features jacks for two wired mics3
LED display
FM tuner
Integrated
Lighting effect
True Wireless Stereo (TWS)
Microphone
Wired mic inputs
Display
Tuner
Handles

FCC statement
This equipment has been tested and found to comply with the limits for a Class B digital device, pursuant to
part 15 of the FCC rules. These limits are designed to provide reasonable protection against harmful
interference in a residential installation. This equipment generates, uses and can radiate radio frequency energy
and, if not installed and used in accordance with the instructions, may cause harmful interference to radio
communications.
However, there is no guarantee that interference will not occur in a particular installation. If this equipment
does cause harmful interference to radio or television reception, which can be determined by turning the
equipment off and on, the user is encouraged to try to correct the interference by one or more of the
following measures:
• Reorient or relocate the receiving antenna.
• Increase the separation between the equipment and receiver.
• Connect the equipment into an outlet on a circuit different from that to which the receiver is connected.
• Consult the dealer or an experienced radio/TV technician for help.
Precautions
• Do NOT use this unit for anything other than its intended use.
• Do NOT expose the speaker to excessive heat or to direct sunlight for long periods of time.
• Do NOT expose the speaker to rain or water and avoid environments with high humidity or dust.
• Do NOT disassemble, repair or modify the speaker yourself. There are no user serviceable parts inside the
unit. Only qualified personnel should be allowed to perform repairs without voiding the warranty.
• Do NOT use cleaning products that contain benzene, solvents or alcohol.
• Do NOT use near a microwave oven or wireless LAN products.
• Do NOT place containers with liquid on top or near the speaker.
• Do NOT place objects which are sources of heat on the speaker cabinet such as lighting equipment
or smoke machines.
• Do NOT stack the speaker cabinet in a manner that could cause injury should a cabinet become dislodged.
1. Range estimate is based on an area free and clear of obstacles and interference, and within the line of sight between devices.
2. It depends on the volume level and type of music file being played.
3. Second wired microphone not included.
4. Additional speaker sold separately.
Additional information
15.5 x 10.5 x 10.2 in
6.6 lb
4.9 ft
One year
Product dimensions
Product weight
Cable length
Warranty

Español
1 2 3 4 5
18 16 14 13 12 11
15
17
7
6
8
10
9
21
20
19
22
Felicitaciones por la compra de su nuevo sistema de parlantes Klip Xtreme®KLS-652 con
tecnología inalámbrica. Para aprovechar al máximo su sistema de parlantes, tómese unos minutos
para leer las siguientes instrucciones y familiarizarse con el funcionamiento de la unidad. Lo
invitamos a visitarnos en www.klipxtreme.com para recibir asistencia y obtener más información
sobre este sistema de audio y otros productos nuevos y emocionantes.
• 1.500 vatios de potencia máxima
• Un subwoofer de 8 pulgadas y un parlante de agudos de 1,5 pulgadas que brindan un audio
potente con graves profundos
• Las luces LED flameantes y dinámicas crean experiencias musicales fantásticas en todo momento
• Portátil, con batería incorporada recargable que ofrece hasta 7 horas de música con las luces
encendidas y hasta 13 horas cuando las luces están apagadas2
• Tecnología TWS (True Wireless Stereo) diseñada para conectar y transmitir audio a través de
dos unidades idénticas simultáneamente4
• Incluye un micrófono con cable premium para cantar solo o a dúo gracias a sus dos entradas
en la consola
• Funciona con sus dispositivos favoritos habilitados para Bluetooth®V5.0
• Viene con perillas de control de graves y agudos para ajustar el sonido manualmente
• Entrada auxiliar de 3,5 mm y de memoria USB y microSD™ integradas para mayor versatilidad
• Graves y agudos ajustables para adaptarse a sus preferencias de sonido
• Espacio para colocar tabletas o teléfonos inteligentes
• Pantalla LED fácil de leer
• Radio FM
Antes de configurar el dispositivo, asegúrese de que los siguientes elementos estén incluidos
en la caja:
• Unidad de parlantes
• Micrófono con cable de primera calidad (1)
• Cable de carga DC 5V a USB (1)
• Guía del usuario (1)
Desembale la unidad cuidadosamente. Le recomendamos guardar la caja y todos los materiales de
embalaje originales, en caso de que desee almacenar la unidad o si alguna vez necesita devolverla
para reparaciones.
III. Descripción del producto
Panel superior
I. Introducción
Principales características
II. Contenido del empaque

Paneles frontal y lateral
1. Asa de transporte
2. Consola de mando
5. Luces LED
6. Rejilla metálica
3. Pantalla LED
4. Subwoofer/parlante de agudos
6
5
3
1
4
2
Botón Función
1.Botón de modo/ LED
2. Micrófono como prioridad
3. Perilla de volumen
4. Refuerzo de graves
5. Encendido/Pausa
6. Silencio
7. Tecla de acceso directo a modo Bluetooth
8. TWS
9. Interruptor de encendido
10. Graves
11. Puerto USB
12. Entrada de microSD™
13. Línea auxiliar
14. Agudos
15. Micrófono 2
16. Micrófono 1
17. Indicador LED
18. Entrada de alimentación de CC
19. Volumen del micrófono
20. Siguiente canción
21. Canción anterior
22. Reproducir y pausar
/ scanner de radio FM
Púlselo para alternar entre todas las fuentes de audio disponibles/Mantener presionado para cambiar el efecto del LED
Optimiza el sonido del micrófono para una mejor experiencia de canto.
Regula el volumen general de las fuentes de audio.
Pulse este botón para obtener un sonido de graves más robusto.
Enciende la unidad de altavoz.
Activa y desactiva el silencio.
Presione este botón para ir directamente al modo Bluetooth.
Presiónelo para activar la tecnología True Wireless Stereo.
Utilice este interruptor para encender y apagar la unidad.
Use esta perilla para regular el nivel de sonidos graves.
Permite la reproducción de audio desde archivos de música compatibles almacenados en una memoria USB
Inserte una tarjeta de memoria microSD™ para reproducir archivos de música.
Conecte un reproductor de CD, reproductor multimedia digital u otra fuente de audio a esta entrada de línea
estéreo
Use esta perilla para regular el nivel de sonidos agudos.
Estos conectores estéreo de 1/4 de pulgada aceptan la entrada de un micrófono con cable
Se vuelve rojo durante la carga y se apaga cuando está completamente cargado.
Inserte en este puerto el cable de carga incluido en el empaque.
Regula el volumen de los micrófonos.
Presione este botón brevemente para reproducir la siguiente pista.
Presione este botón brevemente para reproducir la pista anterior.
Presione este botón rápidamente para reproducir o pausar su música, o durante tres segundos
para buscar estaciones de radio FM

IV. Configuración inicial
V. Modos de funcionamiento
VI. Operación avanzada
Emparejamiento del parlante con dispositivos inalámbricos
1. Enchufe el cable de carga de CC en el altavoz y el otro extremo en un adaptador o conector USB tipo
2. El indicador LED (en el panel superior) se pondrá rojo mientras se carga y se apagará cuando el
parlante esté completamente cargado.
3. Cuando la unidad no esté en uso o esté apagada, la batería interna recargará automáticamente
mientras permanezca conectada a la corriente.
Nota: Para su seguridad, lea este manual y siga todas las instrucciones de seguridad antes de utilizar el producto.
1. Reproducción auxiliar
Cargar la batería
1. Gire la perilla de volumen principal en la parte superior en sentido horario.
2. Conecte primero los dispositivos de entrada de audio. Asegúrese de que todas las fuentes de entrada,
como micrófonos o reproductores, estén apagadas y que el volumen esté en cero.
3. Gire lentamente el volumen en sentido horario hasta que la salida de sonido esté en el nivel deseado.
Encender la unidad
1. Enchufe el micrófono y enciéndalo. El parlante detectará el dispositivo automáticamente.
2. Cuando no esté en uso, apague el micrófono.
Uso del micrófono con cable
a) Conecte el cable de audio incluido en el empaque a la entrada auxiliar (en el panel superior) para
conectar dispositivos de audio externos.
b) Si el parlante no está configurado en Line, presione el botón MODE hasta encontrar el modo de
entrada correspondiente.
c) Cuando se muestre el indicador Line en la pantalla, puede comenzar a transmitir audio directamente
desde fuentes compatibles.
d) Tenga en cuenta que las opciones canción previa y siguiente canción no están disponibles en
este modo.
2. Reproducción USB/SDTM
a. Inserte una tarjeta SDTM o una memoria USB en la entrada correspondiente.
b. El dispositivo reproducirá automáticamente cualquier archivo en formato de audio almacenado
en la memoria.
3. Modo radio FM
1. Presione el botón MODE brevemente para alternar entre las fuentes de audio disponibles y seleccione FM.
2. Mantenga presionado el botón PLAY/PAUSE para comenzar a buscar estaciones de radio automáticamen-
te, en el rango de frecuencia entre 87.5 y 108.0MHz.
3. Una vez terminada la búsqueda, la unidad guardará las estaciones activas automáticamente.
4. Utilice y para seleccionar los canales almacenados.
Nota: Una señal de radio óptima dependerá de la ubicación del dispositivo y la proximidad de las estaciones
de radio.
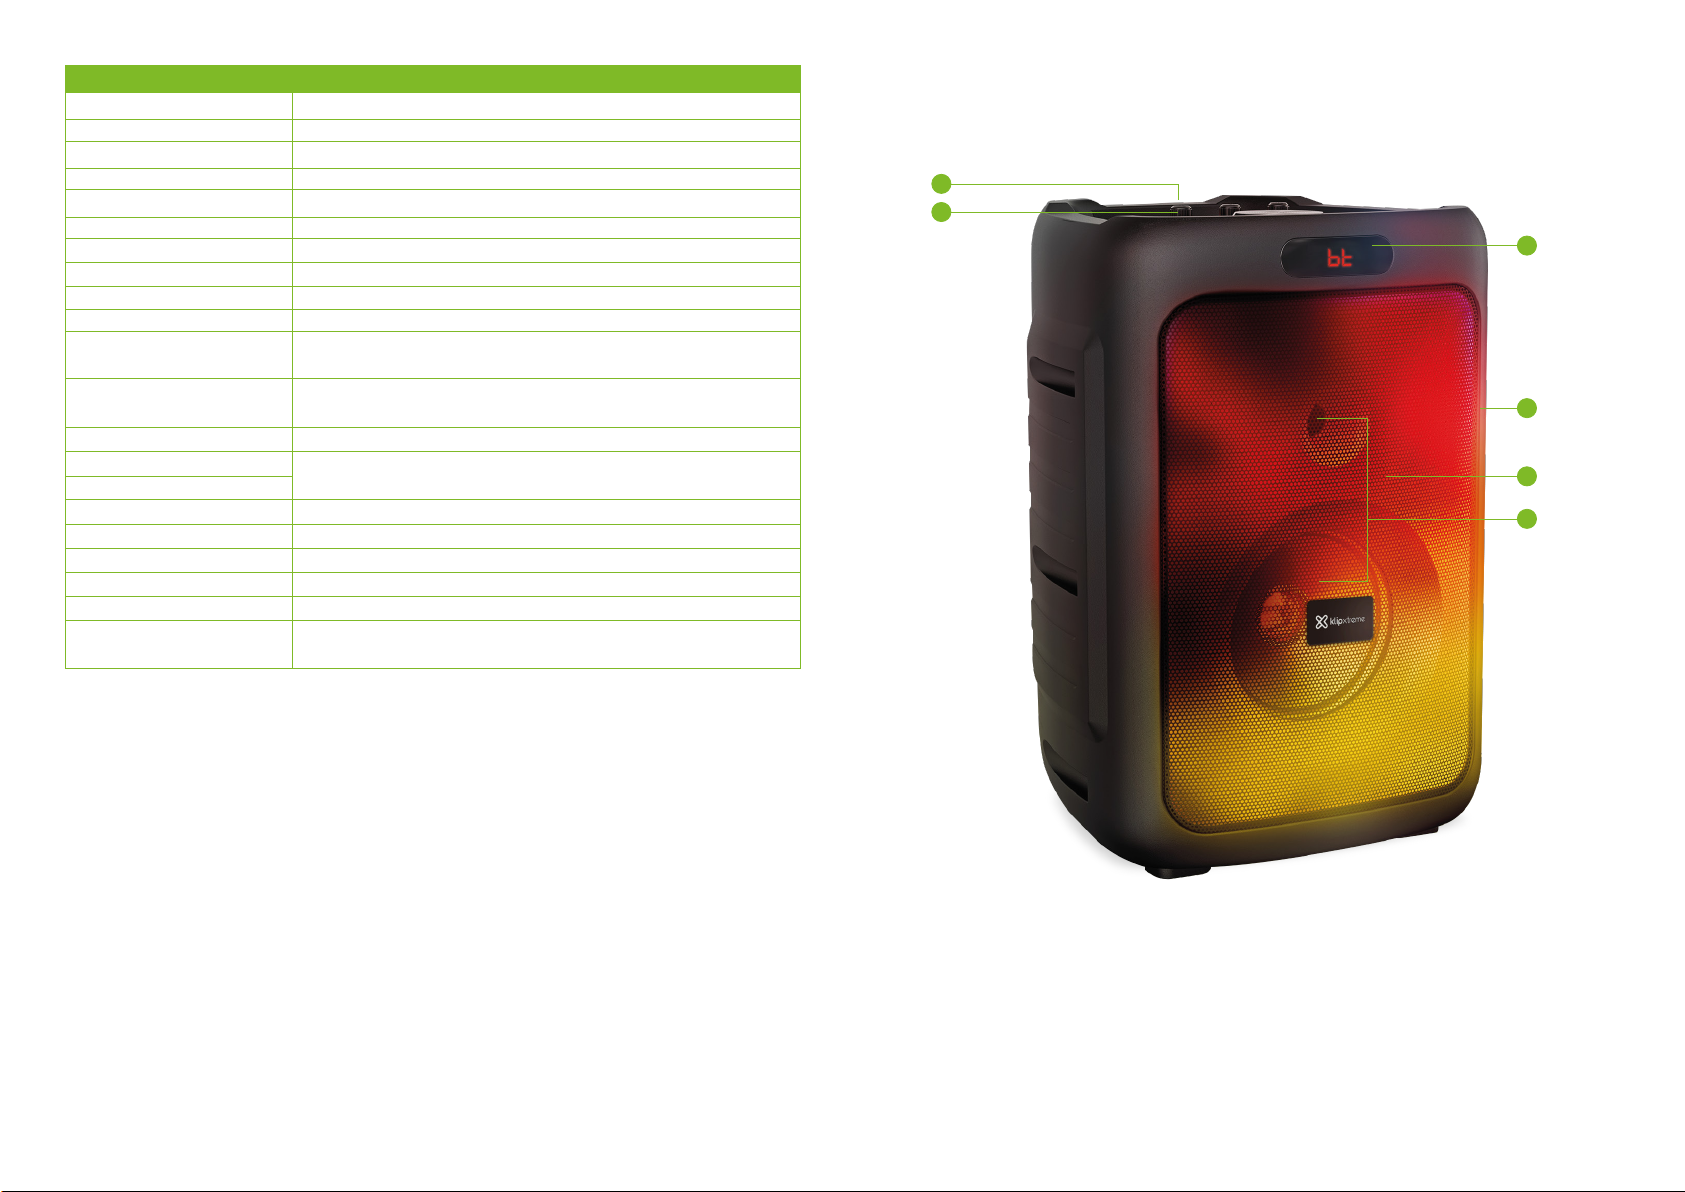
Nota: Antes de instalar este producto, asegúrese de que su dispositivo sea compatible con Bluetooth®.
1. Habilite la función Bluetooth®en la fuente seleccionada y configúrela para detectar el parlante inalámbrico.
2. Coloque su dispositivo inalámbrico y el parlante a no más de un metro de distancia entre sí.
3. A continuación, vaya a la función Bluetooth®en el parlante presionando el botón MODE que se encuentra
en el panel y selecciónelo como fuente de entrada. El indicador bt parpadea rápidamente en la pantalla para
indicar que el parlante ha entrado en modo de emparejamiento.
4. Una vez que el parlante (KLS-652) aparezca en la lista bajo los dispositivos Bluetooth®recién encontrados en
su dispositivo inalámbrico, un mensaje le preguntará si desea emparejarlo.
5. Acepte presionando Sí u Ok. Si tiene una versión anterior de Bluetooth®, es posible que se le solicite ingresar
la clave de acceso 0000 (4 ceros).
6. Cuando el emparejamiento se realiza correctamente, el indicador deja de parpadear para indicar que se ha
establecido la conexión inalámbrica. Si después de 60 segundos el proceso de emparejamiento falla, repita los
pasos del 1 a 5 descritos anteriormente.
7. Ahora puede comenzar a transmitir audio a través del parlante de forma inalámbrica desde sus dispositivos
favoritos compatibles con Bluetooth.
8. El parlante se volverá a emparejar automáticamente con el dispositivo memorizado cuando se seleccione el
modo BT en la unidad tras apagarlo y volverlo a encender.
Conexión TWS
La conexión TWS permite vincular dos parlantes al mismo tiempo, para amplificar el sonido.
1. Coloque los dos parlantes uno cerca del otro, a no más de 1 metro entre ellos.
2. Encienda ambas unidades, entrarán directamente en “modo Bluetooth”.
3. En una de las unidades (esta se convierte en la unidad maestra), mantenga presionado el botón Play/TWS
ahora emparejado.
4. Habilite el modo Bluetooth en su dispositivo y busque el parlante KLS-652 para emparejarlo.
5. Realice la prueba de audio (desde la biblioteca de música del teléfono inteligente o YouTube) y asegúrese de
que el audio se reproduzca en ambos parlantes al mismo tiempo.
6. Para desemparejar el modo TWS, mantenga presionado el botón Reproducir/TWS hasta que ambas
unidades generen un tono. Las unidades ahora están desemparejadas del modo TWS.

VII. Solución de problemas Especificaciones técnicas
Problema Causa posible Solución
La pantalla no enciende El parlante no está conectado correctamente.
El interruptor no está encendido
Verifique la conexión y conecte el adaptador de corriente
Encienda el botón
No se escucha sonido Volumen al nivel más bajo
El modo de entrada seleccionado es incorrecto
Conexión incorrecta de los parlantes
Ajuste el volumen a un nivel cómodo
Elija el modo de reproducción según la fuente externa que
se esté utilizando
Verifique todas las conexiones y vuelva a intentarlo
Sonido distorsionado El volumen principal está demasiado alto
El parlante está dañado
Disminuya el volumen principal
Verifique o reemplace el parlante
Dispositivo
Parlante
Micrófono
Conectividad
Parlante para fiestas portátil
1500W
100W
5V 1A
Modo /Volumen / Refuerzo de bajos/Encendido/Pausa y silencio / Botón de Bluetooth / TWS /
Interruptor de encendido/ Bajo / Reproducir-Pausa/Anterior/Adelantar/ Prioridad del
micrófono/Volumen del micrófono
Un subwoofer de 8” y un parlante de agudos de 1.5”
100W
80Hz-15kHz
4.0 ohms
83dB ±3dB
75dB
1kHz, 0dB (±10%)
Con cable (incluido)
Punto único
100-12kHz
600Ω±20%
-55.3±3dB
Inalámbrico
Bluetooth®V5.0
Incluida
Incluida
microSDTM de hasta 32GB
Incluido
2.4GHz ~ 2.480GHz
Hasta 10m1
Aux. 3.5mm estéreo
Dos de 6.5mm para micrófono
Tipo
Potencia máxima de salida (PMPO)
Potencia máxima de salida (RMS nominal)
Entrada máxima de CC (corriente/voltaje)
Botones
Unidades del parlante
Potencia RMS de referencia
Frecuencia
Impedancia
Sensibilidad
Relación de señal a ruido
THD
Conectividad
Directividad
Frecuencia
Impedancia
Sensibilidad
Tipo de conexión
Versión Bluetooth
Función TWS
Ranura para tarjeta de memoria
Capacidad máxima de la tarjeta de memoria
Puerto USB
Frecuencia RF inalámbrica
Alcance inalámbrico
Entrada de audio
Entradas adicionales
Batería
Funciones destacables
Batería de litio,18650/4000mAh
6 horas
Hasta 7 horas con las luces LED encendidas / 12 horas con las luces LED apagadas2
Hasta 2 horas con las luces LED encendidas / Hasta 2.5 horas con las luces LED apagadas2
15 días
DC 5V/1A (adaptador no incluido)
Tipo de batería
Tiempo de carga
Tiempo de funcionamiento con volumen al 50%
Tiempo de funcionamiento con volumen al 100%
Tiempo en pausa
Método de carga
Iluminación LED de llama multicolor dinámica
Incluido
Micrófono con cable premium incluido
Cuenta con conectores para dos micrófonos con cable3
Pantalla LED
Sintonizador de FM
Integradas
Efectos de iluminación
True Wireless Stereo
Micrófono
Entradas de micrófono con cable
Monitor
Radio
Asas

1. El rango estimado se basa en una línea recta entre los dispositivos sobre un área despejada y libre de obstáculos e interferencias.
2. Depende del nivel de volumen y el tipo de archivo de audio que se reproduce.
3. Segundo micrófono con cable no incluido.
4. Parlante adicional se vende por separado.
Información adicional
39.3 x 26.6 x 26 cm
3 kg
1.5 m
Un año
Dimensiones del producto
Peso del producto
Longitud del cable
Garantía
Declaración de la FCC
Este equipo ha sido probado y se encontró que cumple con los límites para un dispositivo digital de Clase B,
de conformidad con la parte 15 de las normas de la FCC. Estos límites están diseñados para brindar una
protección razonable contra interferencias dañinas en una instalación residencial. Este equipo genera, usa y
puede irradiar energía de radiofrecuencia y, si no se instala y usa de acuerdo con las instrucciones, puede
causar interferencias dañinas en las comunicaciones por radio. Sin embargo, no hay garantía de que no se
produzcan interferencias en una instalación en particular. Si este equipo causa interferencias dañinas en la
recepción de radio o televisión, lo que se puede determinar apagando y encendiendo el equipo, se
recomienda al usuario que intente corregir la interferencia mediante una o más de las siguientes medidas:
• Reoriente o reubique la antena receptora.
• Aumente la separación entre el equipo y el receptor.
• Conecte el equipo a la salida de un circuito diferente a aquel donde está conectado el receptor.
• Consulte al distribuidor o a un técnico experimentado en radio/TV para obtener ayuda.
Precauciones
• NO use esta unidad para otra cosa que no sea su uso previsto.
• NO exponga el parlante a un calor excesivo ni a la luz solar directa durante largos períodos de tiempo.
• NO exponga el parlante a la lluvia o al agua y evite entornos con mucha humedad o polvo.
• NO desmonte, repare ni modifique el parlante usted mismo. No hay piezas reparables por el usuario dentro
de la unidad. Solo se debe permitir que personal calificado realice reparaciones sin anular la garantía.
• NO use productos de limpieza que contengan bencina, solventes o alcohol.
• NO lo use cerca de un horno de microondas o productos LAN inalámbricos.
• NO coloque recipientes con líquido encima o cerca del parlante.
• NO coloque objetos que sean fuentes de calor sobre la caja del parlante, como equipos de iluminación
o máquinas de humo.
• NO apile la caja del parlante de manera que pueda causar lesiones si se cae.

NOTASNOTES

KlipXtreme®is a registered trademark. All rights reserved. The Bluetooth®word mark is owned by
Bluetooth SIG, Inc. SD™ and microSD™ are trademarks owned by SD-3C, LLC. Other trademarks and
trade names are those of their respective owners. Any mention of such is only intended for identification
purposes, and therefore shall not be construed as a claim to any or all rights pertaining to those brands.
Made in China.
KlipXtreme®es marca registrada. Todos los derechos reservados. El logograma Bluetooth®es propiedad
de Bluetooth SIG, Inc. MicroSD™ y SD™ son marcas registradas de SD-3C, LLC. Todas las demás marcas
y nombres comerciales son propiedad de sus respectivos dueños. Cualquier mención de estos es por
motivo de identificación solamente y, por ende, no constituye reclamo alguno a ningún derecho
perteneciente a, patrocinado por, ni afiliación con cualquiera de estas marcas. Hecho en China.
www.klipXtreme.com
Table of contents
Languages: