Klugmann KFF185BGL User manual

KFF185BGL
Refrigerator
INSTRUCTION MANUAL
Klugmann Hausgeraete GmbH.
Gropiusstraße 7,
48163 Münster, Deutschland
+49 (0)2501 - 963 5732
+49 (0)2501 - 963 1834
service@klugmann-hausgeraete.de
www.klugmann-hausgeraete.de

GUIDELINES CONCERNING THE SAFETY OF USE
Some provisions in this user manual are unified for refrigerating products of different
types (for a refrigerator, refrigerator-freezer or freezer). CAREFULLY READ THE
INSTRUCTION MANUAL.
The Manufacturer shall not be held liable for damage arising from the failure to observe
the instructions contained in this manual.
Keep this manual for future reference, or to pass it over to the next user.
General information:
The appliance is a two–compartment refrigerator-freezer combination and is intended to
be used in household and similar applications such as: staff kitchen areas in shops,
offices and other working environments.
The refrigerator compartment is designed for the brief storage of fresh food. The
freezer compartment is designed for the freezing and long-term storage of food
products. The freezer compartment is equipped with a frost-free refrigeration system
(“No Frost”).
In the refrigerator compartment is the cold section. A temperature of -2 to +3 °C is
maintained in the cold section which is suitable for short-term storage of meat, fish and
similar products.
The freezer compartment is designed for the freezing and long-term storage of food
products.
General safety requirements:
–Do not cover the ventilation holes at the top and on the sides of the appliance.
–Do not use any mechanical means or electrical devices to hasten the thawing
process when cleaning the freezer compartment.
–Do not use electrical appliances inside the food storage compartments of the
appliance, unless they are of the type recommended by the manufacturer.
–If the supply cord is damaged it must be replaced by the manufacturer,
manufacturer service agent or a similarly qualified person, in order to avoid a
hazard.
–Disposal of the appliance should be according to national rules.
–The appliance can’t be disposed of by burning.
–Do not damage the appliance refrigeration system. It contains the refrigerant
gas R600a. If the refrigeration system is damaged:
•Do not use any open flame.
•Avoid sparks―do not turn on any electrical appliances or lighting
fixtures..
•Immediately ventilate the room: air the room in which the
appliance is placed for a few minutes (the size of the room for a
product containing isobuthane / R600a must be at least 4 m3) to
avoid damage to the cooling system.

1
–The appliance should be used only for freezing and storing foodstuffs.
–This appliance is not designed for the storage of explosive substances such as
aerosol cans with a flammable propellant.
–It is prohibited to store petrol and other flammable liquids near the appliance.
Children and vulnerable people safety:
–Do not allow children to play with the appliance or to plug it in or unplug from
the electricity supply socket. Do not allow children to play with the packaging
material from the appliance.
–This appliance can be used by children aged from 8 years and above and
persons with reduced physical, sensory or mental capabilities or lack of
experience and knowledge if they have been given supervision or instruction
concerning use of the appliance in a safe way and understand the hazards
involved.
–Cleaning and user maintenance shall not be made by children without
supervision.
Requirements for the connection to the mains:
–The appliance should only be connected to an earthed socket installed in
accordance with the regulations. Make sure that the supply voltage
corresponds with the voltage marked on the rating label. This product complies
with all binding CE labelling directives. The earthed electrical socket by which
the appliance is connected to the mains should be in an accessible place. It is
a legal requirement that the appliance is properly earthed. The manufacturer
will not be held liable for any damage or injury which may result from the failure
to fulfil this requirement.
–To avoid the exposure to danger, always have faulty cable be replaced only by
the manufacturer, by our customer service or by qualified person and with a
cable of the same type.
–It is forbidden to readjust or modify any parts of the unit. It is crucial not to
damage the capillary tube visible in the compressor recess. The tube may not
be bent, straightened or wound. If the capillary tube is damaged by the user
the guarantee will be void.
–Do not use adapters, multiple sockets and two-wire extension leads. If it is
necessary to use the extension lead, it must be equipped with a protection ring
and a single socket and must have a VDE/GS safety certificate.
–If an extension lead is used (with a protection ring and safety certificate), its
socket must be located at a safe distance, away from the sinks, and must not
be in a place where it could be flooded by water or waste water.

2
–When positioning the appliance, be careful that the electrical cord isn’t
squeezed in order to avoid its damage. Do not store heavy objects such as
cooling devices, furniture or other domestic devices next the appliance in such
a way that they could squeeze and damage the electrical cord. This can cause
a short circuit and a fire.
–Make sure that the plug of the electrical cord is not squeezed by the back wall
of the appliance or otherwise damaged. A damaged plug can be the cause of
a fire!
–ATTENTION! DO NOT REMOVE THE COVER OF THE LIGHT EMITTING
DIODE (LED) LUMINAIRE! If the cooling appliance is equipped with light
emitting diode (LED) luminaire and the lighting is not functioning, please
contact a maintenance technician to have it replaced. THE LUMINAIRE CAN
BE REPLACED ONLY BY A MAINTENANCE TECHNICIAN!
Do not try repair the appliance on your own. Always contact an authorized
technician. To avoid the exposure to danger, always have faulty cable be
replaced only by the manufacturer, by our customer service or by qualified
person whit a cable of same type.
Requirements for safe use:
–Pull the plug out from the mains socket before each maintenance activity. Do
not pull on the cord, but hold the body of the plug instead.
–If the appliance is unplugged (for cleaning, moving to another place, etc.), it
may be repeatedly switched ON AFTER 15 MIN.
–The mains cable must stay below the level of the mains plug.
–It is forbidden to use a technically damaged appliance.
–Do not place any switched on electrical devices (such as microwave ovens,
hair dryers, irons, electric kettles or other electrical devices) on top of the
appliance because this may cause ignition of plastic parts.
–Do not place any dishes with liquids on top of the appliance and do not keep
flowers in vases or other liquid-filled vessels on the appliance.
–Do not place heavy objects on the top of the freezer considering that objectives
may fall when switching the door, and accidental injuries might be caused.
–This appliance is heavy. Care should be taken when moving it.
–Do not remove or touch items from the freezer compartment if your hands are
wet or damp
–Do not use water spray and steam to clean the appliance.

3
The appliance should be transported in the vertical position. The
manufacturer will not be responsible for any damage of the appliance that
results from non-compliance with the instructions for transportation.
The manufacturer guarantees reliable operation of the refrigerator when
the relative air humidity not greater than 70 per cent and the ambient
temperature is: +16 to +32 degrees Celsius - climate class N;
+16 to +38 degrees Celsius - climate class ST.
INSTALLATION AND OPERATING CONDITIONS OF THE
APPLIANCE
Positioning:
•This appliance can be installed in a dry, well ventilated indoor where the ambient
temperature corresponds to the climate class indicated on the rating plate of the
appliance.
WARNING! Do not install this appliance in areas that are too humid or
too colds, such as the construction appendices, garages or wine cellars.
The rear wall of the refrigerator, in particular, the condenser and other elements of the
cooling system must not contact other elements, which may damage them, (e.g. central
heating pipes and the water supply pipes).
WARNING! The appliance must not touch any pipes for heating, gas or
water supply, or any other electrical devices.
Minimum distances from the heat sources:
- from the electric gas and other ovens - 30 mm,
- from oil or coal fired ovens - 300 mm,
- from built-in ovens - 50 mm
If there is no possibility of ensuring the above- mentioned
distances, provide an appropriate insulation board
•Do not cover the ventilation holes at the top of the appliances –it
must be a good air circulation
around the appliance. There should
be a gap of at least 10 cm between
the top of the appliance body and
any furniture that may be above it
(see fig.). If this requirement is not
followed, the appliance consumes
more electrical energy and its
compressor may overheat.
•If the appliance is placed in a corner, a gap must be left
between the appliance body and the wall so that the
freezer compartment door can be opened enough to
pull out the frozen product drawer (see picture).

4
•The appliance must stand on a level surface and must not touch the wall. If
necessary, regulate the height of the appliance by adjusting the levelling feet: by
turning them clockwise –the front of the appliance rises, by turning them counter
clockwise –it comes down. If the appliance is tilted slightly backward –the doors will
close by themselves.
Preparing for operation:
•It is recommended to prepare the appliance for operation with a helper.
•Remove package. Lift the appliance away from foamed polystyrene base. Tear off
adhesive tapes.
•When positioning the appliance in chosen location, it will move more easily into position if
you lift the front a little and incline it backward, allowing it to roll on its casters. When
placing, moving, lifting the appliance, do not hold the door handles, do not pull
the condenser at the rear part of the refrigerator and do not touch the
compressor unit.
•Remove all red-coloured parts from the
shelves (fig. 2.). Tear away the red-coloured
adhesive tapes from the door trays –they are
intended only for the transport of the
appliance.
NOTE. When you open the freezer compartment door
a little red packing detail will fall out –IT IS FOR
TRANSPORTATION PURPOSES ONLY.
•Take two supports 1from the bag and insert
them into the guides 2at the top back part of the
appliance (see picture).
The appliance should not be connected to the mains until all packing and
transport materials aren’t removed. Suitably dispose the packaging material.
First use:
•Before using the appliance for the first time, the interior and all internal accessories
should be washed with lukewarm water and some neutral soap to remove the typical
smell of a brandnew product, then dried thoroughly.
Wait at least 4 hours before connecting the appliance to the
power supply. This is to allow the oil to flow back in the compressor.
•When first starting-up or after a period out of use, before putting the products in the
compartment let the appliance run at least 2 hours.

5
DESCRIPTION OF THE APPLIANCE, BASIC PARTS (Fig. 1)
A–refrigerator compartment
B–freezer compartment
The cold section drawer 5 moves on
roller bearings 17. The drawer can
be removed by pulling it out, and
lifting it off the rails.
1
Control panel
2
On / off switch for interior light
3
Adjustable height shelves
4
Shelf for bottles
5
Cold section drawer
6
Glass shelf
7
Fruit and vegetable boxes
9
Fast-freeze section
10
Frozen products section(s)
12
Egg tray
13
Adjustable height door trays
14
Condenser
15
Thaw water drip tray
16
Compressor

6
ELECTRONIC CONTROL PANEL DESCRIPTION
TEMPERATURE REGULATION
Turning on the appliance
Set by the manufacturer temperatures +4 °C of the refrigerator chamber and -18 °C of
the freezer chamber are shortly shown in the control board. Later in the window of the
freezer chamber temperature display 8(pic.3) blinking letters „HI“ appear with
temperature fixed at the moment of turning on. Also the alarm indicator 7lights (pic. 3)
and acoustic signal is heard. When suitable for storafe of foodstuffs temperature is
reached, the alarm indicator and acoustic signal turn off automatically. Letters „HI“
don‘t turn off automatically. Acoustic signal and letters „HI“ may be turned off not
reaching suitable for storafe of foodstuffs temperature by touching one of the buttons
10. Set by the manufacturer temperatures will appear in the control board which will be
reached after 4-6 hours.
NOTE. When the appliance is turned on for the first time after cleaning or longer
periods of time, a temperature suitable for food storage is reached within 4-6 hours.
The appliance features and temperature are controlled with touch (sensory) buttons.
When the desired function is on, the function symbol lit in a white colour and
when it is turned off, the symbol becomes grey.
a
1
Refrigerator compartment ON / OFF
button
7
Alarm indicator
2
Quick cooling button in the refrigerator
compartment
8
Freezer compartment temperature
display
3
Vacation function button
9
Control panel lock indicator

7
SELECTION OF FUNCTIONS
F un c t i on s a n d s e tt i n g s o f t h e r e fr i ge r a t or c o mp a r tm e n t
1 - Refrigerator compartment ON / OFF. The refrigerator compartment is turned
on or off by touching the symbol.
NOTE. After a loss of power the appliance turns off automatically preserving the last
user-set temperature of the refrigerator compartment.
2 –Quick cooling in the refrigerator compartment. This function is activated by
touching the symbol. The quick cooling function is recommended when you want to
cool down quickly fresh food products to +5 °C or when many food products are loaded
into the refrigerator. When the food products have been cooled to +5 °C, the quick
cooling function turns off automatically. If you do not want to wait until it has cooled
down to the set temperature, touch the symbol of this function and turn the function off
- the symbol will become grey.
3 –Vacation function. This function is activated by touching the symbol. The
vacation function is recommended when you are leaving your home for a long period of
time. Turning on this, the refrigerator compartment will be cooled at a minimal mode,
thereby saving energy. Upon your return turn off the vacation function. The refrigerator
compartment will automatically reset to the temperature set before the activation of the
function.
IMPORTANT. When activating the vacation feature, remove all perishable food
products from the refrigerator compartment and leave the refrigerator door closed. Do
not take frozen food products from the freezer compartment –the vacation function
does not change the temperature of the freezer compartment.
11 –Temperature setting in the refrigerator compartment. You can set the
temperature of the refrigerator compartment to between +2 °C and +9 °C.
Touch the symbol to raise the temperature by one degree at a time.
Touch the symbol to lower the temperature by one degree at a time.
F r ee z er c o mp a r tm e n t f u nc t i on s a n d s e tt i n gs
4–"Party" function. This function is activated by touching the symbol. We
recommend using the “Party” function to quickly and safely chill your drinks in the
freezer compartment. We recommend a maximum cooling time of 30 minutes (do not
change the factory settings) for the first use.
The cooling time can be set to between 10 min and 60 min. Upon activating the "Party"
function by using the freezer temperature setting buttons 10 (see Fig. 3a), set the
desired cooling time (from 10 to 60 min).
4
"Party" feature: fast-freezing button in
the freezer compartment
10
Temperature setting buttons the
freezer compartment
5
Super-freeze button
11
Temperature setting buttons in
the refrigerator compartment
6
Freezer compartment ON / OFF button
12
Open door alert indicator
13
Refrigerator compartment
temperature display

8
After the period of time set has been reached, an audible signal will sound. Turn off the
"Party" function by touching button 4 (see Figure 3a) and remove the drinks from the
freezer compartment.
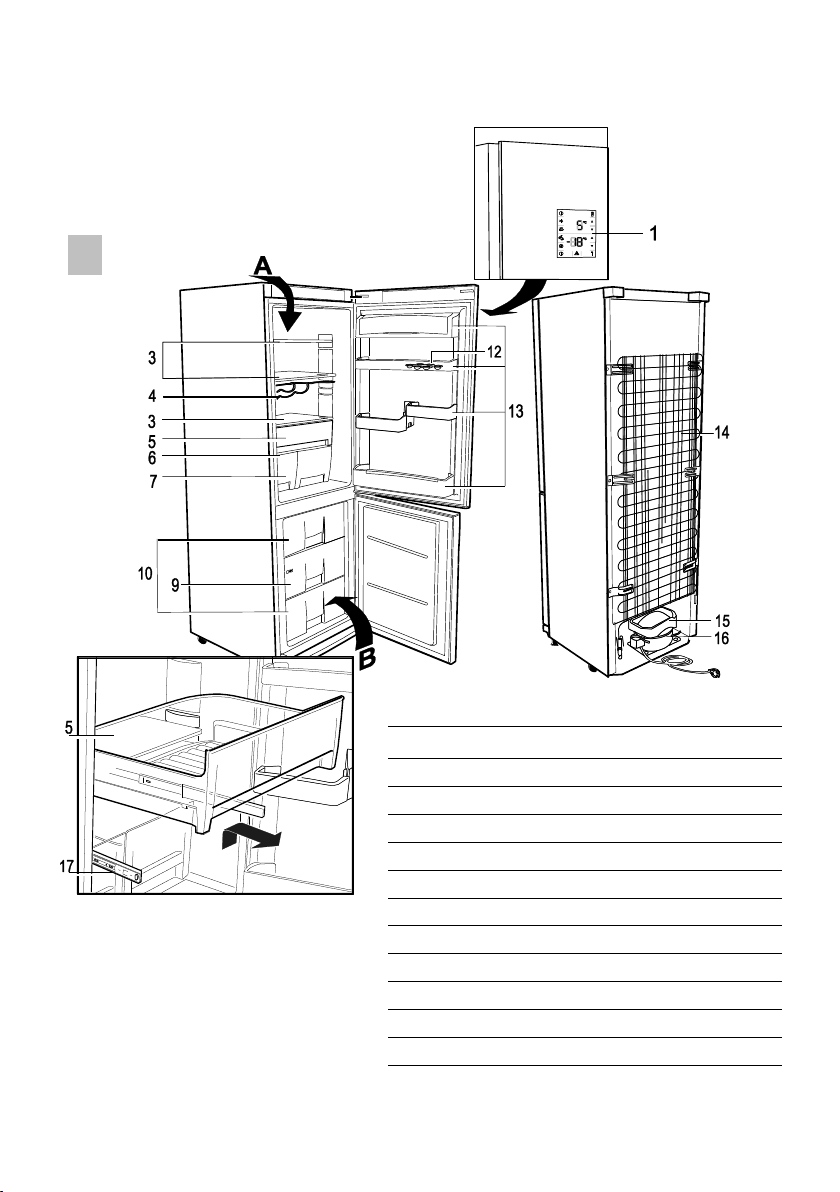
5 –Super-freeze function. This function is activated by touching the symbol.
The super-freeze function is recommended for freezing a large quantity of fresh food
products. This function should be enabled 24 hours in advance. After 24 hours place the
food products in the freezer compartment marked with the symbol. The super-
freeze function automatically turns off after 26 hours or when a temperature lower than
-18 °C is achieved.
6 - Freezer compartment ON / OFF. The freezer compartment is turned on or off by
touching the symbol.
NOTE. After a loss of power the appliance turns off automatically, preserving the last
user-set temperature of the freezer compartment.
10 –Temperature setting in the freezer compartment. The freezer compartment
temperature can be set to between -16 °C and -24 °C.
Touch the symbol to raise the temperature by one degree at a time.
Touch the symbol to lower the temperature by one degree at a time.
THE TEMPERATURE MAY VARY DEPENDING ON AMBIENT TEMPERATURE, THE
AMOUNT OF FOODSTUFFS, THE TEMPERATURE OF THE FOODSTUFFS, AND
HOW OFTEN THE APPLIANCE DOORS ARE OPENED AND CLOSED. Therefore we
recommend: locate the appliance away from heat sources, food placed in the
appliance should not be warmer than the room temperature, appliance door
must not to be left open, the appliance door should not be open longer than it is
necessary to take out or put in foodstuffs.
IF THE ROOM IS COOL, THE COOLING CAPACITY OF THE APPLIANCE IS REDUCED
AND THIS MAY RESULT IN A HIGHER TEMPERATURE IN THE REFRIGERATOR. Use the
temperature setting buttons (10 and 11) to set a lower temperature (see Fig. 3a).
O th e r f u n ct i o ns
12 –Open door alert indicator. This is marked by the symbol. When indicator 12
is flashing in white and display 13 indicates a flashing letter "d" instead of the
refrigerator temperature (see Fig. 3a), the open door alert function is on.
If the refrigerator door is left open for more than 30 seconds an audible signal will
sound, the open door symbol and the letter "d" will flash. When the refrigerator door is
closed, the audible signal and the flashing symbol will turn off automatically.
9 –Control panel lock function. This is marked by the symbol. The function is
activated / deactivated by pressing both chambers start / stop buttons 1 and 6
together. The control panel lock feature is intended to prevent the refrigerator
temperature or other settings against unintentional changes, or the turning off of the
refrigerator. We rec omm en d ac tiva ti n g th i s func tio n be fo re cl ean in g th e
a pp l i an c e s ur f a c e.
7 –Alarm indicator. This is marked by the symbol. The alarm LED lights up red,
when:
•the temperature of the freezer compartment rises above -13 °C. When the freezer
compartment temperature is -18 °C, the alarm indicator is off and the symbol turns
grey;

9
•the temperature of the freezer compartment rises above -8 °C, display field 8 will
display the letters "HI" (see Fig. 3a) instead of the freezer compartment temperature.
When the freezer compartment temperature reaches -18 °C, the alarm indicator turns
off, the symbol becomes grey and the set temperature is shown again on screen 8;
•the refrigerator temperature drops below -1 °C, display 13 shows the letter "L" (see
Fig. 3a) instead of the refrigerator temperature. When the refrigerator temperature
rises above 1 °C, the alarm indicator turns off, the symbol becomes grey and the set
temperature is shown again on screen 13.
IMPORTANT. You should immediately contact the cooling equipment
maintenance company if:
•The alarm indicator is red and the freezer compartment temperature display field 8
(see Figure 3a) displays any of the characters "EE", "ER", "F", "FF".
•The alarm indicator is red and the temperature indicator displays (see Fig. 3a) any of
the characters "HI", "L" for 24 hours continuously (symbols can‘t be turned off by
touching on of the buttons 10 or 11).
FREEZING OF FOODSTUFFS
When planning to freeze a large quantity of fresh food products, turn on the super-
freeze function 24 hours in advance by touching the symbol (see Fig. 3a).
Place one or two layers of the fresh food products ready for freezing into the fast
freezing compartment marked with the symbol
After one day reload the frozen products from the fast-freezing compartment (if you
intend to re-freeze the products) into the storage compartment drawers. The super-
freeze function will turn off automatically.
•DO NOT EXCEED THE MAXIMUM AMOUNT OF FROZEN FOOD INDICATED IN THE
PRODUCTS DATA SHEET.
•Leave not less than 3 cm gap between a top of frozen products and a bottom of
drawer, which is over them.
•Do not place unwrapped foodstuffs in the freezer sections.
•Do not refreeze partly thawed products.
•Fresh food for freezing should not touch already frozen foodstuffs.
•Do not freeze foodstuffs that are warmer than the room temperature.
•WARNING! Do not freeze liquid foodstuffs in glass vessels or bottles.
•Strictly observe the frozen foodstuffs validity dates indicated by the
manufacturer on the product packaging.
•WE RECOMMEND THAT FROZEN FISH AND SAUSAGE SHOULD BE STORED IN THE
FREEZER COMPARTMENT NOT LONGER THAN 6 MONTHS; CHEESE, POULTRY, PORK,
LAMB –NOT MORE THAN 8 MONTHS; BEEF, FRUIT AND VEGETABLES –NOT
LONGER THAN 12 MONTHS.
DEFROSTING, CLEANING AND CARE
THE REFRIGERATOR COMPARTMENT defrosts automatically. Drops of ice that form on
the back wall of the refrigerator compartment thaw during the time the compressor is
not working and the thaw water runs down the thaw water runoff channel to the tray
on top of the compressor (Fig. 1), where it evaporates.

10
FREEZER COMPARTMENT gets defrosted automatically: it operates a frost-free cooling
system (No Frost). However, according to how often the freezer door were opened and
closed, and to - how warm products were placed into the appliance, the frost can
accumulate on walls of freezer inner liner and drawers. It is normal. But the thicker is
the layer of frost, the higher is a power consumption. In case if No Frost system had
not managed to evaporate the excess moisture and the frost layer has formed on, you
should defrost the appliance. To defrost the appliance, follow the steps in sequence:
•WARNING! Turn the appliance off and pull the plug out of the electrical socket.
•Remove foodstuffs from freezer compartment.
•Leave door of freezer compartment open. When the frost melts, clean and wipe dry
the surfaces and fixtures of the freezer compartment.
•Close the appliance door. Plug in and turn on the appliance.
REGULARLY CLEAN THE APPLIANCE !
Note: before cleaning the cooling device and its rear compartment
part, the device must be disconnected from the mains by unplugging.
•Protect the appliance inner surfaces and plastic parts from fats, acids and sauces. In
case of accidental spills –immediately clean with warm soapy water or dishwashing
detergent. Wipe dry.
•Regularly clean the hermetic gaskets of the doors. Wipe dry.
•◄ REGULARLY CLEAN THE THAW WATER CHANNEL SPACE WITH
A SPECIAL CLEANER FOR THAT PURPOSE (Fig. 1).
•At least once a year clean dust away from the back part of the
appliance body and the compressor. A soft brush, electrostatic
cloth or vacuum cleaner may be used for cleaning.
•DO NOT use detergents containing abrasive particles, acid,
alcohol or benzene for cleaning the appliance inner and outer
surfaces. DO NOT use for cleaning cloths or sponges that have
coarse surfaces intended for scrubbing.
•If the appliance is to be left switched off for an extended period,
leave its doors open.
CHANGING THE OPENING DIRECTION OF THE DOORS
WE RECOMMEND that the opening direction of the refrigerator door is
changed by a maintenance technician. However, this work is not included in
the warranty service.
If you have decided to change the opening direction of the refrigerator door, we
recommend doing this with an assistant. You will need: spanners No 8 and No 10, a
screwdriver.
When changing the opening direction of the door, DO NOT lay the
appliance down horizontally!
Follow these steps:
ATT E NT ION! Turn off the refrigerator and freezer compartments –touch symbols 1
and 6 , they will become grey (see Fig. 3a). T ur n o f f t h e a pp l i an c e –
re m ove t h e powe r s up p l y ca bl e plu g fr om th e ele c tr ical s o c ke t.
1. Remove the four screws (13) and the door cover (12) from the top door.
2. Remove the caps (c) from the body and the inside of the door.

11
3. Remove the clamp (14) and pull out the cable (15) from the door with the bushing
(16). Before doing this, disconnect the connectors (23) of cable 15 and cable 24
from the electronic control unit.
4. Remove the upper bracket (6) together with the nut and washers, and the spacer
under the bracket.
5. Remove the refrigerator door (1). Remove the stopper (5) from the bottom. Screw
the stopper (5) on the opposite side of the door (you will find it in the packet) for
the door to open to the left.
6. Remove the middle bracket (4) together with the washers on the axle, and the
plastic.
7. Remove the freezer compartment door (3). Remove the stopper plate (25) from the
bottom. Screw the stopper plate on the opposite side of the door (you will find it in
the packet) for the door to open to the left.
8. Remove the bottom cover (11) together with the small cap (10).
9. Remove the axle (2) with the washers on the axle and the fixer (26) of the bottom
bracket (7) and screw them to bracket 7 on the other side of the compartment,
symmetrically to their former position.
10. Remove the caps (8) from the partition separating the refrigerator and freezer
compartment and place into the holes on the opposite side.
11. Remove the caps (9) from the freezer compartment door and place (push) on the
opposite side.
12. Put the freezer compartment door on the bracket (7) and the axle (2).

12
13. Turn the bracket (4) together with washers on the axle and the plastic spacer by a
180 degree angle and insert the bracket axle into the freezer door screw on the
opposite side of the washers on the axle at the top and the bottom of the bracket.
14. Remove the four screws (18) and remove the decorative panel (19).
15. Move the cable (15) to the other side of the cabinet, symmetrically to its former
position. Insert the cable into the special recess on the left side of the. Make sure
the cable is not bent sharply.
16. Screw on the decorative panel. Before doing this, lay the cable on the left side of
the cabinet symmetrically to its former position.
17. Put the refrigerator compartment door on the bracket (4) axle.
18. Move cable 24 in the refrigerator compartment door to the other side of the door
and hang on the free clamp (22). Connect the connections (23) of cables 15 and 24.
19. Turn the bracket (6) around 180° together with the washers on the axle and the
plastic spacer. Remove the axle and the washers and reattach them on the other
side of the bracket. Having the axle of bracket (6) placed into the door of
refrigerator compartment door, screw the bracket into lower holes on the opposite
side of refrigerator.
20. Screw the cover (12) to the top of the refrigerator door.
21. Place the cap (10) to the guides of the bottom cover (11) on the opposite side and
place the bottom cover (11) in its former place.
OPERATION PROBLEMS AND THEIR SOLUTIONS
(TROUBLESHOOTING). What if …
•The appliance is plugged in to the mains but it does not work. Check that your
house electricity supply installations are in order. Check that the plug is correctly
inserted into the electricity supply socket.
•Compressors operate for a long time or without interruption at a high
temperature in the cooling appliance. Check whether the refrigerator door is
closed tightly, whether the door has not been kept open when loading the food
products for longer periods than required to perform the actions and whether too
many warm food products have been loaded.
You should immediately contact the cooling equipment maintenance company if:
The alarm indicator is red and the freezer compartment temperature display field 8
(see Fig. 3a) shows any of the characters "EE", "ER", "F", "FF".
The alarm indicator is red and temperature indicator displays (see Fig. 3a) any of
the characters "HI", "L" for 24 hours continuously (symbols can‘t be turned off by
touching on of the buttons 10 or 11).
•High temperature in appliance, the compressor operation pauses are short.
Ascertain whether the appliance doors are shutting tightly, whether the door wasn’t
kept open longer than necessary when taking out or putting in foodstuffs or whether
a large amount of warm food was placed in the appliance.
•The noise has become louder. Check that the appliance is standing stable, on a
level place. To make it level, regulate the front feet. Check if the appliance is not
touching any furniture, and that no part of the refrigeration system at the back part of
the appliance body is touching the wall. Pull the appliance away from any furniture or

13
walls. Check that the cause of increased noise isn’t due to bottles, cans or dishes in
the appliance that might be touching each other.
•Water has appeared at the bottom of the refrigerator compartment. Check
whether a thaw water channel space isn’t blocked. Clean the thaw water channel
space with a cleaner intended for that purpose.
•Water has appeared on the tempered glass shelves. Food items or dishes in
the refrigeration compartment are touching the back wall of the compartment. Do not
let food items or dishes touch the back wall.
•Moisture dripping from under the glass shelves. If you placed many containers
with liquids on the shelf, moisture can condense and drip onto the shelf below. Move
some containers with liquids onto other shelves.
•Water has appeared under the appliance. The thaw water collection tray has
slipped off the compressor. Place the tray on top of the compressor.
•When the appliance door is opened, the rubber sealing gasket pulls out. The
gasket is smeared with sticky foodstuffs (fat, syrup). Clean the sealing gasket and the
groove for it with warm water containing soap or dishwashing detergent and wipe dry.
Put the rubber sealing gasket back into the place.
•The top of the appliance has condensation on it. The ambient relative air
humidity is above 70 %. Ventilate the room where the appliance stands and if
possible remove the cause of the humidity.
Remarks on the appliance operating noise. As the appliance operates and
goes through the freezing cycle, various noises will be emitted. This is normal
and is not a sign of any malfunction.
•As the refrigerant circulates around the refrigeration system, it causes sounds like
murmuring, bubbling, or rustling. Louder sounds like popping or clicking may be heard
for a short time as the refrigerator’s compressor switches on.
ENVIRONMENTAL PROTECTION INFORMATION
This appliance is marked according to the European directive 2002/96/EC on
Waste Electrical and Electronic Equipment (WEEE). By ensuring this product is
disposed of correctly, you will help prevent potential negative consequences for
the environment and human health, which could otherwise be caused by inappropriate
waste handling of this product.
Disposal must be carried out in accordance with local environmental regulations for
waste disposal. For more detailed information about treatment, recovery and recycling
of this product, please contact your local authority, your household waste disposal
service or the retailer where you purchased the product.
If you decided to scrap the appliance, make it impossible to use in order to prevent
possible misadventure. Pull out the electric plug from the electricity supply socket and
then cut off the cord. Tear off the gasket. Break the door lock if any.
Do not dismantle the appliance yourself. Pass it on to recycling companies.

14
Product data sheet
NOTE. The manufacturer reserves the right to make future changes to technical parameters and
specifications.
¹)
1 = Refrigerator with one or more fresh-food storage compartments, 2 = Refrigerator-cellar, Cellar and
Wine storage appliances, 3 = Refrigerator-chiller and Refrigerator with a 0-star compartment, 4 =
Refrigerator with a one-star compartment, 5 = Refrigerator with a two-star compartment, 6 = Refrigerator
with a three-star compartment, 7 = Refrigerator-freezer, 8 = Upright freezer, 9 = Chest freezer, 10 =
Multi-use and other refrigerating appliances
²)
A+++ (most efficient) to D (least efficient)
³)
Annual energy consumption (AE C ) in kWh per year, based on standard test results for 24 hours. Actual
energy consumption will depend on how the appliance is used and where it is located.
4)
1 One-star compartment with nominal temperature of -6°C
2 Two-star compartment with nominal temperature of -12°C
3 Three-star compartment with nominal temperature of -18°C
4 Food freezer compartment (four-star compartment) with nominal temperature of -18°C
⁵)
Climate class: This appliance is intended to be used at an ambient temperature between lowest and
highest temperature:
SN = 10°C-32°C, N = 16°C-32°C, ST = 16°C-38°C, T = 16°C-43°C
Model
KFF185BGL
Category ¹)
7 = Refrigerator-freezer
Fridge net volume, L
210
Freezer net volume, L
74
Energy efficiency class ²)
A++
Annual energy consumption ³), kWh/annum
227
Climate class
N - ST
Frost-free system
yes
Star marking of frozen-food storage compartments 4)
*/****
Freezing capacity, kg / 24 h
8
Temperature rise time, h 5)
15
Height x width x depth of product, cm
185 x 60 x 67
Acoustical noise emissions [dB(A) re1 pW]
41
Construction
Freestanding
Electrical Data: see in the product label

Klugmann Hausgeraete GmbH.
Gropiusstraße 7,
48163 Münster, Deutschland
+49 (0)2501 - 963 5732
+49 (0)2501 - 963 1834
service@klugmann-hausgeraete.de
www.klugmann-hausgeraete.de
Table of contents
Popular Refrigerator manuals by other brands

Whirlpool
Whirlpool GSS30C6EYW User instructions

LG
LG LSC27931SB Specification sheet

Whirlpool
Whirlpool Chillerator GARAGE REFRIGERATOR Use and care guide

KitchenAid
KitchenAid KSSS42M Use and care guide

Hotpoint Ariston
Hotpoint Ariston SBD 2022 F/HA operating instructions

ThinkGizmos
ThinkGizmos TG718 user manual