Kommander K1pro User manual

Disclaimer
Thank you for trusting us and purchasing our product
Copyright of this Manuel belongs to Hunan Bowan Tec Ltd.without our
permission in written form, any form of copying, sharing and saving this file
are seen illegal. We preserve the right of changing and editing the content
without delivering public announcement.
There is controlling software contained in this product, this is your
property ,you can do whatever you want ,but keep this in mind ,you dont want
get yourself into any legal trouble, we own this software. You can copy it ,but
only for personal use. MAY I HAVE YOUR ATTENTION ,if you are using this
product for other porpoise ,especially commercial ,please contact us first.
Reserves the right to pursue legal liability
Pls read this Manuel before you get right into using it, if your mis
operation leads to damage to product, that will do you no good and it is no you;
This product needs electricity to make it run,so play dont play with
electricity.I f you did what we told you nor to do and cause you physical
damage or property loss, we shall not take any responsibility for your stupidity.
If this rule goes against your local laws, we shall set your local law as our
standard
Version Info
Version: v1.0
Release date: 2018.10

Safety instructions
(Power supply)
This device is working properly access the power supply 100~220V AC,
please use this product in this voltage range.
(High voltage)
This equipment contains high voltage components.
(Non-professionals do not disassemble)
This equipment is not equipped with maintenance accessories for
users to repair and use by themselves, please do not open the box for
operation by yourself. Disassembly by yourself may cause irreparable
damage to the equipment. If repair is required, please contact the
after-sales personnel.
(Ensure good grounding and earthing)
To protect users safety ,before you power up this device,make sure that
the earthing is good
Stay away from high-
intensity magnetic field,electric
generator and voltage transformer)
(Keep dry)
Keep dry ,we are not water-proofed device,so if there is water in this
device,dry it up and then check if everything is ok before you plug it
into electricity
(Keep explosive away)
Dont use this device near any explosive things
Avoid fluid and electric conductive particles in box
(You should really keep out fluid and electric conductive
particles from the box, if one of this happened ,you should cut
off electricity right away
after cleaning them away, plug it to
electricity)

Content
Overview............................................................................................................... 3
Hardware introduction.................................................................................... 4
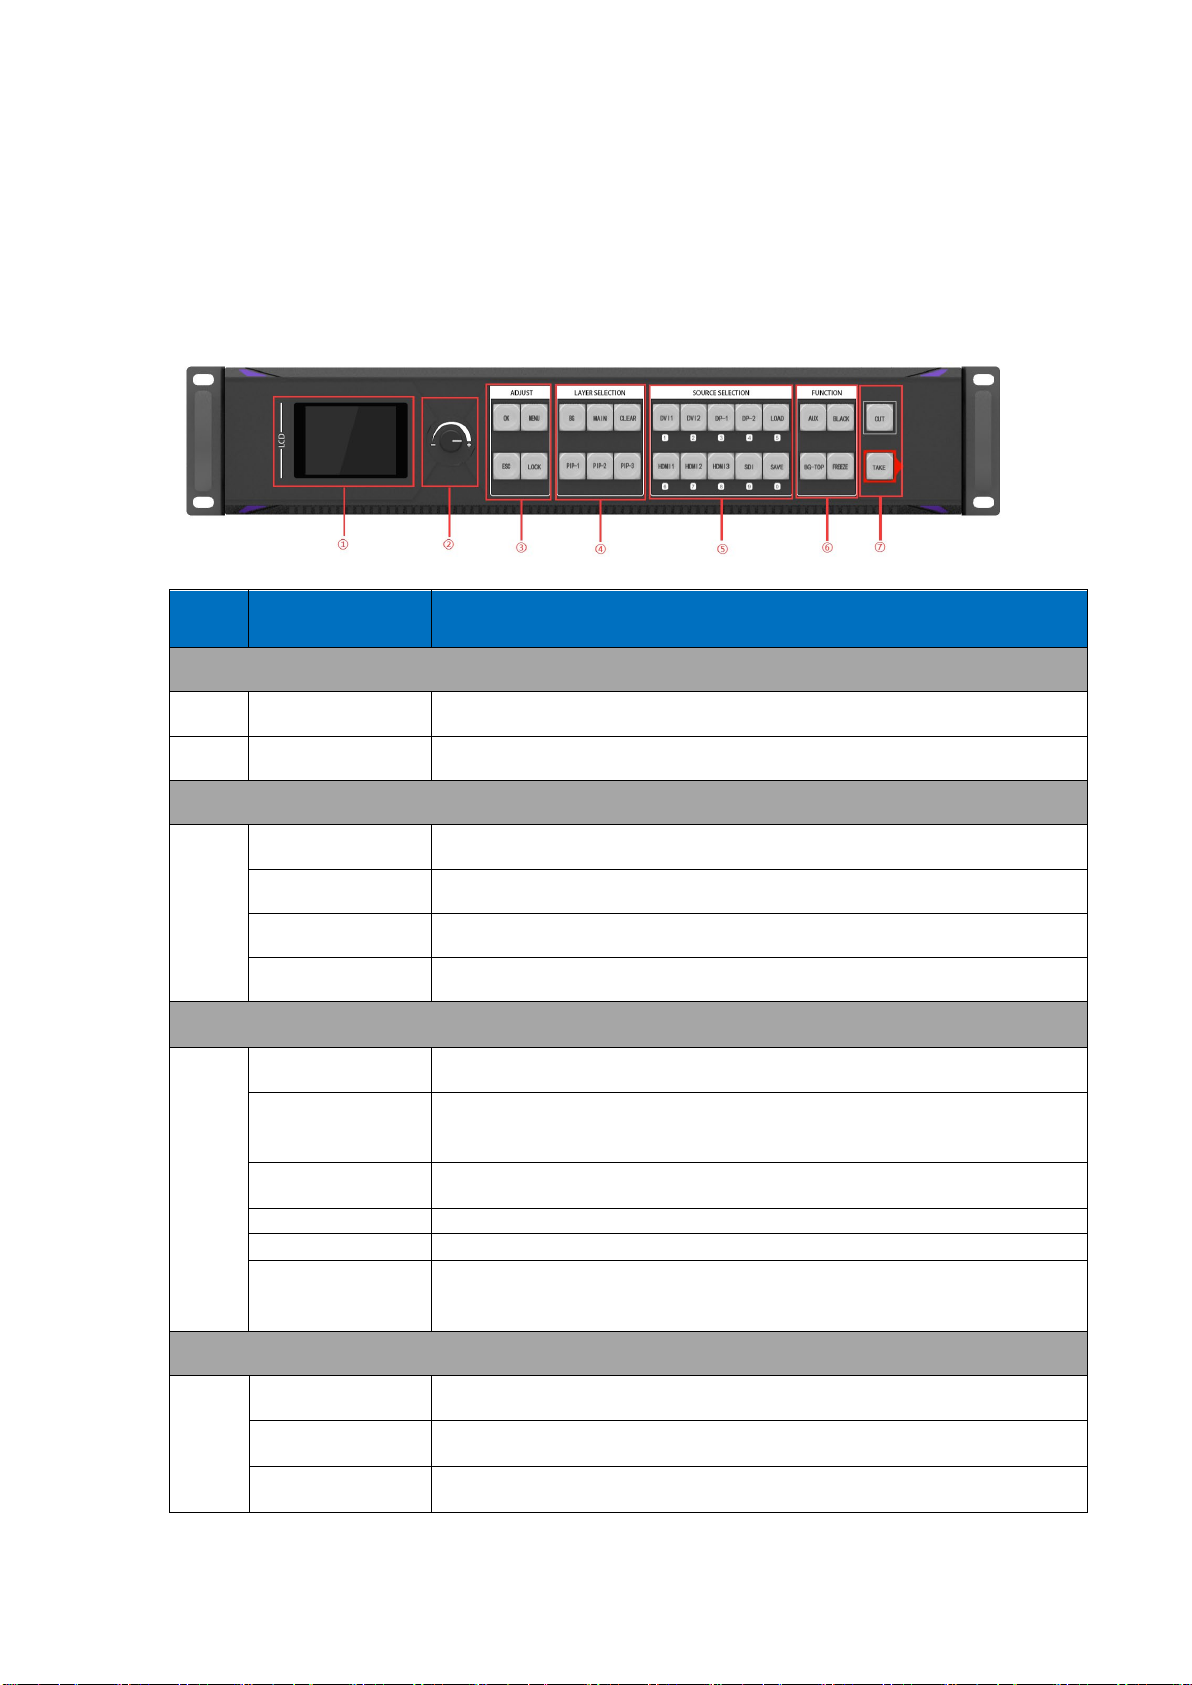
2.1Front panel....................................................................................................................................... 4
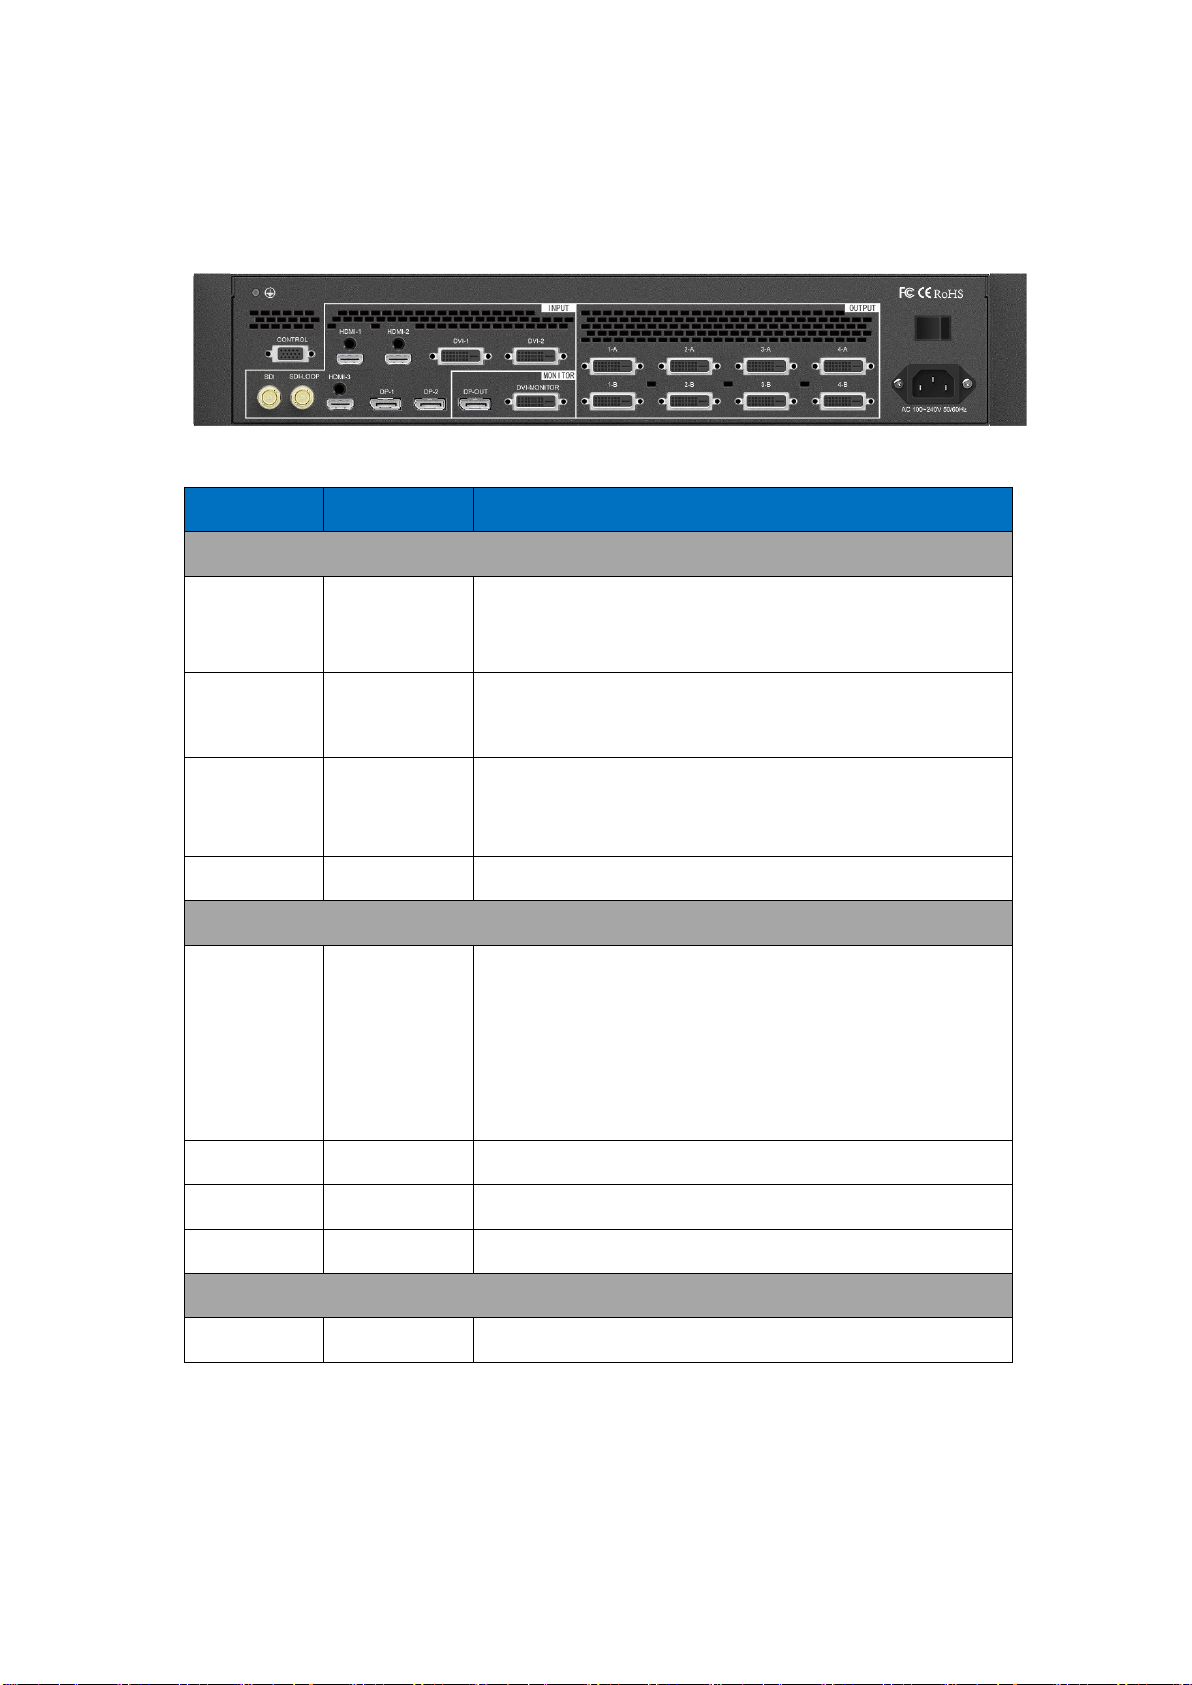
2.2Back panel........................................................................................................................................ 6
2.3Connection....................................................................................................................................... 7
QuickStart Tutorial ........................................................................................... 8
3.1Connection ....................................................................................................................................... 8
3.2Device mode setting ..................................................................................................................... 8
3.3Splice mode settings..................................................................................................................... 9
3.4Screen parameter settings ....................................................................................................... 10
3.5Layout of layers settings ........................................................................................................... 11
3.6Output resolution setting......................................................................................................... 11
3.7Pattern save setting..................................................................................................................... 12
More .....................................................................................................................13
4.1Technology support .................................................................................................................... 13
4.2Advanced menu settings........................................................................................................... 13
4.2.1Languange.............................................................................................................................. 13
4.2.2Factory settings.................................................................................................................... 14
4.2.3Special effects settings ...................................................................................................... 14
4.2.4Pattern deletion................................................................................................................... 15
4.2.5Multiple machine connection......................................................................................... 16
4.2.6Hide the lost signal............................................................................................................. 16
4.2.7Communication settings .................................................................................................. 16
4.3Layer info settings....................................................................................................................... 17
4.3.1Image parameters................................................................................................................ 17
4.3.2Local settings........................................................................................................................ 18
4.3.3Global& Local Display....................................................................................................... 18
4.3.4Advanced settingsLayer.................................................................................................... 19

4.4Signal choose ................................................................................................................................ 19
4.4.1List of ports............................................................................................................................ 19
4.4.2output brightness................................................................................................................ 20
4.4.3Output contrast.................................................................................................................... 20
4.4.4EDID........................................................................................................................................ 21
4.4.5Intellectual hot backup and validity of input signal .............................................. 21
Splicing Functions...........................................................................................22
5.1Horizontal splice .......................................................................................................................... 22
5.2Vertically splice ............................................................................................................................ 23
5.32*2..................................................................................................................................................... 24

Overview
MPC-K1pro is a splicer and processor, supporting 76801080@60 pixel to
pixel display, powered and programmed by Hunan Bowan Tech. Ltd.
Company, also known as Kommander, have been mainly used to splice and
broadcast for four independent main and backup channel with 76801080@60
main and backup output4main4backup output splice Splice mode ,four layers
and switcher and splicer two in one mode, can be easily implemented in
middle small sale of conference .
Characteristics:
2* 4K@60Hz Display Port input signal
Support 15360 pixels width utmost vertically 7680pixels utmost support many
device connection splice
Two work mode PVW&PGM, monitoring every signal
Screenshot the outputting signal as a background, in case of input crash
One button pushes switch content in PVW&PGM to avoid maloperation
Connect Kommander PS4 Server to achieve highest security of broadcast. When
broadcast system does crash or other unexpected situations, K1Pro can switch to
backup signal of Kommander server automatically.
4 ports stitched but still support arbitrary layout of layers, painkiller in this industry
Support cut and take effects fade in fade out and other special effects one click Take
and Cut
All layer support image matting and feathering transparency adjustment, to provide
everything you could use to improve the quality of event
Adjust brightness and contrast of every single output individually, and set EDID
Built-in Military power anti-interference filter, no matter how complicated the
environment is
One button black and freeze

Hardware introduction
2.1Front panel
N0. Name Description
LCD monitor
①LCD display User-friendly interface, provide vivid image of operations
②Twist Used to change parameters in menu
ADJUST
③
OK Confirm button
MENU Menu button
ESC Esc button to return to previous menu
LOCK Lock/unlock keyboard
LAYER SELECTION
④
BG Press to enter background setting interfaceyou can get/delete, reload BG
MAIN MAINlong press for 3 second to create the main layerafter activation ,enter the
main layer setting panel
Clear Delete appointed layer
PIP-1
Layer 1long press for 3 second to create layer 1after activation ,enter the setting
PIP-2
Layer 2long press for 3 second to create layer 2after activation ,enter the setting
PIP-3 Layer3,long press for 3 second to create layer 3after activation ,enter layer 3
setting panel
SOURCE SELECTION
⑤
DVI1/1 DVI-1 /11
DVI2/2 DVI-2/22
DP-1/3 DP-1/33

DP-2/4 DP-2/44
LOAD/5 /55
HDMI1/6 HDMI-1/66
HDMI2/7 HDMI-2/77
HDMI3/8 HDMI-3/88
SDI/9 SDI/99
SAVE/0 /1010
FUNCTION
⑥
AUX Look all activate button
BLACK Output black
BG TOP Background top all layers
Freeze Output picture all freeze
CUT AND TAKE
⑦
CUT Cut between PVW and PGM
TAKE Switch between PVW and PGM with certain special effects

2.2Back panel
Port Qty. Resolution/Standards
Input
DVI24+1 2 19201080/60HZ ,compatible downwardsVESA standard
resolution
DP1.2 2 38402160/60HZ,compatible downwardsDP1.2 standard
resolution
HDMI 3 19201080/60HZ
,compatible downwardscompatible to
HDMI1.3 and older version
SDI 1 Support SD-SDIHD-SDI and 3G-SDI
Output
1-A1-B
2-A2-B
3-A3-B
4-A4-B
DVI8
(4 set main-backup
ports)
Support those
resolutions:20481152@60Hz19201080@60Hz15361536@
60HZ
Support customize resolutionWidth 4000 utmostHeight
SDI-LOOP SDI1 3G-SDIsupport to 1080P/1080I
DP-OUT DP1 Look back one signal
DVI-MONIT
DVI1 19201080/60HZ(fixed) for monitor
Control port
COM RS2321 Serial port control

2.3Connection
监控显示器
舞台演出现场
摄像机(实时显示) 笔记本(Z3播控4K输出)
Kommander K1 MINI切换台
光纤1080P三路
视频处理器/发送卡
监控控制显示器
控制台(选配)笔记本(Z3播控4K输出)Kommander F1视控服务器(选配)

QuickStart Tutorial
3.1Connection
According to your needsconnect input and outputK1Pro supports ports
below
3.2Device mode setting
DEVICE MODE
Device mode module contains 2 options, they are PVW&PGM, according
to your need and choose the corresponding mode
Splicer modeLED Display changes to your actions ,what you do reflects
on screen
Port Qty. Resolution/Standards
Input
DVI24+1 2
19201080/60HZ ,compatible downwardsVESA standard
DP1.2 2
38402160/60HZ,compatible downwardsDP1.2 standard
HDMI 3 19201080/60HZ,compatible downwardscompatible to
SDI 1 Support SD-SDIHD-SDI and 3G-SDI
Output
5-A1-B
6-A2-B
7-A3-B
8-A4-B
DVI8
(4 set main-backup
ports)
Support those
resolutions:20481152@60Hz19201080@60Hz15361536@
60HZ
SDI-LOOP SDI1 3G-SDIsupport to 1080P/1080I
DP-OUT DP1 Look back one signal
DVI-MONIT
DVI1 19201080/60HZ(fixed) for monitor
Control port
COM RS2321 Serial port control

Switcher mode Operations only take effects on PVWswitch to make led
display change
3.3Splice mode settings
SPLICE MODE
Three optionsHorizontal vertical2*2 spliceAccording to the distribution
of the connected led and choose the fitting mode.
Horizontal layoutSplicer put them horizontally like a line and make a
complete picture
Vertical layoutSplicer put them horizontally like a pole and make a
complete picture
2*2Splicer put them together 2*2 like a square, we call it

注释:
所有输出口田字排列
水平拼接
垂直拼接
田字拼接
3.4Screen parameter settings
Screen parameters
4OUT1OUT2OUT3OUT444Screen parameter setting module is
designed to change and adjust the parameters in system so that the actually
connected screen to the machine could match. Parameters of
OUT1OUT2OUT3OUT4 is correspond the output at the back of machine ,irs
serial number can be seen at the back of the machine
OUT1 水平位置:0
垂直位置:0
水平大小:1920
垂直大小:1080
×1 ×10 ×100
点击LOCK调节幅度
OUT2
OUT3
OUT4

3.5Layout of layers settings
Layout of layers
The screen layout function module includes four fixed layout patterns.
The layout mode is fixed through the layers activated by the screen layout.
Layout 1Activate one layerone layer fill the whole screen
Layout 2Activate two layersLayout of layers look like the one belowLayer
3 and 4 are following this pattern
布局一
布局二
布局三
布局四
画面一
S1
3.6Output resolution setting
Output resolution
The output resolution function module can define the output port load
and output frequency of the splicer. The output resolution is divided into
general resolution and custom resolution. The custom resolution is that the
output port size can be defined according to the specific needs when the
conventional resolution does not meet the conditions.

1024×768
1280×720
1280×768
1280×800
1280×960
1280×1024
¼
旋钮选择输出分辨率
点击"OK"进入下一级
50Hz
30Hz
60Hz
3.7Pattern save setting
Pattern save
You can save all fixed parameters in the pattern for later use, easy to
reloadYou can save 32 patterns
模式1
模式2
模式3
模式4
模式5
模式6
模式7
模式8
¼
保存模式1
拼接模式 2×2
画面布局 1
S1
画面一
After saving it ,you can recall it whenever you need

More
4.1Technology support
Support
Here you can see all essential information about this device and a 400-
hotline
4.2Advanced menu settings
4.2.1Languange
CN/ENHere you can change its language into Chinese ,English or Russian

中文 ENGLISH
4.2.2Factory settings
Here you can restore all saved settings and patterns
确认 取消
所有设置将被重置
4.2.3Special effects settings
Set TAKE special effects between PGM and PVW and its duration

特效类型
特效时间
画面切换所使用的时间
淡入淡出
直接切换
椭圆入
椭圆出
菱形入
菱形出
向上划幕
右上划幕
0.2S
0.4S
0.6S
0.8S
1.0S
1.5S
2.0S
3.0S
向右划幕
右下划幕
向下划幕
左下划幕
向左划幕
左上划幕
水平梳理
垂直梳理
4.2.4Pattern deletion
Delete the saved patterns. You can choose either single deletion or
continuous deletion. The operation of individual deletion is to select the
pattern number to be deleted and confirm deletion. The operation of
continuous deletion is to select the preset start number and end number to be
deleted and confirm deletion.
单个模式 多个连续模式
请选择删除模式和模式编号!
编号
确认 取消

4.2.5Multiple machine connection
This function is turned off if there is only one device When multiple is
needed to load the splicing task ,you can turn that on and achieve many
machine sync, this is the diagram of connection
开启 关闭
S1 S2 S3
S4 S5 S6
4.2.6Hide the lost signal
Turned off by defaultwhen it is turned onwhen the signal is lostthis layer
will be hideWhen the signal is restored ,the layer will appear again
关闭
开启
4.2.7Communication settings
Communication setting module include serial port settings and IP

settingsBy changing its parameters collocate the twist
IP地址
子网掩码
192.168.0.100
255.255.255.0
网关 192.168.0.254
串口
校验位
COM
115200
数据位
NONE
波特率
停止位
8
1
CautionWhen done setting the communication settings, you have to reboot the
machine to make it take effects
4.3Layer info settings
Two ways to activate layers:1.By long pressing the PIP button to create a
layer,2.Choose a layout of layers to activate corresponding layersThe MAIN
layer is activated by defaultLayer setting interface includes all settings of
layers
DVI 图像参数
局部设置
全景显示
高级设置
信号状态:输入正常
输入分辨率:1920×1080
热备份通道:NONE
4.3.1Image parameters
Image parameters is by adjusting its horizontal and vertical
Table of contents