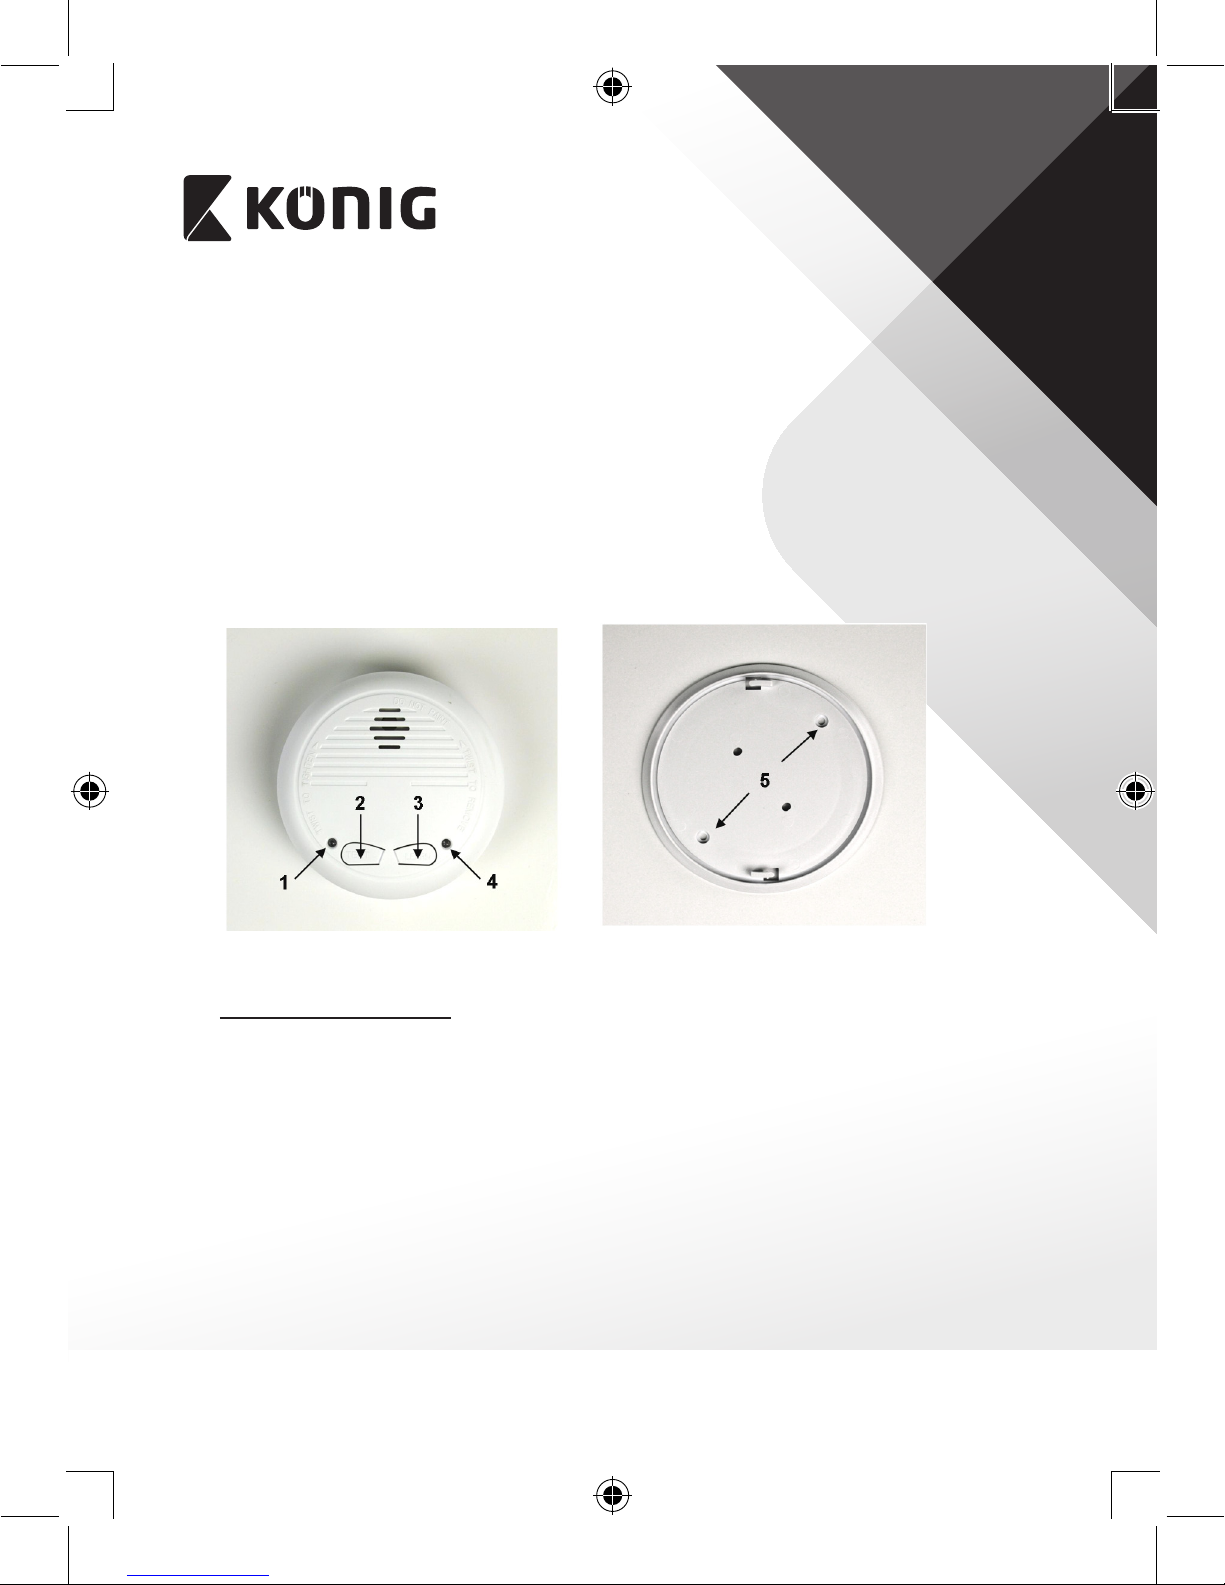
Konig SAS-SA200 User manual

SAS‑SA200/2002
MANUAL (p. 2)
ANLEITUNG (S. 9)
MODE D’EMPLOI (p. 16)
GEBRUIKSAANWIJZING (p. 23)
MANUALE (p. 30)
MANUAL DE USO (p. 37)
MANUAL (p. 44)
HASZNÁLATI ÚTMUTATÓ (o. 51)
KÄYTTÖOHJE (s. 58)
BRUKSANVISNING (s. 65)
NÁVOD K POUŽITÍ (s. 72)
MANUAL DE UTILIZARE (p. 79)
ΕΓΧΕΙΡΙΔΙΟ XPHΣHΣ (σελ. 86)
BRUGERVEJLEDNING (s. 93)
VEILEDNING (s. 100)
ИНСТРУКЦИЯ (107 стр.)
KILAVUZ (s. 114)
KASUTUSJUHEND (lk. 121)
NÁVOD (s. 128)
ROKASGRĀMATA (lpp. 135)
NAUDOJIMO VADOVAS (142 p.)
PRIRUČNIK (str. 149)
РЪКОВОДСТВО (p. 156)
INSTRUKCJA OBSŁUGI (str. 163)
PRIROČNIK (str. 170)
Interconnectable Optical Smoke Alarm

ENGLISH
2
Introduction
This battery operated optical smoke alarm sends out a signal through radio
frequency to activate other installed SAS‑SA200/2002’s in case smoke is detected.
When installing multiple SAS‑SA200/2002’s, the smoke alarm that detects smoke will
automatically activate all other SAS‑SA200/2002’s to give an early warning audible
alarm. This provides extra time to leave the house. Equipped with a learn button and
a test button for periodic testing.
A smoke alarm has a limited life and should always be replaced 10 years after the
date of purchase. Write the purchase date on this manual for future reference.
The smoke alarm complies with the EN14604 standard of the Construction Products
Directive.
• We recommend that you read this manual before you install the smoke alarm
• Keep this manual in a safe place for future reference
Safety precautions
Do not expose the product to water or moisture
Do not paint over the smoke alarm
Packaging content
• 1x Smoke alarm
• 1x 9 V battery
• 3x 1.5 V AA batteries
• 1x Mounting material
• 1x Manual
Table of contents
• Introduction 2
• Safety precautions 2
• Packaging content 2
• Technical specications 3
• Product and user description 3
• Installation instructions 6
• Maintenance 8
• Warranty 8
• Disclaimer 8
• Disposal 8

ENGLISH
3
Technical specications
• Radio frequency: 433.92 MHz
• Battery: 1x 9 V DC, 3x 1.5 V AA
• Alarm: > 85 db (3 m)
• Maximum number to connect: unlimited
• Maximum range: 40 metres
• Test button: yes
• Learn button: yes
• Low battery alert: yes
• Operating temperature: ‑10 °C ~ + 40 °C
Product and user description
1. ALARM indicator
2. TEST button
Testing the smoke alarm
Like any other electronic device, smoke alarms are not foolproof. Smoke alarms
contain electronic components that can fail or wear out at any time.
We recommended that you test the smoke alarm every week to make sure it is
working properly.
Push and hold the test button until the alarm sounds for a few seconds. The
(red) alarm indicator (1) and (green) learn indicator (4) will ash for a moment.
If the alarm does not sound, check if the battery indicator ashes once every
45 seconds. If this is not the case and testing fails, please replace the batteries
immediately.

ENGLISH
4
Battery indicator
The battery indicator ashes every 45 seconds to show that the smoke alarm is
working properly. When the battery indicator ashes and gives a short beeping
sound, it indicates that the battery has a low capacity and should be replaced
immediately.
3. LEARN button
Follow the next steps to set the MAIN smoke alarm and ASSISTANT smoke
alarm(s) to create a smoke alarm system with 2 or more SAS‑SA200/2002’s.
1. Press the LEARN button two times. The LEARN indicator turns from red to
green. This smoke alarm will be the MAIN smoke alarm. Ensure the LEARN
indicator is green before proceeding.
2. Press the LEARN button of the ASSISTANT smoke alarm(s) once. The ALARM
indicator(s) turns on red. Ensure the ALARM indicator(s) are red before
proceeding.
3. Press the TEST button of the MAIN smoke alarm for several seconds in order
to send out the learn signal to the ASSISTANT smoke alarm(s). The ALARM
indicator ashes and the smoke alarm sounds. The ASSISTANT smoke
alarm(s) receive the signal and sounds.
4. Press the TEST button on each ASSISTANT smoke alarm(s) for several
seconds in order to send out the learn signal to the MAIN smoke alarm. The
MAIN smoke alarm receives the signal and sounds.
Note: the number of smoke alarms is unlimited. The maximum range between
2smoke alarms to communicate with each other is 40 metres.
4. LEARN indicator
5. Mounting plate and holes
Use the supplied screws and plugs to mount the mounting plate to the ceiling.
6. Remove the mounting place
Turn the mounting plate of the smoke
alarm counter clockwise to get access to
the battery compartment of the smoke
alarm.

ENGLISH
5
7. Battery compartment 9 V battery
8. Battery compartment 1.5 V AA battery
9. Safety catch
The safety catch prevents installing the
smoke alarm on the mounting plate
without inserting the battery rst. Note:
push the safety catch of the 1.5 V AA
battery into the battery compartment
when placing the batteries.
10. Placing the 9 V battery
Take o the plastic seal of the 9 V battery
and place the 9 V battery in the battery
compartment. Conform to the polarity
markings inside the battery compartment.
11. Placing the 1.5 V AA batteries
Take o the plastic seal of the 1.5 V AA
batteries and place the 1.5 V AA batteries
in the battery compartment. Place the
1.5V AA batteries conforming to the
polarity markings inside the battery
compartment.

ENGLISH
6
After placing the battery, use the test button to see if the smoke alarm works
properly.
(See Testing the smoke alarm.)
When the mounting plate is mounted on the ceiling and the smoke alarm is tested
after inserting the batteries, place the smoke alarm on the mounting plate by
turning it clockwise.
See the following chapter for where to mount the smoke alarm(s).
Installation instructions
Install a smoke alarm in every room or area on every level of the home.
Smoke may not reach the smoke alarm if it’s installed in only one room or area. If a
re starts in another room or area to where the smoke alarm is installed, the smoke
alarm will not detect the smoke, or will detect it too late to alert the household
members. A smoke alarm will not promptly detect a re except in the room or area
in which it is installed.
Place at least one smoke alarm in every room/area between the bedroom and the
exit of the house.
We recommended that you make an emergency escape plan, and practice this with
the members of your household, in case of an emergency.
The requirements for the installation of the smoke alarm may dier slightly by
region. Please contact your local authorities for any additional requirements.
Example installation of smoke alarms:
Bedroom Hallway
Hallway
Hallway
Hallway
Loft
Bedroom
Kitchen
Basement
Living room

ENGLISH
7
On ceilings
Install smoke alarms as close to the centre of
the ceiling as possible. If this is not possible,
install the smoke alarm at least 30 to 50 cm
from the wall.
(Due to dead air spaces)
Rooms with a gabled ceiling
Install the smoke alarm 90 cm from the
highest point.
(Due to dead air spaces)
ceiling mounting
minimum 30/50 cm
Minimum 90 cm
Note: when installing a smoke alarm in a hallway that is 7.5 metres or longer, we
recommended that you install a smoke alarm at the beginning and at the end of the
hallway.
Do not install a smoke alarm
‑ In a humid, dusty and smoky environment
‑ In rooms or areas where temperatures are below 4 °C or above 38 °C
‑ In the kitchen, bathroom or garage
‑ In drafty places
‑ Near a fan or air vent
‑ Above heating
Note: when installing a smoke alarm in a hallway that is 7.5 metres or longer, we
recommended that you install a smoke alarm at the beginning and at the end of the
hallway.

ENGLISH
8
Maintenance
We recommended that you clean the smoke alarm once a month. Gently vacuum the outside of the smoke alarm with the
soft brush attachment of the vacuum cleaner. Do not use water, cleaning solvents or abrasives.
Warranty
No guarantee or liability can be accepted for any changes and modications of the product or damage caused due to
incorrect use of this product.
Disclaimer
Designs and specications are subject to change without prior notice. All logos, brands and product names are trademarks
or registered trademarks of their respective holders and are hereby recognised as such.
Disposal
• This product is designated for separate collection at an appropriate collection point.
Do not dispose of this product with household waste.
• For more information, contact the retailer or the local authority responsible for waste management.
This product has been manufactured and supplied in compliance with all relevant regulations and directives, valid for all
member states of the European Union. It also complies to all applicable specications and regulations in the country of sales.
Formal documentation is available upon request. This includes, but is not limited to: Declaration of Conformity (and product
identity), Material Safety Data Sheet, product test report.
Please contact our customer service desk for support:
via website: http://www.nedis.com/en‑us/contact/contact‑form.htm
via telephone: +31 (0)73‑5993965 (during oce hours)
NEDIS B.V., De Tweeling 28, 5215 MC ’s-Hertogenbosch, THE NETHERLANDS
13
Intended re safety and installed in buildings
Essential characteristic 1: Pass
Essential characteristic 2: Pass
Essential characteristic 3: Pass
Essential characteristic 4: Pass
Essential characteristic 5: Pass
Essential characteristic 6: Pass
Essential characteristic 7: Pass
Essential characteristic 8: Pass
Model: LM‑101LG
DoP: 201308060001
0832‑CPR‑FR0033
EN 14604:2005/AC:2008
Smoke alarm devices

DEUTSCH
9
Einleitung
Batteriebetriebener optischer Rauchmelder, mit Funkübertragung zur Aktivierung
weiterer installierter SAS‑SA200/2002, sobald Rauch entdeckt wird. Beim Einbau
mehrerer SAS‑SA200/2002, wird der Rauchmeldealarm, der den Rauch erkennt,
aktiviert automatisch alle anderen SAS‑SA200/2002, damit diese einen akustischen
Frühwarnalarm abgeben. Dies verschat zusätzliche Zeit, das Haus zu verlassen.
Mit einer Lerntaste und einer Testtaste ausgestattet, um das System regelmäßig zu
testen.
Eine Rauchmeldeanlage hat eine begrenzte Lebensdauer und muss jeweils 10 Jahre
nach Kaufdatum ausgetauscht werden. Schreiben Sie das Kaufdatum als zukünftige
Referenz auf dieses Handbuch.
Dieser Rauchmelder erfüllt die Norm EN14604 der Europäischen Produktnorm.
• Wir empfehlen Ihnen, dieses Handbuch zu lesen, bevor Sie den Rauchmelder
installieren
• Bewahren Sie diese Bedienungsanleitung für späteres Nachschlagen auf.
Sicherheitsvorkehrungen
Setzen Sie das Gerät nicht Wasser oder Feuchtigkeit aus
Überstreichen Sie den Rauchmelder nicht mit Farbe
Verpackungsinhalt
• 1x Rauchmelder
• 1x 9 V Batterie
• 3x 1,5 V AA Batterie
• 1x Installationsmaterial
• 1x Handbuch
Inhaltsverzeichnis
• Einleitung 9
• Sicherheitsvorkehrungen 9
• Verpackungsinhalt 9
• Technische Spezikationen 10
• Produktund Benutzerbeschreibung 10
• Installationsanleitungen 13
• Wartung 15
• Garantie 15
• Haftungsausschluss 15
• Entsorgung 15

DEUTSCH
10
Technische Spezikationen
• Funkfrequenz: 433,92 MHz
• Akku: 1x 9 V DC, 3x 1,5 V AA
• Wecker: > 85 db (3 m)
• Maximal anzuschließende Anzahl Geräte: unbegrenzt
• Maximale Reichweite: 40 Meter
• Testtaste: ja
• Lerntaste: ja
• Alarm bei niedrigem Batteriestand: ja
• Betriebstemperatur: ‑10 °C ~ + 40 °C
Produktund Benutzerbeschreibung
1. ALARM-Anzeige
2. TEST-Taste
Den Rauchmelder testen
Wie jedes andere elektronische Gerät sind auch Rauchmelder nicht 100%
betriebssicher. Rauchmelder enthalten elektronische Bauteile, die ausfallen oder
jederzeit verschleißen können.
Wir empfehlen, dass Sie den Rauchmelder wöchentlich testen, um
sicherzustellen, dass dieser ordnungsgemäß funktioniert.
Drücken und halten Sie die Testtaste gedrückt, bis der Alarm einige Sekunden
lang ertönt. Die (rote) Alarmanzeige (1) und die (grüne) Lernanzeige (4)blinken
einen Augenblick lang. Wenn der Alarm nicht ertönt, prüfen Sie, ob die
Batterieanzeige einmal alle 45 Sekunden blinkt. Wenn nicht und wenn der Test
fehlschlägt, tauschen Sie die Batterien sofort aus.

DEUTSCH
11
Batterieanzeige
Die Batterieanzeige blinkt alle 45Sekunden, um anzuzeigen, dass der
Rauchmelder ordnungsgemäß funktioniert. Wenn die Batterieanzeige blinkt und
einen kurzen Piepston abgibt, zeigt dies an, dass die Batterieleistung niedrig ist
und die Batterie sofort ausgetauscht werden muss.
3. LERN Taste
Zum Einstellen des HAUPT‑Rauchmelders und des (der) NEBEN‑Rauchmelder,
um ein Rauchmeldesystem mit 2 oder mehr SAS‑SA200/2002 zu erstellen.
1. Drücken Sie zwei Mal die LERN‑Taste. Die LERN‑Anzeige schaltet von rot auf
grün um. Diese Rauchmeldeanlage ist die HAUPT‑Rauchmeldeanlage. Stellen
Sie sicher, dass die LERN Anzeige grün ist, bevor Sie fortfahren.
2. Drücken Sie einmal die LERN‑Taste der NEBEN‑Rauchmeldeanlage(n). Die
ALARM Anzeige(n) schaltet/‑en auf Rot. Stellen Sie sicher, dass die ALARM
Anzeige(n) rot ist/sind, bevor Sie fortfahren.
3. Drücken Sie die TEST‑Taste der HAUPT‑Rauchmeldeanlage mehrere
Sekunden lang, um das Lernsignal an die NEBEN‑Rauchmeldeanlage(n) zu
senden. Die ALARM‑Anzeige blinkt und die Rauchmeldeanlage ertönt. Die
NEBEN‑Rauchmeldeanlage(n) erhält/‑en das Signal und ertönt/‑en.
4. Drücken Sie die TEST‑Taste an jeder NEBEN‑Rauchmeldeanlage mehrere
Sekunden lang, um das Lernsignal an den HAUPT‑Rauchmeldeanlage zu
senden. Die HAUPT‑Rauchmeldeanlage erhält das Signal und ertönt.
Hinweis: Die Anzahl der Rauchmeldeanlagen ist unbegrenzt. Der
Maximalabstand zwischen 2 Rauchmeldeanlagen, um miteinander zu
kommunizeren, beträgt 40Meter.
4. LERN-Anzeige
5. Montageplatten und Bohrungen
Verwenden Sie die mitgelieferten Schrauben und Stecker, um die Montageplatte
an der Decke zu montieren.

DEUTSCH
12
6. Entfernen der Montageplatte
Drehen Sie die Montageplatte des
Rauchmelders gegen den Uhrzeigersinn,
um das Batteriefach des Rauchmelders zu
önen.
7. Batteriefach für 9V Batterie
8. Batteriefach für 1,5V AA Batterie
9. Aushängesicherung
Die Aushängesicherung verhindert, die
Rauchmeldeanlage auf der Montageplatte
anzubauen, ohne dass zuvor die Batterie
eingelegt wurde. Hinweis: Drücken Sie die
Aushängesicherung beim Einlegen der
1,5VAA Batterie in das Batteriefach.
10. Einlegen der 9V Batterie
Entfernen Sie die Plastikversiegelung von
der 9V Batterie und legen dann Sie die
Batterie in das Batteriefach ein. Beachten
Sie die Polaritätsmarkierungen im
Batteriefach.

DEUTSCH
13
11. Einlegen der 1,5VAA Batterien
Entfernen Sie die Plastikversiegelung
von den 1,5VAA Batterien und legen
dann Sie die 1,5VAA Batterien in das
Batteriefach ein. Legen Sie die 1,5VAA
Batterien ein und beachten Sie dabei die
Polaritätsmarkierungen innerhalb des
Batteriefachs.
Nachdem Sie die Batterie eingelegt haben, drücken Sie die Test‑Taste, um zu sehen,
ob die Rauchmeldeanlage ordnungsgemäß funktioniert.
(Siehe Rauchmeldeanlage testen.)
Wenn die Montageplatte an der Decke montiert und die Rauchmeldeanlage
getestet ist, nachdem die Batterien eingelegt wurden, positionieren Sie die
Rauchmeldeanlage auf die Montageplatte, indem Sie diese im Uhrzeigersinn
drehen.
Lesen Sie im folgenden Kapitel nach, wo die Rauchmeldeanlage(n) eingebaut wird/
werden.
Installationsanleitungen
Installieren Sie in jedem Zimmer oder Bereich, auf jeder Etage Ihres Hauses einen
Rauchmelder.
Es kann sein, dass der Rauch den Rauchmelder nicht erreicht, wenn diese nur
in einem Zimmer oder Bereich installiert ist. Wenn ein Brand in einem anderen
Zimmer oder Bereich ausbricht, als dem, wo die Rauchmeldeanlage eingebaut ist,
erkennt die Rauchmeldeanlage den Rauch nicht oder es ist zu spät, die anderen
Haushaltsmitglieder zu alarmieren. Ein Rauchmelder erkennt einen Brand nur dann
sofort, wenn dieser in dem betreenden Zimmer oder Bereich installiert ist.
Platzieren Sie mindestens eine Rauchmeldeanlage in jedem Zimmer/Bereich
zwischen Ihrem Schlafzimmer und dem Ausgang des Hauses.
Wir empfehlen Ihnen, einen Notfall‑Fluchtplan zu erstellen und diesen mit den
Mitgliedern Ihres Haushaltes im Notfall zu praktizieren.
Die Anforderungen für den Einbau der Rauchmeldeanlage können je nach Region
leicht abweichen. Bitte kontaktieren Sie Ihre örtlichen Behörden, um jegliche
zusätzliche Anforderungen in Erfahrung zu bringen.

DEUTSCH
14
Beispiel für den Einbau von Rauchmeldeanlagen:
Schlafzimmer Flur
Flur
Flur
Flur
Dachboden
Schlafzimmer
Küche
Kellergeschoss
Wohnzimmer
An Decken
Bauen Sie die Rauchmeldeanlagen so nah
wie möglich zur Mitte der Decke ein. Sollte
dies nicht möglich sein, platzieren Sie die
Rauchmeldeanlage mindestens 30‑50cm
von der Wand.
(Auf Grund der Toträume)
Zimmer mit einer Giebeldecke
Bauen Sie die Rauchmeldeanlage 90cm
vom höchsten Punkt entfernt ein.
(Auf Grund der Toträume)
Deckenmontage mit
einem Abstand von
mindestens 30/50cm
Minimum 90cm
Hinweis: Wenn Sie eine Rauchmeldeanlage in einem Flur mit einer Länge
von 7,5Metern oder länger einbauen, empfehlen wir Ihnen, dass Sie eine
Rauchmeldeanlage am Anfang und Ende des Flurs einbauen.
Installieren Sie keinen Rauchmelder
‑ In einer feuchten, staubigen oder verrauchten Umgebung
‑ In Zimmern oder Bereichen mit Temperaturen unter 4°C oder über 38°C
‑ In der Küche, dem Badezimmer oder der Garage

DEUTSCH
15
‑ In zugigen Räumen
‑ Neben einem Ventilator oder einer Entlüftungsanlage
‑ Oberhalb einer Heizung
Hinweis: Wenn Sie eine Rauchmeldeanlage in einem Flur mit einer Länge
von 7,5Metern oder länger einbauen, empfehlen wir Ihnen, dass Sie eine
Rauchmeldeanlage am Anfang und Ende des Flurs einbauen.
Wartung
Wir empfehlen Ihnen, die Rauchmeldeanlage einmal monatlich zu reinigen. Reinigen Sie den Rauchmelder vorsichtig von
außen mit einem Staubsauger mit einer weichen Bürste. Verwenden Sie kein Wasser, Reinigungsmittel oder Scheuermittel
zur Reinigung des Rauchmelders.
Garantie
Es kann keine Garantie oder Haftung für irgendwelche Änderungen oder Modikationen des Produkts oder für Schäden
übernommen werden, die aufgrund einer nicht ordnungsgemäßen Anwendung des Produkts entstanden sind.
Haftungsausschluss
Design und technische Daten können ohne vorherige Ankündigung geändert werden. Alle Logos, Marken und
Produktnamen sind Marken oder eingetragene Marken ihrer jeweiligen Eigentümer und werden hiermit als solche
anerkannt.
Entsorgung
• Dieses Produkt muss an einem entsprechenden Sammelpunkt zur Entsorgung abgegeben werden.
Entsorgen Sie dieses Produkt nicht zusammen mit dem Hausmüll.
• Weitere Informationen erhalten Sie beim Verkäufer oder der für die Abfallwirtschaft verantwortlichen
örtlichen Behörde.
Dieses Produkt wurde hergestellt und geliefert in Übereinstimmung mit allen geltenden Vorschriften und Richtlinien, die für
alle Mitgliedsstaaten der Europäischen Union gültig sind. Es entspricht allen geltenden Vorschriften und Bestimmungen im
Land des Vertriebs.
Eine formale Dokumentation ist auf Anfrage erhältlich. Diese beinhaltet unter anderem, jedoch nicht ausschließlich:
Konformitätserklärung (und Produktidentität), Sicherheitsdatenblatt, Testreport des Produkts.
Wenden Sie sich bei Fragen bitte an unseren Kundendienst:
per Internet: http://www.nedis.de/de‑de/kontakt/kontaktformular.htm
per Telefon: Niederlande +31 (0)73‑5993965 (während der Geschäftszeiten)
NEDIS B.V., De Tweeling 28, 5215 MC ’s-Hertogenbosch, NIEDERLANDE
13
Zu Brandschutzzwecken und in Gebäuden installiert
Wesentliches Merkmal 1: Bestanden
Wesentliches Merkmal 2: Bestanden
Wesentliches Merkmal 3: Bestanden
Wesentliches Merkmal 4: Bestanden
Wesentliches Merkmal 5: Bestanden
Wesentliches Merkmal 6: Bestanden
Wesentliches Merkmal 7: Bestanden
Wesentliches Merkmal 8: Bestanden
Modell: LM‑101LG
DoP: 201308060001
0832‑CPR‑FR0033
EN 14604:2005/AC:2008
Rauchmeldergeräte

FRANÇAIS
16
Introduction
Détecteur de fumée optique, alimenté par pile, avec transmission à fréquence radio
pour activer d'autres détecteurs SAS‑SA200/2002 en présence de fumée. Lors de
l'installation de plusieurs SAS‑SA200/2002, le détecteur de fumée qui se déclenche
en premier activera automatiquement tous les autres an de produire une alarme
sonore pour une d’alerte avancée. Un temps d'évacuation supplémentaire est ainsi
garanti. Muni d'un bouton de test et d'acquisition pour un contrôle régulier.
Un détecteur de fumée a une durée de vie limitée et doit toujours être remplacé
10ans après la date d'achat. Notez la date d'achat sur ce manuel pour une
consultation future.
Ce détecteur de fumée est conforme à la norme EN14604 de la directive des
«Produits de Construction».
• Nous vous recommandons de lire ce manuel avant que vous n'installiez le
détecteur de fumée
• Conservez ce manuel dans un endroit sûr, pour pouvoir le consulter ultérieurement
Précautions d'emploi
Ne pas exposer l’appareil à l’eau ni à l’humidité
Ne pas peindre sur le détecteur de fumée
Contenu de l'emballage
• 1x Détecteur de fumée
• 1x batterie de 9V
• 3x batteries de type AA de 1,5V
• 1x Support de xation
• 1x Manuel
Table des matières
• Introduction 16
• Précautions d'emploi 16
• Contenu de l'emballage 16
• Spécications techniques 17
• Description du produit et du fonctionnement 17
• Instructions d'installation 20
• Entretien 22
• Garantie 22
• Avertissement 22
• Élimination des déchets 22

FRANÇAIS
17
Spécications techniques
• Fréquence radio: 433,92 MHz
• Batterie: 1x 9 V DC, 3x 1,5 V de type AA
• Alarme: > 85 dB (3 m)
• Nombre maximum de connexion: illimité
• Portée maximale: 40 mètres
• Bouton test: oui
• Bouton d'acquisition: oui
• Indicateur de niveau faible de batterie: oui
• Température de fonctionnement: ‑10 °C ~ + 40 °C
Description du produit et du fonctionnement
1. Indicateur d'ALARME
2. Bouton de TEST
Test du détecteur de fumée
Comme tout autre dispositif électronique, les détecteurs de fumée ne sont pas
infaillibles. Les détecteurs de fumée contiennent des composants électroniques
qui peuvent tomber en panne ou s'user à tout moment.
Nous vous recommandons que vous testiez le détecteur de fumée chaque
semaine pour contrôler son bon fonctionnement.
Appuyez et maintenez le bouton d'essai jusqu'à ce que l'alarme retentisse
pendant quelques secondes. L'indicateur (1) d'alarme (rouge) et l'indicateur
(4) d'acquisition (vert) clignotera pendant quelques instants. Si l'alarme ne se
déclenche pas, vériez que l'indicateur de niveau de batterie clignote une fois
toutes les 45secondes. Si ce n'est pas le cas et le test échoue, remplacez alors
immédiatement les batteries.

FRANÇAIS
18
Indicateur de niveau de batterie
L'indicateur de niveau de batterie clignote toutes les 45secondes pour indiquer
que le détecteur de fumée fonctionne correctement. Quand l'indicateur de
niveau de batterie clignote et un bip sonore se produit, il indique que le niveau
de la batterie est faible et qu'elle doit être remplacée immédiatement.
3. Bouton d'ACQUISITION
Pour dénir le détecteur de fumée PRINCIPAL et les détecteurs de fumée
ASSISTANTS an d'établir un réseau de détecteur de fumée avec 2 ou plusieurs
SAS‑SA200/2002.
1. Appuyez deux fois sur le bouton APPRENTISSAGE. L'indicateur
d'APPRENTISSAGE passe du rouge au vert. Ce détecteur de fumée devient le
détecteur de fumée PRINCIPAL. Vériez que l'indicateur d'ACQUISITION est
vert avant de poursuivre.
2. Appuyez une fois sur le bouton d'ACQUISITION des détecteurs de fumée
ASSISTANT. Les indicateurs d'ALARME deviennent rouges. Vériez que les
indicateurs d'ALARME sont rouges avant de poursuivre.
3. Appuyez sur le bouton de TEST du détecteur de fumée PRINCIPAL pendant
plusieurs secondes an d'émettre le signal d'acquisition aux détecteurs
de fumée ASSISTANT. L'indicateur d'ALARME clignote et l'alarme sonore
de détection de fumée se déclenche. Les détecteurs de fumée ASSISTANT
reçoivent le signal et se mettent à sonner.
4. Appuyez sur le bouton de TEST de chaque détecteur de fumée ASSISTANT
pendant plusieurs secondes an d'émettre le signal d'acquisition au
détecteur de fumée PRINCIPAL. Le détecteur de fumée PRINCIPAL reçoit le
signal et se met à sonner.
Remarque: le nombre de détecteur de fumée est illimité. La distance maximale
de communication entre 2 détecteurs de fumée est de 40mètres.
4. Indicateur d'APPRENTISSAGE
5. Plaque et trous de xation
Utilisez les vis et les chevilles fournies pour installer la plaque de xation au
plafond.

FRANÇAIS
19
6. Démontage de la plaque de xation
Tournez la plaque de xation du détecteur
de fumée dans le sens anti‑horaire pour
accéder au compartiment de la batterie
de l'appareil.
7. Compartiment de la batterie de 9V
8. Compartiment des batteries de 1,5V de
type AA
9. Cran de sûreté
Le cran de sûreté évite d'installer le
détecteur de fumée sur la plaque de
xation sans avoir introduit la batterie en
premier. Remarque: poussez le cran de
sûreté des batteries de 1,5V de type AA
à l'intérieur du compartiment de batterie
lors de l'installation des batteries.
10. Installation de la batterie de 9V
Retirez la protection en plastique de la
batterie de 9V et placez la batterie dans
son compartiment. Respectez la polarité
indiquée à l'intérieur du compartiment de
la batterie.

FRANÇAIS
20
11. Installation des batteries de 1,5V de
type AA
Retirez la protection en plastique des
batteries de 1,5V de type AA et placez
les batteries dans leur compartiment.
Placez les batteries de 1,5V de type AA, en
respectant la polarité indiquée à l'intérieur
du compartiment.
Après avoir introduit les batteries, utilisez le bouton de test pour vérier le bon
fonctionnement du détecteur de fumée.
(Voir Test du détecteur de fumée.)
Quand la plaque de xation est installée et le détecteur de fumée a été testé,
après avoir introduit les batteries, remontez l'alarme sur la plaque de xation en la
tournant dans le sens horaire.
Voir le chapitre suivant pour savoir où installer les détecteurs de fumée.
Instructions d'installation
Installez un détecteur de fumée dans chaque pièce ou endroit et à tous les étages
de l'habitation.
La fumée peut ne pas atteindre le détecteur de fumée s'il est uniquement installé
dans une seule pièce ou un seul endroit. Si un incendie débute dans une autre pièce
ou un autre endroit, privé de détecteur de fumée, le détecteur de fumée ne relèvera
pas la présence de fumée, ou la détectera trop tard pour avertir les membres de
l'habitation. Un détecteur de fumée sera en mesure de détecter rapidement un
incendie uniquement dans la pièce ou l'endroit où il est installé.
Placez au moins un détecteur de fumée dans chaque pièce/endroit entre la chambre
à coucher et la sortie de l'habitation.
Nous vous recommandons d'établir un plan d'évacuation, en cas d'urgence, et de le
mettre en pratique avec les autres membres de votre habitation.
Les obligations d'installer un détecteur de fumée varient légèrement en fonction
des régions. Veuillez consulter vos autorités locales an de connaître les obligations
supplémentaires.
This manual suits for next models
1
Table of contents
Languages:
Other Konig Smoke Alarm manuals