Konig SAS-HA100 User manual

SAS-HA100
Heat alarm
USER MANUAL
GEBRUIKSAANWIJZING
BEDIENUNGSANLEITUNG
MANUAL DE USUARIO
MANUEL DE L’UTILISATEUR
MANUALE PER L’UTENTE
MANUAL DO UTILIZADOR
BRUGSVEJLEDNING
BRUKERVEILEDNING
BRUKSANVISNING
KÄYTTÖOPAS
ΕΓΧΕΙΡΙΔΙΟ XPHΣHΣ
INSTRUKCJA OBSŁUGI
NÁVOD K POUŽITÍ
NÁVOD NA POUŽITIE
HASZNÁLATI ÚTMUTATÓ
MANUAL DE UTILIZARE
РУКОВОДСТВО ПОЛЬЗОВАТЕЛЯ
KULLANIM KILAVUZU

2
English
SAS-HA100
Heat alarm
Description
The heat alarm was designed to detect heat. The heat alarm does not detect smoke or gas. Heat
alarms are intended to be supplementary to smoke alarms, located in areas where smoke alarms
cannot be used. The device is suitable for indoor use only.
If the device detects heat, the alarm will sound and the indicator will ash red continuously until the
heat is eliminated.
8
6
7
5
21 3
4
1. Heat alarm
2. Heat indicator
3. Test button
4. Ventilation openings
5. Battery compartment
6. Mounting plate
7. Screw
8. Plug

3
English
Safety
• Read the manual carefully before use. Keep the manual for future reference.
• Only use the device for its intended purposes. Do not use the device for other purposes than
described in the manual.
• Do not use the device if any part is damaged or defective. If the device is damaged or defective,
replace the device immediately.
Installation
Warning!
• Do not use the device outdoors.
• Do not expose the device to water or moisture.
• Install the device out of the reach of children.
• Install at least one device at each oor level. Preferably install one device in each recommended area.
• Install the device in the bedroom or in the hallway adjacent to the bedroom. Make sure that you
can hear the alarm in all bedrooms. Install devices at both ends of the hallway or room if the
hallway or room is longer than 9 metres.
• Do not install the device in bathrooms, toilets or other rooms where the device can be triggered
by steam or condensation.
• Do not install the device in dusty or dirty environments.
• Do not install the device near radiators or air vents in walls or ceilings.
• Do not install the device near doors and windows.
• Do not install the device behind curtains or furniture.
• Do not block the ventilation openings.
• Do not paint the device.
Area Yes No
Living room X
Dining room X
Kitchen X
Bathroom / Toilet X
Bedroom X
Hallway X
Attic X
Basement X
Garage X
Boiler room X

4
English
min.10 cm
min.10 cm
max. 30 cm
122 cm
90 cm 90 cm
5 mm

5
English
Use
Heat indicator
1 Normal operation The indicator will ash red once every
60seconds. Action: ---
2 Heat detection
The alarm will sound and the indicator
will ash red continuously until the heat is
eliminated.
Action: Eliminate
the heat.
3 Low-battery warning The alarm will beep and the indicator will ash
red once every 60seconds.
Action: Replace the
battery.
Testing the alarm
The alarm must be tested weekly to ensure correct operation.
1. Press and hold the test button for 3 seconds.
The alarm will sound and the indicator will ash red continuously until the test button is released.
Alarm sound: 3 short beeps, 2 seconds pause (repeated).
2. Release the test button.
Cleaning and maintenance
Warning!
• Do not use cleaning solvents or abrasives.
• Do not clean the inside of the device.
• Do not attempt to repair the device. If the device does not operate correctly, replace it with a new
device.
1. Replace the battery at least once a year or immediately when the device gives a low-battery
warning.
2. Clean the outside of the device at least once a month. Use a vacuum cleaner with brush nozzle to
clean the outside of the device.

6
English
Technical data
Battery type
9V battery (PP3)
Alkaline battery:
6LR61 (IEC) / 1604A (ANSI/NEDA)
Zinc-carbon battery:
6F22 (IEC) / 1604D (ANSI/NEDA)
Battery life 1 year
Standby current < 30 μA
Alarm current < 30 mA
Alarm volume > 85 dB(A) (3 m)
Ambient temperature 4~44 °C
Relative humidity 25~85%
Warranty
Any changes and/or modications to the product will void the warranty. We cannot accept any
liability for damage caused by incorrect use of the product.
Disposal
• The product is designated for separate collection at an appropriate collection point. Do not
dispose of the product with household waste.
• For more information, contact the retailer or the local authority responsible for waste
management.

7
English
Documentation
The product has been manufactured and supplied in compliance with all relevant regulations
and directives, valid for all member states of the European Union. The product complies with all
applicable specications and regulations in the country of sales.
Formal documentation is available upon request. The formal documentation includes, but is not
limited to the Declaration of Conformity, the Material Safety Data Sheet and the product test report.
Disclaimer
Designs and specications are subject to change without notice. All logos, brands and product
names are trademarks or registered trademarks of their respective holders and are hereby recognized
as such.

8
Nederlands
SAS-HA100
Hittemelder
Omschrijving
De hittemelder is ontworpen om rook te detecteren. De hittemelder detecteert geen rook of gas.
Hittemelders zijn bedoeld als aanvulling op rookmelders, in ruimten waar rookmelders niet kunnen
worden gebruikt. Het apparaat is uitsluitend geschikt voor gebruik binnenshuis.
Indien het apparaat hitte detecteert, gaat het alarm af en knippert de indicator continu rood totdat
de hitte wordt geëlimineerd.
8
6
7
5
21 3
4
1. Hittemelder
2. Hitte-indicator
3. Testknop
4. Ventilatieopeningen
5. Batterijvak
6. Montageplaat
7. Schroef
8. Plug

9
Nederlands
Veiligheid
• Lees de handleiding voor gebruik aandachtig door. Bewaar de handleiding voor latere
raadpleging.
• Gebruik het apparaat uitsluitend voor het beoogde doel. Gebruik het apparaat niet voor andere
doeleinden dan beschreven in de handleiding.
• Gebruik het apparaat niet als een onderdeel beschadigd of defect is. Indien een onderdeel
beschadigd of defect is, vervang het apparaat dan onmiddellijk.
Installatie
Waarschuwing!
• Gebruik het apparaat niet buitenshuis.
• Stel het apparaat niet bloot aan water of vocht.
• Installeer het apparaat buiten bereik van kinderen.
• Installeer minstens één apparaat op iedere verdieping. Installeer bij voorkeur één apparaat in
iedere aanbevolen ruimte.
• Installeer het apparaat in de slaapkamer of in de gang die aan de slaapkamer grenst. Zorg ervoor
dat u het alarm in alle slaapkamers kan horen. Installeer apparaten aan beide uiteinden van de
gang of kamer als de gang of kamer langer is dan 9 meter.
• Installeer het apparaat niet in badkamers, toiletten of andere ruimtes waar het apparaat kan
worden geactiveerd door stoom of condens.
• Installeer het apparaat niet in stoge of vieze omgevingen.
• Installeer het apparaat niet in de buurt van radiatoren of ventilatieroosters in muren of plafonds.
• Installeer het apparaat niet in de buurt van deuren en ramen.
• Installeer het apparaat niet achter gordijnen of meubels.
• Blokkeer de ventilatieopeningen niet.
• Schilder het apparaat niet.
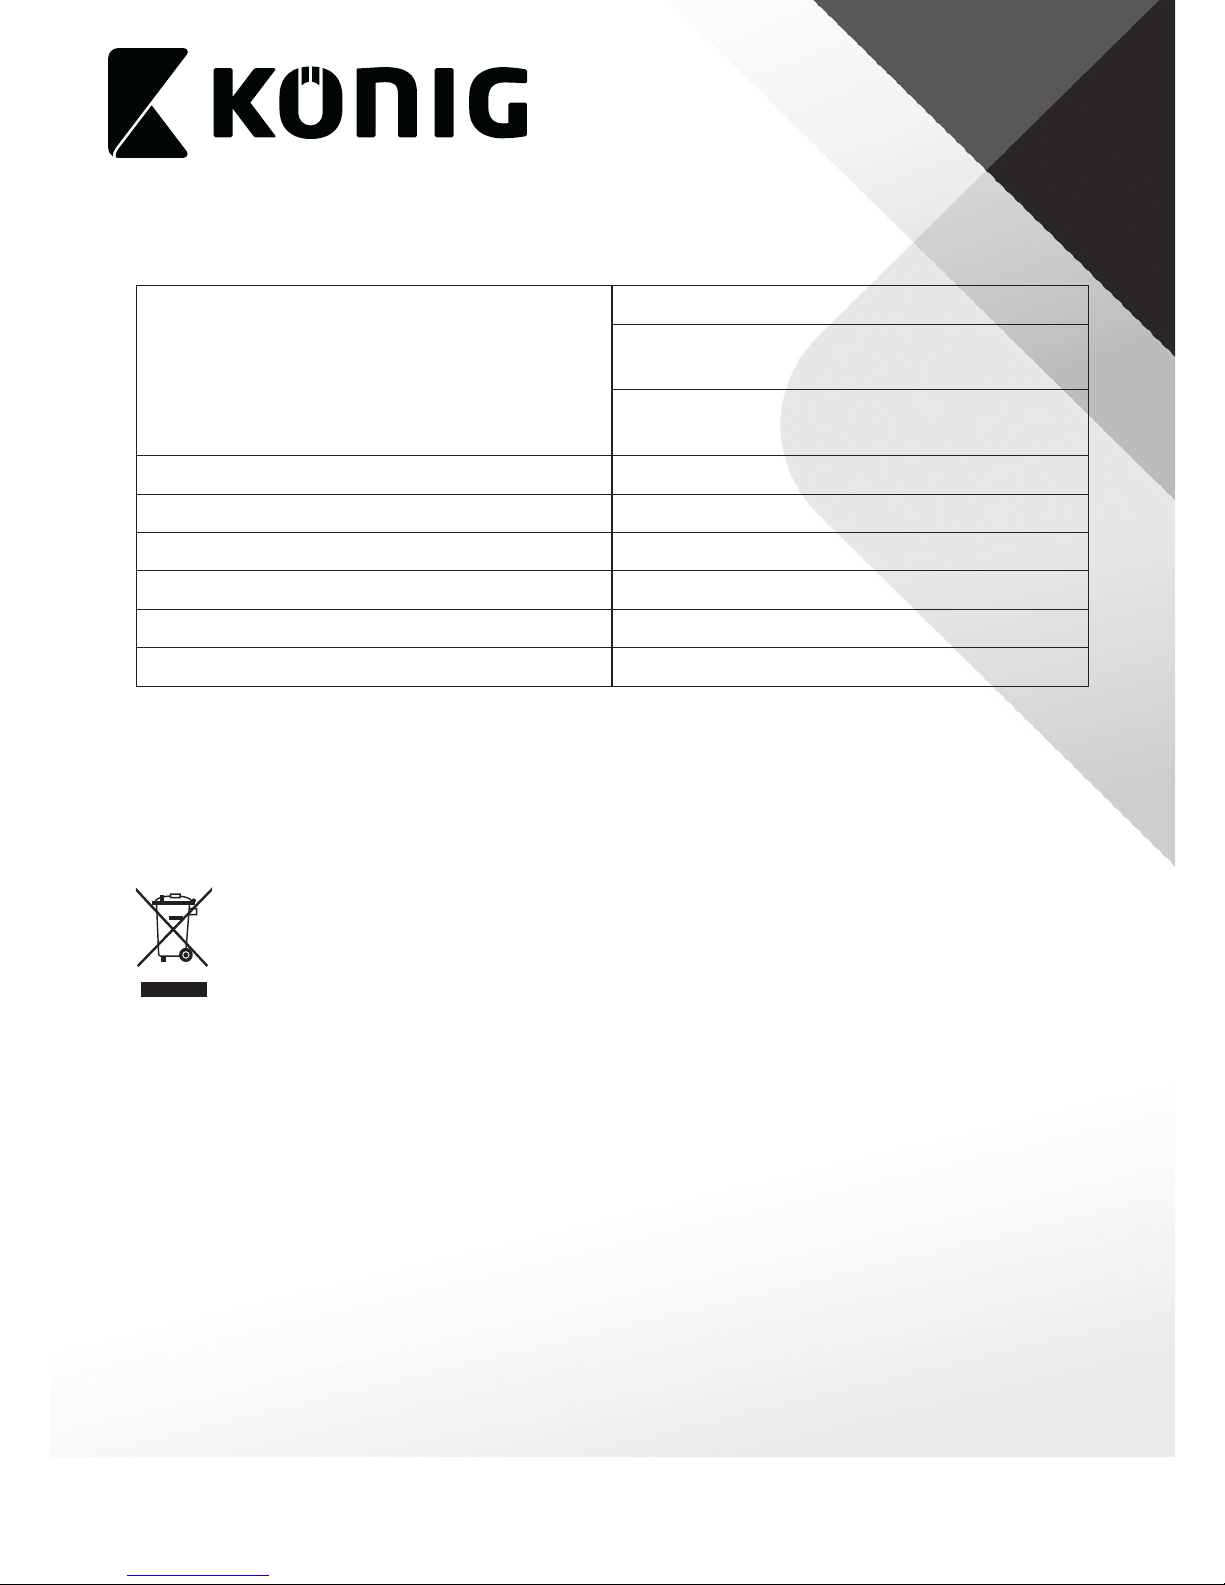
Ruimte Ja Nee
Woonkamer X
Eetkamer X
Keuken X
Badkamer / Toilet X
Slaapkamer X
Gang X
Zolder X
Kelder X
Garage X
Boilerruimte X

10
Nederlands
min.10 cm
min.10 cm
max. 30 cm
122 cm
90 cm 90 cm
5 mm

11
Nederlands
Gebruik
Hitte-indicator
1 Normaal bedrijf De indicator knippert iedere 60seconden
rood. Actie: ---
2 Hittedetectie
Het alarm gaat af en de indicator knippert
continu rood totdat de hitte wordt
geëlimineerd.
Actie: Elimineer de
hitte.
3Waarschuwing batterij
bijna leeg
Het alarm piept en de indicator knippert
iedere 60seconden rood.
Actie: Vervang de
batterij.
Het alarm testen
Het alarm moet wekelijks worden getest om de juiste werking te garanderen.
1. Houd de testknop gedurende 3 seconden ingedrukt.
Het alarm gaat af en de indicator knippert continu rood totdat het water wordt geëlimineerd.
Alarmgeluid: 3 korte piepjes, 2 seconden pauze (herhaald).
2. Laat de testknop los.
Reiniging en onderhoud
Waarschuwing!
• Gebruik geen reinigingsmiddelen of schuurmiddelen.
• Reinig niet de binnenzijde van het apparaat.
• Probeer het apparaat niet te repareren. Indien het apparaat niet juist werkt, vervang het dan door
een nieuw apparaat.
1. Vervang de batterij minstens één keer per jaar of onmiddellijk wanneer het apparaat aangeeft dat
de batterij bijna leeg is.
2. Reinig de buitenzijde van het apparaat minstens één keer per maand. Gebruik een stofzuiger met
borstelmondstuk om de buitenzijde van het apparaat te reinigen.

12
Nederlands
Technische gegevens
Type batterij
9V-batterij (PP3)
Alkalinebatterij:
6LR61 (IEC) / 1604A (ANSI/NEDA)
Zink-koolstofbatterij:
6F22 (IEC) / 1604D (ANSI/NEDA)
Levensduur batterij 1 jaar
Stand-by-stroom < 30 μA
Alarmstroom < 30 mA
Alarmvolume > 85 dB(A) (3 m)
Omgevingstemperatuur 4~44 °C
Relatieve vochtigheid 25~85%
Garantie
Eventuele wijzigingen en/of aanpassingen aan het product zullen de garantie ongeldig maken. Wij
aanvaarden geen aansprakelijkheid voor schade veroorzaakt door onjuist gebruik van het product.
Afdanken
• Het product is bestemd voor gescheiden inzameling bij een hiertoe aangewezen verzamelpunt.
Werp het product niet weg bij het huishoudelijk afval.
• Neem voor meer informatie contact op met de detailhandelaar of de lokale overheid die
verantwoordelijk is voor het afvalbeheer.

13
Nederlands
Documentatie
Het product is vervaardigd en geleverd in overeenstemming met de relevante reglementen en
richtlijnen die voor alle lidstaten van de Europese Unie gelden. Het product voldoet aan alle van
toepassing zijnde specicaties en reglementen in het land van verkoop.
Op aanvraag is ociële documentatie verkrijgbaar. De ociële documentatie omvat, maar
is niet beperkt tot de Verklaring van Overeenstemming, de Material Safety Data Sheet en het
producttestrapport.
Disclaimer
Ontwerpen en specicaties kunnen zonder kennisgeving worden gewijzigd. Alle logo’s, merken
en productnamen zijn handelsmerken of geregistreerde handelsmerken van de respectievelijke
eigenaren en worden hierbij als zodanig erkend.

14
Deutsch
SAS-HA100
Hitzemelder
Beschreibung
Der Hitzemelder wurde zur Erkennung von Hitze konstruiert. Der Hitzemelder erkennt keinen
Rauch und kein Gas. Hitzemelder sind als Ergänzung zu Rauchmeldern gedacht und benden sich
in Bereichen, in denen Rauchmelder nicht verwendet werden können. Das Gerät eignet sich nur zur
Verwendung in Innenräumen.
Wenn das Gerät Hitze erkennt, ertönt der Alarm und die Anzeige blinkt kontinuierlich rot, bis die
Hitze beseitigt ist.
8
6
7
5
21 3
4
1. Hitzemelder
2. Hitzeanzeige
3. Prüftaste
4. Belüftungsönungen
5. Batteriefach
6. Montageplatte
7. Schraube
8. Dübel

15
Deutsch
Sicherheit
• Lesen Sie die Bedienungsanleitung vor dem Gebrauch genau durch. Bitte bewahren Sie die
Bedienungsanleitung zur späteren Bezugnahme auf.
• Verwenden Sie das Gerät nur bestimmungsgemäß. Verwenden Sie das Gerät nur für den in dieser
Bedienungsanleitung beschriebenen Zweck.
• Verwenden Sie das Gerät nicht, falls ein Teil beschädigt oder defekt ist. Ist das Gerät beschädigt
oder defekt, erneuern Sie es unverzüglich.
Installation
Warnung!
• Verwenden Sie das Gerät nicht im Freien.
• Setzen Sie das Gerät keinem Wasser und keiner Feuchtigkeit aus.
• Installieren Sie das Gerät so, dass es für Kinder unzugänglich ist.
• Installieren Sie mindestens ein Gerät auf jedem Stockwerk. Installieren Sie möglichst ein Gerät in
jedem empfohlenen Bereich.
• Installieren Sie das Gerät im Schlafzimmer oder im Flur, der an das Schlafzimmer angrenzt. Stellen
Sie sicher, dass Sie den Alarm in allen Schlafzimmern hören können. Installieren Sie Geräte an
beiden Enden des Flurs oder Raums, falls der Flur oder Raum länger als 9 Meter ist.
• Installieren Sie das Gerät nicht in Badezimmern, Toiletten oder anderen Räumen, in denen es
durch Dampf oder Kondensation ausgelöst werden kann.
• Installieren Sie das Gerät nicht in staubigen oder schmutzigen Umgebungen.
• Installieren Sie das Gerät nicht in der Nähe von Radiatoren oder Be-/Entlüftungsönungen in
Wänden oder Decken.
• Installieren Sie das Gerät nicht in der Nähe von Türen oder Fenstern.
• Installieren Sie das Gerät nicht hinter Gardinen oder Möbeln.
• Blockieren Sie nicht die Lüftungsönungen.
• Lackieren Sie das Gerät nicht.
Bereich Ja Nein
Wohnzimmer X
Esszimmer X
Küche X
Badezimmer/Toilette X
Schlafzimmer X
Flur X
Dachgeschoss X
Keller X
Garage X
Heizungsraum X

16
Deutsch
min.10 cm
min.10 cm
max. 30 cm
122 cm
90 cm 90 cm
5 mm

17
Deutsch
Gebrauch
Hitzeanzeige
1 Normalbetrieb Die Anzeige blinkt alle 60 Sekunden ein Mal
rot. Handlung: ---
2 Hitzeerkennung Der Alarm ertönt und die Anzeige blinkt
kontinuierlich rot, bis die Hitze beseitigt ist.
Handlung:
Beseitigen Sie die
Hitze.
3Warnung - Batterie
schwach
Der Alarm ertönt und die Anzeige blinkt alle
60 Sekunden ein Mal rot.
Handlung: Erneuern
Sie die Batterie.
Prüfen des Alarms
Der Alarm muss wöchentlich geprüft werden, um die einwandfreie Funktion des Geräts
sicherzustellen.
1. Drücken und halten Sie die Prüftaste 3 Sekunden lang.
Der Alarm ertönt und die Anzeige blinkt kontinuierlich rot, bis die Prüftaste losgelassen wird.
Alarmton: 3 kurze Signaltöne, 2 Sekunden Pause (wiederholend).
2. Lassen Sie die Prüftaste los.
Reinigung und Pege
Warnung!
• Verwenden Sie keine Lösungs- oder Scheuermittel.
• Reinigen Sie das Gerät nicht von innen.
• Versuchen Sie nicht, das Gerät zu reparieren. Falls das Gerät nicht einwandfrei arbeitet, tauschen
Sie es gegen ein neues aus.
1. Erneuern Sie die Batterie mindestens einmal im Jahr oder dann, wenn signalisiert wird, dass die
Batterie schwach ist.
2. Reinigen Sie das Äußere des Geräts mindestens ein Mal im Monat. Verwenden Sie einen
Staubsauger mit einer Bürstendüse, um das Äußere des Geräts zu reinigen.

18
Deutsch
Technische Daten
Batterietyp
9V Batterie (PP3)
Alkalische Batterie:
6LR61 (IEC) / 1604A (ANSI/NEDA)
Zink-Kohle-Batterie:
6F22 (IEC) / 1604D (ANSI/NEDA)
Batterielaufzeit 1 Jahr
Standby-Stromaufnahme < 30 μA
Alarm-Stromaufnahme < 30 mA
Alarm-Lautstärke > 85 dB(A) (3 m)
Umgebungstemperatur 4~44 °C
Relative Feuchtigkeit 25~85%
Garantie
Alle Änderungen und/oder Modizierungen an dem Produkt haben ein Erlöschen der Garantie zur
Folge. Wir übernehmen keine Haftung für Schäden durch unsachgemäße Verwendung des Produkts.
Entsorgung
• Dieses Produkt muss an einer entsprechenden Sammelstelle zur Entsorgung abgegeben werden.
Entsorgen Sie das Produkt nicht mit dem Haushaltsabfall.
• Weitere Informationen erhalten Sie beim Verkäufer oder der für die Abfallwirtschaft
verantwortlichen örtlichen Behörde.

19
Deutsch
Dokumentation
Dieses Produkt wurde in Übereinstimmung mit allen geltenden Vorschriften und Richtlinien
hergestellt und geliefert, die für alle Mitgliedsstaaten der Europäischen Union gültig sind. Das
Produkt entspricht allen geltenden Spezikationen und Bestimmungen im Land des Vertriebs.
Eine formale Dokumentation ist auf Anfrage erhältlich. Die formale Dokumentation beinhaltet die
Konformitätserklärung, das Datenblatt zur Materialsicherheit und den Produktprüfbericht, ohne
jedoch darauf beschränkt zu sein.
Haftungsausschluss
Design und technische Daten unterliegen unangekündigten Änderungen. Alle Logos, Marken und
Produktnamen sind Marken oder eingetragene Marken ihrer jeweiligen Eigentümer und werden
hiermit als solche anerkannt.

20
Español
SAS-HA100
Alarma de calor
Descripción
La alarma de calor se ha diseñado para detectar calor. La alarma de calor no detecta humo ni gas.
Las alarmas de calor son un complemento de las alarmas de humo y se sitúan en zonas donde no
pueden utilizarse las alarmas de humo. El dispositivo sólo es apto para uso en interiores.
Si el dispositivo detecta calor, la alarma sonará y el indicador parpadeará en rojo de forma continua
hasta que se elimine el calor.
8
6
7
5
21 3
4
1. Alarma de calor
2. Indicador de calor
3. Botón de prueba
4. Aberturas de ventilación
5. Compartimento de la batería
6. Placa de montaje
7. Tornillo
8. Enchufe
Table of contents
Languages:
Other Konig Smoke Alarm manuals
Popular Smoke Alarm manuals by other brands

Aritech
Aritech 2X-A Series installation manual

AJAX
AJAX FireProtect user manual

GEZE
GEZE GC 172 Supplementary sheet

Challenger
Challenger SMART FORCE ASFSM Installation and operating instructions

System Sensor
System Sensor OSI-RE-SS Installation and maintenance instructions

Siterwell
Siterwell GS511-B-H01 user manual