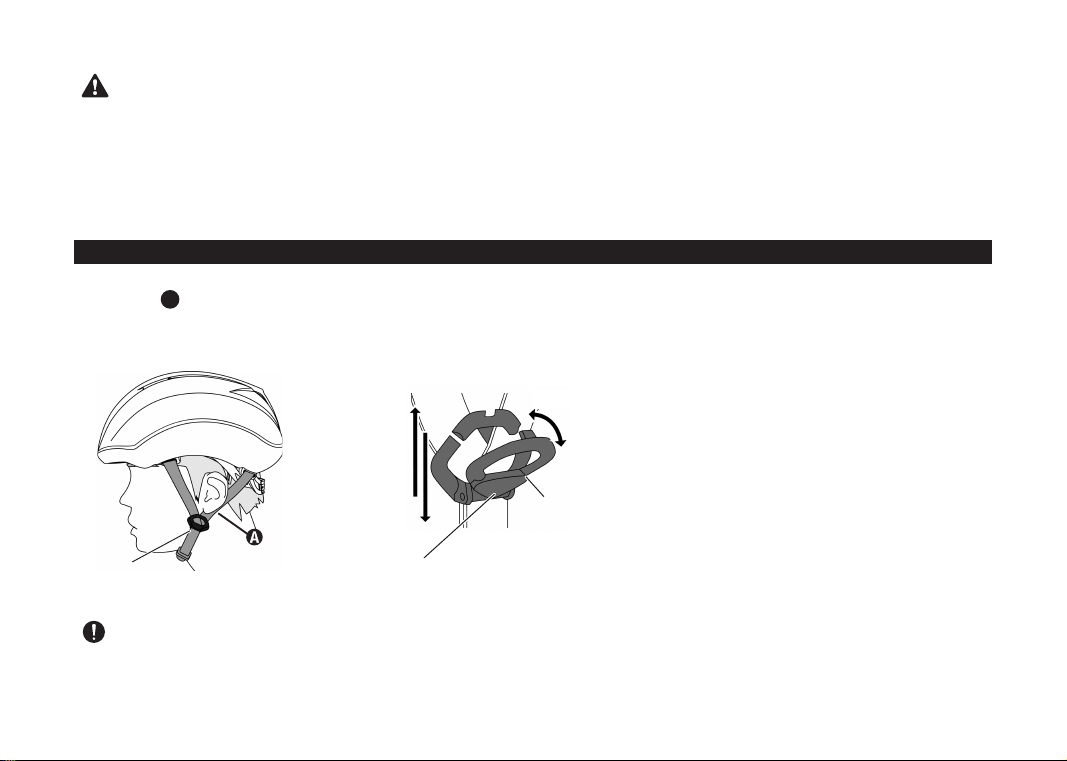
KOOFU BC-VIA User manual

取扱説明書
Instruction Manual
2017年04月版


警 告 次の文章は必ずお読みください。
このたびは、弊社製品をお買い上げいただき、誠にありがとうございます。
ヘルメットの 外 観 、内 装に傷 や 割 れが 無いか 、付 属品 が 不足していない かをご 確 認のうえご 使 用ください。
この取扱説明書は、ヘルメットの正しい取扱方法について説明しております。
ご使用前には必ず最後までこの説明書をお読みいただき、
お読みの後は当説明書を大切に保管していただきますようお願いいたします。
ヘルメットは、いかなる事故にも絶対という訳ではなく、万一の際に危険の度合いを減らす装備の一つで、安全の一要素としてご理解のうえ
ご使 用ください。安 全 快 適なバイシクルライフを楽しむためにも、以下の注 意事 項をよくご 理 解いただきますようお願いいたします。
「 あご ひもは 必 ずしっかり締 め てください 。」
あごひもを締めなかったり締めかたが緩かったりすると、万一転倒したときなどに脱げてしまい、頭を守ることができず非常に危険です。
またヘルメットの下に、帽子・フード・バイザー・ヘッドフォン等を着用しないでください。ヘルメットがズレたり、脱落するおそれがあります。
こ の ヘ ル メット は「 自転車専用」です。オートバイやその他の用途には絶対に使用しないでください。
国で 定 め ら れ て い る 交 通 規 則 に 必 ず 従 ってくだ さ い 。
「JCF推奨ヘルメット」について
●この製品は、JCF(公財)日本自転車競技連盟より、自転車乗車において
十分な安全性能があると認められた「JCF・推奨ヘルメット」です。
●この推奨ヘルメットは、JCF公認競技では使用できません。
ご使用になる前に
01

ご注意
「 ヘ ルメットは大 切 に取り扱ってください 。」
ヘルメットは丈夫だからといって、床等に放り投げたり、上に座ったりしないでください。その度に衝撃を吸収するため衝撃吸収力が低下します。
万一のために大切に取り扱ってください。また、乗車時での頭を保護する以外の目的には使用しないでください。
「ヘルメットの保管について」
ヘルメットは直射日光の当たる場所、車の中および、暖房機のそばなど、高温(50℃以上)の場所や、湿度の高い場所への長時間の放置を避け、
風通しの良い場所で保管して下さい。ヘルメットに使われている材質等が変質して性能が低下するおそれがあります。
「長期間の日光照射によるシェルの劣化について」
ヘルメットは、日光を浴びることにより紫外線によるシェルの劣化、色調の変色が進みます。
変色はカラーにより程度が異なりますが、このため使用開始後、3年を目安に買い替えを推奨しています。
「マット(つや消し)カラーについて」
マットカラーは表面処理の都合上、あらかじめ貼付されているステッカーをはがすと、表面のマット(つや消し)処理がはがれる事がありますので、ステッカー
は絶対にはがさないでください。またお客様がご購入後にご自身で貼付したステッカーを再度はがし取る場合も、同様のことが考えられますので、ステッカー
を貼付される際は十分にご注意ください。
「大きな衝撃を受けたヘルメットは外観上に損傷がなくても、ご使用にならないでください。」
ヘルメットはシェルおよび衝撃吸収ライナーが潰れることで、衝撃エネルギーを吸収します。大きな衝撃を受けたヘルメットは、既にライナーが潰れていること
が多く、そのまま使用すると、再度衝撃吸収エネルギーを吸収できず非常に危険です。外観にキズがなくても使用しないでください。
「ヘルメットの改造および分解は絶対にしないでください。」
ヘルメットに穴を開けたり、内部の衝撃吸収材を削ったり、またあごひもなどは絶対に改造しないでください。
ヘルメット本来の性能が発揮できなくなり非常に危険です。
「ヘルメットのお手入れは薄めた中性洗剤でふき取るようにしてください。」
ガソリン、シンナー、ベンジン、熱湯(50℃以上)や塩水等は絶対に使用しないでください。
「ヘルメットのペイントは絶対にしないでください。」
衝撃吸収ライナーは、塗料や熱の影響により材質が侵され衝撃吸収力が低下する場合がありますので、ペイントは絶対におやめください。
02

ご注意
正しい位置でヘルメットを装着する
ヘルメットを前から 後ろにか けて水平 になるように着用してください。このときにヘルメットの 先端 がまゆ毛 のすぐ上にない 場 合は、正しく装 着
できて いません 。( 装 着 の 際 は 鏡を見な がら調 整してください)また、あご ひもの 長さやアジャストロックの 調 整もヘルメットを正しくか ぶるうえ
で 大 変 重 要 な 部 分 で す。当 説明 書 の 該 当 項目をよくお 読 みのうえ、正しくか ぶってください 。
ヘルメットは 正しい 位置 で正しくかぶり、あご ひもを正 確に 締める事で、はじめてヘルメット本来の 安 全 性能を発 揮します。
ヘ ル メット は 走 行 前 に し っ か り正 し く装 着 し まし ょう 。
正しい
かぶり方の 例
誤った
かぶり方の 例
03
ヘ ル メット の 先 が
まゆ 毛 の すぐ上 に
ある
ヘ ル メット の 先 が 上
を向き、前頭部が見
えている

部位名称ともくじ
1あごひもについて
2アジャスターについて
3インナーパッド・バイザーについて
4インナーパッドのお手入れ・補修パーツについて
English -11
Front
Rear
ご使用になる前に -01
警 告( ご 使 用 前 に 必 ず お 読 み く だ さ い ) -01
正し い 位 置 で ヘ ルメット を 装 着 する -03
部 位 名 称 ともくじ -04
ワンタッチバックルの脱着-05
あごひもの長さを調整する-05
アジャストロックの高さを調整 する-06
アジャスター の 調 整 方 法 -07
イン ナ ー パ ッド の 取 付 位 置 -08
バ イザー の脱 着 方 法 -08
イン ナ ー パ ッド の お 手 入 れ に つ い て -09
補修用パーツについて -09
シェル
シェル
ライナ ー
アジャスター
バイザー
ライナ ー
アジャストロック
あごひも
ワンタッチバックル
04

あごひもについて
あごひもは万一転倒などアクシデントの際に、ヘルメットが容易に脱落しないようにする重要なパーツです。ヘルメット本来の性能を発揮させ
る た め に も 、「 あ ご ひ も の 長 さ 」 や 「 ア ジ ャ ス ト ロ ッ ク の 位 置 」 を 適 切 に 調 整 し 、「 ワ ン タ ッ チ バ ッ ク ル 」 を 正 し く 留 め て く だ さ い 。
ワンタッチバックルは、あごひもの両先端に付いている保持装置のことです。
あ な た の 頭 に ぴ ったりフィット す るようあ ご ひも の 長 さを 必 ず 調 整しましょう。
あごひもの長さは、ワンタッチバックルを締めたとき、指が2〜3本入る程度が一
般 的 で す。
ご 使 用 前 に 必 ず 試 着 を 行 い 、「 あ ご ひ も 」の 長 さ や「 ア ジ ャストロ ック」の ロ ック 位 置 、
「アジャスター」の締め具合などを適 切に調整し、あなたの頭にぴったりフィットする
ようにしてください 。
※「ア ジ ャ ス タ ー 」の 調 整 に つ い て は「 2 ア ジ ャ ス タ ー の 調 整 」を 参 照 。
ご使用前に必ず試着し、調整しましょう!
リリースボタンを押 すと、ワン
タッチバックルが外れます。
最後にあごひもの先端を
「Oリング」と「ストラップホルダー」で留めてください。
ワ ン タッ チバ ックル の 留 め 方:
ワンタッチ
バックル
ワンタッチ
バックル
ワンタッチバックル
ボタンを押す
リリースボタン
外れる
あごひも
Oリング
ストラップ
ホルダー
ボタンを押す
ワンタッチバックルの外し方:
●あごひもは正しくしっかり締めてください。締めないままの走行は、万一転倒した際に大変危険ですので、絶対におやめください。
●ワンタッチバックルは必ず最後まで(カチッと音がするまで)きっちり留めてください。
留めかたが 不 完 全 ですと、万 一転 倒した際にワンタッチバックル が 外れてしまい ヘルメットが 脱落してしまうお それ があります。
ワンタッチバックルを 留める
ときは、お肌を挟まないよう
ご 注 意ください。
1
ワンタッチバックルの脱着
あごひもの長さを調整する
警 告
警 告
05
短くする
ワンタッチバックル(差し込む側)の
向きにご注意ください。
長くする

ワンタッチバックルを 留め 、しっかり顔 の 側 面 に合 うように「アジャストロック」の 位 置を 調 整します。
あごひものAの 部 分 が す っきり 収 まって い る か 確 認 してくだ さ い 。
このとき、耳の辺りが緩いまたはきつい場 合は「アジャストロック」を移動させて高さを調整します。
①アジャストロックのカバーを矢 印の 方 向に開きます 。
②アジャストロックを正しい 高さに調 整します 。
③ 高 さ が 決 ま っ た ら 、ア ジ ャ ス ト ロ ッ ク の カ バ ー を
元通りに閉じます。
アジ ャスト
ロック
カバー
アジ ャストロック
正しい
あごひもの位置
● あ ご ひもをワンタッチバックル に 通 す 際 、図 以 外 の 通 しか たを すると、転 倒 など で 強 い 力 が 加 わ った 際 、ワンタッ チバックル か らあ ご ひ も
が 滑り抜 け てしま い 、ヘ ルメットが 脱 落 する お そ れ が あり大 変 危 険 で す。バックル へ は 必ず 図 の 通り正 確 に 通してくださ い。
●ワンタッチバックル( 差し込 む 側 )の 表 裏 を間 違 えると、転 倒など で 強 い力 が 加 わった 際、ワンタッチバックル から あご ひもが 滑り抜 け てし
まい、ヘルメットが脱落するおそれがあり大変危険です。
警 告
アジャストロックの高さを調整する
ご注意
アジャストロックの 調 整 後 は、必ず 最 後まで ロックしてください 。
ロックされて いないまま使 用 すると、アジャストロックの 位 置 が 正しく保てない 場 合 が あります。
②
①・③
06

アジャスターについて
「アジャスター」は、ヘルメットのズレやブレを抑えるために、ヘルメット後頭部に装備されたサイズ調整機構の事です。
あなたの頭にぴったりフィットさせ、しっかりホールドするように、アジャスターを調整しましょう。
ご自分のサイズや用途に合わせて、アジャス
ターの調整スナップを最適な位置に調整して
くださ い 。
2
アジャスターの調整方法
ご注意 スナップを取り外す際は、スナップの根元付近をしっかり持って取り外してください。スナップが破損する恐れがあります。
07
調整スナップ お好みの位置でスナップをとめる

08
インナーパッド・バイザーについて
3
この製品は、状況・お好みによりバイザーを脱着できます。
フロントパッド
ご注意
快適な装着感を得るためにも、
インナーパッドは正しく取り付けてください。
インナーパッドの取付位置 バイザーの取付位置
■ 取り外しかた ■ 取り付けて使用する場合
■ 取り外して使用する場合
■ 取り付けかた
インナーパッドはマジックテー
プで付いています。
イ ン ナ ー パ ッド を ゆ っ くり 引 っ
張ると、取り外 せます 。
①フロントパッドを取り外します 。
② フ ロ ント パ ッド の 代 わ り に バ イ ザ ー
を取り付 けます 。
(し っかり押 さえ つ け てくださ い )
逆 の 手 順 で バイザ ーを取り外し 、同じ場 所 にフロントパッドを
取り付 けます 。
イ ン ナ ー パ ッド を そ れ ぞ れ
左 図 位 置にしっかり取り付
けます 。
走行前にバイザーが確実に取付けられているか確認してください。
取り付けが不完全ですと走行中に脱落するおそれがあります。
警 告
トッ プパ ッド
バイザー

09
インナーパッドのお手入れ・補修パーツについて
4
汗などで汚れたインナーパッドは、取り外して洗うことができますので、定期的にお手入れすることでインナーパッドを清潔に保てます。
インナーパッドを洗う場合は、水もしくはぬるま湯(35℃以下)にごく少量の洗髪用シャンプーもしくは家庭用中性洗剤を入れ、やさしく手もみ洗いを行って
からよくすすいでください。洗い終わったら乾いた布などで水気をやさしく取り除き、直射日光の当たらない風通しのよい場所で陰干しを行ってください。
インナーパッドは消耗品です。
傷 んだまま使 い 続 けると、フィット感 など に悪 影 響をおよぼ す おそ れ があります 。
古くなった パ ーツは 、早 期 に 交 換され ることをお 薦 めします 。
<BC-Via補修用パーツ>
○インナーパッドセット ○バイザー各種
BCシリーズの補修用パーツ各種についてさらに詳しくは、
当製品掲載のカタログもしくはKOOFU WEBサイトに掲載のパーツリストをご覧ください。
www.koofu.jp KOOFU 検索
インナーパッドのお手入れについて
補修用パーツについて
ご注意
補修用パーツをお買い求めの際は、お使いのヘルメットのモデルをよくご確認のうえ、販売店などへご注文ください。


10
10
Instruction Manual
English
11

12
WARNING Be sure to read these instructions.
Thank you for purchasing Kabuto helmet.
Before using, please make sure that there is no scratch, no crack both on the external surface and in the internal components of
the helmet. Please also make sure that all the components are in the package.
This manual explains how to use your Kabuto helmet correctly.
Please take time to read this instruction manual before using the helmet, and keep the manual in a safe place for future reference.
No helmet can protect the user 100% in any case of accidents, but it can reduce the risk of injury.
Please make sure you understand the following warnings and enjoy riding your bicycle safely.
●The helmet should be worn in a way that it protects your forehead, with the edge just above your eyebrows, and never pushed
far over the back of your head. Wear the helmet from the front to the rear horizontally.
●No helmet can protect the wearer against all injuries or foreseeable impacts.
●Your helmet is eective as protection only when it is worn properly. Never put anything on your head that prevents you from
wearing the helmet properly.
●This helmet is for bicycle use only. Do not use this helmet for motorcycle riding or any other activities.
●Please obey all trac rules.
NOTES BEFORE USE
Helmet Recommended by JCF (Japan Cycling Federation)
*This product is the “Helmet Recommended by JCF (Japan Cycling Federation)”,
which licensed by JCF for its enough safety performance.
*Helmets Recommended by JCF are NOT acceptable for the JCF races.

WARNING
●Before riding a bicycle, make sure to adjust the helmet so it ts your head correctly. The strap should be positioned not to cover
the ears, the buckle positioned away from your jawbone, and the strap and buckle adjusted to be both comfortable and secure.
●Please handle the helmet with care. The helmet is designed to absorb shock by partial destruction of the liner and its damage
may not be visible. DO NOT sit on it, drop it on the oor or otherwise cause impact.
●If subjected to a severe impact, the helmet should be discarded and destroyed.
●Wipe the helmet with common ph-neutral detergent diluted with clear water.
Never use any petroleum, thinner, benzine, hot water above 50°C/122ºF or saline water.
●
Do not leave the helmet in the direct sunlight or where the temperature may surpass 50ºC/122ºF such as in a car or near a heater, and/
or avoid leaving in a humid place for a long time. Doing so will aect the materials and the performance of the helmet will diminish.
●Do not paint the helmet. Paints may reduce the original protective performance of the helmet considerably.
●Do not modify the helmet. In order to fully maintain the performance of the helmet, do not attempt to take it apart or change it in
any manner that involves making holes in it or cutting it (or any of its parts) other than as recommended by the manufacturer.
●This helmet should not be used by children while climbing or doing other activities when there is a risk of strangulation/hanging if
the child gets trapped with the helmet.
THE EFFECTS OF THE DIRECT SUNLIGHT
Do not leave the helmet in the direct sunlight. The UV potentially deteriorates and discolour the shell.
CAUTION FOR MATTE COLOUR PRODUCT
Matte processing on the surface of this product could be peeled o if the attached sticker is removed from the surface. To prevent
this, never remove the sticker. The same problem may occur also when other stickers are attached and removed. If you attach
stickers on the product, please be aware of the risk.
13

Wearing Helmet Properly
Wear the helmet from the front to the rear horizontally.
Make sure to put the front side of the helmet on just above your eyebrows (Please see a mirror to check).
It is necessary to adjust the length of the chinstrap and Adjustment-lock.
Please make sure to read and follow the instruction before use.
Your helmet is only e ective as protection in case of an accident if it is positioned correctly on your head and the strap is
fastened securely. Be sure you are wearing the helmet properly before riding.
WRONG
Make sure the front
edge of the helmet
is just above your
eyebrows.
Wear it from the
front to the rear
horizontally.
The front of the
helmet is too
far up, and your
forehead is not
properly covered.
WARNING
14
CORRECT

Part Names and Table of Contents
1 Chinstraps
2 Adjuster
3 Linings /Visors
4 How to Clean Linings/Replacement Parts
NOTES BEFORE USE -12
WARNING -13
Wearing Helmet Properly -14
Part Names and Table of Contents -15
Fastening the Strap Buckle -16
Adjusting the Chinstrap -16
Adjusting the Adjustment-locks -17
Adjusting the Adjuster -18
Replacing the Inner Pad -19
Detach/Attach the Visor -19
How to Clean the Linings -20
Replacement Parts -20
Shell
Shell
Adjuster
Visor
Liner
Liner
Adjustment-lock
Chinstrap
Strap Buckle
Front
Rear
15

16
Chinstraps
Chinstraps play an important role under an accident, preventing the helmet from coming o. In order to maintain the original performance
of the helmet, make sure to adjust "Chinstraps length" and "Adjustment-locks positions" properly and fasten "Strap buckle" correctly.
Strap buckle is the retention system at the end of both chinstraps.
Try on the helmet before use!
Adjust the chinstrap to fit your head. It generally should be just long
enough to leave space for 2 to 3 ngers horizontally when fastening the
chinstrap.
Try on your helmet before riding, and adjust the length of the "chinstrap", the
position of the "Adjustment-locks" and the t of "Adjuster" to t helmet to your
head. See " 2 :Adjuster" for how to adjust the Adjuster.
Strap buckles will be released
by pushing the release button.
Fastening the strap buckle
Strap
Buckle
Strap
Buckle
Release
Release button
Release button
Releasing the strap buckle
•Make sure to fasten the strap rmly. It is dangerous to ride a bicycle without fastening the chinstrap.
•If the strap buckle is not fastened (ie, you don’t hear it click), or if it is fastened loosely, the helmet may come o in an
accident, leading to death or serious injury.
Be careful not to pinch
your skin when fastening
the strap buckle.
1
Fastening the Strap Buckle
Adjusting the Chinstrap
WARNING
WARNING
Bind the strap with the “O-ring” and “Strap
holder” at the end.

17
Put on the helmet, fasten the strap buckle and adjust the Adjustment-locks so they can be placed rmly on the side of your
face. Check that the A part is placed correctly. If the chinstrap around your ears is loose or tight, change the position of the
Adjustment-lock.
aOpen the cover of the Adjustment-lock in the
direction shown by the arrow.
bMove the Adjustment-lock up or down to
change the position.
cWhen the Adjustment-lock is placed properly,
close the cover securely.
Adjustment
lock
Correct
positions of the
chinstraps
•It is very dangerous if the chinstrap is not inserted into the strap buckles the way as illustrated. It can be slipped out
when subjected to a strong pressure such as fall, and the helmet may come o. Make sure to insert the chinstraps into
the buckles properly as the illustration.
•It is very dangerous if the strap buckle is inserted upside down. The chinstrap will be slipped out from the strap buckles
when subjected to a strong pressure such as fall, and helmet may come o.
Adjusting the Adjustment-locks
How to change the Adjustment-lock position
Lock the cover securely after changing the position of the Adjustment-locks.
If the helmet is used without locking the cover securely, the strap will be loose and the helmet may come o.
WARNING
WARNING
Cover
Adjustment-lock
②
①・③

18
Adjuster
"Adjuster" is the mechanism at the rear of the helmet to keep the helmet from moving.
Adjust the Adjuster so it will keep the helmet on your head securely.
2
Adjusting the Adjuster
Choose the best adjustment snap position
to t your head.
WARNING
Adjustment snaps Fasten the snaps at your best position
To remove the snaps, please hold the base of the snaps. Otherwise the snaps may break.
Table of contents
Other KOOFU Motorcycle Accessories manuals
Popular Motorcycle Accessories manuals by other brands

Ohlins
Ohlins TR 538 Mounting instructions

Wunderkind Custom
Wunderkind Custom 107045-F15 INSTALLATION MANUALS AND SAFETY INFORMATION

KTM Power Parts
KTM Power Parts 76012935044 Information

Condor
Condor SC-2000 User instruction manual

Dakota Digital
Dakota Digital MCL-3K-VLT manual

Lincoln Electric
Lincoln Electric VIKING 3250D FGS Operator's manual