Kydera CDR300UV User manual
Guide how to set up APRS to Kydera CDR300UV
Basic guides
1. Update radio to the latest firmware and use proper software
2. Always read code plug from radio, make a change to code plug and then write back to the radio, because in this case your code plug will have all
correct data that match to your radio
3. Never write data to the radio from different version of CPS, while this will lead to unpropped function/working of your radio.
Setting in Radio CDR-300UV
You need to prepare your radio for APRS.
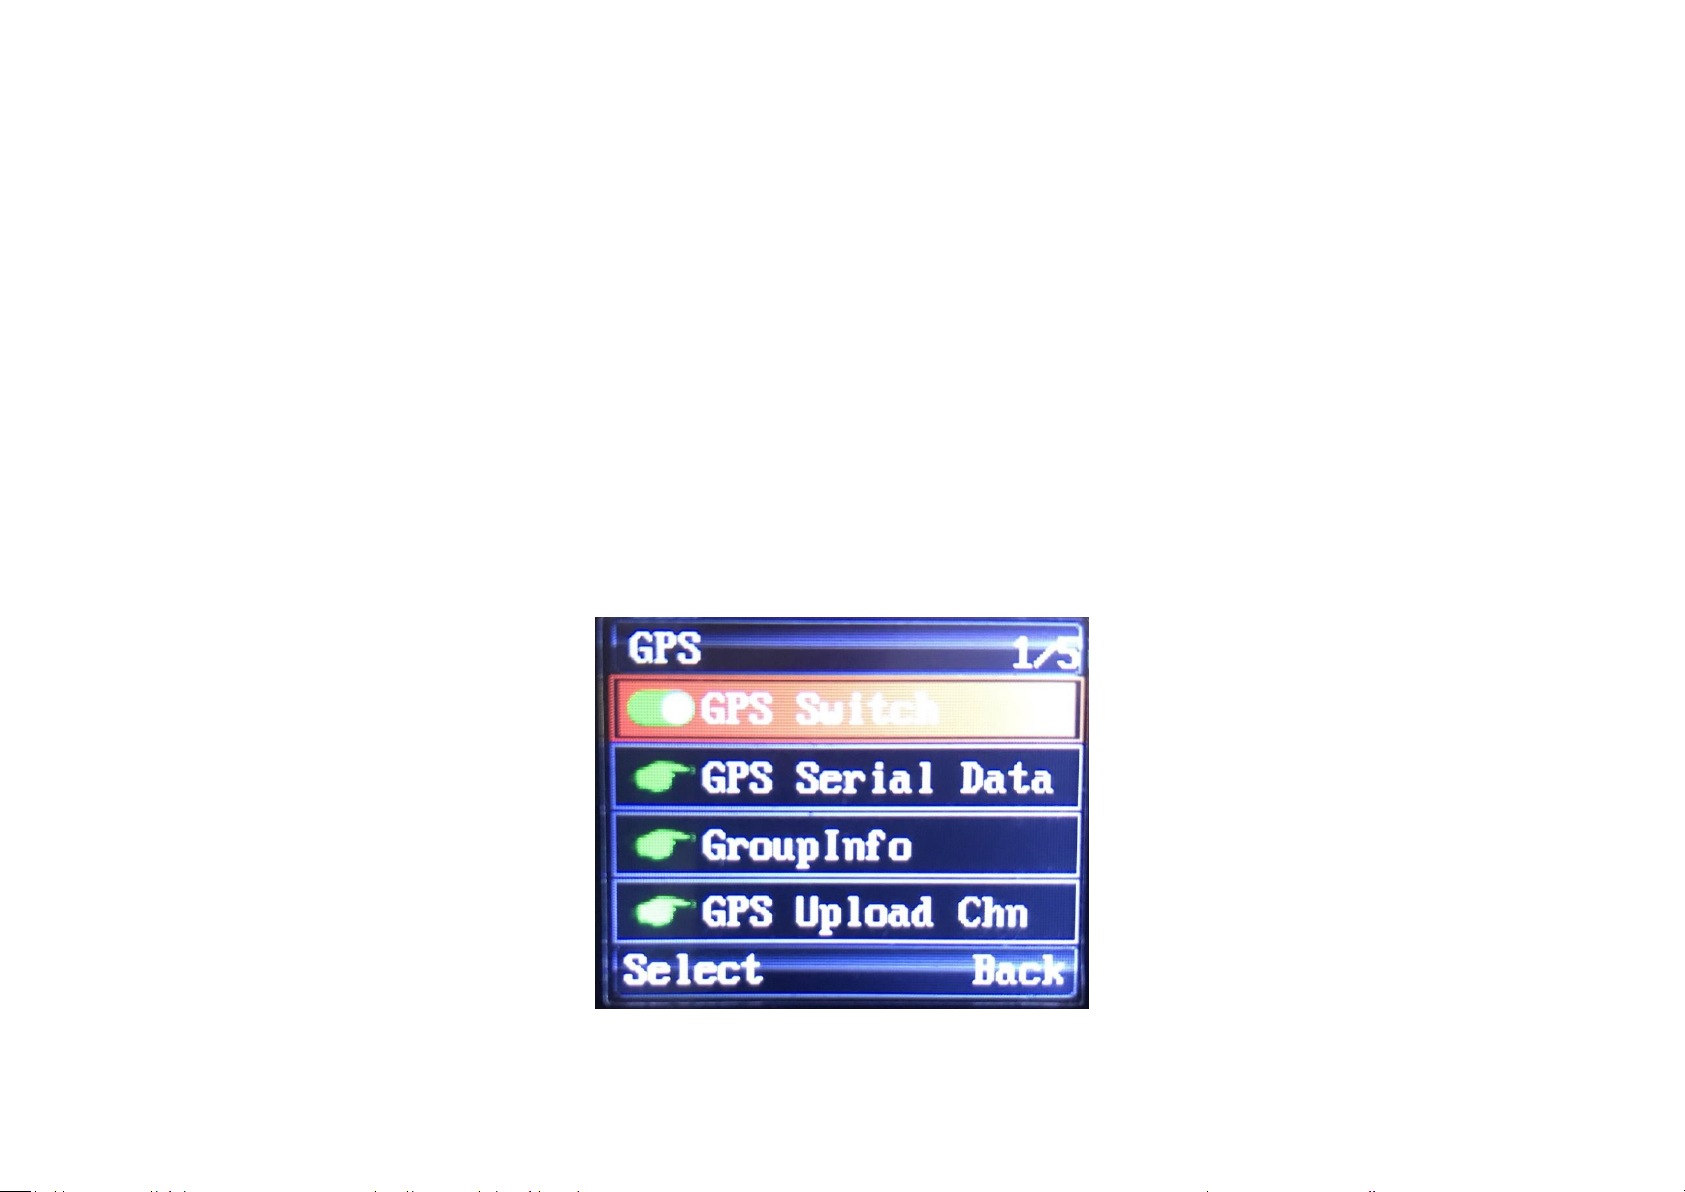
Press Menu, go to Appendix, Choose GPS (red icon) and you will see this menu
Enable GPS Switch
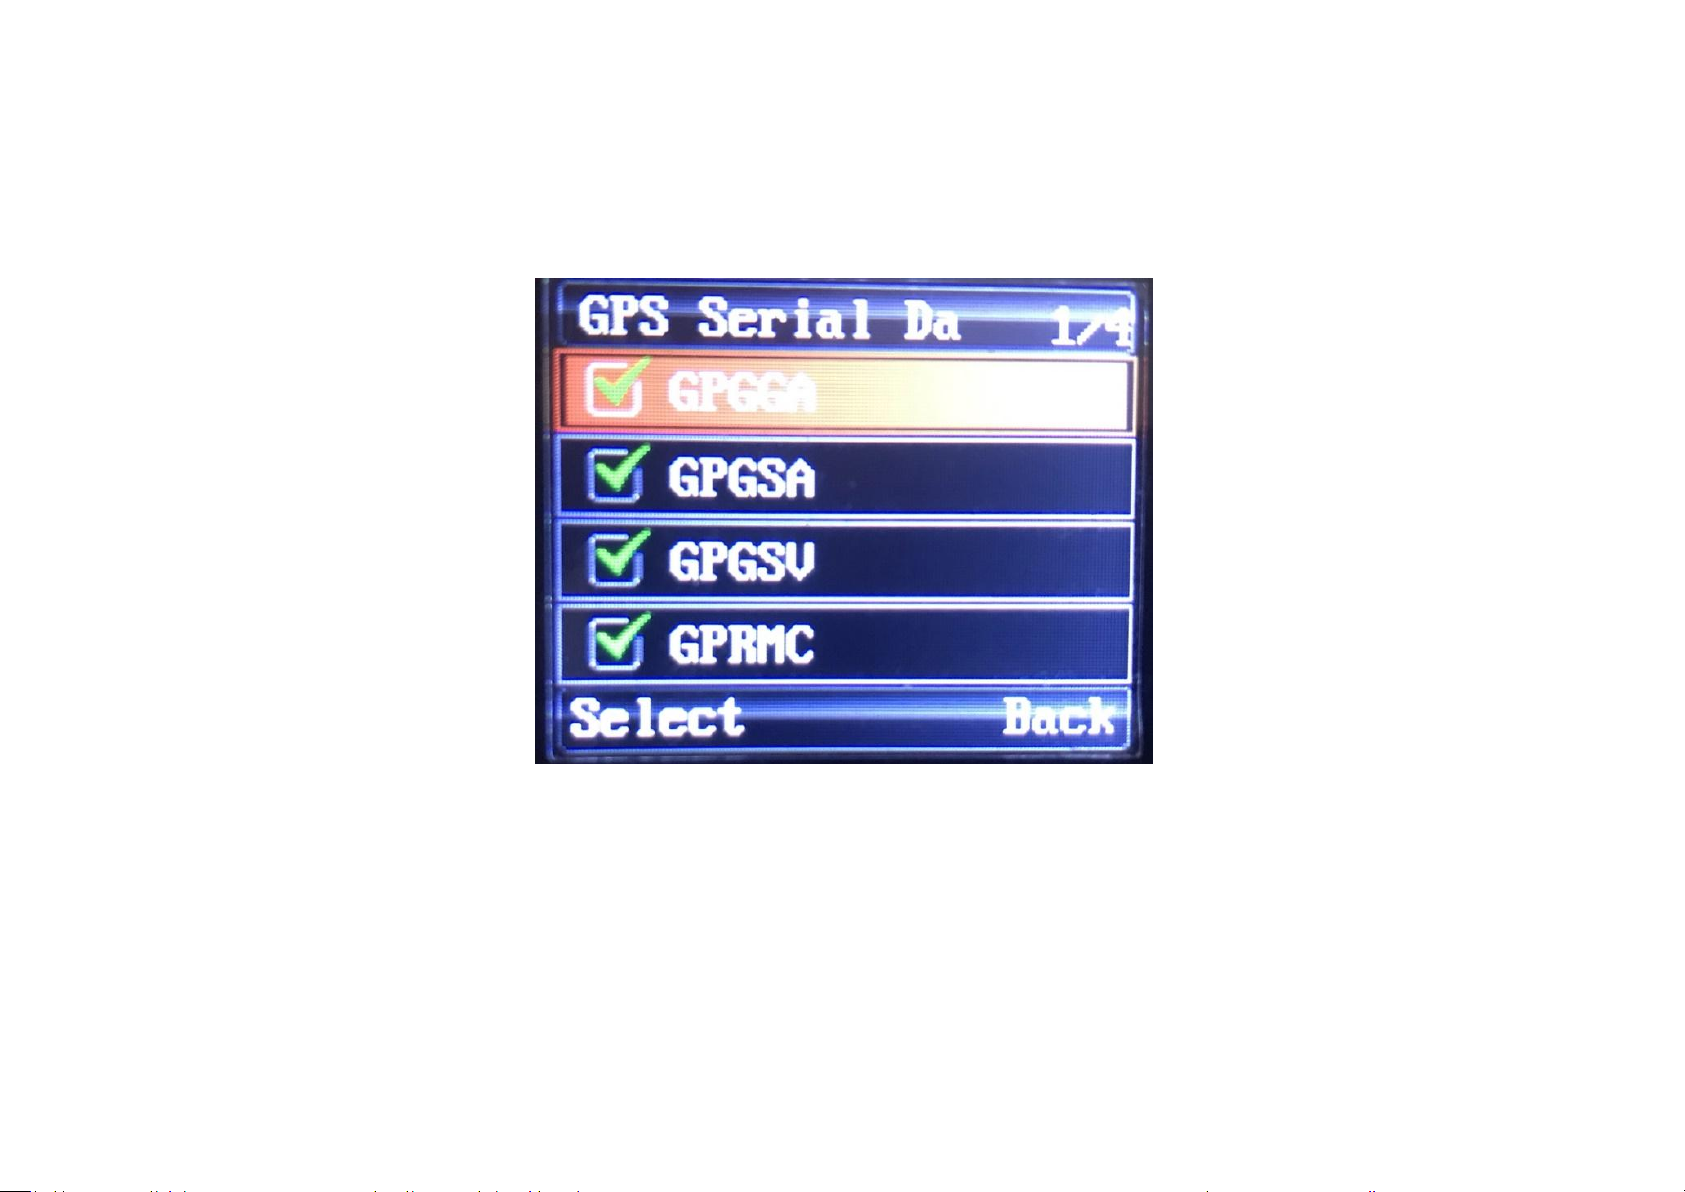
Under GPS Serial Data tick all options
Go to Calibrator and set to AUTO.
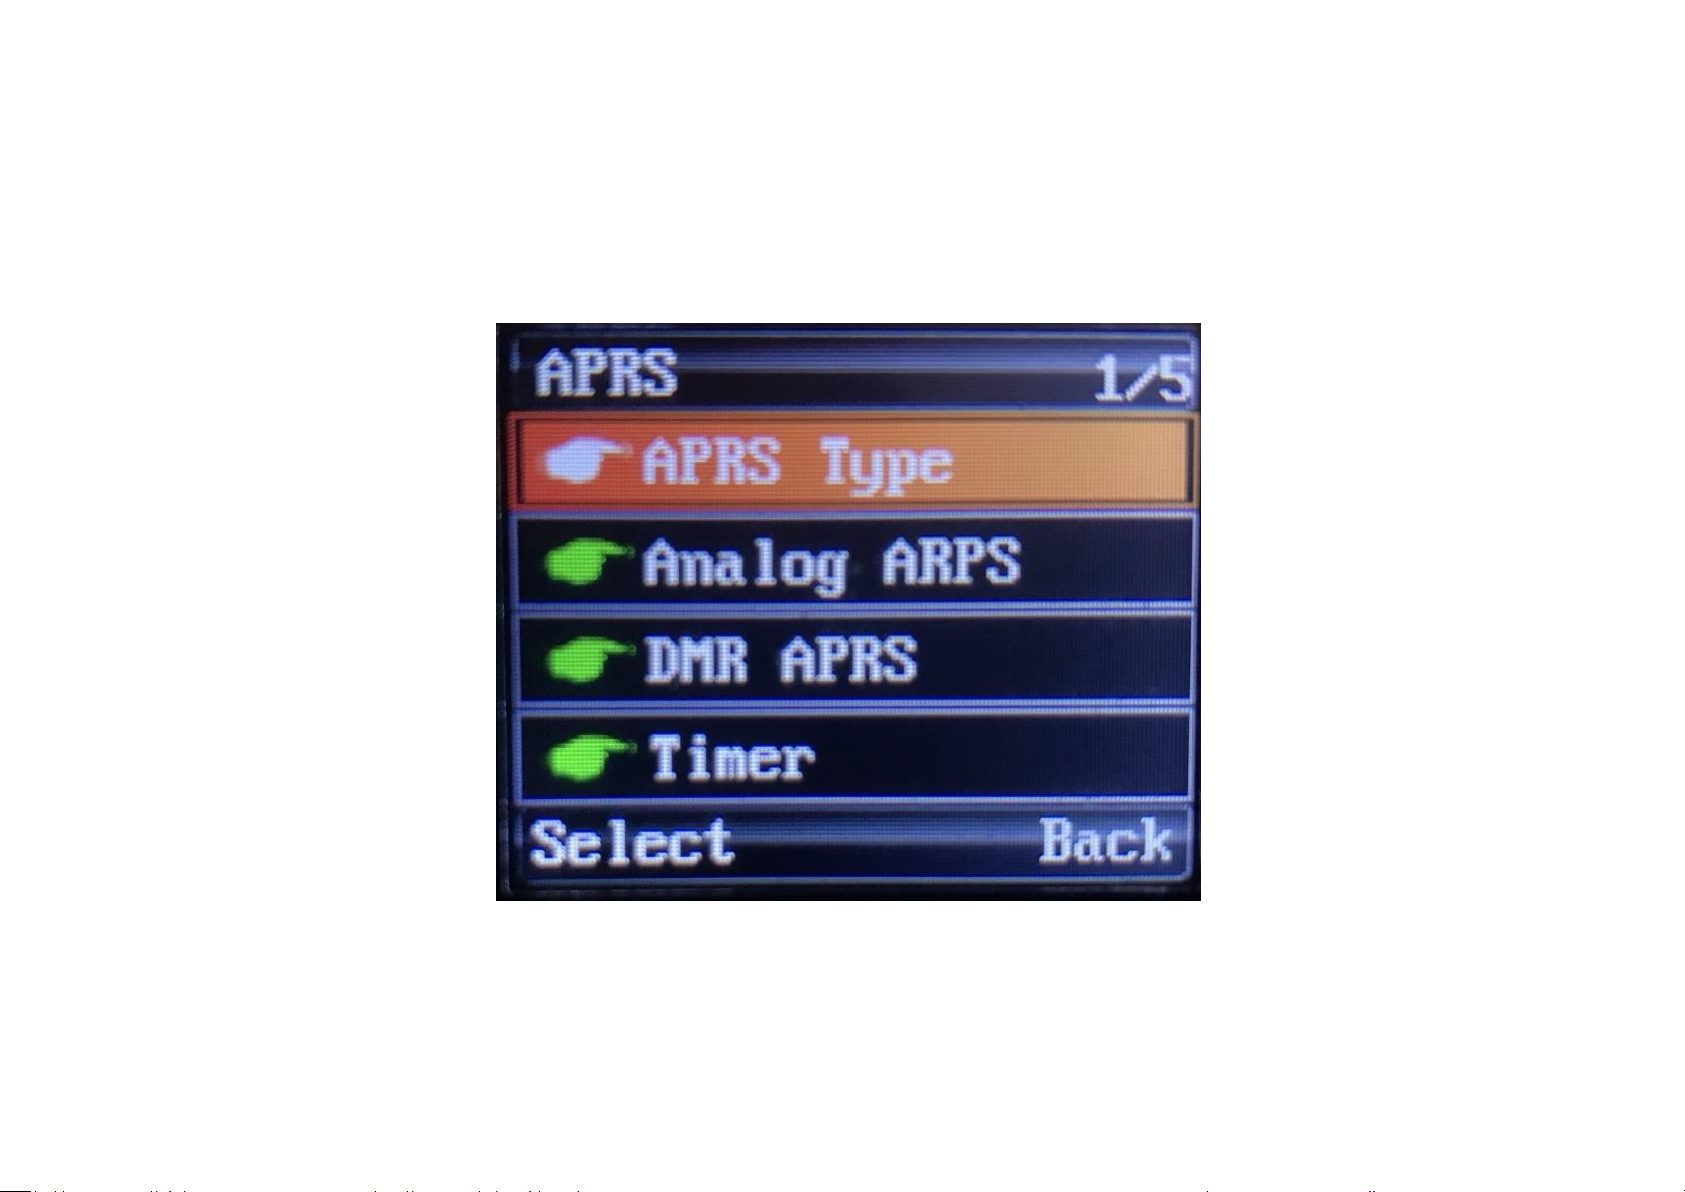
Now go back to appendix menu and choose APRS
In APRS Menu you have 5 options: APRS Type, Analog APRS, DMR APRS, Timer and Beacon
Select APRS Type, you will see 4 options, select DMR+Analog APRS
Under Analog APRS choose PTT Upload and choose TX End
All other settings we will made in CPS

Connect your Radio via USB and open CPS
Read from the radio, do not open saved code plug.
Go to the DMR Service and set:
GPS to ON, GPS Interval 10s, GPS Channel OFF
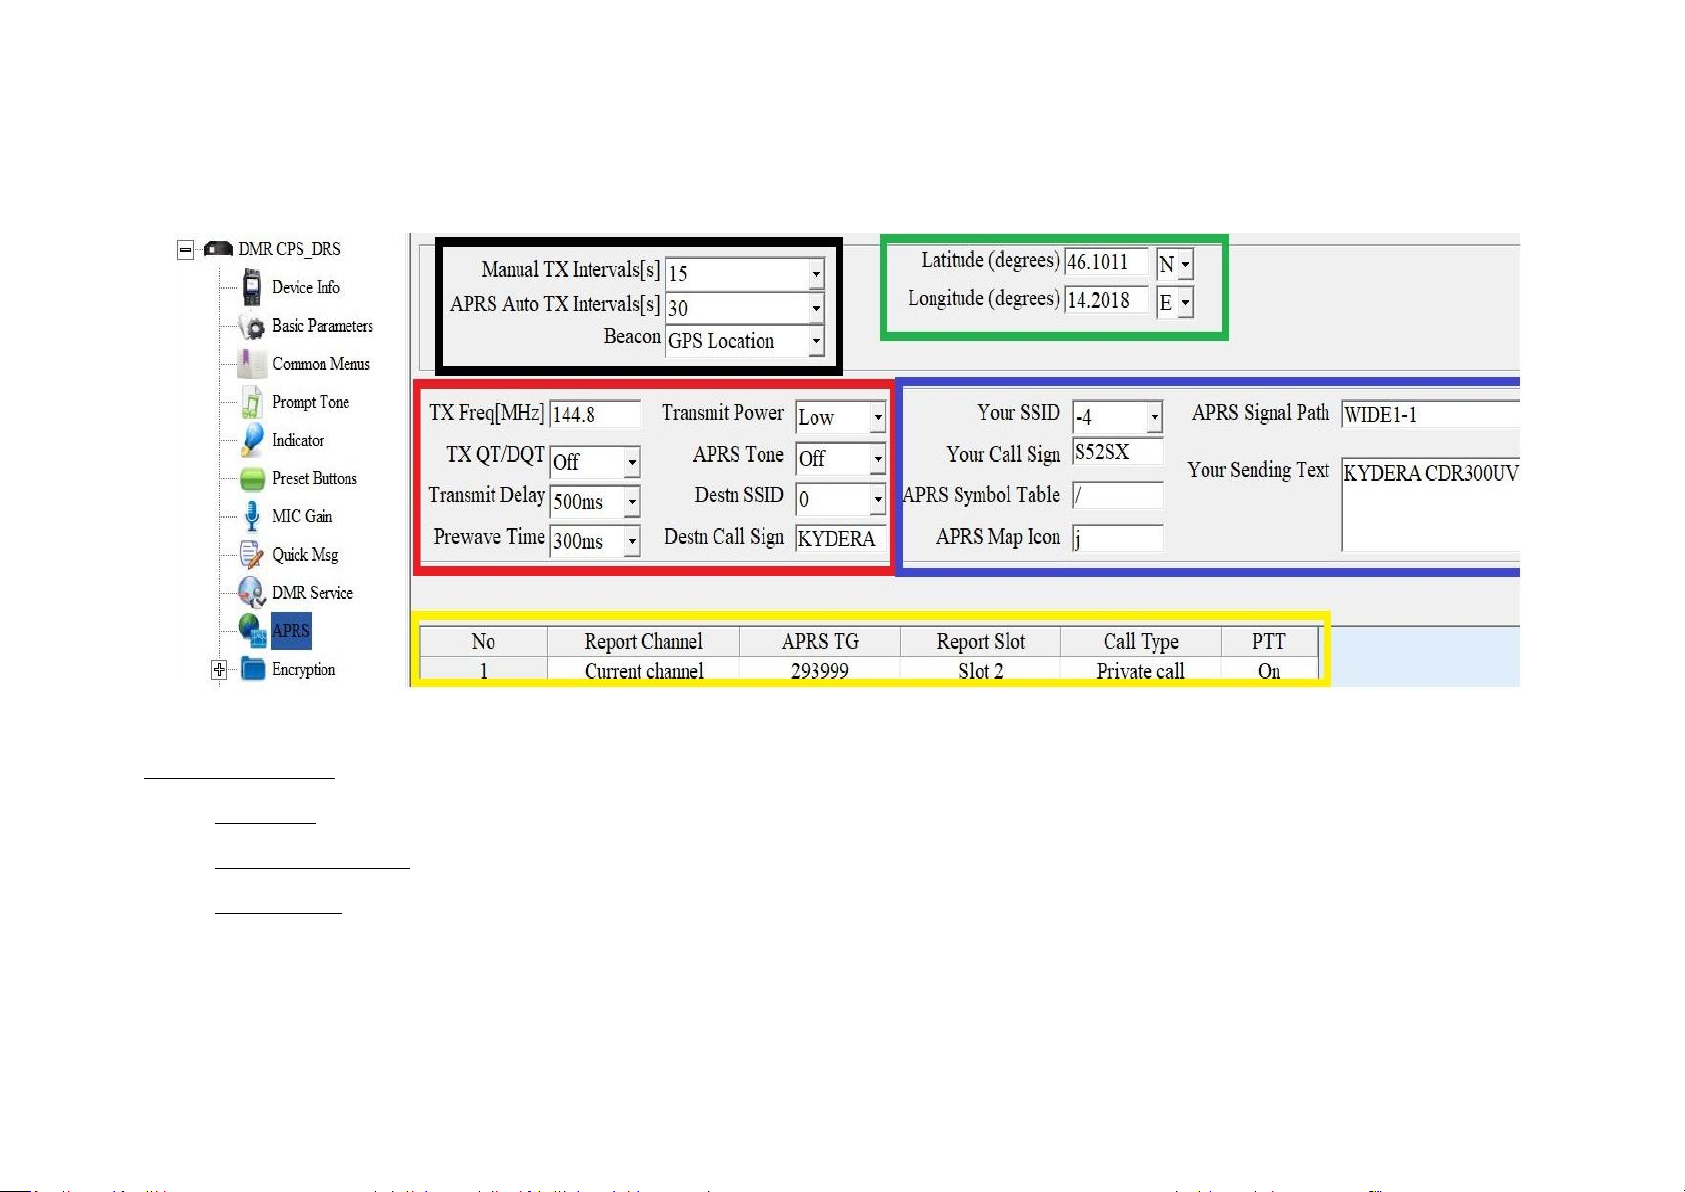
Under the MENU APRS you have following:
Black frame settings:
Manual TX, set 15
APRS Auto TX Interval set to 30s,
Under Beacon –set Beacon. Here you have two options –GPS Location or Fixed Location.
If you choose Fixed Location your radio will transmit GPS Coordinate marked in green frame!

Green frame settings:
You can find own coordinates by web browser or visit www.aprsdirect.com.
Be Aware that those Coordinate are in Slovenia right now.
Those are in format Latitude 46°10' 11ˇ N and Longitude 14°20'18ˇ E
RED frame you have following settings:
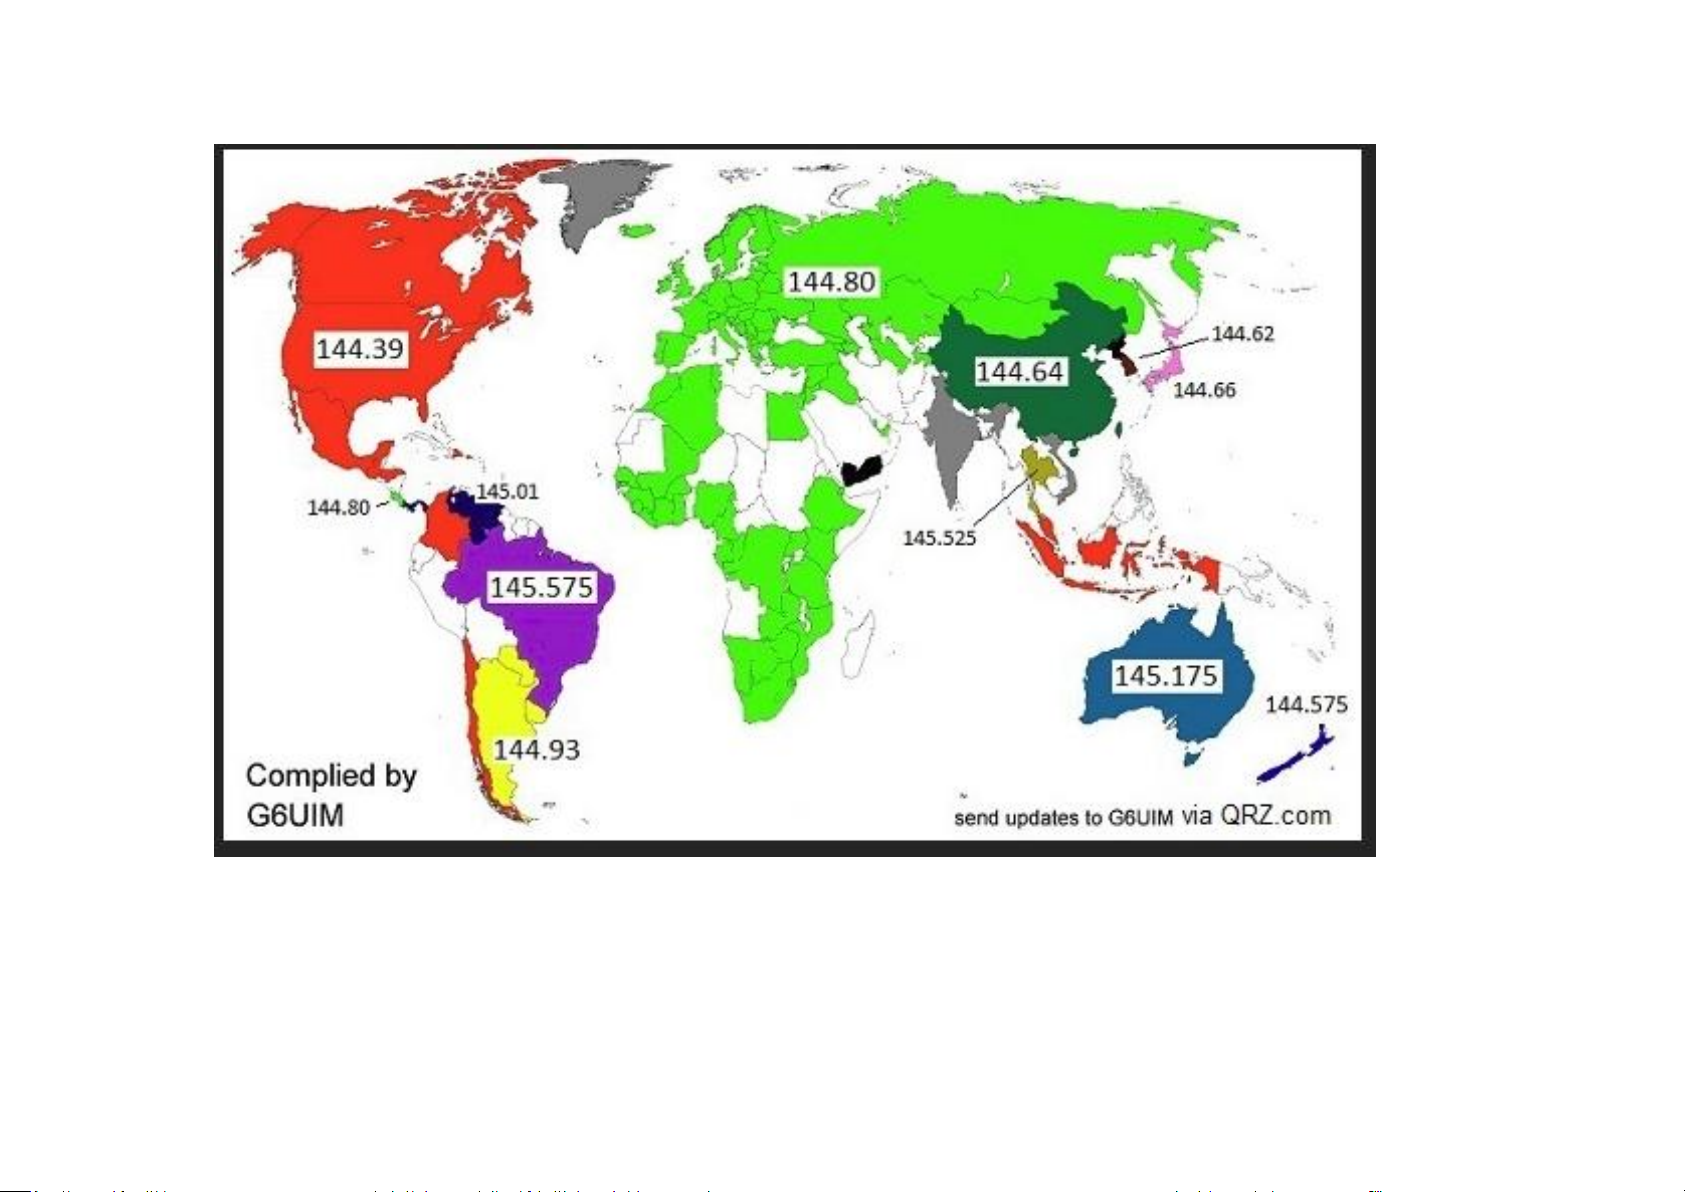
TX frequency: for Europe Africa and Russia is 144.80, for all other counties check picture bellow
TX QT/DTQ –this is analogue or digital tone. Leave this to OFF. If in your country is in use tone, that ask your local igate owner what kind of tone is
used to open igate
Transmit Delay and Preware Time: Optimal setting are 500ms and 300 ms, if you think this scan be decreased, go ahead and test it.
BLUE frame settings:
YOUR SSID: you have options from 0 to -15, it up to you what kind of extension you would like to have. Usually 0, -1.-2 are used for fixed location,
-7 for weather station, all other extension can be normally used.
APRS Signal Path: WIDE1-1, is working fine, you can also use WIDE2-1 and WIDE2-2. Always use this without any space.
You Call Sign: put in your call sign
APRS Symbol table: there are two option according to APRS map chart –primary symbols ˇ/ ˇ and alternate symbols ˇ \ ˇ
Map Symbols can be found at this link: https://www.yachttrack.org/info_camper/downloads/APRS_Symbol_Chart.pdf
APRS Map Icon: According to the map symbols you can use whatever icon you like.
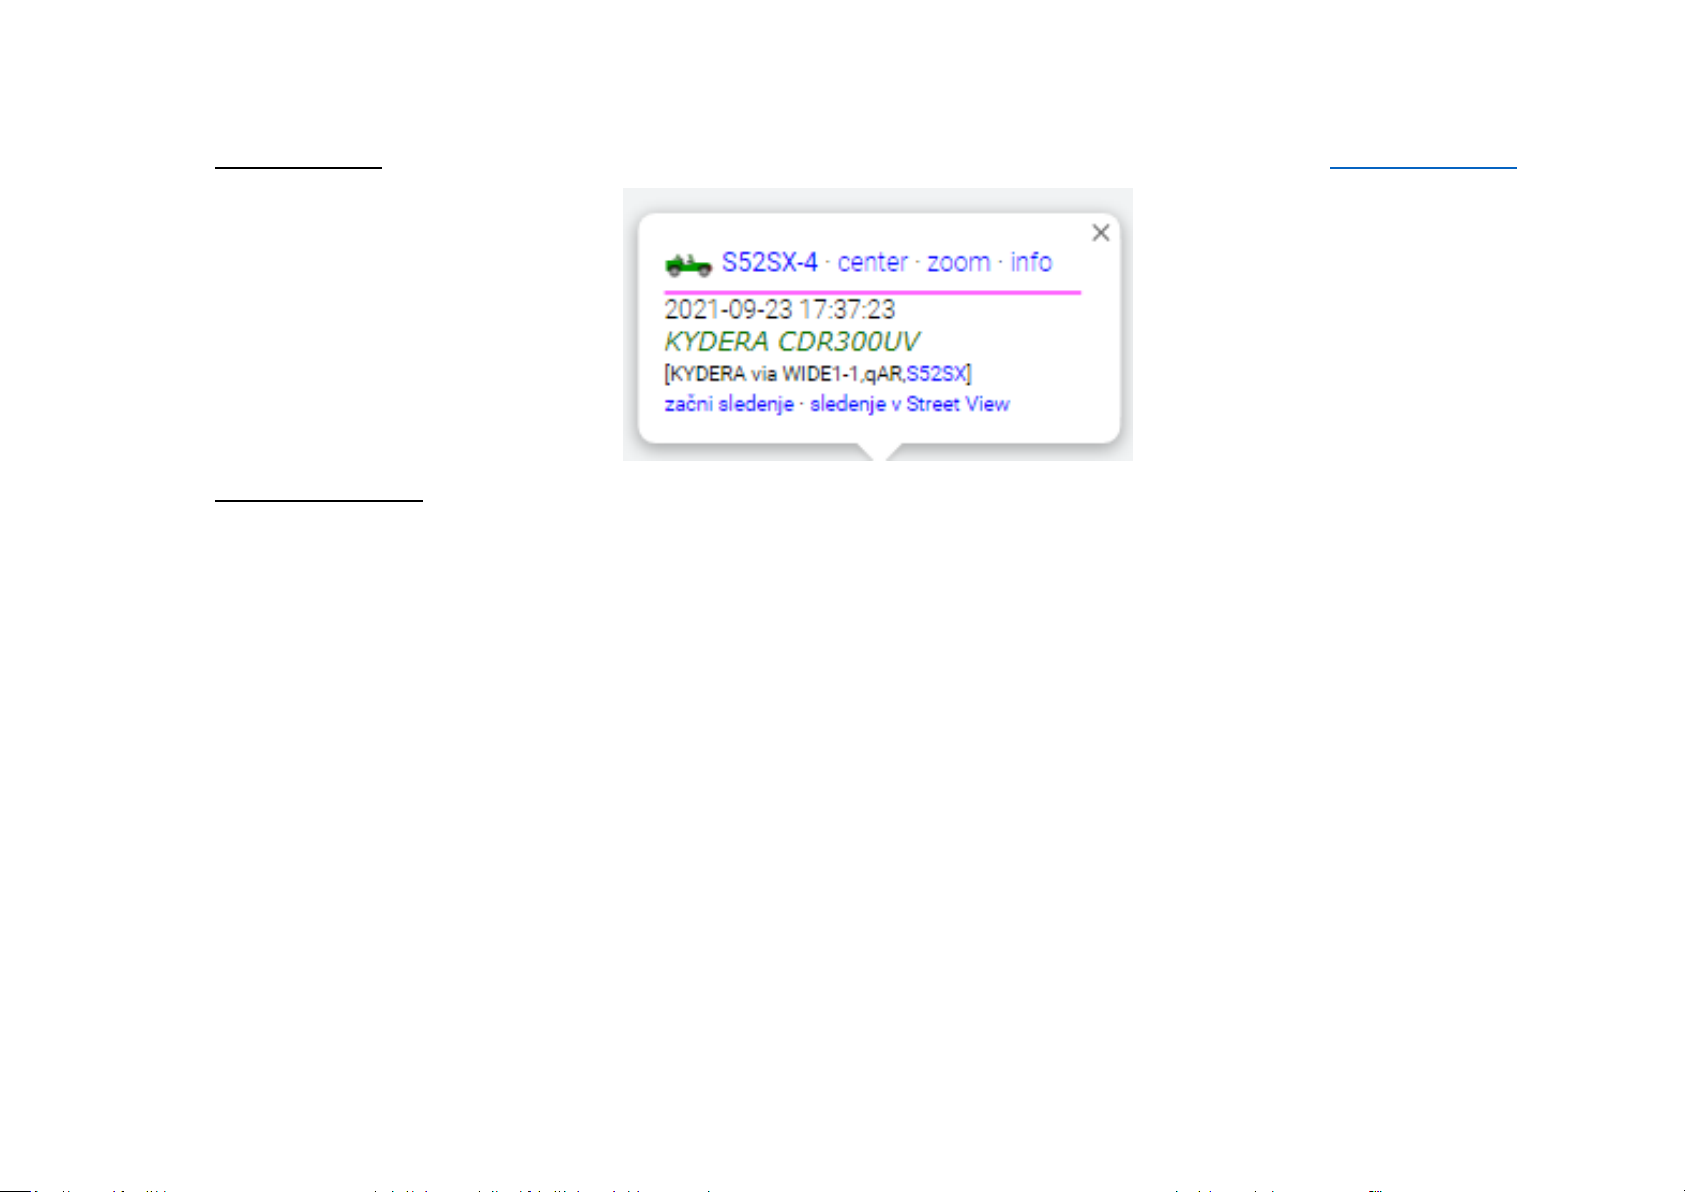
Your Sending Text: Here you can write a text, that everyone can be seen, if click on your call sing in web page www.aprs.fi or www.aprsdirect.com
Yellow Frame Settings:
This setting are for digital APRS via DMR repeater’s.
Report Channel You can choose Current channel, or any other channel in your channel list. I recommend to use Current channel
APRS TG: this is assembly from country code (293 for Slovenia) and 999 for TG for Brendmeister. 293999 is for Slovenia.

Digital PARS registering at Brandmeister.
For Digital APRS you must be registered to Brendmaister. Please check what type of DMR repeaters are in use in your country.
Go to the following web page: https://brandmeister.network/
Klick register and filled up all necessary data. Sometimes you need to way a while that your account be to confirmed.
After confirmation click to Login and put in your credentials
Click on your call sign on the right upper corner and choose Selfcare

Brand: Choose Chinese radio
Language: Choose your language on drop down menu
APRS interval: choose 60s
APRS Callsign: put your callsign and extension from -1 to -15
APRS Text: put your text in, but MAX 12 letters!
APRS Icon: choose your Icon which will be displayed on web pages like aprs.fi and aprsdirect
In Call GPS, Compact/CSBK data and Text Capture: leave to OFF
AirSecurity/TOTP: OFF
Hotspot Security: if you have a hotspot, than put in your personal password
Do not forget to press SAVE button at the end.
Other manuals for CDR300UV
1


