L2 Audio PH-1023 Manual

PH SERIES POWERED MIXER RANGE
OWNERS MANUAL AND INSTRUCTION GUIDE

Thank you for choosing the L2 audio PH range of powered mixer heads. We’re confident that
your purchase will give you years of service and the high quality of sound reproduction that
our customers have come to expect. We pride ourselves in designing the right product for the
right application. We have listened to our customers and have designed what we consider to
be the best product in both performance and value for money that is available on the market
today.
Please take some time to read this manual and then keep it somewhere safe for future
reference.
Also, here at L2 audio, we welcome your feedback and information. We like to know what
you’re using your L2 audio product for!
Please take a few minutes to register your purchase online at www.l2audio.co.uk/warranty
within 14 days of purchase. Failure to do so could affect your warranty. This information is for
our information only and will not be passed on to any third party. Complete customer
satisfaction is our goal at L2 audio. If you have any questions, technical or otherwise please
Once again, many thanks for your purchase.........
The L2 audio team.


INTRODUCTION
This manual is designed to help you get the most out of your L2 audio PH series powered mixer
head. The PH range is a range of powered mixer heads. This means that it has built in power
amplifiers. Although designed specifically as a live sound mixer, the PH series can also be used in
a studio environment. The most common set up is a PH series mixer connected to a pair of L2
audio passive (unpowered speakers), such as the IM or TM series speakers.
Please take time to read through this manual to familiarize yourself with all the functions that are
at your fingertips.
1. High. This is used to cut or boost high or treble frequencies. When the pot is at 12 0 clock,
this is referred to as flat position meaning that high has neither been cut or boosted.
2. Mid. This works in the same way as the high pot but adjusts frequencies in the mid range.
3. Low. This operates in the same way as the mid and high pot, boosting or cutting low (bass)
frequencies.
4. Mon (monitor). This pot controls the amount of monitor signal that is sent from the
channel.
5. EFX. This pot controls the amount of effects sent from the channel.
6. Level. This pot controls the amount of volume coming into the channel
7. Pad. This reduces the input gain by 25dB when line level signals are used such as
keyboards, drum machines or Music playback.
8. Hi-Z. This is for connecting either balanced line level signals or unbalanced jacks such as an
instrument cable. Usually a DI box is required if you are connecting a guitar to these inputs
to boost the signal
9. Lo-Z. This is a XLR input used for connecting microphones.

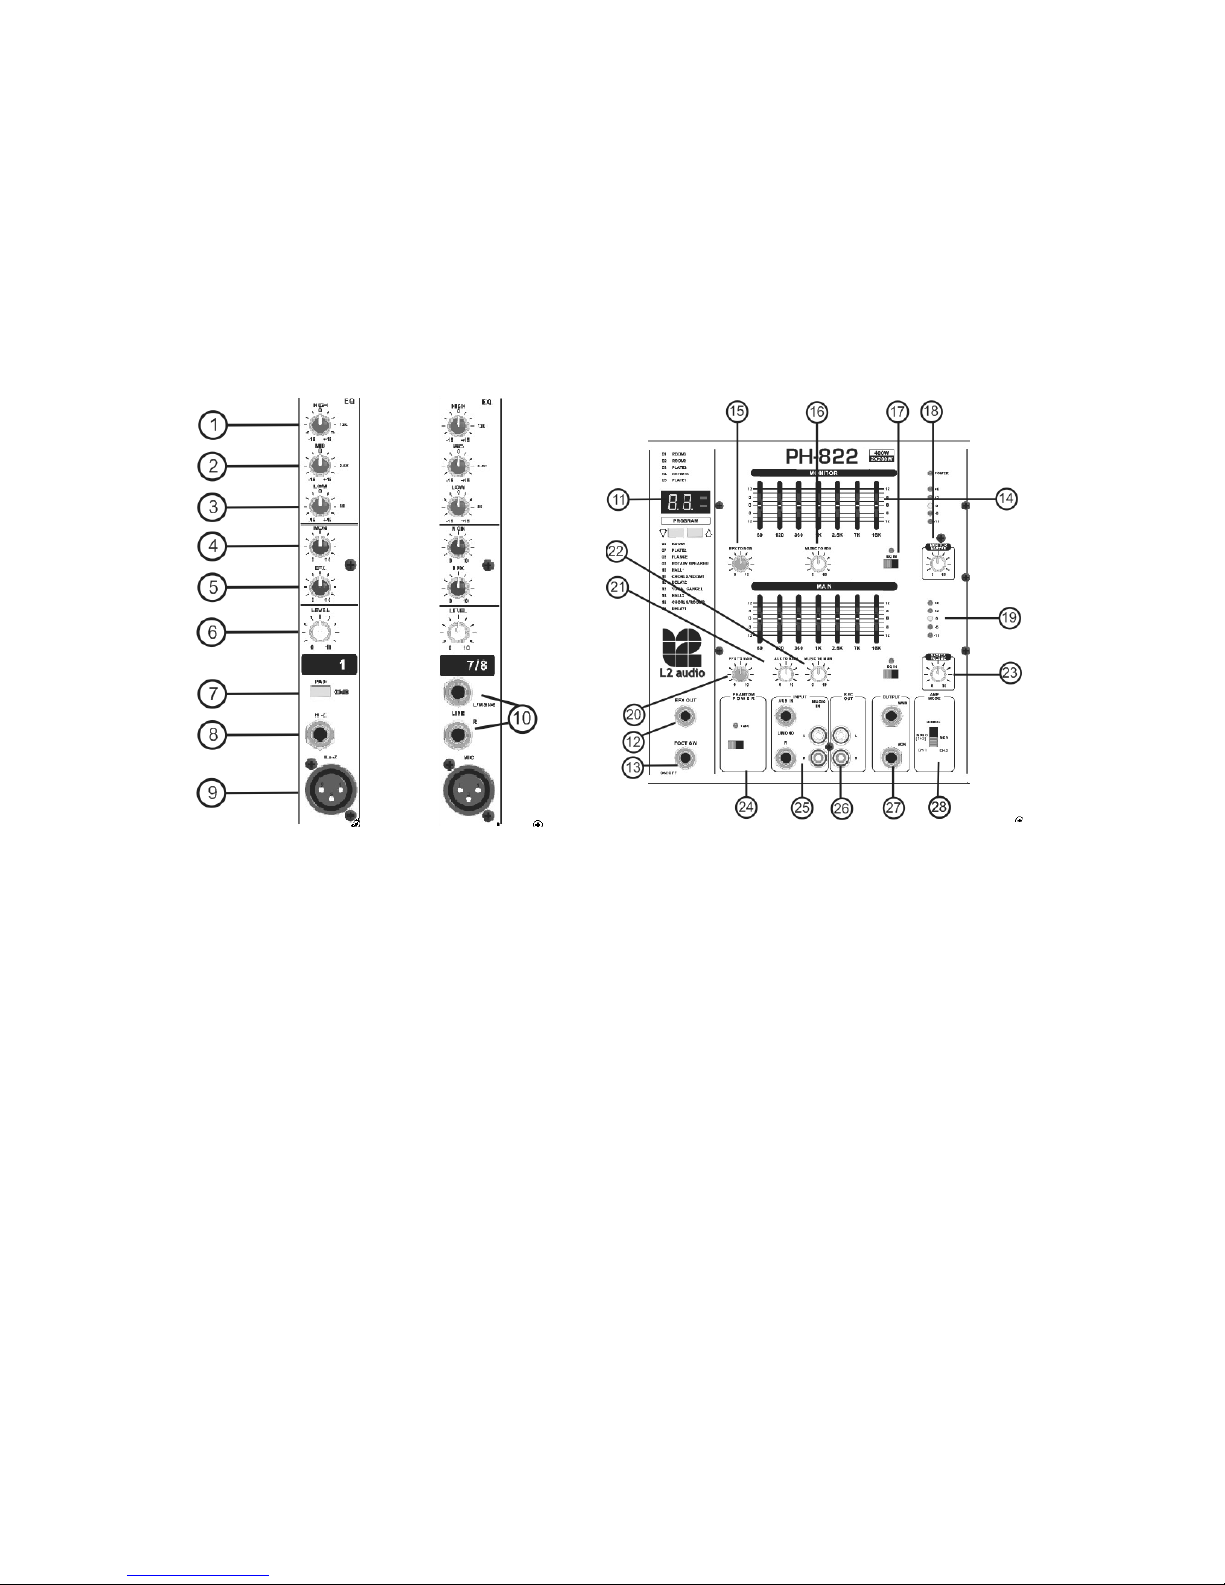
10. Line. L/mono&R. (Channels 7, 8, 9, 10, 11, 12 only dependant on model). As with channels
1-6, these channels have a ¼” jack line input which also serves as the mono channel in
these stereo channels. The primary function of these inputs is for signal source that require
a stereo feed (2 inputs), such as Keyboard, Music playback, drum machine, etc.
11. Program (efx). Here you can choose any one of 16 preset digital effects. By using the scroll
up and down key you can see all the various effects on the LCD screen. Once an effect is
chosen it will be saved when the mixer is switched off.
12. EFX out. This is to route into an external effects unit.
13. Foot sw. This is to switch the vocal effects on and off via a ¼ jack footswitch (not included).
14. Graphic equalizer (monitor/main). This allows you to cut or boost certain frequencies to
help enhance the mix. The middle of each graphic is your 0dB starting point. Frequencies
tend to be cut or ‘notched out’ more than boosted. Ideal if you are in a room which does
not have particularly good acoustics. You can use the graphic to cut certain frequencies that
sometimes tend to feedback. There are 2 graphics, 1 for each output. This one (monitor)
can be assigned to the monitor mix or the out front mix (see bridge/mix/mon) There are 7
frequency bands on each graphic, ranging from a low 60Hz to a high 16KHz.
15. EFX to mon. This controls the amount of effect routed back through your foldback monitor
16. Music to Mon. This controls the amount of music (playback) through your monitor
17. EQ in. This button is used if you wish to bypass the graphic equalizer. When the button is
in, the green LED will light indicating that the graphic is in use.
18. Monitor master. This controls the overall level of signal to the monitor when the amplifier
is split for use in main/monitor mode(
19. LED’s. These LED’s will show you the output level of the mixer. An output of 0dB should try
to be achieved as much as possible for optimum performance.
20. EFX to main. This controls the amount of effects to the out front mix
21. Aux to main. This controls the amount of signal to the out front mix of whatever is plugged
into the auxiliary (see aux in)
22. Music to main. This controls the amount of music (playback) to the out front mix.
23. Master volume. This controls the overall volume to the out front mix
24. Phantom power. The +48v phantom power switch should be activated when connecting
condenser microphones or DI boxes that require phantom power to the mixer.
25. Input (aux in/music in) These inputs are for any stereo music playback or anything that
requires a signal source, such as a drum machine, video camera, etc. Either ¼” jack or
phono RCA) inputs can be used.

26. Rec out. This output can be connected to the input(s) on any recording device.
27. Output (main/monitor) These outputs enable you to send line level signals to an external
input source.
28. Amp mode. This is to alter the amp mode. BRIDGE MODE bridges the 2 internal amps
together to give you 1 x 400, 600 or 1000 watt mono output. (see bridge output). MONO 1
+ 2/MON splits the 2 amplifiers to enable you to use one for the out front mix and one for
the stage monitors. CH 1 + 2 is considered to be ‘normal mode’, giving you 2 x 200/300/500
watts to your out front mix.
29. AC Power connector. This is where the mains IEC plugs in. It also houses the internal AC
power fuse.
30. Main switch. This is to switch the mixer on.
31. Speakers. These are outputs for the speaker leads. Connection is via speakon® or speakcore
connection . The left and right outputs are for normal application when using either 2 x
separate amplifiers for out front mix configuration (1 to the left speaker, 1 to the right
speaker) or Main/mon configuration when the left hand output goes to the fold back
monitor and the right hand output goes to the out front speaker. NB. You can then link in
another speaker from the speaker output, providing the total speaker load does not go
below 4 ohms. All L2 audio speakers are 8 ohms each, so linking two together will send the
total load down to 4 ohms. This is OK. DO NOT CONNECT 2 x 4 OHM SPEAKERS TOGETHER
IN THIS WAY OR THE AMPLIFIER WILL OVERHEAT AND SERIOUS DAMAGE COULD OCCUR. If
you are using the mixer in bridge mode the BRIDGE speaker output should be used.
32. Fan. Designed to keep the amplifier cool. Please do not obstruct.

Model number PH822 PH1023 PH1225
Max power output 2 x 200 watts 2 x 330 watts 2 x 525 watts
Frequency response 20Hz-20KHz 20Hz-20KHz 20Hz-20KHz
THD >0.5% >0.5% >0.5%
Max voltage gain 80dB 80dB 82dB
Input channel EQ 3 Band EQ
Hi 12KHz,Mid 2.5KHz,
Low 80Hz ±15dB
3 Band EQ
Hi 12KHz,Mid 2.5KHz,
Low 80Hz ±15dB
3 Band EQ
Hi 12KHz,Mid 2.5KHz,
Low 80Hz ±15dB
Graphic EQ 7 band eq.
60Hz,120Hz,360Hz,1K
Hz,
2.5KHz,7KHz,16KHz.
7 band eq.
60Hz,120Hz,360Hz,1K
Hz,
2.5KHz,7KHz,16KHz.
7 band eq.
60Hz,120Hz,360Hz,1K
Hz,
2.5KHz,7KHz,16KHz.
Meters (dBU) 5 LED 5 LED 5 LED
Effects 16 Rotary DSP 16 Rotary DSP 16 Rotary DSP
Phantom power +48v +48v +48v
Power consumption Max 615VA Max 930VA Max 1540VA
Dims (WxHxD) 475x245x285mm 475x245x285mm 505x245x285mm
Weight 14kg 15kg 18.3kg
Specifications

WARRANTY TERMS AND CONDITIONS
1. L2 Audio is exclusively distributed by the MGD group limited (hereinafter referred to as
‘MGD’)
2. MGD or any MGD authorised agent warrant that the products supplied are free from
defective material or workmanship. This warranty is for a period of one year from date of
purchase. (Exceptions are listed in points 6 & 7)
3. The product should be registered within 14 days of purchase. There is a dedicated on line
form at www.l2audio.co.uk/warranty. If you are not able to register online, please
contact MGD at the address below within 14 days of purchase.
4. Your warranty is a RTB (return to base) warranty. In the unlikely event that your product
needs to be returned, please initially contact your place of purchase to obtain a returns
advice number. We will however always try first to establish if the fault can be rectified
without returning the product.
5. Every effort must be made to retain the original packaging. Any return not in original
packaging is more susceptible to transit damage. Any subsequent claim may be invalidated
due to insufficient packaging. MGD is not liable for any goods sent back that are received
damaged.
6. The warranty does not apply to any misuse, modifications, accidental damage, wear and
tear, neglect or loss occurred during transit.
7. Mains leads and batteries (rechargeable or other) are not covered under this warranty.
Please refer to ‘Battery care’ section of this manual for further information.
8. Your statutory rights are not affected.
C/O MGD Group Ltd
11 Pentrich Road
Giltbrook Trade and Industrial Park
Nottingham NG16 2UZ
England
E&OE
This manual suits for next models
2
Table of contents
Other L2 Audio Music Mixer manuals