La Sommeliere DeLonghi PRESTIGIO User manual

- QUICK GUIDE -
2
Rorrorem veri rehen-
dae corerum
Rorrorem veri rehen-
dae corerum Rorrorem veri rehen-
dae corerum
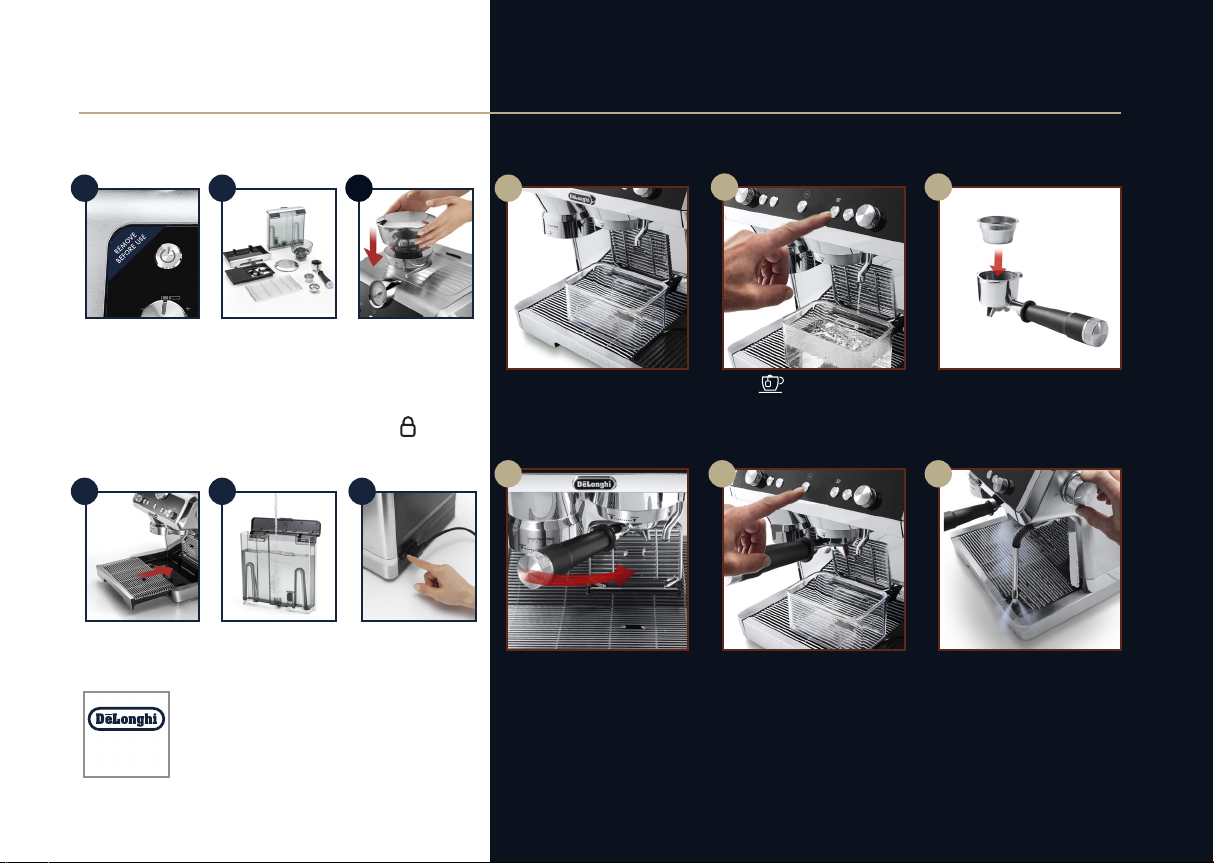
Remove stickers &
packing materials
Insert the drip tray
with cup grill.
Insert the Bean
container in the coffee
grinder.The container is
correctly inserted when
the arrow is lined up
with the symbol and
you hear a “click”.
Wash and dry ac-
cessories; including
water tank.
Fill water tank. Plug in machine
and switch on the
main power.
PREPARING YOUR MACHINE
321
5 64
Place a container under the
water spout.
Attach the portafilter.
Press to rinse.
Press OK to rinse.
Insert filter basket into
portafilter.
Open the steam dial for a few
seconds. For optimal steam
performance we recommend
you repeat this action 3 or
4 times. This is to purge the
steam arm before frothing or
steaming your milk.
SETTING LA SPECIALISTA FOR FIRST USE
12 3
4 5 6
Loremipsum
How-To
For more details on setting up your La Specialista
Prestigio please check out the De’Longhi How To
Channel

3
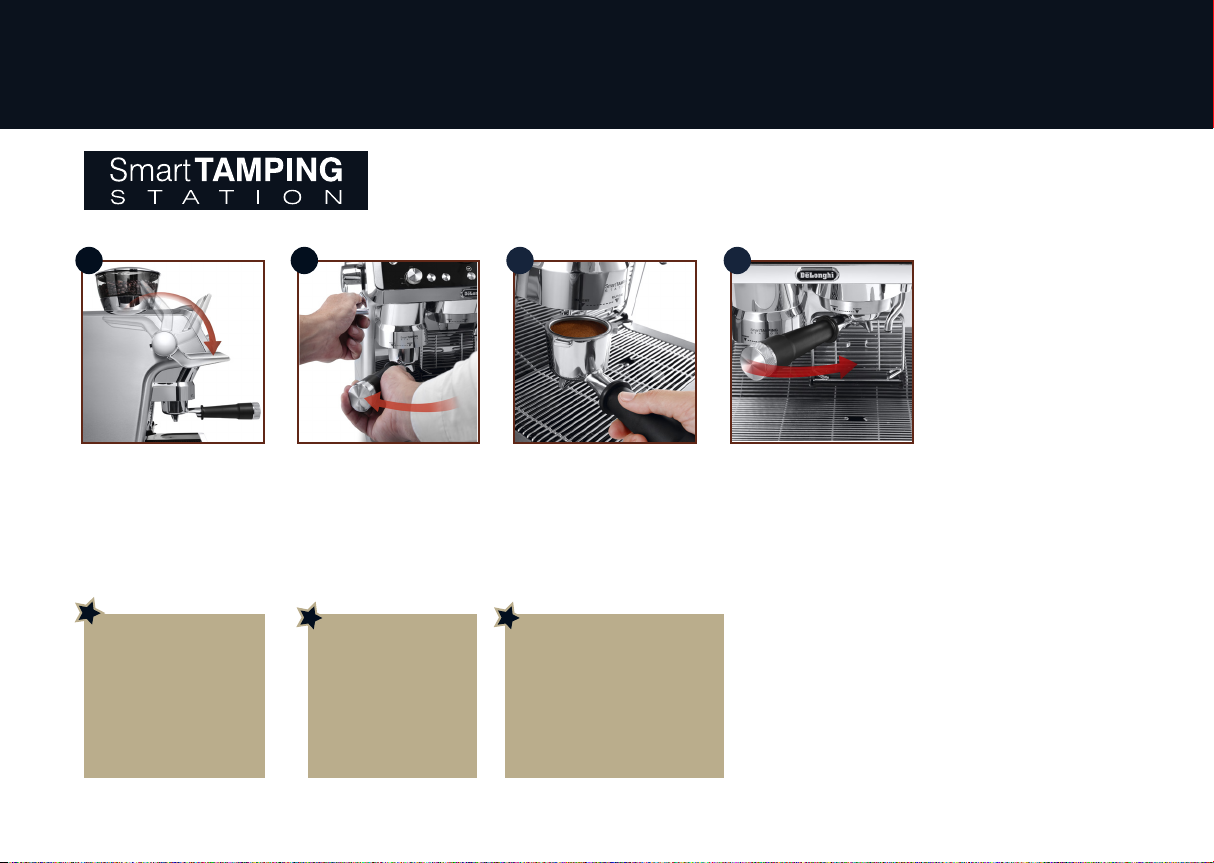
Add beans to hopper.
Fresh is best; fill in just with
the quantity you need.
Store the remainder of
your beans in a vacuum
container.
The ideal setting depends on
your coffee bean type. The
factory default is 5. If you are
not satisfied, adjust the level
according to your personal
taste and the type of coffee (do
it while grinding).
Select single or double
dose filter and place in the
portafilter. If you are using
the double filter, press the
X2 button.
Please note: the x 2 button
will double the volume of
the espresso shot as well.
Set the dose level by adju-
sting the dial starting from
the min. position.
Attach portafilter.
Once locked into place,
grinding will start.
To disable the grinder from
auto starting turn the dial to
setting.
1 2 3 54
X2
Step 1 - grinding
Refer to “Focus on perfect dose” on next
page for suggestions.
BARISTA TIPS:
A grinding level between 3 and 6 is recommended for most
coffees. A grinding level of 1 or 2 is very ne and should
be used with special coffees only (light roasted)

4
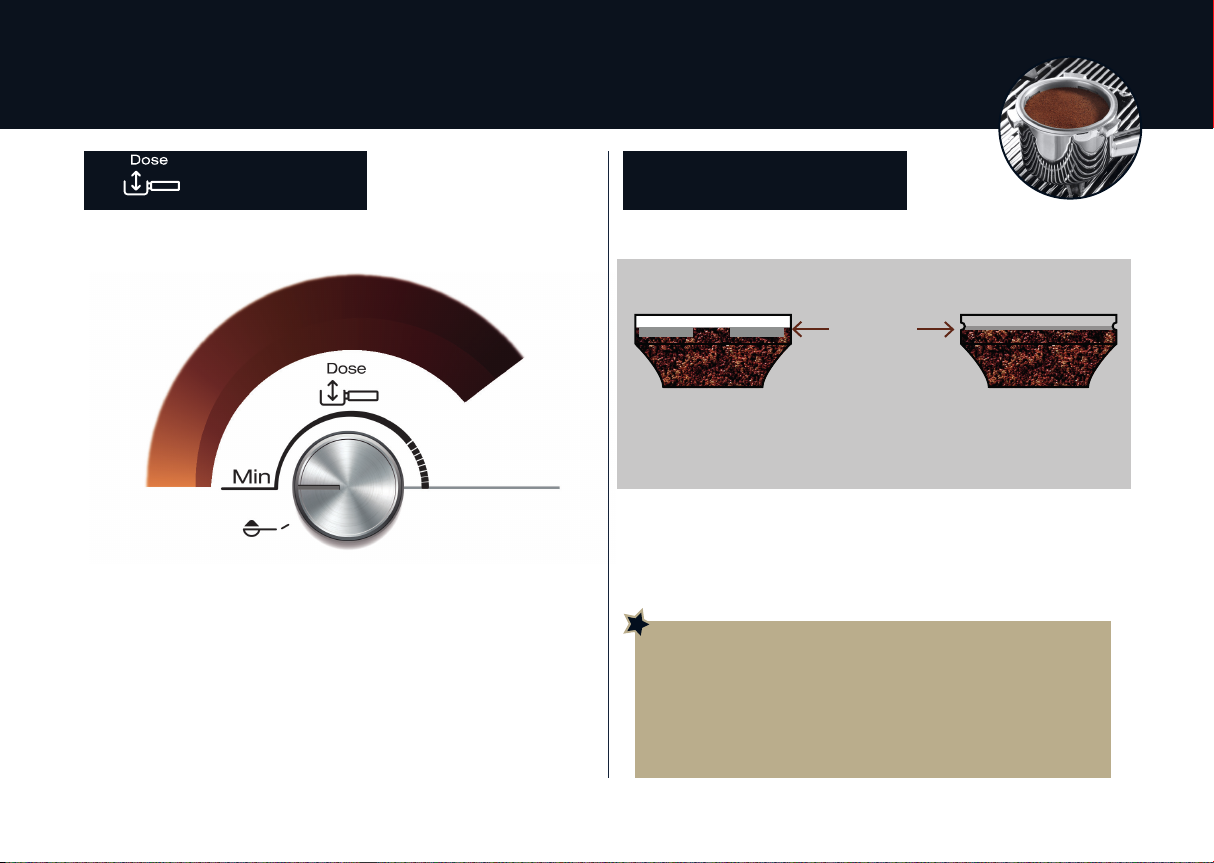
Focus on perfect dose
Adjust dose
Achieve Espresso perfection
The coffee filters have a mark inside to identify the level for perfect dose.
A- Laser marked filters: the perfect quantity corresponds to the top
line of the mark.
B- Filters with relief mark: the perfect quantity corresponds to the
line in relief.
Perfect dose
BARISTA TIP:
if your coffee is over or under extracted and the dose is within the perfect
dose range, adjust the grinder settings ner or coarser.
Over extracted coffee (pouring too slowly) needs coarser grind
Under extracted coffee (pouring too fast) needs ner grind.
Each variety of coffee beans can behave differently during grinding and this is the
reason why setting the dose at the beginning might require extra care.
With this illustration we give you some indications on how to regulate the dose. Please
note these suggested setting ranges, based on the roasting level, are certainly a good
starting point, but they might slightly vary depending on specific composition of your
coffee beans.
1. Set the dose (to reach the mark inside of the filter basket, see image for perfect
dose) starting from the minimum position.
2. Look at which roasting level your coffee is and based on that, turn the knob slowly,
referencing the ranges.
Extra
grinding
adjustment
X-LIGHT
LIGHT
MEDIUM
MEDIUM-DARK
DARK
X-DARK
A - Lasermarked lters B - Filters with relief mark
The lters provided may vary upon the models.
5
After grinding, pull the lever
down fully (do not remove
portafilter). For a perfect
result, you can do it twice.
Keep the lever down while
removing the portafilter.
Once it is done, place
back the lever in its original
position.
Check the level.
1 2 3
Attach the portafilter to the
brewing unit.
4
BARISTA TIP:
Pull the lter holder out
while the tamper is still
down for polished nish
of coffee.
Step 2 - tamping
BARISTA TIP:
Ensure the coffee is at the
recommended dosage
level after tamping. You
may need to adjust the
dosage dial more times
before reaching the
perfect dose.
BARISTA TIP:
Coffee left on the edges of the
lter after pressing does not in
any way compromise the quality
of the brewing and therefore the
end result.
6
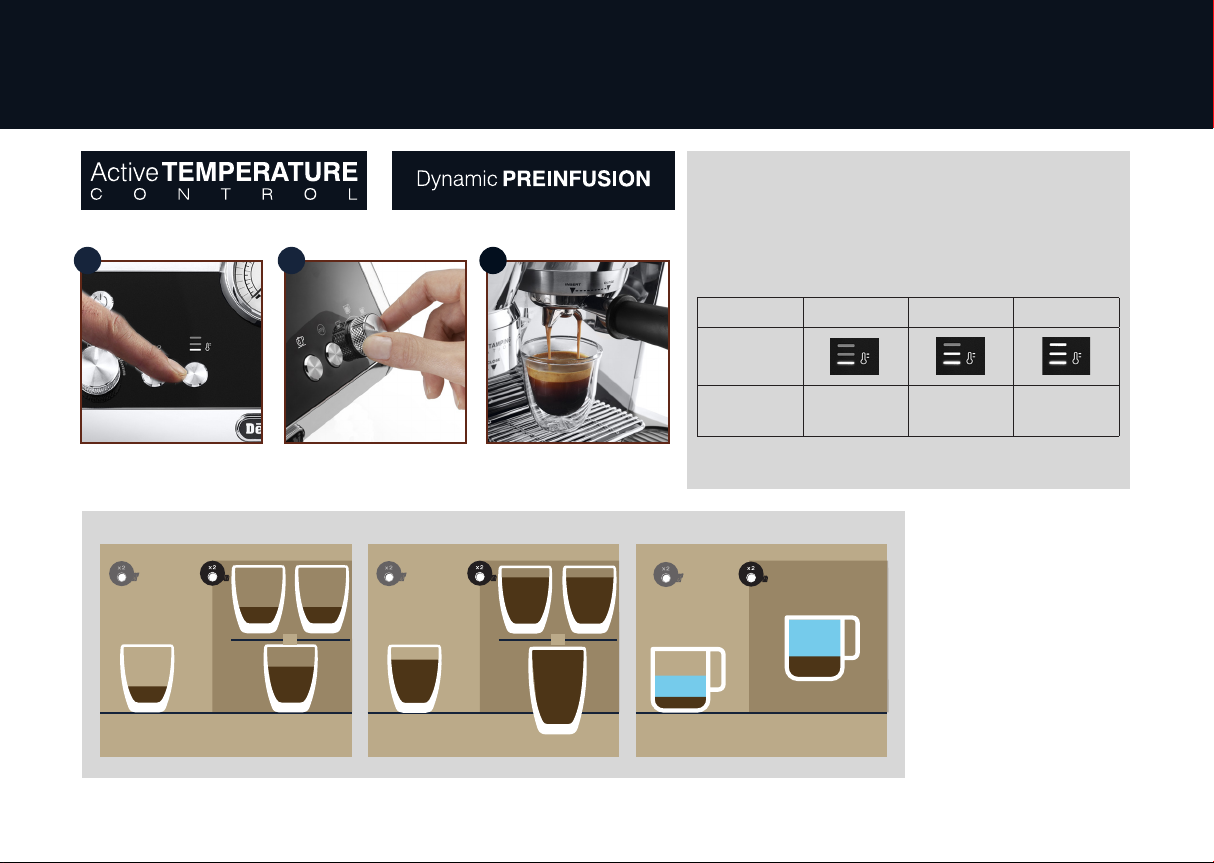
Select your beverage.Select the temperature
21 3
Step 3 - brewing
INFUSION TEMPERATURE PROFILES
• The water temperature is precisely controlled throughout the entire brewing process to ensure
the ideal temperature stability for the extraction. La Specialista Prestigio offers up to 3 infusion
temperature* proles to select, correspondent to a range of temperatures between 92° and 96°C.
• Coffee bean varieties as well as roasting colours require their own specic temperature setting
for the best extraction: Robusta coffee beans prefer lower temperature; Arabica prefers higher
temperature. The same is applicable to beans with a darker roasting colour or to freshly-roasted
beans than those degassed over time.
Temperature level MIN MED MAX
Corresponding
light
Coee Beans
Roasting Range
DARK MEDIUM to
DARK
LIGHT to
MEDIUM
* This temperature refers to the water inside the thermoblock. This differs from the tempe-
rature of the beverage in the cup or the temperature measured when the beverage comes
out from the portalter spouts.
Espresso
35 ml
35 ml
35 ml
oo o
o
.
70 ml
onon
Coee Americano
80 ml
120 ml
oo onon
80 ml
80 ml
160 ml
onon
240 ml
(≃35 ml)
(≃85ml)
(≃70 ml)
(≃170 ml)
ESPRESSO BASED BEVERAGES MENU
Single
Single
Single
Double
Double
Double
Approx.
O O
Approx. Approx.
Approx.
Approx. Approx.
Approx. Approx.
Approx. Approx.
Approx
Circa
Approx
Circa
7
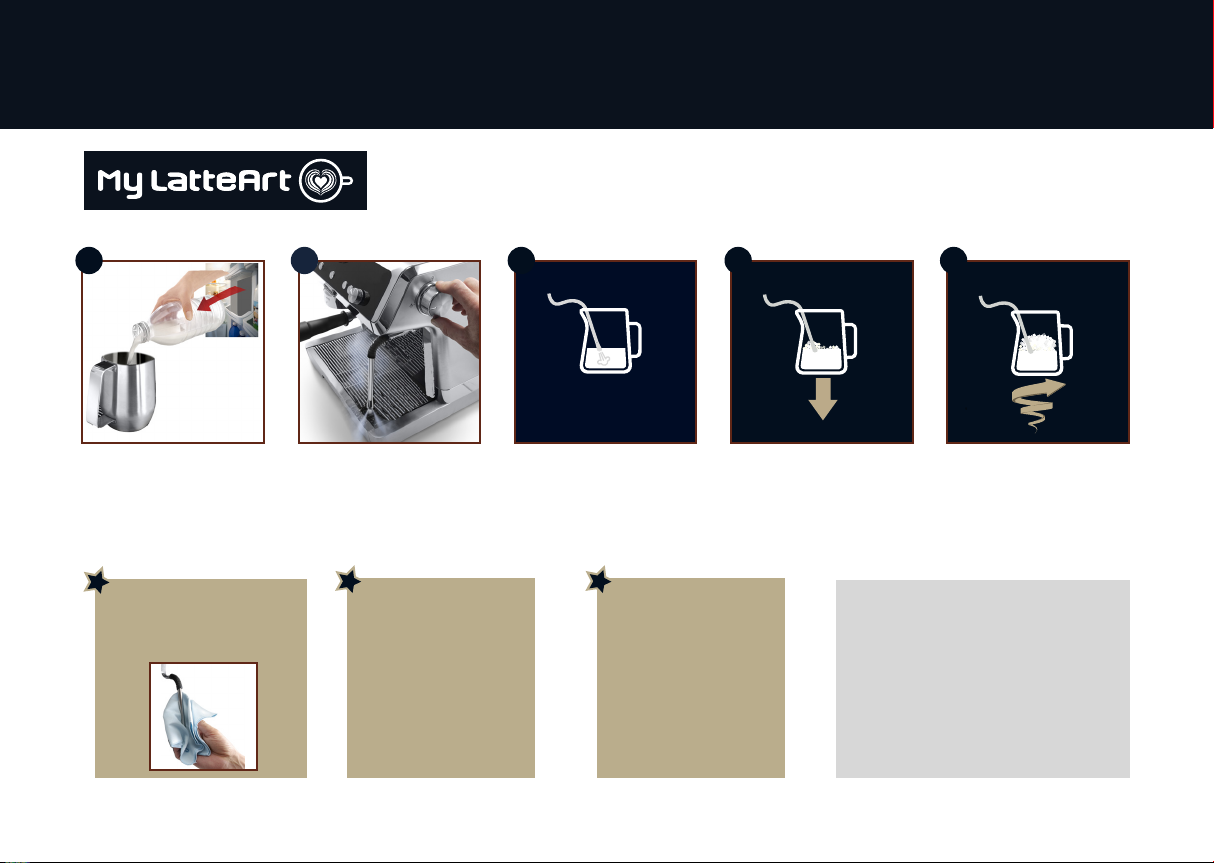
Step 4 - manual frothing
Turn the steam wand on
briefly to purge condensa-
tion. Make sure the wand is
pointing away from you.
Keep the steam nozzle just
on the surface, careful not to
make big bubbles by letting
too much air in.
Fill the milk jug with fresh
cold milk. Milk will up to
triple in volume.
To make the froth, put the
nozzle on the surface of
the milk and air will catch
by the mixing of milk and
steam.
Insert the steam nozzle just
under the milk: this create
a vortex. Once the desired
temperature is reached turn
the steam knob off and wait till
steam stops completely before
removing jug.
1 2 3 54
BARISTA TIP:
Fresh is best : Be sure
to use fresh cold milk
every time. Whole milk
is recommended for best
results. Dairy and Non
Dairy alternatives will
vary in ease of texturing
depending on type.
BARISTA TIP:
After foaming milk,
eliminate unwanted
bubbles by swirling the
pitcher.
CLEANING TIP:
Always clean the steam nozzle with a
clean damp cloth and release a short
burst of steam to remove milk residue.
Find out more in our dedicated video series
for how to use your La Specialista Prestigio
Take Care of your Coee Machine
Regular maintenance and cleaning helps
preserve the coffee machine, keeping it
running efciently for a longer period of
time.
Discover the full range of original
accessories.
Visit “Delonghi.com” for more information.

8
Rorrorem veri rehen-
dae corerum
Rorrorem veri rehen-
dae corerum Rorrorem veri rehen-
dae corerum
Entfernen Sie die
Aufkleber und die
Verpackungsmate-
rialien.
Setzen Sie die Abtropf-
schale zusammen mit
dem Rost ein.
Setzen Sie den Kaf-
feebohnenbehälter in
das Mahlwerk ein. Der
Behälter ist richtig ein-
gesetzt, wenn der Pfeil
mit dem Symbol
übereinstimmt und ein
„Klicken” zu hören ist
Waschen und
trocknen Sie die
Zubehörteile,
einschließlich
Wassertank.
Füllen Sie den
Wassertank. Schließen Sie die
Kaffeemaschine an
das Stromnetz an
und drücken Sie den
Hauptschalter.
VORBEREITUNG DER KAFFEEMASCHINE
321
5 64
Stellen Sie einen Behälter
unter den Wasserauslauf.
Setzen Sie den Siebträger
ein.
Drücken Sie , um einen
Spülvorgang durchzuführen.
Drücken Sie OK, um einen
Spülvorgang durchzuführen.
Setzen Sie das Kaffeesieb in
den Siebträger ein.
Öffnen Sie für einige Sekunden
den Ausgabeknopf für Dampf.
Wiederholen Sie dies drei-
oder viermal, um das ganze
Dampfausgaberohr zu reinigen,
bevor die Milch aufgeschäumt
wird.
ERSTER GEBRAUCH
12 3
4 5 6
Loremipsum
How-To
Mehr Details zur Kaffeemaschine finden Sie im
De’Longhi Kanal How To

9
Füllen Sie die Bohnen in den
Behälter. Es wird empfoh-
len, jeweils nur die für die
Zubereitung benötigten
Bohnen einzufüllen, damit
der Kaffee immer frisch
verwendet wird. Bewahren
Sie den Kaffee in einem
luftdichten Behälter auf.
Die Einstellung variiert je nach
Kaffeesorte. Die werkseitige
Einstellung ist 5. Sollte das
Resultat nicht zufriedenstellend
sein, kann die Stufe anhand
des eigenen Geschmacks und
der Kaffeesorte eingestellt
werden (Einstellung muss bei
laufendem Mahlwerk erfolgen).
Setzen Sie das 1- oder
2-Tassen-Sieb in den
Siebträger. Wenn das 2-Tas-
sen-Sieb verwendet wird,
muss die Taste X2 gedrückt
werden.
Hinweis: mit der Taste X2
wird auch die doppelte
Menge Espresso ausgege-
ben.
Stellen Sie die Kaffeemenge
ein, indem Sie den Drehk-
nopf regeln und auf Position
MIN befinnen.
Setzen Sie den Siebträger
ein. Nachdem er
eingerastet ist, beginnt der
Mahlvorgang. Um das
Mahlwerk auszuschalten,
drehen Sie den Drehknopf
auf Position
1 2 3 54
X2
Schritt 1 - Mahlvorgang
Für weitere Empfehlungen, siehe
„Die perfekte Menge” auf der folgenden Seite.
TIPP VOM BARISTA:
Der Mahlgrad zwischen 3 und 6 wird für die meisten Kaffees
empfohlen. Bei der Einstellung des Mahlgrads auf 1 oder 2 ist
das Resultat sehr fein; sie sollte daher nur bei sehr speziellen
Kaffees verwendet werden (leicht geröstet)
10
Die perfekte Menge
Regelung
der Menge Der perfekte Espresso
TIPP VOM BARISTA:
wenn der Kaffee über- oder unterextrahiert ist und die Menge den richtigen
Füllstand hat, muss der Mahlgrad geregelt werden
Wenn der Kaffee überextrahiert ist (Ausgabe sehr langsam), ist ein gröberer
Mahlgrad notwendig.
Wenn der Kaffee unterextrahiert ist (Ausgabe sehr schnell), ist ein feinerer
Mahlgrad notwendig.
Das Resultat des Mahlvorgangs variiert anhand der Kaffeebohnen; die Einstellung der
Menge muss daher zu Beginn sehr sorgfältig erfolgen.
Die Abbildung gibt Hinweise zur Einstellung der Menge, die auf der Röststufe basieren:
sie sind ein guter Ausgangspunkt, können aber je nach verwendeten Kaffeebohnen
variieren.
1. Stellen Sie die Menge ein (um den Füllstand im Kaffeesieb zu erreichen, siehe
Abbildung zur perfekten Menge), indem Sie auf kleinster Stufe beginnen.
2. Bestimmen Sie den Röstgrad und drehen Sie anhand dessen den Drehknopf
langsam auf den entsprechenden Bereich.
Erweiterter
Mahlbereich
Perfekte Menge
Erweiterter
Mahlbereich
XHELL
HELL
MITTEL
MITTELDUNKEL
DUNKEL
XDUNKEL
Die perfekte Menge ist durch eine Markierung in den Sieben angegeben:
A- Siebe mit Lasermarkierung: die perfekte Menge entspricht der
oberen Linie der Markierung;
B- Siebe mit erhabener Markierung: die perfekte Menge ent-
spricht der erhabenen Linie;
Die mitgelieferten Filter können je nach Modell variieren
A- Siebe mit Lasermarkierung B- Siebe mit erhabener
Markierung
Table of contents
Languages:
Popular Coffee Maker manuals by other brands


Bunn
Bunn LCA-1 Installation & operating guide

Chris Coffee Service
Chris Coffee Service Silvano owner's manual

Black & Decker
Black & Decker BLACK DECKER HOME DE790 Use and care book

Saeco
Saeco Vienna Plus Sup 018M operating instructions

INCAPTO
INCAPTO BXCO1470E Instructions for use

Bosch
Bosch TASSIMO finesse TAS16B Series user manual