Lacerta M-GEN User manual

Lacerta MGEN Quick Start Guide
While The Lacerta MGEN Superguider provides many functions for the advanced user, it is
actually quite simple to use, even for a beginner Here we describe the basic steps to start
guiding
Contents
The Lacerta MGEN Superguider consists of a hand controller and the guide camera The
hand controller has the patch bay on the bottom, with 5 different jacks:
Assembly and starting
- first, attach the MGEN camera to your guide scope, either by using the T2 thread or an
optional 1 25" adapter You can first estimate where the focal plane should be, by measuring
the distance from the some point on the guide scope to an image (sun, moon) focused on a
piece of white cardboard, and then mounting the MGEN's chip approximately at that distance
Make sure the connection is solid and does not wobble
Now plug in the provided cables in the following order:
- connect the power cable to the MGEN hand box (12V, middle positive) The four LEDs will
blink once briefly to indicate that the unit is under power

- connect the MGEN camera to the hand box using the 8 PIN cable Take care that the cable
has slack and does not pull on the camera at any time If you use a 9x50 finder as the guide
scope, sling the cable once loosely around it's base
- connect the hand box to your mount using the ST4 (6 PIN) cable
- connect your DSLR or CCD to the hand box using the proper 3,5mm jack camera cable
Though not a prerequisite, we recommend that you use the MGEN to control your camera
Note: By following this order, there is no danger that you will accidentally plug the ST4 cable
into the wrong port, which could damage the connectors
- switch on the MGEN hand box by pressing ESC
- enter the date and time using the cursor
buttons and SET, (only necessary if you want to
have a time stamp on your guiding file which
you can upload it to PC later on to see how well
your guiding has worked) Press ESC to
proceed
- open a new file if you want the MGEN to
write a guiding file (not necessary in the
beginning)
Focusing using live view
In order to get the system up and running it is a good idea to first point the guide scope to a
bright open cluster, like the Pleiades (Subaru) or the Beehive so that you have plenty of bright
stars in the field of view This will make it easy to get the MGEN camera nicely in focus so it
will later be better able to find suitable guide stars Make sure your mount's tracking is
switched on
Place the cursor on "Guiding" in the main menu and press SET to enter the guiding menu
First mark "guider setup" and press SET Your guide scope's focal length and the
auto guiding speed of your mount should be entered here (approximately), and set CCD
binning to 1x1 Standard values are 180mm for a 9x50 finder, and 0,5x for most Goto mounts
Go back to the guiding menu by pressing ESC

Next, place the cursor on "live view" and press SET to enter live view
Here you see what the MGEN camera sees On the
right there are a few values We recommend these
settings when using a 9x50 finder scope:
gain (sensitivity) = 7
exp (exposure time) = 900ms
thr (threshold) =1%
The threshold is a limit value Above it, the MGEN interprets signals as stars, beneath it as
noise, which is cut off Here in live view we want to see even the fainter stars, so we expect to
also see some noise, as seen here on the left side of the screen You may need to change the
gain and exposure (exp) settings when using other guide scopes, but these values are a good
starting point
If you have estimated your focal length well, the MGEN camera chip will already be placed
near enough to the focal plane that you can see larger and/or smaller dots on the screen These
are the stars If you do not see any, you may need to re-focus or make sure that you really
have pointed your guide scope directly at a cluster using an eyepiece It helps if you use a
Plössl type eyepiece for focusing the finder You can exchange it with the camera and focus
should only be off by a few mm, (usually a little too far back) As you slowly re-focus, watch
the screen for stars to appear The more stars you see, the better
Focus until the stars appear as small as possible
Now mark "select" and press SET
A small rectangle appears on the screen, and you can use the directional buttons to move it
and place it over a brighter star
Then press SET to enter the guiding window

If you are eager to try guiding for the first time, you can skip the next paragraph which
describes the MGEN's built in fine-focusing aid For guiding, stars do not necessarily need to
be in perfect focus, but it does help in finding fainter guide stars
Fine focusing: (You really only need to do this the first time you use the MGEN as long as the
best focus position is "remembered" See below)
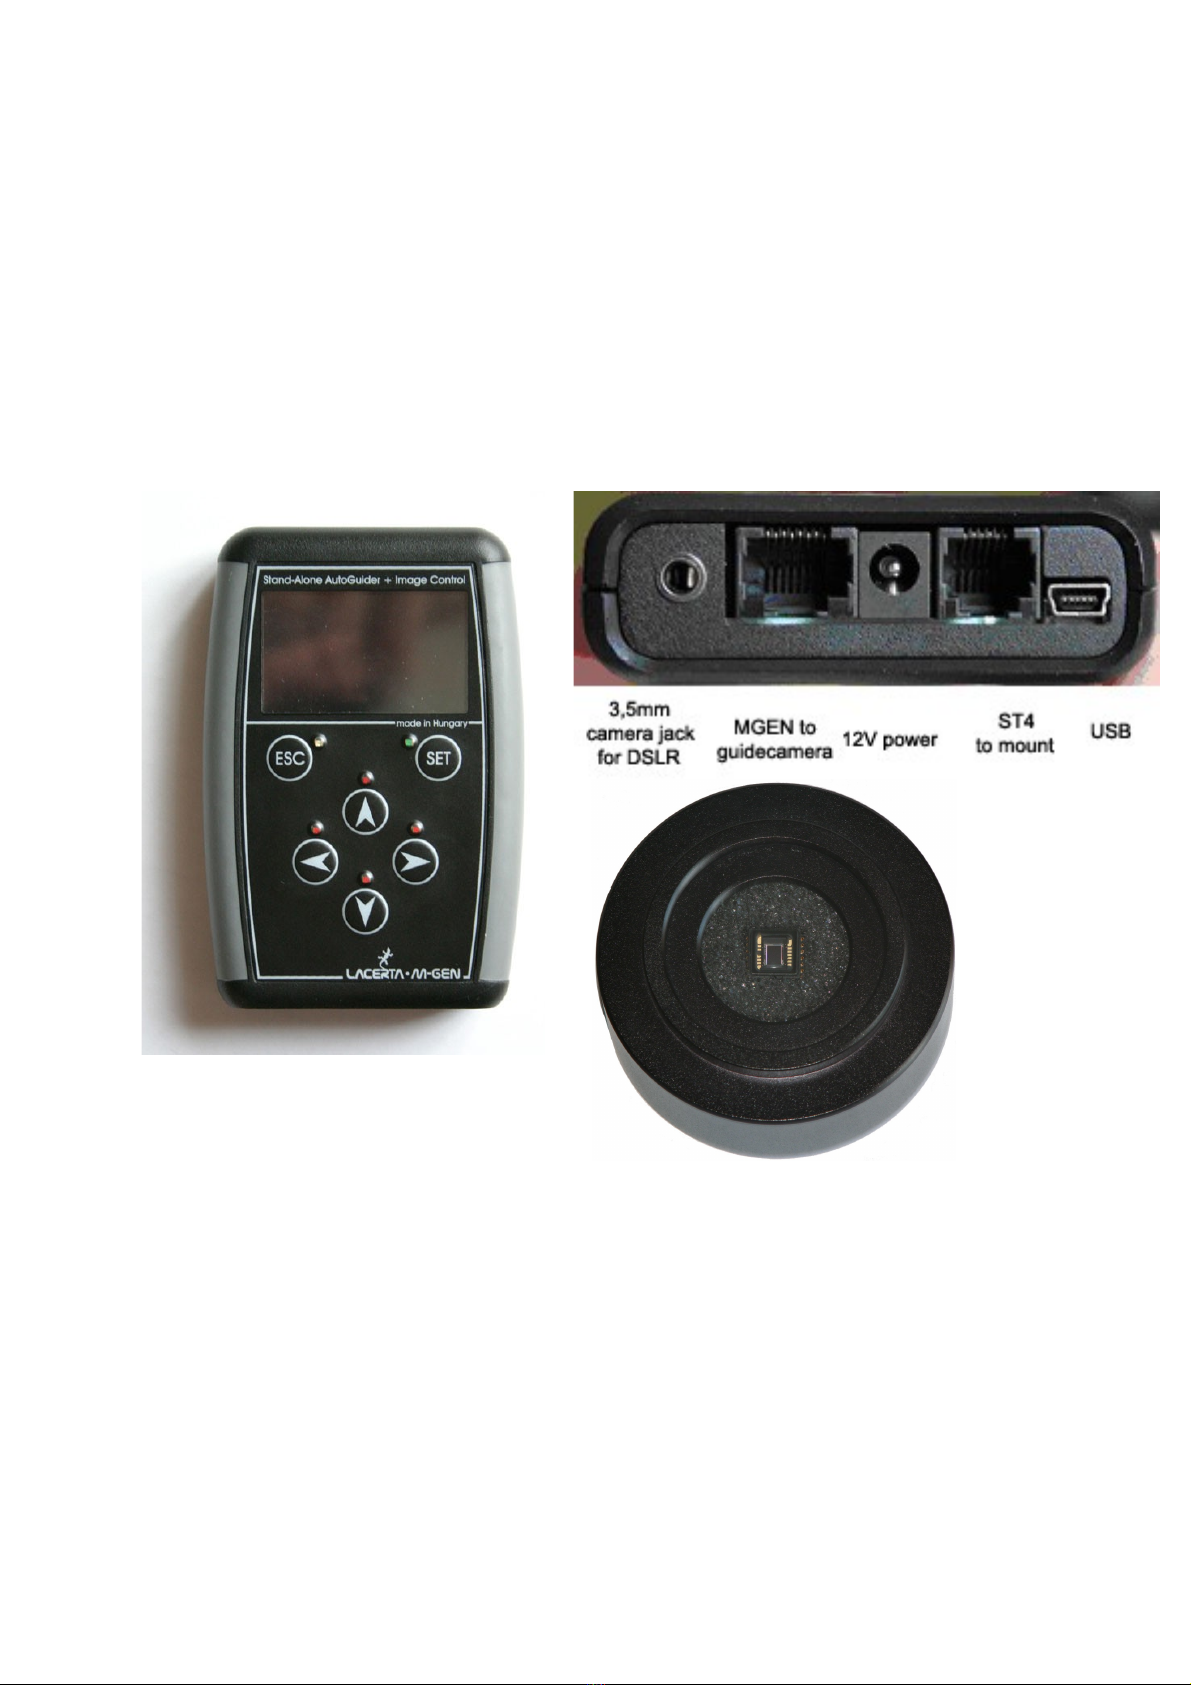
In the guiding window ("Gui" in upper right corner), you can switch the live display between
three modes, "Gui mask" (live view) "profile" (for focusing) and "drifts" (showing in real
time the guide star movements you want to correct) Use the UP directional button, place the
cursor onto the "<<" mark next to the name under the live view screen, and press SET to
toggle between the modes For fine focusing, select "profile"
The star is now depicted not as a dot, but as a converging column from top to bottom Use
careful fine focusing to make the column as slim as possible If your star is too bright, lower
the gain to make the star dimmer and the column easier to interpret Focus until it is as thin
and as long as possible Ideally you should make the column so small that it does not quite
reach the bottom You may want to somehow mark this best focus position on your guide
scope, or just fix it and if possible, not remove the MGEN camera again Now go back to "gui
mask" and watch your focused guide star on the screen
Calibration
For successful auto guiding, the MGEN Superguider needs to know how your mount is
moving in the part of the sky you want to photograph So it is necessary to let it run a short
test where it sends signals to the mount, and analyzes how the guide star moves This is called
calibration, and you need to do it every time you choose a new target Usually it only takes a
minute or so While the MGEN is sending signals to the mount the red LED's next to the
directional buttons light up, and you can see the guide star moving on the live view screen
How to do the calibration:

With your guide star on the screen, place the cursor using the UP button on the page numbers
on the bottom right By pressing SET you can toggle between the pages, and for calibration
select page 2/5 On that page, move the cursor up to "calibration" and press SET
On the Calibration screen mark "Delete cal " if a previous calibration has been saved, or if
not, just press "Calibrate" Watch the calibration routine run, first moving DEC, then moving
RA, and finally finishing and outputting some values Orthogonality is good over 90%
The mount is then driven back to the pre-calibration starting position, and when finished,
("Press any key to continue") press ESC twice to return to the guiding window
Start Auto guiding
Now comes the fun part
Place the cursor on the page switch at the bottom right, and by pressing SET or LEFT, toggle
to page 1, mark "AG start" and press SET That's it You're off and running You have started
auto guiding!
A few additional remarks to help get acquainted with your MGEN:
- On page 1 we see the same values that we saw on the earlier live view screen: gain, exp and
threshold Threshold is set to 10% by default, to reduce noise If you have a weak guide star,
you can lower this value a bit, or increase gain or exposure, but not so much that noise starts
appearing Do not select a guide star that is too small (1 pixel) as it prevents the sub pixel
calculation of the star center
- on pages 3 and 4 you can adjust the values that influence and fine tune your guiding
Place the cursor on the page number and toggle using LEFT or RIGHT or SET

A short description of the values you find there:
- Num (number of exposures) – normally set to 1 You normally want a signal output after
every guide star measurement
- tol (tolerance) – a value that defines how much drift you allow A good value
for the 9x50 finder is 0 1 pixel If you use a different guide scope, add 0 1 for every 200mm
focal length
- aggr (aggressivity) – what percentage of the calculated correction should be applied
This is initially set to 70%, to feather overcorrection You can play around with this later
on to reduce drift to a minimum, depending on your mount and seeing
- mode – there are three guiding modes available, mode 2 being the preferred one In that
mode, signals are sent to the mount even before the guide star touches the tolerance limit
Dithering
In the main menu you find the entry "random displace" This is a special function that greatly
improves the quality of your pictures It means that between the individual exposures of your
deep sky camera, the guider directs the guide star (and thus your camera) to a slightly
different position before triggering the next exposure When stacking your exposures later on,
the software will stack only the stars, and the hot pixels and dark current of your camera will
be averaged out The resulting pictures are smoother, with less noise and more weak signal
information that can be extracted in post processing This is the gold standard in modern
astrophotography
Naturally you must synchronize the dithering movements with your deep sky exposures With
your DSLR or CCD connected, you can use the extensive exposure program available
in the MGEN When enabled, dithering takes place automatically between the exposures
(Dithering is not possible without using the exposure program unless you use APT
to control the MGEN's dithering)
Dithering is a feature you do not need to use in the beginning, but we highly recommend that
you later take full advantage of what the MGEN can do!
Some important values summarized for quick reference:

Guider Setup:
Objective focus: 180mm
Guide speed 0,5x (also check the value in your mount's controller!)
binning 1x1
Live View screen:
Gain 7
exp 900ms
thresh 1 or 2 (to see all stars and dark-noise)
Guide screen:
Gain 6, 7 or 8 (depending on the guide star)
exp between 200 and 2000ms (depending on the guide star and guiding interval)
thresh Between 7 and 10 (to guide ONLY on the guide star)
Guiding values in RA und DE :
Num 1
tol 0,10
aggr 70%
mode 2
Dithering (random displacement):
enable, 10 pixel width recommended
Exposure program:
Adjust the wait time to allow enough time for your camera to save the last exposure , (at least
5 seconds recommended) We also recommend not using mirror lock up, as it is of little use in
deep sky photography
Guiding file:
If activated, and only while using the exposure program, a guiding file is written while
guiding is running The purpose for this is to have a record of the guiding characteristics
during each exposure Use the MGEN's software to upload the file to your computer and
convert it into individual guiding diagrams Use the diagrams to check the heartbeat of your
mount, and get information about possible gear problems etc , if guiding is not as expected
Happy guiding!
your Lacerta MG N team
Other manuals for M-GEN
3
Table of contents