Art. 70167 Modalità d’uso:
1 Premere brevemente il pulsante BOOST e verificare che la carica della funzione BOOST sia oltre i
14V. Eventualmente caricare la funzione BOOST in uno dei modi descritti precedentemente
(Vedi Modalità di carica della funzione “BOOST”).
2 Collegare la pinza nera (-) dell’avviatore al contatto negativo del veicolo se predisposto. Per i veicoli
senza predisposizione collegarla al polo negativo (-) della batteria. Successivamente collegare la
pinza rossa (+) al contatto positivo del veicolo se predisposto, oppure al polo positivo (+) della
batteria per i veicoli senza predisposizione. Verificare sempre sul libretto di uso e manutenzione del
veicolo eventuali note, avvertenze e suggerimenti riportati nella sezione avvio d’emergenza.
3 Sul display comparirà la scritta JUMP START READY. Accendere il veicolo entro 10secondi.
4 Lasciare collegato l’avviatore al veicolo acceso per 10-15 secondi così da ricaricare la funzione BOOST.
5 Scollegare l’avviatore entro 30 secondi rimuovendo prima la pinza rossa poi quella nera.
Ricarica batteria di backup interna:
La batteria di backup interna può essere ricaricata in 2 modi:
A: Tramite caricatore MicroUSB da 5V - 2A (tempo di ricarica circa 4 ore).
B: Tramite presa accendisigari 10A (tempo di ricarica circa 50 minuti).
Grazie per aver scelto l’avviatore LAMPA.
Questo avviatore di nuova generazione permette di mettere in moto un veicolo con la batteria scarica,
grazie alla speciale funzione “BOOST” che genera sufficiente corrente per permetterne l’avviamento.
Una piccola batteria di backup interna permette di attivare la funzione BOOST in condizioni di emergenza.
Domande frequenti:
D) Perché pur essendoci la scritta “JUMP STARTER READY” non riesco ad avviare il veicolo?
R) Il veicolo potrà essere avviato entro 10 secondi dall’uscita della scritta “JUMP STARTER READY”.
Scollegare l’avviatore, attendere alcuni secondi e ricollegarlo. Avviare il veicolo entro 10secondi.
D) Perché quando ricarico la funzione BOOST mediante presa accendisigari o caricatore MicroUSB, una
volta raggiunti i 15V, sul display rimane la scritta “CHARGING”?
R) Una volta ricaricata la funzione BOOST, l’avviatore passa a ricaricare la batteria di backup interna.
Avvertenze:
•Seguire le indicazioni contenute nel presente manuale.
•Ad avviamento avvenuto, scollegare immediatamente le pinze del Power-Pack dal veicolo.
•Utilizzare solo su veicoli con impianto elettrico e batterie 12V
•Non utilizzare l’avviatore come caricabatterie o al posto della batteria.
•Controllare sempre che le pinze dell’avviatore siano in buono stato e che i cavi non siano tagliati o
rovinati. Controllare che i connettori della batteria del veicolo da avviare non siano allentati,
arrugginiti o sporchi. In questo caso, pulirli prima di collegare l’avviatore.
•Non tentare di avviare il veicolo dopo 3 tentativi falliti. Controllare che non ci siano altri problemi. In
caso rivolgersi a un’officina.
•Non smontare o manomettere il l’avviatore. Far riparare solo da un centro specializzato.
•Non utilizzare come giocattolo, tenere lontano dalla portata dei bambini.
•Non utilizzare sotto la pioggia, non bagnare né immergere in acqua.
•Non utilizzare in ambienti pericolosi, ad esempio in presenza di liquidi infiammabili, gas o polveri.
•Non esporre direttamente ai raggi solari o nelle vicinanze di fonti di calore.
Conservare a temperature inferiori a 70° C.
•Ricaricare solo a temperature comprese tra 0° C e + 60° C.
•Ricaricare utilizzando solo il caricatore MicroUSB o il cavo presa accendisigari forniti.
•In condizioni estreme, possono verificarsi perdite della batteria di backup interna. Pulire il liquido con
un panno. Evitare il contatto del liquido con a pelle. In caso di contatto con gli occhi o pelle,
risciacquare immediatamente con abbondante acqua e consultare un medico.
•Alla fine della sua vita utile, smaltire l'apparecchio tramite gli appositi centri di raccolta RAEE.
Garanzia:
1 Il prodotto è coperto da garanzia limitata di 24 mesi dalla data di acquisto da parte dell'utente finale
contro qualsiasi difetto di produzione.
2 La garanzia è valida solo dietro presentazione della ricevuta d’acquisto originale (scontrino / ricevuta).
3 La garanzia non è valida se il numero di serie, la data di produzione o l'etichetta del prodotto sono
state rimosse o danneggiate.
4 La garanzia non copre i danni o guasti del prodotto risultante dalla normale usura, abuso fisico,
errati collegamenti, uso improprio, modifiche o riparazioni da terzi non autorizzati.
5 Non siamo responsabili per eventuali danni diretti o indiretti derivanti dall'uso o abuso di questo prodotto.
6 Tutte le richieste di garanzia sono limitate alla riparazione o sostituzione del prodotto difettoso.
7 Se il prodotto viene sostituito o riparato, sarà coperto per il tempo rimanente del periodo di garanzia
originale. La riparazione o la sostituzione possono comportare l'uso di componenti rigenerati
equivalenti. I pezzi o i prodotti sostituito diventeranno di nostra proprietà.
8 I componenti di consumo come le batterie non sono coperti dalla garanzia.
Ricarica batteria di Backup interna:
Presa accendisigari: 50 minuti
Caricatore MicroUSB: 4 ore
Specifiche tecniche:
Misure: 295 x 219 x 81 mm
Peso: 2000 gr
Batteria di backup interna: 6000mAh
Temperature di funzionamento: da-20°C a 60°C / da -4°F a 140°F
Tensione d’uscita: 12v
Corrente massima d’avviamento: 1200A
Ricarica funzione BOOST:
Batteria di backup interna: 8 minuti
Presa accendisigari: 5 minuti
Caricatore MicroUSB: 40 minuti
Batteria o veicolo di soccorso: 3 minuti
Cicli di ricarica BOOST ottenibili con batteria di backup interna completamente carica: 3
Sostanze tossiche e nocive contenute:
Composizione e quantità di sostanze tossiche e nocive.
Pb Hg Cd Cri (Vi) PBB PBDE
0 0 0 0 0 0
0 Indica che il contenuto massimo di sostanze tossiche e nocive (MCV = Maximum Concentration Values)
sono inferiori ai limiti degli standard secondo la direttiva 2002/95EC (RoHs).
Contenuto della confezione:
Avviatore
Caricatore MicroUSB (5V – 2A)
Presa accendisigari
Manuale d’istruzioni
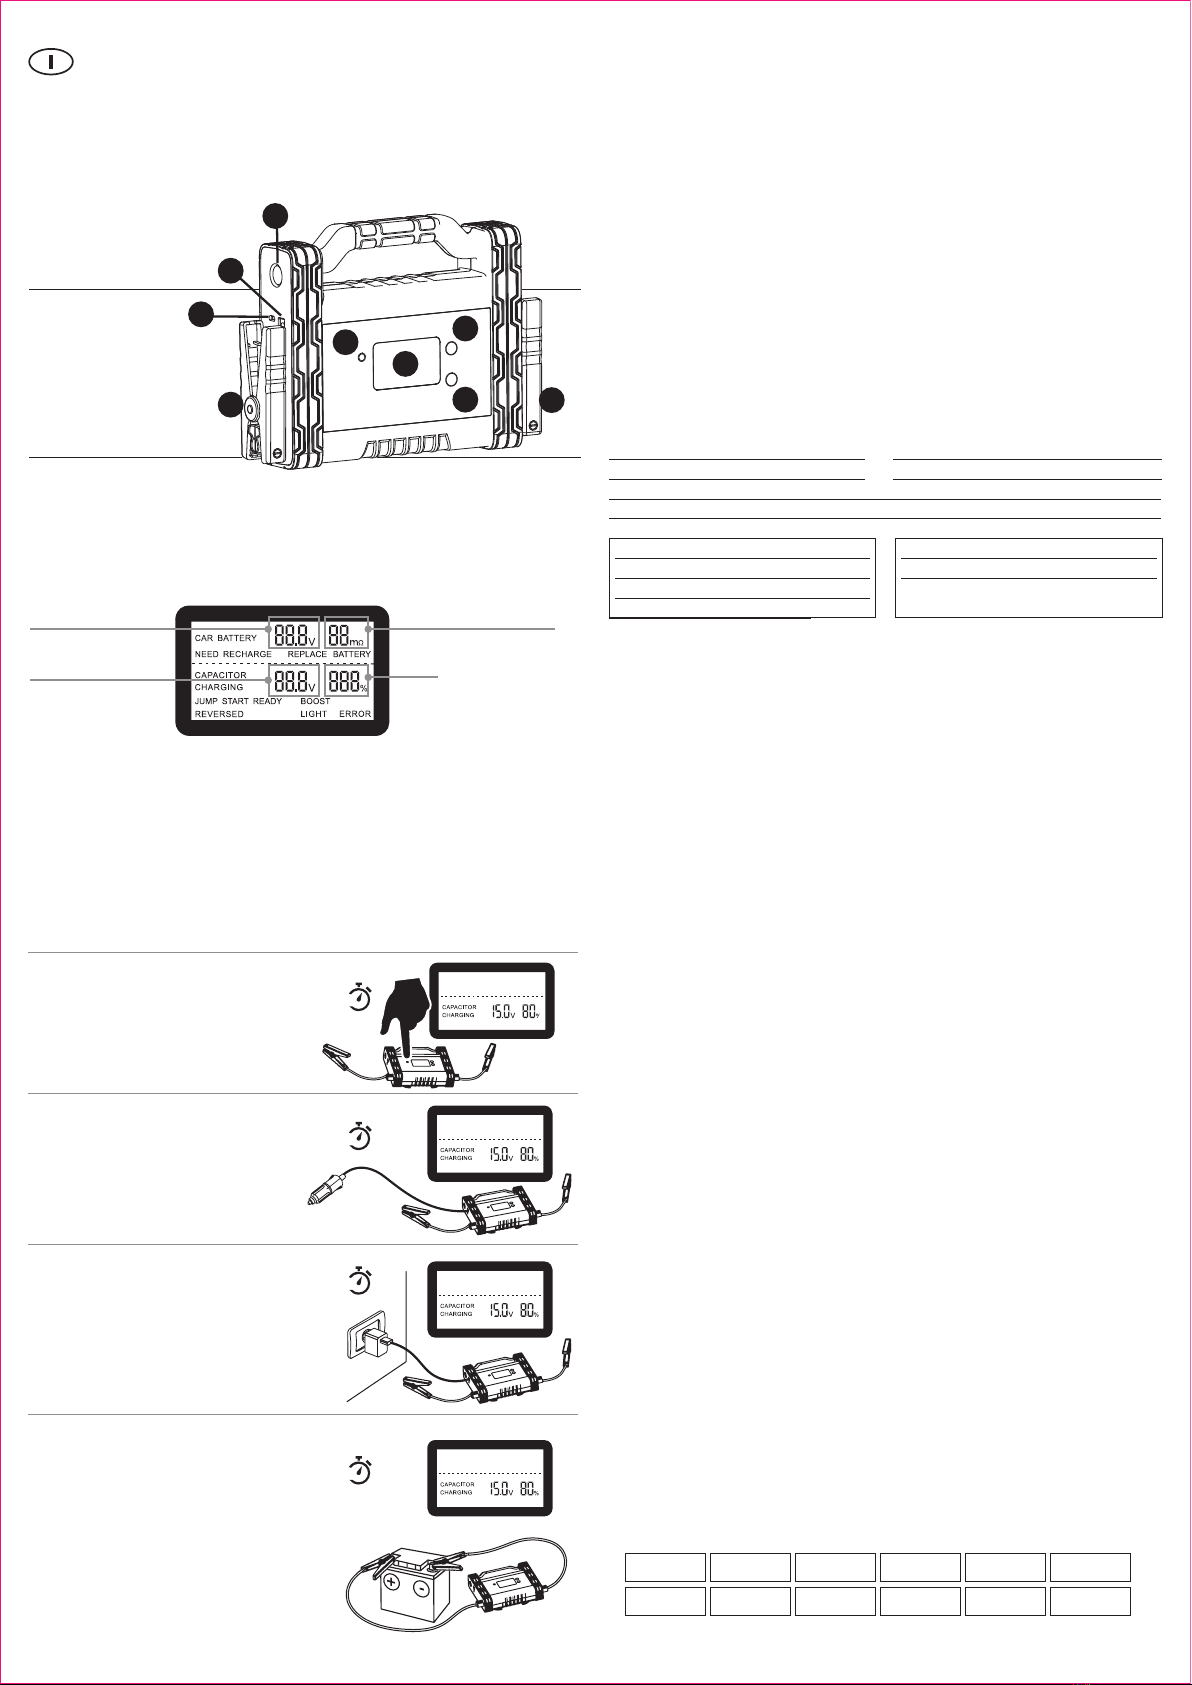
Struttura prodotto:
1 Display
2 Pulsante BOOST
3 Pulsante ACCENSIONE
4 Pulsante LED
5 LED
6 Presa Accendisigari
7 Caricatore Micro USB
8 Pinze
1
23
4
5
6
7
88
Display:
Il display è diviso in 2 parti:
La parte superiore indica lo stato della batteria del veicolo da avviare: sulla sinistra la tensione della
batteria, sulla destra la resistenza.
La parte inferiore indica lo stato dell’avviatore: sulla sinistra la carica del BOOST, sulla destra la carica
della batteria di backup interna.
Descrizione pulsanti:
1 Pulsante accensione: una volta premuto, si attiva il display.
2 Pulsante BOOST: Premere brevemente per controllare lo stato di carica della funzione “BOOST”.
Premere per 2 secondi per attivare la funzione BOOST. (vedi Modalità d’uso)
3 Pulsante LED: Premere il pulsante per attivare una delle 3 modalità della torcia LED
(normale, stroboscopico, SOS)
Tensione della batteria Resistenza della batteria
Carica del BOOST Carica della batteria
interna di BACK-UP
Modalità di carica della funzione “BOOST”:
Esistono 4 modi per ricaricare e attivare la funzione BOOST:
1: Tramite batteria di backup interna.
Premere per 2 secondi il pulsante BOOST.
Attendere 8 minuti fino a quando non saranno
raggiunti i 15V e il display non mostrerà la scritta
JUMP START READY.
2: Tramite presa accendisigari (12V - 10A)
Collegare l’avviatore alla presa accendisigari del
veicolo acceso tramite cavo in dotazione.
Attendere 5 minuti fino a quando non saranno
raggiunti circa i 15V. Scollegare l’avviatore.
3: Tramite caricatore MicroUSB (5V - 2A)
Collegare l’avviatore al caricatore MicroUSB in
dotazione.
Attendere circa 40minuti fino a quando non
saranno raggiunti circa i 15V. Scollegare
l’avviatore.
4: Tramite batteria o veicolo di soccorso
Collegare la pinza nera (-) dell’avviatore al polo
negativo della batteria o veicolo di soccorso.
Successivamente collegare la pinza rossa (+) al
polo positivo.
Attendere 3minuti fino a quando non saranno
raggiunti circa i 15V e il display non mostrerà la
scritta JUMP START READY. Scollegare l’avviatore.
Verificare sempre sul libretto di uso e manutenzio-
ne del veicolo di soccorso eventuali note,
avvertenze e suggerimenti riportati nella sezione
avvio d’emergenza.
Manuale d’uso
3min
5min
8min
40min


