Laundrylux CROSSOVER 2.0 Series User manual

CROSSOVER 2.0 SERIES
In a class by itself
DRYER OPERATING MANUAL
DOC. NO. 098538
EDITION 4.2018
DRYER OPERATING MANUAL
DOC. NO. 098538
EDITION 4.2018

To reduce the risk of re, electric shock, or injury to persons when using your appliance,
follow basic precautions, including the following:
• Read all instructions before using the appliance.
• Do not dry articles that have been previously cleaned in, washed in, soaked in,
or spotted with gasoline, dry-cleaning solvents, or other ammable or explosive
substances, as they give off vapours that could ignite or explode.
• Do not allow children to play on or in the appliance. Close supervision of children is
necessary when the appliance is used near children.
• Before the appliance is removed from service or discarded, remove the door to the
drying compartment.
• Do not reach into the appliance if the drum is moving.
• Do not install or store this appliance where it will be exposed to the weather.
• Do not tamper with controls.
• Do not repair or replace any part of the appliance or attempt any servicing unless
specically recommended in the user-maintenance instructions or in published user-
repair instructions that you understand and have the skills to carry out.
• Do not use fabric softeners or products to eliminate static unless recommended by the
manufacturer of the fabric softener or product.
• Do not use heat to dry articles containing foam rubber or similarly textured rubber-like
materials.
• Clean lint screen before or after each load.
• Keep area around the exhaust opening and adjacent surrounding areas free from the
accumulation of lint, dust, and dirt.
• The interior of the appliance and exhaust duct should be cleaned periodically by
qualied service personnel.
• Do not place items exposed to cooking oils in your dryer. Items contaminated with
cooking oils may contribute to a chemical reaction that could cause a load to catch re.
SAVE THESE INSTRUCTIONS
WARNING
IMPORTANT SAFETY INSTRUCTION
MANUFACTURED BY HAIER EXCLUSIVELY FOR LAUNDRYLUX

FIRE OR EXPLOSION HAZARD
• Failure to follow safety warnings exactly could result in serious injury, death or
property damage.
• Do not store or use gasoline or other ammable vapors and liqids in the vicinity
of this or any other appliance.
WHAT TO DO IF YOU SMELL GAS:
• Do not light the gas appliance; Do not touch any electrical switch.
• Do not use any phones in your building.
• Clear the room, building, or area of all occupants.
• Immediately call your gas supplier from a neighbor’s phone. Follow the gas
supplier’s instructions.
• If you cannot reach your gas supplier, call the re department.
• Installation and service must be performed by a qualied installer, service
agency, or gas supplier.
GROUNDING INSTRUCTIONS
This appliance must be connected to a grounded metal, permanent wiring
system, or an equipment-grounding conductor must be run with the circuit
conductors and connected to the equipment-grounding terminal or lead on the
appliance.
FIRE HAZARD:
• Failure to follow safety,warnings exactly could result in serious injury, death or
property damage.
• Do not install a booster fan in the exhaust duct.
• Install all clothes dryers in accordance with the installation instructions of the
manufacturer of the dryer.
Do not store or use gasoline or other ammable vapors and liquids in the vicinity
of this or any other appliance.
WARNING
WARNING
WARNING
FOR YOUR SAFETY

Model Numbers
Electric
DLHF0817EMI
DLHF0817E
DLHS0817EMI
DLHS0817E
Gas
DLHF0817GMI
DLHF0817G
DLHS0817GMI
DLHS0817G

Operating Manual
WARNING: ALL OPERATING AND MAINTENANCE PROCEDURES SHOWN IN THIS
MANUAL MUST BE FOLLOWED AT THE FREQUENCY SPECIFIED FOR PROPER
OPERATION OF YOUR MACHINE.
PLEASE ENTER THE FOLLOWING INFORMATION AS IT APPEARS ON THE
MACHINE(S) DATA PLATE(S).
KEEP THIS MANUAL FOR FUTURE REFERENCE.
MACHINE MODEL
MACHINE TYPE (GAS / ELECTRIC)
MACHINE SERIAL NUMBER

Contents
Control Panels + Instructions for Use...............................................................1:1
Coin Meter ........................................................................................................2:1
Fault Codes ......................................................................................................3:1
Services Code ..................................................................................................4:1
Preventive Maintenance ...................................................................................5:1

Control Panel 1:1
The display control panel allows the selection of the main drying programs.
The panels consist of program selection buttons (A), a start button (B) and a display (C) which
shows the price for each program and the drying time designated for each program.
In the event of faults, error codes will be displayed. See the fault codes section of this manual.
Explanation of the control panel.
A – Program selection buttons
B – Start Button
C – Display indicating program time and price of the programs
Price/Time Remaining
Start
Precio/Tiempo
Comienzo
Cooling
Enfriando
Heating
Calentando
No Heat
Aire Frio
Low
Baja
Medium
Media
High
Alta

Instruction for Use
1:2
Dryer Operation
Load garments into machine and close the door. Do not overload the dryer.
Press the button for the desired program.
Program Description
The machine is equipped with four programs adapted to the range of use to which the machine is
intended.
The machine offers four standard drying programs. These programs are labeled on the control
panel as High, Medium, Low, and No Heat. For coin operated machines, “Price per program”, “Time
for each program”, and “Time for additional coin(s) or press” settings can be assigned to each
program individually.
High, Medium, and Low drying programs are divided into two segments: a Heating period and a
Cool Down period. Drying time and temperature settings for each program can be adjusted with
the service menu registers. Heating and Cool Down times can also be adjusted using the registers
in the service menu. During heating, the display shows “d xx” where “xx” are the remaining drying
time minutes. During cool down the display shows “c xx” where xx is the remaining cool down time.
The program stops at “c 00.”
For machines in “free” mode the additional drying time can be added to the initial time by pressing
the respective program buttons to add Time for ATS.
Press Start Button
Press Start to start one of the program described above in Program
Description.
Program End
The display will show “donE” when the program ends.
Price/Time Remaining
Precio/Tiempo
Price/Time Remaining
Start
Precio/Tiempo
Comienzo
Cooling
Enfriando
Heating
Calentando
No Heat
Aire Frio
Low
Baja
Medium
Media
High
Alta
Price/Time Remaining
Start
Precio/Tiempo
Comienzo
Cooling
Enfriando
Heating
Calentando
No Heat
Aire Frio
Low
Baja
Medium
Media
High
Alta

Coin Operation
In coin operated machines prices for programs and other operational parameters must be
programmed during machine setup.
Prices can be programmed as dollars and cents or as the number of coins or tokens required to
start and to add additional drying time.
There are four drying programs High, Medium, Low, and No Heat. These four programs can be
programmed for different prices and times. When the machine is in standby mode (i.e. before the
drying program begins), the selected drying program may be changed. Once a drying program has
started, the program may be changed only if all the programs High, Medium, Low and No Heat
have identical settings for price, drying time, and time added for each additional coin or press.
After the initial drying time has been purchased for a selected program, additional drying time may
be added by inserting more coins. The amount of extra time per coin inserted for the selected
program can be programmed in the service registers. Additional drying time up to the maximum
allowed may be purchased.
Price Programming & Drying Time Program Setup
Amount to Start (ATS) service registers 040-043 dene the price that must be paid before a
selected program may be started.
The ATS price is displayed when the machine is idle. As each coin is deposited the display will
count down by the “Coin 1 Value” or “Coin 2 Value” as the coin pulses are received. The following
instructions show how to set up prices for drying programs
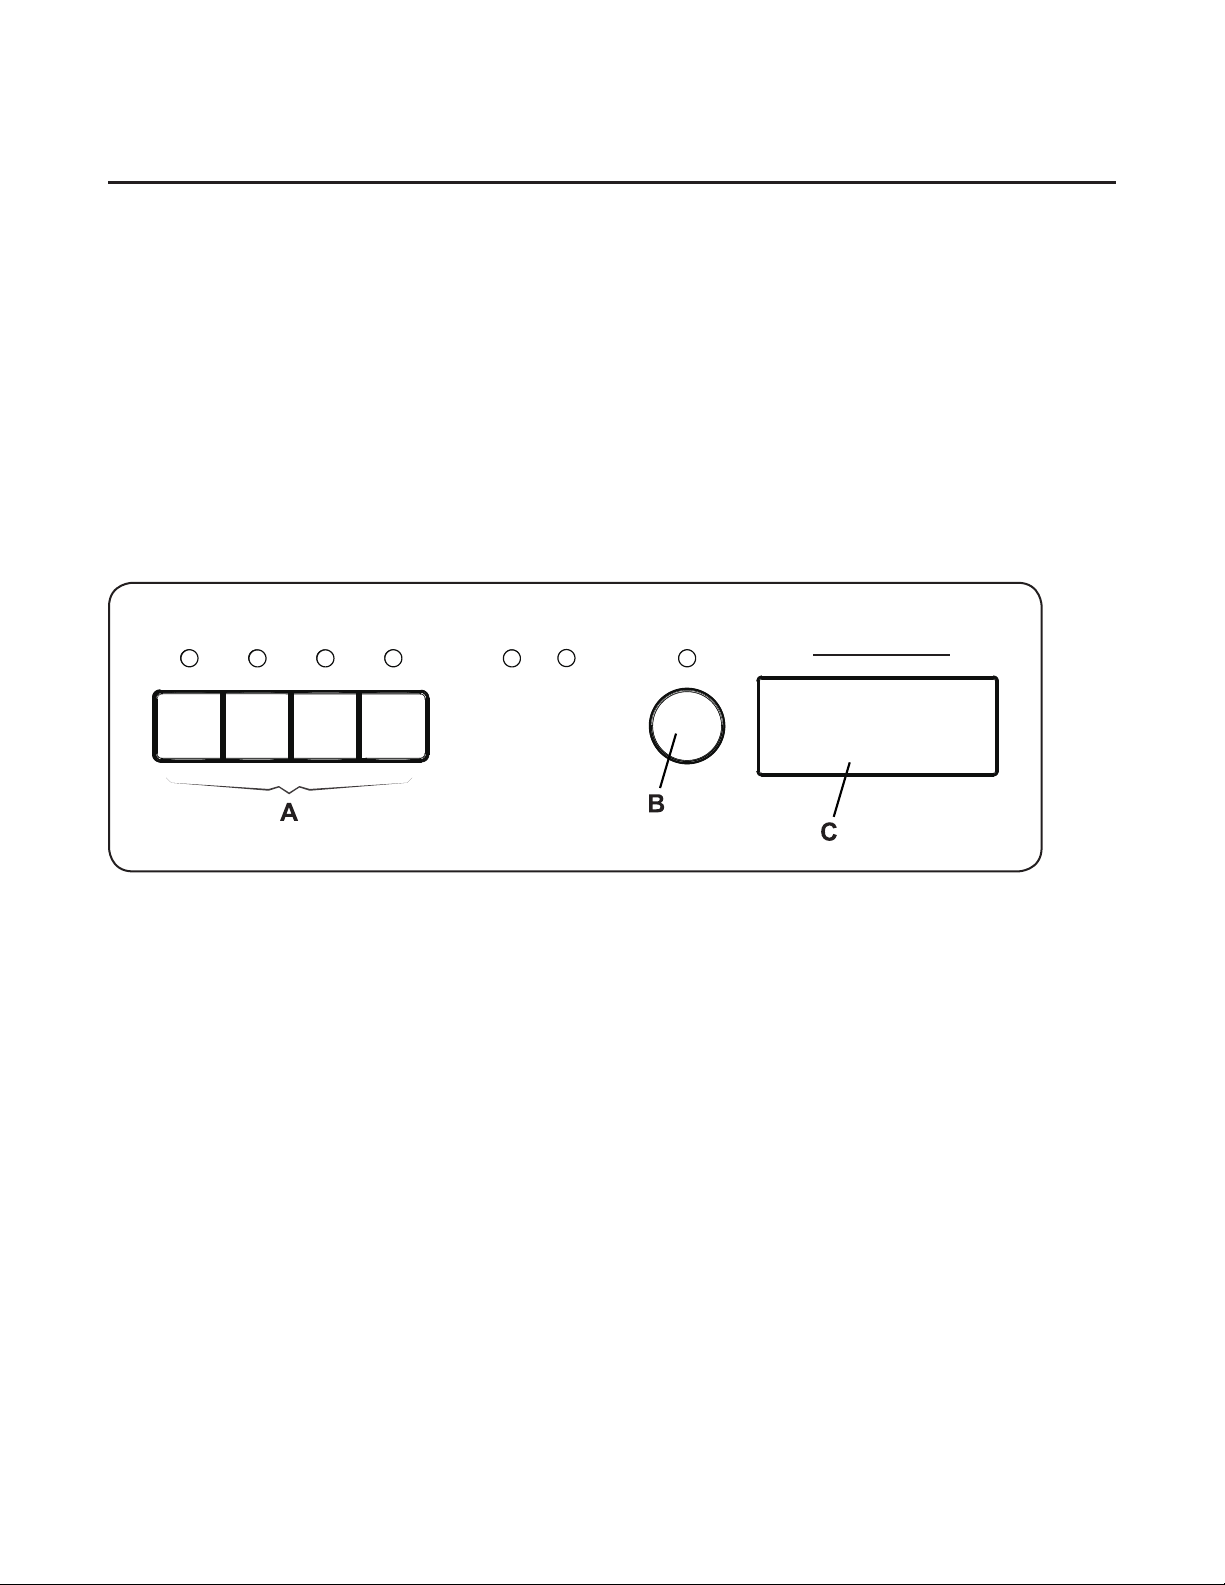
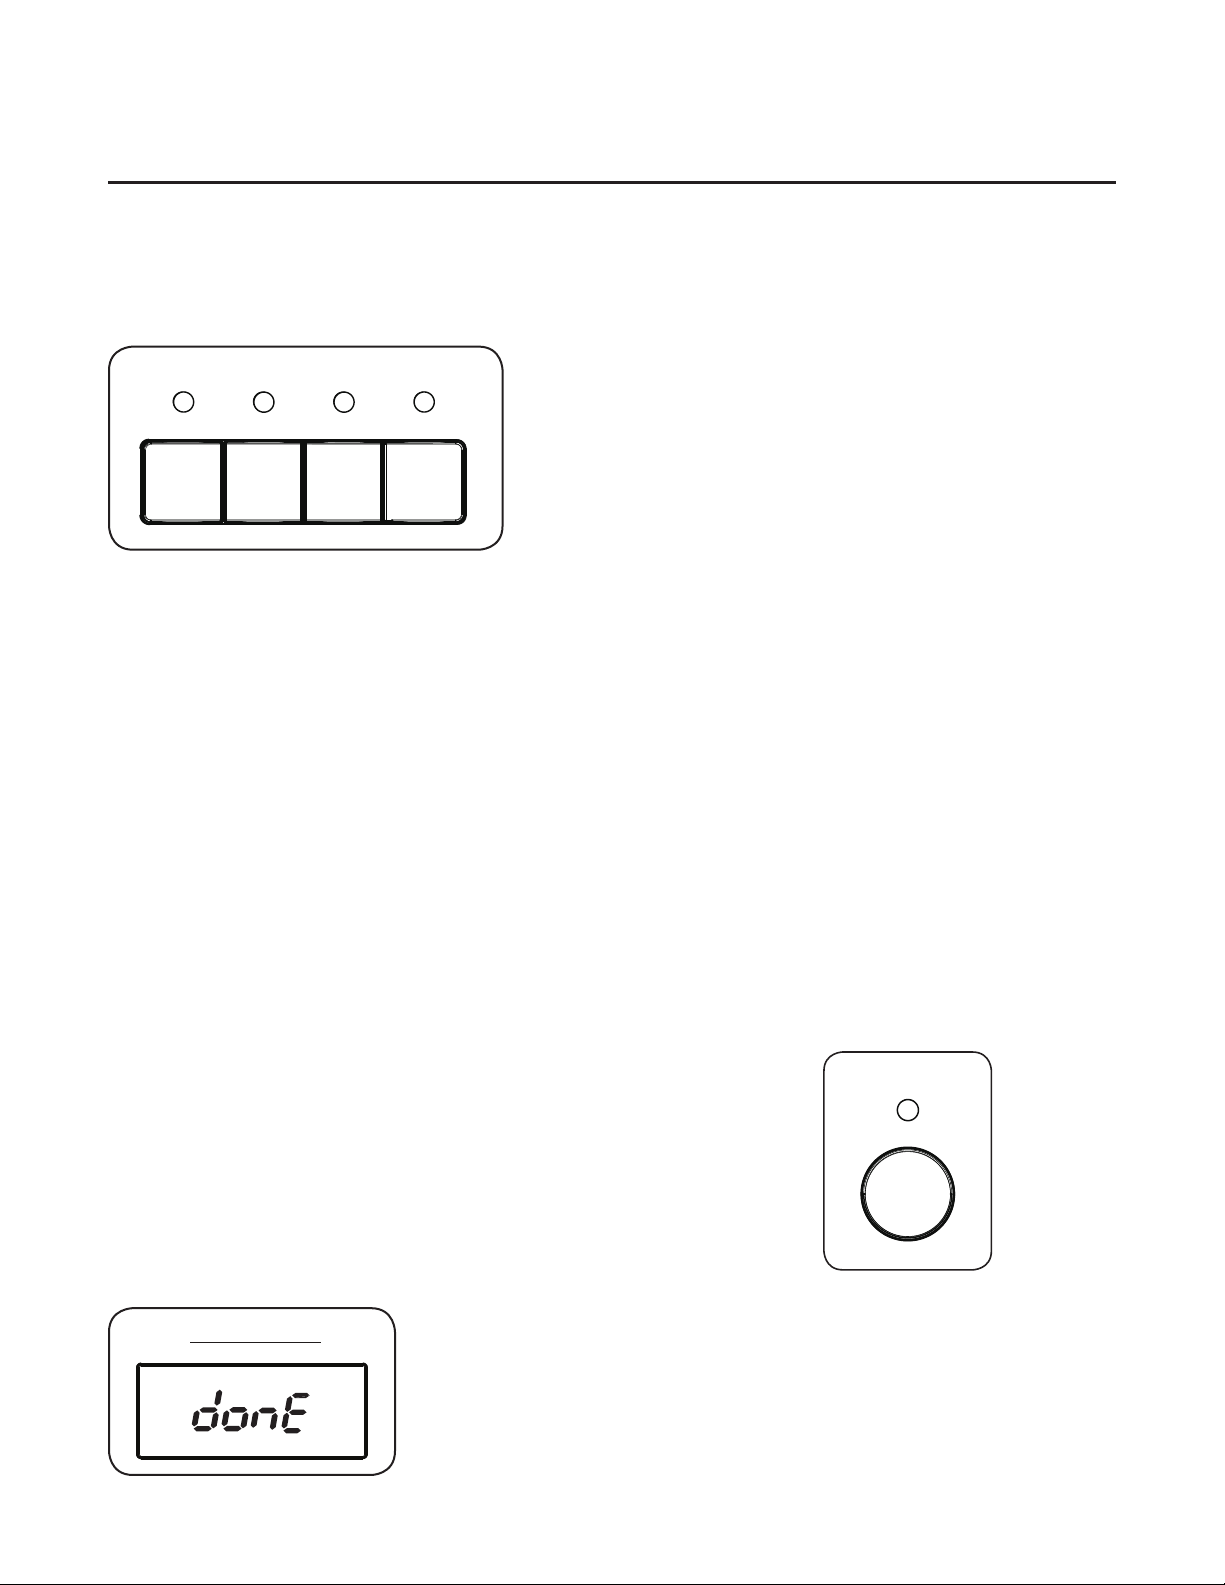
1. To enter programming mode, unlock and remove the coin box.
2. Press and release the Service Switch located in the rear of the coin vault to enter service mode.
The display will light up all the LED’s in the display.
3. Press the Start button and the display will show “SE” conrming access to the service registers.
4. Use the “Low” and “No Heat” buttons to navigate to the desired register.
5. Go to register 40, High heat and press Start to enter. The current price will be shown in the
display, blinking.
6. Use the three program selection buttons; Medium, Low, and No Heat to change each of the
three digits in the price display. Each button increments a corresponding digit, left to right, in the
price. Each digit rolls over from 9 to 0 without affecting the other digits. Once the desired price
has been set in the register, press the Start button to save the value and exit the register.
7. If registers 041, 042, and 043 = “0.00” the values of these registers will be set to the same value
as register “040”. If different pricing is desired, program each register separately repeating steps
4-5.
8. Press the Service Switch in the vault to exit service mode.
9. Check the newly entered prices by selecting each program.
Register 030 (Coin / Token Mode) determines how prices are displayed by the machine. When set
to “00” (default), prices are set and displayed with a decimal (e.g. “3.00”). When set to “01”, the
2:1
Coin Meter

Coin Meter
2:2
decimal point is turned off, and prices are set and displayed as “number of coins or tokens” required
(e.g. “12”). In either case, the value of each coin drop is stored in Register 031 “Coin Value 1” and
Register 032 “Coin Value 2” and determine how much the remaining price will be reduced each
time a coin is deposited. The coin-value registers can be adjusted to accommodate any currency.
Free Dry / OPL Mode
When the Amount To Start (ATS) register for a program is set to 0.00 (00 in “token mode”), the
program operates in “Time per push mode” (this is free dry mode). In this mode, each time a
program button is pressed, the remaining time is incremented. The rst press adds the “Time for
Amount to Start” register value (Register 044 – 047) to the drying time, and then each additional
press continues to add the “Time per Push or Coin” (Register 048 – 051) to the drying time. These
registers are only accessible in Full Service Mode. In no case shall the displayed remaining dryer
time be greater than the “Max drying time” for that program.
Each program (temperature) button has a group of registers (040-055) assigned for setting vend
time, price, and maximum allowable time. The registers are organized to provide maximum
exibility for vended operations, yet simple programming for non-vended applications (Free dry).
Price and Time Registers
Time for Amount to Start
The time for amount to start registers Register (044 – 047) denes the time credited when the
amount to start has been paid or the base time of the drying program when Amount to start = 0.00
(00 in token mode). This time is credited when a program-selection (temperature) button is pressed
for the rst time if the remaining drying time = 0. These registers are only accessible in Full Service
Mode.
Time Per Coin (or Push In Free Dry Mode)
Register (048 – 051) denes the time, in minutes, that is credited when a coin pulse is received
from a payment device or when a program button is pressed when amount to start (ATS) Register
(040 -043) = 0, AFTER the initial “Time for amount to start” has been credited, whether the
machine is idle or operating. This register is only accessible in Full Service Mode. Once these
registers are set, the control vends the same amount of time for each coin pulse received from
the payment device (or push of a program button if Amount to start = 0 for that program), up to the
Maximum drying time specied for the particular program.
DISCOUNT PRICE “PROMOTION” PROGRAMMING
The dryer can apply “Promotion” percentage discount to the vend price of a program selection at
specied times and days. Up to four different Promotion discount events and percentages can be
selected using the dryer’s built-in Real Time Clock (RTC) or one promotion event can be selected
using an optionally-installed, external signal provided by a clock-driven relay or switch. This signal
can activate multiple dryers. Both options require setup via the service registers, access to which is
described in the Service Mode section of this manual.
During machine setup, the promotional discount is represented by a three-digit percentage (%%%)
and can range from 000% (no discount) to “999” = 999%. It denes the percentage by which

Coin Meter 2:3
credited time shall be increased before being added to the base price of the drying program. For
example, if “Time for amount to start”, (Register 044 – 047) = 30 and Time for additional coin or
push, register (048 – 051) = 10 and promotion percentage = 50, then 45 minutes shall be credited
when the Amount to start is paid and 15 minutes shall be credited when additional coin 1 pulses are
received. Setting the promotion to “A00” sets the machine to free dry mode.
Note that the remaining drying time will not exceed the Maximum Drying Time established for each
program in the Maximum Drying Time registers (052-055).
PROMOTION PRICING VIA THE REAL TIME CLOCK (RTC)
The RTC and Promotion pricing times are set and displayed in 24hr format. (e.g. 1:15 PM = 13:15).
The promotion days of the week are represented by a two digit number (nn). The RTC’s built in
calendar adjusts for leap years. Promotion pricing set up requires setting the RTC and up to four
pairs of Promotional start and stop times and percentages.
RTC and Promotional Pricing Setup
1. Navigate to Register 72 (RTC set-up) as explained in the Service Mode section.
2. Press START, this will stop the clock. The year will be displayed as a four digit number (yyyy).
Edit these values using the HIGH, MEDIUM, LOW, and NO HEAT buttons.
3. Press START, the Month and Day will be displayed as two-digit numbers (mm.dd). Edit these
values using the HIGH, MEDIUM, LOW, and NO HEAT buttons.
4. Press START, the Hour and Minutes will be displayed in 24 hr format as two digit numbers (hh.
mm). Edit these values using the HIGH, MEDIUM, LOW, and NO HEAT buttons.
5. Press START to save the changes and exit register 72. This will reset the clock to the set time,
reset the clock’s seconds digit to “00”, and restart the clock. This allows synchronizing the
clocks on multiple machines to a master clock such as a wall clock, wristwatch, or cell phone.
6. Navigate to Register “73” (RTC Promotion #1 START) to set the percentage discount, day of the
week and start time for promotion #1.
7. Press START, a two-digit day number (“0d”) for which the start day(s) of the week for promotion
#1 will be displayed. (1=Sunday, 2=Monday, ... 7=Saturday, 8=All days, 9=Monday-Friday only,
A=Saturday and Sunday only, 0=promotion is inactive.) Edit this number using the NO HEAT
button to cycle through the allowed values.
8. Press START, the Hours and Minutes in 24 hr format for the start of Promotion #1 will be
displayed (hh.mm). Edit these values using the HIGH, MEDIUM, LOW, and NO HEAT buttons.
9. Press START, the promotion percentage discount will be displayed as three digits (%%%). The
discount can range from “000” = 000% to “999%” = 999%. Setting the promotion to = “A00” will
allow free drying). Edit this number using the Medium, Low and No Heat buttons. Note, pressing
the Medium button ten times will cycle the value to “A00”.
10. Press START to save the changes and exit Register “73”
11. Navigate to Register “74” (RTC Promotion #1 END”). This will allow you to set the end time for
promotion #1.
12. Press START, the promotion end time in hours and minutes in 24 hr format will be displayed
(hh.min). Edit these values using the HIGH, MEDIUM, LOW, and NO HEAT buttons.

Coin Meter
2:4
13. Press START, this will save the changes and exit register 74.
14. Program the three other Promotion times and percentages as desired using register pairs:
075 & 076 (Promotion #2), 077 & 078 (Promotion #3), and 079 & 080 (Promotion #4). Each
promotion can have a different percent reduction. They must not overlap with each other.
15. Exit Service Mode.
PROMOTION PRICING VIA EXTERNAL CLOCK-DRIVEN RELAY OR SWITCH
This dryer can apply a Promotion price discount using an external clock-driven relay or manual
switch. To use this feature the dryer requires an optional external price reduction harness kit be
installed. Refer to the kit’s installation manual for information regarding connecting this signal to the
dryer to activate discounts.
Price Promotion Setup Via External Signal
1. Navigate to Register 081 (Promotion %%% for discount input signal) as explained in the Service
Mode section.
2. Press START the promotion percentage discount will be displayed as three digits (%%%). The
discount can range from “000” = 0% to “999” = 999% Setting to “A00” will allow free drying. Edit
this number using the Medium, LOW and NO HEAT buttons.
3. Press START, this will save the changes and exit register 081 and save the changes.
4. Exit Service Mode.
When the external signal is activated, the DRYER will apply Promotion set in register 081, to
increase the drying time as explained elsewhere in this manual.
Please contact Laundrylux’s Technical Support team at 516-371-0700 if you have any questions or
need assistance with price programming or implementing promotion events.

Fault Codes 3:1
Faults/errors in the program or machine are indicated by a numerical error code on the panel
display. Some error codes are cleared automatically when the Start button is pressed and some
when the door is opened. For other error codes, a service technician must be called.
Error Code Cause / Action
E 00 Machine out of operation.
E 01 Inlet air temperature limit exceeded.
E 02 Outlet air temperature limit exceeded.
E 03 Inlet thermistor short circuit.
E 04 Outlet thermistor short circuit.
E 14 Heating not working.
E 17 Inlet thermistor open circuit.
E 18 Outlet thermistor open circuit.
E 21 Connectivity malfunction between Wi-Fi and Control Panel
(Reserved for Future Use)
E 28 Inlet air temperature exceeded during previous cycle.

Service Mode
4:1
To activate Service Mode for machines with coin meters:
1. Remove the coin box.
2. Press and release the SERVICE MODE plunger switch at the rear of the coin vault. The screen
will display “8888”.
3. Press the START button. “SE” appears in the display.
4. Use the LOW and NO HEAT buttons to navigate to the desired register.
5. Press START to access the register or activate the function.
6. Use LOW and NO HEAT to change values, as appropriate. Some registers require using the
HIGH, MEDIUM, LOW and NO HEAT buttons to edit settings.
7. Press START to save new values, as appropriate.
8. Press the SERVICE MODE switch to exit. SM exits automatically after 60 seconds of inactivity
with all service functions are off.
To activate Limited Service Mode:
1. Press and hold HIGH, NO HEAT and then START buttons for three seconds.
2. Use the program buttons to enter the PIN code (default is “1234”).
3. Press START. The display shows “10” (the rst register available in LSM)
4. Use the LOW and NO HEAT buttons to navigate to the desired register.
5. Press START to access the register or activate the function.
6. Use LOW and NO HEAT to change values, as appropriate. Some registers require using the
HIGH, MEDIUM, LOW and NO HEAT buttons to edit settings.
7. Press START to save new values, as appropriate.
8. LSM exits automatically after 60 seconds of inactivity with all service functions off.
PARAMETER MEMORY REGISTER ASSIGNMENTS
000-019 Statistics: These are non-resettable counters and log registers for tracking machine usage,
coin vault access, and error codes.
020-029 Machine test functions.
030- Editable payment, drying, and control parameters.
Notes:
1. The “>” in string following register descriptions denotes one press of the “Start” button to
advance to the next value in a sequence.
2. In the “Register Assignments” section, all temperature values are specied in °C, for simplicity.
3. Register contents value shall blink at 1Hz when displayed, even if value is read-only.

Service Mode
4. Service mode automatically terminates if no pushbutton is pressed for 60 seconds whenever
the machine is not running.
5. When service modes 20, 21, 22 or 23 are activated a “background timer is started and shall
be used to stop the dryer after running for 90 continuous minutes if the machine has not been
stopped by a press of the Start button.
6. A CPU reset will return the machine’s registers and temperature settings to default values.
The machine will be set to COIN mode and pricing cleared. The statistics (00-19) and RTC/
Promotion registers (72-81) will be unaffected.
Register Assignments
Machine usage registers (default values= “0000” for registers 00-14).
000 Running hour counter for High temp program. (Range: 0000 to F999).
001 Running hour counter for Medium temp program. (Range: 0000 to F999).
002 Running hour counter for Low temp program. (Range 0000 to F999).
003 Running hour counter for No Heat temp program. (Range 0000 to F999).
004 Total hour counter = 00+01+02+03. (Range 0000 to F999).
005 Total collections counter - rst 4 digits. (Range 0000 to F999).
006 Total collections counter - last 4 digits (Range 00.00 - 99.99)
(Decimal suppressed in “token” mode).
Error log and coin vault access time stamp registers (time in 24 hour format):
*010 Error code register 1 (Newest error: “010”>E##>yyyy>mm.dd>hh.mm>(r004)>”010”).
*011 Error code register 2.
*012 Error code register 3.
*013 Error code register 4.
*014 Error code register 5 (Oldest error: “014”>E##>yyyy>mm.dd>hh.mm>(r004)>”014”).
015 Coin vault access 1: (Most recent access: “015”>yyyy>mm.dd>hh.mm>”015”).
016 Coin vault access 2: time stamp 2.
017 Coin vault access 3: time stamp 3.
018 Coin vault access 4: time stamp 4.
019 Coin vault access5: (Oldest access: “019”>yyyy>mm.dd>hh.mm>”019”).
Note: “(r004)” in error-log time stamp indicates that the value of the total hour counter register 004
shall be displayed in this position of the sequence.
4:2

Service Mode
4:3
Operating Test Registers:
Note: Activation of test 020-023 clears previous value stored in register 028.
*020 Run, Heat to 65°C (display shows outlet temperature blinking, while operating).
*021 Run, Heat to 57°C (display shows outlet temperature blinking, while operating).
*022 Run, Heat to 49°C (display shows outlet temperature blinking, while operating).
*023 Motor ON, Runtime 60 minutes, No heating (display shows outlet temperature blinking,
while operating).
NOTE: When registers 020-023 are active, press and hold “High “temperature pushbutton to
show actual INLET air temperature. Release High temperature button to return to display of actual
OUTLET air temperature. When outlet air temperature reaches value specied for register 020-022,
cool-down shall be executed with outlet temperature displayed, just as if a regular drying program
were running. When cool-down completes, machine stops.
*024 Buzzer test
*025 Display test
*026 Coin meter test. (Each dropped coin adds 1 to displayed total - registers 005 and 006
are not incremented).
*027 Displays current time: “027”>yyyy>mm.dd>hh.mm>”027”. (Read only).
*028 Recorded rate of inlet air temperature rise (degrees per minute) during most recent test
(Reserved for future use)
Payment Conguration Registers:
030 Coin Mode/Token Mode. (range=0-1, default=”0” coin mode).
When set to “token mode” the decimal point in the display will be suppressed when
programming prices and when displaying cycle price information in standby mode.
031 Coin value 1 (range=”0.00”-”9.99”, default=”0.25”, omit decimal if register 030=”1”).
032 Coin value 2 (range=”0.00”-”9.99”, default=”1.00”, omit decimal if register 030=”1”).
033 Display price or “FILL” / price as standby (range “0”-”1”, default=”0” (price), “1”=”FILL” /
price alternating at 0.5 Hz).
034 Standby value blinks. (range”0”-”1”, default=”1” (blinking)).
035 Auto start paid. (range”0”-”1”, default=”0” (auto start paid disabled).
When Auto Start Paid is enabled, if the loading door is closed when drying time is added,
the machine shall start automatically.
Price and Time Settings:
040▼ Amount to start (ATS) for High heat program (range=0.00-9.99, default= 0.00).
041▲ Amount to start for Medium heat program (range=0.00-9.99, default=0.00).
042▲ Amount to start for Low heat program (range=0.00-9.99, default=0.00).
043▲ Amount to start for No heat program (range=0.00-9.99, default=0.00).
▼ means registers following (marked with ▲) will be automatically set to the same value entered
into this register IF they are presently zero.

Service Mode 4:4
044 Time for ATS for High heat(range=1-90, default=40).
045 Time for ATS for Medium heat(range=1-90, default=40).
046 Time for ATS for Low heat(range=1-90, default=40).
047 Time for ATS for No heat(range=1-90, default=40).
048 Time for additional coin or push for High heat (range = 0-90, default = 6).
049 Time for additional coin or push for Medium heat (range = 0-90, default = 6).
050 Time for additional coin or push for Low heat (range = 0-90, default = 6).
051 Time for additional coin or push for No heat (range = 0-90, default = 6).
052 Max drying time - High (range 1-90, default = 90).
053 Max drying time - Medium (range 1-90, default = 90).
054 Max drying time - Low (range 1-90, default = 90).
055 Max drying time – No Heat (range 1-90, default = 90).
Temperature and Cooling Settings:
060 Set temperature for High (range 0-80C,default=65°C/150°F).
061 Set temperature for Medium (range 0-80C,default=57°C/135°F).
062 Set temperature for Low (range 0-80C, default=49°C/120°F).
063 Set temperature for No Heat (range 0-80C, default=0°C/32°F).
064 Cool down time for High (minutes, range 01-10, default=01).
065 Cool down time for Medium (minutes, range 01-10, default=01).
066 Cool down time for Low (minutes, range 01-10, default=01 )
067 Cool down time for No Heat (minutes, range 01-10, default=01).
068 Cool down temperature for High (range 27-60°C, 80-140°F, default =49°C/120°F).
069 Cool down temperature for Medium (range 27-60°C, 80-140°F, default =49°C/120°F).
070 Cool down temperature for Low Heat (range 27-60°C, 80-140°F, default =49°C/120°F).
071 Cool down temperature for No Heat (range 27-60°C, 80-140°F, default =49°C/120°F).
During cool down time, display shows c 01 > c 00 (machine stops at 00).
During remaining wait time for cool down temperature, display shall show “c --”.
Real Time Clock and Promotion Settings:
072 RTC set-up:24 hr format,“072”>yyyy>D>mm.dd>hh.mm>”072”. Where: yyyy=year, D=day
of week (“1”=Sunday), mm.dd=month & date, hh.mm=24 hr time.
Note: During set up, the RTC shall be stopped. When “Start” is pressed to save new hh.mm
value, the seconds digits of the RTC shall be set to “00” without affecting the hours and
minutes values, and the RTC shall be re-started.

Service Mode
4:5
073 RTC promotion1 “073”>d>hh.mm>%%%>”073”
074 RTC promotion 1 END “074”>hh.mm>”074”
075 RTC promotion 2 START “075”>d>hh.mm>%%%>”075”
076 RTC promotion 2 END “076”>hh.mm>”076”
077 RTC promotion 3 START”077”>d>hh.mm>%%%>”077”
078 RTC promotion 3 END “078”>hh.mm>”078”
079 RTC promotion 4 START”079”>d>hh.mm>%%%>”079”
080 RTC promotion 4 END “080”>hh.mm>”080”
Note 073-080 ranges: d= day of week “0”-”A”; 0=promotion inactive, 1=Sunday,2=Monday,
...7=Saturday, 8=Every day, 9= Monday-Friday only, A=Saturday and Sunday only; hh=”00”
”23”; mm=”00”-”59”; %%% “000” –“999”, “A00” = Free, Default = “000”
081 Promotion %%% for discount input signal (range “000”-“999”; “A00” = Free, default = “000”
Miscellaneous Settings:
082 LSM PIN code (range=”0000”-”9999”, default=”1234”)
083 FSM PIN code (range=0000”-“9999”, default=”0000” (disabled))
084 Default program (range 0-3, 0=none,1=High, 2=Medium, 3=Low, 4=, No Heat, default=”1”)
085 Default program timeout (seconds, range 000-999, default=060)
086 Temperature displayed in °F or °C (0=°F,1=°C, default=0 (display °F))
087 Disable outlet air temperature display (range 0-1,default =0=enabled,1=disabled)
088 Disable buzzer (default =0=enabled,1=disabled)
089 Serial communication enabled (range 0-1, default = 0) (Reserved for future use)
*098 Machine address (range 000-999, default 000)
*099 Firmware version
*Function available in both “Limited Service Mode” and “Full Service Mode”.

Preventive Maintenance 5:1
Cleaning
A program and/or schedule should be established for periodic inspection, cleaning, and removal of
lint from various areas of the dryer, as well as throughout the ductwork system. The frequency of
cleaning can best be determined from experience at each location. Maximum operating efciency is
dependent upon proper airow. The accumulation of lint can restrict this airow.
• Clean the lint screen after each load.
Weekly
• Clean lint accumulation from lint chamber, and temperature sensor area. See illustration x-x.
• Clean the door gasket.
• Use a soft wash cloth and mild detergent to clean door.
Every Third Month
• Disconnect Power.
• Remove lint from gas valve burner area with a dusting brush or vacuum cleaner attachment.
• Vacuum make up air inlet holes. On removing the lint lter from the lint compartment, clean lint
in the lint compartment.
• Check to clear any accumulated lint around NTC – 1 (See Image below)
• Clean any lint accumulation in and around the motor(s) casing opening.
NOTE: To prevent damage, avoid cleaning and/or touching ignitor/ame-probe assembly located on
the gas burner assembly.
Outlet Thermistor (NTC - 1)

Preventive Maintenance
5:2
Every 6 Months (Refer this service to qualied personnel)
• Inspect and remove lint accumulation external exhaust ductwork and from dryer’s internal
exhaust ducting.
• The accumulation of lint in the exhaust ductwork can create a potential re hazard.
• Do not obstruct the ow of combustion and ventilation air. Check back draft dampers in the
exhaust ductwork. Inspect and remove any lint accumulation, which can cause the damper
to bind or stick. Obstructed ducting leads to longer drying times, higher energy consumption
and reduced motor life
• If ducting is highly obstructed with lint change to a shorter service interval such as every
three months.
• A back-draft damper that is sticking partially closed can result in slow drying and the
shutdown of heat circuit safety switches or thermostats.
• When cleaning the dryer cabinet, avoid using cleaners with harsh abrasives. A product
intended for appliance cleaning is recommended.
Every 12 Months
• A competent service professional should inspect bolts, nuts, screws, setscrews, grounding
connections and nonpermanent gas connections (unions, shutoff valves, and orices).
• Belts should be examined. Cracked or seriously frayed belts should be replaced.
• Complete an operational check of controls and valves.
• Complete an operational check of all safety devices (lint switch, door switch).
To be carried out by
qualied personnel.
Other manuals for CROSSOVER 2.0 Series
1
This manual suits for next models
8
Table of contents
Other Laundrylux Dryer manuals