Lawmate PV-500EVO2 User manual

PV-500EVO2 User’s
Manual
1
PV-500EVO2 User’s Manual
English
- Content -
1 OVERVIEW ........................................................................................................................................2
2 FUNCTION MODES..........................................................................................................................5
3 BASIC OPERATION..........................................................................................................................5
4 INTRODUCTION TO ALL SETTING FUNCTIONS....................................................................9
5 VIDEO PLAYBACK.........................................................................................................................20
6 VIDEO EDITING..............................................................................................................................23
7PHOTO BROWSING........................................................................................................................24
8 PHOTO EDITING MODE...............................................................................................................25
9 SUPPORTED IMAGE FILE FORMAT.........................................................................................26
10 RECORD..........................................................................................................................................27
11 REMOTE CONTROLLER............................................................................................................31
12 SPECIFICATIONS.........................................................................................................................32
13 SUPPORTED VIDEO FILE FORMAT........................................................................................33
14 PRECAUTION................................................................................................................................33
PV-500EVO2 User’s
Manual
2
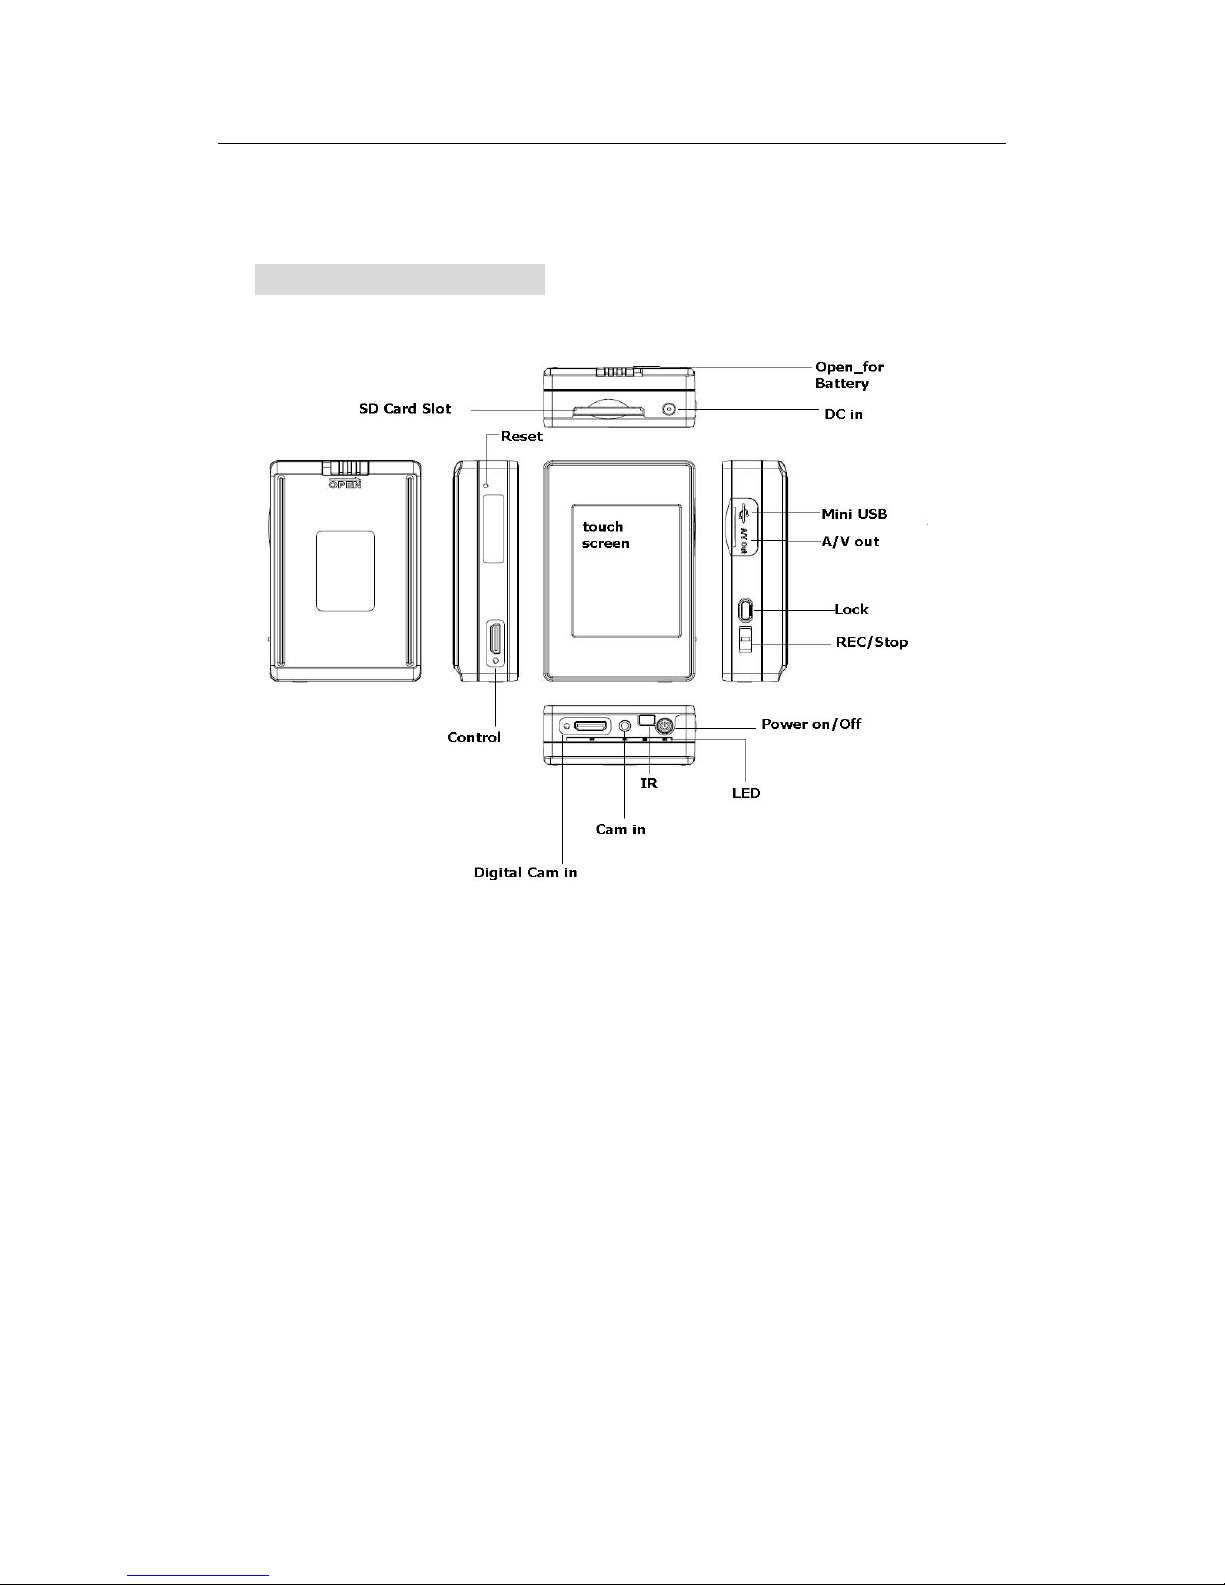
1 Overview
01 PV-500EVO2 Main Device

PV-500EVO2 User’s
Manual
3
02 Remote Controller
1.Power On Button 4. Five-direction Key & Pause key
2.LCD/TVSwitch 5.VolumeButton
3.RecordingButton 6.SetupButton
7. ESC/STOP

PV-500EVO2 User’s Manual
4
03 Accessories
PV-500EVO2 User’s Manual
5
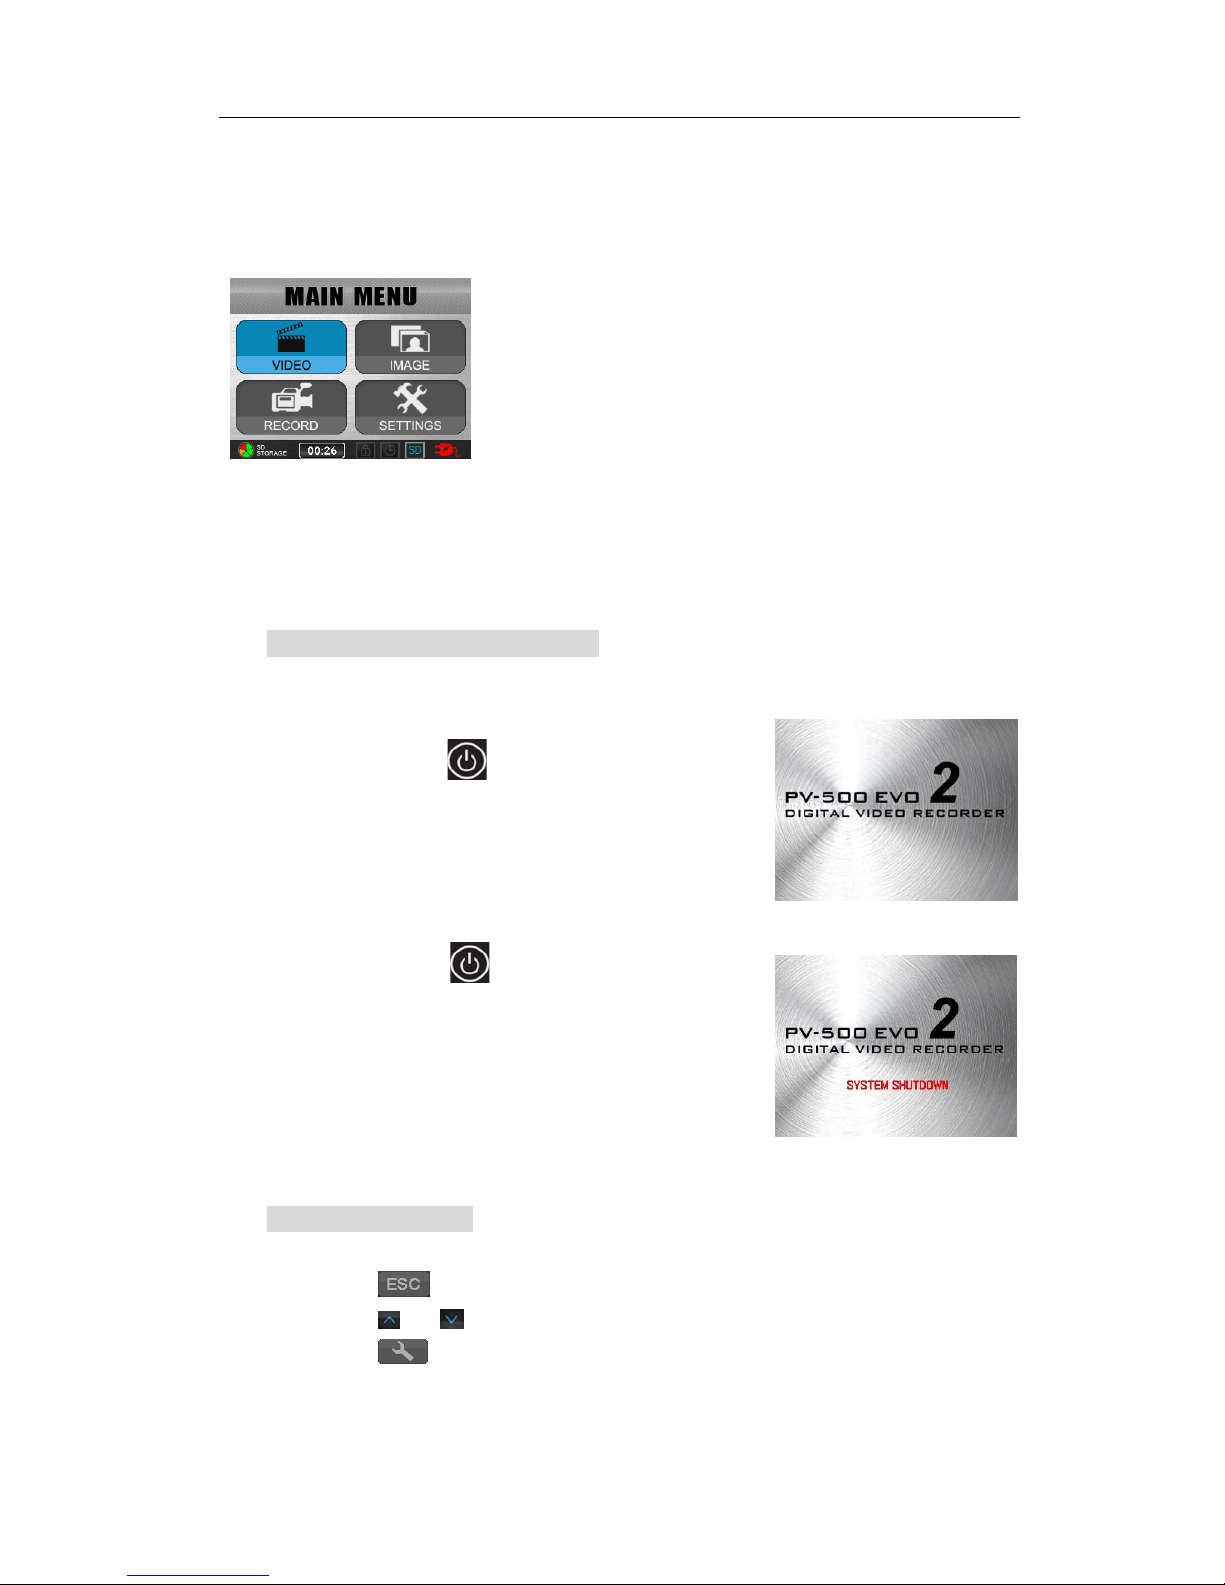
2 Function Modes
Video: Video file playback
Image:Browse images and picture
Record : external video source recording
Settings: functions setting
3 Basic Operation
Turn on / off of PV-500EVO2 player
Turn On: Press the Power On/Off button about
1 sec. on PV-500EVO2 to turn on the power
and the greeting screen will appear.
Turn Off: Press the Power On/Off about 1sec.
button on PV-500EVO2 or press the Power
button on the remote control to turn off
PV-500EVO2。
Using the touch screen
Tap any application to get started or tap an item in the list to choose it.
Tap icon to return last page or return back to main menu.
Tap icon or to move next page’s menu.
Tapicon for function setting.

PV-500EVO2 User’s Manual
6
Adjust Volume
While playing Video, Tap icon / or the
one in the remote controller to adjust volume.
Volume varies in 10 steps.
Volume status will be displayed on the left–down side
of screen.
REC Button
1 Start Recording: Push the button to REC on the PV-500EVO2 or the one on the
remote controller to start recording.
2 Stop Recording: Push the button to STOP or the one on the remote controller to
stop recording, and the screen will return to stand-by mode of
Preview to prepare for recording.
Link with Other equipments
External Video Source Recording – Cam in
Plug an external camera into Cam-in, it enable recording.

PV-500EVO2 User’s Manual
7
External Video Source Recording – Digital Cam in
Output to TV Screen
Plug an RCA cable in AV-out to have the image output to the TV.
Note :
Check “Setup” Menu, the setting of “Display” must be set from “LCD”
into “TV” enable image output.
PV-500EVO2 User’s Manual
8
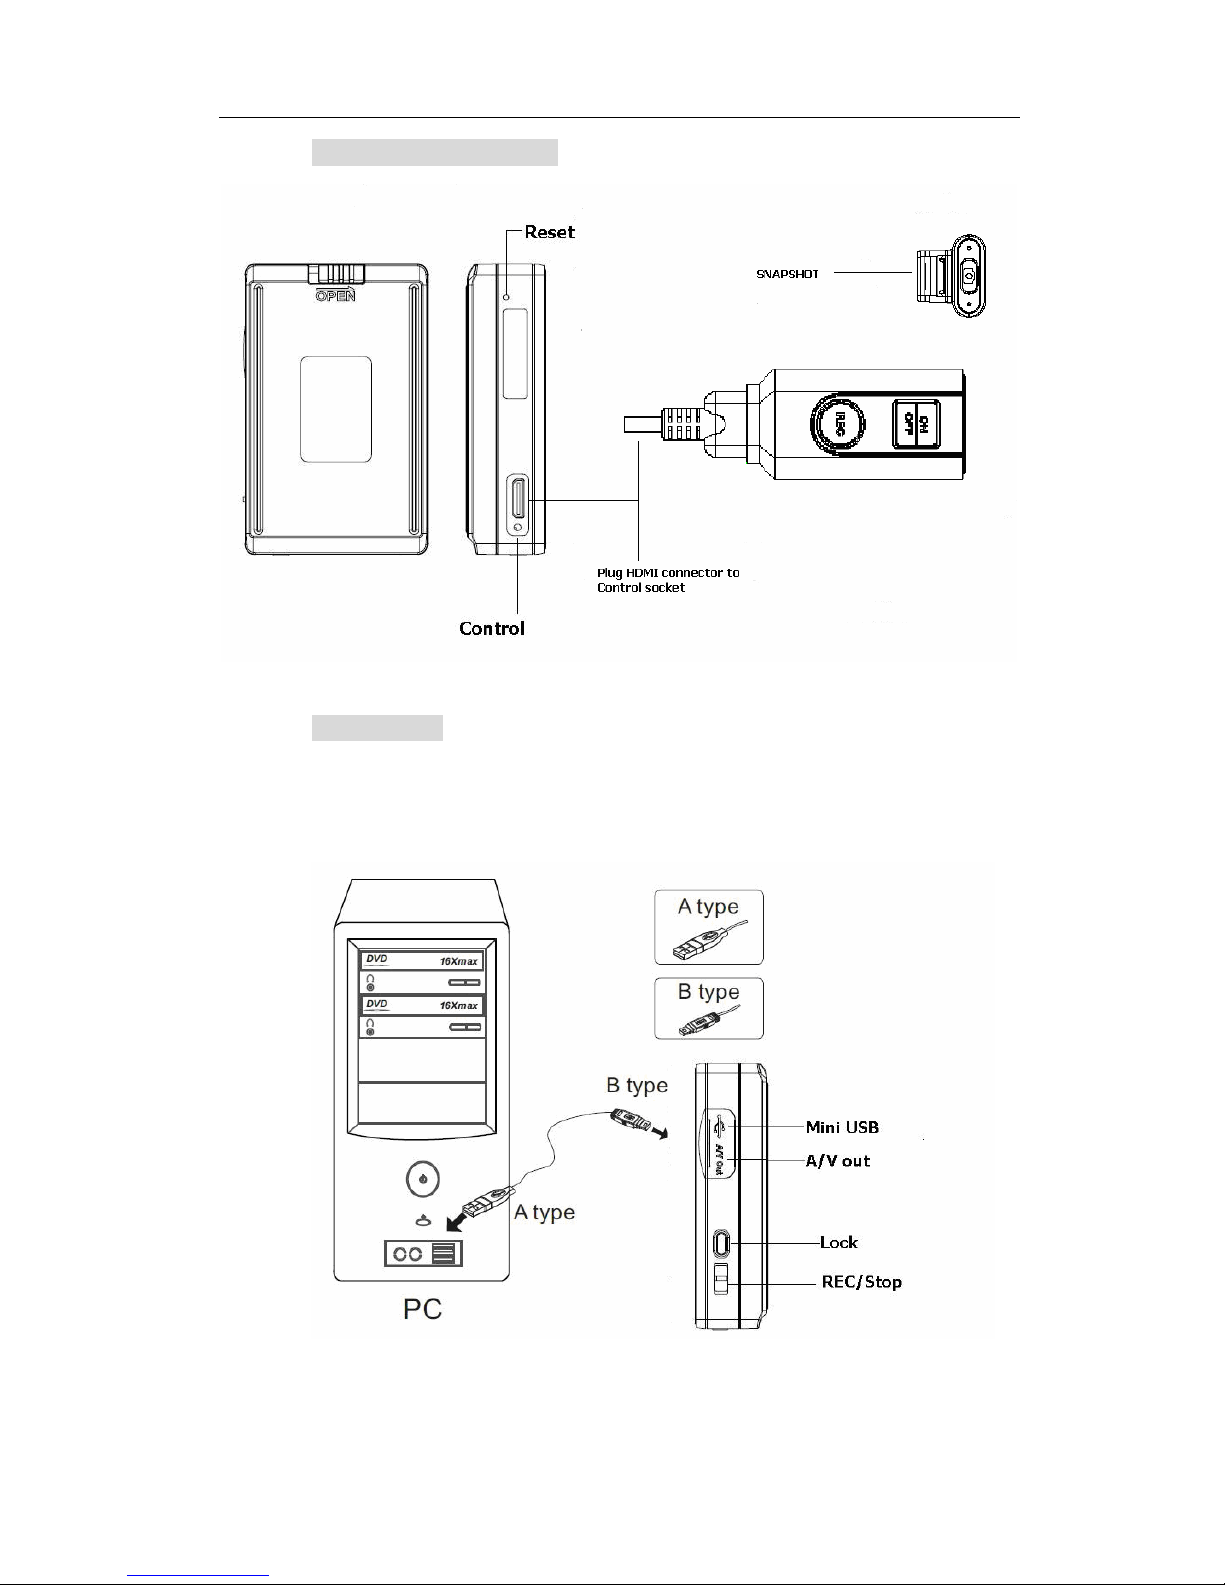
Connect to Wire Controller
Connect to PC
1 Connect the two ends of A/B type of USB cable to PV-500EVO2 and PC.
2 An indication for “USB Mode” appears on the screen for 5 seconds after the link is
properly installed.

PV-500EVO2 User’s Manual
9
Charging
When the power goes down, the meter with no bars displays on the bottom
right corner of the screen, which indicates that the power of the host exhausts;
please recharge it immediately.
Please connect the main device with the power supply and then plug the
power supply into the electrical outlet. The LED light will be on Red.
Note:
The LED light will be turned off after finishing charging; to keep long life-span of
the battery, the power supply should be unplugged after finishing charging; Please
charge the battery last for 12 hours before 1st time to use.
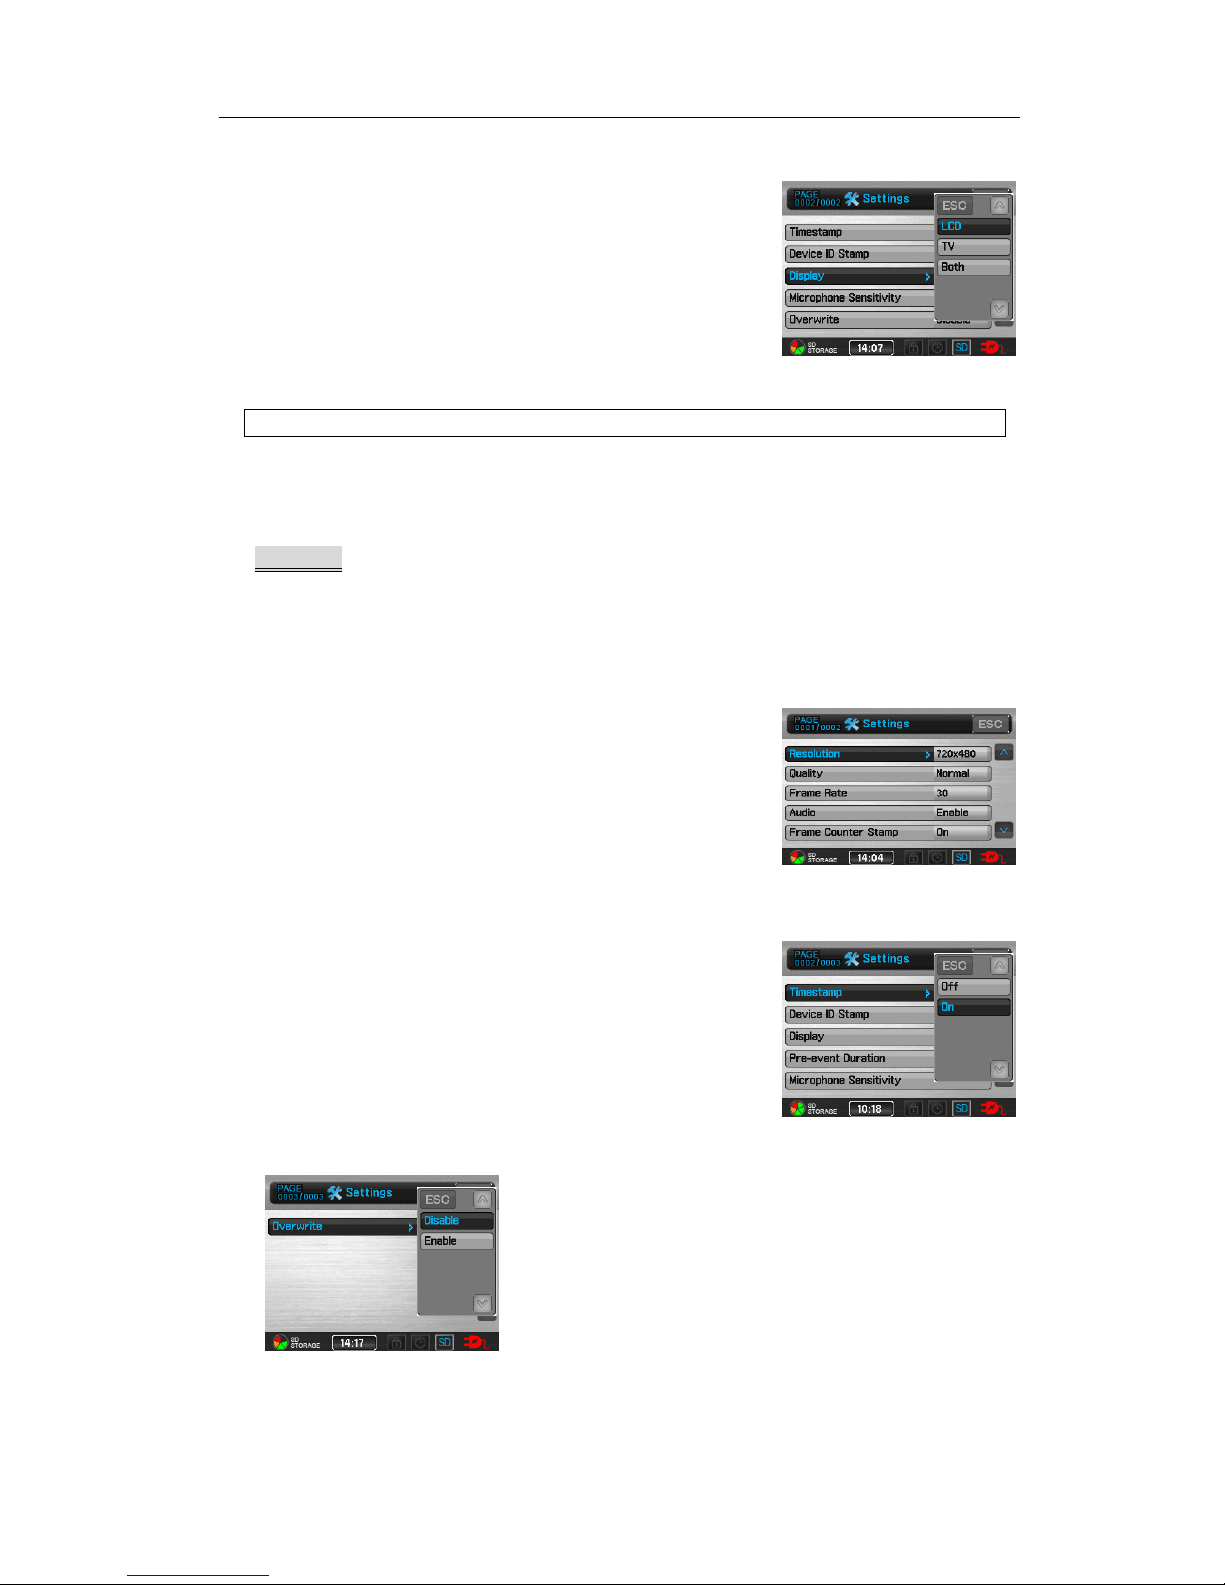
4 Introduction to all Setting Functions
1 Preview>
Tap SETTINGS on the screen to the page1 of setting functions then Tap
Preview to start setting each function as below.
Tap or to move to next page menu.
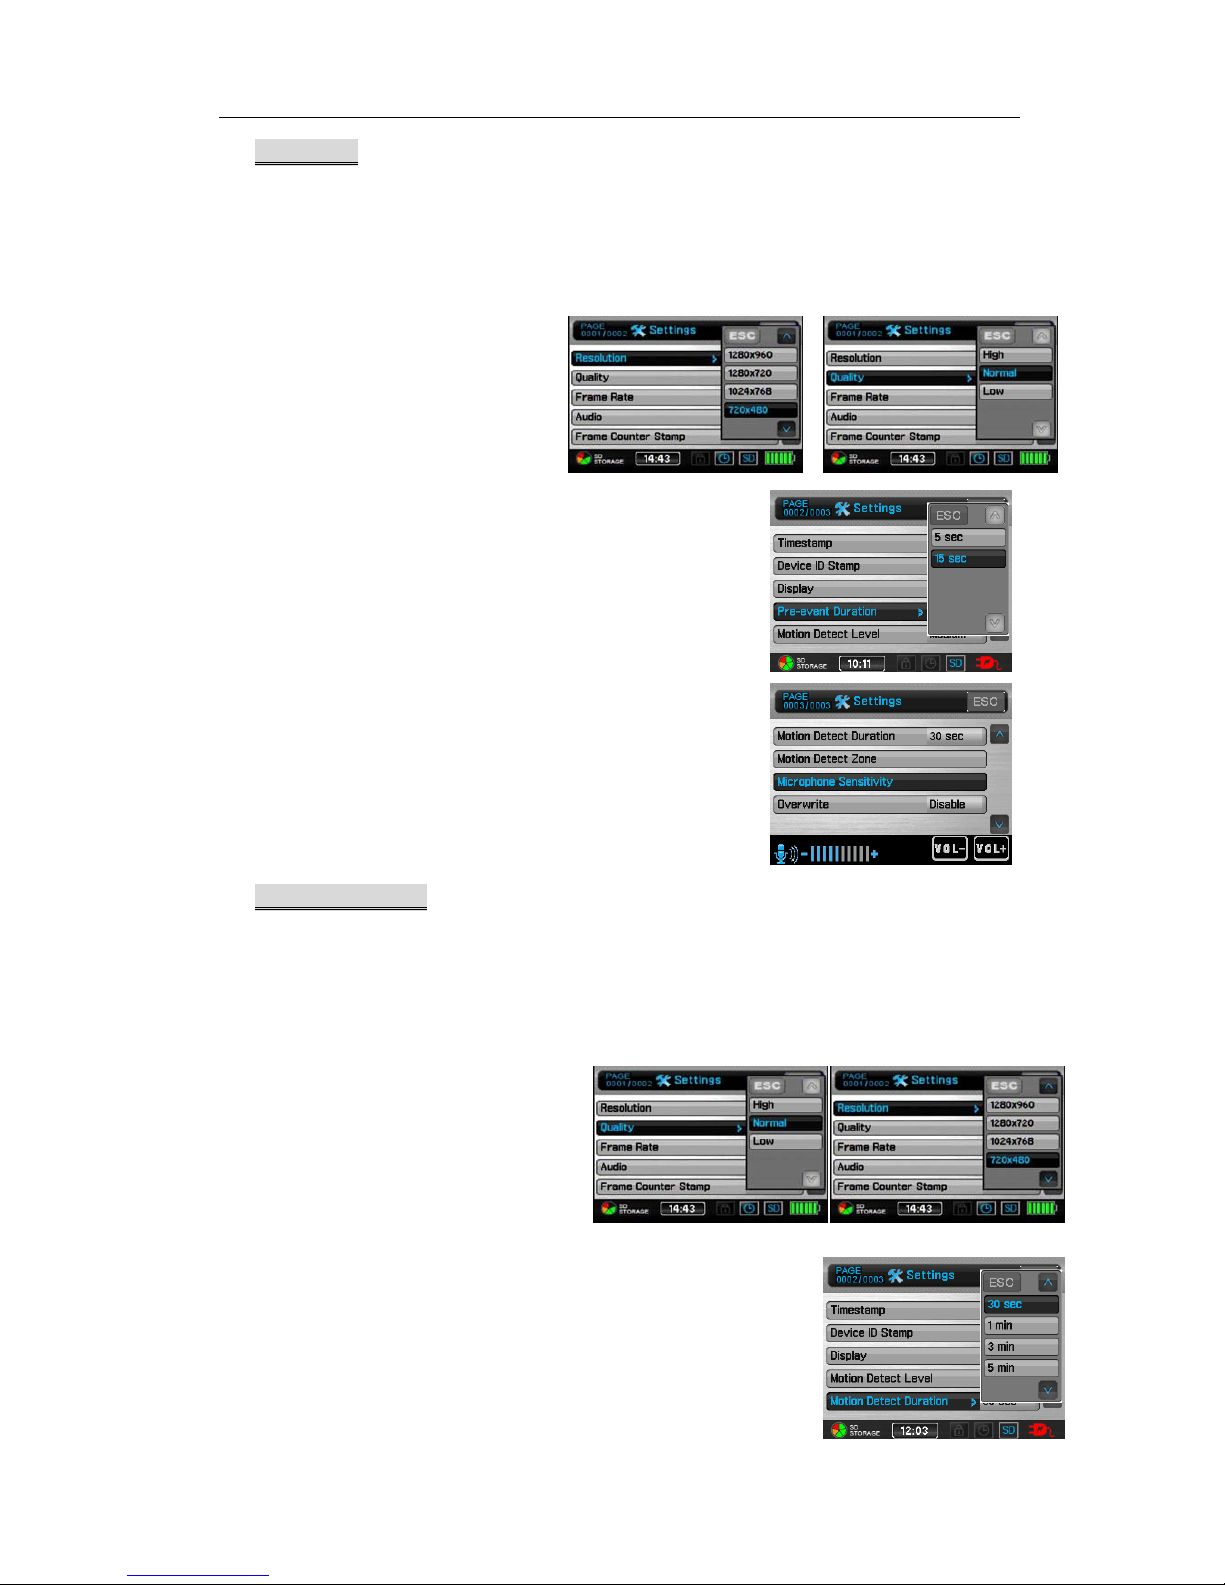
Resolution (1280*960/1280*720/1024*768/720*480//640*480/320*240)
Quality (High/Normal/Low)
Frame Rate ( 1/5/15/20/30)
Audio (Enable/Disable)
Frame Counter Stamp (On/Off)
PV-500EVO2 User’s Manual
10
Timestamp (On/Off)
Device ID Stamp (On/Off)
Display (LCD/TV/Both)
Microphone Sensitivity
Overwrite (Enable/Disable)
Notice:
For TVoutput, it is needed to select Display to TV or Both.
2 Pre-event>
Tap SETTINGS on the screen to the page1 of setting functions then Tap
Pre-event to start setting each function as below.
Resolution (1280*960/1280*720/1024*768/720*480/640*480/320*240)
Quality (High/Normal/Low)
Frame Rate (1/5/15/20/30)
Audio (Enable/ Unable)
Frame Counter Stamp (On/Off)
Timestamp (On/Off)
Device ID Stamp (ON/Off)
Display (LCD/TV/BOTH)
Pre-event Duration (5 sec/15 sec)
Microphone Sensitivity
Overwrite (Disable/Enable)
PV-500EVO2 User’s Manual
11
3 Pre Motion>
Tap SETTINGS on the screen to the page1 of setting functions then Tap MPre
Pre Motion to start setting each function as below.
Resolution (1280*960/1280*720/1024*768/720*480/640*480/320*240)
Quality (High/Normal/Low)
Frame Rate (1/5/15/20/30)
Audio (Enable/ Unable)
Frame Counter Stamp (On/Off)
Timestamp (On/Off)
Device ID Stamp (ON/Off)
Display (LCD/TV/Both)
Pre-event Duration (5 sec/15 sec)
Motion Detection Level (LOW/Medium/High)
Motion Detect Duration
(5sec/30sec/1min/3min/5min/10min)
Motion Detect Zone
Microphone sensitivity
Overwrite (Disable/Enable)
4 Motion detection>
Tap SETTINGS on the screen to the page1 of setting functions then Tap
Motion detection to start setting each function as below.
Resolution (1280*960/1280*720/1024*768/720*480/640*480/320*240)
Quality (High/Normal/Low)
Frame Rate (1/5/15/20/30)
Audio (Enable/ Unable)
Frame Counter Stamp (On/Off)
Timestamp (On/Off)
Device ID Stamp (ON/Off)
Display (LCD/TV/BOTH)
Motion Detection Level (LOW/Medium/High)
Motion Detect Duration
(30sec/1min/3min/5min/10min)

PV-500EVO2 User’s Manual
12
Motion Detect Zone
Microphone Sensitivity
Overwrite (Disable/Enable)
5Date and Time> set Date and Time
Tap SETTINGS on the screen to the page1 of setting functions then Tap Date and
Time to start setting the number. Tap or to move next page menu.
6 Date Format >
Tap SETTINGS on the screen to the page2 of setting functions then tap Date
Format to select.
7 Language> Choose the language for Operating interface
Tap Language on the page2 of setting functions; tap or move next page
menu.

PV-500EVO2 User’s Manual
13
8 Pre-set Recording Mode> set up the screen after turn on to be automatically
returned to recording mode. Tap Pre-set Recording Mode on the page2 of setting
functions then select the one you wish.
9 Resume to Pre-set Duration> set up the timing to recording mode
Tap Resume to Pre-set Duration on the page2 of setting functions to select.
10 Timer Recording>
Tap the application of Timer Recording on the page 2 of setting functions to
select one blank column in order to reset the timer. Once timer setting is set,
the screen will appear reserving time as below.
Notice:
it is needed to set the setting as “ ON” to book the reserved recording successfully;
the reservation will be executed only when the device is in Power on state.

PV-500EVO2 User’s Manual
14
11 Vibration> set the Vibration to turn on or off the device.
12 Backlight Out Duration> set the time delay to turn off the backlight during device
is not used.
13 Digital Cam Low Lux > set the Low Lux function to turn on or off.
14 Digital Cam NTSC/PAL > Choose the NTSC or PAL for Operating interface.

PV-500EVO2 User’s Manual
15
15 Storage Option > already set SD card for this device.
16 Storage Information>show the size and the residual space
17 Storage Capacity Icon>show the icon on the device
18 Format Memory > allow to format SD.
19 TV Out Setting>

PV-500EVO2 User’s Manual
16
20 TV Output Adjustment>
21 Display > Output TV Display setting
22 Video Playback> set up repeat mode for video file
23 Video Thumbnail> Set up if enable to preview image when reading video files
24 Image Thumbnail> set up if enable to preview when reading photo files

PV-500EVO2 User’s Manual
17
25 Start Slideshow> set up if enable slideshow
26 Slideshow Duration> set up the section time during slideshow playing
27 Firmware Upgrade >Insert the SD card which contains updated software into the
device and press enter button, after the system is updated, it will reboot automatically;
if the message “Update Error” is shown, it means that there are errors during updating,
it might be that the software is incomplete or the memory card has some problem,
please use other memory card, or reboot the device after inserting the memory card.
28 Restore Factory Setting> choose if you would restore factory setting, Tap
ok/Cancel. l

PV-500EVO2 User’s Manual
18
29 Power On Password > lock or not to lock when turning on PV-500EVO2; if
set” On”, it requires password to enter main menu of PV-500EVO2 player.
30 Set Power On Password > Tap your chosen 6 characters and then confirm these
characters once more, after setting Tap Enter to complete the setting.
31 USB Connection Password > set up if locked when reading data through USB
32 Set USB Connect Password > Tap your chosen 6 characters on the screen and then
confirm these characters once more, after setting Tap Enter to complete the
setting.
33 Touch Panel Calibration>
PV-500EVO2 User’s Manual
19
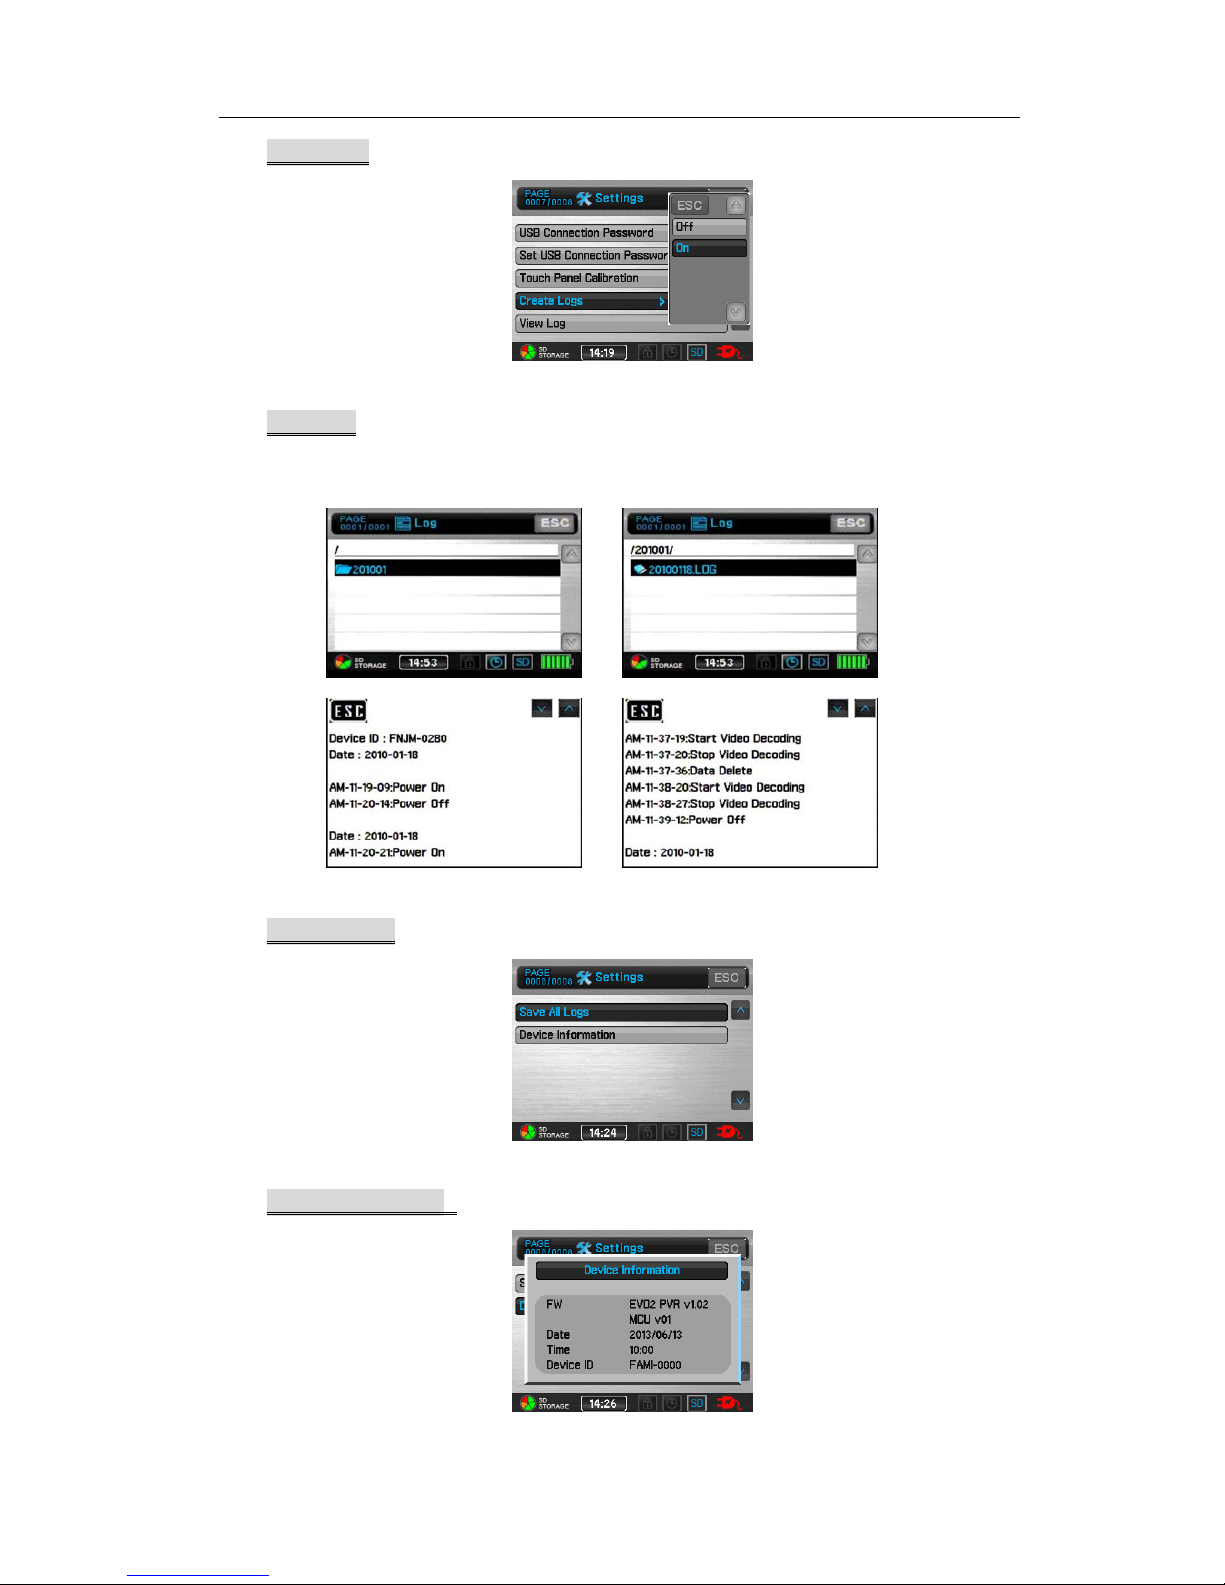
34 Create logs>
35 View Log> record all log times for power on/off, USB plug-in/out and record and
playback.
36 Save All Logs>
37 Device Information>show information about PV-500EVO2

PV-500EVO2 User’s Manual
20
5 Video Playback
¾OperationsinMainMenu
Tap VIDEO on the Main Menu to open the newest files
Choose the files to play video as below.
Tap button to open files listed in date; choose desired video file to play. Tap
button again to enter the upper level of MyRecord.
¾Fast Playback
Double Speed Playback: Tap during normal
playback, the video file will be played with a speed
two times quicker; press to return to the normal
playback speed.
4 Times Speed Playback: Tap twice during normal
playback, the video file will be played with a speed four
times quicker; press to return to the normal playback
speed.
Other manuals for PV-500EVO2
1
Table of contents
Other Lawmate Media Player manuals


