LAWN STAR LSPS 5850 User manual

PROFESSIONAL
PETROL CHAIN SAW
OPERATING INSTRUCTIONS
MODEL: LSPS 5850

2
Thank you for purchasing the Lawn Star Petrol Chain Saw which is one of the finest and
most advanced chain saws today’s technology can produce. Before you begin using it,
please read this manual carefully and familiarise yourself with the control and the proper
use of this product to ensure you get the best possible performance from it.
IMPORTANT INSTRUCTIONS FOR YOUR PERSONAL SAFETY
Before using the chain saw, read the operating instructions and act accordingly.
ATTENTION: You run the risk of injury if you use the chain saw incorrectly. It is
imperative that you read these Operating Instructions and follow the instructions given.
A) General safety instructions
Do not allow children less than 18 years of age, nor anyone who is not familiar with
these instructions to use the petrol chain saw.
The chain saw should be used by trained and experienced persons only.
Keep the operating instructions for future reference.
Do not operate this equipment when tired, ill, or under the influence of alcohol, drugs
or medication.
Only operate the chain saw if physically fit and alert.
Obey all safety instructions and warnings.
B) Instructions on the proper use of personal protective clothing
Working with a chain saw requires special measures with regard to protective
equipment and clothing suitable for protecting your head, hands, feet, legs, eyes and
ears.
Keep body parts away from the chain.
Wear close fitting clothing which cannot get caught in moving parts.
Always wear an approved safety helmet when felling trees and removing branches.
Always wear safety goggles and/or a face guard.
Always wear suitable heavy-duty protective gloves.
Wear ear protection to avoid damage to your hearing.
Wear safety clothing including sturdy, non-slip footwear.
Wear leg guards.
C) Instructions on the safe use of the chain saw
ATTENTION: Read the operating instructions carefully and familiarise yourself in the
correct use of the chain saw before using it for the first time.
Before storage allow the engine to cool. When not in use, store the chain saw in a
dry and locked place, out of reach of children.
Use only genuine Lawn Star (Pty) Ltd. replacement parts when servicing or repairing
the unit. These parts are available from your supplying dealer or service agent.
Repairs may only be performed by authorised service agents.
Avoid dangerous environments. Do not use the unit in poor light or in damp or wet
locations. Do not use in the rain. Do not over-reach. Ensure good footing and balance
are maintained.
Inspect your petrol chain saw before each operation. Pay special attention to the
chain-bar and chain. If any part is damaged or worn, repair or replace before
operation.
Always hold the chain saw firmly with both hands while working with it.
No other person may be within the working range of the chain saw.

3
When not in use put the chain saw down in such a manner that there is no risk of
injury.
Switch the device off, wait for the chain to come to a complete standstill and
disconnect the spark plug before setting, servicing, cleaning, transportation or
storage.
Always use the chain cover when transporting the chain saw.
Hold the chain saw firmly when starting. The chain and bar must be free.
Before starting work ensure that you are standing firmly.
Never cut with the tip of the bar –the chain saw may recoil (“kick-back”)
Do not use the chain saw near combustible gases or dust –danger of explosion.
Always ensure all handles and guards are fitted when using the chain saw. Ensure all
screws and nuts are properly tightened before use.
Only operate this chain saw once correctly and fully assembled.
Switch the chain saw off immediately if you notice any changes in the machine.
Always have a first-aid kit at hand in case of accidents.
If the chain comes into contact with soil, stones, nails or other foreign objects, stop
the chain saw immediately and check the chain as well as the bar.
Never leave the chain saw unsupervised.
Ensure that no chain oil penetrates into the soil or sewage. Always place the chain
saw on something that will absorb any oil dripping from the bar or chain.
Stop the engine and disconnect the spark plug if the chain saw becomes blocked.
Never remove any of its components and never use a damaged or incomplete
machine. Never modify any of the machine components.
Do not use your petrol chain saw for any jobs other than those for which it was
intended.
WARNING: Petrol and its vapours are highly flammable. Always stop the engine
before refuelling. Do not smoke or light any flames while refuelling. Wipe off any fuel
that may have spilled. Refuel in a well ventilated area and never in closed
environments. Start the engine away from the place where it was refuelled. Ensure
the tank cap is tightened properly. Return the chain saw to its normal operating
position before starting.
CAUTION: Exhaust fumes are toxic and asphyxiating. Inhalation may be lethal. Do
not start the engine in closed or poorly ventilated environments.
If the chain becomes jammed or blocked by obstacles, switch the engine off
immediately and visually inspect the chain saw for damage. Note, if the chain saw is
damaged, repairs and servicing must only be performed by authorised dealers and
service agents.
D) Warning: Danger of recoil (“kickback”)
WARNING: While the engine is running, kickback may occur when the nose or tip of
the guide bar touches an object, or when the wood closes in and pinches the saw
chain in the cut. Top contact in some cases may cause a lightning fast reverse
reaction, kicking the guide bar up and back towards the operator. Pinching the saw
chain along the top of the guide bar may push the guide bar rapidly back towards the
operator. Either of these reactions may cause the operator to lose control of the saw
which could result in the chain saw being flung upwards at high speed towards the
person holding the chain saw and causing serious personal injury.
Do not rely exclusively on the safety devices built into your saw. As a chain saw user
you should take several steps to keep cutting jobs free from accident or injury:

4
With a basic understanding of kickback you can reduce or eliminate the element of
surprise. Sudden surprise contributes to accidents.
Keep a good grip on the saw with both hands, the right hand on the rear handle, and
the left hand on the front handle, when the engine is running. Use a firm grip with
thumbs and fingers encircling the chain saw handles. A firm grip will help you reduce
kickback and maintain control of the saw.
Make certain that the area in which you are cutting is free from obstructions. Do not
let the nose of the guide bar contact a log, branch, or any other obstruction which
could be hit while you are operating the saw.
Do not overreach or cut above shoulder height.
Follow manufacturers sharpening and maintenance instructions for saw chain.
Only use replacement bars and chains specified by the manufacturer or the
equivalent.
If possible, use a log stand for cutting loose logs.
Always keep aware of the bar tip relative to other objects.
Cut at high engine speeds. Never start the machine while the chain rests on an
object.
Piercing cuts with the bar tip may only be performed by trained and experienced
operators.
E) Instructions on safe working techniques
Always maintain a normal body posture when operating the device. Always keep your
balance.
Do not work with your body bent forwards.
Do not work on ladders, scaffolding, walls or trees.
Do not use the chain saw above shoulder height.
Do not cut plastic or other material. This chain saw is only intended for cutting wood.
Ensure that the wood cannot twist while it is being cut.
Never climb in a tree to cut branches.
Watch out for splintering wood. While you are sawing you may be injured by flying
wood chips.
Do not use the chain saw to lever or move the wood.
Only cut with the lower section of the saw. The saw will be repulsed towards you if
you try and cut with the upper section of the saw.
Ensure that the wood is free from of stones, nails and other foreign objects.
First-time users must obtain practical training in the correct use of the chain saw and
the required safety equipment from an experienced operator.
Keep the running chain saw from touching the ground or wire fences. Do not cut thin
wood or timber that is already sawn into small pieces.
Do not use the chainsaw as a lever for lifting or moving objects.
DO NOT fasten tools or accessories to the chainsaw that are not specified by the
chainsaw manufacturer.
ATTENTION: SAFETY FEATURES
Safety features are designed to protect you against injuries and must not be altered or
circumvented.
5
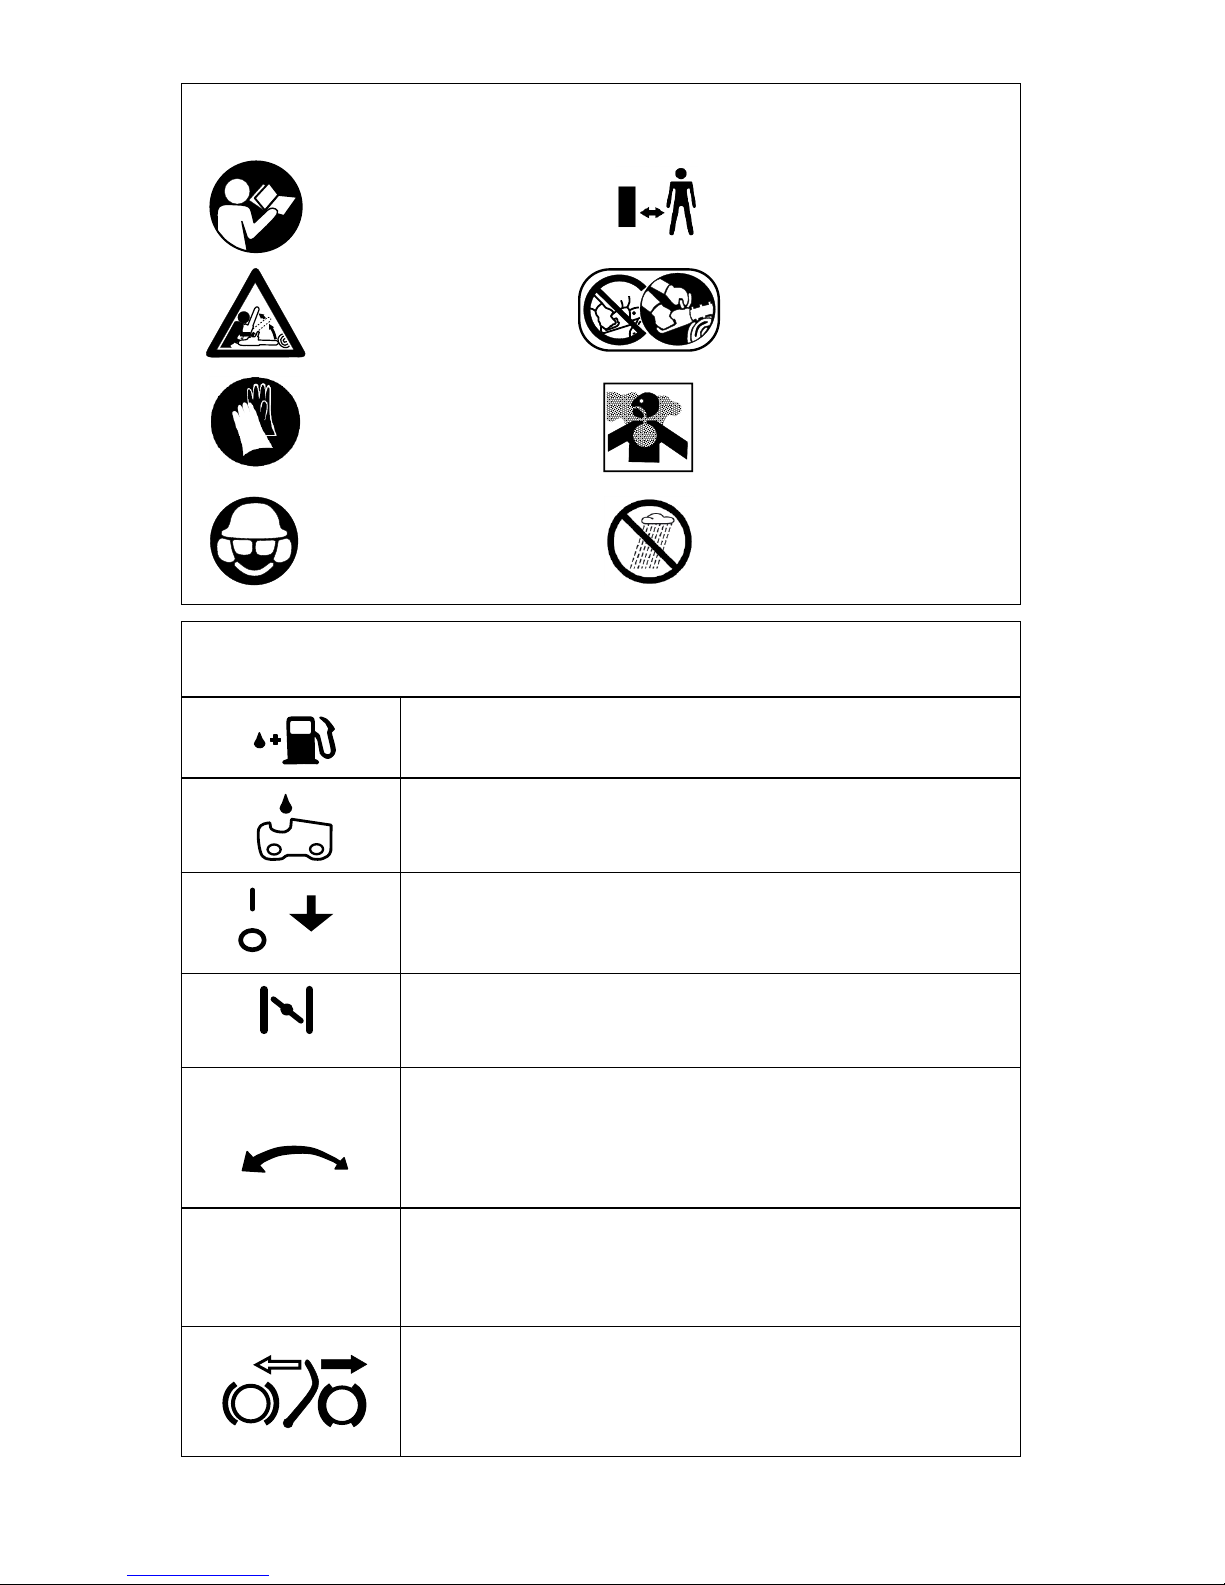
Warning Symbols
Read operating instructions
before operating this machine
Warning: Kick-back
Wear heavy-duty safety
gloves
Wear head, eye and ear
protection
Keep bystanders away from
chain saw when it is in use
Do not use in rain
Hold the chain saw with
both hands when operating.
Avoid running the engine indoors.
The exhaust gases contain
harmful carbon monoxide.
The following symbols appear on the chain saw. For safe operation and
maintenance, please know what the symbols mean:
Fuel tank cap
Chain oil tank cap
On/Off switch
Choke
Indication regarding the chain oil adjuster nut:
“MIN” direction-the oil flow decrease
“MAX” direction-the oil flow increase
Carburettor adjustment symbols:
The position of H-needle
The position of L-needle
The position of idle adjustment screw
Chain Brake Symbol:
Arrows show which direction to engage or disengage chain
brake. Push the guard all the way forward to engage, and
pull back to disengage.
STOP
PULL
CHAIN OIL
MIN
MAX
H
L
T

6
ASSEMBLY OF CHAIN SAW
CAUTION: The saw chain has very sharp edges. Always use safety gloves when assembling
the chain.
Your chain saw package contains the following items as illustrated in figure 1.
Assemble the guide bar and the saw chain on the power unit as follows:
1. Ensure the spark plug wire is disconnected and keep it away from spark plug.
2. Place the chain saw on a stable surface.
3. Pull the guard towards the front handle to check that the chain brake is not on (Fig.2).
4. Loosen the nuts (Fig.3a) and remove the chain cover (Fig.3b).
5. Install the included claw to the power unit (Fig.4) if it is not pre-fitted.
6. Gear the chain to the sprocket (Fig.5) and, while fitting the saw chain around the guide bar,
mount the guide bar to the power unit (Fig.6). NOTE: Pay attention to the correct direction of
the saw chain. The cutting teeth on the upper side of the bar must point in the forward
direction (Fig.7)
7. Adjust the position of chain tensioner screw on the chain cover to the lower hole of guide
bar (Fig.3b) If necessary, adjust the tensioner screw until the tensioner bolt is seated in the
lower hole in the bar.
8. Fit the chain cover to the power unit and fasten the nuts (Fig.3a) to finger tightness.
9. Check that all chain links are seated correctly in the bar’s groove and that the chain is fitted
around the driving sprocket correctly.
10. While holding up the chain bar, adjust the chain tension by turning the tensioner screw until
the chain links just touch the bottom side of the bar rail (Fig.8). The chain should be
tensioned such that it can be lifted about 3 mm in the middle of the bar (Fig.8).
11. Tighten the chain cover nuts securely (12-15N.m). Check the chain for smooth rotation and
proper tension while moving it by hand.
12. If necessary, readjust the tension of the chain by first loosening the chain cover nuts slightly,
then again adjusting the chain tension by turning the tensioner screw. Securely retighten the
chain cover nuts.
NOTE:
A new chain will expand its length in the beginning of use. Check and readjust the tension
frequently as a loose chain can easily derail or cause rapid wear of itself and the guide bar.
The chain tension has a significant effect on the life of the chain saw, and must therefore be
checked regularly. When the chain warms up to operating temperature it will expand a little and
might need to be re-tensioned.
1
2
3
4
6
7
1. Engine
2. Bar protector
3. Chain bar
4. Saw chain
5. Chain file
6. Universal tool
7. Screwdriver for carburettor
adjustment
Figure 1
7
Sprocket
1. Loosen
2. Tighten
Figure 8
Figure 5
Figure 6
Figure 7
Figure 3b
Tensioner
bolt
Lower
hole
Chain
cover
Figure 4
claw
Chain
catch
bolt
Chain
brake OFF
(operating
position)
Chain
brake ON
Guard
Figure 2
Oiling
port
Figure 9
Bar
groove
Oiling
port
Sprocket
Grease
port
Nuts
Chain
cover
Figure 3a
Tensioner screw
1
2
3 mm
clearance

8
FUELLING
This product is equipped with a 2-stroke engine which requires 2-stroke lubricating oil to be
pre-mixed with petrol. Mix both thoroughly (as per fuel-mix ratio) in a separate container.
Always prepare the fuel-mixture and refuel the chainsaw outside in a well ventilated
environment.
Use Lawn Star high performance 2-stroke oil (stock code 90-20000) and lead-free petrol
(Octane 95).
Oil/Fuel mix ratio for normal 2-stroke engine oil - 1:25 (4%) e.g. 40 ml of oil per 1 litre of
petrol
Always stop the engine before refuelling. Do not smoke or light any flames while refuelling.
Wipe off any fuel that may have spilled. Start the engine away from the place where it was
refuelled. Ensure the tank cap is tightened properly. Return chainsaw to its normal operating
position before starting.
CHAIN OIL
The chain saw must never be operated without chain oil as this will cause damage to the
chain, bar, and engine. No claims under warranty can be accepted if damage occurs due to
the chain saw being operated without chain oil.
Use Lawn Star chain lube (stock code 90-30000). Alternatively motor oil grade SAE 10W-30
can be used.
NOTE: Do not use waste or recycled oil that can cause damage to the oil pump.
Fill approximately 260ml oil into the tank using a funnel and replace the cap securely.
Remove the chain oil from the oil tank if the chain saw is not used for a long period.
The oil tank should be emptied before the chain saw is transported.
After use, lay the chain saw horizontally on an absorbent surface.
BEFORE USING THE CHAINSAW
Before proceeding to your job, read “IMPORTANT INSTRUCTIONS FOR YOUR
PERSONAL SAFETY” section.
Always follow the safety procedures and guidelines.
Check chain saw for damage before starting work.
Ensure that the chain tension is correct. If the chain is too loose, it may come off during use
and lead to injuries. The chain must be replaced immediately if it is damaged. The cutting
teeth must be at least 4 mm long.
Check the sharpness of the chain every time before using the chain saw. Sharpening a
chain requires experience and specialised knowledge, therefore it is recommended that
sharpening be carried out by a specialised workshop, or a new chain be used.
It is recommended to first practice sawing on smaller easier-to-cut logs. This helps to get
accustomed to the chainsaw.
SAFETY DEVICES ON THE CHAIN SAW
CHAIN BRAKE
This machine is equipped with a mechanical chain brake. In the event of kickback, the chain
brake guard (Fig.10-No.1) will be activated by the back of the operators hand and saw chain
rotation will be stopped. The engine will continue to run until switched off.
Immediately release the throttle lever as soon as the chain brake is activated.
Switch the engine off as soon as possible if the chain brake is engaged to prevent the clutch
from overheating.
The brake will only be activated if operating the chain saw correctly.
Always insure that the chain brake guard is locked into the operating position (Fig.2)
before starting the chain saw.

9
CAUTION: The engine must be switched off before the chain brake is released.
To release brake, pull up the front guard toward the front handle till “click” sound is heard.
Check the chain brake operation before each usage by running the saw at full throttle for 1-2
seconds and pushing the front hand guard forward. The chain should stop immediately with
the engine at full speed. If the chain is slow to stop or does not stop, have the brake band
and clutch drum replaced or serviced before using the chain saw.
It is extremely important that the chain brake be checked for proper operation before each
use and that the chain is sharp. Removal of the safety devices, inadequate maintenance, or
incorrect replacement of the bar or chain may increase the risk of serious personal injury due
to kickback.
CHAIN CATCH BOLT
The chain saw is fitted with a chain catch bolt (Fig.4). Should the chain break when the saw is in
use, the chain bolt will catch the loose chain end and thus prevent injury to the operator’s hand.
2
14
7
13
12
3
Key:
1. Brake guard
2. Front handle
3. Pull starter
4. Air filter knob
5. Air filter cover
6. Choke knob
7. Throttle interlock
8. Rear handle
9. Throttle trigger
10.Primer bulb
11.On/Off switch
12.Fuel cap
13.Chain oil cap
14.Saw chain
15.Guide bar
16.Universal tool
Figure 10
1
4
15
6
8
11
10
9
5
16

10
OPERATING INSTRUCTIONS
BEFORE STARTING ENGINE
Check the working area, the wood to be cut and cutting direction. If there is an obstacle,
remove it.
Ensure you have a clear working area, secure footing and a planned retreat path from falling
timber
Inspect the machine for worn, loose, or damaged parts. Never operate the machine that is
damaged, improperly adjusted, or is not completely and securely assembled.
WHEN STARTING THE ENGINE
Ensure the saw chain is not in contact with anything.
Always hold the machine firmly with both hands when the engine is running. Use a firm grip
with thumb and fingers encircling the handles.
Keep all parts of your body away from the machine when the engine is running.
OPERATION
Keep the handles dry, clean and free of oil or fuel mixture.
Never touch the muffler, spark plug or other metallic parts of the engine while the engine is
on or immediately after stopping the engine. Doing so could result in serious burns or
electrical shock.
Use extreme caution when cutting small size brush and saplings because slender material
may catch the saw chain and be whipped toward you or pull you off balance.
When cutting a limb that is under tension, be alert for spring back so that you will not be
struck when the tension in the wood fibres is released.
Check the tree for dead branches that could fall during the felling operation.
Always shut off the engine before setting the chain saw down.
GENERAL INSTRUCTIONS ON WORKING WITH A CHAIN SAW
WARNING: Always ensure your foothold. Do not use an unstable foothold, such as a ladder
or log.
Be alert to the rolling over of a cut log.
Stand on the uphill side of a cut log when working on a slope.
Do not force the chain saw when cutting wood. Apply only light pressure while running the
engine at full throttle. If the chain is sharp, it will cut through the wood with ease.
Never try to continue cutting with a blunt chain. Always have a replacement chain at hand.
When the saw chain is caught in a cut, do not attempt to pull it out by force, but use a wedge
or a lever to open the cut.
WARNING: Do not overreach.
WARNING: Do not cut above shoulder height.
WARNING: Always use your both hands to grip the saw.
Take regular breaks.
After use always place the chain saw horizontally to avoid oil dripping from the chain oil
reservoir.
Always use the chain cover when transporting the chain saw.
Prevent the chain from contacting soil.

11
STARTING COLD ENGINE
1. Fill fuel (Fig.10-No.12) and chain oil (Fig.10-No.13) tanks respectively, and tighten the caps
securely (refer to the “FUELING” and “CHAIN OIL” sections in this manual).
2. Ensure safety brake guard (Fig.10-No.1) is pushed fully forwards towards the chain into the
on position.
3. Switch the ON/OFF switch (Fig.10-No.11) up into the “ON(I)” position.
4. Pull out the choke knob (Fig.10-No.6) to the closed position.
5. Press primer bulb slowly 5-10 times (Fig.10-No10).
6. While holding the chain saw securely on the ground (Fig.11), pull the starter cord (Fig.10-
No.3) three times fully. The engine might start.
WARNING: Keep clear of the saw chain as it will start rotating upon starting of the engine.
7. While holding the throttle lock-on button in (Fig.10-No7), pull throttle trigger (Fig.10-No9) to
disengage the choke. If the engine stalled or did not start pull the starter cord (Fig.10-No.3)
repeatedly until the engine starts.
8. Release safety brake guard (Fig.10-No.1) by pulling guard backwards into the off position.
9. Allow the engine to warm up for a few seconds.
10.While holding the throttle lock-on button in (Fig.10-No.7), pull throttle trigger (Fig.10-No.9) to
rev the engine.
Note: When the engine is started the chain will rotate until the throttle lock-off button is
released, then the engine will idle and the chain will stop rotating.
STARTING WARM ENGINE
Proceed as with cold engine start but with the choke knob pushed, i.e. in the run position.
STOPPING ENGINE
1. Release the throttle trigger to allow the engine to idle for a few minutes.
2. To stop the engine, flip the ON/OFF switch down to the (0) position.
Figure 11
Figure 12
Oil spray from
chain
12
CHECKING OIL SUPPLY
After starting the engine, run the chain at medium speed and observe if chain oil is sprayed
off (Fig.12).
First switch off the engine, wait for the chain to stop and then remove the spark plug wire
before adjusting the chain oil flow.
The chain oil flow-rate can be changed by adjusting the screw in the hole on bottom of the
clutch side (Fig.13). Adjust according to your work conditions.
NOTE
The oil tank should become nearly empty by the time fuel is used up. Be sure to refill the oil
tank every time when refuelling the unit.
ADJUSTING CARBURETOR (REFER TO FIGURE 14)
The carburettor on the chain saw has been factory adjusted, but may require fine turning due
to change in operating conditions.
Before adjusting the carburettor, make sure you have clean air/fuel filters and fresh, properly
mixed fuel.
Note: Be sure to adjust the carburettor with the bar chain attached
When adjusting, take the following steps:
1. Stop engine and screw in both H and L needles clockwise until they stop. Do not force
them.
2. Set the needles back the number of turns as shown below:
3. H needle: 1⅜ turns
4. L needle: 1¼ turns
5. Start engine and allow it to warm up at half-throttle.
6. Turn L needle slowly clockwise to find a position where idling speed is maximum, then
set the L needle back a quarter (1/4) turn counter clockwise.
7. Turn idle adjusting screw (T) counter clockwise until the saw chain does not turn. If
idling speed is too slow, turn the screw clockwise.
8. Make a test cut and adjust the H needle for best cutting power, not for maximum
speed.
Figure 13
Chain oil adjusting
screw
Key:
L = L needle
H = H needle
T = Idle adjusting screw
Figure 14
T
H
L

13
INSTRUCTIONS ON THE CORRECT USE OF THE CHAIN SAW
REMOVING BRANCHES (Fig.15)
Ensure that you are standing properly.
Cut a deep notch from below into the branch about 15cm from the trunk.
Now cut the branch from above about 5cm further outwards from the lower notch until the
branch drops off.
In order to remove the remaining stub, cut from below about 1/3 into the remaining branch
close to the trunk.
Cut into the branch from above until the branch has been removed completely.
WARNING: Do not remove free-hanging branches from below.
FELLING A TREE (Fig.17)
Ensure that no one is within the felling area, minimum distance: 2 tree lengths.
Ensure that no one can be hit by the falling tree or branches.
Ensure that there is an escape path as shown in figure 19.
Clear the area around the tree, ensuring there will be a good foothold area and retreat path
during felling.
Keep the working area free of objects.
Always stand at the side of the tree during felling (not in front!)
Decide the felling direction of the tree by considering the wind, lean of the tree, location of
heavy branches, ease of job after felling and other factors. The felling notch is cut on this
side of the trunk.
First cut 1/3 of the trunk diameter horizontally into the tree at the intended felling notch
(Fig.17 No.1).
Now cut the second part of the felling notch from above at an angle of 45 degrees to the first
cut (Fig.17 No.2).
Now make the felling cut exactly opposite to the felling notch. The felling cut must run
horizontal and at a level slightly higher than the bottom of the felling notch (Fig.17 No.3).
Do not cut completely through the tree. Leave about 1/10 of the trunk diameter.
Put wedges into the felling cut to bring the tree to fall (Fig.17 No.4). Note the felling direction
of the tree (Fig.17 No.5).
WARNING: When felling a tree, be sure to warn neighbouring workers of the danger.
CUTTING A LOG LYING ON THE GROUND (Fig.18)
Saw down halfway, then roll the log over and cut from the opposite side.
CUTTING A LOG HANGING OFF THE GROUND (Fig.16)
If cutting in area A (see figure 16), saw up from the bottom one-third and finish by sawing
down from the top. If cutting in area B, saw down from the top one-third and finish by sawing
up from the bottom.
This technique must be following to ensure the chain bar does not jam. If the chain saw does
become jammed, switch it off immediately. Use wedges to free the bar.
CUTTING THE LIMB OF A FALLEN TREE (Fig.19)
Before starting work, check the direction of bending force inside the log to be cut. Then
make the initial cut from the bent side (Fig.19 No.1) and finish by sawing from the opposite
side (Fig.19 No.2). Always finish cutting from the opposite side of bending direction to
prevent the guide bar from being caught in the cut.
WARNING: When cutting a limb that is under tension, be alert for spring back so that you will
not be struck when the tension in the wood fibres is released.

14
45°
2
1
3
4
5
Key:
1. Felling notch cut
2. Felling notch cut
3. Felling cut
4. Wedge
5. Felling direction
Figure 17
A –Felling direction
B –Danger area
C –Escape area
B
B
C
C
Tree
A
15cm
8cm
4
3
2
1
Figure 15
Area B
Area A
1
2
1
2
Figure 16
Figure 19
Figure 20
Figure 18

15
MAINTAINANCE AND CLEANING
In order to maintain your chain saw in proper working order, perform the maintenance and
checking operations described in this manual at regular intervals. Leave all maintenance other
than the items listed in the Owner’s Manual to your competent servicing dealer. Repairs and
servicing must only be performed by authorised dealers and service agents.
Before cleaning, inspecting or repairing the chain saw, make sure that engine has stopped and
is cool. Switch off and disconnect the spark plug to prevent accidental starting during
maintenance and cleaning.
WARNING: The metal engine parts are at high temperatures immediately after stopping
the engine.
MAINTENANCE AFTER EACH USE
Check all the chain saw parts for wear after every use, particularly the chain, bar and sprocket.
Air filter
Clean air filter regularly. Unscrew air filter knob (Fig.10 No.4) and remove air filter cover (Fig.10
No.5) and remove filter (Fig.21). Dust on the filter surface can be removed by tapping a corner
of the filter against a hard surface. To clean dirt in the mesh, split the filter into halves and brush
in gasoline. When using compressed air, blow from the inside. Remember to wear safety
goggles. To assemble the filter halves, press the rim until it clicks. Note, when installing the
filter, make sure that the grooves on the filter edge are correctly aligned with the intake hole on
the cylinder.
Fit new filter if damaged.
Oiling port
Dissemble the guide bar and check the oiling port for clogging (Fig. 4).
Guide bar
When the guide bar is dissembled, remove sawdust in the bar groove and the oiling port.
Grease the nose sprocket from the feeding port on the tip of the bar (Fig. 9).
Chain
Remove the chain and clean it if it is dirty, e.g. gumming with resin. Place the chain in a vessel
containing chain cleaner. There after clean the chain with clean water. If the chain is not used
again immediately, it must be treated with oil or a custom anti-corrosion spray.
Ensure that the chain tension is correct. If the chain is too loose, it may come off during use and
lead to injuries. The chain must be replaced immediately if it is damaged. The cutting teeth must
be at least 4 mm long.
Oil level and lubrication
Check the oil level and lubrication after every use. Insufficient oil and lubrication leads to
damage to the chain, bar and engine.
General
Check for fuel leakage, loose fasteners and damage to major parts, especially handle joints and
guide bar mounts. If any damage is found, make sure to have it repaired before operating the
chain saw again.
PERIODIC MAINTENANCE
Cylinder fins
NOTE: Block the air intake hole when cleaning cylinder fins.
Dust clogging between the cylinder fins will cause overheating of the engine. Periodically check
and clean the cylinder fins after removing the air filter and the cylinder cover (Fig.22). When re-
fastening the cylinder cover, make sure that switch wires and grommets are positioned correctly
in place.

16
Fuel filter
Replace every 12 months.
(a) Using a wire hook, take out the filter from the fuel tank refilling inlet (Fig.10 No.12).
(b) Disassemble the filter and wash with gasoline, or replace with new one if needed.
NOTE
After removing the filter and when assembling the filter, take care not to allow filter fibres or dirt
inside the suction pipe.
Silencer
The silencer may become blocked by deposits over a period of time and must be removed to be
cleaned or replaced.
Chain oil tank
With a wire hook, take out the oil filter through the oil filler port (Fig.10 No.13) and clean in
gasoline. When putting the filter back into the tank, make sure that it is positioned in the front
right corner. Also clean out any dirt in the tank.
Spark plug
Check every 12 months or if starting problems are experienced. When the engine is cold,
remove the plug cap and unscrew the spark plug with a suitable spark plug socket. Clean the
electrodes with a wire brush and reset the gap to 0.65 mm when necessary (Fig.23). If the
electrodes are excessively soiled or worn then replace with an equivalent new spark plug (e.g.
BM6A). Excessive soiling may be due to a) too high ratio/poor quality 2-stroke oil or b) clogged
air filter.
Replace spark plug and screw in by hand to avoid stripping of thread, then tighten with socket.
Sprocket (Fig. 5)
Check for cracks and for excessive wear interfering with the chain drive. If the wearing is
observed, replace. Never fit a new chain on a worn sprocket, or a worn chain on a new
sprocket.
Front and Rear dampers
Replace rubber dampers if they are cracked or appear peeled.
Figure 22
Figure 23
Figure 21
0.65 mm
17
Figure 25
Figure 27
Figure 24
File
Figure 26
(1)
(2)
(3)
0.65 mm
(4)
(5)
30°
(6)
85°
(7)
60°
3
4
1
2
Note: only
clamp the
chain bar and
NOT the chain

18
SAW CHAIN
WARNING
It is very important for smooth and safe operation to keep the cutters always sharp.
Your cutters need to be sharpened when
Sawdust becomes powder-like.
You need extra force to saw in.
The cut way does not go straight.
Vibration increases.
Fuel consumption increases.
Cutter setting standards:
WARNING: Be sure to wear safety gloves.
Before filing:
Make sure the saw chain is held securely (Fig.24).
Make sure the engine is stopped.
Use a round file of proper size for your chain.
Chain type: K2
File size: 3/16 in (4.76mm)
Place your file on the cutter and push straight forward. Keep the file position as illustrated
(Fig.25)
After every cutter has been set, check the depth gauge and file it to the proper level as
illustrated (Fig.26).
WARNING: Be sure to round off the front edge to reduce the chance of kickback or tie-strap
breakage.
Make sure every cutter has the same length and edge angles as illustrated (Fig.26).
Referring to figure 26:
(1) Appropriate gauge checker.
(2) Make the shoulder round
(3) Depth gauge standard
(4) Cutter length
(5) Filing angle
(6) Side plate angle
(7) Top plate cutting angle
GUIDE BAR
Reverse the bar occasionally to prevent partial wear.
The bar rail should always be a square. Check for wear of the bar rail. Apply a ruler to the bar
and the outside of a cutter. If a gap is observed between them, the rail is normal. Otherwise ,
the bar rail is worn. A worn bar needs to be repaired or replaced (Fig.27).
Referring to figure 27:
1. Ruler
2. Gap
3. No gap
4. Chain tilts
GENERAL CLEANING
Always remove wood shavings and oil from the chain saw after use. Clean the chain saw
by brushing away dirt and waste residue that may be caught the machine. Wipe the
chainsaw clean with a damp cloth or hand brush. DO NOT use running water, solvents,
strong detergents or a high pressure washer to clean. (Use a mild detergent and sponge
to clean the plastic surfaces.)
Pay particular attention to the air intake area, keeping it free of debris.

19
Switch the chain saw off immediately if the machine starts to shake or produce abnormal
noise.
NOTE: It is important to prevent gum deposits from forming in essential fuel system parts such
as the carburettor, fuel filter, fuel hose, or fuel tank during storage. Alcohol blended fuels (called
gasohol or using ethanol or methanol) can attract moisture which leads to fuel mixture
separation and formation of acids during storage. Acidic gas can damage the engine.
TRANSPORTATION AND STORAGE
WARNING: Stop the engine and allow the chain saw to cool before storing or
transporting in a vehicle.
Always carry the unit with the engine stopped, the guide bar covered and muffler away
from your body.
Clean the unit before storing.
Store the chain saw and fuel in an area where fuel vapours cannot reach sparks or open
flames.
If chain saw is unused for more than 2 months or being transported, then empty the fuel
tank. Before storage allow the engine to cool. Store the unit indoors in a dry, ventilated
and locked place, out of reach of children.
Store the chain saw with all guards in place.
Attention
Any maintenance and repair work beyond that described in this instruction manual must
only be performed by an authorised service agent.
SPECIFICATIONS
Model: LSPS 5850
Engine type: 2-stroke naturally aspirated
Engine displacement: 58cc
Fuel type: lead-free petrol
2-stroke oil type: Lawn Star high performance 2-stoke oil (90-20000)
Fuel/oil mixing ratio: 25:1
Fuel tank capacity: 550 ml
Chain oil type: Lawn Star chain lube (90-30000)
Chain oil tank capacity: 260 ml
Carburettor: diaphragm type (Walbro WT)
Ignition system: pointless (CDI)
Spark plug: L8RTF or BM6A
Oil feeding system: automatic pump with adjuster
Dry weight: 5.5 kg (without bar and chain, empty tanks)
Guide bar type: sprocket nose
Guide bar length: 50 cm
Saw chain type: Oregon 20BPX078X (Lawn Star Stock Code 80-27585)

20
TROUBLE SHOOTING GUIDE
PROBLEM
PROBABLE CAUSE
CORRECTIVE ACTION
Engine won’t start
No spark
Ensure the spark plug is clean.
Replace the spark plug if upon
inspection the electrodes are burned
or worn. Check the spark plug gap
(Fig.23) with a feeler gage. Check for
spark by using a Spark Tester.
No fuel
Pump primer bulb, if no fuel flows
then pipes blocked. Have serviced. If
primer bulb fills then engine may be
flooded
Flooded engine
Remove spark plug, turn engine
upside down, set choke to run, pull
starter cord 10 times, clean spark
plug and refit.
Check fuel/oil mix
Drain and use fresh and correct fuel
mix
Engine will not rev
Carburettor needs
tuning
Have serviced
Blocked exhaust spark
arrestor
Remove spark arrestor, clean & refit
Engine Smokes and
will not rev
Incorrect fuel mixture
too much oil
Drain and use fresh and correct fuel
mix (Oil/Fuel mix ratio 1:25)
Dirty air filter or fuel
filter
Incorrect oil used
Clean as per instructions
Use Lawn Star High performance 2-
stroke engine oil (90-20000)
Chain does not run
Chain brake is on
Check the position of the chain brake
guard. The chain will only run if chain
brake guard is released and locked
into position.
Chain oil does not
flow
Check oil level
Top up oil
Blocked oil flow
openings
Clean the oil flow ports and passages
for clogging
Poor quality / wrong
grade oil
Oil leaks out of
exhaust muffler
Incorrect fuel mixture
too much oil
Drain and use fresh and correct fuel
mix (Oil/Fuel mix ratio 1:25)
Table of contents
Other LAWN STAR Chainsaw manuals


