Le Voyageur LV 6.8 LF User manual

2020 USER MANUAL

Standard motorhome conguration
The pictograms and dierent areas shown on this basic diagram do not necessarily reect the layout of your motorhome.
Baggage compartment
230V
connection
Water heater drain Fresh water inlet Fuel ller cap
Garage space
Wastewater Draining
Cassette toilet Lower living area
ventilation
Control panelLeisure battery Fire extinguisher
(depending on country)
Gas bottle
cupboard
Despite being the exclusive property of GP SAS Group, the photographs and illustrations published here are not binding. Le Voyageur reserves the
right to modify, add or remove components or technical characteristics at any time, without notice, for the sole purpose of improving the quality of its
products. Despite the care taken in preparing it, this catalogue is a non-binding document.

6
1.1 Welcome aboard .......................................................................... 6
1.2 Your onboard pouch.................................................................... 6
1.3 How to use this manual............................................................... 7
1.4 Legal Information......................................................................... 8
1.4.1 Regulations ............................................................................................. 8
1.4.2 Warranty ................................................................................................ 8
1.5 Motorhome manners .................................................................. 9
1.5.1 General principles ................................................................................. 9
1.5.2 Parking .................................................................................................... 9
1.5.3 Waste..................................................................................................... 10
1.5.4 Reference organisations ..................................................................... 10
2.1 Base vehicle ................................................................................ 11
2.1.1 Chassis .................................................................................................. 11
2.2 Living area................................................................................... 12
2.2.1 Hatches, openings and valves ............................................................ 12
2.2.2 Luggage holds and storage areas ...................................................... 12
2.2.3 Interior layout....................................................................................... 12
2.3 Basic uid diagrams................................................................... 13
2.3.1 Water ..................................................................................................... 13
2.3.2 Electricity............................................................................................... 14
2.3.3 Gas ......................................................................................................... 18
2.3.4 Ventilation and heating ....................................................................... 19
2.4 SAFETY ......................................................................................... 20
2.4.1 Fire ......................................................................................................... 20
2.4.2 Gas ......................................................................................................... 21
2.4.3 Electricity .............................................................................................. 21
2.4.4 Emergency exits ................................................................................... 22
24
3.1 Start-up after immobilisation................................................... 24
3.1.1 Fresh water ........................................................................................... 24
3.1.2 Refrigerator........................................................................................... 24
3.2 Refuelling and levels.................................................................. 24
3.2.1 Fuel ........................................................................................................ 24
3.2.2 AdBlue ................................................................................................... 25
3.2.3 Tyre pressure........................................................................................ 25
3.2.4 Fresh water ........................................................................................... 26
3.2.5 Gas ......................................................................................................... 27
3.2.6 Battery................................................................................................... 28
3.2.7 Light bulbs ........................................................................................... 30
3.3 Loading........................................................................................ 31
3.3.1 Technical specications....................................................................... 31
3.3.2 Calculating mass .................................................................................. 32
3.3.3 Storing baggage ................................................................................... 32
3.3.4 Trailer .................................................................................................... 33
4.1 Safety checks before departure ............................................... 34
4.2 Settings........................................................................................ 35
4.3 Driving ......................................................................................... 35
4.4 Driving and non-driving seats................................................... 35

5.1 Choosing a spot .......................................................................... 38
5.2 Safety when stationary.............................................................. 38
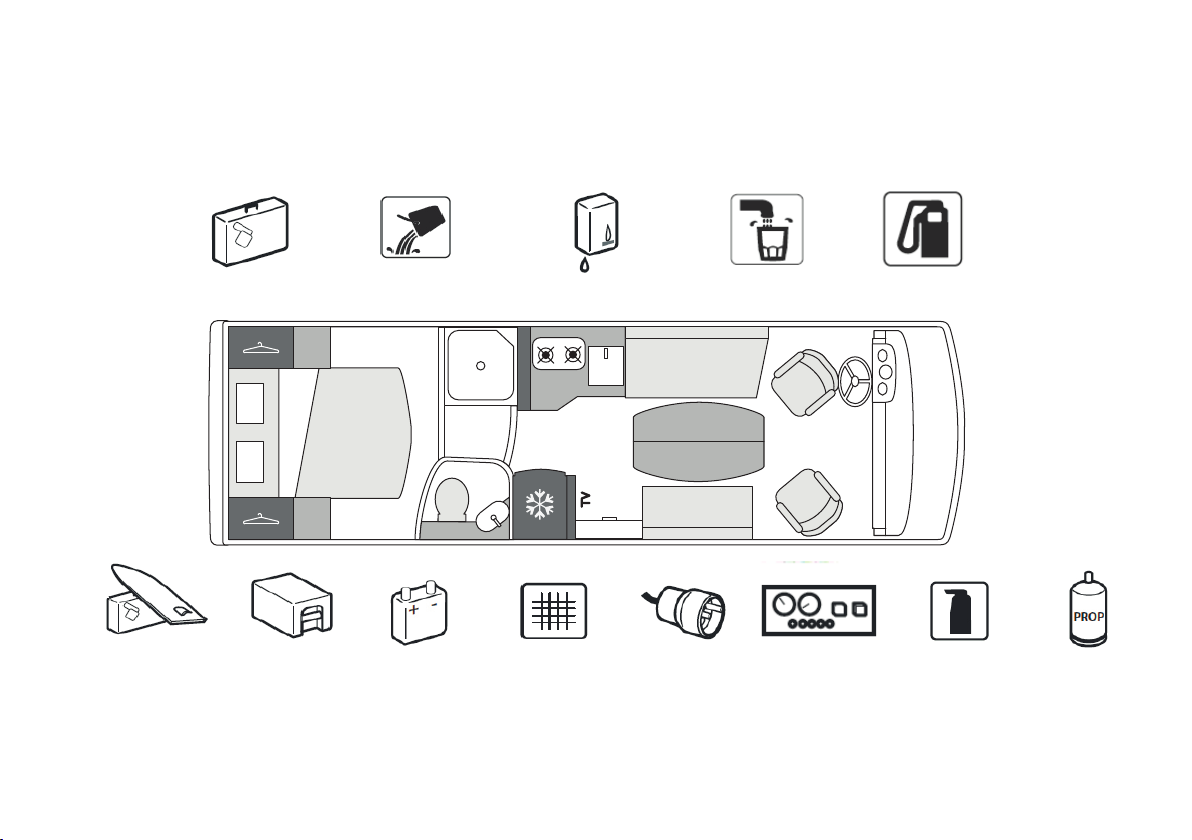
5.3 Supply .......................................................................................... 39
5.3.1 Turning on the water .......................................................................... 39
5.3.2 Turning on the gas .............................................................................. 39
5.3.3 230 V electricity .................................................................................... 39
5.4 Draining....................................................................................... 40
5.4.1 Wastewater........................................................................................... 40
5.4.2 Toilet...................................................................................................... 40
5.5 Insulation .................................................................................... 40
5.6 Locking ........................................................................................ 40
6.1 Windows and doors ................................................................... 41
6.1.1 Windows................................................................................................ 41
6.1.2 Sunroof (depending on the model) ................................................... 44
6.1.3 Doors ..................................................................................................... 45
6.1.4 Electric hatch ........................................................................................ 45
6.1.5 Awning................................................................................................... 46
6.2 Kitchen......................................................................................... 46
6.2.1 Sink ........................................................................................................ 46
6.2.2 Turbovent.............................................................................................. 47
6.2.3 Extractor hood ..................................................................................... 47
6.2.4 Gas-powered appliances .................................................................... 49
6.3 Table ............................................................................................ 50
6.3.1 Living room table ................................................................................. 50
6.3.2 Small cab table 7.8 LU ......................................................................... 51
6.3.3 Bar leg.................................................................................................... 51
6.3.4 Telescopic leg (option)......................................................................... 51
6.4 Television (option)...................................................................... 52
6.5 Car radio/DVD player and GPS (option)................................... 53
6.6 Reversing camera with dual view in wing mirrors ................ 53
6.7 Bathroom .................................................................................... 54
6.7.1 Shower and washbasin ....................................................................... 54
6.7.2 Toilet...................................................................................................... 54
6.8 Beds ............................................................................................. 54
6.8.1 Central bed ........................................................................................... 55
6.8.2 Twin beds.............................................................................................. 55
6.8.3 Drop-down beds .................................................................................. 55
6.9 Cab blinds.................................................................................... 59
6.9.1 Manual privacy blind ........................................................................... 59
6.9.2 Electric Venetian blinds (option)......................................................... 59
6.10 Air conditioning (option) ........................................................... 59
6.11 Lights ........................................................................................... 59
6.12 Heating ....................................................................................... 60
62
7.1 Gas systems ................................................................................ 62
7.1.1 Changing gas bottles ........................................................................... 62
7.2 Cleaning the interior.................................................................. 62
7.2.1 Cab......................................................................................................... 62
7.2.2 Furniture and ooring ......................................................................... 62
7.2.3 Metal hinges on furniture doors........................................................ 63
7.2.4 Cleaning windows ................................................................................ 63
7.2.5 Bathroom equipment.......................................................................... 63

7.2.6 Cooking appliances.............................................................................. 63
7.2.7 Refrigerator........................................................................................... 63
7.2.8 Boiler ..................................................................................................... 64
7.2.9 Control panel........................................................................................ 64
7.3 Cleaning the exterior................................................................. 64
7.3.1 Washing the bodywork........................................................................ 64
7.3.2 Tar.......................................................................................................... 64
7.3.3 Small scratches..................................................................................... 64
7.4 Winterisation or long stops....................................................... 65
7.4.1 Batteries................................................................................................ 65
7.4.2 Fresh water/wastewater .................................................................... 68
7.4.3 Turning o the refrigerator ................................................................ 69
7.4.4 Cushions, mattresses and curtains ................................................... 69
7.4.5 Repairs .................................................................................................. 69

6 • Welcome
Chapter 1. Welcome
Dear Customer,
Welcome to the exclusive club of Le Voyageur owners. Thank you for choosing our brand. It is very important to carefully read this manual, as well as
the operating instructions that come with each appliance: refrigerator, heating system, stove, control panel, etc. By using your motorhome correctly,
you will enjoy greater comfort and protect your vehicle’s value.
Our Le Voyageur network and Motorhome Service Center (MSC) are always at your disposal. Any infringement, translation or copy of all or part of
this document is strictly forbidden. Any full or partial copy requires our prior written permission. We hope you enjoy wonderful journeys with your Le
Voyageur motorhome.
· FIAT logbook
· ALDE Frost Control manual
· Water pump manual
· ALDE heat exchanger assembly instructions
· THETFORD toilet manual
· THETFORD hob manual
· Converter manual
· CS DuoControl instructions
· VICTRON regulator manual
· ALDE heating system manual
· SCHEIBER control panel manual
· Manual stabilising jack instructions (when option is selected)
· SOG installation instructions (when option is selected)
· Bike rack assembly instructions (when option is selected)
· DUO CONTROL display remote instructions
· Kit for Super B lithium battery
· Car radio kit (explanation, disassembly kit, etc.)
· 80, 100 & 110 km/h speed restriction discs
· Filter for cassette toilet
· Cleaning product for cassette toilet
· Electronic code for ignition key
· Spanner to tighten the gas hoses
· Television remote

Welcome •
Always keep the user manual to hand in the motorhome and inform the other users of the safety instructions. This document contains some
important remarks concerning personal safety. Please read it carefully.
You will nd below the meaning of the various symbols associated with these remarks:
If you ignore this, you may place other people in danger.
If you ignore this, you may damage the appliance(s) concerned.
These provide further information or draw your attention to useful details.
Certain actions and behaviours may cause damage to the environment.
Beware of hazards caused by cold weather.
Warning, you may limit or void the warranty if you do not heed these recommendations.

Welcome
1.4.1 REGULATIONS
The vehicle must be registered according to the regulations. There are no specic regulations that apply to the use of a motorhome. Motorhomes
are both vehicles and a form of accommodation. As such, they are subject to the following codes, depending on the country:
· the highway code when driving the vehicle
· local legislation and the highway code when parking on public roads
· urban land use code when parking on private property
1.4.2 WARRANTY
The warranty, guaranteed by the dealership, lasts 24months from delivery and key handover. The date is specically mentioned by the dealer in the
box reserved for that purpose on the warranty certicate.
· The warranty only applies to the living area and any modications made by GP SAS to the base vehicle chassis; the chassis is covered by the
automotive manufacturer’s warranty.
· The warranty should, as far as possible, be redeemed by the dealership where the vehicle was purchased, both for the living area itself and for any
defective parts that may be replaced separately.
· The motorhome shall be made available to the dealer for any exchange or repair work. No refund shall be made for the cost of transport to and
from the dealer (both for the motorhome and the people) or other related expenses incurred directly or indirectly.
· If household appliances are covered by their own manufacturer's warranty (fridge, heating system, etc.), contact your nearest brand representative
(see list of representatives provided with the appliance) or, failing this, your Le Voyageur dealer.

Welcome •
You must ll out the warranty documents for appliances when provided and return them to the various manufacturers. The warranty will not apply in
the following cases:
· The buyer has not complied with the instructions for use
· Wheel alignment has not been checked at 1,500km (900miles).
· The motorhome has been modied by a non-approved person or by installing non-original parts
· The damage or the defect is due to failure to observe the Highway Code
· The damage results from improper or negligent use
· Normal wear and tear
· The motorhome was repaired in a workshop not approved by GP SAS or without its prior written agreement
· The motorhome has been converted or equipped with accessories not tted by the manufacturer and which are liable to aect key vehicle
characteristics
1.5.1 GENERAL PRINCIPLES
Good motorhome owners are discreet and should be careful not to leave any trace of their stay. Good manners, respect for others and protecting
the environment are values that everyone, including Motorhome owners, should abide by. The use of a motorhome as accommodation implies
respecting the rules with regard to the inhabitants of those places visited.
1.5.2 PARKING
In town centres and urban areas, it is best to choose parking sites:
· with a low population density
· that do not hinder visibility or stores’ trade
· where the motorhome’s size does not hinder trac
Likewise, using motorhomes as accommodation should take place in such areas without:
· without spreading to the area around the vehicle
· without causing inconvenience to residents
· without monopolising the public area

Welcome
· pets to run riot, foul or otherwise disturb the neighbours
1.5.3 WASTE
Wastewater emptying must take place:
· In appropriate places and never near to housing, rivers, streams or crops.
· Emptying of ‘black’ waste (toilet) into the rainwater drainage network is strictly prohibited.
All water drainage valves must be closed whilst travelling. Even fresh water should be emptied discreetly, to avoid appearing suspect. It is always
worth checking the facilities in each location for properly disposing of wastewater. Household rubbish must be placed in plastic bags and disposed of
in designated places.
Wastewater must be drained o in appropriate places, never near housing, rivers, streams or crops.
By observing all of these common-sense rules, everyone may fully enjoy the multitude of pleasures provided by the passion for motorhomes.
1.5.4 REFERENCE ORGANISATIONS
You can obtain a copy of the Guide to Responsible Motorhome Use from the Motorhome Liaison Committee
online.
You can also contact the association of recreational vehicles.
The CLC asks every user to follow the charter it publishes.
The CLC comprises three organisations: The Syndicate of Motorhome Manufacturers
(SICVERL), the Syndicate of Motorhome Distributors (DICA) and the Federation of
Motorhome Users Clubs (FACCC)

Welcome •
Chapter 2. Discovering your motorhome
2.1.1 CHASSIS
Your dealer should give you the user manual and the chassis maintenance book published by the automotive manufacturer when your motorhome
is delivered. We recommend that you take note of the contents and follow the instructions relating to chassis.
The wheel alignment is set by the chassis manufacturer before leaving the factory. This must be checked at 1,500km (900miles). An
additional inspection is also strongly recommended at 20,000km (12,000miles). Such inspections are at your expense.
The hard stamped chassis number is located on the front right wheel-housing. It is visible through a window in the gas bottle cupboard.
Hard stamped number
through front right gas
bottle cupboard window.

Discovering your motorhome
2.2.1 HATCHES, OPENINGS AND VALVES
Your motorhome has several types of openings on the outside (see basic diagram on rst page):
2.2.2 LUGGAGE HOLDS AND STORAGE AREAS
Your motorhome features several interior and exterior luggage holds.
2.2.3 INTERIOR LAYOUT
Your motorhome is made up of four equipment zones for your comfort and safety. Layouts dier according to the models and the options delivered.
· Driving: seats tted with safety belts
· Meals: table, seats, sink, cooking appliances, refrigerator
· Bathroom: washbasin, shower, toilet
· Living room: storage, display case, bar table leg (option)
· Bedroom: wardrobe, storage, sliding door
· Cab entrance door(s)
· Living area entrance door
· Side window(s)
· Skylights (translucent)
· Storage compartment access hatches
· Cassette toilet access hatch for draining
· Battery and electrical component access
hatch
· Heating and fresh water inlet access hatch
· Fuel (exterior)
· Footwear (interior)
· Access to fresh water and wastewater tank
plugs (interior)
· Draining the fresh water tank
· Draining the wastewater tank
· Draining the water heater
· Foul air grills and/or ventilation shafts (for
cooking appliances, refrigerator, heating
system, etc. depending on the model)
· Vents built into the skylights

Discovering your motorhome •
2.3.1 WATER
Fresh water supply diagram
Fresh water is relled in the heating service
compartment using a screw-on nozzle.
Wastewater is drained using a discharge valve
located behind the driver side skirt.
Fresh water and wastewater tanks can be accessed through
the hatch located in the bedroom’s technical oor (except for
6.8 LF where the access hatch is in the kitchen).
Draining Drain
Draining
Tanks
Cassette toilet
Fresh water
Tank
Pump
Bathroom
Shower Toilet Outside
shower
Kitchen

Discovering your motorhome
2.3.2 ELECTRICITY
Basic diagram of 12 V and 230 V electricity supply.
The electricity supply is made up of a 230 V 50 Hz AC part and a 12 V DC part.
Connecting the motorhome to a 230 V mains supply allows you to:
· recharge the leisure battery
· use the mains power outlets located in the kitchen, bedroom, storage area and bathroom
· run the refrigerator on 230V
· run the heating system if your vehicle is tted with one that can run on 230 V power
Connecting your motorhome to a 230 V power supply with a cable/extension plugged into the blue outlet located
in the electrical compartment or using the fully unwound reel cable (option):
Never carry out or allow modications to electrical systems and appliances, unless performed by
approved tters. A cable reel must be completely unwound to prevent the electric power supply
cable from overheating.
Your 230 V power distribution panel comprises at least one circuit breaker for the safety of people. This circuit breaker only activates when the
vehicle is connected to an external 230 V outlet or the converter (option) is running. You must check it once a year by pressing on the test button(s)
when the vehicle is connected to an external 230 V outlet. Pressing the test button triggers it to cut all power. Should the circuit breaker not trigger,
contact your dealer to have it replaced.

Discovering your motorhome •
The motorhome’s 12 V power supply comes from two batteries: the engine battery and the leisure battery. The engine battery powers all electrical
equipment in the vehicle section.
The leisure battery powers the electrical appliances in the living quarters. It is located in the electrical service compartment which can be accessed
from outside. This battery is of the ‘semi-stationary’ type. Under no circumstances may it be replaced by a vehicle start-up battery. You must contact
your dealer when replacing the leisure battery. The two batteries are separated by a cut-out switch which takes care of charging either via the
alternator (running engine) or the charger module (motorhome connected to external 230 V supply).
The charger for the power pack provides an additional charge to the engine battery to oset low consumption when running a car radio, for
example. Under no circumstances will this operation fully recharge a depleted battery.
A solar panel may be connected (option). The solar panel (option) regulator is an MPPT and is located in the hatch under the fridge. Read the
manufacturer’s instructions for its operation. A cable is available in the passenger side wardrobe or in the bedroom rear unit. For your solar panel to
operate correctly, it must be connected by your dealer to the 12 V electrical system via a solar regulator.
Solar panels often do not provide adequate additional charge when several electric appliances are used
simultaneously at night.
When using a generator set, consult your dealer on how to install it and ensure you perform these steps in the right order:
· First start the generator set
· Connect the 230V cable to the motorhome
A generator set connected to the motorhome’s 230 V system must be perfectly adjusted (risk of damage
to the internal charger).

Discovering your motorhome
Your motorhome may be equipped with a converter as an optional extra. The ones selected for Le Voyageur motorhomes are bypass-type
converters. This means they automatically detect a connection to external 230 V mains power and distribute that power supply to the motorhome’s
outlets. The converter is started using the control panel. It can only be used for a limited time in order to protect your battery. Likewise, under a
certain battery charge level, the control panel will automatically deactivate the converter’s control (see the control panel instructions).
Load shedding (cutting power to all LED strips) in the motorhome occurs when the low battery charge threshold is reached. A message also appears
on the control panel. This threshold can be congured (see the manual for your control panel).
Refer to the manufacturer’s instructions.
The current consumed should not exceed 90 % of the nominal value of the corresponding fuse on the power pack.
The control panel is used to control the electrical functions in the living area of your motorhome and to display information about engine and leisure
battery charge levels, and fresh water/waste water tank levels. It is located above the entrance door to the living area.
For more detailed information about operating the control
panel, please refer to the manufacturer’s instructions.

Discovering your motorhome •
The motorhome’s electrical system must comply with required standards. Any interference with or modications made to electrical systems may
aect personal and vehicle safety and is therefore prohibited. It is formally prohibited to carry out modications to the control panel. Only approved
professionals trained in Le Voyageur are authorised to carry out such work.
The nominal voltage is 12 V. When power is supplied by a power pack, the voltage may be between 11.2V and 14.5 V.
Step
Activating the step: Press the step button by the cab entrance to activate the electric step, then wait ve seconds for it to deploy.
Your vehicle is equipped with an emergency unit called ‘ByPass’ which
provides emergency power, during an outage, to the following:
1 • Water pump (15 A fuse)
2 • Heating (20 A fuse)
3 • Electric absorption fridge or 12V compression fridge (5 A fuse)
4 • Lighting units (20 A fuses)
5 • 12 V outlets/USB ports (15 A fuse)
6 • Check LED
7 • Control button
8• ByPass fuse slot
9 • ByPass fuse
When there is an issue with the control panel, you can press one of the
ByPass buttons to activate the function. If it still does not work, open the
middle of the ByPass to access the fuses.
To activate the function you want, take a fuse (corresponding to the right
amp rating) and put it in the slot for that function. Several functions can be
powered at the same time.
1
24
35
8
9
7
6

Discovering your motorhome
2.3.3 GAS
Only approved tters are authorised to work on
gas-powered appliances.
Furthermore, it is essential to avoid closing the vents.
Your motorhome is tted with a gas cupboard that can hold two bottles
connected to the system. The gas bottles should be placed in the external
compartment provided for this purpose. The system operates only on
propane, in all countries. The operating pressure is 30mbar.
To connect other additional elements to your system, consult your dealer (see
manual delivered with the motorhome).
· Do not change the type of regulator
· Do not use the appliances with a dierent mains pressure
· Before the indicated expiry date, replace the exible supply hoses (tubes)
with an approved model that is identical to the original.
· Gas bottles must be rmly attached with the straps provided in the
compartment.
Check and tighten all hoses before rst use and at least
once a year.
Connector hose
Heating
Hob
Fridge
Oven
Pressure
regulator
Flow regulator with
manual reset

Discovering your motorhome •
The pressure regulator has a built-in impact detector. In case of an accident, with a strong deceleration, a mechanical protection system shuts o
the gas inlet. This system complies with European regulations and allows you to use the gas heater while driving. Apart from the heating, no other
appliances are designed to be used when driving.
“Twiny”-type gas bottles may not function properly in cold weather when gas consumption is high (use of heating system). It is
preferable to use a 13 kg bottle, keeping the ‘Twiny’ in reserve.
2.3.4 VENTILATION AND HEATING
The existence of permanent upper and lower ventilation is essential in
order to ensure constant air renewal.
· Lower ventilation is generally provided through a vent at the bottom
of the furniture or in the oor.
· The main lower ventilation is located in the electrical compartment.
· Upper ventilation is provided through the roof windows, which have a
permanent vent system in accordance with the supplier’s guidelines.
· These systems enable natural air circulation, including inside the
bench seats.
The vents should never be blocked, even during the
winter. They must be kept clean and dust free.

20 • Discovering your motorhome
Never leave children unattended in your motorhome. Safety precautions are crucial in a motorhome, due to the presence of medium and low
voltage electrical appliances and gas-powered equipment. Using the electric-window command can be dangerous. Ensure that there is no risk of
passengers' limbs getting caught in the electric-windows.
Keep away from the electric windows when they are operating.
2.4.1 FIRE
Provide an approved dry powder re extinguisher with a capacity of at least 1 kg and familiarise yourself with the instructions.
Keep a re-blanket near the kitchen area.
Consult the local re safety measures. Do not store aerosol cans in the campervan; there is a risk that they could explode at temperatures above
50°C, which can often occur in the summer.
Never use cooking or heating devices other than those installed in the motorhome. If you must plug in a cooking appliance or
electric heater, it must work on the principle of direct radiation to avoid re and asphyxia hazards.
You can nd a diagram showing the emergency exit(s) from your Le Voyageur motorhome under “ 2.4.4 Emergency exits“, page 22.
This manual suits for next models
18
Table of contents
Other Le Voyageur Motorhome manuals
Popular Motorhome manuals by other brands

Tiffin Motorhomes
Tiffin Motorhomes PowerGlide 2020 owner's manual

Monaco
Monaco SIGNATURE 2001 series owner's manual

Westfalia
Westfalia SVEN HEDIN Maintenance and operating manual

Winnebago
Winnebago SIGHTSEER 30A Operator's manual

Airstream
Airstream Sport 2019 owner's manual

Boler
Boler B-1300S owner's manual

Fleetwood
Fleetwood Terra 2011 owner's manual

Winnebago
Winnebago 1987 Itasca Operator's manual

Westfalia
Westfalia JOKER Maintenance and operation

Karmann-Mobil
Karmann-Mobil DEXTER 580 2021-2022 operating manual

Airstream
Airstream Caravanner 1977 owner's manual

Airstream
Airstream 30' Classic 2019 owner's manual