manuals.online logo
Brands
  1. Home
  2. •
  3. Brands
  4. •
  5. Leader Light
  6. •
  7. Outdoor Light
  8. •
  9. Leader Light LL SPORT D630-NA-I20 User manual

Leader Light LL SPORT D630-NA-I20 User manual

©MMXI - LEADER LIGHT – All right reserved Edition: A - 2012 Additional information on [email protected]
LEADER LIGHT s.r.o.
M.Gorkeho 33
052 01 Spisska Nova Ves
Slovakia
www.leaderlight.eu
USER MANUAL
02.2 Product description - DRIVER inside (DIM version)
03 INSTALLATION
03.1 Unpacking
Unpack carefully.
This is electronic equipment and should be handled carefully.
Damaged delivered package or if are any mechanical parts broken – it must be
claim immediately by the transport company. Photo pictures as evidence are
valuable for future claim.
-
-
-
03.2 Physical installation
Loading capacity of bearing area has to be at least 10 times the weight of all
device clusters.
Hairbreadth from combustible materials is 0,5m.
-
-
03.3 Connection
Respect all SAFETY INFORMATION 01!
Connect the ground (earth) !
It is necessary to open the Driver box before power supply (1.1 Figure) and
DMX connection (DIM version)!
The xture is equipped with auto-switching power supply that automatically
adjusts to any 50-60Hz AC power source from 100-260V.
Cord plug connections:
-
-
-
-
-
Symbol Pin Wire Colour Screw (US)
Llive brown yellow or brass
Nneutral blue silver
ground (earth) yellow/green green
!
Non-minimum distance and / or non-use the original brackets is at your own risk!
!!
WARNING!!!
Page 1 /2
ENVIRONMENTAL PROTECTION
Do not throw away the appliance with the normal household waste at the end of its
life, but hand it in at an ofcial collection point for recycling. By doing this, you help to
preserve the environment.
01 SAFETY INFORMATION
WARNING!!!
Carefully read before installing, powering or servicing. Nothing to do if
anything misunderstand! Installation can be done only by a qualied
professional in accordance with relevant local codes.
01.1 Risk of eyes damage
Do not look directly into LED lamps.
Do not look into light beam from a distance of less than 40 cm (16 inches)!
-
-
01.2 Safety instructions
Shut down power before installation or maintenance.
Do not modify, alter, or attempt to service the LEADER LIGHT appliance. Doing
so will void the warranty.
Appliance and recommended AC power supply must be installed by a qualied
professional in accordance with relevant local codes. Use only acceptable source
of AC power and frequency that complies with local biulding and electrical codes.
Use only the recommended voltage source.
Appliance always connect to earth (eltech.)!
Do not use or do not connect the products if the power cable, power plug or
xtures are any way damaged, wet, or if they are overheating.
Before removing or installing any cover or part of appliance disconnect it from AC
power.
AC power supply must be protected against overvoltage and short circuits.
-
-
-
-
-
-
-
-
01.3 Fire protection
Follow all safety restrictions.
Thermostatic switches or fuses never to bypass.
Device and ventilating slots never shield. Around the axis of the tting (180°)
must be maintained space for cooling. Minimum distance from the surrounding
objects must be 100mm (4 in.).
LEDs never direct cover with lters or other materials.
Allowing max. ambient temperature is 40°C (104°F).
Luminaries never use without mounting brackets. The housing never install directly
to the surface.
-
-
-
-
-
-
02 PRODUCT SPECIFICATION
02.1 Technical specication
Power connection: AC90-264V, 47-63Hz
IP: Driver: IP20; Fixture: IP43/IP65
Control data: only DIM version: DMX 512 In/Out
Ambient temp. (Ta): Standard: -30ºC<Ta< +40ºC; Optional: +50°C
Net weight: 6,80kg
Installation: Surface / suspended mounting with bracket
!
379
145
LL SPORT D630-NA-I20
COMPLIMENTS ON YOUR PURCHASE!
All dimensions are in millimeters
Package includes:
LL SPORT D630-NA-I20
with adjustable bracket & driver- 1pc.
User manual- 1pc.
Additional items needed:
Data and power cables-
Controller compatible with DMX (DIM version)-
Mounting accessories as necessary-
Content:
01 SAFETY INFORMATION
01.1 Risk of eyes damage
01.2 Safety instructions
01.3 Fire protection
02 PRODUCT SPECIFICATION
02.1 Technical specication
02.2 Product description
03 INSTALLATION
03.1 Unpacking
03.2 Physical installation
03.3 Connection
03.4 Control data connection
03.5 DMX channels
04 MAINTENANCE AND SERVICE
300
Rotating DIP DMX
In/Out
Power
In/Out
Before connecting the
power and DMX (DIM
version) remove the
cover from the Driver
box!
Rotary DIP (DIM
version) set before the
physical installation!
©MMXI - LEADER LIGHT – All right reserved Edition: A - 2012 Additional information on [email protected]
Page 2 /2
03.4 Control data connection
Control data cable length is speci ed by Norm IEC929 Annex E4.
It is necessary to open the Driver box before connecting of DMX512 control
signal. Interconnections are realized by... connectors.
Pin connections:
Pin 1 – ground
Pin 2 – signal negative
Pin 3 – signal positive
-
-
-
03.5 DMX channels - only for DIM VERSION!!!
These informations are subject to change, latest data are on: www.leaderlight.eu
Order code Product name
LL47 305.426* LL SPORT D630-NA-I20 SW; 5.600K
LL47 315.426* LL SPORT D630-NA-I20 DIM; 5.600K
04 MAINTENANCE AND SERVICE
Before any maintenance is necessary to carefully read all SAFETY INFORMATION 01!
Damages caused by inadequate cleaning or maintenance are not covered by warranty.
Requires periodic cleaning (dust, dirt ,...)
Procedure for maintenance:
Unplug mains before maintenance and at least 10 minutes cool off.
Appliance do not illegal open or demount.
-
-
-
-
-
!
Functions Dip1-Dip4:
ModA: Dip3=Off, Dip4=Off (1ch, 8b+fade)
1ch: all White
Adress:
Dip1=Off, Dip2=Off : DmxAdress=1
Dip1=On, Dip2=Off : DmxAdress=2
Dip1=Off, Dip2=On : DmxAdress=3
Dip1=On, Dip2=On : DmxAdress=4
ModB: Dip3=Off, Dip4=On (6ch, 8b+fade)
1ch: White1
2ch: White2
3ch: White3
4ch: White4
5ch: White5
6ch: White6
Adress:
Dip1=Off, Dip2=Off : DmxAdress=1
Dip1=On, Dip2=Off : DmxAdress=7
Dip1=Off, Dip2=On : DmxAdress=13
Dip1=On, Dip2=On : DmxAdress=19
ModC: Dip3=On, Dip4=Off (2ch, 16b)
1ch: all White High
2ch: all White Low
Adress:
Dip1=Off, Dip2=Off : DmxAdress=1
Dip1=On, Dip2=Off : DmxAdress=3
Dip1=Off, Dip2=On : DmxAdress=5
Dip1=On, Dip2=On : DmxAdress=7
ModD: Dip3=On, Dip4=On (AutoTest)
Overlapping six channels.
* Order code: LL47 ---.xyz:
"x" = Product colour: x = 1 (RAL 9005), x = 4 (RAL 9006) ,
"y" = IP: y = 2 (IP20), y = 4 (IP43), y = 6 (IP67),
"z" = Light colour temperature: z = 1 (3.000K), z = 2 (3.500K), z = 3 (4.000K), z = 4 (4.500K), z = 5 (5.000K), z = 6
(5.500K), z = 7 (6.000K) +/- 200K
3. Fixture  xation
3.1
Variable angle setup 0°-75°
.
The standard bracket offers two options for  xture  xation: variable angle setup or step setup:
3.2
Step setup 0°-15°-30°-45°-60°-75°.
2. Mechanical mounting of LL SPORT D630-NA-I20
AIMING POSSIBILITY
The whole  xture could be aim
to wish position with adjustable
bracket.
Mounting on surface:
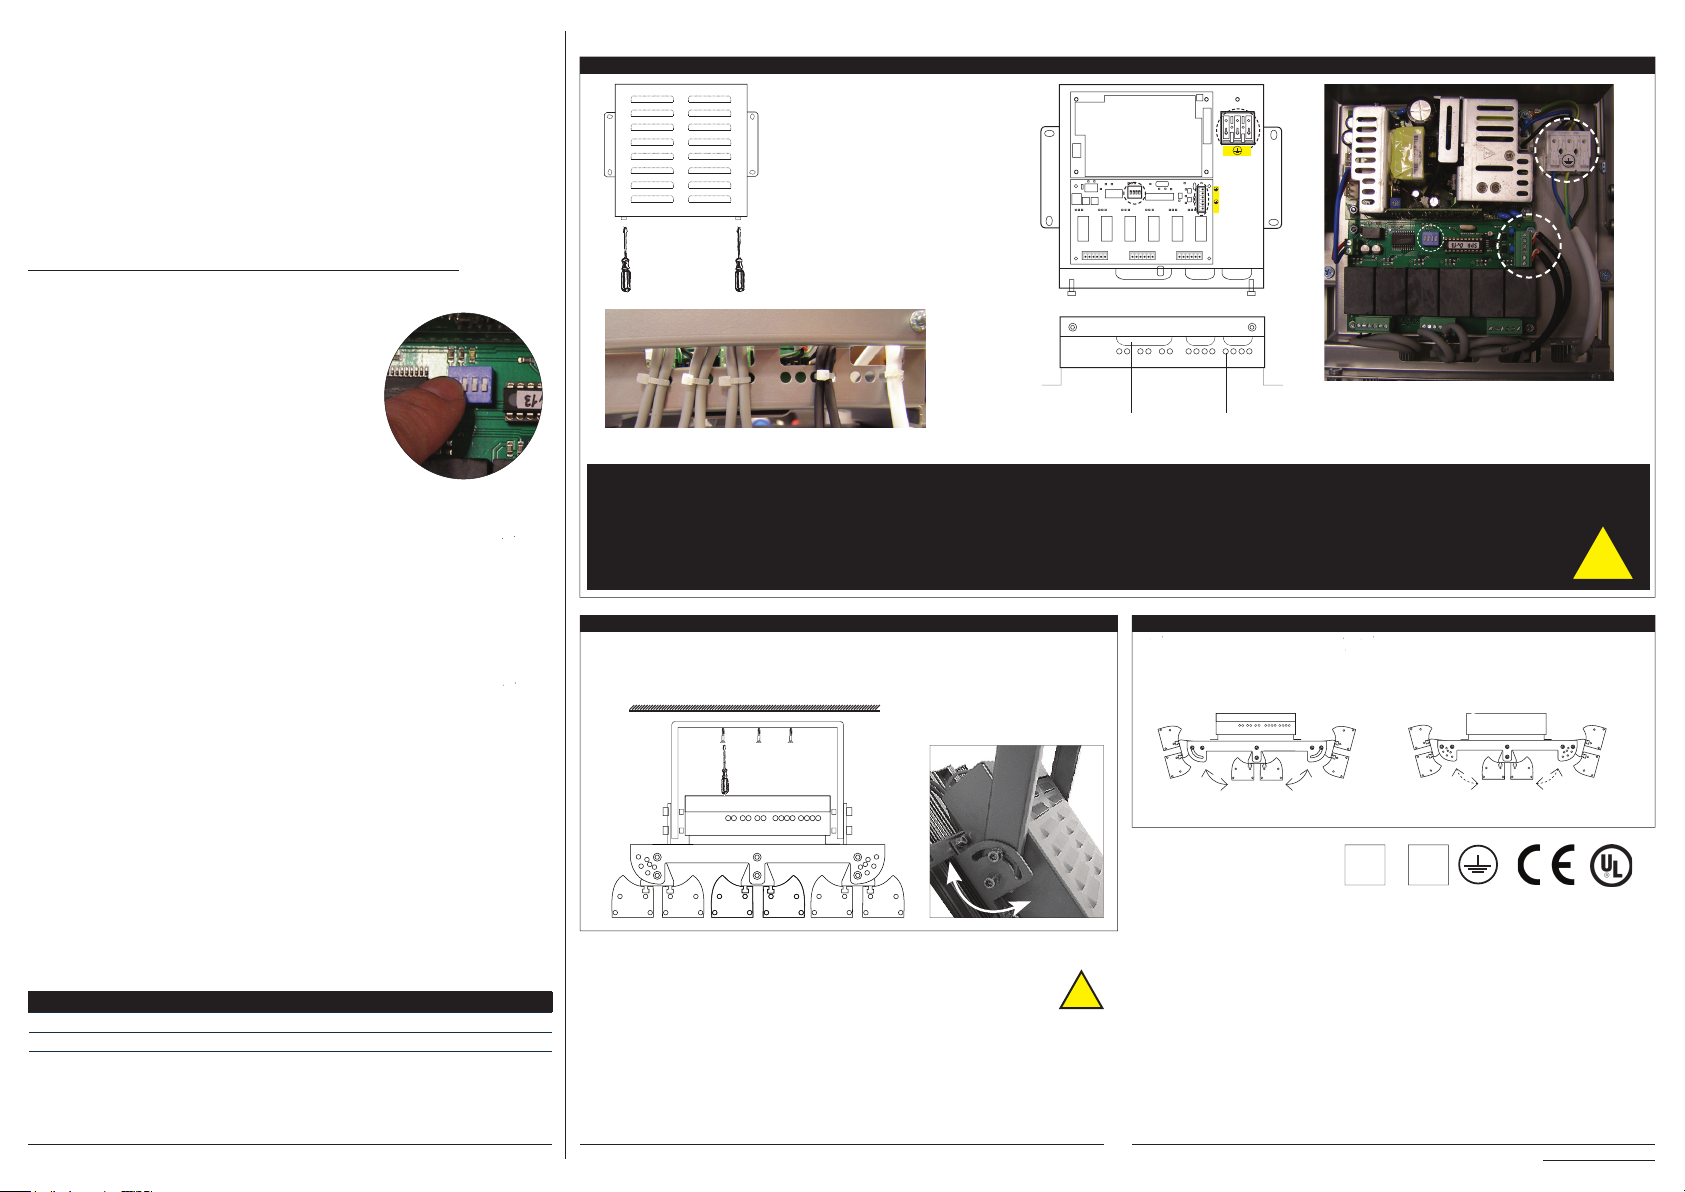
2.1 Screw the  xture to the surface (3xM10)
1. Power and DMX (only DIM version) connecion
1.1. Before connecting the power and DMX (DIM
version) remove the cover from the Driver box!
Rotary DIP (DIM version) set before the physical
installation!
N L
+
_
+
_
N L
Shut down power before installation or maintenance.
Do not modify, alter, or attempt to service the LEADER LIGHT appliance. Doing so will void the warranty.
Appliance and recommended AC power supply must be installed by a quali ed professional in accordance with relevant local codes. Use only acceptable source of AC power and frequency that complies with local
biulding and electrical codes.
Use only the recommended voltage source.
Appliance always connect to earth (eltech.)!
Do not use or do not connect the products if the power cable, power plug or  xtures are any way damaged, wet, or if they are overheating.
Before removing or installing any cover or part of appliance disconnect it from AC power.
AC power supply must be protected against overvoltage and short circuits.
-
-
-
-
-
-
-
-!
100-260V
AC
50-60Hz
DMX
IN/OUT
DIP
Clean-up dust only from outer surface. Use vacuum or dumpy duster (warm water)
Before reinstalling make sure everything is intact and dry– no wet parts!
Service:
Customer service provided by the manufacturer.
-
-
-
cable slot slot for cable  xation
1.2. Connect the power and DMX (DIM version).
1.3. After DIP setup, connecting the DMX (DIM version)
and power, you must mount back the DRIVER cover!
90V
~
264V
IP20
PENDING

Other Leader Light Outdoor Light manuals

Leader Light LL STREET PT60 User manual

Leader Light

Leader Light LL STREET PT60 User manual

Leader Light LL STREET PS60 User manual

Leader Light

Leader Light LL STREET PS60 User manual

Popular Outdoor Light manuals by other brands

RH ARMAGNAC quick start guide

RH

RH ARMAGNAC quick start guide

Landscape Forms Torres installation guide

Landscape Forms

Landscape Forms Torres installation guide

B LIGHT LINEAR TUBE SLIM 674 8 Series Installation

B LIGHT

B LIGHT LINEAR TUBE SLIM 674 8 Series Installation

Roger Pradier Hogar 100 manual

Roger Pradier

Roger Pradier Hogar 100 manual

Quoizel WVR8407A installation guide

Quoizel

Quoizel WVR8407A installation guide

Melissa 16780014 manual

Melissa

Melissa 16780014 manual

Promate MotionTorch user guide

Promate

Promate MotionTorch user guide

LIGMAN SE-90002-LC instruction manual

LIGMAN

LIGMAN SE-90002-LC instruction manual

LIGMAN ODESSA 2 OD-21025 installation manual

LIGMAN

LIGMAN ODESSA 2 OD-21025 installation manual

HEPER LF8017.693-US Installation & maintenance instructions

HEPER

HEPER LF8017.693-US Installation & maintenance instructions

Griven AL5251 user manual

Griven

Griven AL5251 user manual

Maxim Lighting Laredo manual

Maxim Lighting

Maxim Lighting Laredo manual

DS Produkte PY-T1094 manual

DS Produkte

DS Produkte PY-T1094 manual

Original BTC DAVEY LIGHTING 2467/E14 instruction manual

Original BTC

Original BTC DAVEY LIGHTING 2467/E14 instruction manual

physa MF-22 user manual

physa

physa MF-22 user manual

LIGMAN VEKTER 27 installation manual

LIGMAN

LIGMAN VEKTER 27 installation manual

LIGMAN KIOS 10 installation manual

LIGMAN

LIGMAN KIOS 10 installation manual

Würth POWERQUAD M AC-R Translation of the original operating instructions

Würth

Würth POWERQUAD M AC-R Translation of the original operating instructions

manuals.online logo
manuals.online logoBrands
  • About & Mission
  • Contact us
  • Privacy Policy
  • Terms and Conditions

Copyright 2025 Manuals.Online. All Rights Reserved.