Leadtek WinFast 3D S320 User manual

WinFast®3
3D
DS320 II
User’s Manual
Leadtek Research Inc.

WinFast 3D S320 II User’s Manual
i
Table Of Contents
Getting Started.................................................................................................... I
Accessories.........................................................................................................................................I
System Requirements.......................................................................................................................I
Connection Guide............................................................................................................................II
Chapter 1 Welcome toWinFast 3D S320 II.................................................... 1
1.1 Introduction................................................................................................................................1
1.2 Features........................................................................................................................................2
Chapter 2 Hardware Installation ..................................................................... 3
2.1 Card Layout.................................................................................................................................3
2.2 Jumper Settings...........................................................................................................................5
Chapter 3 Software Installation....................................................................... 7
3.1Windows 95/98..........................................................................................................................7

Leadtek Research Inc.
ii
3.1.1 Installing WinFast 3D S320 II Drivers and DirectX 6 forWindows 95/98....7
3.1.2 Explanations for theWinFast 3D S320 II Display Properties.............................9
3.2Windows NT 4.0......................................................................................................................20
3.2.1 Installation of Windows NT 4.0 withWinFast 3D S320 II...............................20
3.2.2 InstallWinFast 3D S320 II Drivers forWindows NT4.0...................................20
3.3 Updating existingWinFast 3D S320 II Drivers forWindows 95/98............................23
3.4 BIOS Flash Utility.....................................................................................................................24
Chapter 4 TV Output (Optional)................................................................... 25
Chapter 5 Digital Flat Panel Output (Optional).......................................... 27
Chapter 6 Display ModesTable ...................................................................... 29
LimitedWarranty............................................................................................................................31
Calling forTechnical Support.......................................................................................................32
Copyright,Trademark,Disclaimer Notes..................................................................................33
FEDERAL COMMUNICATIONS COMMISSION REQUIREMENTS..............................34

WinFast 3D S320 II User’s Manual
I
Getting Started
Accessories
•WinFast 3D S320 II
WinFast 3D S320 IIWinFast 3D S320 II
WinFast 3D S320 II card
•User‘s Manual
•WinFast software pack CD
( Including drivers for
Windows 95/98, Windows
NT 4.0, DirectX Runtime
Driver )
System Requirements
•Hardware : Pentium II or compatible system with AGP slot
•Operating system: Win 95/98 / Windows NT 4.0 with Service Pack 3 or later

Leadtek Research Inc.
II
Connection Guide
Step 1 Insert the WinFast 3D S320 II
WinFast 3D S320 IIWinFast 3D S320 II
WinFast 3D S320 II card into an empty AGP slot and fix it with screw on back panel.
JP1
WinFast
3D S320 II
V
GA Cable
Step 2 Plug the free end of the monitor cable into the video connector on the
WinFast 3D S320 II
WinFast 3D S320 IIWinFast 3D S320 II
WinFast 3D S320 II card.

WinFast 3D S320 II User’s Manual
1
1
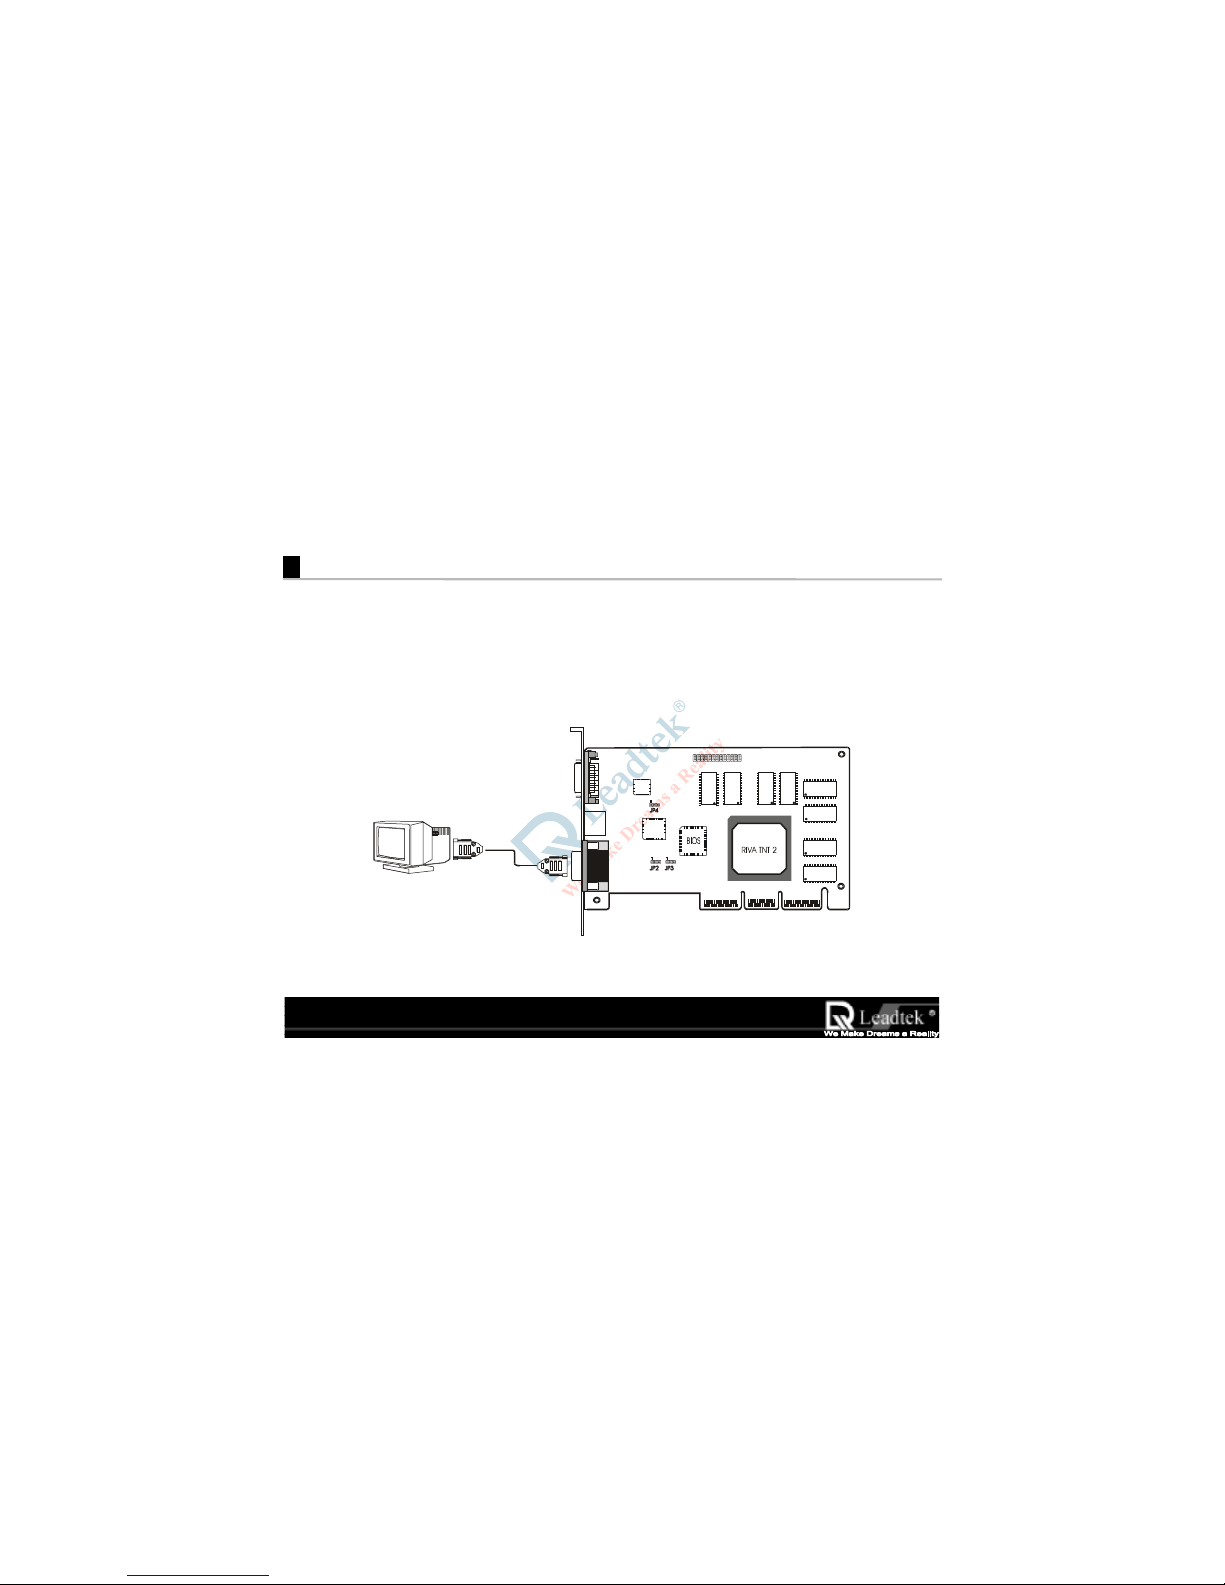
Welcome to WinFast 3D S320 II
1.1 Introduction
Congratulations! You have chosen one of the most powerful high
Congratulations! You have chosen one of the most powerful highCongratulations! You have chosen one of the most powerful high
Congratulations! You have chosen one of the most powerful high-
--
-end 3D accelerator cards. Leadtek’s
end 3D accelerator cards. Leadtek’send 3D accelerator cards. Leadtek’s
end 3D accelerator cards. Leadtek’s
“
““
“WinFast 3D S320 II
WinFast 3D S320 IIWinFast 3D S320 II
WinFast 3D S320 II” uses the
” uses the” uses the
” uses the RIVA TNT II
3D processor c
3D processor c3D processor c
3D processor chip from
hip fromhip from
hip from nVIDIA. The “
. The “. The “
. The “WinFast 3D S320 II
WinFast 3D S320 IIWinFast 3D S320 II
WinFast 3D S320 II”
””
”
introduces the most advanced Direct3D/OpenGL acceleration solution and also delivers leadership VGA,
introduces the most advanced Direct3D/OpenGL acceleration solution and also delivers leadership VGA,introduces the most advanced Direct3D/OpenGL acceleration solution and also delivers leadership VGA,
introduces the most advanced Direct3D/OpenGL acceleration solution and also delivers leadership VGA,
2D and Video performance, enabling a range of applications from 3D games through DVD and
2D and Video performance, enabling a range of applications from 3D games through DVD and2D and Video performance, enabling a range of applications from 3D games through DVD and
2D and Video performance, enabling a range of applications from 3D games through DVD and
Multimedia applications
Multimedia applicationsMultimedia applications
Multimedia applications.
...

Leadtek Research Inc..
Leadtek Research Inc..Leadtek Research Inc..
Leadtek Research Inc..
1.2 Features
•Fast 32-bitVGA / SVGA
•High performance 128-bit 2D / GUI / DirectDrawAcceleration
•128-bit wide frame buffer interface supporting up to 32 Mbyte SDRAM/SGRAM
•Video Acceleration for DirectShow,MPEG-1/2 and Indeo.
•Optimized for Direct3Dacceleration with complete support for DirectX 5.0 and 6.0
•Twin texel 32-bit graphics pipeline
•32-bit RGB rendering with destination alpha
•24-bit Z-buffer, 8-bit stencil buffer
•Anisotropic filtering (better thanTri-Linear MIP-mapping)
•100% hardware triangle setup engine
•300 MHz Palette-DAC supporting up to 2048 x 1536,Hi Color 60 Hz
•Video output for NTSC and PALTV-output (Option)
•DDWG (Digital Display Working Group) compliant Digtal Flat Panel output up to 1280 x 1024
(Option)
•AGP 4x/2x with full sideband/Execute Mode support

WinFast 3D S320 II User’s Manual
3
2
Hardware Installation
2.1 Card Layout
JP1
Win F a st
3D S320 II
VGA Connector
Digital Flat Panel Output
(Option)
( SDRAM VERSION
)
TV Output
(Option)

Leadtek Research Inc..
Leadtek Research Inc..Leadtek Research Inc..
Leadtek Research Inc..
JP1
WinFast
3D S320 II
VGA Connector
TV Output
(Option)
Digital Flat Panel Output
(Option)
( SGRAM VERSION )

WinFast 3D S320 II User’s Manual
5
2.2 Jumper Settings
Please follows the jumper layout to setTV output format:forVersion SDRAM and SGRAM:
Jumper
JumperJumper
Jumper
NTSC
NTSCNTSC
NTSC
PAL
PALPAL
PAL
JP2
JP2JP2
JP2
123
123
JP3
JP3JP3
JP3
123 123
JP4
JP4JP4
JP4
123 123

WinFast 3D S320 II User’s Manual
7
3
Software Installation
3.1 Windows 95/98
3.1.1Installing WinFast 3D S320 II Drivers and DirectX 6 for Windows 95/98
During the booting of Win95/98 after having inserted the WinFast 3D S320 II
WinFast 3D S320 IIWinFast 3D S320 II
WinFast 3D S320 II card into AGP slot, the new
installed hardware will be detected and the “Update Device Driver Wizard” window will appear on the
screen. At this point, if your machine has updated version of “VGARTD” software installed then you can use
the “nv4agp.inf” file in the accompany CD to install the driver, otherwise lets Windows install the “Standard
PCI Graphics Adapter (VGA)” driver which Windows found.
When Standard VGA driver installation is complete, Windows will prompt you to restart your Windows.
Click “NO” to response the prompt and follows the steps described below for continuing installation:
Step 1 Insert the WinFast Software Pack CD into the CD-ROM drive.
Note: The WinFast 3D S320 II package contains the “WinFast Software Pack CD”
,
Please read the “Readme.txt
Readme.txtReadme.txt
Readme.txt” file in the “S320ii
S320iiS320ii
S320ii” sub-director
y
of the CD for the latest
information about the software before installation.

Leadtek Research Inc..
Leadtek Research Inc..Leadtek Research Inc..
Leadtek Research Inc..
Step 2 The “Autorun” will be executed immediately and a “WinFast 3D S320/S320 II/S320 V
Installation Program” dialog with four selectable buttons will be shown on the screen. Click
the”Win9x” button to install the driver for Win95/98 automatically.
Step 3 When finishing the driver installation follow the screen direction “Restart” Windows 95/98.
Step 4 Eject the CD-ROM and load WinFast Software Pack CD again. Click the “DirectX 6” button
to install the DirectX 6 to your machine for better 3D performance.
Note:
Note:Note:
Note: If the autorun function is not enabled on your machine. Please find the “Install.exe” file in the root
directory of CD and double click it to install the software automatically.

WinFast 3D S320 II User’s Manual
9
3.1.2 Explanations for theWinFast 3D
S320 II Display Properties
W
hen drivers were installed
p
ro
p
erl
y
, ri
g
ht click on
Win95/98 deskto
p
wall
p
a
p
er area and select
“Properties
PropertiesProperties
Properties” item. A window with a title name
“Display Properties
Display PropertiesDisplay Properties
Display Properties” will a
pp
ear on
y
our screen as
shown on the right.
NOTE: Please enable the Monitor Protective
Setting by click the check box to protect
your monitor. This sets the range of
display modes such as Refresh Rate,
Display Area you can select according to
your specific monitor manufacturer.
Click the “Advance…
Advance…Advance…
Advance…” button, another sheet o
f
“Additional Properties
Additional PropertiesAdditional Properties
Additional Properties” will be shown as on next
page.

Leadtek Research Inc..
Leadtek Research Inc..Leadtek Research Inc..
Leadtek Research Inc..
“Direct3D” Tab
The RIVA TNT II can automatically generate
mipmaps to increase the efficiency of texture
t
ransfers across the bus and
p
rovide hi
g
her
application performance.
However, some applications may not display
correctly when auto-generated mipmaps are
enabled. To correct any problems, reduce the
number of automatically generated mipmap levels
until the images are properly displayed. Reducing
t
he number of mi
p
ma
p
levels can often eliminate
t
exture misali
g
nment or "seamin
g
"
(
at the ex
p
ense
of some performance).
Properties

WinFast 3D S320 II User’s Manual
11
All
ows
y
ou to se
l
ect t
h
e auto-m
ip
ma
ppi
n
g
met
h
o
d
used b
y
the RIVA TNT II.
You can select either the bilinear or trilinear
mipmapping method, whereby the bilinear method
generally provides better performance, while the
t
rilinear method
g
enerally produces a higher quality
ima
g
e.
This o
p
tion allows for ditherin
g
of trilinear mi
p
ma
p
s.
Allowin
g
mi
p
ma
p
ditherin
g
will
p
rovide increased
a
pp
lication
p
erformance at the ex
p
ense of some
ima
g
e
q
ualit
y
. In some cases, a loss of ima
g
e
q
ualit
y
may not be noticeable, so
y
ou ma
y
wish to take
advanta
g
e of the extra
p
erformance
g
ained b
y
enablin
g
this feature.
Th
ese o
p
t
i
ons a
ll
ow
y
ou to contro
l
t
h
e ant
i
-a
li
as
i
n
g
features of the drivers
A
nt
i
-a
li
as
i
n
g
i
s a met
h
o
d
use
d
to smoot
h
e
dg
es o
f
3D objects to eliminate a jagged appearance. Note
t
hat enablin
g
anti-aliasing will not automatically
cause all Direct3D programs to render anti-aliased
images. Anti-aliasing must be supported by the
a
pp
lication in order for it to work
p
ro
p
erl
y
.
Properties

Leadtek Research Inc..
Leadtek Research Inc..Leadtek Research Inc..
Leadtek Research Inc..
Allows
y
ou to ad
j
ust the LOD
(
Level of Detail
)
bias
for mi
p
ma
p
s.
A lower bias will
p
rovide better ima
g
e
q
ualit
y
, while
a higher bias will increase application performance.
You can choose from five preset bias values, varying
from "Best Ima
g
e Qualit
y
" to "Best Performance"
Allows you to select the anti-aliasing sampling
method.
You can ad
j
ust the settin
g
s to values which ran
g
e
from providing the fastest application performance
t
o renderin
g
the hi
g
hest
q
ualit
y
ima
g
e.
Lets
y
ou save the current settin
g
s as a custom
"tweak". Saved settings will then be added to the
ad
j
acent list.
Once
y
ou have found the o
p
timal settin
g
s for a
particular Direct3D application, saving the settings
as a custom tweak allows you to quickly configure
Direct3D before starting the program and
eliminates the need to set each of the options
individuall
y
.
Dis
p
la
y
s a dialo
g
which allows
y
ou to customize
additional Direct3D settings for the RIVA TNT II as
shown on next
p
a
g
e.
Properties

WinFast 3D S320 II User’s Manual
13
This o
p
tion is used to turn fo
g
table emulation on
or off.
Direct3D s
p
ecifies that a dis
p
la
y
ada
p
ter ca
p
able of
D3D hardware acceleration should be able to
implement either vertex fog or table fog. Some
games do not correctly query the D3D hardware
capabilities and expect table fog support. Choosing
t
his o
p
tion will ensure that such
g
ames will run
p
ro
p
erl
y
on the RIVA TNT II.
This o
p
tion allows
y
ou to disable the DirectX 6
features of the drivers.
Some
g
ames written for earlier versions of DirectX
may not run properly with DirectX 6 installed and
t
he DirectX 6 su
pp
ort enabled in the drivers.
Selecting this option forces the drivers to run in
DirectX 5 compatibility mode so that older games
will run correctl
y
.
Use this o
p
tion if
y
ou wish to run certain older
games that do not start or do not run as they
should.
Continued on next
p
a
g
e…..

Leadtek Research Inc..
Leadtek Research Inc..Leadtek Research Inc..
Leadtek Research Inc..
This o
p
tion chan
g
es the hardware texture addressin
g
scheme for
t
exels
(
texture elements
)
.
Chan
g
in
g
these values will chan
g
e where texel ori
g
in is defined. The
default values conform to the Direct3D specifications. Some
software may expect the texel origin to be defined elsewhere. The
image quality of such applications will improve if the texel origin is
redefined. Use the slider control to adjust the texel origin anywhere
between the u
pp
er left corner and the center of the texel.
Allows
y
ou to s
p
ecif
y
the maximum size of the PCI texture hea
p
.
Increasin
g
this value on PCI s
y
stems with sufficient memor
y
ma
y
significantly improve the performance of some Direct3D
a
pp
lications.
For
p
erformance reasons, this utilit
y
will not allow
y
ou to set the
value to more than one half of the available system memory as
reported by Windows.
This o
p
tion is not available on dis
p
la
y
ada
p
ters which use the AGP
bus.
This option allows you to limit the number of frames the CPU can prepare before they are processed by the
RIVA TNT II (when VSYNC is disabled).
In some cases, the higher the number of pre-rendered frames allowed, the greater the "input lag" may be in
response to devices such as joysticks, gamepads or keyboards.
Reduce this value if you experience a noticeable delay in response to the input devices connected to your
computer while playing games.

WinFast 3D S320 II User’s Manual
15
“O
p
enGL” Tab
Allows you to adjust the image quality of textures
dis
p
la
y
ed in O
p
enGL a
pp
lications.
Optimize for best image quality
Optimize for best image qualityOptimize for best image quality
Optimize for best image quality renders textures with
t
he hi
g
hest ima
g
e
q
ualit
y
available for the best
appearance.
Optimize for best performance
Optimize for best performanceOptimize for best performance
Optimize for best performance renders textures with
reduced image quality to improve application
performance.
Blen
BlenBlen
Blend
dd
d uses a combination of the above two features.
This is the default value.
This o
p
tion turns on
p
a
g
e fli
pp
in
g
for full-screen
OpenGL applications, which may improve their
performance. If disabled, OpenGL will use a bit block
t
ransfer to fli
p
from the back buffer to the front buffer.
This option forces the driver to wait on VBlank after a
page flip
This allows for frame rates higher than the refresh rate
of your monitor, but may produce visual artifacts and
t
earin
g
resultin
g
in reduced ima
g
e
q
ualit
y
.
A list of the custom settings (or "tweaks") you have
saved. Selecting an item from the list will activate the
setting. To apply the setting, choose the "OK" or
"Apply" button.
Properties

Leadtek Research Inc..
Leadtek Research Inc..Leadtek Research Inc..
Leadtek Research Inc..
“Other Options” Tab
Select this option to disable the cachin
g
of cursors b
y
the
drivers.
If the mouse cursor is im
p
ro
p
erl
y
dis
p
la
y
ed or becomes
corru
p
ted while runnin
g
certain a
pp
lications, disablin
g
the
cursor cache ma
y
correct the
p
roblem. If this settin
g
is
changed, Windows must be restarted for new settin
g
to
t
ake effect.
Select this o
p
tion to disable driver su
pp
ort for enhanced
instructions used by certain CPUs.
Some CPUs su
pp
ort additional 3D instructions that
com
p
lement
y
our RIVA TNT II and im
p
rove
performance in 3D games or applications. This option
allows
y
ou to disable su
pp
ort for these additional 3D
instructions in the drivers. This can be useful fo
r
performance comparisons or for troubleshooting.
Allows
y
ou to select between two monitor timin
g
modes:
General Timing formula
General Timing formulaGeneral Timing formula
General Timing formula or GTF
GTFGTF
GTF is a standard used b
y
most newer hardware. This is the default setting.
Discreet Monitor Timings
Discreet Monitor TimingsDiscreet Monitor Timings
Discreet Monitor Timings or DMT
DMTDMT
DMT is an older standard
still in use on some hardware. Enable this o
p
tion if
y
ou
r
hardware requires DMT.
Properties
This manual suits for next models
1
Table of contents
Other Leadtek Video Card manuals
Popular Video Card manuals by other brands

Diamond Multimedia
Diamond Multimedia Radeon X1050AGP256 Specification sheet

Orchid
Orchid Fahrenheit ProVideo 64 user manual

Asus
Asus Vanta 2000 Series user manual

EMS Imaging
EMS Imaging Xtreme Series user guide

Asus
Asus AGP-V6600 MX user manual

Diamond Multimedia
Diamond Multimedia Stealth S9250PCI256 Specification sheet